Morgan MPC-800 User manual

USER MANUAL
Pressure
Cooker MPC-800
E-mail: electrical.appliance@dksh.com
www.morgan.my
Market Expansion
Services by
www.dksh.com.my
facebook.com/morganappliances

32
Thank you for purchasing a quality MORGAN appliance. We trust that you will have a pleasant
experience with your new product. To guarantee safety and est efficiency, please read this
manual carefully and keep a copy for future reference.
C O N T E N T S
3
5
5
6
6
7
8
9
13
14
I PORTANT SAFEGUARDS
PARTS IDENTIFICATION
SPECIFICATIONS
CONTROL PANEL OVERVIEW
PRESSURE COOKING TIPS
PRESET COOKING PROGRA S
BEFORE FIRST USE
OPERATING INSTRUCTIONS
CARE AND AINTENANCE
TROUBLE SHOOTING
IMPORTANT SAFEGUARDS
WARNING
DO NOT touch the metal parts on top of the pressure cooker as these can get extremely hot during the
cooking process and may result in burns, scalds or other bodily injuries. It is recommended to not touch
these parts for at least 30 minutes after turning off the appliance.
When using electric appliances, asic safety precautions should always e followed including
the following:
• Read all instructions carefully and retain them for future reference.
• Before use, ensure that the voltage of your wall outlet corresponds to the one on the rating plate found
on the bottom of the appliance.
• IMPORTANT: Do not operate the appliance with a damaged power cord or after the appliance
malfunctions or has been damaged in any manner.
• Prior to operation, inspect the appliance and power cord for physical damage. Do not use if physical
damage has occurred.
• Do not operate with a power supply outlet below counter, and never operate with a power extension
cord.
• Do not hang power cord over edge of table or counter or touch hot surfaces nor bend, twist or place
the power cord under the weight of sharp or heavy objects.
• To protect against the risk of electric shock, do not immerse power cord, power plug, or any parts of
the unit in water or other liquids.
• If the supply cord is damaged, it must be replaced by the manufacturer or its service agent or a
similarly qualified person in order to avoid a hazard.
• Do not touch the appliance or power cord with wet hands to prevent the risk of electric shocks.
• WARNING: Spilled food can cause serious burns. Keep appliance and cord away from children.
• Do not expose this cooker to excessively high temperatures. Do not place it in, on, or near heat
sources such as fireplace, stove, radiator, etc. Do not leave it in direct sunlight.
• Use only in a well-ventilated area where steam and heat can escape and dissipate.
• Do not expose your skin to escaping steam during cooking to avoid the risk of burns and scalds.
• Disconnect appliance from the power supply when not in use and prior to cleaning and maintenance.
• Never disconnect the appliance by pulling on the power cord. Always grasp the power plug to
disconnect from the power supply.
• Always attach power plug to the cooker first before inserting power cord plug into the power supply.
To disconnect, press CANCEL and detach power plug from the power supply. Always unplug from
power supply when not in use and before cleaning. Allow the cooker to cool before putting on or taking
off parts, and before cleaning.
• IMPORTANT: Always inspect and clean the pressure limit valve and release valve needle before
every use.
• WARNING: DO NOT open the lid while the float valve is up. This indicates that pressure is still inside
the appliance.

54
IMPORTANT SAFEGUARDS PARTS IDENTIFICATION
• WARNING: DO NOT touch the lid, pressure limit valve, or float valve during use. Wait for the
appliance to fully cool down before touching these parts.
• Do not move the cooker by holding the lid handle. Use the handles on the body side instead.
• Do not attempt to move the appliance when it is operating under pressure or contains hot liquids.
• Ensure that there is a minimum of 2 cups of liquid in the cooker to maintain pressure.
• Ensure that the lid is fully installed and properly sealed prior to operation.
• Do not use the cooker without the lid securely installed, except when using the Saute function.
• Do not open the pressure cooker until it has cooled and all internal pressure has been released.
• I PORTANT: Never fill the cooking pot with food and/or liquids above the 4/5 mark. Do not exceed
the 3/5 mark for foods that expand during cooking, such as beans or rice. Never attempt to cook with
food and/or water below the 1/5 mark.
• The cooking pot is only usable with the cooker. Do not place it on a stove or in an oven. Do not store
in the refrigerator.
• NOTE: The maximum of the Keep-warm time is 24 hours, however it is recommended to not exceed
6 hours to ensure the best taste for your food.
• The maximum time of the preset timer is 24 hours. However, it is recommended to not exceed 6 hours
to ensure the best fresh for the food.
• This cooker has no user serviceable parts. Do not attempt to open, service, or modify the cooker.
• This appliance should not be used by children; by individuals whose physical, sensory or mental
abilities prevent safe use of the appliance; or by individuals with limited knowledge of using a pressure
cooker. Close supervision is needed when using this appliance near such individuals.
• Children should be supervised to ensure they do not play with this appliance.
• This appliance is for household use only, and not intended for outdoor use.
SPECIFICATIONS
2
17
18
4
5
6
1
3
7
20
19
8
9
11
15
12
21
13
14
16
10
Press Down
Press Down
Pull Out
Pull Up
DISMANTLING
INSTALLING
1. Handle
2. Handle Cover
3. Lid
4. Pressure Limit Valve
5. Release Valve Needle
6. Float Valve
7. Inner Pot
8. iddle Pot
9. iddle Ring
10. Control Panel
11. Base
12. Dew Collector
13. Pot Handle
14. Housing
15. Power Cord
16. Heating Plate
17. easuring Cup
18. Rice Spoon
19. Sealing Ring
20. Float Valve Seal Ring
21. Anti-blocking Cover
MODEL MPC-800
RATED OLTAGE / FREQUENCY 220-240 ~ 50/60Hz
RATED WATTAGE 1250W
CAPACITY 8.0L

76
CONTROL PANEL O ER IEW
AB
C
DE
A. TI E DISPLAY : displays remaining cooking time or remaining delayed start time.
B. TI E PRESET : To set a delayed starting time.
C. + : increase cooking time for selected program.
D. – : decrease cooking time for selected program.
E. KEEP WAR /CANCEL: enters Warm mode or cancels a cooking program.
• Always use at least 2 cups of water or other liquid in your recipes. This will ensure there is enough
steam to be created to produce the pressure required for cooking.
• Ensure sufficient food to fill the Inner Pot to at least the 1⁄5 mark. If using food that expands when
cooked, such as beans or rice, do not fill the pot past the 3⁄5 mark. If using food that does not expand,
do not fill the pot past the 4⁄5 mark.
• It is suggested to begin with a shorter cooking time if in doubt which cooking time to select. Cook for
the set time and use the quick release method to release the pressure when the timer completes.
• If food is not done, select another cooking program until the food is fully cooked. It is suggested to
select the default cooking time for first use if unsure about the cooking time. It will be easy to adjust
the time for different cooking after a series of trials and errors.
PRESSURE COOKING TIPS
PRESET COOKING PROGRAMS
Function Default Pressure Adjust Pressure Pressure Setting
Keeping Time Keeping Time
( inutes) ( inutes)
Sauteing 20 / Without pressure
Soup 20 15-40 Set pressure ± 60kpa
Warm / / Without pressure
Rice 12 8-20 Set pressure ± 60kpa
Beans 40 30-45 Set pressure ± 60kpa
Beef 35 15-40 Set pressure ± 60kpa
eat 10 8-30 Set pressure ± 60kpa
Baby Food 21 15-35 Set pressure ± 60kpa
Stew 35 25-45 Set pressure ± 60kpa
Noodles 5 3-8 Set pressure ± 60kpa
Porridge 20 10-30 Set pressure ± 60kpa
ultigrain 15 10-20 Set pressure ± 60kpa
Steam 5 5-20 Set pressure ± 60kpa
Cake 30 30-50 Without pressure
Bake 21 15-35 Without pressure
Reheat 10 5-20 Set pressure ± 60kpa
• For “WAR ” mode, the cooker will enter into “WAR ” mode automatically after other mode(s) has
completed, or manually choose “WAR ” mode. There is no default time for “WAR ” mode. The
maximum keep-warm time is 24 hours, but it is not advisable to exceed 6 hours to ensure best taste.
• Open the lid to cook under “SAUTE” mode.

8 9
BEFORE FIRST USE OPERATING INSTRUCTIONS
1. Read this entire manual carefully, including all warnings.
2. Remove all stickers, tape, excess packaging, etc. from the appliance.
3. Wash the Inner Pot, the inside of the Cooker Lid, and all included accessories with warm water, mild
soap, and soft cloth.
REMO ING THE LID
• Grab the Handle and turn the Cooker Lid clockwise to unlock
the lid from the base. Then gently lift the lid upward and away
from the base (see illustration on the right).
ATTACHING THE LID
• Grab cooker lid by the handle and place it on top of the base. Reposition the Lid (if required) to ensure
it is secured properly to the base. Once the Lid is seated properly turn lid counterclockwise to lock in
place.
PREPARING THE PRESSURE COOKER
1. Remove the Inner Pot from the Cooker Body.
2. Put food and liquids into the Inner Pot per the recipe. Fill the Inner Pot with food to at least the 1/5
mark inside the pot. Do not fill the pot past the 3/5 mark if cooking food that expands, such as beans
or rice. Do not fill the pot past the 4/5 mark if cooking non-expandable foods (see illustration below).
3. Ensure that the exterior of the Inner Pot is clean before placing into the Cooker Body.
4. Place Cooker Lid on the Cooker Body (except for Sauteing) and turn counterclockwise to lock in
place.
5. Ensure the Pressure Limit Valve is attached with the needle pointing to the right. Also ensure the Float
Valve is in the down position. Turn the Release Valve Needle to the Keep Pressure Setting.
6. Insert power plug to power supply. The Control Panel will turn ON and will show “----” to indicate
appliance is in standby mode.
1. Turn the Pressure Limit Valve to “SEAL” position. Ensure that the Float Valve is in the down position.
2. Connect the power plug into a power supply. The control panel display will show “--:--“.
3. Press the Cooking ode Button (such as Soup, Cake, eat, etc.) of your choice, or press “ ANUAL”.
4. Press the “–” or “+“ buttons (D & E) to adjust the Cooking Time up or down.
5. The cooking mode light on the control panel will blink several times and the cooking process will
begin.
•NOTE: for modes that cook under pressure, the cooker will begin pressurizing as the first step of
the cooking process. This process may take several minutes to complete depending on the fullness
of the pot. The timer will not start counting down until after the cooker is fully pressurized.
6. When the set cooking time has finished, the cooker will beep 5 times and automatically switch to
“WAR ” mode. (The Keep Warm light will turn ON).
7. To exit “WAR ” mode simply press the Warm/Cancel button.
8. Follow the instructions below for Releasing the pressure to remove your cooked food.
CANCELLING OR STOPPING A COOKING PROGRAM
• Press the Warm/Cancel button during the programming steps to cancel a selection and start over.
• Press Warm/Cancel button during operation to stop cooking.
RELEASING THE PRESSURE
WARNING: never attempt to force the lid open. If the lid does not open easily, it means there is still
pressure inside the appliance that must be released before the lid can be opened. Always ensure the
Float Valve has returned to the lowered position before attempting to open the lid.
WARNING: Hot steam will escape from the appliance during pressure release. Before proceeding with
either of the pressure release methods described below, it is important to wear oven mitts or other
protective gloves to avoid burns or scalds caused by the escaping steam.
THERE ARE TWO METHODS OF PRESSURE RELEASE:
• Natural Release – this method allows the cooker to naturally release the built-up pressure inside the
appliance automatically. The pressure will slowly release out of the cooker over several minutes
(normally between 10-45 minutes) depending on the amount of food in the cooker. During Natural
Release hot steam will slowly eject from the appliance through the vents in the Pressure Limit Valve.
• Quick Release – this method allows the user to manually release the built-up pressure inside the
cooker in one of two ways:
– Turn the Pressure limit valve to the “RELEASE” setting.
WARNING: Hot steam will be ejected from the pressure cooker with both types of release methods.
Always keep hands and face away from the steam vents on the top of the unit.
*TIP: for foods with large liquid volume or starch content, use the Natural Release method. If Quick
Release is used with these types of food thick liquid can be ejected from the Pressure Limit Valve and
cause splattering during pressure release.
As the appliance releases pressure, the Float Valve will begin to drop. When all pressure is released,
the Float Valve will be at the low point setting as it was before the cooking process started.
It is safe to open and remove food to a serving plate only when the Float Valve has fully dropped.
4
5
3
5
1
5

10 11
OPERATING INSTRUCTIONS OPERATING INSTRUCTIONS
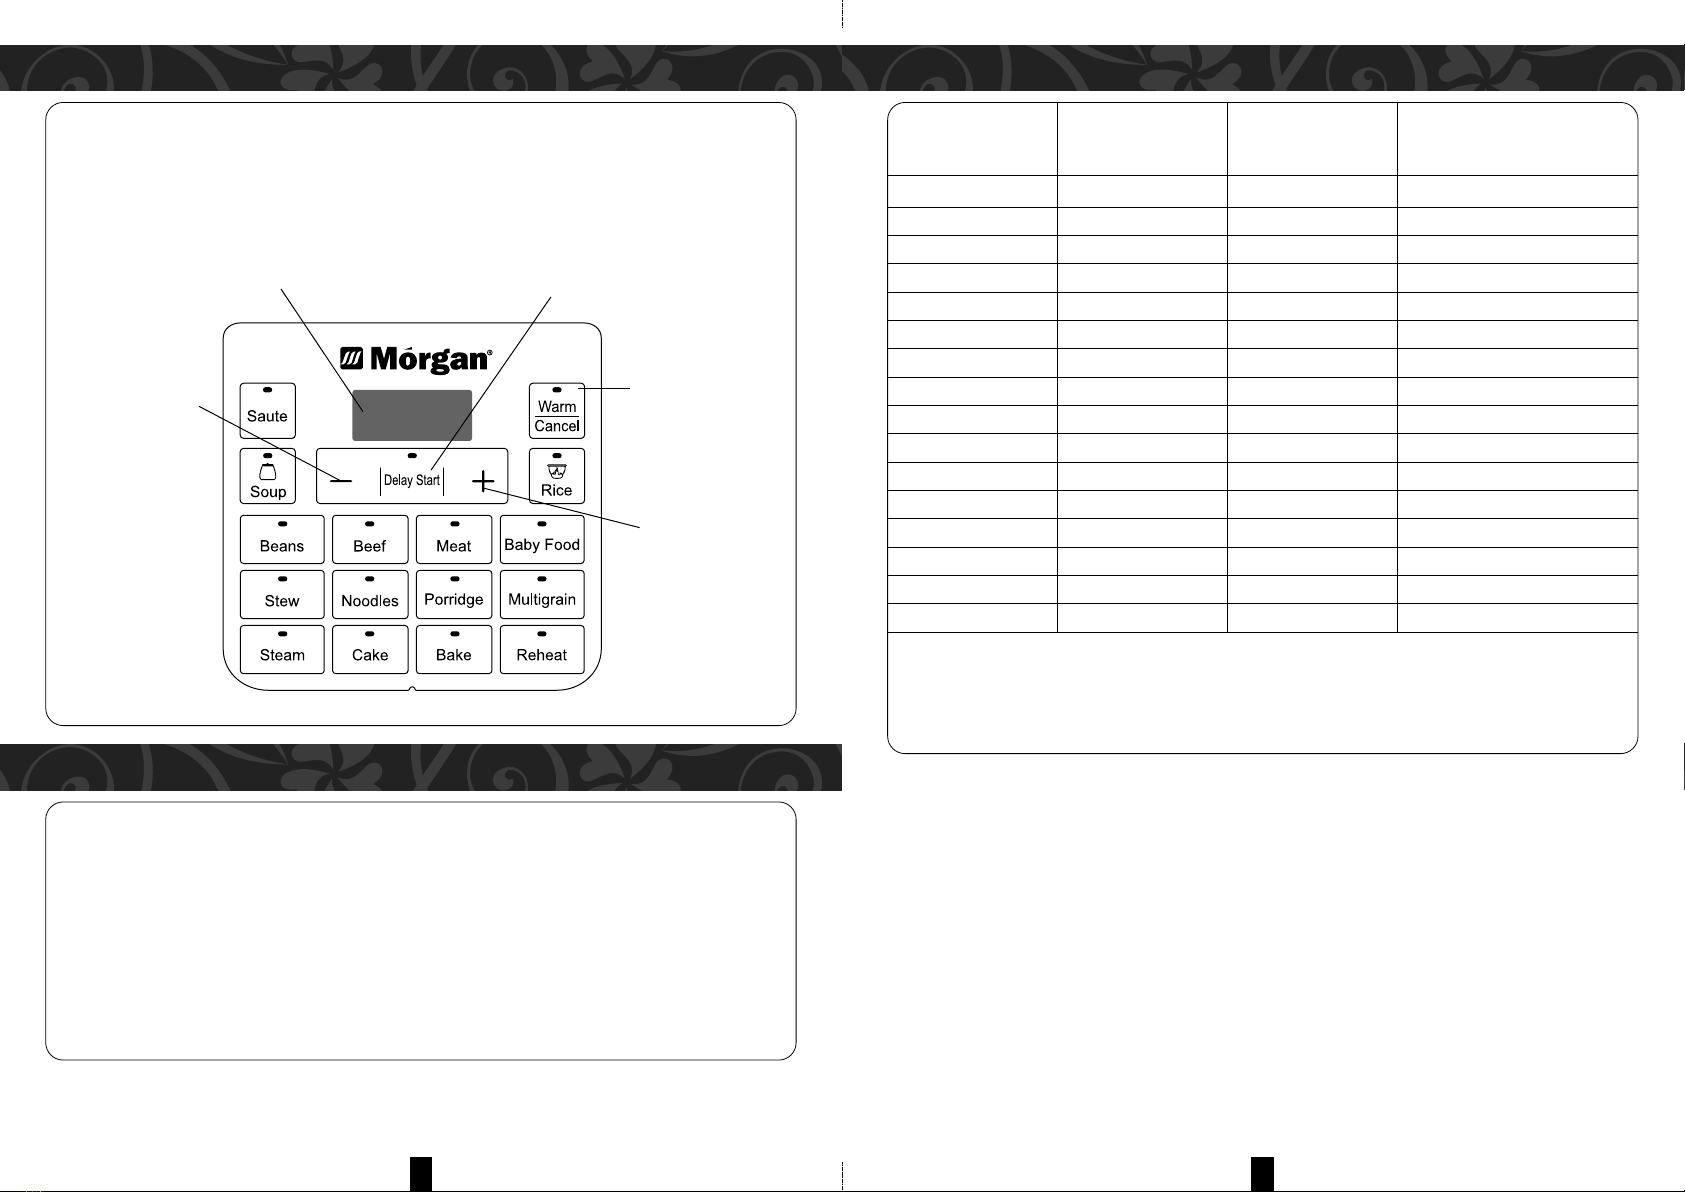
WARM MODE
• The “WAR ” mode is used to keep cooked food warm for extended periods of time.
• The appliance will automatically enter “WAR ” mode upon completion of the set cooking time.
• “WAR ” mode can me manually selected at any time during cooking by pressing the Warm / Cancel
button twice.
• The appliance will stay in “WAR ” mode for up to 24 hours before automatically shutting down.
• To cancel “WAR ” mode simply press the Warm / Cancel button.
SAUTE MODE
• Do not attach the lid during saute mode. This mode is to saute or brown foods such as ground beef,
ground turkey, etc. Use this mode much like a frying pan on the stove or hot plate.
• To use saute mode simply place food in the pot, choose SAUTE mode from the control panel, set the
desired cooking time, and begin cooking.
• This mode does not use pressure, and Pressure Release steps is not required. When cooking is
completed, simply press the Warm / Cancel button to end the cooking process.
SOUP MODE
• The Soup function is designed to cook soup and stew under pressure. The default time is 20 minutes,
which can be increased to a maximum of 40 minutes. Cooking soup with meat requires longer
cooking time.
RICE MODE
• The Rice function cooks rice quickly under pressure. It has a default time of 12 minutes, and can be
increased to a maximum of 20 minutes. Always rinse rice before cooking. Cook rice in water or broth.
BEANS MODE
• The Bean function is designed to cook beans, chili, and related sauces under pressure. It has a
default time of 40 minutes, and can be increased to a maximum of 50 minutes.
• To cook using the “Beans” mode simply follow the same steps described previously, however when
the food has finished cooking, press the Warm / Cancel button to stop the cooking process. Never
attempt to force the lid open, wait until all the steam release automatically.
BEEF MODE
• The Beef function is designed to cook beef under pressure. It has a default time of 35 minutes, which
can be decreased to a minimum of 30 minutes or increased to a maximum of 45 minutes.
MEAT MODE
• The eat function is designed to cook various types of meats under pressure. It has a default time of
10 minutes, which can be decreased to a minimum of 8 minutes or increased to a maximum of 30
minutes.
BABY FOOD MODE
• The Baby Food function is designed to cook such as muddy flesh under pressure. It has a default
time of 21 minutes, which can be decreased to a minimum of 15 minutes or increased to a maximum
of 35 minutes.
STEW MODE
• The Stew function is designed to stews meat or ribs under pressure. The default time is 35 minutes,
which can be increased to a maximum of 45 minutes.
NOODLES MODE
• The Noodles ode function is designed to cook noodles or pasta under pressure. It has a default time
of 5 minutes, which can be increased to a maximum of 8 minutes.
PORRIDGE MODE
• The Porridge function is designed to cook porridge under pressure. The default time is 20 minutes,
which can be increased to a maximum of 30 minutes. DO NOT use Quick Release to avoid splatter.
MULTIGRAIN MODE
• The ultigrain function is designed to cook multigrain under pressure. It has a default time of 15
minutes, which can be increased to a maximum of 20 minutes.
STEAM MODE
• The Steam function is designed to steam food under pressure. It has a default time of 5 minutes,
which can be increased to a maximum of 20 minutes.
CAKE MODE
• The “CAKE” mode is designed to cook food in the same way as a traditional oven. This mode does
not using pressure.
• To cook using the “CAKE” mode simply follow the same steps described previously, however when
the food has finished cooking you can simply press the Warm / Cancel button to end the cooking
process and then remove the lid. Pressure release isn’t needed under this mode.
BAKE MODE
• The Bake function is designed to cook chicken or other poultry with sauce(at least 100ml) under
pressure. This function no need to cook with water. It has a default time of 21 minutes, which can be
increased to a maximum of 35 minutes.
REHEAT MODE
• The Reheat function is designed to reheat the leftover food under pressure. It has a default time of
10 minutes, which can be increased to a maximum of 20 minutes.
USING THE DELAY TIMER (DELAY START)
• The delay timer function will set the appliance to power on and cook up to 24 hours in the future.
NOTE: Perishable foods such as meat, poultry, fish, cheese, dairy products, etc. cannot be left at
room temperature for more than 2 hours (no longer than 1 hour when room temperature is above
30°C). When cooking these foods do not set the delay time function for more than 1-2 hours.
NOTE: The delay start function is not applicable for Cake and saute programs.
1. Add food to the Inner Pot and close the Lid (see “Operating Instructions”).
2. Turn the pressure limit valve point to “SEAL” position.
3. Connect the power plug to the power supply. The control panel display will show “--:--“.
4. Press the Time preset button.

12 13
OPERATING INSTRUCTIONS CARE AND MAINTENANCE
5. Press the “–” or “+“ buttons to set the desired time of delay (up to 24 hours in the future). Time can
be delayed in 30-minute increments up to 10 hours, and 1-hour increments from 10 hours to 24
hours. The “Delay” light will flash.
6. Select the Cooking ode Button (ex: Rice, Porridge, Soup, anual, etc.) of your choice.
7. Use the “-” or “+“ buttons to set the desired Cooking Time.
8. Use the Pressure Adjust button to the desired Cooking Pressure.
9. The screen on the control panel will blink several times and then begin the Delay Timer countdown.
NOTE: Cooking mode, time and pressure can be selected first before setting the delay start
function.
10. The set Delay Time will appear on the control panel.
NOTE: the appliance will begin the pressurizing process after the set Delay Time has elapsed. The
countdown for cooking time will begin after the cooker is pressurized.
11. When the set cooking time has finished, the cooker will beep 5 times and automatically switch to
“WAR ” mode. (The Keep Warm light will turn ON).
12. To exit “WAR ” mode simply press the Warm/Cancel button (B).
13. Follow the previous instructions for “Releasing the Pressure” and to remove food.
Regular care and maintenance is essential in ensuring the appliance’s safe and relia le
performance.
• During the cooking process, excess moisture is collected in the Dew Collector attached located at the
rear of the appliance. Remove and empty the reservoir after each use by gently pulling it downwards.
• Small parts of food can sometimes enter the Anti-block Shield. The Anti-block Shield is located on the
underside of the lid directly below the Pressure Limit Valve. Clean the Anti-block shield with water and
a dry, soft cloth after each use.
• Visually inspect and clean the seal ring regularly. The seal ring is located on the underside of the lid.
It is attached around a metal ring that is designed to hold the seal ring in place.
• Remove the seal ring for cleaning by gently pulling it away from the metal ring and by cleaning it with
water. Dry using a soft cloth and then reattach by gently pressing it over the metal ring. Ensure the
seal ring is completely seated over the metal ring, otherwise the cooker will not be able to pressurize
properly.
CLEANING
• CAUTION: Do not attempt cleaning until the cooker has completely cooled down. Allow a minimum
of 30 minutes for the cooker to cool.
1. Turn off and unplug the appliance after each use.
2. Always allow the appliance to cool completely before cleaning.
3. Do not use abrasive brushes or pads, or harsh cleaning solutions.
4. Wash the inside of the Pot with hot water, mild dish soap, and a clean dishcloth. Use a sponge or
rubber spatula to remove any stuck- on food or residue. Rinse and wipe dry with a soft cloth.
NOTE: Pot is also dishwasher safe.
5. Wash the inner surface of the lid thoroughly, including the seal ring, Float Valve, and Anti-block Shield.
NOTE: Do not use the appliance with a damaged seal ring. Pressure will not build if the seal ring is
not positioned properly. Inspect periodically to ensure the seal ring is clean, flexible, and not cracked
or torn.
6. Wipe the Base of the Pressure Cooker clean using a damp cloth.
7. Do not immerse the power cord into water.
8. Ensure all parts are dried thoroughly before reassembling and using the appliance again.
9. Store the Pressure Cooker with the Lid upside down on top of the pot. This will protect the valves,
knobs and pressure regulator on top of the lid. If the Pressure Cooker is stored with the lid sealed,
persistent odors may form inside and the seal ring may become damaged

14 15
TROUBLE SHOOTING
PROBLEM POSSIBLE CAUSES SOLUTION
Lid is difficult to close Sealing ring not properly Reposition the sealing ring correctly.
installed.
Floating valve stuck in upwards Push down the floating valve so that it
position. does not block the locking pin.
Difficult to open Pressure trapped inside the Use the steam release handle to reduce
the lid appliance. the pressure inside the appliance. Open
the lid after the pressure has completely
released.
Floating valve stuck in upwards Push down the floating valve lightly.
position.
Steam escapes from Sealing ring not installed. Install the sealing ring.
the side of the lid Sealing ring damaged. Replace the sealing ring.
Foreign objects stuck to the Clean the sealing ring.
sealing ring.
Lid not closed properly. Open and close the lid again.
Steam leaks from Food debris stuck on the floating Clean the floating valve silicone seal.
floating valve valve silicone seal.
Floating valve silicone seal worn Replace the floating valve silicone seal.
out
Table of contents
Other Morgan Electric Pressure Cooker manuals
Popular Electric Pressure Cooker manuals by other brands

Presto
Presto Pressure Canner and Cooker Instructions and recipes

FIRST AUSTRIA
FIRST AUSTRIA FA-5130 instruction manual

AIGOSTAR
AIGOSTAR 30KYE instructions

Cuisinart
Cuisinart EPC-1200PC - EPC-1200PC Electronic Pressure... Instruction booklet

Cuizen
Cuizen BA-3800B instruction manual

Cosori
Cosori CMC-CO601-SUS user manual