American Telecom 5101 User manual

User’s Manual
for
American Telecom 5100 Series
Model Numbers 5101, 5102, 5103, 5104 and 5105
2.4GHz Digital Spread Spectrum Cordless
Telephone
To fully enjoy all the benefits of this product, we
ask that you review the information contained in
this manual

2
TABLE OF CONTENTS
Important Safety Instructions.................................................................................................................................. 4
Safety Instructions for Handset Battery Pack.......................................................................................................... 5
Handset and Base Layouts ...................................................................................................................................... 6
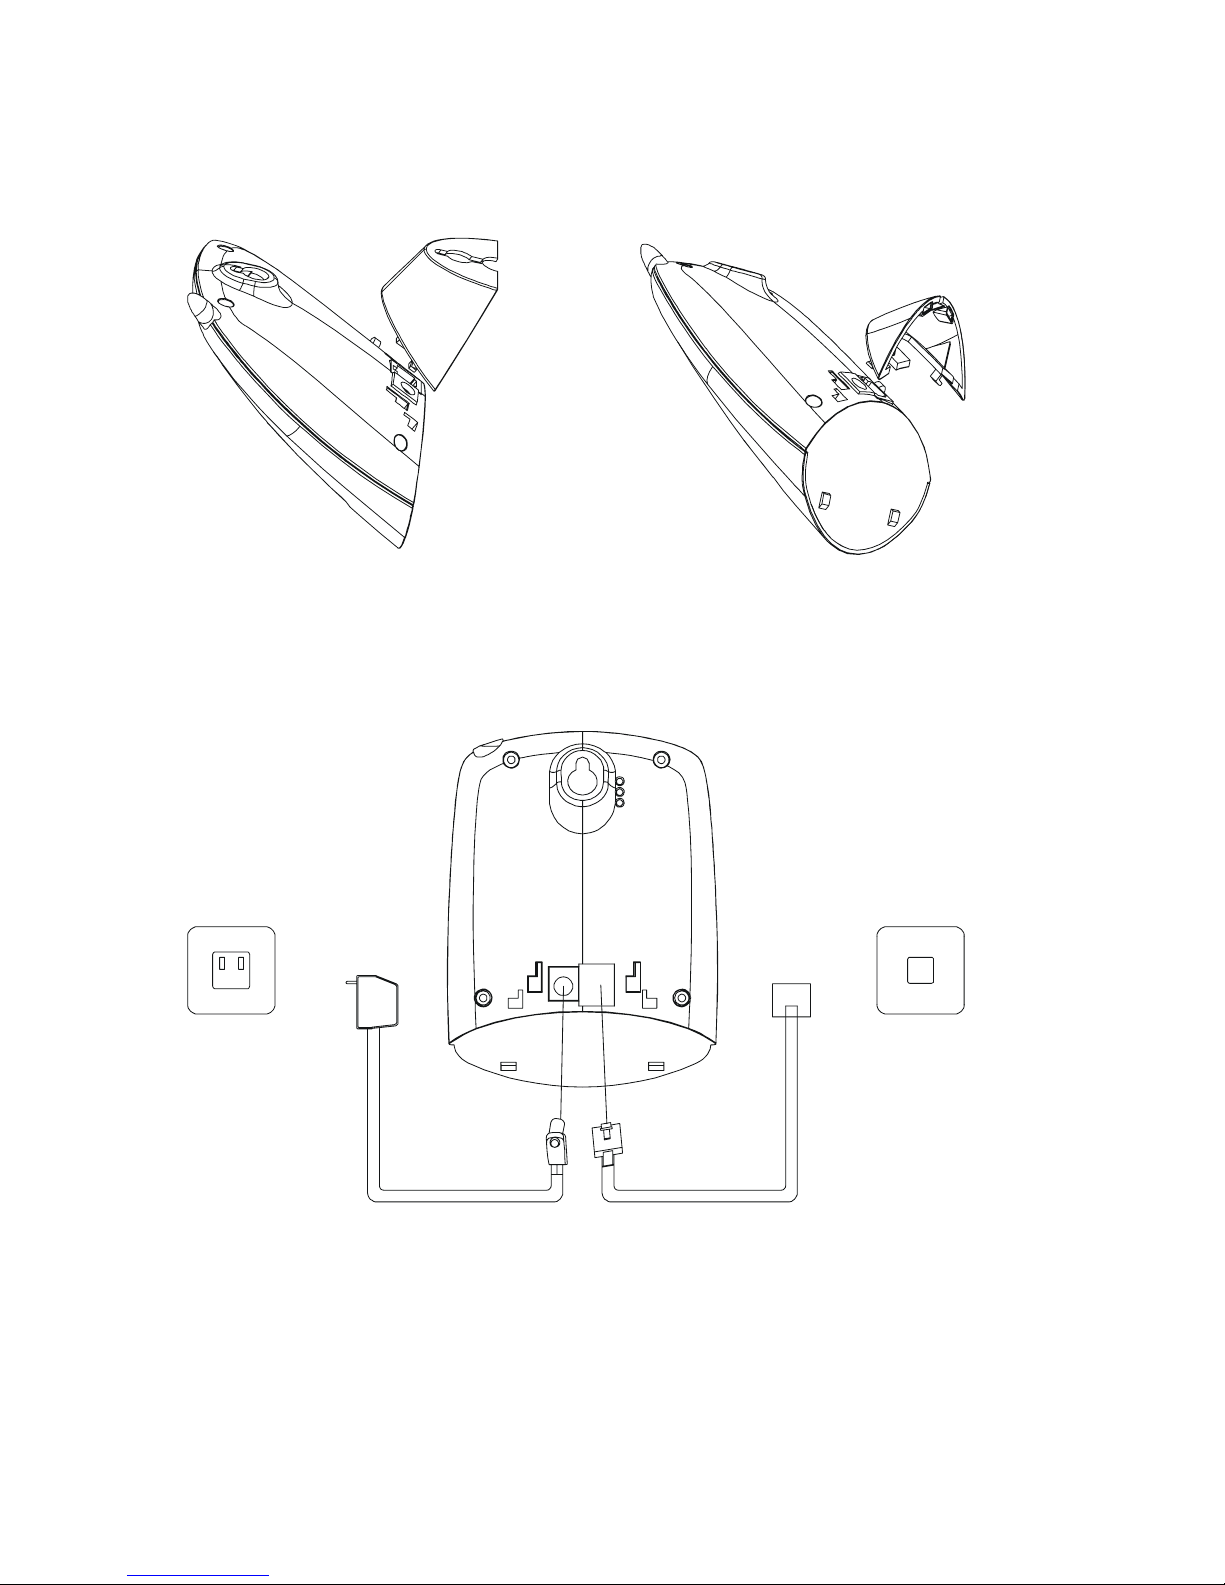
Handset and Charger............................................................................................................................................... 7
LCD Display ........................................................................................................................................................... 8
Getting Started ........................................................................................................................................................ 8
Features................................................................................................................................................................. 10
Basic Operation..................................................................................................................................................... 10
Answering Calls .......................................................................................................................................... 10
Display presentation for incoming calls:............................................................................................ 10
Display presentation during an ongoing call:......................................................................................11
Display presentation after call is terminated .......................................................................................11
Making Internal Calls ..................................................................................................................................11
Making External Calls................................................................................................................................ 12
Making Calls – Pre-Dialling .............................................................................................................. 12
Making Calls – Post-Dialing.............................................................................................................. 12
Teleconference and Intercom Call Transferring .......................................................................................... 12
Call Waiting / Call Waiting ID..................................................................................................................... 13
Call Waiting ....................................................................................................................................... 13
Call Waiting ID .................................................................................................................................. 13
Redial .......................................................................................................................................................... 13
Muting the Handset Microphone................................................................................................................. 13
Page ............................................................................................................................................................. 13
Hands-Free Mode ....................................................................................................................................... 13
Pay-Per-Use (PPU) Keys............................................................................................................................. 13
Long Distance Service (LDS) Key.............................................................................................................. 14
Handset Menu and Programming ................................................................................................................ 14
Call Log (Caller ID) .................................................................................................................................... 14
Phone Book ................................................................................................................................................. 16
Characters .......................................................................................................................................... 16
Phone Book Operation....................................................................................................................... 17
How to use your Phone Book: ........................................................................................................... 17
Deleting a Phone Book entry: ............................................................................................................ 17
Entering new names and numbers into the Phone Book:................................................................... 18
Volume......................................................................................................................................................... 18
Ring Volume................................................................................................................................................ 18
Ring Pattern................................................................................................................................................. 18
Auto talk...................................................................................................................................................... 19
Low Battery alert Tone ................................................................................................................................ 19

3
No coverage alert Tone................................................................................................................................ 19
Key Tone ..................................................................................................................................................... 20
Key Lock ..................................................................................................................................................... 20
Power on/off ................................................................................................................................................ 20
Handset Naming .......................................................................................................................................... 20
Language ..................................................................................................................................................... 21
LCD Contrast .............................................................................................................................................. 21
Reset for Handset ........................................................................................................................................ 21
Handset setting ............................................................................................................................................ 22
Base PIN Code ............................................................................................................................................ 22
Base Dial Mode ........................................................................................................................................... 22
Base Flash Timing ....................................................................................................................................... 22
Base Message Waiting LED ........................................................................................................................ 23
Resetting the Base ....................................................................................................................................... 23
Base setting.................................................................................................................................................. 23
Base Unit Status Indication ......................................................................................................................... 23
Display Messages ........................................................................................................................................ 23
Registering Your Handsets (Adding Handsets to Your System) .................................................................. 24
Consumer Information .......................................................................................................................................... 25
Limited Warranty .................................................................................................................................................. 27
What does our warranty cover?.......................................................................................................... 27
For how long after the original purchase?.......................................................................................... 27
What will American telecom do?....................................................................................................... 27
How do I arrange for service, whether in or out of warranty? ........................................................... 27
What does our warranty not cover? ................................................................................................... 27
How does state or provincial law relate to this warranty?.................................................................. 27

4
Important Safety Instructions
BEFORE USING YOUR TELEPHONE EQUIPMENT, BASIC SAFETY PRECAUTIONS SHOULD
ALWAYS BE FOLLOWED TO REDUCE THE RISK OF FIRE, ELECTRIC SHOCK AND INJURY
TO PERSON, INCLUDING THE FOLLOWING
1. Read and understand all instructions.
2. Follow all warnings and instructions marked on the product.
3. Unplug this product from the wall outlet before cleaning. Do not use liquid cleaners cleanser or
aerosol cleanser. Use a damp cloth for cleaning.
4. Do not use this product near water, for example, near a bath tub, wash bowl, kitchen sink, laundry tub,
in a wet basement, or near a swimming pool.
5. Do not place this product on an unstable cart, stand, or table. The product may fall, causing serious
damage to the product.
6. Slots and openings in the cabinet and the back or bottom are provided for ventilation. To protect it
from overheating, these openings must not be blocked or covered. The openings should never be
blocked by placing the product on the bed, sofa, rug, or other similar surface. This product should
never be placed near or over a radiator or heat register. This product should not be placed in a built-in
installation unless proper ventilation is provided.
7. This product should beoperated only from the type of power source indicated onthe marking label. If
you are not sure of the type of power supply to your home, consult your dealer or local power
company.
8. Do not allow anything to rest on the power cord. Do not locate this product where the cord will be
damaged by persons walking on it.
9. Do not overload wall outlet extension cords, as this can result in the risk of fire or electric shock.
10. Never push objects of any kind into this product through cabinet slots as they may touch dangerous
voltage points or short out parts that could result in a risk of fire or electric shock. Never spill liquid of
any kind on this product.
11. To reduce the risk of electric shock, do not disassemble this product. Instead, when some repair work
is required, take the unit to a qualified technician. Opening or removing covers may expose you to
dangerous voltages or other risks. Incorrect reassembly can cause electric shock when the appliance is
subsequently used.
12. Unplug this product from the wall outlet and refer servicing to qualified service personnel under the
following conditions:
a. When the power supply cord or plug is damaged or frayed.
b. If liquid has been spilled into the product.
c. If the product has been exposed to rain or water.
d. If the product does not operate normally by following the operating instructions. Adjust only those
controls that are covered by the operating instructions because improper adjustment of other controls
may result in damage and will often require extensive work by a qualified technician to restore the
product to normal operation.
e. If the product has been dropped or cabinet has be damaged.
f. If the product exhibits a distinct change in performance.

5
13. Avoid using a telephone(other than a cordless type) during an electrical storm. There may be a remote
risk of electrical shock from lightning.
14. Do not use the telephone to report a gas leak in the vicinity of the leak.
15. This power unit is intended to be correctly oriented in a vertical or floor mount position.
SAVE THESE INSTRUCTIONS
Safety Instructions for Handset Battery Pack
CAUTION:
Danger of explosion if battery is incorrectly replaced. Use only an approved battery pack in the handset of your
American Telecom 5100 Series Cordless Telephone. To reduce the risk of fire or injury, always do the following
when replacing, discarding, or charging battery, when handling the batteries, be careful not to short the battery
with conducting materials such as rings, bracelets, and keys. The Battery or conducting material may overheat and
cause burns. Use only the following type and size of battery pack:
FOR HANDSET UNIT:
SANIK, 2SN-AAA70H-S-X2F Ni-MH AAA 700mAh 2.4V Battery Pack
ATTENTION- Il y a danger d’explosion s’il y a remplacement incorrect de la batterie. Remplacer
uniquement avec une batterie du même type ou d’un type équivalent recommandé par le constructeur.
Mettre au rebut les batteries usagées conformément aux instructions du fabricant
CONTAINS NICKEL-METAL HYDRIDE BATTERY. BATTERY MUST
BE RECYCLED OR DISPOSED OF PROPERLY
Do not dispose of the battery in a fire. The cell may explode. Check with local codes for
possible special disposal instructions.
1. Do not open or mutilate the battery. Released electrolyte is corrosive and may cause damage to the
eyes or skin. It may be toxic if swallowed.
2. Exercise care in handling batteries in order not to short the battery with conducting materials such as
rings, bracelets and keys. The battery or conductor may overheat and cause burns.
3. Charge the batteries provided with or identified for use with this product only in accordance with the
instructions and limitations specified in this manual.
4. Observe proper polarity orientation between the battery(ies) and battery charger.
5. Do not mix old and new batteries in this product.
6. Do not mix batteries of different sizes or from different manufacturers in this product.
SAVE THESE INSTRUCTIONS

6
Handset and Base Layouts
1 Dialing Keys (0-9; *; #)
2 Talk / Speakerphone 9 Phone Book
3 Clear / Mute 10 Volume ▼/ Scroll ▼/ Caller ID
4Flash 11Intercom
5 LDS (Long Distance Service) 12 Off / Cancel
6Program/Okay 13Repeat Dial (Pay-Per-Use)
7 Volume ▲/ Scroll ▲/ Redial 14 411 Directory Info. (Pay-Per-Use)
8Display(LCD) 15*69 Last Call Return (Pay-Per-Use)
1
2
3
4
5
6 7
8
9
10
11
12
13
14
15

7
16 Message Waiting/In Use Indicator 18 Page
17 Charge Indicator
Handset and Charger
19 Charging LED
16
17
18

8
LCD Display
Speakerphone icon (displayed when the Speakerphone is ON)
Key lock icon (displayed when user locks the keypad)
Mute icon (displayed when Handset microphone is Mute)
Low battery icon (on only if battery voltage is low)
Off Hook icon (displayed when Handset is on an external or intercom call)
NEW icon (displayed when new Caller ID records have been received)
Ringer OFF icon (displayed when user turns the ringer off)
In Service icon (displayed when Handset is ‘in range’ of the Base)
Getting Started
Install and Charge the Battery Pack
1Open the battery compartment by sliding the cover down.
2Plug the Battery Pack connector into the Handset socket, then place the battery pack and wires in the
compartment.
3Slide the battery cover back into place.

9
4(Optional) Attach the belt clip and change color face plate, if desired.
5Choose the appropriate mounting bracket. One is for tabletop installations. The bracket with the round hole
is for wall mounting. You must use one of the brackets. Thread the telephone cord and DC power cord
through the large opening in the bracket. Plug the two cords into the corresponding jacks on the bottom of
the Base.
6Snap the bracket into place on the back of the Base. If you are using the tabletop bracket, run the two cords
through the channel at the back of the bracket. If you are wall mounting the Base, carefully line up the slots
on the wall mount bracket with the studs on the telephone wall plate, and carefully mount the telephone on
the wall.
7Connect the power supply to a live outlet. Make sure the outlet is not controlled by a switch.
8Leave the Handset in the Base for 10 hours so that the battery pack is fully charged.
9Plug the adaptor in socket-outlet which is near equipment and easily accessible.
10 Place the Handset in the Base cradle. The Handset and Base communicate with each other automatically (if
handset is not registered before, the display will show “Not Reg” to indicate this handset needs registration)
11 Allow the Handset to charge for a day for the first time charging. The CHARGE indicator on the Base
will glow while the Handset is charging.

10
Features
Congratulation on your purchase of this high quality, cordless telephone set. The set offers the following features:
1. Phone book for 50 entries with names and numbers.
2. Caller ID function with caller list for 30 numbers or names from phone book (dependent on network)
3. Dot matrix alphanumeric LCD display
4. Extended redialing for 10 call numbers
5. Microphone mute
6. Keypad lock
7. Power on/off
8. Support 3 operation languages.
9. Internal ,free communication between handsets
10. Pre-dialing.
11. Smart dialing
12. Automatic call answering on/off
13. Three Pay-Per-Use(PPU) Keys
14. Long Distance Service
15. Operation of up to 4 handsets
16. Up to 100 hours standby
17. Up to 10 hours talk time
Basic Operation
Answering Calls
If auto talk is disabled, press Talk/Spk,
If auto talk is enabled, the incoming call is answered by removing the Handset from the charger.. If the Handset is
not cradled, simply press Talk/Spk.
During the call, you can press Talk/Spk to toggle Speakerphone On/Off.
You can end your call by pressing:
●OFF, or
●Place the Handset in the charger
Display presentation for incoming calls:
An incoming call without caller ID:
Call
If your local service provider sends the caller ID information, First “Call” and” ” will display, then the caller
ID information will display.
987-654-3210
or, in addition to that, caller’s name and time/date information.
The name, which will be shown, may either come from the service provider or from the Phone Book. If the CID
information sent by the service provider contains name information, this name will be shown. However, if the
calling number matches a number you have programmed in the Phone Book, the name associated with this number
is shown instead; i.e. the Phone Book name takes precedence.
SOMEBODY
987-654-3210
The Caller ID information may be blocked. The Handset will display calls with blocked name/numbers as
indicated below:
Private number:
SMITH
Withheld

11
Out of area number:
SMITH
Unavailable
Private name:
Withheld
98-765-4321
Out of area name:
Unavailable
98-765-4321
If both name and number are blocked:
Private name & number:
Withheld
Out of area name & number:
Unavailable
Display presentation during an ongoing call:
When answer the call, the display changes depending on the type of call. The different presentations are:
Call without Caller ID:
Call
00:00:10
Call with caller ID (number only):
987-654-3210
00:00:10
If the Caller ID number is blocked (and no name), the incoming call is shows as:
Call
00:00:10
Call with Caller ID (number and name or an associated number in the Phone book):
SOMEBODY
00:00:10
Calls with blocked name in Caller ID is shown as:
Call
00:00:10
The number ‘00:00:10’ represents the elapsed time of your call, in hours, minutes and seconds.
Key entries during a call will replace the number/name in the second line, and the digits are left-truncated in case
the entered number exceeds 16 digits.
Display presentation after call is terminated
When the call is terminated, the current screen is maintained for 2 seconds before the phone returns to idle
presentation. This current display is interrupted in the event of a key press or an incoming call.
Making Internal Calls
If more than one handset is registered on the base station, internal calls can be made free of charge.
1. Press the INT key.
2. Press the number of the required handset (1..4) . Carry out the conversation.
3. Press the OFF key to end the call.
Note: 1. When two handsets are in intercom mode and there is a external call (a beep tone can be heard on
the handsets.), third handset is allowed to answer.(only after ending the internal call , external call can be

12
answered)
2. When a handset is in call mode, the other handsets are allowed to intercom each other.
Making External Calls
Making Calls – Pre-Dialling
You can enter the phone number before pressing Talk/Spk to get a dial tone:
1. Enter the number. It will be displayed as enlarged font. In case the number exceeds 16 digits, it will split the
numbers into two lines with normal font. You may enter a 3-second pause in the sequence by holding “0”. It
is indicated by the character "P".
1234567890123P96
322300
2. Check if the number is correct. You can backspace by pressing CLEAR. The entire number is cleared by
holding down CLEAR.
3. Press Talk/Spk to dial the displayed number.
7890123P96322300
00:00:01
4. During the call, you can press Talk/Spk to toggle Speakerphone On/Off.
5. The max pre-dialing number is 24 digits.
Making Calls – Post-Dialing
1. Press Talk/Spk, and listen for dial tone.
2. Enter the phone number and it will dial out:
9876543210
00:00:01
The display shows the digits of the number as they are entered. The first digit is entered in the left-hand side of the
second line.
3. During the call, you can press Talk/Spk to toggle Speakerphone On/Off.
Ending your outgoing call
Your outgoing call is terminated by either pressing:
●OFF;
●or by placing the Handset in the charger.
After terminating your call, the Call Timer stops running. The Handset returns to the idle screen after 2 seconds. If
the Handset is put in the cradle, it returns to the idle screen immediately.
NOTE:
If the Handset connection is lost, (e.g. the Handset is out of range of the Base for at least 5 seconds), the Base Unit
automatically goes on-hook (terminates the call), and the Handset will display ‘Searching’.
Teleconference and Intercom Call Transferring
After having received an external call, it is possible to include a second handset in the conversation (three-way
conference)
1. Press the INT and enter the number of the corresponding handset (e.g.2) which should be included in the call.
2. The external caller is kept on hold. As soon as handset 2 takes the call, press Talk/Spk key to transfer the call
to handset 2.
Note: the handset which initiates the intercom can switch to talk between the line and the intercom handset by
pressing PROG/OK key twice to select the ‘Switching’ . .(when the intercom is processing,the far end user
will hear beep tone)
Or
3. In order to join Teleconference, simply press the Talk/Spk LDS or PPU button of the handset (except the
handset talking with the external line), teleconference will be activated automatically. (A beep tone will be
heard and “Conference “ will be displayed on the LCD.)
4. By pressing the OFF key, any of the handsets can be disconnected from the teleconference and the other

13
handset continues with the external call.
Call Waiting / Call Waiting ID
Call Waiting
When you receive a Call Waiting alert tone in the earpiece (or Handset Speakerphone), the ‘waiting’ call can be
answered by pressing the FLASH key. Pressing FLASH clears the second line in the display. If the ‘waiting’ call is
not answered, the display will return to normal ongoing call presentation after 15 seconds.
Call Waiting ID
When the Handset is in use, and you receive Caller ID information, the Redial and call log menu will be available
by pressing “PROG/OK” button.
Use the ▲and ▼scroll keys to highlight the desired action.
Confirm the action by pressing PROG//OK.
The Handset then returns to the normal call display.
Redial
The last 10 called numbers are stored in redial memory.
With the Handset idle (on hook), press RDL and Use the ▲and ▼scroll keys to find the desired phone number.
“Empty” will be displayed, and then the unit will return to standby mode.
Muting the Handset Microphone
It is possible to mute the microphone during a conversation by pressing the Clear/MUTE key. With the
microphone muted, you can hear the other party, but they can’t hear you. Return to the two-way conversation by
pressing Clear/MUTE again.
The Mute function is automatically cancelled when you hang up (go on hook)
Page
The page call function is used as an aid to locate the Handset.
Press PAGE on the Base Unit to page the Handset.
Hands-Free Mode
The hands-free operation can be switched on and off while in conversation. Using the Handset Speakerphone, you
can place the Handset on a table talk hands-free. It’s a portable speakerphone!
With the Handset either idle or active, enter hands-free operation by pressing Talk/Spk. Pressing Talk/Spk again
will disable the hands-free operation.
While in conversation, the hands-free function can be enabled or disabled pressing Talk/Spk.
The hands-free mode is automatically deactivated when you terminate your call.
NOTE: You can also use the speakerphone while the Handset is in the charger.
Pay-Per-Use (PPU) Keys
There are 3 Pay-Per-Use keys, located on the bottom row of the Handset. There are fees associated with use of
these keys. Contact your local service provider for details.
The 3 PPU keys are:
a) Last Call Return---- *69
b) Repeat Dial---- *66
c) Information------ 411

14
To use any of these PPU features:
1) Press the desired PPU access key.
2) The phone automatically goes off-hook and the number is dialed.
-OR-
1) Press Talk/Spk.
2) Press the desired PPU access key
Long Distance Service (LDS) Key
LDS access from the Handset
To dial the LDS access number
1. Press the LDS access number.
2. The phone automatically goes off-hook and you are connected to the Long Distance platform.
Note: there is no response by pressing the LDS button when the phone is in off-hook state.
Handset Menu and Programming
1. Press PROG//OK key to enter the menu.
2. Use the ▲/ ▼keys to scroll through the menu items. By pressing ▼twice at the last menu item, you will
scroll to the first menu item; and by pressing ▲twice at the first menu item, you will scroll to the last menu
item.
3. Press Clear to step back one level in the menu
4. Press OFF to enter the idle stage
5. Press PROG//OK to choose the menu item shown in the first line of the display which has an Arrow pointer.
6. Confirm setting/level by pressing the PROG//OK key. The Handset automatically returns to the previous
menu level.
In case the Handset is in the menu mode when a call arrives, the phone automatically aborts the menu and receives
the incoming call. The menu is not accessible during an ongoing call.
If there are no key presses for 30 seconds while in the menu mode, the Handset automatically returns to an idle
state.
The menu is accessed by pressing the PROG//OK key. An overview of the menu structure is shown in Figure 1.1.
Setup HS
Ring melody
Ring Volume
Low battery
No coverage
Tones
Key tone
Auto talk
Handset name
English
Language Francais
Espanol
Contrast
Reset
Figure 1.1 Menu structure.
Call Log (Caller ID)
All incoming calls with a valid Caller ID provided phone number are stored in the call log. Name and time/date
information is also stored in the call log if your service provider sends it.
The number of unanswered calls (NEW), if any, is indicated:

15
Missed Calls
The new call indication is removed when the call log has been reviewed.
The call log is entered via the menu, as described below or by pressing ▼in idle mode, whereby the Handset
jumps directly to the call log.
The call log is reviewed as follows:
1. Press CID to enter the menu.
2. The caller’s name is shown in the second line of the display, and the number in the third line. If time and date
information is contained in the CID and there are three lines in the display, it is shown in the top line.
12/10 7:48PM NEW
SOMEBODY
987-654-3210
The name contained in the received CID is replaced by the name in the Phone Book, if the Phone Book contains a
matching number; i.e. the Phone Book name takes precedence.
3. Scroll through the call log entries using the ▼and ▲keys.
11/27 11:02AM
ANOTHERPERSON
012-345-6789
The following actions are possible from the call log:
●Dialing the caller displayed by pressing the Talk/Spk key.
Press PROG //OK and using the ▼and ▲keys, you can select the following actions
●Select the number and edit it as pre-dialing. Pressing the Talk/Spk key when edit complete and ready to dial.
●Save number: Save the CID information displayed into the Phone Book by pressing the PROG//OK key. Before
the name and number is transferred to the Phone Book, you can edit the number and name.
Note: CID information without a valid phone number cannot be transferred to Phone Book memory.
●Delete: Delete the caller displayed by pressing the PROG//OK key. After press the PROG//OK key, you will be
asked ‘Confirm?’; you can either accept deletion by pressing PROG//OK (=yes) or cancel it by pressing Clear
(=no).
●Delete all?: You can delete all entries in the call log by pressing the PROG key. You will then be asked
‘Confirm?’ Accept the deletion by pressing PROG//OK (= yes) or cancel it by pressing CANCEL (= no).
By selecting PROG//OK, the phone displays “CALL LOG EMPTY” for 5 seconds and returns to main menu after
deleting. By selecting CANCEL, the phone returns to the Call Log.
●Exit the Call Log review by pressing the OFF key.
Two info messages are displayed together with the Caller ID data:
●‘NEW’ icon on the right hand side of the top line indicates that the call has not previously been reviewed. The
‘NEW’ icon is cleared when scrolling to the next entry or when leaving the Call Log. The maximum length of the
name shown in the second line is 15 characters.
●A number in the right hand side of the third line shows the call log number - 1 is the first (latest) received call.
The maximum length of the number shown in the third line is 15 characters. If the number is longer, it is left
truncated.
The incoming calls are sorted by the order of arrival; the latest is shown first. A number is only contained once in
the list. A new call from a caller that is already contained in the log removes the old entry and inserts the new call.
All calls with a blocked number are stored as individual calls. Your Handset stores 30 records.
If the call log is full, the oldest entry is deleted to make room for the new call. If the call log is empty when the user
tries to enter to Call Log review, a message ‘Empty’ is displayed and the phone returns to the main menu after 2
sec.
Empty

16
It is possible to change the number format in the call log before storing the name/number in the Phone book or
dialing the caller. Pressing the # key toggles the number format. The available number formats depend on the
received number. The table below shows the possible selections and the order as a function of the incoming
number format. The number format is changed by truncating or by adding the digits as described in the table 1.1.
Incoming format Dialable/storable formats and selection sequence
11 1xxx-yyy-yyyy xxx-yyy-yyyy 1-yyy-yyyy yyy-yyyy
10 xxx-yyy-yyyy 1-yyy-yyyy yyy-yyyy 1xxx-yyy-yyyy
81-yyy-yyyy yyy-yyyy
7
yyy-yyyy 1-yyy-yyyy
Table 1.1 Number format selection.
yyy-yyyy: basic number
xxx: area code
Phone Book
●You can store up to 50 Phone book entries, which includes names and phone numbers.
●The Phone book entries are sorted and presented in alphabetical order.
●Press PB to initiate Phone book operation.
Characters
Names are entered using the numerical keys. Characters are generated by multiple key presses (see the table
below). The cursor moves to the next position if another numerical key is pressed or by pressing the ▼key. The
last entered character is deleted by pressing CLEAR or ▼. The entire name is cleared with a long CLEAR key
press. At any time, you can Press *to switch between Upper and Lower case.
Key Alphanumeric
(For Phone book, including upper & lower case) Number
1st 2nd 3rd 4th 5th 6th 7th 8th 9th 10th
1 space
space
1
11
2 A
a
B
b
C
c
2
2 2
3 D
d
E
e
F
f
3
3 3
4 G
g
H
h
I
i
4
4 4
5 J
j
K
k
L
l
5
5 5
6 M
m
N
n
O
o
6
6 6
7 P
p
Q
q
R
r
S
s
7
7 7
8 T
t
U
u
V
v
8
8 8
9 W
w
X
x
Y
y
Z
Z
9
9 9
0 .
.
,
,
?
?
!
!
0
0
+
+
-
-
:
:
'
'
"
" 0, P (Pause)

17
* Toggle upper/lower case *
# #
#
*
*
@
@
\
\
/
/
_
_
(
(
)
)
=
= § #
Table 1.2 Character guide.
Phone Book Operation
The Phone Book is entered via the menu, as described below.
The Phone book is accessed by simply press PB:
From the Phone Book menu it is possible to:
● Search for an entry and dial the number. If no records match the search criteria, the closest alphabetic match is
displayed.
● Add New entry
●Select
●Edit an entry.
●Delete an entry.
When attempting to search, edit or delete entries in an empty Phone Book, the Handset will display:
Empty
How to use your Phone Book:
Searching for and dialing from the Phone Book:
1) Press PB
2) Scroll through the Phone book entries using ▼or ▲; OR enter the first character of the desired name and
continue searching using the ▼or ▲keys.
NOTE: You can toggle Contact name and number display by pressing “*” key.
R
ROBERT
9898327822
1) Press TALK/SPK to dial the number.
TALK 0:00:01
9898327822
Editing a Phone Book entry:
1) Press PB
2) Scroll through the Phone book entries using ▼or ▲; OR enter the first character of the desired name and
continue searching using the ▼or ▲keys.
R
ROBERT
9898327822
3) Press PROG/OK
4) Use ▼or ▲to select Edit to enter number edit mode and enter correct number. Press Clear/MUTE to erase a
digit. A long CLEAR key press erases the whole number.
9898327777
5) Press PROG/OK to confirm number and enter name edit mode.
ROBT
6) Press CLEAR or ▼to erase right most character. A long CLEAR key press erases the whole name.
7) Press PROG/OK to confirm change. The phone returns to Phone Book recall mode.
Deleting a Phone Book entry:
1) Press PB
2) Scroll through the Phone book entries using ▼or ▲; OR enter the first character of the desired name and

18
continue searching using the▼or ▲keys.
R
ROBERT
….
3) Press PROG/OK
4) Use ▼or ▲to select Delete? to delete the Number.
5) Press PROG to accept; the Phone Book displays the next entry. –OR- Press Clear to abort.
Confirm?
Entering new names and numbers into the Phone Book:
1) Press PB
2) Press PROG/OK twice to select Add new to add new number
Enter number
3) Enter the number (up to 24 digits).
4) Press PROG
Enter name
5) Enter the desired name (up to 15 characters). A name has to be entered, otherwise an audible alert is given and
the phone returns to the ‘Enter name’ display.
Enter name
6) Press PROG/OK. Your new entry has been stored. “Saved” will display, and the screen returns to:
SOMEBODY
Press OFF to return to the idle screen.
If the Phone Book is full when the user tries to store a new number in it, a message ‘PHONEBOOK FULL’ is
displayed and an error tone is emitted.
PHONEBOOK FULL
Volume
During your conversation, the volume can be adjusted with the ▲/▼keys. The level will be represented by the
number of bars displayed on the screen. The display returns to normal in-call presentation after 4 seconds.
Ring Volume
The ring volume is adjusted by the following key sequence:
1) Press PROG /OK twice to select Setup HS
> Ring melody
Ring volume
2) Press ▼once and Press PROG/OK to enter the ring volume sub-menu.
2) Using ▼/▲keys. The current ring tone is played once at the selected new volume.
4) Press PROG/OK to confirm the setting. The display returns to:
>RING VOLUME
Tones
Ringing is switched off by pressing * key and there is an alert tone to indicate that the Ringer is OFF / ON.
Ring Pattern
The ring pattern of an incoming call is changed by the following key sequence:
1) Press PROG/OK twice to select Setup HS.

19
> Ring melody
Ring volume
3) Press PROG/OK once more.
3) Using ▼/▲keys. The selected ring pattern is played for you.
>Melody 1
Melody 2
4) Press PROG/OK to confirm the setting. The display will return to:
Saved
Auto talk
With Auto talk ON, you can answer a call by simply removing the Handset from the Base Unit.
1) Press PROG/OK twice to select Setup HS.
> Ring melody
Ring volume
2) Press the ▼key three times.
>AUTO TALK
Handset name
3) Press PROG/OK to enter the auto talk sub-menu.
>On
OFF
4) Using ▲or ▼to select your option (On / Off)
5) Press PROG/OK to confirm the setting. The display will return to:
>AUTO TALK
Handset name
Low Battery alert Tone
It is possible to disable the low battery alert tone by the following sequence:
1) Press PROG/OK twice to select Setup HS.
> Ring melody
Ring volume
2) Press the ▼key two times.
>Tones
Auto talk
3) Press PROG/OK to enter the Tones sub-menu.
>Low battery
No coverage
4) Press PROG/OK to enter Low battery tone sub-menu
5) Using ▲or ▼to select your option (On / Off)
6) Press PROG/OK to confirm the setting.
Note: Low battery alert tone is On by default
No coverage alert Tone
It is possible to switch off the Out-of-range / no coverage alert tone by the following sequence:
1) Press PROG/OK twice to select Setup HS.
> Ring melody
Ring volume
2) Press the ▼key two times.
>Tones
Auto talk
3) Press PROG/OK to enter the Tones sub-menu.
>Low battery
No coverage
4) Press the ▼key once.
>No coverage
Key tone

20
5) Press PROG/OK to enter No coverage tone sub-menu
6) Using ▲or ▼to select your option (On / Off)
7) Press PROG/OK to confirm the setting.
Note: No coverage alert tone is Off by default
Key Tone
When the key tone option is enabled, any key press generates a click sound, except when the keypad is locked. To
access the Key Tone option:
1) Press PROG/OK twice to select Setup HS.
> Ring melody
Ring volume
2) Press the ▼key two times.
>Tones
Auto talk
3) Press PROG/OK to enter the Tones sub-menu.
>Low battery
No coverage
4) Press the ▼key two times.
>Key tone
------------------
5) Press PROG/OK to enter Key tone sub-menu
6) Using ▲or ▼to select your option (On / Off)
7) Press PROG//OK to confirm the setting. The display will return to:
>Key tone
------------------
Note: 1) Key Click is On by default; and 2) Key Tone is disabled when the key lock is ON.
Key Lock
It is possible to lock / unlock the Handset keypad by holding #.
Key lock is disabled in the event of an incoming call, but returns to key lock when the call is terminated.
Key lock is disabled by default.
Power on/off
It is possible to switch off the handset by pressing and holding the OFF key for 3 seconds .When it is switched off,
simply press Talk/Spk key to switch on the handset.
Handset Naming
It is possible to name your Handset. The name is shown in the 2nd line during idle mode, and it replaces the
"Handset" indication. The maximum name length is 13 characters.
The Handset is named by following this programming sequence:
1) Press PROG/OK twice to select Setup HS.
> Ring melody
Ring volume
2) Press the ▼key four times.
>HANDSET NAME
LANGUAGE
3) Press PROG/OK to enter the Handset name sub-menu and the current Handset name will be displayed:
Handset
4) Enter Handset name (characters are entered in the same way as for the Phone Book).
DADDY PHONE
5) Press PROG/OK to confirm the setting.
This manual suits for next models
4
Table of contents