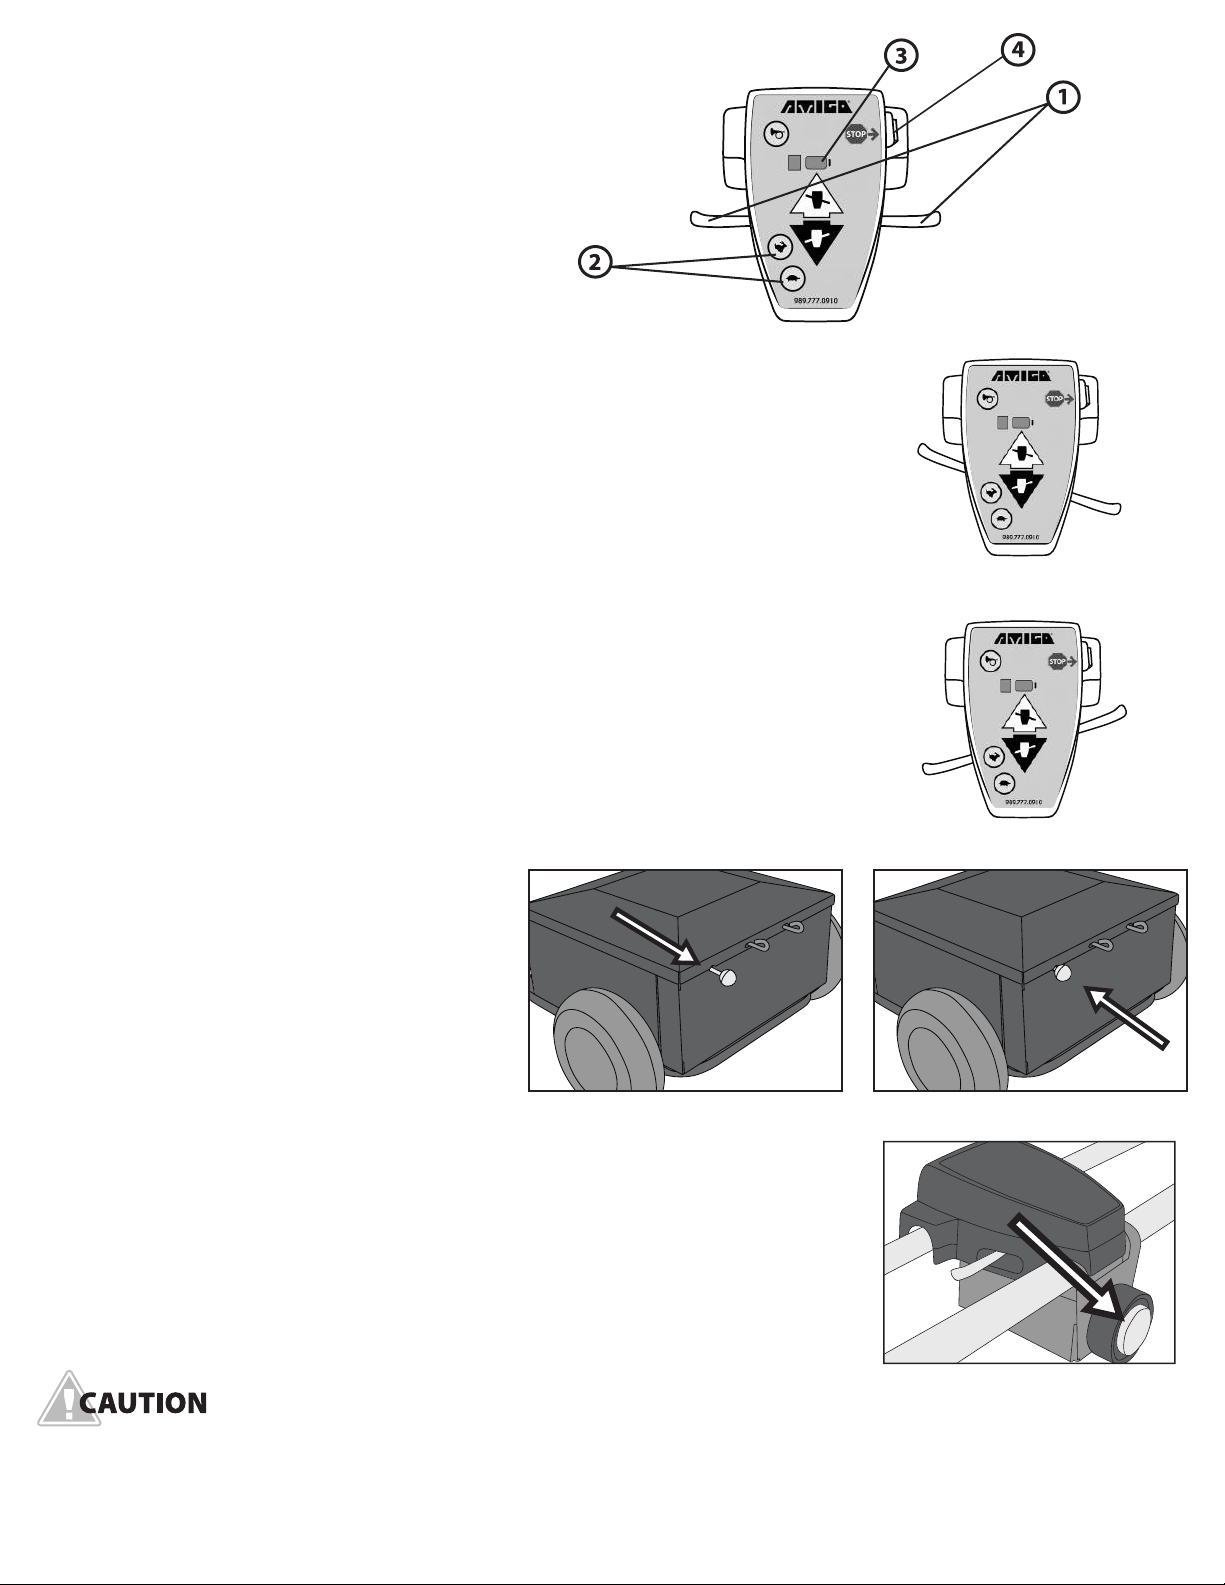
manuals.online logo
Brands
  1. Home
  2. •
  3. Brands
  4. •
  5. Amigo
  6. •
  7. Outdoor Cart
  8. •
  9. Amigo Dex User manual

Amigo Dex User manual

Serial Number:
Date of Purchase:
Dex Pro+™
Max Pro™
Dex™
Max™
AMIGO OPERATIONAL MANUAL
Dex™, Dex Pro™, Dex Pro+™ Max™ and Max Pro™
Dex Pro™
2www.amigocarts.com
TABLE OF CONTENTS
Safety first 3
Operating the cart 4
Charging the cart 6-7
Maintenance schedule 8-9
Diagnostic codes 10
Warranty 11
Dear Facility Manager:
Thank you for purchasing an Amigo material handling cart. Please read this manual carefully before anyone
operates the cart. It is important to review operational and safety tips with your sta so they are prepared to
safely operate Amigo carts.
When Amigo Mobility founder Al Thieme invented the first motorized cart in 1968, his goal was to provide an
affordable, durable and user-friendly mobility solution. We have more than a half century’s experience in
providing top quality products. We want customers to be thrilled – not simply satisfied – with the products
and services we offer.
If you have questions about your Amigo material handling cart or would like to learn about ordering parts,
please contact the Amigo customer service team.
Hours of operation are
8:00 AM through 6:00 PM EST,
Monday - Friday.
AMIGO MOBILITY INTERNATIONAL
amigocarts.com
myamigo.com
Operating the Dex Pro+™ 5
1-800-MY-AMIGO
(989) 777-0910 or e-mail
[email protected] or visit
myamigo.com and click on the chat
tab in bottom right corner of page.
Thank you,
AMIGO MOBILITY INTERNATIONAL
SAFETY FIRST
For your convenience and understanding, signal words are dened below:
WARNING IS USED TO INDICATE THE PRESENCE OF A HAZARD, WHICH CAN CAUSE SEVERE PERSONAL
INJURY, DEATH OR SUBSTANTIAL PROPERTY DAMAGE IF THE WARNING IS IGNORED.
CAUTION IS USED TO INDICATE THE PRESENCE OF A HAZARD, WHICH WILL OR CAN CAUSE MINOR
PERSONAL INJURY OR PROPERTY DAMAGE IF THE CAUTION IS IGNORED.
Precautions
•Use caution around other people, fixed obstacles, and other objects.
•The individual’s feet must remain on the Dex™, Dex Pro™ and Dex Pro+™ platforms while carts are operational.
•Use is restricted to one occupant who must remain standing on the platform while the Dex™, Dex Pro™ and
Dex Pro+™are operational.
•DO NOT stand or sit on trailer.
•Do not operate the unit under low-light conditions.
•Do not drive over or off obstacles more than 1 inch (2.5 cm) high. This could be unsafe and damage the cart.
•Drive slowly while turning and on inclines.
•Drive straight up and down inclines and do not park on inclines.
•Do not back down inclines or onto any changes in the surface or grade.
•Do not make sharp, abrupt turns at high speeds or while going down an incline.
•Avoid inclines or ramps having a rise of more than 1 inch (2.5 cm) per one foot (30.5 cm).
•When driving over bumps, dips or inclines, approach them at a 90 degree angle.
•Travel over grass, gravel or soft dirt is NOT recommended.
•Always turn the Dex™, Dex Pro™ and Dex Pro+™ “OFF” when rider is getting on or off cart.
•Make sure the trailer is connected and secured to the platform before operating Dex Pro+.
•Do not expose the cart to spray-on cleaning solutions and excessive moisture, such as spraying with a hose or
leaving uncovered in heavy rain.
•Use caution when turning Dex Pro™ and Dex Pro+™ as trailer swings wide.
•Observe the following weight capacities for the Dex™, Dex Pro™, Dex Pro+™, Max™ and Max Pro™.
TURNING THE MATERIAL HANDLING CART “OFF”WHILE IN MOTION WILL BRING THE UNIT TO AN ABRUPT
STOP. DO NOT DRIVE INTO ANY FIXED OBSTACLES OR OBJECTS AS THIS MAY RESULT IN PERSONAL INJURY OR
STRUCTURAL DAMAGE.
(989) 777-0910 3
PRODUCT RIDER LOAD TOWING CAPACITY TRAILER LOAD
Dex™ 350 lbs/ 158kg 750 lbs/ 340kg
Dex Pro™ 350 lbs/ 158kg 750 lbs/ 340kg
Max™ 1,100 lbs/ 498kg
Max Pro™ 1,100 lbs/ 498kg
Dex Pro+™
350 lbs/ 158kg 750 lbs/ 340kg
OPERATING THE CART
Handle controls
1. Hand control lever.
2. HI/LO speed push buttons.
3. Battery indicator light.
4. ON/OFF key/Emergency stop.
Driving
To move forward, pull the right side of the hand control lever toward you (Figure
2). You may also move forward by pushing the left side of the control lever away
from you. By releasing the control lever, you will come to a gradual stop. To operate
in reverse, pull the left side of the hand control lever toward you or push the right
side control lever away from you (Figure 3).
HI/LO speed control handle
Handle controls include: HI/LO speed push buttons, ON/OFF key and battery
indicator light. The key located on the right side of the handle control cover will
turn the power of the cart on or off. Turning it “OFF” will prevent drainage
of batteries. Pressing the rabbit button raises the cart’s top speed (max of 6mph/
9.7kph on select models). Pressing the turtle button reduces the cart’s top speed.
Manually moving the material handling cart
To engage the freewheeling mode, pull the
brake lever out (Figure 4). To terminate the
freewheeling mode, push the brake lever in
(Figure 5).
Stopping
To stop, release the hand control lever and
the cart will come to a gradual stop.
Emergency stop
Max™ and Max Pro™ are equipped with an emergency stop belly switch. When
activated, the switch will stop the unit from operating. The emergency stop belly
switch is located underneath the handle controls (Figure 6).
A QUICK STOP OF THE MATERIAL HANDLING CART CAN BE ACCOMPLISHED BY REVERSING THE
HANDLE CONTROL, OR BY TURNING THE CART OFF. THIS PROCEDURE IS NOT RECOMMENDED
EXCEPT IN EMERGENCY SITUATIONS.
4www.amigocarts.com
FIGURE 3 (reverse)
FIGURE 4 FIGURE 5
FIGURE 6
FIGURE 2 (forward)
FIGURE 1
(989) 777-0910 5
OPERATING THE DEX PRO+™
Attaching and detaching the trailer to Dex Pro+™ :
First, bring the Dex Pro+™ to a complete stop on a flat surface.
After the unit has come to a complete stop, the trailer can be attached.
To attach the trailer:
Open the Dex Pro+ trailer latches by grasping both
sides of the release handle and pulling up firmly.
When the latches are in the open position, the trailer can
be guided into position. The bar on the front of the trailer
fits into the latches. When the trailer bar is correctly pushed
into place within the latches, the latches will lock around the bar,
securing the trailer. The unit and trailer are now ready for travel.
To detach the trailer:
Bring the unit to a complete stop on a flat surface.
After the unit has come to a complete stop, the
trailer can be detached.
To detach the trailer, open the Dex Pro+™ trailer
latches by grasping both sides of the release
handle and pulling up firmly.
The trailer can now be pulled away and parked
in a desired location.
Shown attached Shown detached
CHARGING THE CART
24V Charger operating instructions
READ INSTRUCTIONS COMPLETELY BEFORE USING.
To charge, park the material handling cart near a grounded AC electrical outlet and turn the power “OFF” before
charging. First, find the charging cord located near the handle on all carts. Plug the end into the AC electrical
outlet. Ensure the end of the cord is secure in the outlet. Observe the LED light on the handle control panel.
Connecting the charge cord to an AC source will initiate the charge cycle. The battery display gauge will flash for
approximately 30 seconds, indicating the start of the charge cycle. The LED battery display bar will remain solid
and move from left to right as the batteries charge. The LED will flash when the charge is complete. When
connected to an outlet with power, the AC cord end lights up.
•It is always best to allow the batteries to charge fully.
•Charge nine (9) hours or overnight for the very rst charge.
•After the rst charge, attempt to achieve a ve (5) hour minimum uninterrupted charge cycle. However, Amigo
recommends an eight (8) hour uninterrupted charge cycle.
•It is best to keep the batteries fully charged. Extended charging will not overcharge the batteries and is
recommended when the cart is not in use.
24V charger safety features
Driving functions are disabled while in the charging mode. This safety feature eliminates the possibility of driving
away while the cord is attached.
Note: Make sure the charge cord is unplugged from the wall outlet before disconnecting from or moving the cart.
Assuring long battery life & warranty protection
Establish a regular procedure for charging a fleet of Amigo material handling carts to assure all are fully charged.
A multiple outlet strip with a “POWER ON”indicator light could be used. Do not exceed outlet rating. Chargers draw
a maximum of 1.5 amps each.
Be sure that all charging outlets are protected by a 15-amp ground-fault circuit interrupter (GFCI).
If the cart slows down and eventually loses all power within a day’s use - and all other systems appear to be
functioning normally - the batteries may need replacing. If the batteries are faulty, you may call the factory direct
to order a replacement and verify warranty status. If they are not faulty, another problem exists. Refer to
diagnostic codes on page 10, or contact Amigo Service at 989-777-9010.
6www.amigocarts.com
Charging precautions
•Charge batteries fully in a dry location.
•Clean any corrosion on the plug.
•Examine cord periodically for cracking or damage.
•If you remove the batteries from the cart, place them on a surface resistant to damage by acid fumes.
“Breathing” occurs whenever a battery is charged and discharged through a cycle. This breathing of batteries
emits acid fumes and may mark surfaces they rest on for long periods of time.
•Each time you charge the cart, follow the charging instructions exactly. Working in the vicinity of a sealed lead
acid battery can be dangerous. Batteries can generate explosive gases during operation.
•Never smoke or allow an open flame in the vicinity of the batteries.
•Use only a charger designed for sealed lead acid batteries. The charger is not intended to supply power to an
extra-low voltage electrical system or to charge dry cell batteries.
•Never charge a frozen battery.
•Do not operate the charger in a closed-in area or restrict ventilation in any way.
•A spark near the battery may cause an explosion.
•Someone should be within range of your voice or close enough to come to your aid, if needed.
•Be extra cautious not to drop a metal tool onto the batteries.
•Remove metal jewelry before servicing batteries.
To reduce the risk of spark: Prevent external damage to AC and DC cords.
TO AVOID DAMAGE TO BATTERIES DURING STORAGE, DO NOT PLACE THEM END TO END WITH THE
POSITIVE (+) AND NEGATIVE (-) TERMINALS NEXT TO EACH OTHER.
FAILURE TO FOLLOW THESE SAFETY INSTRUCTIONS MAY RESULT IN PERSONAL INJURY
OR PROPERTY DAMAGE.
FIGURE 7
(989) 777-0910 7
MAINTENANCE SCHEDULE
Only minimum maintenance is required to increase the cart’s serviceability and dependability.
Daily
•Maintain battery charge. When not in use, turn the unit “OFF” to prevent battery drainage.
•Charge overnight, every night.
•We recommend keeping the cart plugged into a wall outlet when not in use. Extended charging will
not overcharge the batteries.
Monthly
•Clean plastic and metal with a mild surface cleaner.
•Check and tighten any exposed fasteners.
•Check caster wheel bearings for roughness during rotation. Replace if necessary.
•Check charge cord and AC charging receptacle.
Three months
•Check all bolts and connections for tightness and wear.
Six months
•Check all electrical connections for clean contact.
•Charging bracket should be inspected for tightness.
•Check tires for wear.
Yearly
•Have your authorized service center check the cart completely.
•Inspect bolts for wear.
DO NOT EXPOSE THE CART TO SPRAY-ON CLEANING SOLUTIONS AND EXCESSIVE MOISTURE (SPRAYING IT
WITH A HOSE OR LEAVING IT UNCOVERED IN HEAVY RAIN). EXCESSIVE MOISTURE AROUND THE MICRO
PROCESSING CONTROLLER (MPC) OR ELECTRICAL CONNECTIONS MAY CAUSE CONTAMINATION OF
ELECTRICAL CIRCUITRY, DAMAGE, MALFUNCTION OR PERSONAL INJURY.
Fasteners replacement
Use only Grade 8 (U.S.) or 12.9 DIN (metric) in all applications. For service and
replacement parts, we recommend Amigo authorized parts.
FIGURE 8
8www.amigocarts.com
Grade: 12.9 Grade: 8
Trans-axle drive systems
The trans-axle is a precision assembly lubricated for long service. Do not attempt to open or service the
assembly. These actions will void your warranty.
Micro-processing controller (MPC)
Do not attempt to service the MPC or related electronic components as you may void your warranty.
Circuit breaker replacement instructions
An automatic resetting circuit breaker (Figure 9) protects the wiring and batteries
in the event of a short circuit. If the cart stops, check for overloads or short circuits
before continuing to operate. The circuit breaker is located under the rear cover
and attached to the positive terminal on the batteries.
DO NOT CONTINUE TO OPERATE THE CART UNTIL THE CIRCUIT BREAKER IS REPAIRED.
For operation or service questions, call the Amigo service hotline at (989) 777-0910, 8 a.m. to 6 p.m. Monday
through Friday, email [email protected] or visit myamigo.com and click on the chat tab in the bottom right
corner of the page. You can also contact your local service representative. Please reference your serial number
when calling.
Serial number location
There are two serial number locations on each Amigo material handling cart. The Dex™, Dex Pro™ and Dex Pro+™
have one serial number located on the steering column (Figure 10), and another on the bottom of the power base
cover (Figure 11). The Max™ and Max Pro™ have one serial number located on the bottom of the power base cover
(Figure 11), and another on the left side of the handle enclosure, below the throttle (Figure 12). The Dex Pro+
trailer has one serial number located on the rear of the trailer deck (Figure 13).
FIGURE 9
FIGURE 10 (Dex™/Dex Pro™/Dex Pro+™) FIGURE 12 (Max™/Max Pro™)
FIGURE 11 (Dex™/Dex
Pro™/Dex Pro+™ and
Max™/Max Pro™)
(989) 777-0910 9
FIGURE 13(Dex Pro+™ Trailer)
DIAGNOSTIC CODES
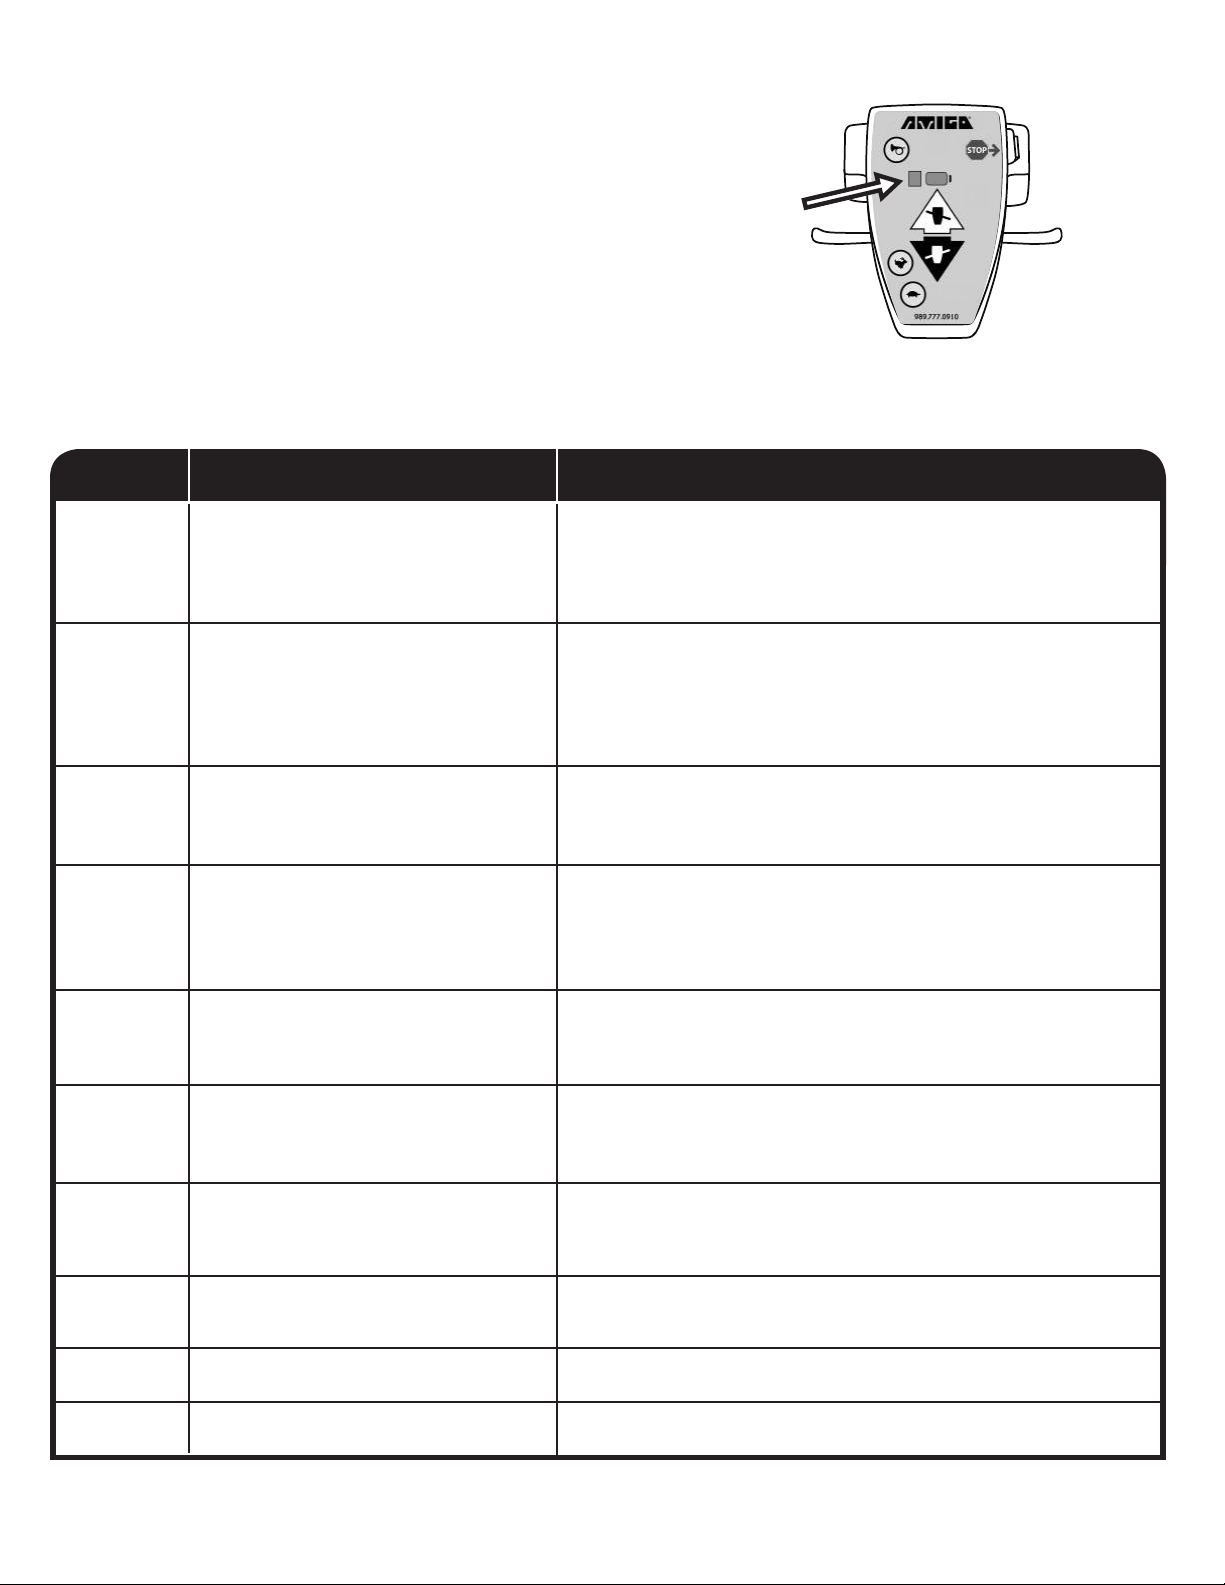
The Amigo controller has a built-in diagnostic feature that will cause
the diagnostic LED lights (Figure 14) to flash a numeric code,
indicating service issues to aid in diagnosis. When indicating a service
problem, the diagnostic lights will ash, hesitate for a moment, and
then ash again. Follow the code listings below to determine the
problem. Solutions should be attempted in the order they are written.
If the code indicates a service problem, contact your local service
representative or call the Amigo service department at
(989) 777-0910 for instructions to verify and correct the problem. FIGURE 14
10 www.amigocarts.com
(1) Unplug handle cable and plug back in.
(2) Check all wiring connections and output.
(3) Disconnect brake and cycle key, if code changes to 2, replace brake.
(4) Replace controller.
(1) Ensure EM brake lever is in normal/drive position
.
(2) Unplug handle cable and plug back in.
(3) Check all wiring connections and output.
(4) Replace brake.
(5) Replace controller.
(1) Check motor wiring connections.
(2) Disconnect brake and cycle key, if code changes to 4, replace motor.
(3) Replace controller.
(1) Ensure EM brake lever is in normal/drive position.
(2) Check motor wiring connections.
(3) Replace motor.
(4) Replace controller.
(1) Check to ensure handle cable is in good condition.
(2) Check that throttle lever moves freely and returns to center.
(3) Replace throttle hall effect.
(1) Allow to sit idle for 15 minutes, restart and see if code disappears.
(2) Ensure EM brake and / or motor is not causing excessive amperage draw.
(3) Replace controller.
(1) Replace charger wiring.
(2) Replace battery charger.
(3) Replace controller.
(1) Check / replace batteries.
(2) Check / replace controller.
(1) Replace controller.
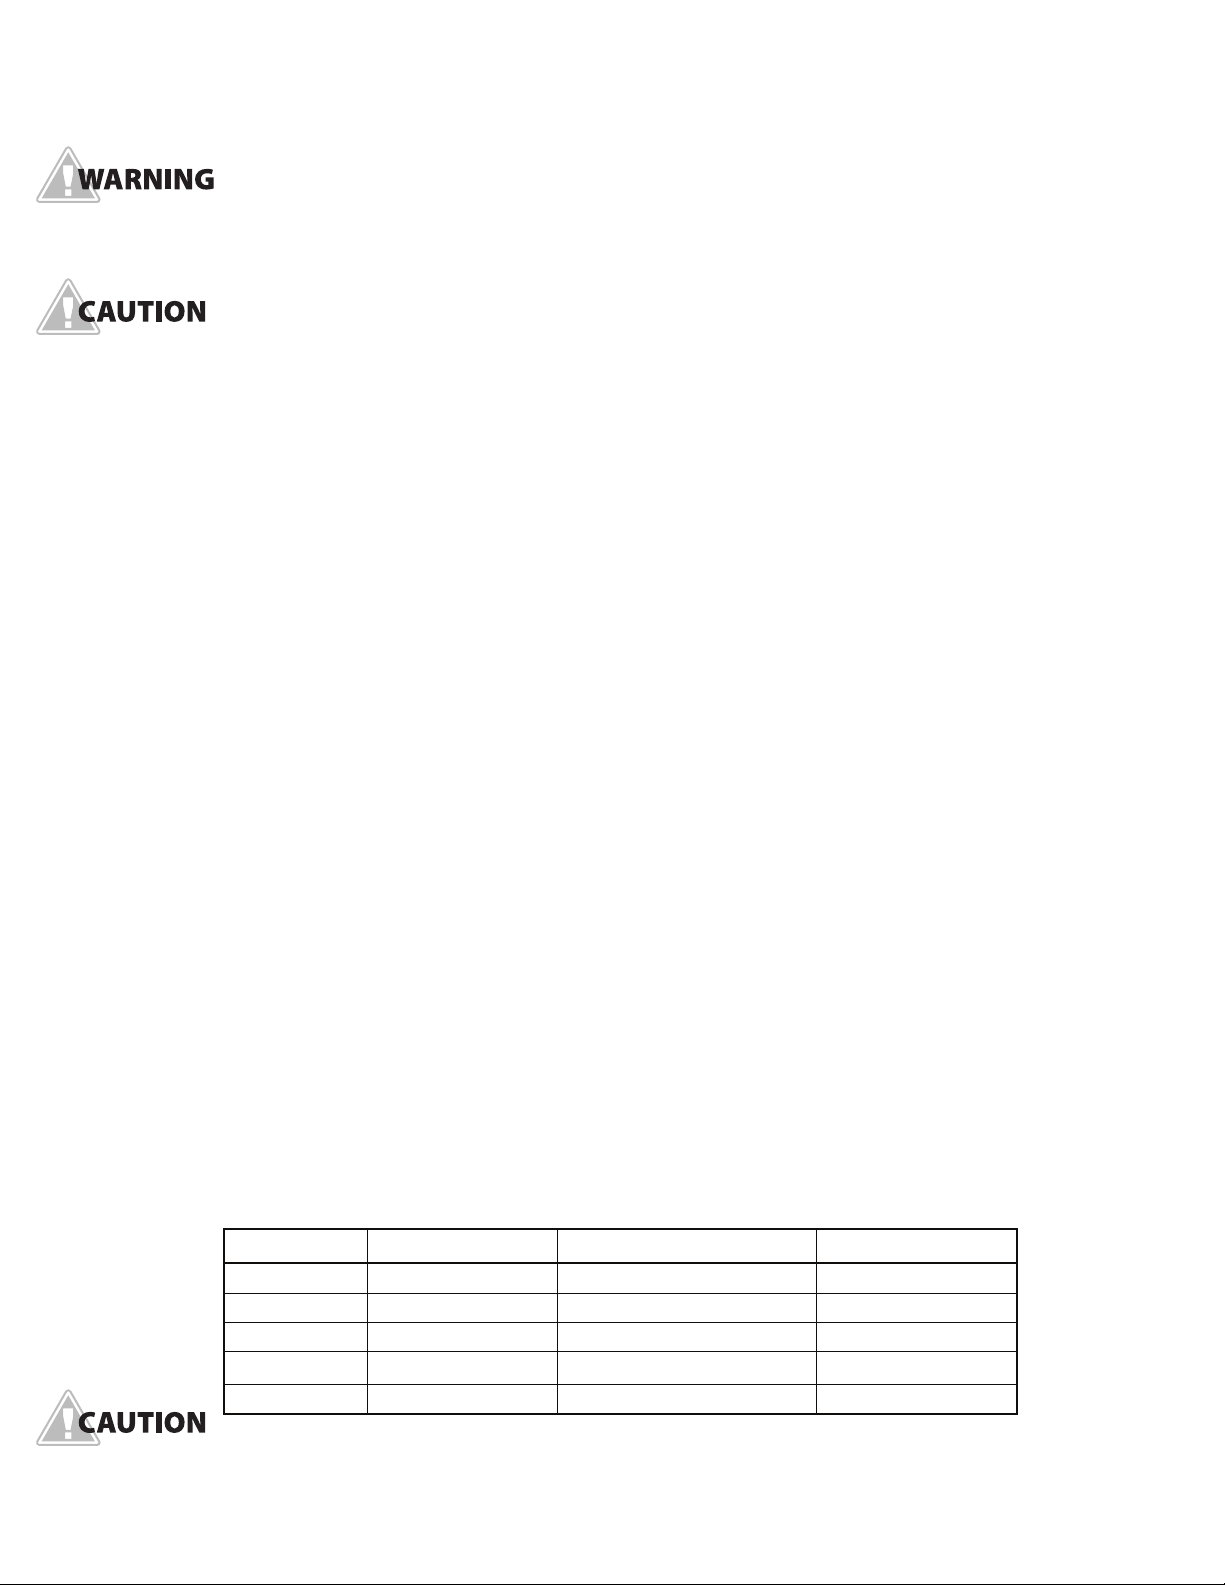
1
2
3
4
5
6
7
8
8
8
EM Brake windings or connections are shorted
LED CODEODE CAUSE SOLUTIONS
EM Brake windings or connections
are open or
EM brake release lever in
"freewheeling position"
Motor windings or connections are shorted
Motor windings or connections are open
Power Relay Fault (Controller failure)
Over temperature condition
Charger not dropping back into "float
mode" during battery charge cycle
Controller drive FETS shorted
Controller regenerative braking FETS shorted
Throttle hall effect or throttle
circuitry reading fail band fault
DIAGNOSTIC LIGHT LOCATION
WARRANTY
General warranty provisions
Amigo Mobility International, Inc. (AMI) warranties its OEM products to the original purchaser and commences on
date of shipment.
The warranties on this page DO NOT cover the failure of any part or accessory due to:
•Shipping damage.
•Abuse, misuse, accidental damage or acts of nature.
•Exceeding the specified weight capacity of the model.
•Improper installation or opening sealed components.
•Modifying the cart, or installing accessories not authorized by Amigo.
Warranty coverage
AMI will repair or replace a part that is defective in material or workmanship under normal use. AMI may use
factory re-manufactured parts rather than new parts for some warranty repairs. Warranty replacement parts
are covered for the remainder of the original AMI unit warranty.
•Structural components - platform and frame have a seven (7) year warranty.
•Main components - controller, charger, motor and transaxle have a two (2) year warranty.
•Other components have a one (1) year warranty.
•Batteries supplied by AMI are warranted for one (1) year (freight charges not included after six months).
•Damage caused by lack of charging, battery moisture, spillage or leakage is exclusive of warranty.
•Labor is covered for six (6) months on a pre-authorized basis implemented by an AMI work order.
•AMI provides an ARS tag with all warranty parts required to be returned to the factory
(continental United States only).
•If inspection determines that a returned part is inoperable due to a non-warranty nature, credit for
replacement parts ordered will not be issued.
•Parts purchased separately from the original unit or rebuilt units carry a one (1) year warranty against
defects in material and workmanship.
Customer satisfaction
Your complete satisfaction is our main goal. If you are not satisfied with any maintenance or repair work completed
by a service company, please contact us immediately at (989) 777-0910 or [email protected].
This warranty supersedes and is in lieu of all other warranties, expressed or implied, and no person, agent or dealer
is authorized to give any warranties on behalf of AMI, nor to assume for AMI any other liability concerning any of its
products unless made in writing and signed by an official of AMI.
This warranty gives you specific rights, with the possibility of other rights, which vary depending upon your locality.
(989) 777-0910 11
Improving Lives Through Mobility® since 1968
AMIGO MOBILITY INTERNATIONAL, INC.
6693 Dixie Highway, Bridgeport, MI 48722-9725
Phone(989)777-0910•Fax(800)334-7274
www.amigocarts.com
©2018AmigoMobilityInternational,Inc.•Amigo®is a registered trademark of Amigo Mobility International, Inc. 0116-12098-rev-e

This manual suits for next models

3

Popular Outdoor Cart manuals by other brands

Vivo CART-PC03 instruction manual

Vivo

Vivo CART-PC03 instruction manual

OFYR Dolly manual

OFYR

OFYR Dolly manual

Ironside 102375 manual

Ironside

Ironside 102375 manual

Copernicus Tech Tub TEC510 Assembly guide

Copernicus

Copernicus Tech Tub TEC510 Assembly guide

American TIM-390-A1 instruction manual

American

American TIM-390-A1 instruction manual

FW TITANIUM Series Assembly instructions

FW

FW TITANIUM Series Assembly instructions

VEVOR RYTC0072 user manual

VEVOR

VEVOR RYTC0072 user manual

BrightDrop Trace Grocery 1.1 user manual

BrightDrop

BrightDrop Trace Grocery 1.1 user manual

Gorilla Carts 2345GCG-NF quick start guide

Gorilla Carts

Gorilla Carts 2345GCG-NF quick start guide

Westfalia 860572 manual

Westfalia

Westfalia 860572 manual

Dolmar PT-2010 Assembly instructions

Dolmar

Dolmar PT-2010 Assembly instructions

AKRO-MILS 30812 Assembly instructions

AKRO-MILS

AKRO-MILS 30812 Assembly instructions

Ergotron ERGITD-015 Quick reference guide

Ergotron

Ergotron ERGITD-015 Quick reference guide

LE MARQUIER DVP110E27 instructions

LE MARQUIER

LE MARQUIER DVP110E27 instructions

Daifuku LEVEL CART LVC-04C5 instruction manual

Daifuku

Daifuku LEVEL CART LVC-04C5 instruction manual

Makita DCU602 instruction manual

Makita

Makita DCU602 instruction manual

Spectrum Chromebook Pro20 quick start guide

Spectrum

Spectrum Chromebook Pro20 quick start guide

Fantom PROCART 440 Assembly manual

Fantom

Fantom PROCART 440 Assembly manual

manuals.online logo
manuals.online logoBrands
  • About & Mission
  • Contact us
  • Privacy Policy
  • Terms and Conditions

Copyright 2025 Manuals.Online. All Rights Reserved.