manuals.online logo
Brands
  1. Home
  2. •
  3. Brands
  4. •
  5. Amisco
  6. •
  7. Indoor Furnishing
  8. •
  9. Amisco 12389 User manual

Amisco 12389 User manual

1
LISTE DES OUTILS NÉCESSAIRES:
-Une clé allen 3/16” (incluse).
-Une clé 7/16” et 9/16” ou une clé à molette.
LIST OF TOOLS REQUIRED:
-An allen key 3/16” (included).
-A 7/16” and 9/16” key or adjustable wrench.
TWO (2) PEOPLE ARE REQUIRED TO ASSEMBLE THIS
PRODUCT
DEUX (2) PERSONNES SONT REQUISES POUR ASSEM-
BLER CE PRODUIT
IMPORTANT: In order to prevent any damage to
this product, DO NOT USE ANY POWER TOOLS
to assemble it.Assemble this product manually.
IMPORTANT: Afin de prévenir tout dommage à ce produit,
NE PAS UTILISER D’ OUTILS ÉLECTRIQUES pour son
assemblage. Assembler ce produit manuellement.
AMISCO PLAAMISCO PLA
AMISCO PLATFORM MATFORM MA
TFORM MATFORM MA
TFORM MATTRESS SUPPORTTRESS SUPPOR
TTRESS SUPPORTTRESS SUPPOR
TTRESS SUPPORTT
TT
T
Please refer to the assembly instructions included in the platform mattress
support.You will need the hardware from both hardware bags.
SUPPORSUPPOR
SUPPORSUPPOR
SUPPORT DE MAT DE MA
T DE MAT DE MA
T DE MATELAS PLATELAS PLA
TELAS PLATELAS PLA
TELAS PLATE-FORMETE-FORME
TE-FORMETE-FORME
TE-FORME
Veuillez vous référer aux instructions d’assemblage du support de matelas
plate-forme. Vous aurez besoin du contenu des deux sacs de quincaillerie.
HARDWARE LIST / LISTE DE LA QUINCAILLERIE
Bolt S.H. (Allen) 4 0
Boulon T.H. (Allen)
Bolt S.H. (Allen) 4 4
Boulon T.H. (Allen)
Locknut 4 4
Écrou de blocage
Flat washer
Rondelle plate
Locknut 6 4
Écrou de blocage
Flat washer
Rondelle plate 6 4
ITEM DESCRIPTION QTY
HEADBOARD
& FOOTBOARD
TÊTE ET PIED
HEADBOARD
ONLY
TÊTE DE LIT
SEULE
use as shown
util. si montré
A
B
C
D
E
F
3/4” # 1/4-20nc
2 1/4” #1/4-20nc
1/4-20nc
1/4”
3/8-16nc
8 4
7/16”
Thank you for choosing an Amisco product
Merci d’avoir choisi un produit Amisco
Ne contactez
pas le magasin,
ne retournez pas
votre produit
Do not
contact or return
your product to
the store
Amisco product number/Numéro du produit Amisco
Contact us within 30 days from your
purchase date. Monday to Friday, from
8:30 a.m. to 12 p.m., 1 p.m. to 4:30 p.m.
(Eastern standard time). Keep handy
your proof of purchase and the Amisco
product number when calling.
Contactez-nous dans les 30 jours suivant
votre achat. Du lundi au vendredi, de 8h30
à 12h00, 13h00 à 16h30 (heure de l’Est). Ayez
sous la main votre preuve d’achat et le nu-
méro de produit Amisco au moment d’ap-
peler.
IMPORTANT Dealer or installer: Leave all documents to the consumer.
Détaillant ou installateur: Laissez tous les documents au consommateur.
Consumer: Keep this document with your proof of purchase for reference.
Consommateur: Conservez ce document avec votre preuve d’achat pour référence.
www.amisco.com
1 800 361-6360
Problems, assembly videos, warranty, product care or
other information?
Problèmes, vidéos d’assemblage, garantie, conseils
d’entretien ou autre information?
Headboard
Tête de lit 1
Footboard
Pied de lit 1
Head panel
Panneau de tête 1
Foot panel
Panneau de pied 1
Hardware
Sac de quincaillerie 1
ITEM DESCRIPTION QTY
PARTS LIST / LISTE DES PIÈCES
1
2
3
4
5
M656480179 / Revision: 0, 06-01-2015 G.L.
BED WITH WOOD
LIT AVEC BOIS
12389 12399
AMISCO NONAMISCO NON
AMISCO NON VERSAVERSA
VERSAVERSA
VERSATILE MATILE MA
TILE MATILE MA
TILE MATTRESS SUPPORTTRESS SUPPOR
TTRESS SUPPORTTRESS SUPPOR
TTRESS SUPPORTT
TT
T
SUPPORSUPPOR
SUPPORSUPPOR
SUPPORT DE MAT DE MA
T DE MAT DE MA
T DE MATELAS NONTELAS NON
TELAS NONTELAS NON
TELAS NON VERSAVERSA
VERSAVERSA
VERSATILETILE
TILETILE
TILE AMISCOAMISCO
AMISCOAMISCO
AMISCO
1) Assemble 1headboard to the mattress support with Bbolts, C
locknuts and Dwashers. (If you bought headboard only, go directly to step
3).
Assembler la tête de lit 1au support de matelas à l’aide des boulons B,
des écrous de blocage Cet des rondelles D . (Si vous avez une tête de lit
seule, passer à l’étape 3).
2) Assemble 2footboard to the mattress support with Abolts and D
washers.
Assembler le pied de lit 2au support de matelas à l’aide des boulons Aet
des rondelles D.
3) Tighten all bolts and nuts.
Resserrer tous les boulons et écrous.
MAMA
MAMA
MATTRESS SUPPORTTRESS SUPPOR
TTRESS SUPPORTTRESS SUPPOR
TTRESS SUPPORT FRT FR
T FRT FR
T FROM OOM O
OM OOM O
OM OTHER BRANDSTHER BRANDS
THER BRANDSTHER BRANDS
THER BRANDS
SUPPORSUPPOR
SUPPORSUPPOR
SUPPORT DE MAT DE MA
T DE MAT DE MA
T DE MATELAS D’ATELAS D’A
TELAS D’ATELAS D’A
TELAS D’AUTRES MARUTRES MAR
UTRES MARUTRES MAR
UTRES MARQQ
QQ
QUESUES
UESUES
UES
AMISCOAMISCO
AMISCOAMISCO
AMISCO VERSAVERSA
VERSAVERSA
VERSATILE MATILE MA
TILE MATILE MA
TILE MATTRESS SUPPORTTRESS SUPPOR
TTRESS SUPPORTTRESS SUPPOR
TTRESS SUPPORTT
TT
T
SUPPORSUPPOR
SUPPORSUPPOR
SUPPORT DE MAT DE MA
T DE MAT DE MA
T DE MATELASTELAS
TELASTELAS
TELAS VERSAVERSA
VERSAVERSA
VERSATILETILE
TILETILE
TILE AMISCOAMISCO
AMISCOAMISCO
AMISCO
0
5
7 1/2
9
10
12
14 1/2
”
Mattress 12” thick or more, without box spring.
Matelas 12” et plus, sans sommier caisse.
Mattress 12” thick or less, without box spring.
Matelas 12” et moins, sans sommier caisse.
Box spring and mattress.
Sommier caisse et matelas.
”
”
”
”
”
”
4) Hook angle bars to footboard 2and headboard 1.
Accrocher les fers angles au pied de lit 2et à la tête de lit 1 .
5) Tighten all bolts and nuts.
Resserrer tous les boulons et écrous.
6) Follow the instructions provided with the mattress support to assemble it.
Suivre les instructions fournies avec le support de matelas pour l’assembler.
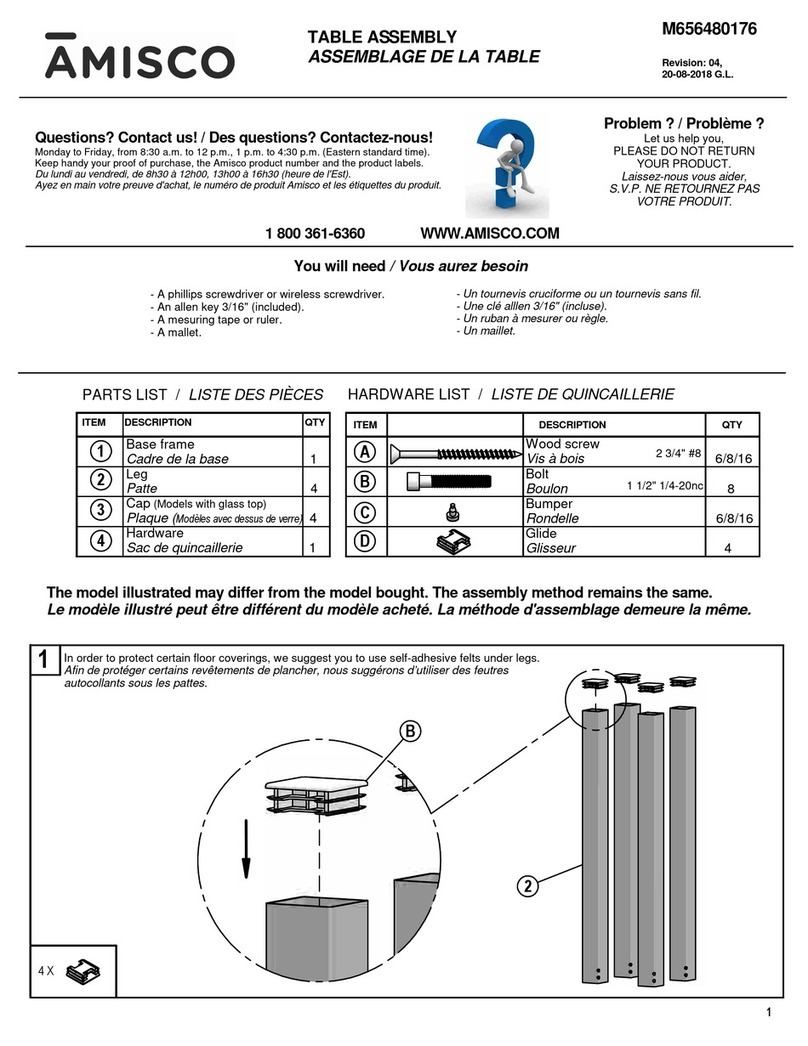
1) Choose the height of your mattress support.
Choisir la hauteur de votre support de matelas.
2) Screw-on lightly Bbolts, Clocknuts and Dwashers of the headboard 1 .
Visser légèrement les boulons B, écrous de blocage Cet les rondelles Dà la tête de lit 1.
3) Screw-on lightly Abolts to footboard 2.
Visser légèrement les boulons Aau pied de lit 2.
WW
WW
WOOD POOD P
OOD POOD P
OOD PANELANEL
ANELANEL
ANEL ASSEMBLASSEMBL
ASSEMBLASSEMBL
ASSEMBLYY
YY
Y
ASSEMBLAASSEMBLA
ASSEMBLAASSEMBLA
ASSEMBLAGE DES PGE DES P
GE DES PGE DES P
GE DES PANNEAANNEA
ANNEAANNEA
ANNEAUX DE BOISUX DE BOIS
UX DE BOISUX DE BOIS
UX DE BOIS
C
DB
1
2
D
A
COUNTERSUNK HOLES OR STICKER (ON SOME MODELS), TOWARDS
THE REAR.
L’EMBOSSAGEDESTROUSOUÉTIQUETTE(SURCERTAINSMODÈLES)
VERSL’ARRIÈRE.
Make sure to tighten the
lock nuts by passing the bolts
through the nylon rings.
S’assurer de serrer les écrous de
blocage en passant les boulons à
travers les bagues de nylon.
NOTE: IFYOU GOT COUNTOURED END BRACKETS ON YOUR MATTRESS SUPPORT,YOU MAYNEED LONGER BOLTS. PLEASE CONTACTAMISCO.
SIVOTRESUPPORTDE MATELASADES PLAQUES COURBÉES, VOUS POURRIEZAVOIR BESOIN DE BOULONS PLUS LONG. SVPCONTACTERAMISCO.
1
B
D
C
COUNTERSUNK HOLES OR STICKER (ON SOME MODELS), TOWARDS THE REAR.
L’EMBOSSAGE DES TROUS OUÉTIQUETTE (SUR CERTAINSMODÈLES) VERS
L’ARRIÈRE.
2
A
Make sure to tighten the
lock nuts by passing the bolts
through the nylon rings.
S’assurer de serrer les écrous de
blocage en passant les boulons à
travers les bagues de nylon.
1) Screw-on lightly Bbolts, Clocknuts and Dwashers in the lowest holes
of the headboard 1 , in the lowest holes.
Visser légèrement les boulons B, écrous de blocage Cet les rondelles D
à la tête de lit 1,dans les trous les plus bas.
2) Screw-on lightly Abolts to footboard 2, in the lowest holes.
Visser légèrement les boulons Aau pied de lit 2, dans les trous les plus
bas.
3) Hook angle bars to footboard 2and headboard 1.
Accrocher les fers angles au pied de lit 2et à la tête de lit 1 .
4) Tighten all bolts and nuts.
Resserrer tous les boulons et écrous.
5) Follow the instructions provided with the mattress support to assemble it.
Suivre les instructions fournies avec le support de matelas pour l’assembler.
1
B
D
C
COUNTERSUNK HOLES OR STICKER (ON SOME MODELS), TOWARDS THE REAR.
L’EMBOSSAGEDESTROUSOUÉTIQUETTE(SURCERTAINS MODÈLES) VERS
L’ARRIÈRE.
2
A
Make sure to tighten the
lock nuts by passing the bolts
through the nylon rings.
S’assurer de serrer les écrous de
blocage en passant les boulons à
travers les bagues de nylon.
1) Put headboard 1upside down on a large blanket to protect the finished surface (treaded
bolts up).
Placer la tête de lit 1à l’envers sur une grande couverture pour protéger son côté fini
(boulons filetés vers le haut).
2) Take the head panel 3(rear label side up) and pass it through the bolts of the headboard
1 add the flat washers F on the bolts and screw with nuts E.
Prendre le panneau de tête 3(étiquette arrière vers le haut) et insérer les boulons de la tête
de lit 1 dans les trous du panneau de tête 3,insérer les rondelles Fsur les boulons et
visser à l’aide des écrous E .
3)Tighten the nuts E so that the head panel is well pressed against the front of plates on the
headboard 1.
Serrer les écrous Epour que le panneau de tête soit bien appuyé sur les plaques de la tête
de lit 1à l’avant.
4) Repeat lines 1 to 3 for the footboard assembly 2(if applicable).
Répéter les lignes 1 à 3 pour le montage du pied de lit 2(si applicable).
Make sure to tighten the
lock nuts by passing the bolts
through the nylon rings.
S’assurer de serrer les écrous de
blocage en passant les boulons à
travers les bagues de nylon.
1-2
3-4 E
F

This manual suits for next models

1

Other Amisco Indoor Furnishing manuals

Amisco Bridget Upholstered Dining Chair 30575 User manual

Amisco

Amisco Bridget Upholstered Dining Chair 30575 User manual

Amisco 50562 User manual

Amisco

Amisco 50562 User manual

Amisco BROCK 41435 User manual

Amisco

Amisco BROCK 41435 User manual

Amisco 16054-RT User manual

Amisco

Amisco 16054-RT User manual

Amisco M656480275 User manual

Amisco

Amisco M656480275 User manual

Amisco 30263 User manual

Amisco

Amisco 30263 User manual

Amisco ANDRE 50684 User manual

Amisco

Amisco ANDRE 50684 User manual

Amisco TABLE BASE 50738 User manual

Amisco

Amisco TABLE BASE 50738 User manual

Amisco 50696 User manual

Amisco

Amisco 50696 User manual

Amisco Edward Upholstered Swivel Bar Stool with Arms... User manual

Amisco

Amisco Edward Upholstered Swivel Bar Stool with Arms... User manual

Amisco Lidya 50588-90863 User manual

Amisco

Amisco Lidya 50588-90863 User manual

Amisco 31244 User manual

Amisco

Amisco 31244 User manual

Amisco 41505 User manual

Amisco

Amisco 41505 User manual

Amisco TABLE User manual

Amisco

Amisco TABLE User manual

Amisco 50524 User manual

Amisco

Amisco 50524 User manual

Amisco Easton Oyster/Oxidado Swivel Counter Stool... User manual

Amisco

Amisco Easton Oyster/Oxidado Swivel Counter Stool... User manual

Amisco Bridget Upholstered Farmhouse Bar Stool... User manual

Amisco

Amisco Bridget Upholstered Farmhouse Bar Stool... User manual

Amisco M656480274 User manual

Amisco

Amisco M656480274 User manual

Amisco 41402 User manual

Amisco

Amisco 41402 User manual

Amisco M656480251 User manual

Amisco

Amisco M656480251 User manual

Amisco 11141 User manual

Amisco

Amisco 11141 User manual

Amisco Architect Adjustable Stool with Wood Back... User manual

Amisco

Amisco Architect Adjustable Stool with Wood Back... User manual

Amisco 30556 User manual

Amisco

Amisco 30556 User manual

Amisco Kyle Dining Chair with Distressed Wood Seat/Back... User manual

Amisco

Amisco Kyle Dining Chair with Distressed Wood Seat/Back... User manual

Popular Indoor Furnishing manuals by other brands

SHOR-LINE 903.3220.10 user guide

SHOR-LINE

SHOR-LINE 903.3220.10 user guide

PAIDI 2105 instructions

PAIDI

PAIDI 2105 instructions

Euroflex FORMA manual

Euroflex

Euroflex FORMA manual

Coaster 205280KE Assembly instructions

Coaster

Coaster 205280KE Assembly instructions

Whalen VANITY WITH TOP WF30CVG Assembly instructions

Whalen

Whalen VANITY WITH TOP WF30CVG Assembly instructions

Teknik Craft 5427456 quick start guide

Teknik

Teknik Craft 5427456 quick start guide

Argos Canterbury 505/9348 Assembly instructions

Argos

Argos Canterbury 505/9348 Assembly instructions

Home Decorators Collection V183106XXA-NP Use and care guide

Home Decorators Collection

Home Decorators Collection V183106XXA-NP Use and care guide

Meja LISON Assembly instruction

Meja

Meja LISON Assembly instruction

Whalen WF48EVB manual

Whalen

Whalen WF48EVB manual

Mile Marker carolina installation guide

Mile Marker

Mile Marker carolina installation guide

Next 431648 Assembly instructions

Next

Next 431648 Assembly instructions

Zenna Home 9114W Assembly instructions

Zenna Home

Zenna Home 9114W Assembly instructions

Tennsco 7114 Assembly Instructions/Parts Manual

Tennsco

Tennsco 7114 Assembly Instructions/Parts Manual

Crate&Barrel Pint Sized Assembly instructions

Crate&Barrel

Crate&Barrel Pint Sized Assembly instructions

Tauris RIO2200LLOAK Assembly & instruction manual

Tauris

Tauris RIO2200LLOAK Assembly & instruction manual

Habitat Madeleine 818341 manual

Habitat

Habitat Madeleine 818341 manual

BIG FURNITURE WAREHOUSE Dorset KY048 Assembly instruction

BIG FURNITURE WAREHOUSE

BIG FURNITURE WAREHOUSE Dorset KY048 Assembly instruction

manuals.online logo
manuals.online logoBrands
  • About & Mission
  • Contact us
  • Privacy Policy
  • Terms and Conditions

Copyright 2025 Manuals.Online. All Rights Reserved.