Amit VHG760AM-0T001 User manual

Quick Installation Guide
VHG760AM-0T001
In-Vehicle Hotspot Gateway
QIG:
V
1.0 20160201

InVehicleHotspotGateway
VHG760AM-0T001 User Manual1
Chapter 1 Introduction
Congratulationsonyourpurchaseofthisoutstandingproduct:In‐VehicleHotspotGateway.For
M2M(Machine‐to‐Machine)applications,AMITIn‐VehicleHotspotGatewayisabsolutelythe
rightchoice.Withbuilt‐inworld‐class3GHSPA+module,youjustneedtoinsertSIMcardfrom
localmobilecarriertogettoInternet.TheredundantSIMdesignprovidesamorereliableWAN
connectionforcriticalapplications.ByVPNtunnelingtechnology,remotesiteseasilybecomea
partofIntranet,andalldataaretransmittedinasecure(256‐bitAESencryption)link.Tomeeta
varietyofM2Mapplicationrequirements,AMITIn‐VehicleHotspotGatewayproductsarebased
onmodulardesign.Anewfunctionalmodulecanreplacecurrentonetosupportnewapplication
inshorttime,suchasforNFCorGPSapplications.
ThisVHG760AM‐0T001productisloadedwithluxuriantsecurityfeaturesincludingVPN,firewall,
NAT,portforwarding,DHCPserverandmanyotherpowerfulfeaturesforcomplexand
demandingbusinessandM2M(Machine‐to‐Machine)applications.Theredundancydesignin
fallback9‐36VDCpowerterminal,dualSIMcardsandVRRPfunctionmakesthedeviceasa
back‐upinpower,networkconnectionanddatatransmissionwithoutlost.
MainFeatures:
ProvidevariousandconfigurableWANconnection.
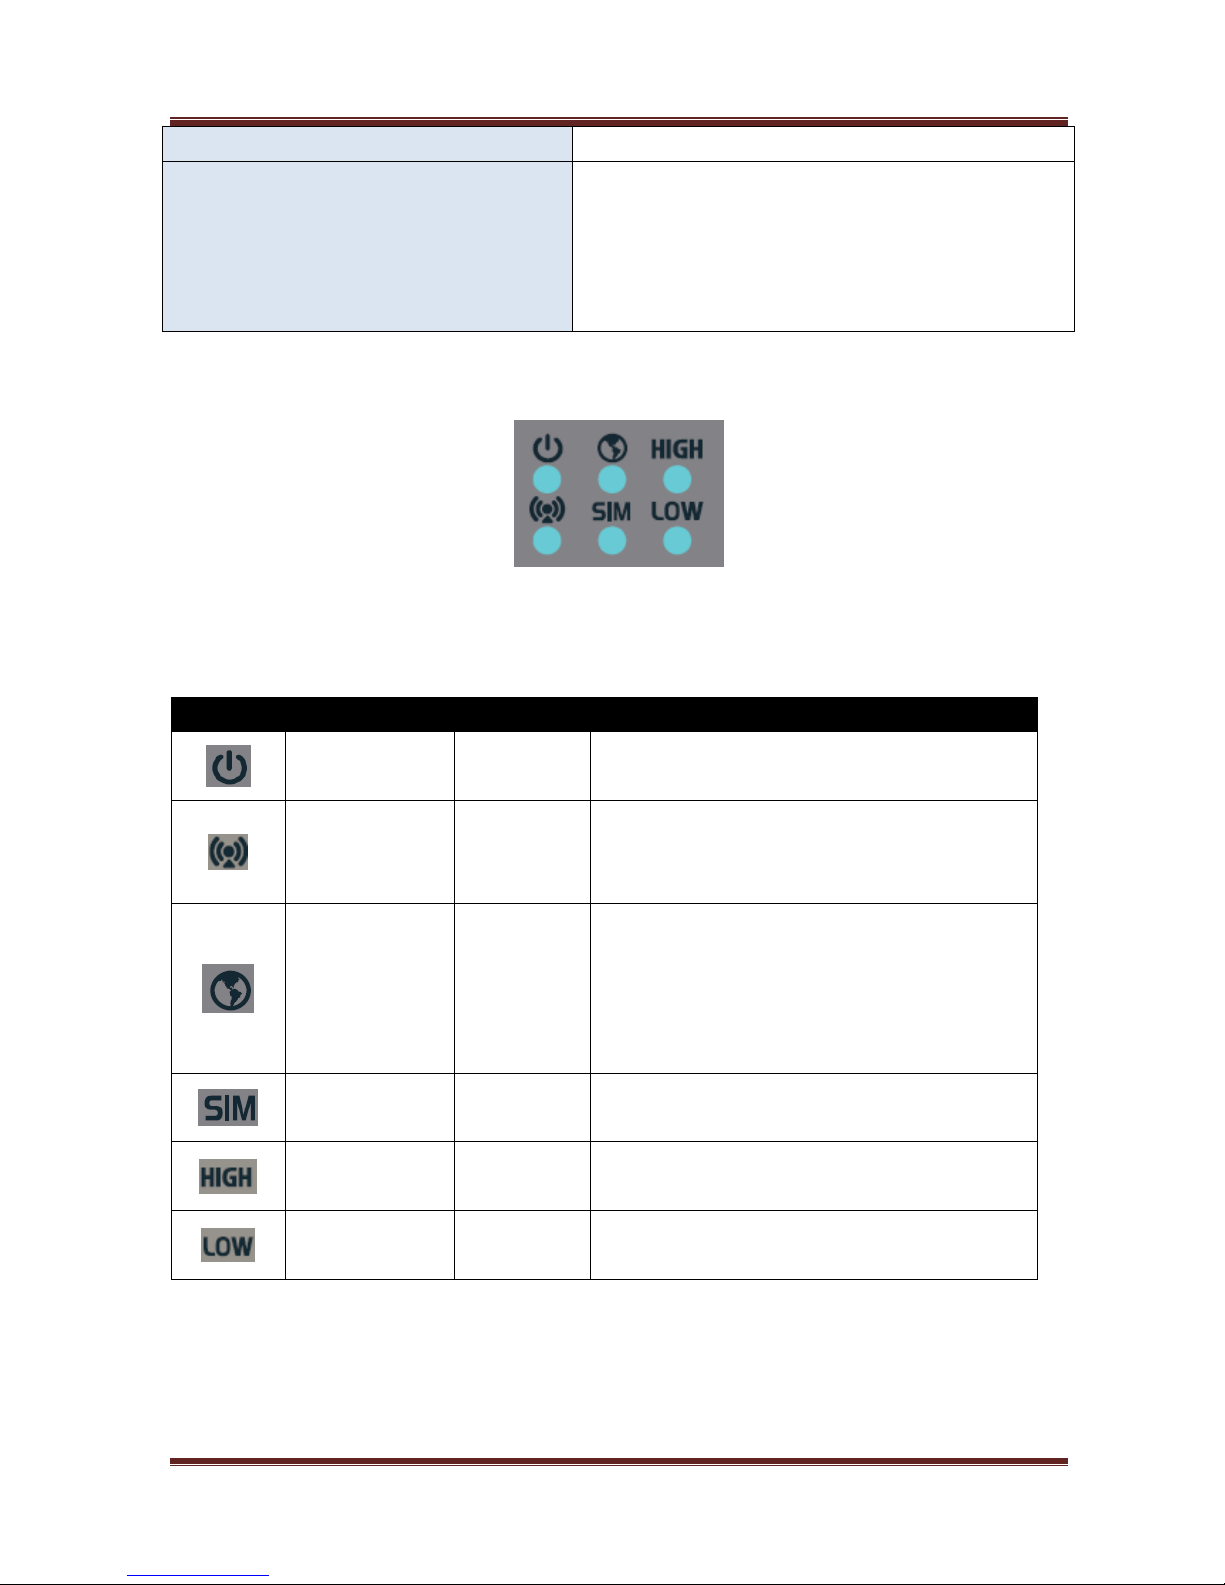
SupportdualSIMsfortheredundantwirelessWANconnection.
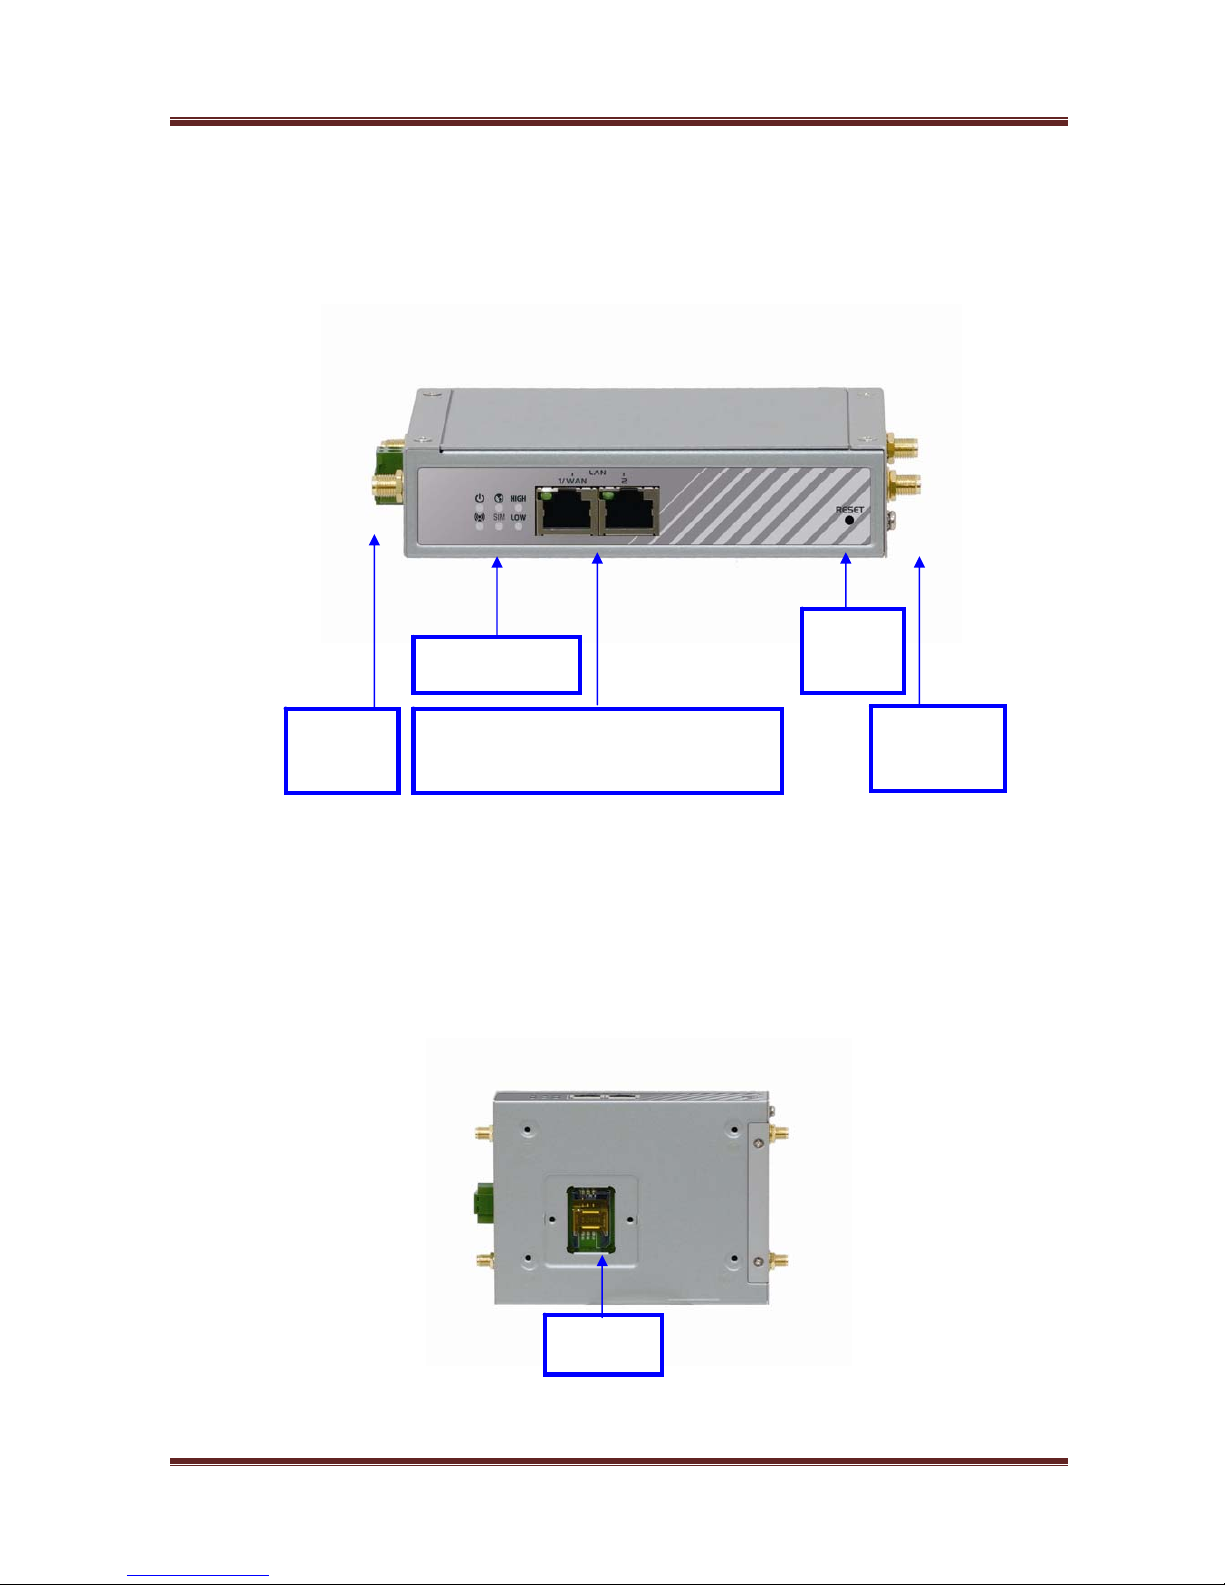
ProvideEthernetportsforcomprehensiveLANconnectionandLAN‐1portcanbeconfiguredto
beanotherWANinterface.
FeaturewithVPNandNATfirewalltohavepowerfulsecurity.
Supporttherobustremoteorlocalmanagementtomonitornetwork.
Designedbysolidandeasy‐to‐mountmetalbodyforbusinessandM2Menvironmenttowork
withavarietyM2M(Machine‐to‐Machine)applications.
Beforeyouinstallandusethisproduct,pleasereadthismanualindetailforfullyexploitingthe
functionsofthisproduct.

InVehicleHotspotGate way
VHG760AM-0T001 Quick Installation Guide 2
1.1 Content List
Table‐1.1Contentsincludedinyourpackage
Items Description Contents Quantity
1 VHG760AM-0T001
In-Vehicle Hotspot Gateway 1pcs
2 Cellular Antenna 2pcs
3 WiFi Antenna 2pcs
4 CD
(Manual)
1pcs
5 Mounting Bracket
2pcs

InVehicleHotspotGate way
VHG760AM-0T001 Quick Installation Guide 3
1.2 Overview
1.2.1 Outward Appearance
Figure1‐1Outward appearance of the VHG760 front panel
※Reset Button
The RESET button provides user with a quick and easy way to resort the default setting.
Press the RESET button continuously for 6 seconds, and then release it. The device will
restore to factory default settings.
Figure1‐2OutwardappearanceoftheVHG760bottomside
SIMSlot
AutoMDI/MDIXRJ45Ports
4xFELANtoconnectlocaldevices
3G
Antenna
Reset
Button
2.4GWiFi
Antenna
LEDIndicators

InVehicleHotspotGate way
VHG760AM-0T001 Quick Installation Guide 4
Figure1‐3OutwardappearanceoftheVHG760leftside
1.2.2 Pre-installation REQUIREMENTS
Table‐1.2Pre‐installationrequirements
Network Requirements
An Ethernet RJ45 cable or DSL modem
3G cellular service subscription
IEEE 802.11n or 802.11b/ g wireless clients
10/100 Ethernet adapter on PC
Web-based Configuration Utility
Requirements
Computer with the following:
Windows®, Macintosh, or Linux-based
operating system
An installed Ethernet adapter
Browser Requirements:
Internet Explorer 6.0 or higher
Chrome 2.0 or higher
Firefox 3.0 or higher
3GAntenna 3GAntenna
PowerTerminalBlock
PWR
GND

InVehicleHotspotGate way
VHG760AM-0T001 Quick Installation Guide 5
Safari 3.0 or higher
CD Installation Wizard
Requirements
Computer with the following:
Windows®7, Vista®, or XP with Service
Pack 2
An installed Ethernet adapter
CD-ROM drive
1.2.3 LED Indication
Figure1‐4TheLEDindicator
Table‐1.3IllustrationoftheLEDIndication
LED Icon Indication LED Color Description
Power Source Green Steady ON: Device is powered on by power
source 1
WLAN (WiFi) Green Steady ON: Wireless radio is enabled
Flash: Data packets are transferred
OFF: Wireless radio is disabled
Internet Green
Steady ON: Internet connection is
established
Flash: Data packets are transferred thru
Internet
OFF: Internet connection is not established
SIM Green Steady ON: SIM card is chosen for
connection
High Cellular
Signal Green Steady ON: The signal strength of Cellular
is strong
Low Cellular
Signal Green Steady ON: The signal strength of Cellular
is weak


InVehicleHotspotGate way
VHG760AM-0T001 User Manual7
Chapter 2 Getting Start
Thischapterdescribeshowtoinstallandconfigurethehardwareandhowtousethesetup
wizardtoconfigurethenetworkwiththewebGUIofVHG760series.
2.1 Hardware Installation
2.1.1 Insert A SIM Card
WARNNING: BEFORE INSERTING OR CHANGING THE SIM CARD, PLEASE MAKE
SURE THAT POWER OF THE DEVICE IS SWITCHED OFF.
ASIMcardslotislocatedatthebottomsideoftheVHG760AM‐0T001model.Acoverisscrewed
overtheslotforprotectingtheSIMmodulefromdamage.BeforeinstallingorremovingaSIM
cardtoorfromtheslot,youneedtounscrewandremovethecoverfirst.Pleasefollowthe
instructionstoinsertaSIMcardintotheslot.
2.1.2 Mount the Unit
TheVHG760AM‐0T001canbeplacedonadesktop,mountedonthewallormountedona
DIN‐rail.TheDIN‐railbracketisnotscrewedontheproductwhenoutoffactory.Pleasescrew
theDIN‐railbracketontheproductfirstifnecessary.
Figure2‐1The SIM card installation instructions
Step1:
Followredarrowto
unlocktheSIMcard
slot
Step2:
LiftupSIMholder,
andinsertSIMcard
Step3:
PutbackSIMholder,
andfollowredarrow
tolockSIMsocket

InVehicleHotspotGate way
VHG760AM-0T001 Quick Installation Guide 8
Notethat,afteraSIMcardiscorrectlyinstalled,pleasescrewthecoverbackagain.
2.1.3 Connecting Power
TheVHG760seriesunitprovidesa9~36VDCpowermodule.AnVHG760unitcanbepoweredby
connectingapowersourcetothepowerterminalblock..Figure‐2.2indicatespinassignmentsof
thepowerterminalblock.Pleaseconnectcarefullyyourpowersource.Makesuretheelectrodes
havebeenpluggedintotherightpinsaccordingtotheirassignments.
Figure2‐2Thepowerterminalblock
2.1.4 Connect to a Host for Configuration
TheVHG760seriesprovidestwo10/100MbpsEthernetRJ‐45ports.TheRJ‐45portsarecapable
ofauto‐detectingthetransmissionspeedoftheEthernetandperformingself‐configuration.
PlugoneRJ‐45connectorofanEthernetcableintoyourcomputer’sRJ‐45portandthenplugthe
alternateintooneofthetwoRJ‐45portsonthefrontpaneloftheunit.Notethatyouneedto
connectyourVHG760unitdirectlytoyourPCforconfiguringortroubleshootingtheVHG760
unit.
2.2 Easy Setup by Configuring WEB UI
TheVHG760unitprovidesafriendlyWeb‐basedUItofacilitateVHG760’sfeaturesetting.Please
openoneofyourfavoritewebbrowsers,andinputtheURLindicatingyourVHG760unitintothe
browsersothatyoucanfollowstepsbelowtoactivateyourVHG760unit.Figure‐2.4illustrates
thewayinputtingadefaultURLintoachosenbrowser.ThedefaultURLis
http://192.168.123.254/.
PWR
GND

InVehicleHotspotGate way
VHG760AM-0T001 Quick Installation Guide 9
Figure2‐3InputthedefaultURLforWeb‐basedUIaccess.
Followingtheabovestepisaloginwebpagepromptingforuserauthenticationtologinthe
Web‐basedUI.Pleaseinputyourloginpasswordintotheblanknexttothe“Password”.Referto
Figure‐2.5forreference.Notethatthedefaultpasswordis“admin”.
Figure2‐4Loginpageforuserauthentication
Youcanbrowsewebuserinterface(UI)toconfigurethedevice.Firstyouneedtolaunchthe
SetupWizardbrowserandthentheSetupWizardwillguideyoustep‐by‐steptofinishthesetup
process.
Afterlogin,selectyourlanguage fromthelist.
Figure2‐5Chooseyourlanguage
2.3 Wizard
Select“Wizard”forbasicnetworksettingsandVPNsettingsinasimpleway.Or,youcangoto
Basic Network / Advanced Network / Applications / Systemtosetuptheconfiguration

InVehicleHotspotGate way
VHG760AM-0T001 Quick Installation Guide 10
byyourownselection.
Figure2‐6Get start with wizard
2.3.1 Configure with the Network Setup Wizard
Step 1 Setup Steps
Thenetworksetupwizardwillguideyouto
finishsomebasicsettingstoenableyour
VHG760unit.Thiswizardpageshowsthe
setupstepstobecompletedinorder,
includingfollowing“password”,“TimeZone”,
“WANInterface”,“EthernetLAN
Interface”,“WiFiLANInterface”,“Setup
Summary&Apply”,and“SystemRestart”.An
“Exit”buttonislocatedattheupper‐rightcornerofeachdialogicwindowtoabortthewizard
beforeyoucompletetheentiresetupprocess.
Notethattheabortionwillinvalidatepreviouschangesbythewizard.
Press“Next” tostartthewizard.
Step 2: Login User Name and
Password
PasswordConfiguration:Youcansetanew
WebUIloginpasswordatthiswizardpage.
Forsettinganewpassword,youhaveto

InVehicleHotspotGate way
VHG760AM-0T001 Quick Installation Guide 11
key‐inyourcurrentpasswordatthe“OldPassword”item,andthenassignanewpasswordto
the“NewPassword”item.Aconfirmationisneededbykey‐inyournewassigningpasswordto
the“NewPasswordConfirmation”item.Otherwise,keepeachitemblankforreservingthe
currentpassword.
Notethat,changethedefaultpasswordisstronglyrecommended.
Press “Next” tocontinue.
Step 3: Time Zone
TimeZoneConfiguration:TheVHG760unit
detectsyourtimezoneautomatically.For
fixingthedetectionifneeded,youcaneither
clickthe“DetectAgain”buttonorselecta
timezonemanually.
Press“Next” tocontinue.
Step 4: WAN Interface
WANInterfaceConfiguration:Choosetypeof
WANconnection.“Ethernet”WANisfor
connectingtoInternetthroughfixedline.Or
“3G/4G”isforconnectingtoInternetthrough
3G/4Gnetwork.
NotethattheVHG760unitsupportsavarietyofWANprotocolsforprovidingWANconnectivity
throughtheWANRJ‐45port.Whenchoosing“Ethernet”,youcandiscover“DynamicIP
Address”,“StaticIPAddress”,“PPPoverEthernet”,“PPTP”,and“L2TP”showninthe
drop‐downlistoftheWANTypeitem.Forthe“Ethernet”choiceofthephysicalinterface,refer
tothesub‐step,4‐1,4‐2,4‐3,4‐4,or4‐5tohaveappropriatesequentialconfiguration
accordingly.
Alternatively,forthe“3G/4G”choice,pleaserefertothesub‐step,4‐6.
Press “Next” tocontinue.
Step 4-1: Ethernet - Dynamic IP
Address
IfchoosingEthernet‐>DynamicIPAddress,
youcaninputhostnameorregisteredMAC
addresswhenyourISPrequestsit.Inmost
cases,youcanleavetheminblanksandgo
next.ThisoptionisusuallychosenwhenyougetadynamicIPaddressfromISP.

InVehicleHotspotGate way
VHG760AM-0T001 Quick Installation Guide 12
Press“Next” tocontinue.
Step 4-2: Ethernet - Static IP Address
IfchoosingEthernet‐>StaticIPAddress,you
needtoinputappropriateIPconfiguration
gettingfromyourISP(InternetService
Provider)manually.Thisoptionisusually
chosenwhenyougetafixedIPaddressfrom
ISP.
AbouthowtoobtainappropriatestaticIPconfiguration,pleasecontactwithyournetwork
administratororISPs.
Press “Next” tocontinue.
Step 4-3: Ethernet - PPP over Ethernet)
IfchoosingEthernet‐>PPPoverEthernet
(PPPoE),youneedtoinputaccountand
passwordthatyougetfromISP.Forother
fields,youcanleavetheminblanksinmost
cases.Thisoptionisusuallychosenwhenyou
useADSLforWANconnection.
AboutobtainingthePPPoEaccountandPPPoEpassword,pleasecontactwithyournetwork
administratororISPs.
Press“Next” tocontinue.
Step 4-4: Ethernet - PPTP
IfchoosingEthernet‐>PPTP,youneedto
inputrequireddial‐upinformationthatyou
getfromISP.Thisoptionisusuallychosen
whenyourISPrequestsit.
Aboutobtainingappropriateconfiguration,
pleasecontactwithyournetworkadministratororISPs.
Press “Next” tocontinue.

InVehicleHotspotGate way
VHG760AM-0T001 Quick Installation Guide 13
Step -5: Ethernet - L2TP
IfchoosingEthernet‐>L2TP,youneedto
inputrequireddial‐upinformationthatyou
getfromISP.Thisoptionisusuallychosen
whenyourISPrequestsit.
Aboutobtainingappropriateconfiguration,
pleasecontactwithyournetworkadministratororISPs.
Press “Next” tocontinue.
Step 4-6: 3G/4G – 3G/4G
Ifchoosing3G/4G‐>3G/4G,pleasemakesure
youhavealreadyinstalledaSIMcard
appropriately.Withtheappropriately
installedSIMcard,youcanselect
“Auto‐Detection”tofinishdial‐upprofile
automatically.Thisoptionischosenwhen
youwanttoconnecttoInternetthrough3G/4Gnetworksratherthanfixedlinebroadband
accessnetworktechnologiesmentionedabove.
Press “Next” tocontinue.
Step 5: Ethernet LAN
LANInterfaceConfiguration:ChangetheLAN
IPaddressandsubnetmaskofthisgateway
fortheIntranet.Youcankeepthedefault
settingandgotonextstep.
Press “Next”tocontinue.
Step 6: WiFi LAN
WiFiLANInterfaceConfiguration:Check
the“Enable”boxtoenabletheWiFiLAN.If
needed,changetheSSID,Channel,
AuthenticationandEncryptionAlgorithm
forthefirstvirtualAPofthisgateway.
NotethataWiFiAPbroadcastsitsSSIDfor
advertisingwirelessconnectionserviceitisproviding.Bycompletingthiswizardsettings,WiFi
clientswhoworkon2.4GHzcandiscovertheSSIDassignedherebynetworkscan.
Itisstronglyrecommendedthatauthenticationandencryptionfeaturesareenabledto prevent
yourwirelessnetworkfrommaliciousandun‐permittedconnectionsandkeeptransferreddata

InVehicleHotspotGate way
VHG760AM-0T001 Quick Installation Guide 14
insecure.Youcanalsokeepthedefaultsettingandgotonextstep.
Press “Next”tocontinue.
Step 7: Confirm and Apply
Checkthenewsettingsagain.Ifall
informationiscorrect,pleasepress“Apply”
buttontosavenewsettings.Thenitwilltake
65secondstorestartthisgatewayandtake
newsettingseffective.
Step 8: Counting Down
Configurationiscompleted.Press“Finish”
buttontocloseSetupWizardandbrowser
countsdownfor65secondsandprovides
youwith“Clickhere”buttontoreconnectto
thedevice.
2.3.2 Configure with the VPN Setup Wizard
Step 1
TheVPNsetupwizardwillguideyoutofinish
profilesofIPSec,PPTP,L2TP,andGREVPN
connectionquickly.
Thiswizardpageshowsfollowingsteps
encounteredinthesettingprocess,including
“SelectVPNType”,“VPNConfiguration”,“SetupSummary&Apply”,and“Configuration
Complete”inorder.
NotethatIfyoudonotneedtoconstructaVPN,youcanskipthiswizardsetting.
Press “Next” tostartthewizard.

InVehicleHotspotGate way
VHG760AM-0T001 Quick Installation Guide 15
Step 2: VPN Type
SelecttypeofVPNconnectionyouwanttocreate.HereyoucanchooseIPSec,PPTP,L2TP,or
GRE.(RefertoSession3.2.3formoredetails.)
Press“Next” tocontinue.
Step3-1: IPSec
IfchoosingIPSec,therearetwooptionsof
tunnelscenariocanbechosen.“SitetoSite”
isfortwoofficestocreateVPNtunnel.
“DynamicVPN”isforremoteusersto
connecttooffice.Forotheroptions,please
gotoAdvancedNetwork‐>VPNtosetup.Inputtherequirednetworkinformationandpre‐shared
keyforVPNconnection.
ForDynamicVPN,youdon’tneedtoinput
networkinformationofremotesubnetand
remotegateway.
Press “Next” tocontinue.

InVehicleHotspotGate way
VHG760AM-0T001 Quick Installation Guide 16
Step 3-2: PPTP
IfchoosingPPTP,therearetwooptionsof
modecanbechosen.Choose“Client”ifyou
wantthisdevicetoconnecttoanotherPPTP
server.Orchoose“Server”ifyouwantother
PPTPclientstoconnecttoit.
Press “Next” to continue.
IfchoosingPPTPClient,pleaseinputtunnel
name,IP/FQDNofPPTPserver,
username/password,authentication,and
MPPEoptions.Pleasemakesurethese
settingsareacceptedbyPPTPserver.
Otherwise,remotePPTPserverwillrejecttheconnection.
Press “Next” to continue.
IfchoosingPPTPServer,pleaseselectoptions
ofauthenticationandMPPE.Youalsoneedto
createasetofusernameandpasswordfor
PPTPclients.Inthiswizard,youcanonly
createoneuseraccount.Ifyouwantto
createmoreuseraccounts,pleasegoto
AdvancedNetwork‐>VPN‐>PPTPtoaddmoreusers.
Press“Next” tocontinue.
Step 3-3: L2TP
IfchoosingL2TP,therearetwooptionsof
modecanbechosen.Choose“Client”ifyou
wantthisdevicetoconnecttoanotherL2TP
server.Orchoose“Server”ifyouwantother
L2TPclientstoconnecttoit.
Press“Next” tocontinue.
IfchoosingL2TPClient,pleaseinputtunnel
name,IP/FQDNofL2TPserver,
username/password,authentication,and
MPPEoptions.Pleasemakesurethese

InVehicleHotspotGate way
VHG760AM-0T001 Quick Installation Guide 17
settingsareacceptedbyL2TPserver.Otherwise,remoteL2TPserverwillrejecttheconnection.
Press “Next”tocontinue.
IfchoosingL2TPServer,pleaseselectoptions
ofauthenticationandMPPE.Youalsoneedto
createasetofusernameandpasswordfor
L2TPclients.Inthiswizard,youcanonly
createoneuseraccount.Ifyouwantto
createmoreuseraccounts,pleasegotoAdvancedNetwork‐>VPN‐>L2TPtoaddmoreusers.
Press “Next” tocontinue.
Step 4: Confirm and Apply
Confirmnewsettings.Ifallnewsettingsare
correct,pleasepress“Apply”buttontosave
thesenewsettingsandtakethemeffective.
Other manuals for VHG760AM-0T001
2
Table of contents
Other Amit Automobile Accessories manuals
Popular Automobile Accessories manuals by other brands

TaoTronics
TaoTronics TT-BR03 user manual

Vision X
Vision X LICENSE PLP910 Installation instructions & user manual

aFe Power
aFe Power advanced FLOW engineering instruction manual

Cruz
Cruz Evo Rack E37-170 Assembly instructions

SAF-HOLLAND
SAF-HOLLAND HOLLAND FW17 Series Service bulletin

Haicom
Haicom HI-701 BT user manual

Fiamma
Fiamma 08753-01 Installation and usage instructions

BEST BUY essentials
BEST BUY essentials BE-MVQ3AC1B23 quick start guide

Piaa
Piaa V-RF Series installation instructions

DVB
DVB FBTT1-01 installation manual

Blue Ox
Blue Ox BedSaver BXR4102 Operator and installation manual

Brodit
Brodit ProClip 804400 installation instructions