AML Oceanographic Keller PA-10 User manual

AML OCEANOGRAPHIC
2071 Malaview Ave. W., Sidney, British Columbia, CANADA V8L 5X6
Tel: +1-250-656-0771 Toll Free: 1-800-663-8721 Fax: +1-250-655-3655
www.AMLoceanographic.com
Micro Pressure Sensor
____________________
User's Manual
Document Version 1.34
July 2015

User Manual for AML Oceanographic’s Micro Pressure Sensor
AML OCEANOGRAPHIC
In-situ Real-time Detection Measurement
2
TABLE OF CONTENTS
1 – INTRODUCTION ................................................................................................................................................. 3
1.1 WARRANTY AND LIMITATION OF LIABILITY ......................................................................................................... 3
DISCLAIMER .............................................................................................................................................................. 3
1.2 INSTRUMENT SPECIFICATIONS .............................................................................................................................. 4
1.3 SYSTEM DESCRIPTION .......................................................................................................................................... 4
1.4 ABOUT THE USER ................................................................................................................................................ 5
2 GETTING STARTED .............................................................................................................................................. 6
2.1 INSPECTING THE INSTRUMENT ............................................................................................................................. 6
2.2 CONNECTING THE MICRO PRESSURE SENSOR TO A COMPUTER ........................................................................... 6
2.3 POWERING THE MICRO PRESSURE SENSOR .......................................................................................................... 6
3 COMMUNICATING WITH THE MICRO PRESSURE SENSOR .................................................................... 7
3.1 CONFIGURING HYPERTERMINAL FOR COMMUNICATIONS WITH THE MICRO PRESSURE SENSOR ............................ 7
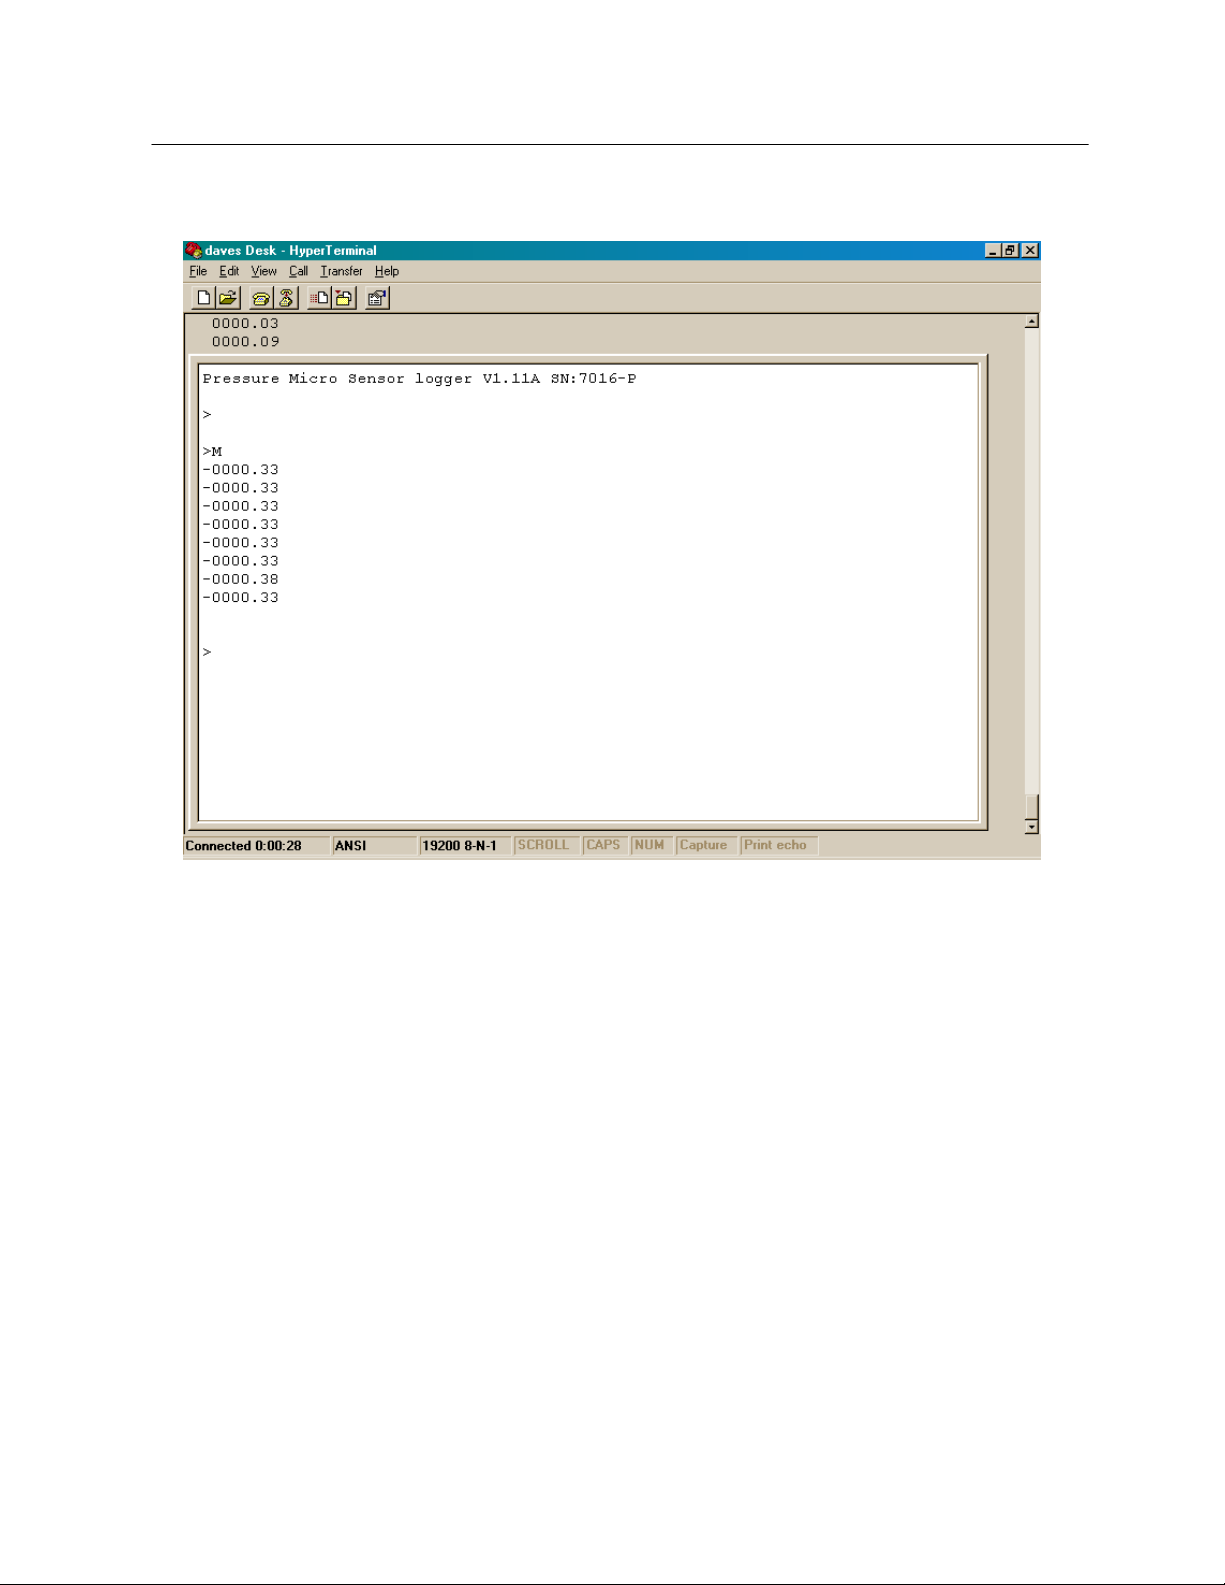
3.2 RAW/REAL PARAMETER VALUES ...................................................................................................................... 9
3.2.1 RAW DATA FORMAT ......................................................................................................................................... 9
3.2.2 REAL DATA FORMAT ........................................................................................................................................ 9
3.3 COMMAND SUMMARY ................................................................................................................................ 10
4 MAINTENANCE .................................................................................................................................................... 13
4.2 MAIN O-RING MAINTENANCE ............................................................................................................................ 13
5 CALIBRATION ...................................................................................................................................................... 15
5.1 THEORY ............................................................................................................................................................. 15
APPENDIX `A': TROUBLESHOOTING GUIDE ................................................................................................ 16
APPENDIX `B': GENERAL LAYOUT ................................................... ERROR! BOOKMARK NOT DEFINED.
APPENDIX `C': WIRING DIAGRAM ................................................... ERROR! BOOKMARK NOT DEFINED.

User Manual for AML Oceanographic’s Micro Pressure Sensor
AML OCEANOGRAPHIC
In-situ Real-time Detection Measurement
3
1 – INTRODUCTION
The AML Oceanographic Micro Pressure Sensor is a single-parameter, self contained, intelligent
oceanographic sensor. This manual describes the Micro Pressure Sensor instrument, covering the
standard specifications, operation, use, communication, troubleshooting, and maintenance requirements.
Please refer to your device specifications to confirm details of the configuration of your unit.
1.1 Warranty and Limitation of Liability
AML Oceanographic warrants the instrument for a period of two years from the date of delivery. AML
will repair or replace, at its option and at no charge, components which are found to be defective. The
warranty applies only to the original purchaser of the instruments. The warranty does not apply if the
instrument has been damaged, by accident or misuse, and is void if repairs or modifications are made by
any other than authorized personnel.
This warranty is the only warranty given by AML. No warranties implied by law, including but not
limited to the implied warranties of merchantability and fitness for a particular purpose shall apply. In no
event will AML be liable for any direct, indirect, consequential, or incidental damages resulting from any
defects or failure of performance of any instrument supplied by AML.
DISCLAIMER
AML Oceanographic reserves the right to make any changes in design, specifications, or operating
functionality, at any time without incurring any obligation to modify previously delivered instruments.
Manuals are produced for information and reference purposes, and are subject to change without
notice. If there is any clarification required as to the operation of our instruments, please do not
hesitate to contact us to speak to a technical representative.

User Manual for AML Oceanographic’s Micro Pressure Sensor
AML OCEANOGRAPHIC
In-situ Real-time Detection Measurement
4
1.2 Instrument Specifications
Pressure Sensor: Keller™ semiconductor strain gauge
Model: PA-10
Accuracy: ±0.05 % full scale
Resolution: 0.1 dbar for 100 bar FS sensors, 0.01dbar for <100 bar FS
sensors
Time constant: 10 ms
Output: RS-232C autobaud communications
Baud rate: 2400 to 38400, 8 data bits, no parity, 1 stop bit.
Data type: ASCII text
Sample Rate: 25 scans per second
Power: Isolated External DC supply
Voltage range: 8-26 Volts DC
Current consumption: 0.012 Amperes
Bulkhead Connector: Micro 6, Female (MCBH-6-FS)
Mating cable connector: PMCIL-6-MP
Pressure Housing Material: Delrin: Acetron GP rated to 500m
Titanium: Grade 5 rated to 6000m
Dimensions: 33 mm (1.3”) diameter by 157 mm (6.2”) OAL
Weight: 490 grams in air
Environment: Operating: -2 to 40C (28 to 104F)
Storage: -40 to 60C (-40 to 140F)

User Manual for AML Oceanographic’s Micro Pressure Sensor
AML OCEANOGRAPHIC
In-situ Real-time Detection Measurement
5
1.3 System Description
The Micro Pressure Sensor is a single parameter, self-contained, intelligent pressure sensor.
The Micro Pressure Sensor features CMOS based microprocessor with 64 bytes of data
memory for storing the instrument's calibration coefficients and an A/D converter with 1
part in 65000 counts resolution.
An on board thermistor mechanically attached to the pressure sensor allows the
microprocessor to temperature compensate the pressure data to an accuracy of ±0.05% of
full-scale pressure.
The Micro Pressure Sensor is designed for use with an IBM-PC compatible computer. The
instrument's output is standard ASCII RS-232. The baud rate is automatically determined
when the sensor receives an <ENTER> or <RET>. The data output may be configured to
display either unprocessed integers, or computed engineering values. The sample rate is
continuous at 25 scans per second. The instrument is powered externally by a power
supply set to 8-26 Volts DC.
1.4 About the User
This manual has been written with the following assumptions:
• The user has had some exposure to Windows™ (IBM-PC) compatible computers, and is
moderately computer literate with a working knowledge of computer operation and
terminology.
• The user is familiar with the operation and function of standard communications
packages.
While it is possible to operate the Micro Pressure Sensor without these qualifications,
some computer experience will greatly assist the user to pass through the learning curve
more rapidly

User Manual for AML Oceanographic’s Micro Pressure Sensor
AML OCEANOGRAPHIC
In-situ Real-time Detection Measurement
6
2 GETTING STARTED
2.1 Inspecting the Instrument
An inspection of the Micro Pressure Sensor before each use will assist in spotting problems
that could lead to inaccurate data or possible failure. Examine the outside of the shipping
case for evidence of heavy impacts during transport. If signs of damage are visible continue
with the inspection as follows and notify the carrier and the factory of any damage found.
Examine the cable for cuts or wear and check the connector ends for visible damage.
2.2 Connecting the Micro Pressure Sensor to a Computer
The user communicates with the Micro Pressure Sensor via any IBM-PC or compatible
computer or data collection device. An AML supplied data cable will link the two. Refer
to the wiring diagram in Appendix ‘C’. At one end of the cable is a DB25 or DB9 female
connector that plugs into the computer's serial port and at the other end is a 6 pin plug that is
inserted into the communications port of the Micro Pressure Sensor. When this connection
has been made and 8-26 volts DC applied, the instrument is powered up and ready to
communicate with the computer.
WARNING:
A plug or cable must be installed in the connector at all times when the instrument is
immersed in water. Failure to do so will cause corrosion to the connectors and may
cause water damage in the electronics housing.
2.3 Powering the Micro Pressure Sensor
The Micro Pressure Sensor is powered externally via the communications cable. Refer to
the wiring diagram in Appendix ‘C’. The power should be 8-26 volts DC. If an AML data
cable is used, attach the red wire to the positive side of the power supply and the black wire
to ground.

User Manual for AML Oceanographic’s Micro Pressure Sensor
AML OCEANOGRAPHIC
In-situ Real-time Detection Measurement
7
3 COMMUNICATING WITH THE MICRO PRESSURE SENSOR
To communicate with the Micro Pressure Sensor, a terminal emulation program such as
HyperTerminal is required. This program provides the mechanism of communication
between the instrument and an IBM-PC compatible computer. The following pages contain
a brief description on how to configure HyperTerminal to communicate with the Micro
Pressure Logger. When all cables have been connected properly and the appropriate baud
rate/serial port combination chosen, the instrument will return the prompt ( > ). Once the
prompt appears, the Micro Pressure Sensor is ready to accept instructions. Refer to the
Micro Pressure Sensor Command Summary in Section 3.4.
3.1 Configuring HyperTerminal for Communications with the Micro Pressure Sensor
Note: If HyperTerminal has not been installed on your computer, please refer to your Windows™
manual.
1. Use the Start button on the Desktop to access the Programs Folder.
2. Open the Accessories menu.
3. Click on the HyperTerminal program to start the program.
4. Double click on the Hypertrm Icon. (Figure 3.1).
Figure 3.1
5. Fill in the name and choose the Icon.
6. Choose the correct communications port. (Figure 3.2)
Figure 1

User Manual for AML Oceanographic’s Micro Pressure Sensor
AML OCEANOGRAPHIC
In-situ Real-time Detection Measurement
8
Figure 3.2
7. Choose the Baud rate (19200), 8 Data bits, No Parity, 1 Stop bit and no Flow control.
(Figure 4.3)
Figure 3.3

User Manual for AML Oceanographic’s Micro Pressure Sensor
AML OCEANOGRAPHIC
In-situ Real-time Detection Measurement
9
8. Press <Return> to start communicating with the instrument. (Figure 3.4)
Figure 3.4
3.2 RAW/REAL Parameter Values
The Micro Pressure Sensor can display data in two modes, real or raw. Real mode displays
data that has been calculated to produce engineering units.
3.2.1 Raw Data Format
Data displayed in raw mode is strictly a numeric representation of the sensor readings. The
raw data is a five digit integer in the range of 00000 to 65000.
3.2.2 Real Data Format
The real data is a five digit signed number, which gives pressure in dBars expressed as the
following format: ±0000.00.

User Manual for AML Oceanographic’s Micro Pressure Sensor
AML OCEANOGRAPHIC
In-situ Real-time Detection Measurement
10
3.3 COMMAND SUMMARY
All commands are in the form of standard English words. Commands can be entered in
upper or lower case letters. The minimum letters of the command that the instrument will
recognize are enclosed in brackets. All commands are followed by an <ENTER> or
<RET>
Command: VER (Version)
This command will display the instrument header. The format is as follows;
Micro Pressure Sensor V1.11A SN:7016-P
>
Command: RAW [RA]
This command will set the instrument to output RAW uncorrected data when using the
MONITOR, SCAN or DUMP commands.
Command: REAL [RE]
This command will set the instrument to output Real corrected engineering data when using
the MONITOR or SCAN commands.
Command: / [/]
This command is used to toggle RAW and REAL modes of operation.
Command: SCAN [S]
This command outputs one scan of data.
Command: MON [M]
This command sets the instrument to continuously output data at the rate programmed with
the SET command. Pressing any key will discontinue the monitor command.
Command: SET [SE] SAMPLE RATE [S]
This command sets the rate at which the instrument will take samples (or scans). The sample
rate is in the form of a number followed by the time units. The allowable time units are listed
below:

User Manual for AML Oceanographic’s Micro Pressure Sensor
AML OCEANOGRAPHIC
In-situ Real-time Detection Measurement
11
CONTINUOUS [C]
/SECONDS [/S]
SECONDS [S]
MINUTES [M]
HOURS [H]
The following examples demonstrate some of the possible permutations of this command.
SET SAMPLE 6 HOUR This will set the sample rate for one sample every 6 hours.
SE SA 30 SEC This will set the sample rate for one sample every 30 seconds.
SET S 5 S This will set the sample rate for one sample every 5 seconds.
SE S CONTINUOUS This sets the sample rate at the maximum of 25 scans per
second.
Command: SET DETECT ab [SE D ab]
Where
a = a Hex number between 0-F
b = a Hex number between 0-F
This command sets the detection mode of the instrument on power up.
The DETECT command can be used to set the Micro CTD to start up in the Auto baud mode
or to set the instrument to default to a specific baud rate at power up.
The ‘a’ value represents how many times the Micro CTD will try to determine the baud rate
(when the enter key is pressed) before it defaults to the baud rate set by the value of ‘b’. If a
= 0 the Micro CTD will not auto baud and will default to the baud rate specified by the
value of ‘b” at each power up.
Specific values of ‘b’ and the corresponding baud rates are outlined in the table below.
b value Baud rate
1 1200
2 1200
3 2400
4 4800
5 9600
6 19200
7 38400

User Manual for AML Oceanographic’s Micro Pressure Sensor
AML OCEANOGRAPHIC
In-situ Real-time Detection Measurement
12
Example 1:
>set detect 97
In the above example, the Micro CTD will try 9 times to auto baud. If the instrument is not
able to establish a baud rate, it will default to 38400 baud.
Example 2:
>set detect 05
In the above example, the Micro CTD will not try to auto baud, but will simply default to
9600 baud on power up.
Command: SET SN nnnn
This command sets the serial number of the instrument. This command is intended to
facilitate integration into OEM equipment. To display the instruments serial number use the
VER command.
Example:
>set sn 7245
To display the serial number,
>ver
Micro CTD Sensor V2.07 SN:7245-CTD
Copyright© 2001-2003, AML Oceanographic
0MB of Memory
Warning: Changing the instruments serial number will adversely effect the
operation of Smart Talk or ISS software.
Command: DIS C (Display)
This command will display the instrument’s current calibration coefficients.
>Dis c returns the instruments calibration coefficients
Command: DIS S
This command displays the current scan rate.
Example:
>DIS S
sample rate is 1 seconds

User Manual for AML Oceanographic’s Micro Pressure Sensor
AML OCEANOGRAPHIC
In-situ Real-time Detection Measurement
13
4 MAINTENANCE
The Micro Pressure Sensor has been designed to minimize user maintenance. To keep the
instrument in top condition the following maintenance is required:
After each deployment, the Micro Pressure Sensor case should be washed thoroughly with
fresh water.
Rinse (with freshwater) and dry the connector if contamination with saltwater is suspected.
Saltwater inside the connector will eventually corrode the contacts causing intermittent
communications.
Caution:
The pressure sensor is fragile. Contact with a sharp object to the pressure sensor face
could damage it.
4.2 Main O-Ring Maintenance
Normal use of the Micro Pressure Sensor will not require the main O-ring to be changed.
However, the main O-ring may be inspected periodically and greased to keep the O-ring
in good condition. If during an inspection damage is suspected please do the following.
Note: Do not use sharp objects to remove the main O-ring from its groove.
1. Using the method outlined in Figure 4.0, use the thumb and index finger to remove
the main O-ring from its groove.
2. Clean the O-ring using a tissue or clean cloth.
3. Inspect the O-ring for cuts or nicks. An eyepiece or magnifying glass will help.
Replace if necessary.
4. Clean the O-ring groove located on the end cap with a swab or tissue.
5. Inspect the O-ring groove for scratches or dirt.
6. Lightly coat the O-ring with silicon grease and replace it onto the end cap.
7. Clean the O-ring surface located on the inside of the pressure housing with a swab or
tissue.
8. Inspect the O-ring surface for dirt or scratches.
9. Lightly coat the O-ring surface on the inside of the pressure housing with silicone
grease.

User Manual for AML Oceanographic’s Micro Pressure Sensor
AML OCEANOGRAPHIC
In-situ Real-time Detection Measurement
14
O-Ring
To remove an O-ring squeeze the end cap
between thumb and finger and slide forward,
the O-ring will bulge and can be easily removed
with the other hand. Do not be tempted to dig the
O-ring out of the groove as this will result in
damage to either the O-ring or the groove surface.
Figure 4.0

User Manual for AML Oceanographic’s Micro Pressure Sensor
AML OCEANOGRAPHIC
In-situ Real-time Detection Measurement
15
5 CALIBRATION
The Micro Pressure Sensor sensor must be calibrated occasionally. The pressure sensor was
calibrated at the factory at the time of manufacture. This should remain within published
specifications for periods of 1 - 2 years, depending on the amount of use, depth of
deployment, and other conditions occurring in the deployment environment. Sensor
accuracy is also dependent upon proper care and maintenance by the user. Re-calibration of
these sensors must be done at the factory.
The sensor is calibrated by recording the instrument's raw data to known reference points at
different temperatures. This data is applied to a curve fitting algorithm to produce
calibration coefficients for both pressure and temperature effects. Each set of coefficients is
permanently stored in the instrument's memory.
Calibration coefficients are not interchangeable. Each set is unique to each instrument. The
calibration coefficients for the instrument to which this manual belongs are listed on the
‘Customer Documentation CD’ sent with the instrument. The user will need these
coefficients if the instrument is to be used in the RAW mode for post processing purposes.
5.1 Theory
The pressure electronics use the following formula to convert raw data to engineering units
(dbar):
P = A+B*Npt+C*Npt2+D*Npt3+(E+F*Npt+G*Npt2+H*Npt3)*Np+(I+J*Npt+K*Npt2+L*Npt3)*Np2
Where: P = pressure in dBar.
Npt, Np = raw values
A through L are calibration coefficients determined at the factory

User Manual for AML Oceanographic’s Micro Pressure Sensor
AML OCEANOGRAPHIC
In-situ Real-time Detection Measurement
16
APPENDIX `A': Troubleshooting Guide
The following section outlines some of the most common problems encountered by users of the
Micro Pressure Sensor. A brief list of suggested solutions has been provided. If the difficulties
persist, please do not hesitate to contact the AML Oceanographic service staff.
Problem:
Micro Pressure Sensor does not communicate with the computer.
Solutions:
Check the power supply for correct voltage setting (8-26 Volts DC) and or current limiting.
The serial port chosen is incorrect. Most IBM-PC compatible computers have only one serial
port; therefore the user should choose one of the COM1 settings. However, if a COM2 port
exists, the user must take care in determining which port the cable has been connected to and
choose the appropriate baud rate/port combination.
The communications set up of the computer is incorrect. The Micro Pressure Sensor will be
factory set to no parity, 1 stop, 8 data bits and will automatically determine the baud rate after
the reception of an <ENTER> or <RET.

User Manual for AML Oceanographic’s Micro Pressure Sensor
AML OCEANOGRAPHIC
In-situ Real-time Detection Measurement
17
APPENDIX `B': General Layout

User Manual for AML Oceanographic’s Micro Pressure Sensor
AML OCEANOGRAPHIC
In-situ Real-time Detection Measurement
18
APPENDIX `C': Wiring Diagram
www.appliedmicrosystems.com
2071 MALAVIEW AVE. W., SIDNEY, B.C. CANADA V8L 5X6
TEL:(250) 656 0771 FAX: (250) 655 3655
DATE SLDWR /DWG NO.
25-AUG-03
TITLE
MC3-01912-GAA-A
SYSTEM
MICRO SENSORS
MICRO SENSOR WIRING
DIAGRAM MICRO8/RS232
MICRO SENSOR PACK
9 Pin "D"
Connector
25 Pin "D"
Connector
5
1
N/C
Screen
Blue
6
7
5
1. Power supplied by customer supplied 12VDC Power or 12VDC AML Battery Pack (optional)
PN# SUB-G0126 - 500meter or SUB-G0128 - 4500 meter
Signal (Tx)
Ground
Signal (Rx)
Power +
3
2
Red
White
Black
Green
2
N/C
7
3
1
3
4
2
Pin
NOTE:
2
8
64
7 3
5
6
5
4
3
1
28
7
MCBH-8-FS PMCIL-8-MP
Ground (sig)
Signal (Tx)
Ground
Signal (Rx)
Power + 1
Red
N/C
Brown
Screen
Blue
White
Green
Black
6
7
5
3
4
2
Pin
OPTIONAL
CONNECTOR
CONNECTOR
OPTIONAL
Ground (sig) Brown
N/C
N/C
Table of contents
Other AML Oceanographic Accessories manuals
Popular Accessories manuals by other brands

Carrier
Carrier 33CSHUMID-01 owner's manual

BOMANN
BOMANN KSG 7282 instruction manual

Bandini
Bandini GI.BI.DI DGF Series Instructions for installations

Endress+Hauser
Endress+Hauser Cleanfit P CPA472 operating instructions

PT
PT PT610 Basic instruction manual

SICK
SICK SureSense HTB18L Series operating instructions

DirecTV
DirecTV Wireless Cinema Connection Kit user guide

Alarmtech
Alarmtech MC 740-E-M14 instruction manual

Festo
Festo SOEL-RTD-Q50-PP-S-7L Mounting and operating instructions

IPVideo Corporation
IPVideo Corporation Halo Administrator's manual

Baxi
Baxi Slinky Operating & installation guide

Dorner
Dorner 6100 Series Maintenance & parts manual