Amprobe DM9C User manual
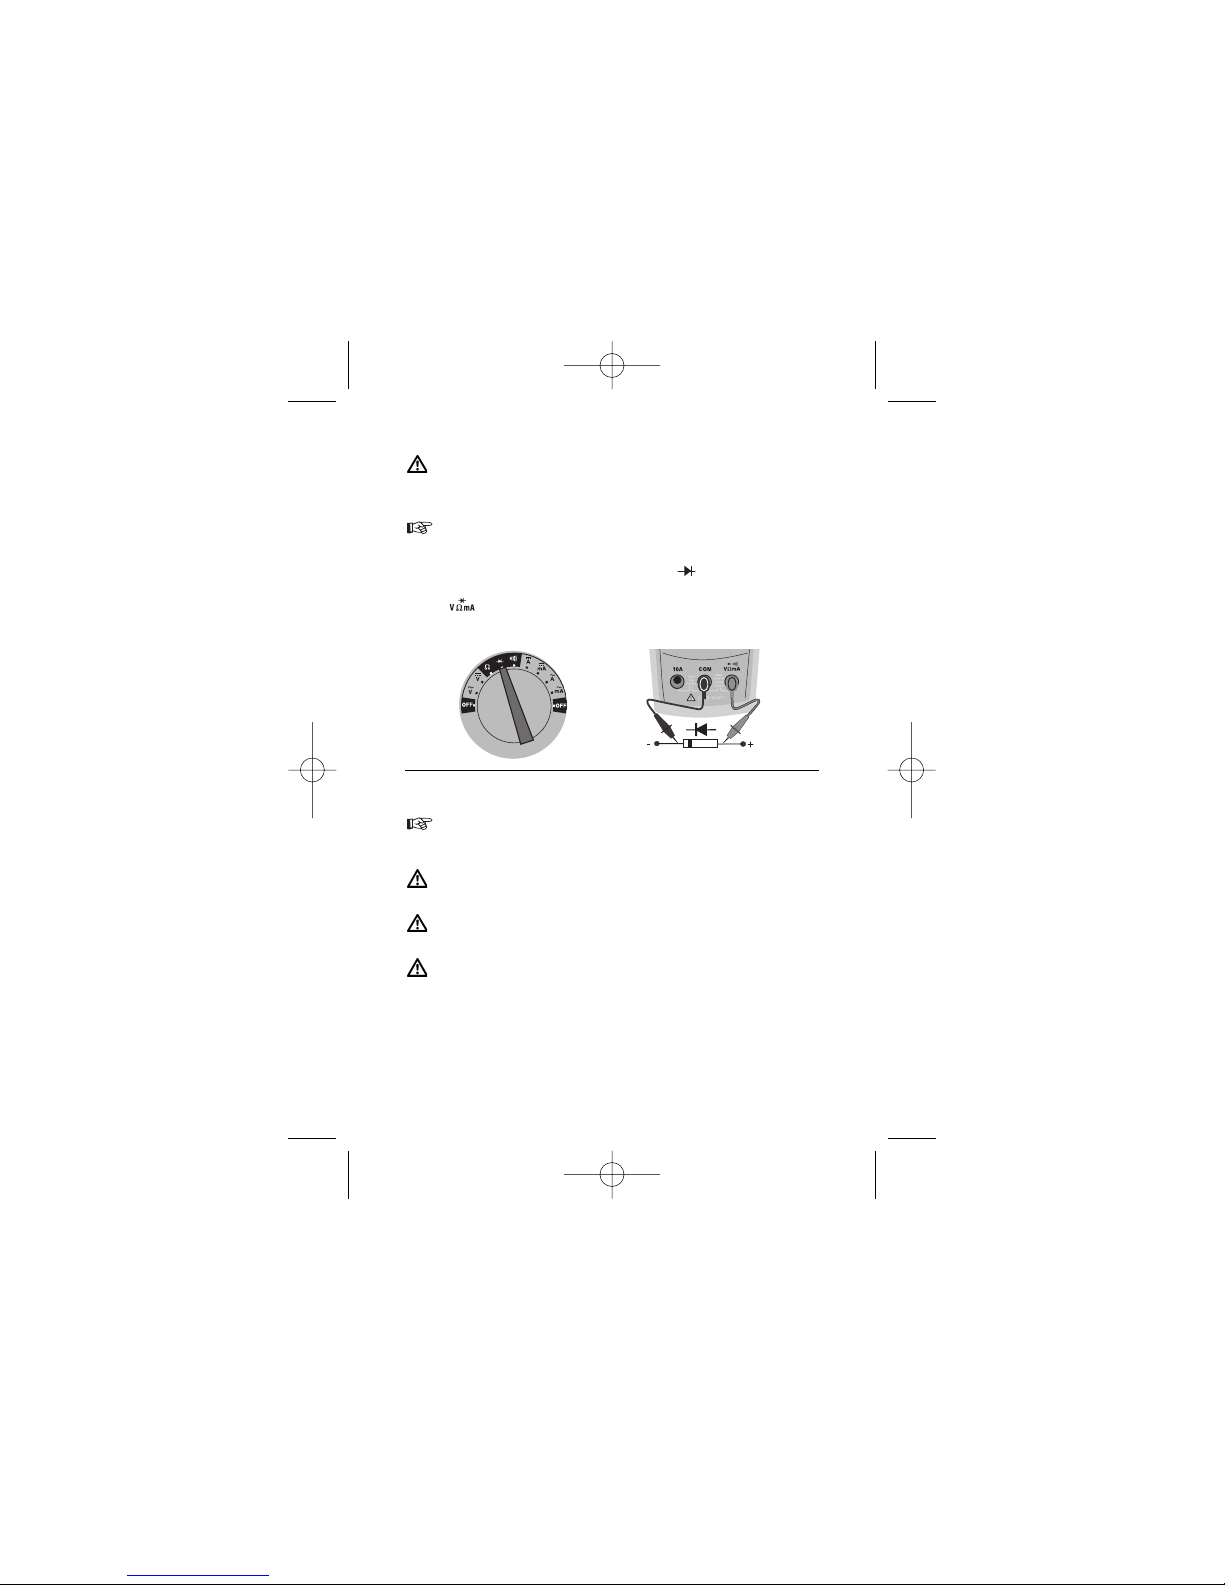
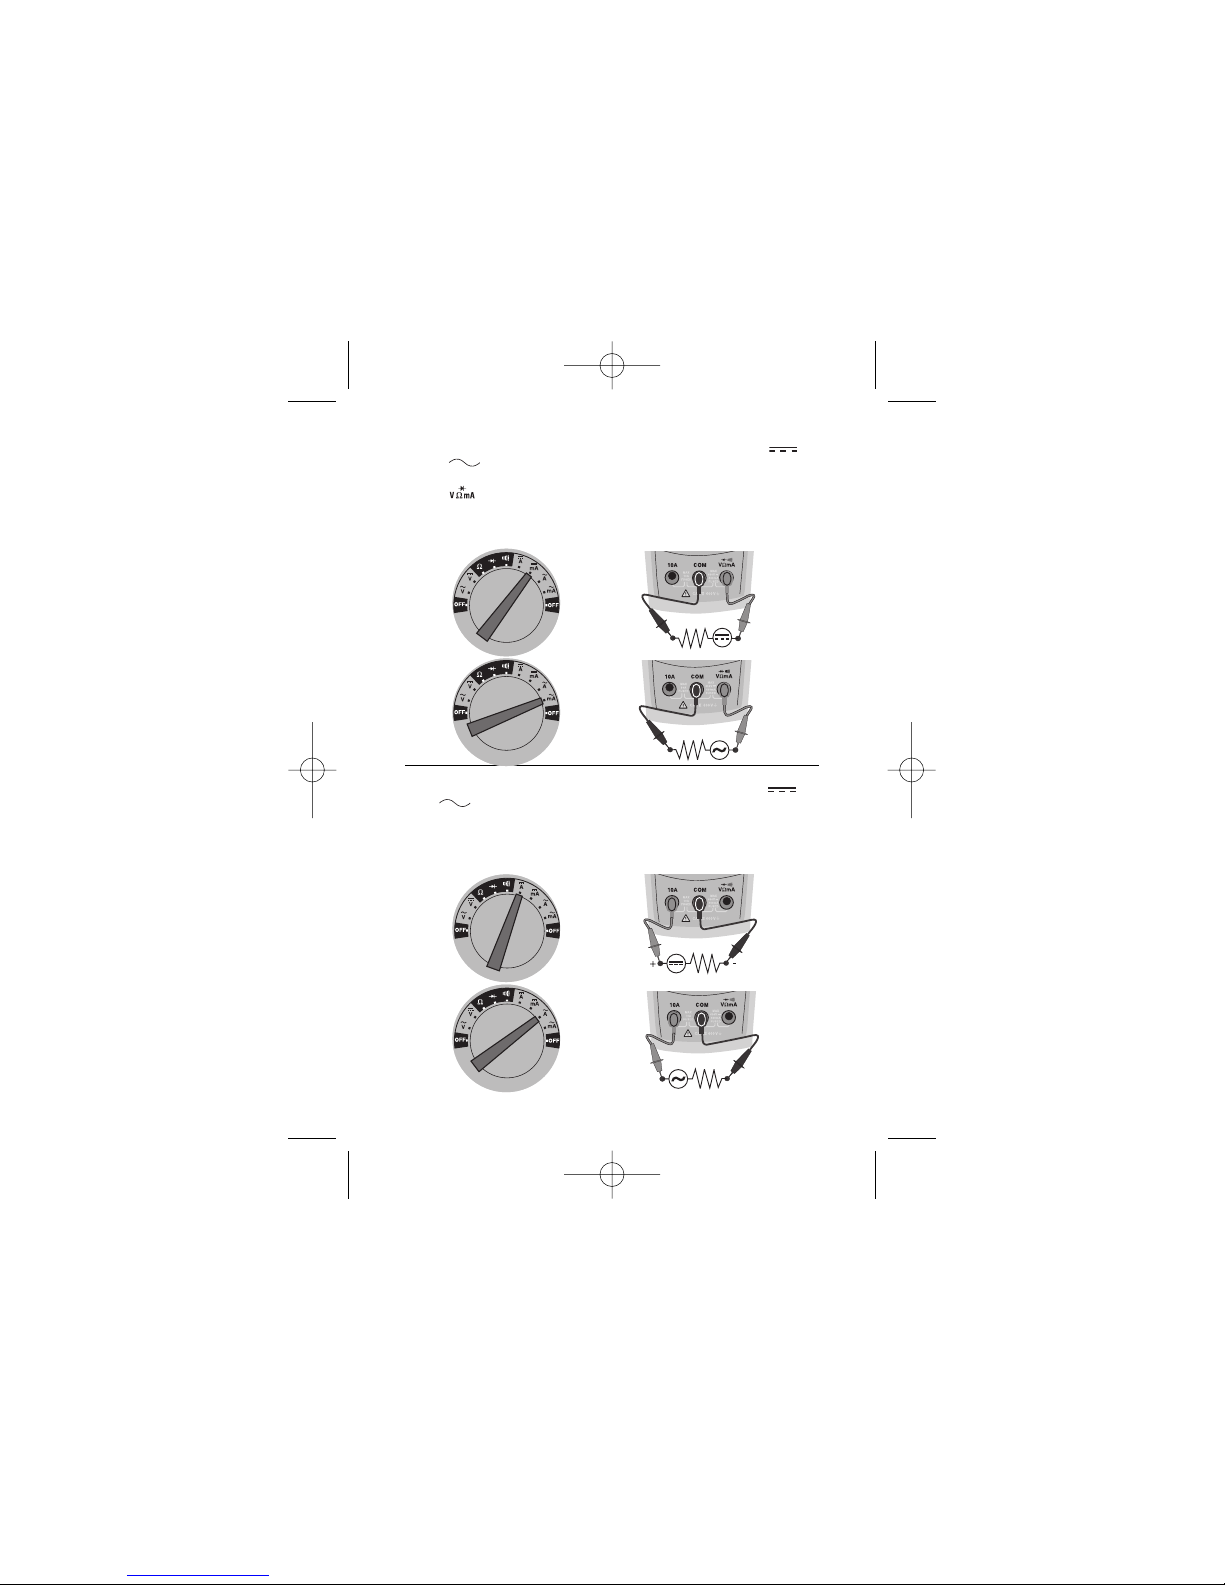
2526044_Rev2_dm9c.qxd 10/26/06 9:50 AM Page 1

2526044_Rev2_dm9c.qxd 10/26/06 9:50 AM Page 2

Contents
Introduction..........................................................................................2
Contents ..........................................................................................3
Transport and Storage ..........................................................................3
Safety ........................................................................................3
Appropriate Usage ....................................................................4
Feature Diagram ..................................................................................4
Operation ..........................................................................................5
Voltage Measurement ................................................................5
DC Voltage Measurement ..........................................................5
AC Voltage Measurement ..........................................................5
Resistance Measurement ..........................................................6
Continuity Test ..........................................................................6
Diode Test..................................................................................7
Current Measurement................................................................7
Current Measurement 400 mA ..................................................8
Current Measurement 10 A........................................................8
Changing the batteries ..........................................................................9
Fuse replacement..................................................................................9
Maintenance ........................................................................................10
Cleaning ....................................................................................10
Calibration Interval ....................................................................10
Specifications ......................................................................................10
Warranty ..........................................................................................13
Repair ..........................................................................................13
1
DM9C Multimeter
Users Manual
2526044_Rev2_dm9c.qxd 10/26/06 9:50 AM Page 1

References marked on instrument or in users manual
The users manual contains information and references, necessary for safe
operation and maintenance of the instrument. Prior to using the instrument the
user is kindly requested to thoroughly read the users manual and comply with it
in all sections. Failure to read the users manual or to comply with the warnings
and references contained herein can result in serious bodily injury or instrument
damage
Introduction
The Amprobe DM9C is a universal, multi-purpose electrical measuring instrument. It
complies with the standards DIN VDE 0411 and EN 61010, and provide safe, reliable
operation. The DM9C multimeter is a valuable tool for all sorts of measurements in both
trade and industry.
• Digital Multimeter with extra large display
• 3 3/4 LC-Display with 4000 digits
• Safety according to DIN VDE 0411, EN 61010, IEC 61010, CAT II/600 V
• Voltage-, Current- and Resistance Measurement
• Diode- and Continuity Test
• Autoranging
• Rubber holster for impact protection
After unpacking, check that the instrument is complete, and that all accessories are
present.
2
Warning of a potential danger,
comply with users manual. Equipment protected
throughout by double
insulation or reinforced
insulation.
Caution! Dangerous voltage.
Danger of electrical shock.
Canadian Standards Association.
Conformity symbol, the
instrument complies with the
valid directives. It complies
with the EMC Directive
(89/336/EEC) and the Low
Voltage Directive (73/23/EEC)
with their valid standards.
Reference. Please use utmost
attention.
Symbol for the marking of
electrical and electronic
equipment (WEEE Directive
2002/96/EC).
2526044_Rev2_dm9c.qxd 10/26/06 9:50 AM Page 2

Contents
1 pc. Amprobe DM9C
1 pc. Holster
2 pcs. Test Leads (1ea. red, 1ea. black)
2 pc. Batteries 1.5V, IEC R03
1 pc. Users Manual
Transport and Storage
• Please keep the original packaging for later transport, e.g. for calibration. Any
transport damage due to faulty packaging will be excluded from warranty claims.
• In order to avoid instrument damage, it is advised to remove batteries when not using
the instrument over a certain time period. However, should the instrument be
contaminated by leaking battery cells, you are kindly requested to return it to the
factory for cleaning and inspection.
• Instruments must be stored in dry and closed areas. In the case of an instrument
being transported in extreme temperatures, a recovery time of minimum 2 hours is
required prior to instrument operation.
Safety
• The multimeter has been manufactured and tested to comply with the safety
regulations for electronic measuring equipment contained in IEC61010 and EN
61010, and left the factory in a safe condition. To maintain this condition, the user
must observe the safety instructions contained in this users manual.
• To avoid electric shock, safety measures must be observed when working with
voltages higher than 120 V (60 V) DC or 50 V (25 V) RMS AC. These are the
values of threshold contact voltages given by DIN VDE.
• Before each measurement make sure that the test leads and the instrument are
undamaged.
• Onlyhandletestleadsandprobesonthegripsprovided.Avoidtouching probes under
any circumstances.
• Measurements in dangerous proximity of electrical installations are only to be
executed when instructed by a responsible electrical specialist, and never alone.
• The relevant safety regulations for electrical plant and equipment must be
observed during all operations.
• The instrument must only be used in the specified ranges.
• Before opening the instrument, it must be disconnected from all circuits.
• Protect the instrument from prolonged exposure to direct sunlight.
3
2526044_Rev2_dm9c.qxd 10/26/06 9:50 AM Page 3

Appropriate Usage
• The instrument may only be used under those conditions and for those purposes for
which it was conceived. For this reason, in particular the safety references, the
technical data including environmental conditions and the usage in dry environments
must be followed.
• When modifying or changing the instrument, the operational safety is no longer
ensured.
• The instrument may only be opened by an authorised service technician, e.g. for fuse
replacement.
Feature Diagram
1. LCD
2. Measurement function selection switch
3. Input socket for measurement ranges
4. Ground connection for all measurement ranges
5. Input socket for current measurement range 10 A
4
DM9C
1
2
3
4
5
2526044_Rev2_dm9c.qxd 10/26/06 9:50 AM Page 4

Operation
Measurements in dangerous proximity of electrical systems are only to be carried
outincompliancewiththeinstructionsofaresponsibleelectronicstechnician,and
never alone.
Test leads and test probes may only be touched at handle surfaces provided. Avoid
the direct contact of the test probes. Prior to switching to a new measurement
rangeoranewtypeofmeasurement,removeall connections from UUT (unit under
test).
Measurements have to be carried out by respecting the standards.
Voltage Measurement
Toavoidelectrical shock, the valid safety measures and VDEdirectivesstrictlyhave
to be met concerning excessive contact voltage when working with voltages
exceeding 120V (60V) DC or 50V (25V)rms AC.
DC Voltage Measurement
1) Select measurement range V via measurement function selection switch.
2) Connect the black test lead to the COM socket and the red test lead to the
socket.
3) Connect test leads to UUT.
4) Read the measurement result displayed on the screen.
AC Voltage Measurement
1) Select measurement range V via measurement function selection switch.
2) Connect the black test lead to the COM socket and the red test lead to
the socket.
3) Connect test leads to UUT.
4) Read the measurement result displayed on the screen.
5
2526044_Rev2_dm9c.qxd 10/26/06 9:50 AM Page 5

Resistance Measurement
Prior to any resistance measurement it has to be ensured that the resistor to be
tested does not have live voltage across it. Failure to comply with this
prescription can lead to dangerous user injuries or cause instrument damage.
Additionally, foreign voltages falsify the measurement result.
1) Select measurement range via measurement function selection switch.
2) Connect the black test lead to the COM socket and the red test lead to
the socket.
3) Connect the test leads to UUT.
4) Read the measurement result displayed on the screen.
Continuity Test
Prior to any continuity test, it must be ensured that the resistance to be measured
does not have live voltage across it.. Failure to comply with this prescription can
lead to dangerous user injuries or cause instrument damage. Additionally, foreign
voltages falsify the measurement result.
1) Position measurement function selection switch to measurement range.
2) Connect the black test lead to the COM socket and the red test lead to
the socket.
3) Connect test leads to UUT.
4) Read the measurement result displayed on the screen.
Acoustic beeper will sound if resistance is less than approx. 60 ohms.!
6
2526044_Rev2_dm9c.qxd 10/26/06 9:50 AM Page 6

Diode Test
Prior to any diode test, it must be ensured, that the diode to be tested does not
have live voltage across it. Failure to comply with this prescription can lead to
dangerous user injuries or cause instrument damage. Additionally, foreign
voltages falsify the measurement result.
Resistors and semiconductor paths in parallel to the diode cause falsified
measurement results.
1) Position measurement function selection switch to measurement range.
2) Connect the black test lead to the COM socket and the red test lead to
the socket.
3) Connect test leads to UUT.
4) Read the measurement result displayed on the screen.
Current Measurement
Ensure that the measurement circuit is not live when connecting the
measurement instrument.
The instruments may only be used in current circuits protected at 16 A up to a
nominal voltage of 600 V.
The nominal cross section of connecting line has to be respected and a safe
connection has to be ensured.
After instrument fuse tripping eliminate the cause for the tripping prior to fuse
replacement.
7
2526044_Rev2_dm9c.qxd 10/26/06 9:50 AM Page 7

Current Measurement 400 mA
1) Position measurement function selection switch to mA or
mA measurement range.
2) Connect the black test lead to the COM socket and the red test lead to
the socket..
3) Connect test leads (in series) to UUT.
4) Read the measurement result displayed on the screen.
If display shows ”1” on the left, change selection to 10A range.
Current Measurement 10 A
1) Position measurement function selection switch to A or
A measurement range.
2) Connect the black test lead to the COM socket and the red test lead to the 10 A
socket.
3) Connect test leads to UUT.
4) Read the measurement result displayed on the screen.
8
DM9C
2526044_Rev2_dm9c.qxd 10/26/06 9:50 AM Page 8

Changing the batteries
Prior to storage battery replacement, disconnect the instrument from any
circuits.
Only use batteries as described in the specifications.
If the symbol for Low-battery appears in the upper left corner of the display, the
battery must be changed.
This is carried out as follows:
1) Separate the Amprobe multimeter DM9C from any circuit, and remove the test leads.
2) Switch the instrument off
3) Open the housing by removing the 4 screws on the rear face.
4) Remove the old batteries
5) Insert new batteries (type 2 x 1,5 V IEC LR6), taking care that the polarity is
correct. Make sure that no wires are trapped between the 2 halves of the
housing, and close it again.
6) The instrument is now ready for further use.
Please consider your environment when you dispose of batteries. They belong in
a disposal area for hazardous waste.
Please, comply with the respective valid regulation regarding the return,
recycling and disposal of used batteries.
If an instrument is not used over an extended time period, the batteries must be
removed. Should the instrument be contaminated by leaking battery cells, the
instrument has to be returned for cleaning and inspection to the factory.
Fuse replacement
Prior to fuse replacement, disconnect the instrument from any circuits.
Only use fuses of voltage and current values as described in the specifications.
Using auxiliary fuses, in particular short-circuiting fuse holders is prohibited and
can cause instrument destruction or serious bodily injury of operator.
1) Separate the Amprobe multimeter DM9C from any circuit, and remove the test leads
and holster.
2) Switch the instrument off and remove the Holster.
3) Open the housing by removing the 4 screws on the rear face.
4) Remove the defective fuse
5) Insert a new fuse. Make sure that no wires are trapped between the 2 halves of the
housing, and close it again.
6) The instrument is now ready for further use.
9
2526044_Rev2_dm9c.qxd 10/26/06 9:50 AM Page 9

Maintenance
Provided it is used in accordance with the users manual, the instrument needs no
special maintenance.
Cleaning
If the instrument is dirty after daily usage, it is advised to clean it by using a humid cloth
and a mild household detergent.
Prior to cleaning, ensure that instrument is switched off and disconnected from
external voltage supply and any other instruments connected (such as UUT,
control instruments, etc.). Never use acid detergents or dissolvants for cleaning.
Calibration Interval
We suggest a calibration interval of one year. If the instrument is used very often or if
it is used under rough conditions we recommend shorter intervals. If the instrument is
used only a few times a year, the calibration interval can be extended to 3 years.
Specifications (at 23° C ± 5° C, max. 75 % rel. humidity)
Display: 3 3/4 digits, LC-Display
Total display: 4000 digit
Polarity display: automatic
Battery status display: Battery symbol appears (< 2.5 V)
Auto-Power-Off: approx. 15 min.
Overvoltage class: CAT II / 600 V
Degree of contamination: 2
Power supply: 2 x 1.5 V, IEC R03 or LR03
Power consumption: approx. 1.5 mA (typical)
Dimensions: 170 x 85 x 50 mm incl. holster
Weight: approx. 410 g (incl. holster)
Ambient conditions:
Operation temperature: 0...50°C (0...80% rel. humidity)
Storage temperature: -10...60°C (0...80% rel.humidity)(without battrie)
Height above sea level: up to 2000 m
Overload protection:
Fuse (mA) : FF500mA / 700V / 50kA , 6x32mm
Fuse (A) : F 10A/600V/50 kA, 6x32mm
Temperature coefficient: 0.15 x specified accuracy per 1°C (<18°C and >28°C)
10
2526044_Rev2_dm9c.qxd 10/26/06 9:50 AM Page 10

Voltage DC
Range Resolution Accuracy Overload protection
400 mV 0.1 mV
4 V 1 mV
40 V 10 mV ± (0.8% rdg.+3D) 600 Veff
400 V 100 mV 600 V
600 V 1 V
Input impedance: 10 MOhm,
Voltage AC (50...400 Hz)
Range Resolution Accuracy Overload protection
4000 mV 1 mV
40 V 10 mV ± (1.3% rdg.+5D) 600 Veff
400 V 100 mV
600 V 1 V
Input impedance: 10 MOhm,
Current DC
Range Resolution Accuracy
40 mA 0.01 mA
400 mA 0.1 mA ± (1.5% rdg.+3 D)
10 A 0.01 A ± (2% rdg.+3 D)
8 A continuously,
10 A for 10 minutes maximum followed by a 20 minutes cooling period
Overload protection:
Fuse (mA) : FF500mA / 700V / 50kA , 6x32mm
Fuse (A) : F 10A/600V/50 kA, 6x32mm
11
2526044_Rev2_dm9c.qxd 10/26/06 9:50 AM Page 11

Current AC (50...400 Hz)
Range Resolution Accuracy
40 mA 0.01 mA
400 mA 0,1 mA ± (1.5% rdg.+3 D)
10 A 0.01 A ± (2% rdg.+3 D)
8 A continuously,
10 A for 10 minutes maximum followed by a 20 minutes cooling period
Overload protection:
Fuse (mA) : FF500mA / 700V / 50kA , 6x32mm
Fuse (A) : F 10A/600V/50 kA, 6x32mm
Resistance
Range Resolution Accuracy Overload protection
400 !0.1 !
4 k!1 !
40 k!10 !
400 k!100 !± (1.5% rdg.+3 D) 600 Veff
4 M!1 k!
40 M!10 k!
Test Voltage <3,2 V DC
Continuity Test
Range Resolution Test Voltage Overload protection
400 !0.1 !< 3.2 V DC 600 Veff
Signal: < 60 !(±50%)
Diode Test
Range Resolution Test Voltage Overload protection
1.0 V 1 mV < 3.2 V DC 600 Veff
12
2526044_Rev2_dm9c.qxd 10/26/06 9:50 AM Page 12

Limited Warranty and Limitation of Liability
Your Amprobe product will be free from defects in material and workmanship for 1 year
from the date of purchase. This warranty does not cover fuses, disposable batteries or
damage from accident, neglect, misuse, alteration, contamination, or abnormal
conditions of operation or handling. Resellers are not authorized to extend any other
warranty on Amprobe’s behalf. To obtain service during the warranty period, return the
product with proof of purchase to an authorized Amprobe Test Tools Service Center or
to an Amprobe dealer or distributor. See Repair Section for details. THIS WARRANTY
IS YOUR ONLY REMEDY. ALL OTHER WARRANTIES - WHETHER EXPRESS, IMPLIED
OR STAUTORY - INCLUDING IMPLIED WARRANTIES OF FITNESS FOR A PARTICULAR
PURPOSE OR MERCHANTABILITY, ARE HEREBY DISCLAIMED. MANUFACTURER
SHALL NOT BE LIABLE FOR ANY SPECIAL, INDIRECT, INCIDENTAL OR
CONSEQUENTIAL DAMAGES OR LOSSES, ARISING FROM ANY CAUSE OR THEORY.
Since some states or countries do not allow the exclusion or limitation of an implied
warranty or of incidental or consequential damages, this limitation of liability may not
apply to you.
Repair
All test tools returned for warranty or non-warranty repair or for calibration should be
accompaniedbythefollowing:yourname,company’sname,address,telephonenumber,
and proof of purchase. Additionally, please include a brief description of the problem or
the service requested and include the test leads with the meter. Non-warranty repair or
replacement charges should be remitted in the form of a check, a money order, credit
card with expiration date, or a purchase order made payable to Amprobe® Test Tools.
In-Warranty Repairs and Replacement – All Countries
Please read the warranty statement and check your battery before requesting repair.
During the warranty period any defective test tool can be returned to your Amprobe®
Test Tools distributor for an exchange for the same or like product. Please check the
“Where to Buy” section on www.amprobe.com for a list of distributors near you.
Additionally, in the United States and Canada In-Warranty repair and replacement units
can also be sent to a Amprobe® Test Tools Service Center (see next page for address).
13
2526044_Rev2_dm9c.qxd 10/26/06 9:50 AM Page 13

Non-Warranty Repairs and Replacement – US and Canada
Non-warranty repairs in the United States and Canada should be sent to a Amprobe®
TestToolsService Center. Call Amprobe® Test Tools or inquire at your point of purchase
for current repair and replacement rates.
In USA In Canada
Amprobe Test Tools Amprobe Test Tools
Everett, WA 98203 Mississauga, ON L4Z 1X9
Tel: 877-993-5853 Tel: 905-890-7600
Fax: 425-446-6390 Fax: 905-890-6866
Non-Warranty Repairs and Replacement – Europe
European non-warranty units can be replaced by your Amprobe® Test Tools distributor
for a nominal charge. Please check the “Where to Buy” section on www.amprobe.com
for a list of distributors near you.
European Correspondence Address*
Amprobe® Test Tools Europe
P.O. Box 1186
5602 BD Eindhoven
The Netherlands
*(Correspondence only – no repair or replacement available from this address.
European customers please contact your distributor.)
14
2526044_Rev2_dm9c.qxd 10/26/06 9:50 AM Page 14

Inhalt
Einleitung ..........................................................................................2
Lieferumfang ........................................................................................3
Transport und Lagerung........................................................................3
Sicherheitsmaßnahmen ........................................................................3
Bestimmungsgemäße Verwendung ......................................................4
Bedienelemente ..................................................................................4
Durchführen von Messungen................................................................5
Spannungsmessung ................................................................5
Gleichspannungsmessung DC ..................................................5
Wechselspannungsmessung AC................................................5
Widerstandmessung..................................................................6
Durchgangsprüfung ..................................................................6
Dioden-Test ..............................................................................7
Strommessung ........................................................................7
Strommessung 400 mA ............................................................8
Strommessung 10 A..................................................................8
Batteriewechsel ....................................................................................9
Sicherungswechsel ..............................................................................9
Wartung ..........................................................................................10
Reinigung ..................................................................................10
Kalibrierintervall ........................................................................10
Technische Daten..................................................................................10
Beschränkte Gewährleistung und Haftungsbeschränkung ....................13
Reparatur ..........................................................................................13
1
Bedienungdsanleitung
DM9C Multimeter
2526044_Rev2_dm9c.qxd 10/26/06 9:50 AM Page 1

Auf dem Gerät und in der Bedienungsanleitung vermerkte
Hinweise:
Die Bedienungsanleitung enthält Informationen und Hinweise, die zu einer
sicheren Bedienung und Nutzung des Gerätes notwendig sind. Vor der
Verwendung des Gerätes ist die Bedienungsanleitung aufmerksam zu lesen und
in allen Punkten zu befolgen. Wird die Anleitung nicht beachtet oder sollten Sie es
versäumen, die Warnungen und Hinweise zu beachten, können ernste
Verletzungen des Anwenders bzw. Beschädigungen des Gerätes eintreten.
Einleitung / Lieferumfang
Die Amprobe Multimeter DM9C ist ein universell einsetzbares Messinstrument. Das
Messgerät wird nach den neuesten Normen gebaut und gewährleistet ein sicheres und
zuverlässiges Arbeiten. Das Multimeter ist im handwerklichen und industriellen Bereich
eine wertvolle Hilfe.
• Digitales Multimeter mit extra großer Anzeige
• 3 3/4-stellige, digitale Anzeige mit 4000 Digits
• Sicherheit nach DIN VDE 0411, EN 61010, IEC 61010, CAT II/600 V
• Spannung-, Strom- und Widerstandsmessung
• Dioden- und akustische Durchgangsprüfung
• Automatische Messbereichswahl
• Stoß- und schlagfest durch serienmäßig zugehörende Schutzhülle
Bitte überprüfen Sie nach dem Auspacken des Gerätes den Lieferumfang auf
Vollständigkeit.
2
Achtung: Warnung vor einer
Gefahrenstelle,
Bedienungsanleitung beachten.
Schutzisolierung; Gerät der
SchutzklasseII entsprechendIEC
61140.
Spannung: Vorsicht! Gefährliche
Spannung,Gefahrdeselektrischen
Schlages.
Canadian Standards Association.
CEKonformitäts-Zeichen,bestätigt
die Einhalten der gültigen
Richtlinien.DieAnforderungender
EMV-Richtlinie 89/336/EWG und
der Niederspannungsrichtlinie
73/23/EWG mit den jeweils
betreffenden Normen werden
ebenfalls eingehalten.
Hinweis:Bitteunbedingtbeachten. Kennzeichnung elektrischer und
elektronischer Geräte (WEEE
Richtlinie 2002/96/EG)
2526044_Rev2_dm9c.qxd 10/26/06 9:50 AM Page 2

Im Lieferumfang ist enthalten:
1 St. Amprobe DM9C
1 St. Schutzhülle
2 St. Messleitungen (1x rot, 1x schwarz)
2 St. Batterien 1,5 V, IEC R03
1 St. Bedienungsanleitung
Transport und Lagerung
• BittebewahrenSiedieOriginalverpackungfüreinespätereVersendung,z.B.zurKalibration
auf. Transportschäden aufgrund mangelhafter Verpackung sind von der Garantie
ausgeschlossen.
• Um Beschädigungen zu vermeiden, sollten die Batterien entnommen werden, wenn das
Messgerät über einen längeren Zeitraum nicht benutzt wird. Sollte es dennoch zu einer
Verunreinigung des Gerätes durch ausgelaufene Batteriezellen gekommen sein, muß das
Gerät zur Reinigung und Überprüfung ins Werk eingesandt werden.
• Die Lagerung des Gerätes muß in trockenen, geschlossenen Räumen erfolgen. Sollte das
Gerät bei extremen Temperaturen transportiert worden sein, benötigt es vor dem
Einschalten eine Aklimatisierung von mindestens 2 Stunden.
Sicherheitsmaßnahmen
• Das Amprobe Multimeter DM9C wurde gemäß den Sicherheitsbestimmungen IEC
61010, EN 61010 für elektronische Messgeräte gebaut, geprüft und hat das Werk in
sicherheitstechnisch einwand-freiem Zustand verlassen. Um diesen Zustand zu
erhalten, muß der Anwender die Sicherheitshinweise in dieser Anleitung beachten.
• Um einen elektrischen Schlag zu vermeiden, sind Vorsichtsmaßnahmen zu beachten,
wenn mit Spannungen größer 120 V (60 V) DC oder 50 V (25 V) eff AC gearbeitet
wird.Diese Wertestellennach DIN VDEdie Grenze dernochberührbaren Spannungen
dar (Werte in Klammern gelten für z.B. medizinische oder landwirtschaftliche
Bereiche).
• Vor jeder Messung vergewissern, dass die Messleitungen und das Prüfgerät in
einwandfreiem Zustand sind.
• Die Messleitungen und Prüfspitzen dürfen nur an den vorgesehenen Handgriffen
(Griffflächen) angefaßt werden. Das Berühren der Prüfspitzen ist unter allen
Umständen zu vermeiden.
• Messungen in gefährlicher Nähe elektrischer Anlagen sind nur nach Anweisung einer
verantwortlichen Elektrofachkraft und nicht alleine durchzuführen.
• Bei sämtlichen Arbeiten müssen die Unfallverhütungsvorschriften der gewerblichen
Berufsgenossenschaftenfürelektrische Anlagen und Betriebsmittel beachtet werden.
• DasPrüfgerätdarfnurindenspezifiziertenMessbereicheneingesetztwerden.
• Vor dem Öffnen des Batteriefachs müssen das Gerät von allen Messkreisen getrennt
werden.
3
2526044_Rev2_dm9c.qxd 10/26/06 9:50 AM Page 3

• EineErwärmung des Gerätes durchdirekteSonneneinstrahlungist zu vermeiden. Nur
so kann eine einwandfreie Funktion und eine lange Lebensdauer gewährleistet
werden.
Bestimmungsgemäße Verwendung
• Das Gerät darf nur unter den Bedingungen und für die Zwecke eingesetzt werden, für
die es konstruiert wurde. Hierzu sind besonders die Sicherheitshinweise, die
Technischen Daten mit den Umgebungsbedingungen und die Verwendung in
trockener Umgebung zu beachten.
• Die Betriebssicherheit ist bei Modifizierung oder Umbauten nicht mehr gewährleistet.
• Das Gerät darf nur vom autorisierten Servicetechniker, geöffnet werden.
Bedienelemente
1. LC-Anzeige
2. Wahlschalter Messfunktion
3. Eingangsbuchse für die Messbereiche
4. Masseanschluss für alle Messbereiche
5. Eingangsbuchse für Strommessbereich 10 A
4
DM9C
1
2
3
4
5
2526044_Rev2_dm9c.qxd 10/26/06 9:50 AM Page 4
Table of contents
Languages:
Other Amprobe Multimeter manuals

Amprobe
Amprobe AM-510 User manual

Amprobe
Amprobe PM-60 User manual

Amprobe
Amprobe AU92 User manual

Amprobe
Amprobe ACD-14-PRO User manual

Amprobe
Amprobe AC71B User manual

Amprobe
Amprobe 37XR-A User manual

Amprobe
Amprobe AM50 User manual

Amprobe
Amprobe CR50A User manual

Amprobe
Amprobe 30XR-A User manual

Amprobe
Amprobe AM-540 User manual

Amprobe
Amprobe AM535 User manual

Amprobe
Amprobe 33XR-A User manual

Amprobe
Amprobe 5XP-A User manual

Amprobe
Amprobe AM-1200 User manual

Amprobe
Amprobe AM-560 User manual

Amprobe
Amprobe AM-1E User manual

Amprobe
Amprobe HD160C User manual

Amprobe
Amprobe DM78C User manual

Amprobe
Amprobe ACD-10 TRMS-PLUS User manual

Amprobe
Amprobe AM-250 User manual