AMS CT412 DAB BT User manual

FR-2
DE-3
NL-4
ES-5
IT- 6
EN-1
DA-7
PL-8
SV-9
CZ-10
SK-11
CT412 BT/ CT412 DAB BT
OWNER'S MANUAL
- 12 volts
- 24 volts
CT424 BT/ CT424 DAB BT
SAFETY & COMFORT

EN-1
Safety Information
Safety Information ..................... ..................1
Specifications............................................... 1
Panel Controls..............................................2
Button Tips....................................................3
Bluetooth Functions.................... .................7
USB function Summarization.........................7
Other function.................................................8
DAB+ function.........................................9
FCC................................................13
Troubleshooting............................................14
Thank you for purchasing this product, please
read the manual carefully before operating,
and reserve it for future reference.
PRECAUTIONS
• Only in a 12 or 24-volt DC negative-
ground electrical system.
• Disconnect the vehicle's negative battery
terminal while mounting and connecting
the unit.
• When replacing the fuse, be sure to use
one with an identical amperage rating.
Using a fuse with a higher amperage
rating may cause serious damage to the
unit.
• Make sure that pins or other foreign
objects do not get inside the unit, they
may cause malfunctions, or create safety
hazards such as electrical shock.
• If you have parked the car for a long
time in hot or cold weather, wait until the
temperature in the car becomes normal
before operating the unit.
• Keep the volume at a level at which you
can hear outside warning sounds (horns
sirens, etc.).
CAUTION
• DO NOT open covers and do not
repair by yourself. Ask the dealer or an
experienced technician for help.
BEFORE OPERATION
• Do not raise the volume level too much,
as this will block outside sounds, making
driving dangerous.
• Stop the car before performing any
complicated operation.
User Safety Code
You need to enter password when power on,
the original password is 1234.
General
Power supply (CT412) : 12V DC (10.8V-16V)
Power supply (CT424) : 24V DC (18V-32V)
Maximum power speaker: 12V : 4X41W
24V : 4x20W
Suitable speaker impedance: 4 ohm
Fuse spec: 10A
Weight: 0.7kg
Dimensions (WxDxH): 188x116.3x58.5mm
Note:
1. According to models with dierent wiring
harness to connect the denition of the
specic content, please refer to the model
label.
2. Specications and the design are
subject to change without notice due to
improvements in technology.
Specications Contents
FM Stereo Radio
Frequency range: 76 - 90 Mhz (japan mode )
87.5 - 108 MHz
Signal/noise ratio: 50dB
AUTO Step: 100KHz
AM (MW) Radio
Frequency range: 522-1620KHz
Step: 9KHz
LW Radio(EURO)
Frequency range: 153-280KHz
AUTO Step: 1KHz
EXT (AUX)
Jack Stereo 3.5mm ≥ 300mV auxiliary source

EN-2
Panel Controls CT412 BT/ CT424 BT
(1). - Microphone
(2). - Power on (press),
- Mute (short press),
- Adjust volume (rotate)
- Power off (long press)
(3). - Press to toggle the playing Sources:
Radio,
USB (when USB inserted),
AUX IN,
A2DP (when Bluetooth is connected),
DAB (CT412-DAB-BT)
- Hold it more than 2 seconds and rotate the
[volume] knob to select PTY mode.
(4).- Band switch:
CT412BT (FM/AM)
FM1 -> FM2 -> FM3 -> MW1 -> MW2-> LW
- Auto memory system:hold it to automatically
search station and save the strongest signal
station to preset from 1 to 6 on the current
band.
(5). - Press [SEL] and rotate [volume] knob to
select EQ (equalizer) preset mode.
- Press to confirm,when selecting the PTY
mode,
When in dial number mode, press [SEL] to
start and rotate [volume] knob to dial
a phone number.
(6). - Radio mode: Press [DSP] (display) to
access: PTY info/ Display FM/AM
frequency/clock
- MP3 mode: track duration
- Hold it to enter setting mode
(7). - Radio mode:
Automatic search the station from high to
low :
Hold the touch 2 seconds for manual
station search.
- MP3 / BT music mode
Select the previous track
Fast rewind (long press)
(8). - Radio mode
Automatic search the station from low
to high:
Hold the touch 2 seconds for manual
station search
- MP3 / BT music mode
Select the next track
Fast forward (long press)
(9). - USB slot
(10). - Play/pause (when USB / BT music)
(11). - Auto playback at the begining
of the track (10 seconds) with an
USB device.
(12). - MP3 repeat play
(13). - MP3 random play
(14). - MP3 folder back/Answer/Dial/Call
transfer/Hang on
(15). - MP3 folder ahead/Hang off/
Disconnect (long press)
(10-15).
-1-6 radio preset
Press to select tune in a preset
station.
Hold for more than 2 seconds to
save current station.
(16). - AUX
210
14
11
15
12
13
3 4 5 6 7 89
1
16

EN-3
Button Tips
SETUP
CLOCK
DX/LO DX LO
TA MODE TA ALARM TA SEEK
ON OFFREG
AREA EUROPE USA JAPAN AUSTRA LATIN
TA RETURN
RETUNEL RETUNES
VOL LAST ADJ
S-VOL 5 to 30
ON OFFBEEP
ON OFF
SWRC SET
ON OFF
TIMER
ON OFF
SCROLL
PWD SET
ON OFF
PWD
OFF ON
CLOCK DISP
24HOURS 12HOURS
12/24H
BT VOL 0 to + 7
TAL VOL 10 to 35
TA ON OFF
AF ON OFF
AUDIO
BASS
BAS -7 to +7
BALANCE 0LEFT 7 RIGHT 7
LOUD ON OFF
CT ON OFF
ST/MONO STEREO MONO
MIC SEL REAR FRONT
AUTO CON
ON OFF
AUTO ANS
ON OFF
TREBLE
TRE -7 to +7
EQ OFF JAZZCLASSIC ROCKPOP
FADER FRONT 70 REAR 7
Tuner mode DAB mode USB/AUX/BT source
TA TA TAON ON ON
ON
ALARM ON FRONT
ON ON
PASSIVE ON
RETUNEL
10 to 35
-3 to +3
-3 to +3
-3 to +3
-3 to +3
-3 to +3
-3 to +3
5 to 30
5 to 30
5 to 30
ON ON 0 to +7
ON
ON
RURAL
STEREO
AUTO
AUTO
AUTO
DIMDAY
DIMDAY
DIMDAY
ON
ON
ON
ON
ON
REIST
RESIST
RESIST
ADJ
ADJ
ADJ
ON
ON
ON
ON
ON
ON
00:00 00:00
00:00
00:00
00:00
00:00
24HOURS
24HOURS
24HOURS
12HOURS
12HOURS
12HOURS
ON
ON
ON
ON
ON
ON
EUR JAPAN
OFF OFF OFF
OFF
SEEK OFF REAR (BT source)
(BT source)
(BT source)
(BT source)
(BT source)
OFF OFF
ACTIVE OFF
RETUNES
OFF OFF
OFF
OFF
URBAN
MONO
MANUAL
MANUAL
MANUAL
OFF
OFF
OFF
DIMNIGHT
DIMNIGHT
DIMNIGHT
OFF
OFF
OFF
OFF
OFF
PWM
PWM
PWM
LAST
LAST
LAST
OFF
OFF
OFF
OFF
OFF
OFF
OFF
OFF
OFF
OFF
OFF
OFF
USA AUSTRA LATIN
TA mode DAB FMLK MIC SEL
TA return DAB LBND AUTO ANS
TA vol DAB ANT AUTO CON
AF SCROLL BT VOL
SCROLL
REG
CT
RUR/URB
ST/MONO
DIM DISP
DIM DISP
DIM DISP
DISMAN
DISMAN
DISMAN
DIMMING
DIMMING
DIMMING
DIM KEY
DIM KEY
DIM KEY
MW
SWRC SET
SWRC SET
SWRC SET
VOL LAST
VOL LAST
VOL LAST
PWD SET
PWD SET
PWD SET
CLOCK DISP
CLOCK DISP
CLOCK DISP
12/24H
12/24H
12/24H
TIMER
TIMER
TIMER
LW
SWRC TYPE
SWRC TYPE
SWRC TYPE
S-VOL
S-VOL
S-VOL
PWD
PWD
PWD
CLOCK
CLOCK
CLOCK
BEEP
BEEP
BEEP
AREA
CT424 BT

EN-4
AUTO ANS(ON/OFF) AUTO CON(ON/OFF)
BEEP(ON/OFF) 12/24H MIC/SEL
(REAR/FRONT) AREA SWRC SET (ON/
OFF) TIMER(ON/OFF) SCROLL(ON/
OFF) BT VOL(0 to +7) VOL LAST/ADJ
S- VOL(5 to 30) PWD SET PWD(ON/
OFF)
Wait for 1s and rotate the knob to adjust.
TA mode
Enable /Disable automatic switching to
FM- tuner mode in case of incoming Traffic
announcements.
Rotate the [volume] knob to select TA
ALARM or TA SEEK mode. If the TA (traffic
announcements) is turned on and there is no
traffic program identification code received in
the specified time, no TA/TP will display and
either TA ALARM or TA SEEK will be activated.
TA ALARM mode
Alarm is turned on
A beep sounds and the display show “No TA-
TP” when you are listening a radio station that
does not broadcast TP info.
TA SEEK mode
TA SEEK is automatically activated.
The radio will automaticaly search for a new “TP”
compatible transmitter in case of signal loss on
the station playing.
Note
EUROPE area: add to RDS function, JAPAN,
AUSTRALIA and USA area: no RDS function.
TA setting
Rotate [volume] knob to set ON/OFF.
TA VOL mode
Button Tips
MP3 Playback
Track skip
Press the [ / ] button to go to the previous or
next track.
MP3 track fast search
Hold it [ / ] to enter fast forward or reverse
back mode.
Folder select
Press the [ 5F-]/[ 6F+] button to select MP3
folder back/ahead.
Set Clock
Radio mode:
Press [DSP] button, turn and turn display PTY/
Clock/current channel.
MP3 playback mode: press [DSP] button, turn and
turn about folder name/le name/ID3 TAG/Clock
Then press [DSP] button more than 2 seconds,
‘Clock‘ displayed, press [SEL] button, rotate the
[volume] knob and press [ /] button to set,
press [SEL] to conrm.
Automatic clock setting :
While listening an FM RDS station, transmitter
updates automatically time on the radio unit.
Clock format:
Press several times on [SEL] button to view “24
hours”.
Rotate [volume] knob to select “12 hours” mode
(displays PM or AM).
System setting
Hold the [DSP] to enter the system setup menu,
and press [ / ] button to select:
CLOCK TA(ON/OFF) TA MODE ALARM/
SEEK TA RETURN/RETURNS TAL VOL(10
to 35) AF(ON/OFF) REG(ON/OFF)
CT(ON/OFF) DX/LOCAL ST/MONO
Rotate the [volume] knob to to adjust TA VOL
10-35.
VOL ADJ mode
Rotate the [volume] knob to select VOL ADJ or
LAST mode.
If ADJ selected after pressing >> “S-VOL” will
display to adjust the sound [volume] at the radio
ignition settings from 5 to 30.
TA RETURN
On the FM mode, set the TA time space Info of
auto search with RDS.
Setting for “LONG”, Auto search the TA time
space for 180 sec, Setting for “SHORT”, auto
search the TA time space for 45 sec.
AREA SETTING
AREA setting: Rotate the [volume] knob to select
EUROPE, USA, JAPAN, AUSTRA, LATIN
Audio setting
Press [SEL] button, and press the [ / ]
button to select BASS/TREBLE/BALANCE/
FADER/LOUD/EQ function, rotate the knob to
adjust.
Radio Operation
Radio seek automatically
Press the [ / ] button to auto search the
station rewind / forward.
Radio tune by step
Hold [/]button more than 2 seconds, switch
to the MANUAL mode, then short press [
/ ] button to step search the station rewind /
forward.
Manual Memory Store
At FM1/FM2/FM3/MW1/MW2/LW mode, press
and hold button 1-6 to save current station in
memory. You can save up to 36 stations in total.

EN-5
RDS
AF (Alternative Frequency):
When the radio signal strength is weak,
enabling the AF function will allow the unit
to automatically search another station
with the same PI, but with stronger signal
strength.
PS (Program Service name): The name of
station will be display instead of frequency.
Press 2 seconds the [DSP] button and
select [ / ] to set AF/TA/REG, rotate the
[volume] knob to open or close AF/TA function.
PTY function
Hold the [SRC] button to PTY function, rotate
the [volume] knob, display NEWS and POP
program type.
Press 2 seconds [SRC] button and rotate
the [volume] knob to select the type of
station INFO-SPORT-EDUCATE-DRAMA-
CULTURE-SCIENCE-VARIED-POPM-
ROCK M-EASY M-LIGHT M-CLASSICS-
OTHER M-WEATHER-FINANCE-CHILDREN-
SOCIAL-RELIGION-PHONEIN-TRAVEL-
LEISURE-JAZZ-COUNTRY-NATIONM-
OLDIES-FOLK-DOCUMENT-TEST-ALARM
REG on: AF function will implement the
regional code (of the PI) and only stations in
the current region can be tuned automatically.
REG o: AF function will ignore the regional
code(of the PI) and stations in the other
regions can also be tuned automatically.
Button Tips
CT ON/OFF
While listening an FM RDS or DAB station,
transmitter updates automatically the clock on
the radio unit.
Automatic display of the clock
This function allows to display automatically
the clock instead of the "standard" display
(tuner, Aux, A2DP, USB, DAB). After 15
seconds, in case of manipulation of buttons the
display will turn back to "standard" display and
will return on the clock.
nb : Noted: some radio stations, besides their
name, reveal " RT + " information (name of
the artist, titles, etc.), in this case the clock will
display between 2 scrollings of text.
Activation:
Press 2 seconds on "DSP" and then press the
button [ / ] several times to select function.
CLOCK_DISP displays, select ON to activate
the function.
BT Audio
To play music from a Bluetooth device and
control with the unit.
1. Press [SRC] button several time up to select
BT MUSIC mode. If the Bluetooth device is
connected, the display shows A2DP.
2. To play or pause, press "1" and/or [ / ]
to skip the track
MUSIC mode : If the Bluetooth device is
connected, the display shows A2DP.
VOL LAST/ADJ mode
Rotate the [volume] knob to select VOL LAST
or ADJ mode.
In ADJ mode, rotate the [volume] knob to adjust
S-VOL 5-30.
BEEP mode
Rotate the [volume] knob to select button beep
sound on or o.
SCROLL mode
Rotate the [volume] knob to select SCROLL (ID
Tag) mode on or o.
SWRC function
(system wired remote control)
This function allows to control main functions of
the radio (VOL-/VOL+ /Source /SEEK+/SEEK-/
Tune Memory /BT-OFF hang off) in USB/BT/
A2DP/AUX.
To do so, you need a wired remote to connect
to the female input 3.5, yellow connector at the
back of the radio.
SWRC SET
Activate or deactivate the steering wheel
controls
SWRC (RESIST / PWM)
Allows you to select the signal mode of the
steering wheel controls:
> RESIST: chain of resistors

EN-6
Button Tips
> PWM: frequency - 100 Hz at 12 Volts
Timer ON/OFF
Timer ON: when ignition of the machine is o,
you can turn the unit on by pressing POWER
button, and it can work for about 2 hours
Timer OFF: when ignition of the machine is
o, the unit can't work anymore.
AREA mode
Press [DSP] button more than 2 seconds, then
press [ /] button several time to select
AREA funtion. Rotate the knob to select
"EUROPE--USA--JAPAN- AUSTRA-LATIN".
NB : the radio will delete the preselected
station memory
LOUD ON/OFF
Press [SEL] to display EQ OFF,then press
[/] button several time to select LOUD
function.
Rotate the [volume] knob to select Loudness
ON or OFF.
STEREO/MONO mode
(in Radio mode)
Press [DSP] button more than 2 seconds, then
press [ /] button several time to select ST/
MONO funtion. Rotate the [volume] knob to
select FM stereo or mono.
LOCAL ON/OFF or RURAL/URBAN
Press [DSP] button more than 2 seconds,
then press [ /] button several time to
select DX/LO or RURAL/URBAN. Rotate
the [volume] knob to select tuner sensitivity
distant or local.
MIC
In Default settings, the MIC SEL is "REAR".
The micro cable is connected at the rear of
the radio, we advise you not disconnect the
micro cable in order to avoid losing it.
On the non time display menu:
Press and hold [DSP] button more than 2
seconds, then press [/] button several
time to select MIC SEL and rotate the [volume]
knob to select "FRONT".
Installation recommandation on page 9.

EN-7
Bluetooth Functions
Pairing
1. Open the device's BT function,
2. Search bluetooth equipments by your device.
Please make sure your device be detectable
(through the menu on the device).
3. Select unit CT412-BT and enter the pairing
code:1234. An authorization request may
occure on your Bluetooth device in some
case. Press [ 6F+] button more than 2
seconds, and the Bluetooth device will be
disconnected (only in A2DP mode or phone
use).
(The pairing code is not needed for : CT424 BT/
CT424 DAB BT)
AUTO CON mode
Press [DSP] button more than 2 seconds.
Press [ ] or [ ] to display "AUTO CON".
Rotate the [volume] knob to select AUTO CON
mode, select on or off. When it is on, it will
automatically connect the device.
AUTO ANS
Press [DSP] button more than 2 seconds. Press
[] or [ ] to display "AUTO ANS". Rotate
the [volume] knob to select AUTO ANS mode,
select on or off. When it is ON, the radio will
automatically hang on after a ring tone (4/5).
BT mode selecting
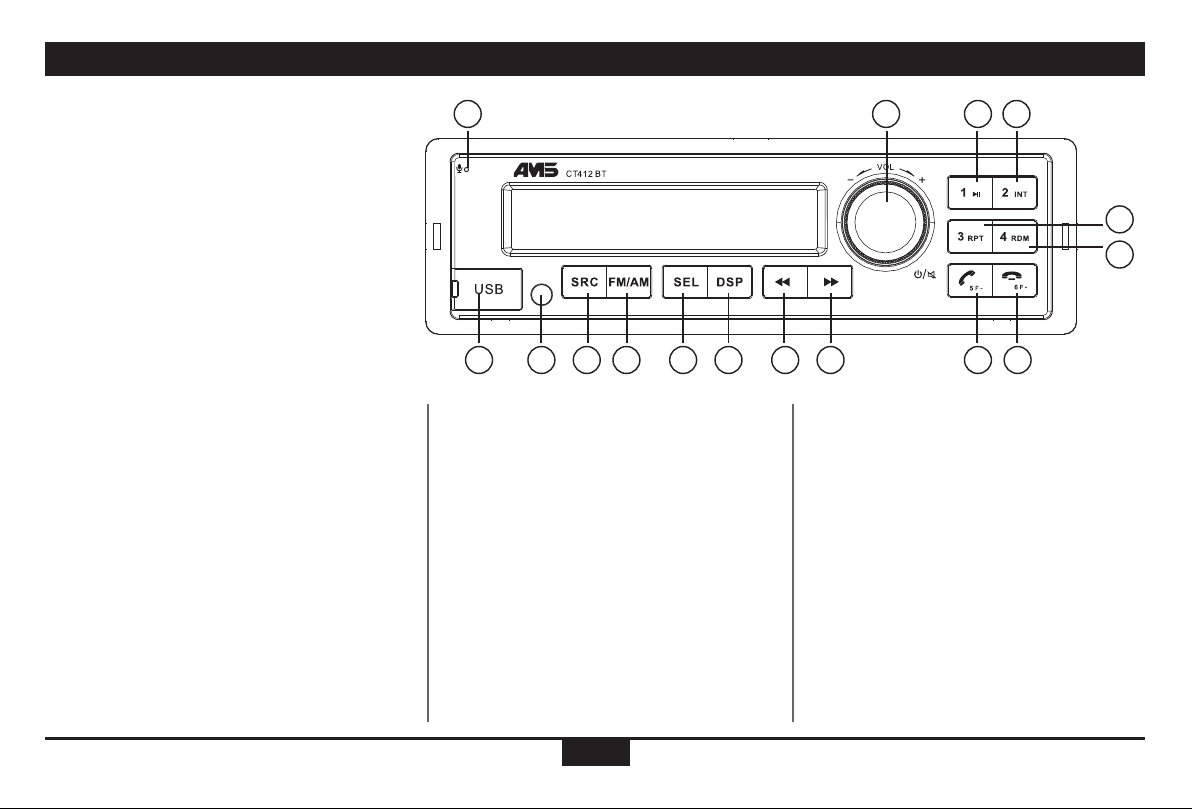
Press [SRC] button to select BT mode.
Press [DSP] button to display the A2DP
information.
Dialing
1. Phone dialing
Use your mobile phone dialing, LCD screen
displays dialing information.
2. Unit dialing
Press [SRC] button to switch to A2DP(BT)
mode. Press [ 5F-] the picture hang on and
"DIAL NO" appears on the LCD, then press
[SEL] button to enter dialing mode. Press
[ / ] button and rotate the [volume] knob
to input dialing numbers, press [ 5F-]
button to dial out.
3. (Not available for CT412 BT) You can search for
any call, dialed, missed, or received. As previously
for ""DIAL NUM"" function, select ""Dialed"",
""Missed"" or ""Received"",
> Press the [SEL] button to enter the selected
history.
> Turn the [VOL] knob to scroll through the
contacts.
> When the contact's name or mobile phone
number is displayed, press the [5F /] button to
call the mobile phone number of this contact.
Press the [6F /] key to end the call
Voice switch
During the call, Press the [ 5F-] button to
transfer between the unit and your phone.
Hang up/Answer
Press [ 5F-] button to answer a call,
Press [ 6F+] button to hang up.
A2DP mode
On A2DP music playing mode, press [1] button to
pause/play.
Press [ / ] to previous or next track.
In AD2P mode, if your phone is paired you can
order vocally by "SIRI" or "Google " application to
select and give a call.
On some ANDROID versions you can separate
phone book and music management in order to
connect two Bluetooth devices
1. Standard Setting (one device phone and
media)with your phone you can receive and
send a call and listen to your music at your
device
2. Double connection (2 phones connected at
Loading/Take out USB equipment
1. Open the USB cap located on the bottom
left of the unit, insert a USB device into
the connector and the unit will begin to
play automatically.
2. To stop playback of USB device, push the
[SRC] button to non USB mode and then
remove the USB device.
USB Function Summarization
the same time)
• rst in BT ( receipt and phone call)
• second in A2DP mode(listen to your music)
you can free media connection on the rst
phone
• on the phone, enter the Bluetooth setting
• position yourself on the CT412-BT
• go to the setting at this device
• uncheck the setting " audio parameter
Media"
• close the acces parameter CT412-BT the
rst device received an transmit call, the
second device playing the audio media, to
return to standard parametrage, tick the
box of the first device having disconnected
the second device
Voice commands
In the A2DP mode, you can use voice
commands (mobile application SIRI / Google
voice / and Android) to make a telephone
call from the phone book or write a SMS.
“Voice commands” function must be
activated on your telephone and avoid noisy
environment.

EN-8
USB functions(ash memory type)
1. USB flash memory 2 in 1 support
2. FAT 12/FAT 16/FAT 32 format supported.
3. USB 1.1 support, USB 2.0 support (For
2.0,speed performance is as USB 1.1)
4. WMA files supported
5. Maximum number of MP3 files FAT 32 format
supported is 65535 files. (Maximum number
of MP3 files NTFS supported is 1000 files. )
Maximum number of folders is 999.
6. Maximum USB capacity support is 8 GB and
best performance with tracks not more than
500, and not exceeding 30 folders.
7. Not all USB devices are compatible with the
unit.
AUX mode
When radio is on, press [SRC] button several
time, to display AUX.
nb: Control the track with the external device
When using AUX mode, only the POWER knob,
the [volume] and [SRC] button can be used.
Timer function
If the device is switched on while the ignition
is on, it then switches off and on again
automatically with the ignition. This is provided
that the A7 contact is connected to the terminal
15/30 of the vehicle. If the device is switched
on without the ignition by pressing "POWER",
it switches off again after 120 minutes to save
the battery. The device can then be switched on
Other functions
again with "POWER".
Caution: When the radio is switched on, the
automatic antenna extends.
Therefore always switch off the device when
the situation requires it (e.g. in a station car
wash).
You can stop this function in the MENU.
SRC Button (Only DAB radio)
Press the [SRC] button to switch from Radio,
USB (when USB is connected), AUX (when the
device is connected), BT audio, AD2P (when
the BT device is connected)
Password entered
Rotate the [volume] knob to select the digits,
press the [ / ] buttons to change the digits.
Once the password is fully displayed, press the
[SEL] button at least 2 seconds to confirm, the
radio switches to the last tuner mode listened.
If the password is incorrect, "ERROR" appears
on the display. Please enter the password
again. If the user code is lost, contact the After
Sales Service.
PWD OFF/ON: Activating/Desactivating
the security code.
When the unit is switched on, Press [DSP]
button more than 2 seconds then press
[ / ] button several time to select "PWD
OFF/ON" and turn the [volume] knob to
select "ON" or "OFF": the password is
activated or deactivated.
When set to "ON", the radio code will be
requested or if you have disconnected the
permanent + (B + battery), you will have
to enter the password after each time
the battery is disconnected (the default
password is "1234"). If you only turn off
the ignition (+15/30), the code will not be
requested.
PWD NEW: Create a new password
You can set a new password for the unit:
Press [DSP] button more than 2 seconds
then press [ / ] button several time
to select "PWD SET", enter your old
password, press the [SEL] button at least 2
seconds to confirm. If the old password is
incorrect,"ERROR" "AGN" appears on the
display, please enter the password again.
If the old password is correctly entered,
"NEW" is displayed, enter your new
password, press the [SEL] button at least
2 seconds to confirm. "AGN" is displayed,
enter your new password again and press
the [SEL] button at least 2 seconds to
confirm; "SET OK" is ;displayed: the code
has been updated.

EN-9
General
Power supply (CT412) : 12V DC (10.8V-16V)
Power supply (CT424) : 24V DC (18V-32V)
Maximum power speaker: 12V : 4X41W
24V : 4x20W
Suitable speaker impedance: 4 ohm
Fuse spec: 10A
Weight: 0.56kg
Dimensions (WxDxH): 188x118x58.5mm
Menu
Specications
DAB+ function
FM Stereo Radio
Frequency range: 76 - 90 Mhz (japan mode )
87.5 - 108 MHz
Signal/noise ratio: 50dB
AUTO Step: 100KHz
AM (MW) Radio
Frequency range: 522-1620KHz
Step: 9KHz
LW Radio(EURO)
Frequency range: 153-280KHz
AUTO Step: 1KHz
EXT (AUX)
Jack Stereo 3.5mm ≥ 300mV auxiliary source
DIGITAL RADIO (DAB)
Frequency range: 174.928-239.200 MHz
1452.960-1490.624MHz
Step: 20KHz
Tuner mode DAB mode USB/AUX/BT source
TA TA TAON ON ON
ON
ALARM ON FRONT
ON ON
PASSIVE ON
RETUNEL
10 to 35
-3 to +3
-3 to +3
-3 to +3
-3 to +3
-3 to +3
-3 to +3
5 to 30
5 to 30
5 to 30
ON ON 0 to +7
ON
ON
RURAL
STEREO
AUTO
AUTO
AUTO
DIMDAY
DIMDAY
DIMDAY
ON
ON
ON
ON
ON
REIST
RESIST
RESIST
ADJ
ADJ
ADJ
ON
ON
ON
ON
ON
ON
00:00 00:00
00:00
00:00
00:00
00:00
24HOURS
24HOURS
24HOURS
12HOURS
12HOURS
12HOURS
ON
ON
ON
ON
ON
ON
EUR JAPAN
OFF OFF OFF
OFF
SEEK OFF REAR (BT source)
(BT source)
(BT source)
(BT source)
(BT source)
OFF OFF
ACTIVE OFF
RETUNES
OFF OFF
OFF
OFF
URBAN
MONO
MANUAL
MANUAL
MANUAL
OFF
OFF
OFF
DIMNIGHT
DIMNIGHT
DIMNIGHT
OFF
OFF
OFF
OFF
OFF
PWM
PWM
PWM
LAST
LAST
LAST
OFF
OFF
OFF
OFF
OFF
OFF
OFF
OFF
OFF
OFF
OFF
OFF
USA AUSTRA LATIN
TA mode DAB FMLK MIC SEL
TA return DAB LBND AUTO ANS
TA vol DAB ANT AUTO CON
AF SCROLL BT VOL
SCROLL
REG
CT
RUR/URB
ST/MONO
DIM DISP
DIM DISP
DIM DISP
DISMAN
DISMAN
DISMAN
DIMMING
DIMMING
DIMMING
DIM KEY
DIM KEY
DIM KEY
MW
SWRC SET
SWRC SET
SWRC SET
VOL LAST
VOL LAST
VOL LAST
PWD SET
PWD SET
PWD SET
CLOCK DISP
CLOCK DISP
CLOCK DISP
12/24H
12/24H
12/24H
TIMER
TIMER
TIMER
LW
SWRC TYPE
SWRC TYPE
SWRC TYPE
S-VOL
S-VOL
S-VOL
PWD
PWD
PWD
CLOCK
CLOCK
CLOCK
BEEP
BEEP
BEEP
AREA
SETUP
CLOCK
DX/LO DX LO
TA MODE TA ALARM TA SEEK
ON OFFREG
AREA EUROPE USA JAPAN AUSTRA LATIN
TA RETURN
RETUNEL RETUNES
VOL LAST ADJ
S-VOL 5 to 30
ON OFFBEEP
ON OFF
SWRC SET
ON OFF
TIMER
ON OFF
SCROLL
PWD SET
ON OFF
PWD
OFF ON
CLOCK DISP
24HOURS 12HOURS
12/24H
BT VOL 0 to + 7
TAL VOL 10 to 35
TA ON OFF
AF ON OFF
AUDIO
BASS
BAS -7 to +7
BALANCE 0LEFT 7 RIGHT 7
LOUD ON OFF
CT ON OFF
ST/MONO STEREO MONO
MIC SEL REAR FRONT
AUTO CON
ON OFF
AUTO ANS
ON OFF
TREBLE
TRE -7 to +7
EQ OFF JAZZCLASSIC ROCKPOP
FADER FRONT 70 REAR 7

EN-10
DAB+ function
(1). - Microphone
(2). - Power on (press),
- Mute (short press),
- Adjust volume (rotate)
- Power off (long press)
(3). - Press to toggle the playing Sources:
Radio,
USB (when USB inserted),
AUX IN,
A2DP (when Bluetooth is connected),
DAB (CT412-DAB-BT)
- Hold it more than 2 seconds and rotate the
[volume] knob to select PTY mode.
(4).- Band switch:
CT412BT (FM/AM)
FM1 -> FM2 -> FM3 -> MW1 -> MW2-> LW
CT412-DAB-BT or CT424-DAB-BT (BAND/SCAN)
DAB 1 / DAB 2 / DAB 3
- Auto memory system:hold it to automatically
search station and save the strongest signal
station to preset from 1 to 6 on the current
band. DAB mode: scan of DAB transmitters.
(5). - Press [SEL] and rotate [volume] knob to
select EQ (equalizer) preset mode.
- Press to confirm,when selecting the PTY
mode,
When in dial number mode, press [SEL] to
start and rotate [volume] knob to dial
a phone number.
(6). - Radio mode: Press [DSP] (display) to
access: PTY info/ Display FM/AM
frequency/clock
- MP3 mode: track duration
- Hold it to enter setting mode
(7). - Radio mode:
Automatic search the station from high
to low :
Hold the touch 2 seconds for manual
station search.
- MP3 / BT music mode
Select the previous track
Fast rewind (long press)
(8). - Radio mode
Automatic search the station from low
to high:
Hold the touch 2 seconds for manual
station search
- MP3 / BT music mode
Select the next track
Fast forward (long press)
(9). - USB slot
(10). - Play/pause (when USB / BT music)
(11). - Auto playback at the begining
of the track (10 seconds) with an
USB device.
(12). - MP3 repeat play
(13). - MP3 random play
(14). - MP3 folder back/Answer/Dial/Call
transfer/Hang on
(15). - MP3 folder ahead/Hang off/
Disconnect (long press)
(10-15).
-1-6 radio preset
Press to select tune in a preset
station.
Hold for more than 2 seconds to
save current station.
(16). - AUX
210
14
11
15
12
13
3 4 5 6 7 89
1
BAND
SCAN
CT412-DAB-BT
16

EN-11
DAB+ function
DAB Radio Selection
DAB/DAB+ Provides radio programs in digital
sound quality. To access Digital Audio Broadcast
(DAB) press the [SRC] button and select DAB
DAB Service SCAN "Synchronising"
If the antenna is not connected, ""No signal""
will be displayed. If the tuner has never
been used, ""No service"" will be displayed.
Automatic scan:
The radio will initiate an automatic scan of
the DAB transmitters for the first operation,
or if the DAB transmitters is lost. When the
radio is powered on, a DAB station scan starts
automatically. Please do not switch sources
during the scan (approx. 1 min)
Manual scan:
In DAB mode, if you want to launch a scan, hold
down the ""BAND/SCAN"" button for 1 second.
The screen will display the message ""SCAN
OK"" and will display the numbers 1 to 100K
one after the other (DAB block). At the end of
the scan, the screen will display the number of
stations received (e.g. FOUND 39 = 39 stations
found) and will broadcast the first station.
Select DAB group
"Press the [ BAND ] Button to select one of
the available DAB groups:
DAB1 > DAB2 > DAB3. They allow the
storage of 6 stations each"
Tuning a DAB Service
To tune a DAB service push [<< / >> ] to
select the next/previous DAB service.
“Tuning” is shown on the Display, Then the
station is automaticaly broadcast
DAB Service List
"To get an overview of receivable DAB
services . Push [SEL] for 2 seconds to open
the DAB Service List, Rotate the [VOL]
knob to scroll through the list of receivable
stations. Push [SEL] to tune a DAB service
. “Tuning” is shown on the display, then the
station is automaticly broadcast "
Storing DAB Favourites
"There are 3 favorite DAB groups
available (DAB1 -> DAB2 -> DAB 3).
Select DAB1-2-3 where you want to store
the station, then press the preset button for
more than 2 seconds "
Recall Stored Favourites
To recall a preset station, briefly press the
desired button (1 to 6)
When the DAB signal quality drops
significantly, it is prefered to switch and
listen to the service via FM. Switching
between DAB and FM (DABFMLNK) can be
disabled via the system settings menu.
Note: If the AF indicator is not displayed,
the radio has not found the corresponding
station in FM and can not switch from DAB
to FM and vice versa
Rural / Urban
Press the [</>] button several times to
select RURAL / URBAN. Turn the [volume]
button to select the appropriate tuner mode:
RURAL (poor reception) or URBAN (locations
near emitters).
BT VOL
Adjusts the level of the AD2P-BT relative to
other sourcies (from 0 to +7).
DIMMING
This radio allows manual or automatic
dimming of the display and key buttons.
Select ""DIMMING"" from the setup
menu and select one of the following:
> Select ""OFF"" to deactivate dimming
> Select the ""MANUAL"" attenuation when
the radio is not connected to the vehicle
ignition pin . The change between day and
night mode is done by selecting Settings
menu ""DIMDAY"" or ""DIMNIGHT""
> Select the ""AUTO"" attenuation when
the radio is correctly connected to the
vehicle ignition pin (A6, +12/24 V lantern
or pilot lights), the lighting will change
when the parking light is switched on.

EN-12
Select Manual dimming to adjust Brightness
of display and Buttons". Select DIM MAN and
change between day mode and night mode by
selecting “DIMDAY“ or “DIMNIGHT”"
> To adjust Night Brightness of the display and
buttons select “DIMNIGHT”
> To adjust Day Brightness of the display and
buttons select “DIMDAY"
DIM KEY
Select "DIM KEY" and adjust the brightness
from the buttons
DIM DISP
Select "DIM KEY" and adjust the brightness
from the display
MW (ON/OFF)
To enable/disable MW Reception
LW (ON/OFF)
To enable/disable LW Reception
Switching automatic between DAB
and FM (DABFMLNK)
Switching automatic between DAB and FM
(DABFMLNK). When the DAB signal quality
drops significantly, it is preferred to switch and
listen to the service via FM.
Switching between DAB and FM (DABFMLNK)
can be disabled via the system settings menu.
Note: If the AF indicator is not displayed, the
radio has not found the corresponding station
in FM and can not switch from DAB to FM and
vice versa
DAB ANT
Selection of Active or Passive antenna
DAB LBND
Rotate the knob to choose DAB LBND ON or
OFF (Enable/Disable L-Band Decoding)
DAB antenna set-up
Position the antenna
- on the windscreen inside the car
- to the right of the driver for safety reasons
- on a fixed surface; avoid moving
parts such as doors, windows, etc.
- vertically and half way up the windscreen,
out of the driver's field of vision.
A detailed version of the assembly
notes is available on our website.
Please do not cut the yellow tape on the DAB
antenna.
Characteristics
These specifications may be modified
without notice.
Frequency band: 170 - 240 MHz (Band III),
1452 - 1492 MHz (Band L), Impedance: 50 Ω
Connector type: SMB
Cable length: 2.9m
DAB+ function

EN-13
FCC STATEMENT
1. This device complies with Part 15 of the FCC
Rules. Operation is subject to the following two
conditions:
(1) This device may not cause harmful
interference,and.
(2) This device must accept any interference
received, including interference that may cause
undesired operation.
2. any Changes or modications not expressly
approved by the party responsible for
compliance could void the user's authority to
operate the equipment.
NOTE: This equipment has been tested and
found to comply with the limits for a Class
B digital device, pursuant to Part 15 of the
FCC Rules. These limits are designed to
provide reasonable protection against harmful
interference in a residential installation.
This equipment generates uses and can
radiate radio frequency energy and, if not
installed and used in accordance with the
instructions, may cause harmful interference
to radio communications. However, there is
no guarantee that interference will not occur
in a particular installation. If this equipment
does cause harmful interference to radio or
television reception, which can be determined
by turning the equipment o and on, the user is
encouraged to try to correct the interference by
one or more of the following measures:
• Reorient or relocate the receiving antenna.
• Increase the separation between the
equipment and receiver.
• Connect the equipment into an outlet on a
circuit dierent from that to which the receiver
is connected.
• Consult the dealer or an experienced radio/TV
technician for help.
FCC Radiation Exposure Statement
This equipment complies with FCC radiation
exposure limits set forth for an uncontrolled
environment. This equipment should be
installed and operated with minimum distance
20cm between the radiator & your body
FCC

EN-14
TROUBLESHOOTING
Issue Possible cause Solution
General
The unit does not switch on. Car ignition is not on.
Cable is not properly connected.
Fuse is burnt.
Turn your car key in the ignition.
Check cables connection.
Replace fuse with a new fuse of the same capacity.
No sound Volume is set at minimum or the MUTE function is on. Check the volume or switch the MUTE function o.
The unit or screen does not
work normally.
The unit system is unstable. Please contact our After Sales Service
Tuner mode
Unable to receive stations. The antenna is not correctly connected properly. Please check if the antenna is correctly connected and check adaptors.
Bad quality reception of radio
station.
The antenna is not fully extended or it is broken. Fully extend the antenna and if broken, replace it with a new one.
Preset stations are lost. - You may have changed reception AREA (USA...) as
this changing cancel all your presets stations.
- You maybe RESET the unit inadvertently (the unit has
turned back to factory settings
- Please turn back to the right AREA.
- You need to set again all parameters
“No service” in DAB mode The radio start-up scan was interrupted Start a new DAB scan
USB mode
Unable to insert USB device The USB device has been inserted the wrong way
round.
Insert it the other way around.
The USB device cannot be
read.
NTFS format is not supported.
Application les such as ".exe"cannot be read
Check that the le system is in FAT or FAT32 format. Due
to dierent formats, some models of storage devices or
MP3 players may not be read.
Please make sure that the USB device only contain WMA or MP3 (AAC not compatible)
Microphone
practical advice :
Bluetooth microphone
recommandation
Bad quality sound of the microphone
According the location of the radio in your machine, which microphone to use :
- If the radio location is in face to the driver, we recommend then to use the front panel
microphone.
- If the radio location is not face to the driver but on the sides or rear, we highly recommend the
use of wired remote microphone (rear connection) and place the microphone face to the driver.
The following checklist can help you to solve some issues which you may encounter when using the unit. Before consulting it, check the connections and
follow the instructions in the user manual. Do not use the unit in abnormal condition, for example without sound, or with smoke or foul smell can cause re
or electric shock, immediately stop using it and call the save where you purchased it.

FR-1
Informations concernant la sécurité
Merci d’avoir acheté cet appareil. Lisez
attentivement ce manuel avant toute utilisation
et conservez-le an de vous y référer à l’avenir.
PRECAUTIONS D’EMPLOI
• Utiliser l’appareil uniquement dans un circuit
électrique 12 ou 24 Vcc négatif à la masse.
• Déconnecter le pôle négatif de la batterie
pendant l’installation et la connexion
de l’appareil.
• Lors du changement d’un fusible, s’assurer
de le remplacer par un fusible de calibre
identique. L’utilisation d’un fusible de calibre
supérieur pourrait causer des dommages
irréversibles à l’appareil.
• Veiller à ce qu’aucun corps étranger ne
pénètre dans l’appareil : cela pourrait entraîner
des dysfonctionnements ou compromettre
votre sécurité (risque d’électrocution).
• Lorsque le véhicule est resté longtemps à
l'arrêt par temps chaud ou froid, attendre
que la température du véhicule revienne à la
normale avant de faire fonctionner l’appareil.
• NE PAS régler le volume de l’appareil à un
niveau où il couvrirait les bruits venant de
l’extérieur (klaxons, sirènes, etc.).
ATTENTION
• NE PAS démonter l’appareil pour tenter de le
réparer vous-même. Demander conseil à
votre concessionnaire ou à un technicien
expérimenté.
Informations concernant la sécurité.................1
Spécifications............................................... 1
Commandes de façade....................................2
Conseils concernant les boutons....................3
Fonction Bluetooth...................... .................7
Lecture USB....................................................7
Autres fonctions.............................................8
Fonction DAB+.......................................9
FCC................................................13
Dépannage............................................14
AVANT TOUTE UTILISATION
• Ne jamais monter le son de manière
excessive: cela couvrirait les bruits
venant de l’extérieur et rendrait la conduite
dangereuse.
• Arrêter la voiture avant toute opération
délicate.
Mot de passe
Vous devez entrer le mot de passe à chaque
débranchement de batterie. (Le mot de
passe par défaut est “1234”).
Généralités
Alimentation (CT412) : 12V DC (10.8V-16V)
Alimentation (CT424) : 24V DC (18V-32V)
Puissance max. haut-parleurs: 12V : 4X41W
24V : 4x20W
Impédance admissible du haut-parleur: 4 ohm
Caractéristique du fusible: 10A
Poids: 0.7kg
Dimensions (L x H x D): 188x116.3x58.5mm
Remarque:
1. Les faisceaux de câblage varient selon
les modèles. Pour associer la bonne
dénition à un contenu spécique, se
reporter à l’étiquette de l’appareil.
2. Les caractéristiques techniques ainsi
que l’apparence peuvent être modiées
sans préavis suite à des améliorations de
la technologie.
Spécications Table des matières
Radio FM stéréo
Bande de fréquences: 76-90 Mhz(japan mode )
87.5 - 108 MHz
Rapport signal/bruit: 50dB
Pas: 100KHz
Radio AM (MW)
Bande de fréquences: 522-1620KHz
Pas: 9KHz
Radio EURO (LW)
Bande de fréquences: 153-280KHz
Pas: 1KHz
EXT (AUX)
Source auxiliaire en Jack Stereo 3.5mm ≥
300mV

FR-2
Commandes de façade CT412 BT/ CT424 BT
(1). - Microphone
(2). - Mise en marche (appuyer),
- Mute (Appui court),
Appui court
- Appui long pour éteindre l’appareil
- Tourner le bouton pour régler le volume
(3). - Appuyer sur [SRC] pour changer de
sources :
Radio,
USB (lorsqu’une clé USB est insérée),
EXT: entrée auxiliaire,
A2DP (quand le Bluetooth est connecté)
DAB (CT412-DAB-BT)
- Appuyer plus de 2 secondes pour
sélectionner le mode PTY
(4).- Sélection de la bande radio :
CT412BT (FM/AM)
FM1 -> FM2 -> FM3 -> MW1 -> MW2 ->
LW (EUROPE)
Système de mémorisation automatique :
Appuyer plus de 2 secondes pour lancer
la recherche de stations automatique et
enregistrer les 6 stations présélectionnées
avec un signal fort
(5).- Appuyer sur [SEL] et tourner le bouton
[volume] pour sélectioner EQ (equalizer)
dans les préréglages.
- Quand le mode PTY est sélectionné,
appuyer pour confirmer. Lors de la
composition d'un numéro, appuyer sur
[SEL] pour commencer la saisie puis tourner
le bouton [volume] pour composer un
numéro de téléphone.
(6).- En mode écoute radio :
Appuyer sur [DSP] (affichage) pour
afficher :
les infos PTY, FM/AM, la fréquence
écoutée, l'horloge
- Mode MP3 : durée de la piste audio
- Maintenir le bouton enfoncé pour
entrer dans les paramètres
(7). - Mode Radio
Recherche de station automatique
(Appuyer 2 secondes pour une
recherche manuelle des stations)
- Mode MP3
Sélection de la piste précédente
(8). - Mode Radio
Recherche de station automatique
(Recherche automatique des stations
par ordre croissant)
- Mode MP3
Sélection de la piste suivante
(9). - Emplacement USB
(10). - Lecture/pause
(11). - Lecture automatique des 10
premières secondes de chaque
morceau lors d'une écoute via
USB.
(12). - Lecture MP3 en boucle
(13). - Lecture MP3 aléatoire
(14). - Dossier MP3 précédent/décrocher
(15). - Dossier MP3 suivant/raccrocher
(10-15).
- Présélection radio 1 à 6
Appuyer pour écouter une station
présélectionnée.
Appui long (plus de 2 secondes)
pour enregistrer la station en cours.
(16). - EXT (aux-in 3.5 source)
210
14
11
15
12
13
3 4 5 6 7 89
1
16

FR-3
Conseils concernant les boutons
SETUP
CLOCK
DX/LO DX LO
TA MODE TA ALARM TA SEEK
ON OFFREG
AREA EUROPE USA JAPAN AUSTRA LATIN
TA RETURN
RETUNEL RETUNES
VOL LAST ADJ
S-VOL 5 to 30
ON OFFBEEP
ON OFF
SWRC SET
ON OFF
TIMER
ON OFF
SCROLL
PWD SET
ON OFF
PWD
OFF ON
CLOCK DISP
24HOURS 12HOURS
12/24H
BT VOL 0 to + 7
TAL VOL 10 to 35
TA ON OFF
AF ON OFF
AUDIO
BASS
BAS -7 to +7
BALANCE 0LEFT 7 RIGHT 7
LOUD ON OFF
CT ON OFF
ST/MONO STEREO MONO
MIC SEL REAR FRONT
AUTO CON
ON OFF
AUTO ANS
ON OFF
TREBLE
TRE -7 to +7
EQ OFF JAZZCLASSIC ROCKPOP
FADER FRONT 70 REAR 7
Tuner mode DAB mode USB/AUX/BT source
TA TA TAON ON ON
ON
ALARM ON FRONT
ON ON
PASSIVE ON
RETUNEL
10 to 35
-3 to +3
-3 to +3
-3 to +3
-3 to +3
-3 to +3
-3 to +3
5 to 30
5 to 30
5 to 30
ON ON 0 to +7
ON
ON
RURAL
STEREO
AUTO
AUTO
AUTO
DIMDAY
DIMDAY
DIMDAY
ON
ON
ON
ON
ON
REIST
RESIST
RESIST
ADJ
ADJ
ADJ
ON
ON
ON
ON
ON
ON
00:00 00:00
00:00
00:00
00:00
00:00
24HOURS
24HOURS
24HOURS
12HOURS
12HOURS
12HOURS
ON
ON
ON
ON
ON
ON
EUR JAPAN
OFF OFF OFF
OFF
SEEK OFF REAR (BT source)
(BT source)
(BT source)
(BT source)
(BT source)
OFF OFF
ACTIVE OFF
RETUNES
OFF OFF
OFF
OFF
URBAN
MONO
MANUAL
MANUAL
MANUAL
OFF
OFF
OFF
DIMNIGHT
DIMNIGHT
DIMNIGHT
OFF
OFF
OFF
OFF
OFF
PWM
PWM
PWM
LAST
LAST
LAST
OFF
OFF
OFF
OFF
OFF
OFF
OFF
OFF
OFF
OFF
OFF
OFF
USA AUSTRA LATIN
TA mode DAB FMLK MIC SEL
TA return DAB LBND AUTO ANS
TA vol DAB ANT AUTO CON
AF SCROLL BT VOL
SCROLL
REG
CT
RUR/URB
ST/MONO
DIM DISP
DIM DISP
DIM DISP
DISMAN
DISMAN
DISMAN
DIMMING
DIMMING
DIMMING
DIM KEY
DIM KEY
DIM KEY
MW
SWRC SET
SWRC SET
SWRC SET
VOL LAST
VOL LAST
VOL LAST
PWD SET
PWD SET
PWD SET
CLOCK DISP
CLOCK DISP
CLOCK DISP
12/24H
12/24H
12/24H
TIMER
TIMER
TIMER
LW
SWRC TYPE
SWRC TYPE
SWRC TYPE
S-VOL
S-VOL
S-VOL
PWD
PWD
PWD
CLOCK
CLOCK
CLOCK
BEEP
BEEP
BEEP
AREA
CT424 BT

FR-4
12/24H MIC/SEL (REAR/FRONT)
AREA SWRC SET (ON/OFF) TIMER(ON/
OFF) SCROLL(ON/OFF) BT VOL(0 to +7)
VOL LAST/ADJ S- VOL(5 to 30) PWD
SET PWD(ON/OFF)
Attendre 1 seconde et tournez le bouton pour
eectuer le réglage.
Mode TA
Activer / Désactiver la commutation
automatique en mode FM-tuner en cas
d’information traffic routier. Tourner le
bouton pour choisir le mode TA ALARM ou
le mode TA SEEK. Si le mode TA (Traffic
Announcements) est activé et que l’appareil
ne reçoit pas de code d’identification TP en
temps voulu, la mention TA/TP ne s’affiche
pas et ni TA ALARM ni TA SEEK ne sont
activés.
Mode TA ALARM
L’alarme est activée.
Un signal sonore retentit lors de l’écoute
d’une station de radio qui ne diffuse pas les
informations trac TP et ache “NO TA-TP”
Mode TA SEEK
L’autoradio cherchera automatiquement un
nouvel émetteur compatible “TP” en cas de
perte de ce signal sur la radio écoutée
Remarque
Zone EUROPE : fonction RDS disponible
Zones JAPON AUSTRALIA et USA : fonction
RDS non disponible
Réglages TA
Tourner le bouton [volume] pour sélectionner
ON/OFF.
Volume TA mode
Tourner le bouton [volume] pour régler le
volume TA VOL : 10-35
Mode VOL LAST/ADJUST
Lecture MP3
Avance rapide
Appuyer sur [ / ] pour accéder à la piste
précédente suivante.
Recherche rapide de piste MP3
Appuyer sur [ / ] pour sélectionner le
dossier MP3 précédent suivant.
Recherche rapide de piste MP3
Appuyer sur [ 5F-]/[ 6F+] pour
sélectionner le dossier MP3 précédent/suivant.
Réglage et format de l’horloge
Mode Radio :
Réglage manuel de l’horloge: Appuyer sur
le bouton [DSP] pour afficher le type de
programme/l’horloge/la fréquence en cours
Mode Lecture MP3 :
Appuyer sur le bouton [DSP] pour afficher le
nom du dossier/chier/la balise ID3/l’horloge
Réglage automatique de l’horloge:
Lors de l’écoute d’une station FM RDS,
l’émetteur envoie la mise à jour de l’heure
automatiquement à l’autoradio.
Format de l’horloge:
Appuyer plusieurs fois sur le bouton [SEL]
pour afficher “24 hour”. Tourner le bouton
de [volume] pour sélectionner le mode “12
heures” (ache PM ou AM).
Réglages
Maintenir appuyé le bouton [DSP] pour
entrer dans le menu des réglages système,
puis appuyer sur le bouton[/]afin de
sélectionner CLOCK TA(ON/OFF)
TA MODE ALARM/SEEK TA RETURN/
RETURNS TAL VOL(10 to 35) AF(ON/
OFF) REG(ON/OFF) CT(ON/OFF) DX/
LOCAL ST/MONO AUTO ANS(ON/OFF)
AUTO CON(ON/OFF) BEEP(ON/OFF)
Pour activer le mode VOL.LAST, tourner le
bouton [volume]. Pour choisir le mode VOL.
ADJ, tourner le bouton.
Si ADJ est sélectionné après avoir appuyé sur
>>, S-Vol apparaît pour ajuster le [volume] du
son au démarrage de la radio (réglage de 5 à
30)
TA RETURN
Dans le mode FM, régler les informations trac
temps/lieu de la recherche automatique avec
RDS. Le réglage est « LONG » quand vous
appuyer pendant 180 secondes au cours de
la recherche automatique d’informations trac
TA; le réglage TA est court / « SHORT » quand
vous appuyez pendant 45 secondes.
Mode AREA SEL
Tourner le bouton pour choisir la zone
EUROPE, USA, JAPAN, AUSTRALIE, LATIN
Réglages audio
Appuyer sur le bouton [SEL], puis presser le
bouton [ / ] pour choisir parmi les fonctions
BASS/TREBLE/BALANCE/FADER/LOUD/
EQ. Tourner le bouton [volume] pour régler.
Tuner
Recherche de station automatique
Recherche de station automatique par
fréquences décroissantes ou croissantes
[ / ].
Recherche de station pas à pas
Appuyer [ / ] pendant plus de 2 secondes et
passer en mode manuel ; à chaque nouvel appui
[ / ], l’appareil recherche la station suivante
(fréquences croissantes ou décroissantes).
En mode
FM1/FM2/FM3/MW1/MW2/LW, appuyer
longuement sur les boutons 1 à 6 pour
enregistrer la station en cours. Vous pouvez
enregistrer jusqu'à 36 stations au total
Conseils concernant les boutons

FR-5
RDS
AF (Alternative Frequencies) : lorsque le
signal radio est faible et que la fonction
AF est activée, l’appareil recherche
automatiquement une autre station
présentant le même code d’identification que
la station actuelle, mais avec un signal plus
fort.
PS (Program Service) : le nom de la station
s’affiche au lieu de la fréquence.
Appuyer 2 secondes sur le bouton [DSP] et
sélectionner [ /] pour régler AF/TA/REG,
tourner le bouton [volume] pour ouvrir ou fermer
la fonction AF/TA.
Fonction PTY
Maintenir le bouton [SRC] pour la fonction PTY,
tourner le bouton [volume], acher NEWS et le
type de programme POP.
Appuyer sur le bouton [SRC] pendant 2
secondes et tournez le bouton de [volume]
an de choisir le type de station INFO-SPORT-
EDUCATE-DRAMA-CULTURE-SCIENCE-
VARIED-POPM-ROCK M-EASY M-LIGHT
M-CLASSICS-OTHER M-WEATHER-
FINANCE-CHILDREN-SOCIAL-RELIGION-
PHONEIN-TRAVEL-LEISURE-JAZZ-
COUNTRY-NATIONM-OLDIES-FOLK-
DOCUMENT-TEST-ALARM
REG on:La fonction AF active le code
régional des codes d’identification. Seules
les stations de la région peuvent être réglées
Conseils concernant les boutons
automatiquement.
REG o:la fonction AF ignore le code régional
parmi les codes codes d’identification et les
stations des autres régions peuvent être
également réglées automatiquement.
Réglage automatique de l’horloge
CT ON/OFF
Lors de écoute d’une station FM RDS ou DAB,
l’émetteur envoi la mise à jour de l’heure
automatiquement à l’autoradio.
Achage automatique de l'horloge
Cette fonction permet d'afficher
automatiquement l'horloge à la place de
l'achage "standard" (tuner, Aux, A2DP, USB,
DAB). Après une durée de 15 secondes, en
cas de manipulation des boutons l'affichage
repassera en achage"standard" et reviendra
sur l'horloge.
Nota: Certaines stations radio, en plus de leur
nom, font apparaître des informations "RT+"
(nom de l'artiste, titre, etc...), dans ce cas
l'horloge s'affichera entre 2 défilements de
texte.
Activation:
Appuyer 2 secondes sur "DSP" puis presser le
bouton
[ / ] plusieurs fois pour choisir la fonction.
CLOCK_DISP" s'ache, sélectionner ON pour
activer la fonction.
BT Audio
Pour écouter la musique d’un appareil
Bluetooth et contrôler la lecture de cet
appareil.
1. Appuyer plusieurs fois sur le bouton [SRC]
pour sélectionner le mode BT MUSIC.
2. Pour lancer la lecture ou mettre en pause
la lecture, appuyer sur "1" et/ou [ / ]
pour passer la piste audio
Lors d'une écoute audio :
Si l'appareil Bluetooth est connecté, l'écran
ache A2DP.
Mode VOL LAST/ADJUST
Pour choisir le mode VOL.ADJ ou VOL LAST,
tourner le bouton [volume]. En mode ADJ,
tourner le bouton pour régler le niveau du
volume 5-30.
Mode BEEP
Tourner le bouton [volume] pour activer ou
désactiver les bips des touches.
Mode SCROLL
Tourner le bouton [volume] pour activer ou
désactiver le mode SCROLL (ID Tag).
Fonction SWRC(système de
contrôle via télécommande laire)
Cette fonction permet de régler les fonctions
principales de la radio (VOL-/VOL+ /Source
/SEEK+/SEEK-/Mémoires tune /BT-OFF
This manual suits for next models
3
Table of contents
Languages:
Other AMS Car Receiver manuals