AMTC HYBRIDFLO AEF-300 Series User manual

SENSOR FAUCET SYSTEMS
Troubleshooting Guide
Advanced Modern Technologies Corporation
19800 Nordhoff Place, Chatsworth, CA 91311
Tel: (818) 883-2682 Toll Free: (800) 874-7822 Fax: (818) 883-2620
www.amtcorporation.com
REV. 07/17
® ® ®
HYBRIDFLO FIXEDFLO HEALTHFLO
AEF-300/300T SERIES
AEF-300 AEF-301 AEF-302 AEF-303 AEF-304
AEF-305T
AEF-306 AEF-307
AEF-300T AEF-302T AEF-304T
AEF-320 AEF-321 AEF-322 AEF-323

2
- Black Motor Cover = HYBRIDFLO
- Green Motor Cover = FIXEDFLO
- Blue Motor Cover = HEALTHFLO
- Green Reset Button = 300 Series
- Red Reset Button = 300T Series
®
®
®
Identify Your Operating System
AEF-300 AEF-301 AEF-302 AEF-303
AEF-304
AEF-305T
AEF-306 AEF-307
AEF-300T AEF-302T AEF-304T
Identify Your Faucet Model
BATTERY
PACK
Control Box
Reset Button
(Green or Red)
(Use 4-Size C)
Identify Your Faucet System
Motor Cover
(Black, Green, or Blue)
BATTERY
PACK
(Use 4-Size C)
Serial Number
(Below Sensor Cable Connector)
Sensor Cable
Connector
AEF-320 AEF-321
AEF-322
AEF-323

3
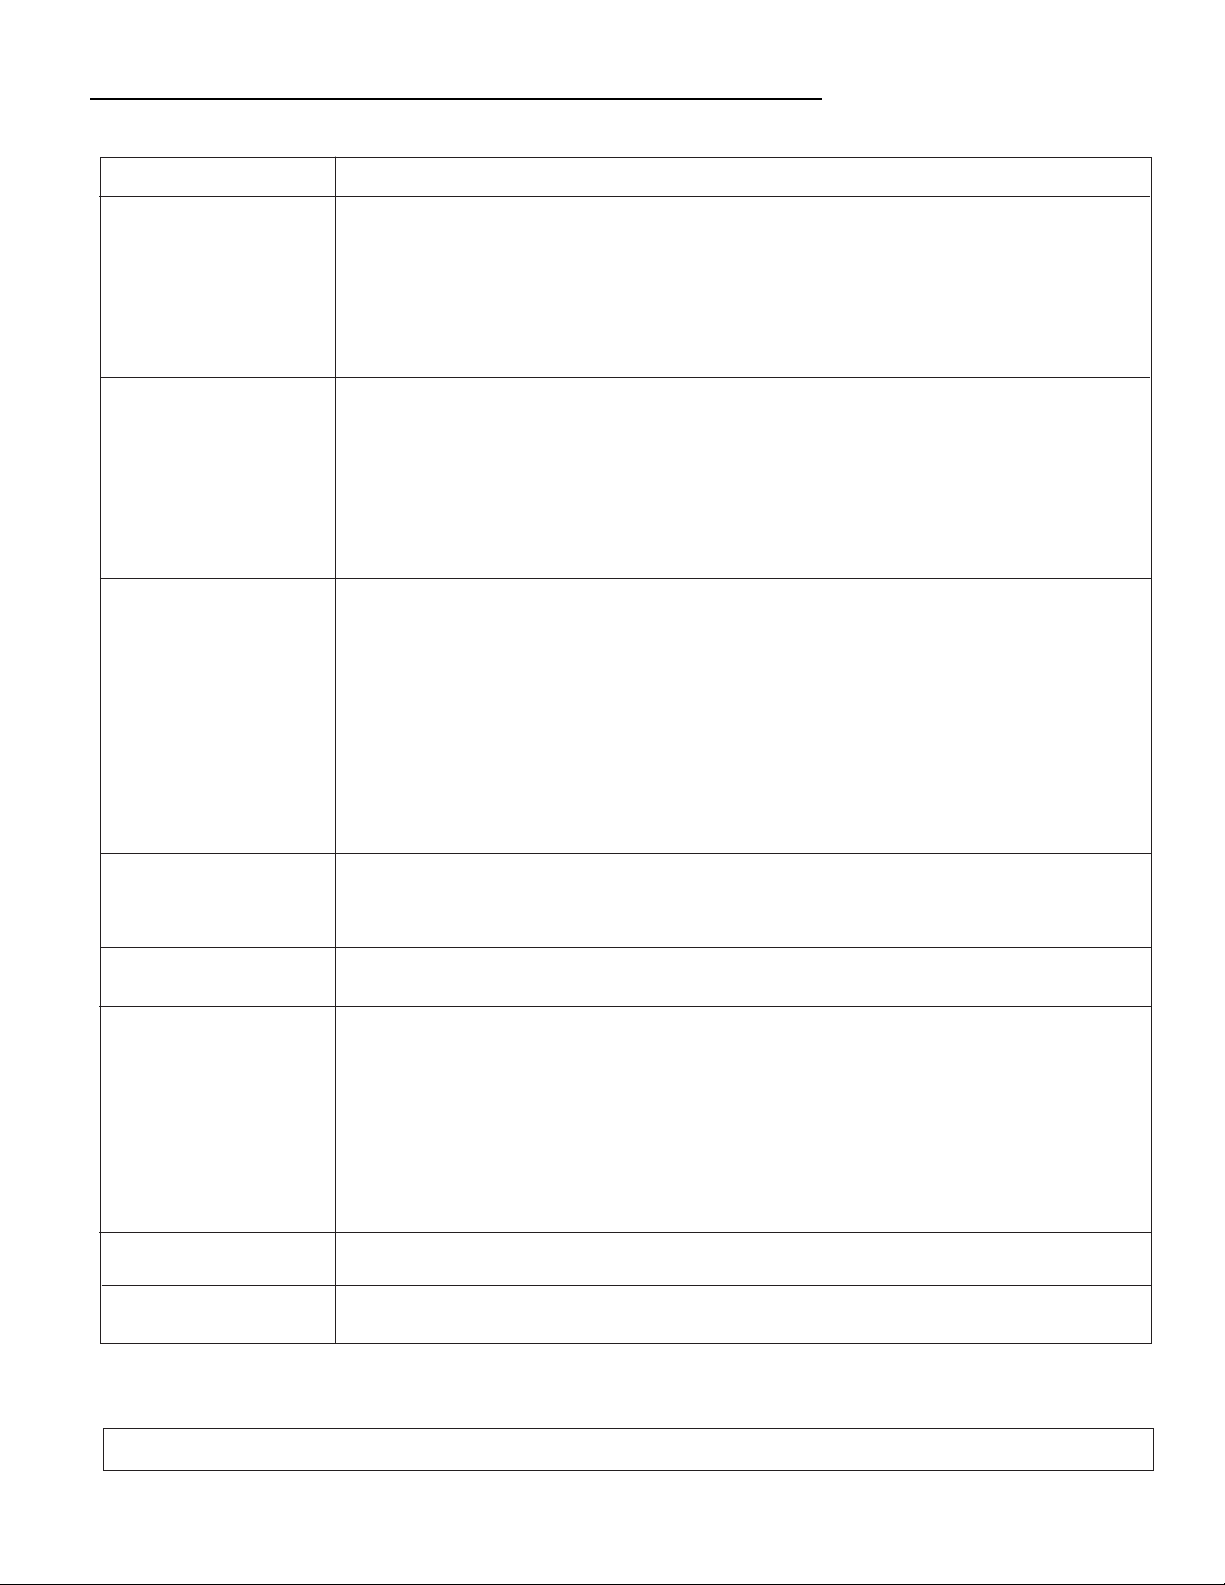
Troubleshooting for 300 Series
Problem
Solution
Faucet does not activate
Water does not shut off
Irregular/low flow
1. Water stop valves may be turned OFF. Make sure the stop valves are ON.
2. Check if red LED blinks on sensor window. If no light is present:
A. Check or replace batteries (and/or alternate power source, if available).
B. Make sure sensor cable is properly plugged into control box.
3. Check that motor plug is properly plugged into control box.
4. Inspect sensor window. If dirty, wipe down with soft cloth. If broken, replace.
5. Check motor mechanism by:
A. Remove motor cover.
B. Manually turn gears (clockwise). If gears do not turn, replace motor drive assembly.
Motor activates but no water
comes out of the faucet
1. Water stop valves may be turned OFF. Make sure the stop valves are ON.
2. Check water filter by:
A. Shut off stop valves and make sure water is completely OFF.
B. Remove water filter and clean if necessary.
C. Re-install water filter.
3. Check nozzle/aerator. If dirty, clean or replace.
4. Reset faucet by:
A. Pressing green button on the control box and keep it pressed in until you see a solid red light come on
in sensor window (about 5 seconds).
B. Let go of the button and place the palm of your hand at desired sensor reading distance.
C. Hold hand in place (about 15 seconds) until water turns ON and then OFF by itself once.
1. Test motor by:
A. Remove motor cover.
B. Manually turn gears (clockwise). If gears do not turn or if they turn non-stop, replace motor drive assembly.
2. Check flow pin assembly by:
A. Shut off stop valves and make sure water is completely OFF.
B. Remove motor cover.
C. Remove motor assembly.
D. Remove and inspect flow pin assembly. Clean or replace components.
E. Re-install all components and turn water stop valves back ON.
3. Test sensor range by:
A. Pressing green button on the control box and keep it pressed in until you see a solid red light come on
in sensor window (about 5 seconds).
B. Let go of the button and place the palm of your hand at desired sensor reading distance.
C. Hold hand in place (about 15 seconds) until water turns ON and then OFF by itself once.
4. Check batteries (and/or alternate power source, if available).
Solid red LED light in
sensor window stays ON
1. Check batteries are installed in the right direction and not fully drained (also check alternate power source,
if available). Solid red light may be a “low power indicator”.
2. Control box may be damaged. If so, replace control box.
3. Sensor may be damaged. If so, replace sensor cable.
1. Check stop valve. If not fully open, open fully.
2. Inspect nozzle/aerator. If dirty, clean or replace.
3. Check water filter by:
A. Shut off stop valves and make sure water is completely OFF.
B. Remove water filter and clean if necessary.
C. Re-install water filter.
4. Check flow pin assembly by:
A. Shut off stop valves and make sure water is completely OFF.
B. Remove motor cover.
C. Remove motor assembly.
D. Remove and inspect flow pin assembly. Clean or replace components.
E. Re-install all components and turn water stop valves back ON.
Water temperature is too high 1. Make sure stop valves are fully open.
2. Calibrate temperature adjustment in mixing valve to lower output temperature.
Water temperature is too low 1. Make sure stop valves are fully open.
2. Calibrate temperature adjustment in mixing valve to increase output temperature.
Spout drips 1. Remove nozzle/aerator and turn water ON and OFF by activating sensor 5 to 6 times.
If dripping continues, follow instructions in “Irregular/low flow” below.
For Additional Assistance Contact Technical Support at 800-874-7822 or Visit our Website at www.AMTcorporation.com

4
Troubleshooting for 300T Series
Problem
Solution
Faucet does not activate
Water does not shut off
Irregular/low flow
1. Water stop valves may be turned OFF. Make sure the stop valves are ON.
2. Check if red LED blinks on sensor window. If no light is present:
A. Check or replace batteries (and/or alternate power source, if available).
B. Make sure sensor cable is properly plugged into control box.
3. Check that motor plug is properly plugged into control box.
4. Inspect sensor window. If dirty, wipe down with soft cloth. If broken, replace.
5. Check motor mechanism by:
A. Remove motor cover.
B. Manually turn gears (clockwise). If gears do not turn, replace motor drive assembly.
Motor activates but no water
comes out of the faucet
1. Water stop valves may be turned OFF. Make sure the stop valves are ON.
2. Check water filter by:
A. Shut off stop valves and make sure water is completely OFF.
B. Remove water filter and clean if necessary.
C. Re-install water filter.
3. Check nozzle/aerator. If dirty, clean or replace.
4. Reset faucet by:
A. Pressing red button on the control box and keep it pressed in until water stops flowing (about 5 seconds).
B. Let go of the button. Sensor will self-adjust (about 15 seconds). Water will turn ON and Off once by itself
when the sensor adjustment process is completed.
1. Test motor by:
A. Remove motor cover.
B. Manually turn gears (clockwise). If gears do not turn or if they turn non-stop, replace motor drive assembly.
2. Check flow pin assembly by:
A. Shut off stop valves and make sure water is completely OFF.
B. Remove motor cover.
C. Remove motor assembly.
D. Remove and inspect flow pin assembly. Clean or replace components.
E. Re-install all components and turn water stop valves back ON.
3. Test sensor range by:
A. Pressing red button on the control box and keep it pressed in until water stops flowing (about 5 seconds).
B. Let go of the button. Sensor will self-adjust (15-20 seconds). Water will turn ON and Off once by itself
when the sensor adjustment process is completed.
4. Check batteries (and/or alternate power source, if available).
Solid red LED light in
sensor window stays ON
1. Check batteries are installed in the right direction and not fully drained (also check alternate power source,
if available). Solid red light may be a “low power indicator”.
2. Control box may be damaged. If so, replace control box.
3. Sensor may be damaged. If so, replace sensor cable.
1. Check stop valve. If not fully open, open fully.
2. Inspect nozzle/aerator. If dirty, clean or replace.
3. Check water filter by:
A. Shut off stop valves and make sure water is completely OFF.
B. Remove water filter and clean if necessary.
C. Re-install water filter.
4. Check flow pin assembly by:
A. Shut off stop valves and make sure water is completely OFF.
B. Remove motor cover.
C. Remove motor assembly.
D. Remove and inspect flow pin assembly. Clean or replace components.
E. Re-install all components and turn water stop valves back ON.
Water temperature is too high 1. Make sure stop valves are fully open.
2. Calibrate temperature adjustment in mixing valve to lower output temperature.
Water temperature is too low 1. Make sure stop valves are fully open.
2. Calibrate temperature adjustment in mixing valve to increase output temperature.
Spout drips 1. Remove nozzle/aerator and turn water ON and OFF by activating sensor 5 to 6 times.
If dripping continues, follow instructions in “Irregular/low flow” below.
For Additional Assistance Contact Technical Support at 800-874-7822 or Visit our Website at www.AMTcorporation.com

5
Sensor Distance Adjustment
This section is for 300 Series spouts only.
(Models AEF-300, AEF-301, AEF-302, AEF-303, AEF-304,
AEF-306, AEF-307, AEF-320, AEF-321, AEF-322, AEF-323)
1. Push and hold reset button on control box (pictured in Figure 17).
Water will turn ON for approximately 5 seconds and then OFF.
Release reset button.
The sensor is now in setup mode.
2. Position the palm of your hand vertically and hold it at desired
sensing distance.
You will see a quick flashing red light in sensor window.
3. Hold your hand at the desired sensor distance for approximately
15 seconds while red light is flashing until solid red light comes on.
Faucet will turn ON and then OFF by itself once when sensor range
is set.
This section is for 300T Series spouts only.
(Models AEF-300T, AEF-302T, AEF-304T, AEF-305T)
1. Locate the reset button on the control box as pictured in Figure 18.
2. Push and hold reset button on control box (pictured in Figure 18).
Water will turn ON for approx. 5-6 seconds then turn OFF. Release
reset button. Sensor will now self-adjust (process takes 15-20 seconds).
Water will turn ON and OFF by itself one time after the sensor has
self-adjusted.
I
E
BATTERY
PACK
(Use 4-Size C)
Reset button
Control box
Sensor window
and sensor light
Figure 17
E
BATTERY
PACK
(Use 4-Size C)
Reset button
Control box
Figure 18
I
I
Sensor light
Sensor window

Warranty
AMTC WARRANTS ITS PRODUCTS TO BE FREE OF DEFECTS IN
MATERIAL AND WORKMANSHIP FOR A PERIOD OF FIVE (5) YEARS
FROM DATE OF PURCHASE, WHEN PROPERLY INSTALLED AND UNDER
NORMAL USE AND SERVICE. THESE PROVISIONS DO NOT INCLUDE THE
BATTERIES SHIPPED WITH THE PRODUCTS. A DEFECTIVE PRODUCT
MAY BE RETURNED TO AMTC OR ITS AUTHORIZED REPRESENTATIVES
WITHIN FIVE (5) YEARS FROM DATE OF PURCHASE WITH THE PROPER
INVOICE OF PURCHASE. AMTC, AT ITS DISCRETION, WILL REPLACE OR
REPAIR DEFECTIVE PRODUCT AT NO CHARGE. CLAIMS FOR LABOR,
TRANSPORTATION, AND ANY OTHER INCIDENTAL COSTS WILL NOT BE
ALLOWED. AMTC WILL NOT BE RESPONSIBLE FOR ANY CONSIDERABLE
DAMAGES OF ANY KIND WHATSOEVER.
FOR TECHNICAL SUPPORT PLEASE CALL TOLL FREE 1-800-874-7822 OR
VISIT OUR WEBSITE AT WWW.AMTCORPORATION.COM
MAKE SURE TO VISIT OUR WEBSITE PERIODICALLY FOR INFORMATION
ON NEW PRODUCTS AND TO DOWNLOAD ANY IMPORTANT PRODUCT
DOCUMENTS THAT YOU MAY NEED IN THE FUTURE.
Advanced Modern Technologies Corporation
19800 Nordhoff Place, Chatsworth, CA 91311
Tel: (818) 883-2682 Toll Free: (800) 874-7822 Fax: (818) 883-2620
www.amtcorporation.com
REV. 07/17
6
This manual suits for next models
50
Table of contents
Other AMTC Plumbing Product manuals