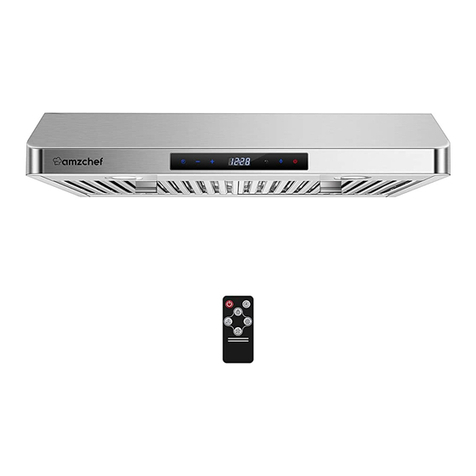
amzchef 3005D User manual

INSTRUCTION MANUAL
RANGE HOOD
MODEL:3005D
Available size:30''
AC 120V 60Hz
PLEASE READ INSTRUCTIONS CAREFULLY BEFORE ASSEMBLY
RETAIN THIS MANUAL FOR FUTURE REFERENCE

CONTENTS
SAFETY WARNING ....................................................................................................01
NOTICE OF INSTALLATION ......................................................................................03
INSTALLATION............................................................................................................03
TOUCH CONTROL PANEL INSTRUCTION ...............................................................06
REMOTE CONTROL FUNCTION ...............................................................................07
MAINTENANCE...........................................................................................................08
TROUBLESHOOTING ................................................................................................10

1
SAFETY WARNING
Thank you for choosing our cooker hood. Please read the instruction
manual carefully before use.
The cooker hood is used on 120V,60Hz.
Never let the children operate the machine.
The cooker hood is for home use only, not suitable for barbecue, roast
shop and other commercial purpose.
The cooker hood and its filter should be clean regularly in order to keep in
good working condition.
Clean the cooker hood according to the instruction manual and keep the
unit from danger of burning.
Forbid the direct baking from the gas cooker.
Please keep the kitchen from a good air flow.
Before connecting this appliance,check if the power supply cord is not
damaged. If the supply cord is damaged,it must be replaced by the
manufacturer,it's service agent or similarly qualified persons in order to
avoid a hazard .
There is fire risk if cleaning is not carried out in accordance with the
instructions.
There shall be adequate ventilation of the room when the range hood is
used at the same time as appliances burning gas or other fuels.
The air must not be discharged into a flue that is used for exhausting
fumes from appliances burning gas or other fuels.
Regulations concerning the discharge of air have to be fulfilled.
Do not flame under the range hood.
The range hood is not intended to be installed over a hob having more
than four hob elements.
This appliance is not intended for use by persons(including children)with
reduced physical,sensory or mental capabilities,or lack of experience and
knowledge,
unless they have been given supervision or instruction concerning use of

2
the appliance by a person responsible for their safely.
Children should be supervised to ensure that they do not play with the
appliance.
When the range hood and appliances supplied with energy other than
electricity are simultaneously in operation,the negative pressure in the
room must not exceed 4 Pa (4x10⁻⁵ bar)
CAUTION:Accessible parts may become hot when used with cooking
appliance.
The light source contained in this luminaire shall only be replaced by the
manufacturer or his service agent or a similar qualified person.
If the external flexible cable or cord of this luminaire is damaged,it shall be
exclusively replaced by the manufacturer or his service agent or a similar
qualified person in order to avoid a hazard.
Electrical Shock Hazard
Only plug this unit into a properly earthed outlet. If in doubt seek advice
from a suitably qualified engineer.
Failure to follow these instructions can result in death, fire,or electrical
shock.
The instructions shall state the substance of the following:
-there shall be adequate ventilation of the room when the range hood is
used at the same time as appliances burning gas or other fuels(not
applicable to appliances that only discharge the air back into the room);
-the details concerning the method and frequency of cleaning;
-there is fire risk if cleaning is not carried out in a accordance with The
instruction;
-CAUTION:Accessible parts may become hot when used with cooking
appliances;
-The air must not be discharged into a flue that is used for exhausting
fumes from appliances burning gas or other fuels(not applicable to
appliances that only discharge the air back into the room);
-In order to optimally capture the contamination during cooking, your

3
extractor hood should be installed at least 65cm above the cooking
surface.
-Regulations concerning the discharge of air have to be fulfilled.
NOTICE OF INSTALLATION
1.Before installation, please ensure the area is clean to avoid suction of
the remaining bits of broken wood and dust.
2.It cannot share the same air ventilation tube with other appliance such as
gas tube, warmer tube,and hot wind tube.
3.The bending of ventilation tube should be≥120°, parallel or above the
start point and should be connected to the external wall.
4.After installation,make sure that the extractor is level to avoid grease
collection at one end.
5.Warning: To prevent air block after power connected,please
remove two protection foams from air outlet before installation.
two protection foams

For general ventilating use only. Do not use to exhaust hazardous or explosive materials
and vapors.
Mount your range hood so that the bottom of the hood is 26" to 30" above the cooking surface.
The minimum hood distance above cooktop must not be less than 26"; any installation less than
26" may cause overheating and cause damage to the range hood.
Two to three installers are recommended because of the larger size and weight of this hood.
To reduce the risk of fire and to properly exhaust air, be sure to duct air outside. Do not exhaust
air into spaces within walls and ceiling or into attics, crawl space or garages.
Because of the high exhausting capacity of this hood,you should make sure enough air is
entering the house to replace exhausted air by opening a window close to or in the kitchen.
Use with approved cord-connection kit only.
Please read product specification label on range hood for further information and requirements.
INSTALLATION CAUTION
Wear protective gloves if it is necessary to remove any parts for installing ,cleaning or servicing.
Check all joints on duct work to insure proper connection and all joints should be properly taped.
All electrical wiring must be properly installed,insulated and grounded.
When cutting or drilling into wall or ceiling,be careful not to damage electrical wiring or other
hidden utilities.

INS
Tools needed for the installation
Parts included
TALLATION
x2
[02] x 8 [03] x 1 [04] x 8
[01] x 1
(4x40 mm) (Φ12*0.8)
[05] x 8

15mm(0.6’’)
750mm(30’’)
716mm(28.2’’)
296mm(11.7’’)
259.4mm
(10.2’’) 65mm
(2.6’’)
280 mm(11’’)
Ø 150mm (6’’)
Side view
Back view
Whole view
400mm(15.7’’)
200mm (7.9’’)
48mm (1.9’’)
259.4mm (10.2’’)
296mm (11.7’’)
120mm (4.7’’)
69.7mm (2.7’’)
26.7mm (1.1’’)

01
Length 716~719 mm
*Width 260~263 mm
*
02
(26 inch)
(30 inch)
Cut-out dimension:Length 716~719mm(28.2’’~28.3’’) X Width 260~263 mm (10.2’’~10.4’’)
The cooker hood should be placed at a distance of 65-75cm(26-30inch) from the
cooking surface for the best effect.
1) Mearsure and cut an opening at the bottom of the cabinet to fit the range
hood housing.
2) Measure and cut a hole (Ø160mm (6.3’’)) at the top of cabinet to fit the duct tube.
3) Note that the hole at the top of the cabinet may not be necessary depending
on venting methods chosen(see step 6 instruction). If the air is vented through
the wall,cut a hole at the wall.
4) According to the sizes shown in whole view and side view,drill the holes on two
wood frames on both sides.
drill the holes on
the wood frame
Ø160mm (6.3’’)

03
04
[05]×8
[02]×8
[04]×8
Optional assembly
Remove two stainless steel filters,then lift the range hood into the cabinet.
1) Align range hood to the pre-drilled holes on both sides
and screw in using the screws provided.
2) User could also drill screws on the top wood plate,
it’s optional assembly.

05
06
Connect the duct tube to air outlet connector on the top of range hood and seal with
aluminum foil tape to make all joints secure and air tight.
•This range hood is factory set for venting through the roof or wall.
•Vent work can terminate either through the roof or wall. To vent through a wall, a 90° elbow is needed.
IMPORTANT:
NEVER exhaust air or terminate duct work into spaces between walls, crawl spaces, ceiling,
attics or garages. All exhaust must be ducted to the outside.
•
Use metal/aluminum duct work only.
•
•Use caulking to seal exterior wall or roof opening around the cap.
VENTING METHODS:
[01] x 1

07
Put the stainless steel filters back to the range hood.

6
TOUCH CONTROL PANEL INSTRUCTION
When the range hood is plugged in,it’s in stand-by mode.
ON/OFF button
1) Time setting function
In stand-by mode, press ON/OFF button for 3 seconds, the buzzer sounds,
and the LCD screen flashes for 3 seconds, indicating that it enters into the
time setting function.
Within these 3 seconds,press speed button and the time will increase by 1
hour ,press light button, the time is reduced by 1 hour, and the adjusted time is
0~24 hours. Press ON/OFF button again, the time setting function jumps to
minutes, the procedure for setting function in minutes is the same as in hours.,
and the adjusted time is 0-60 minutes.
2) Time delay function
When the range hood is working at any speed of low/medium/high speed,
touch ON/OFF button, and the fan enters into the time delay function. The
default time is 3 minute countdown, the fan will automatically turn off after 3
minutes. Touch ON/OFF button again to skip the time delay function and
directly turn off the fan.
ON/OFF Light LCD screen Speed Signal
receiver

7
Light button
In stand-by mode,touch light button,the light is on. Touch again,the light is off.
Speed button
In stand-by mode,touch speed button,the range hood runs at low speed . LCD
screen displays the low speed icon.Press speed button again, the range hood
runs at medium speed, LCD screen displays the medium speed icon,and so
on. Every time you press speed button, the LCD screen displays "low, medium,
high, low, medium, high speed cycle in sequence.
Signal receiver
The signal receiver is received by remote control.
REMOTE CONTROL FUNCTION
ON/OFF key
When the range hood is working at any speed of low/medium/high speed,
touch ON/OFF key, and the fan enters into the time delay function.
The default time is 3 minute countdown, the fan will automatically turn off after
3 minutes. Touch ON/OFF key again to skip the time delay function and
directly turn off the fan.
Clock key
In stand-by mode,press clock key, the buzzer sounds, and the LCD screen
flashes for 3 seconds, indicating that it enters into the time setting function.
Within these 3 seconds,press high speed key and the time will increase by
1 hour,press light key ,the time is reduced by 1 hour, and the adjusted time
is 0~24 hours.
Press clock key again,the time setting function jumps to minutes, the
procedure for setting function in minutes is the same as in hours., and the
adjusted time is 0-60 minutes.

8
Light key
In stand-by mode,touch light key,the light is on. Touch again,the light is off.
Low speed key
Medium speed key
High speed key
MAINTENANCE
Disconnect the power cord from the wall outlet before cleaning and
maintenance.
To clean the appliance outside, use a damp cloth, a soft brush or a fine
sponge, and then wipe it dry.Do not use coarse abrasive cleaning agents
or sharp metal scrapers for cleaning of the appliance as this could result in
surface scoring.
Never leave aggressive or acidic substances (lemon juice, vinegar) on
enamelled or stainless parts of the appliance.
Cleaning and replacement of filters
Metal grease filters
When the appliance is in common use, the metal grease filters should be
checked or cleaned every month. In case of more frequent frying or deep
frying, shorten this interval.

9
Do not use the appliance without the metal grease filters properly installed!
1.Remove the metal filters as shown in Fig. 1.
2.Let the metal filters soak in warm water with addition of a detergent or
put them into a washer with a cleaning agent and set temperature below
60 °C. In case of soaking in warm water, clean the metal filters with a fine
brush, rinse them with clean water and let them dry.
3.Attach the dried filters back.
Charcoal filter (to be purchased)
This filter is only used for the recirculation mode.
The filter contains an active carbon absorbing the smell being discharged.
The active carbon will be saturated after some time, hence the absorption
capacity will be shortened. This filter cannot be washed or cleaned in any
other way.
When the appliance is in common use, the charcoal filter should be
replaced every 2-3 months. In case of more frequent frying or deep frying,
shorten this interval.
1.Remove the metal filters as shown in Fig. 1.
2.The charcoal filters are situated on both sides of the motor. Turn the
filters, until they are secured (see Fig. 2).
3.To replace the charcoal filter, proceed in reverse order.
Fig.1

10
TROUBLE SHOOTING
Problem
Possible Reasons
Suggested Solution
Light on, but
motor does not
work
-The leaf blocked
-The capacitor damaged
-The motor jammed bearing
damaged
-The internal with of motor off or
a bad smell from the motor
- Get rid of the blocking
- Replace capacitor
- Replace motor
- Replace motor
Light does not
work,motor does
not work
- Light damaged
- Power cord looses
-Replace lights
-Connect the wires as per the
electric diagram.
Closed
ClosedOpened
Opened
Fig. 2

11
Oil drops from
the metal grease
filer
Heavily fouled filer.
Immediately clean or replace the
metal grease filer
Shake of the
body
-The leaf damaged and causes
Shaking
-The motor is not tightly hanged
-The body is not tightly hanged
-Replace the leaf
-Lock the motor tightly
-Fixed the body tightly
Insufficient
suction
-The body is not tightly hanged
-Too much ventilation from
open doors or windows
-Readjust the distance
-Choose a new place and resemble
the machine
The machine
inclines
-The fixing screw not tight
enough
-The hanging screw not tight
enough
-Tighten the hanging screw and
make it horizontal
-Tighten the hanging screw and
make it horizontal
Table of contents
Other amzchef Ventilation Hood manuals
Popular Ventilation Hood manuals by other brands

VentAHood
VentAHood UNDER CABINET HOOD installation instructions

Wesco
Wesco FH Scala 200 Use and maintenance instructions

Air King
Air King AX Series operating manual

VentAHood
VentAHood CWSH3 installation instructions

Wesco
Wesco WH QUADRO 5 Use and maintenance instructions

VentAHood
VentAHood XLH12 Installation instruction

Klarstein
Klarstein HIGH LINE 10033053 manual

Siemens
Siemens LC98BA521I Instructions for installation and use

Amica
Amica AH5014 instruction manual

Amica
Amica OKP6655S operating instructions

Futuro Futuro
Futuro Futuro NATALIE ISLAND installation manual

Dacor
Dacor DHD U990C/DA Series installation instructions