manuals.online logo
Brands
  1. Home
  2. •
  3. Brands
  4. •
  5. Anchor
  6. •
  7. TV Mount
  8. •
  9. Anchor TM35 User manual

Anchor TM35 User manual

Popular TV Mount manuals by other brands

Krüger & Matz KM1300 owner's manual

Krüger & Matz

Krüger & Matz KM1300 owner's manual

Barkan E220 manual

Barkan

Barkan E220 manual

Bauhn ACTVB-1120 installation guide

Bauhn

Bauhn ACTVB-1120 installation guide

Vantage Point Products CB01 instructions

Vantage Point Products

Vantage Point Products CB01 instructions

Ergotron Neo Flex Cantilever UHD user guide

Ergotron

Ergotron Neo Flex Cantilever UHD user guide

ECG LD 174203 instruction manual

ECG

ECG LD 174203 instruction manual

StarTech.com FPCEILBTB user manual

StarTech.com

StarTech.com FPCEILBTB user manual

VonHaus 05/038 instruction manual

VonHaus

VonHaus 05/038 instruction manual

Techlink ECHO TV manual

Techlink

Techlink ECHO TV manual

Sandstrom SSTVMC12X instruction manual

Sandstrom

Sandstrom SSTVMC12X instruction manual

Kanto RCAD590 user manual

Kanto

Kanto RCAD590 user manual

Forging Mount HY9440 instruction manual

Forging Mount

Forging Mount HY9440 instruction manual

ICW SCACC18 installation instructions

ICW

ICW SCACC18 installation instructions

LG WM-L640V owner's manual

LG

LG WM-L640V owner's manual

Gembird WM-65ST-01 user manual

Gembird

Gembird WM-65ST-01 user manual

ERARD FiTUP XXL 035320 quick start guide

ERARD

ERARD FiTUP XXL 035320 quick start guide

PEERLESS PLCK-1 Installation and assembly

PEERLESS

PEERLESS PLCK-1 Installation and assembly

GEM GEM GP001 instructions

GEM

GEM GEM GP001 instructions

manuals.online logo
manuals.online logoBrands
  • About & Mission
  • Contact us
  • Privacy Policy
  • Terms and Conditions

Copyright 2025 Manuals.Online. All Rights Reserved.

60mm
10mm
Concrete Wall
bubble level
G3
F
E
G1
Step 1A: Concrete Wall Mounting
Step 1B: Drywall with Wooden Stud Mounting
60mm
3mm
bubble level
Wood Stud
behind drywall
G1
E
G3
Tools
The following tools are recommended for this installation:
• Drill
• 5/32” or 4mm drill bit for drywall
• 3/8” or 10mm drill bit for concrete
• Stud nder
• Phillips screwdriver
• Tape measure
Dimensions & Weights
• 840 x 520 x 62mm / 33 x 20.5 x 2.44”
• Supports VESA up to 800 x 500mm.
• This mount is designed to hold a maximum of 132
lbs (60 kg).
• For TV size 37”-80”
Parts
1
bubble level
G3(1PCS)
ø6
G1(10PCS)
ø8
G2(4PCS)
ø8x5
H1(4PCS)
ø8x10
H2(4PCS)
M6
F(6PCS)
ø8x20
H3(4PCS)
B(4PCS)
M5X20MM
D1(4PCS)
M8X25MM
A(4PCS)
M4X20MM
C(4PCS)
M6X20MM M6
E(6PCS)
D2(4PCS)
M8X50MM
Tilting Flat Panel TV Mount for 37-80”Televisions
User’s Guide for Model TM35 v2350-01
Warnings
• The wall mounted parts of the TV mount must be rmly attached to a concrete/brick/solid wood wall, or wall studs
behind drywall.
• Tighten screws so that the wall plate is rmly attached, but do not overtighten. Overtightening can damage the
screws and increase the chances of failure.
• Do not remove or loosen any screws until they are no longer engaged with the mount. Doing so may cause the
screen to fall.
• It is recommended to have this mount professionally installed.
WARNING : This product can expose you to chemicals including lead, which
is known to the State of California to cause cancer and birth defects or other
reproductive harm. For more information go to www.P65Warnings.ca.gov. This
product meets and complies with all Federal regulations.
Only drill into wooden studs behind drywall. Use a stud nder to locate studs
if needed. DO NOT DRILL AND HANG THE BASE PLATE ON DRYWALL OR
SHEETROCK WITHOUT STUDS. It is not strong enough to support a TV and
will cause damage.
Pre-drill holes and use
included wall anchors
(Part F).
A/B/C
D1
G1
H1
G2
H2
D2
G2
H1/H2/H3
locking screw
D2
G2
H1/H2/H3
A/B/C
G1
H1
D1
G2
H2
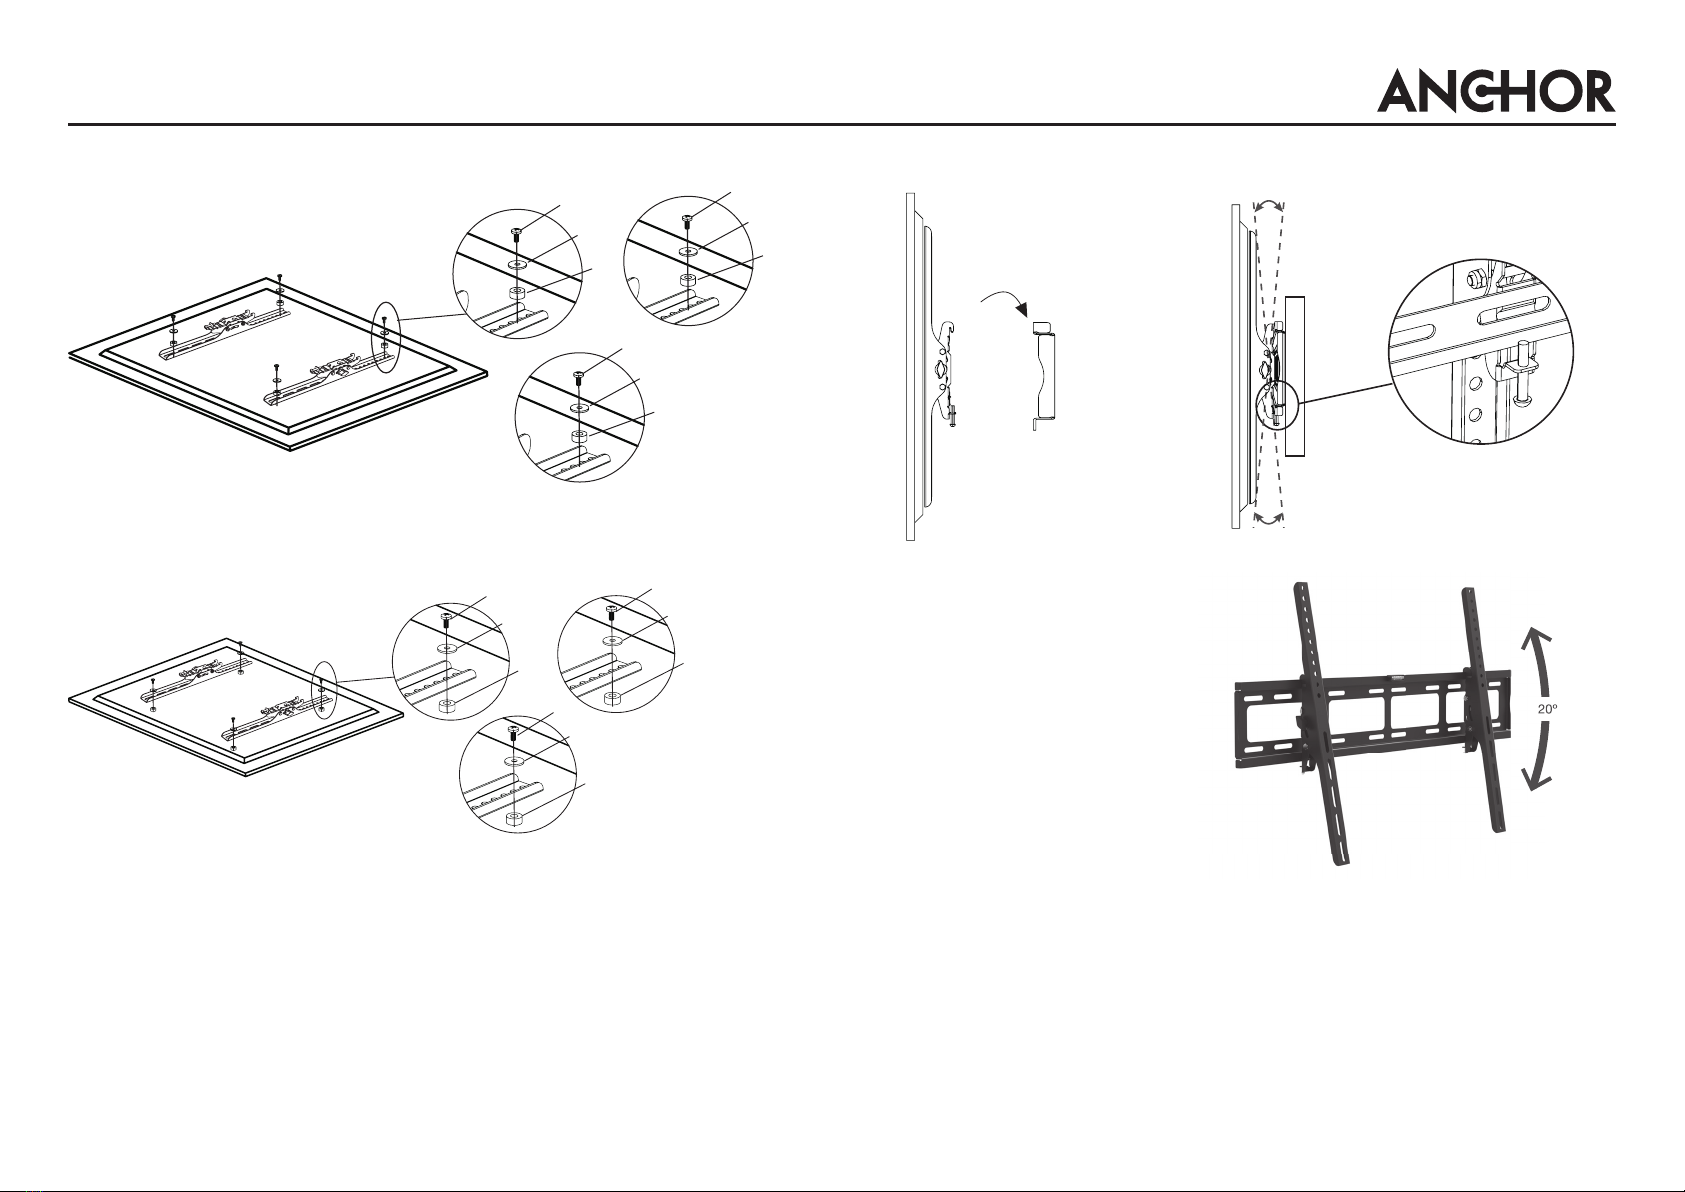
Step 2A: Attach Bracket to TV
Step 2B: Attach Bracket to TV with Curved Back or Obstruction
Step 3: Hang the TV on the Wall Mount
Tilting Flat Panel TV Mount for 37-80”Televisions
User’s Guide for Model TM35 v2350-01
2
Attach the two brackets to the rear of your television, making sure the claw of
the bracket is in the upper position and the tightening screw is in the lower
position.
Use the included screws and washers to secure the bracket to your TV. Find
the set that ts your TV and discard the rest.
Tighten the locking
screw on the bottom of
the bracket to ensure the
TV will not move or shift
after installation.
Customer Support
Customer Service: 1-888-999-4215
Email Support: [email protected]
Email Parts: par[email protected]
For Warranty Information and the most up-to-date version of this User’s Guide, go to www.gpx.com
To download this User’s Guide in English, Spanish, or French, or to get answers to frequently asked questions, visit the support section at:
www.gpx.com
Para descargar este Manual del Usuario en inglés, español y francés, o para obtener respuestas a preguntas frecuentes, visite la sección de
apoyo en: www.gpx.com
Pour télécharger ce guide de l’utilisateur en anglais, espagnol ou français, ou pour obtenir des réponses à des questions fréquemment
posées, consultez la rubrique d’assistance sur: www.gpx.com
Copyright © 2019 Digital Products International (DPI, Inc.) All other trademarks appearing herein are the property of their respective
owners. Specications are subject to change without notice.