AND UA-789AC User manual

EXTRA LARGE ARM
BLOOD PRESSURE MONITOR
Model UA-789AC
Instruction Manual
ENGLISH, FRANÇAIS, ESPAÑOL
1WMPD4003391

Important Information
Please read this important information before using your monitor.
qPlease remember that only a medical practitioner is qualied to
interpret your blood pressure measurements. Use of this device should
not replace regular medical examinations.
qHave your physician review your procedure for using this device. He or
she will want to verify blood pressure measurements before prescribing
or adjusting medications.
qConsult your physician if you have any doubt about your readings.
Should a mechanical problem occur, contact A&D Medical (in Canada,
contact Auto Control Medical).
qDo not attempt to service, calibrate, or repair this monitor.
qBecause your UA-789 monitor contains delicate, high-precision parts,
avoid exposing it to extremes in temperature or humidity or to direct
sunlight, shock and dust. A&D Medical guarantees the accuracy of this
monitor only when it is stored and used within the temperature and
humidity ranges noted on page E-21.
qClean the monitor and cuff with a dry, soft cloth or a cloth dampened
with water and a mild detergent. Never use alcohol, benzene, thinner or
other harsh chemicals to clean monitor or cuff.
qRemove and replace batteries if monitor is not used for more than six
months. Alkaline batteries recommended.
Precautions
The UA-789 is designed to be used at home, by those who are eighteen
(18) years and older, to monitor blood pressure (systolic and diastolic) and
pulse rate. It is not designed for ambulatory use.

Table of Contents
What Display Symbols Mean E-2
Monitor Components E-3
How UA-789 Works E-4
Before You Start E-4
Selecting the Correct Cuff Size E-5
Attaching the Cuff to the Monitor E-5
Taking Your Blood Pressure E-6 - E-10
What is an Irregular Heartbeat E-11
About Cuff Ination Meter E-11
About Average Reading E-12
About Pressure Rating Indicator™E-12
About Memory E-13
Using the Monitor with AC Adapter E-14
About Blood Pressure E-15 - E-19
Troubleshooting E-20
Specications E-21
Limited Warranty E-22

E-2
What display symbols mean
Symbols Condition/Cause Recommended Action
The symbol shown while
measurement is in progress. It
blinks while detecting the pulse.
Measurement is in progress,
remain as still as possible.
Irregular Heartbeat symbol
(I.H.B.) body movement may
have occurred. Refer to page
E-9 for more information on
irregular heartbeats.
Take measurement again and
consult with your physician.
MPrevious measurement stored
in MEMORY. ––––––––––––
FULL BATTERY – The
battery power indicator during
measurement. ––––––––––––
LOW BATTERY – The battery
is low when it blinks.
Replace all batteries with new
ones, when the indicator blinks.
■Err
Unstable blood pressure
due to movement during the
measurement.
Try the measurement again.
Remain very still during the
measurement..
The systolic and diastolic
values are within 10 mmHg of
each other.
Fasten the cuff correctly, and try
the measurement again.
The pressure value did not
increase during ination.
Check for air leaks along the tube
and around the air socket.
The cuff is not fastened
correctly.
Refasten the cuff and retake
measurement.
There is an air leak in the cuff
or monitor.
Make sure tube is properly
connected to cuff and monitor.
■Err
Pulse Display
Error
The pulse is not detected
correctly.
Try the measurement again.
Remain very still during the
measurement.
Cuff Ination Meter Measurement is in progress,
remain as still as possible.
Pressure Rating Indicator™ Refer to the section “About
Pressure as still as possible.

E-3
Monitor Components
Systolic Pressure Memory Button
AC Adapter
Jack
Start Button
Air Hose
Extra Large Cuff
Air Connector Plug
Air Socket
Battery Cover
Battery Compartment
Diastolic Pressure
Cuff Inflation
Meter
Irregular Heartbeat
Pressure Rating
Indicator
Pulse Rate
Clock Button
E-4
How UA-789 Works
LifeSource®blood pressure monitors are easy to use, accurate and
digitally display full measurement readouts. Our technology is based on
the “oscillometric method” – a noninvasive blood pressure determination.
The term “oscillation” refers to any measure of vibrations caused by the
arterial pulse. Our monitor examines the pulsatile pressure generated by
the arterial wall as it expands and contracts against the cuff with each
heartbeat. The cuff is inated until the artery is fully blocked. The ination
speed is maximized and the pressure level is optimized by the device. The
monitor takes measurements while the cuff is both inating and deating.
This results in a faster measurement providing greater comfort to the user.
Before You Start
You must install 4 type AA (1.5 volt) batteries (alkaline batteries
recommended), or use the AC Adapter (see page E-14 for using the
Monitor with AC Adapter) and attach the cuff to the monitor before using
it. To install batteries (or replace them if the “Low Battery” symbol appears
on display), proceed as follows:
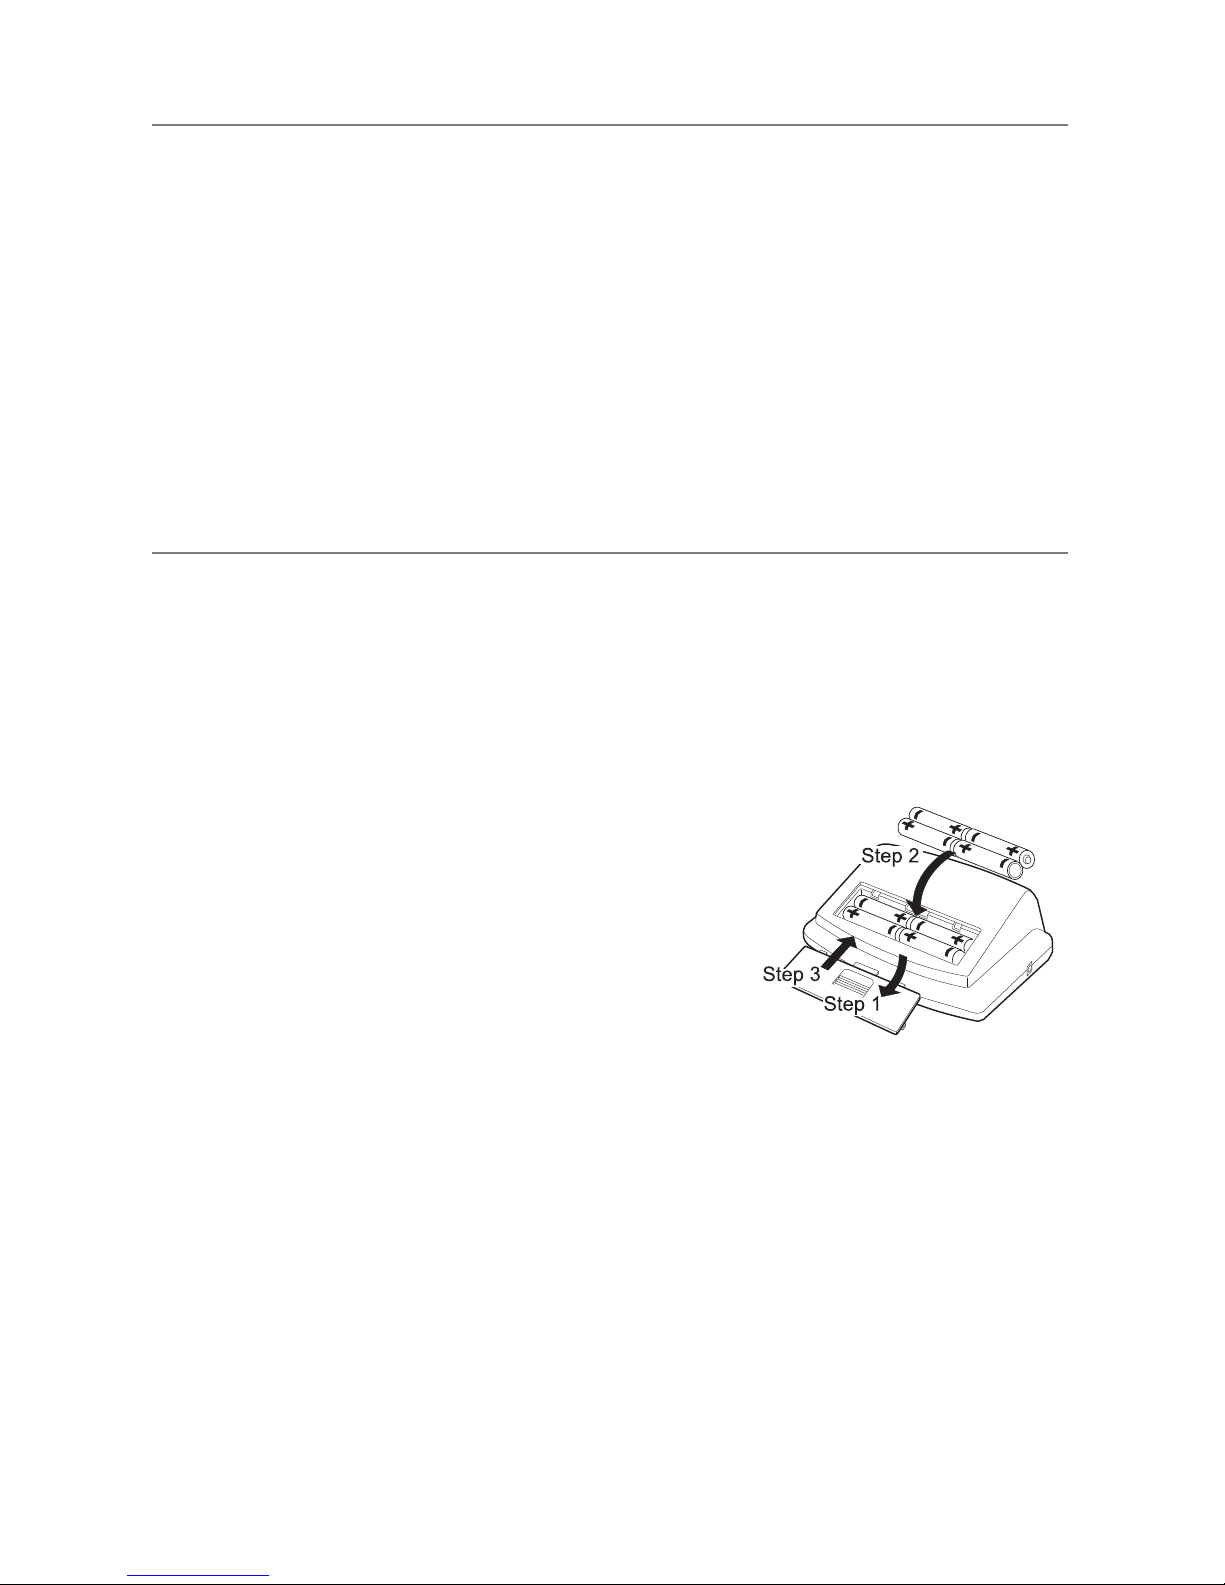
1. Remove battery compartment cover by
gently pushing down on arrow and sliding
cover forward.
2. Put in bottom row of batteries rst. Place
the batteries in compartment with positive
(+) and negative (–) terminals matching
those indicated in the compartment.
Be sure batteries make contact with
compartment terminals.
3. Replace cover by sliding it into the
compartment and gently pressing into place.
NOTE: Rechargeable batteries will not work with this monitor

E-5
Selecting the Correct Cuff Size
Using the correct cuff size is important for an accurate reading. A cuff
that is too large will produce a reading that is lower than the correct blood
pressure; a cuff that is too small will produce a reading that is higher
than the correct blood pressure. With your arm hanging at the side of
your body, measure the circumference of your upper arm at the midpoint
between the shoulder and elbow.
Arm size Recommended
Cuff size
Replacement
cuff model #
16.5” - 23.6” (42-60 cm) Extra Large Cuff Included in unit
14.2” - 17.7” (36-45 cm) Large Cuff UA-281
9.4” - 14.2” (24-36 cm) Medium Cuff UA-280
The AccuFit™Extra Large Cuff is designed to accommodate larger arm
sizes measuring from 16.5” - 23.6” (45-60 cm). This cuff is contoured to
provide you with a quick and comfortable t. To place the cuff on properly,
please read the section “Taking Your Blood Pressure” (see pg. E-8).
Attaching the Cuff to the Monitor
After installing the batteries, you must attach the blood pressure cuff to the
monitor. To do so, insert the Air Connector Plug of the blood pressure cuff
into the Air Socket of the monitor rmly.
NOTE: Be sure to differentiate the Air Socket from the AC Adapter Jack. The Air Connector Plug will
only securely t into the correct jack.

E-6
Taking Your Blood Pressure
Adjusting the Built-in Clock
The UA-789 monitor has a built-in clock that gives you the time and date
and can tell you when a blood pressure reading stored in memory was
taken. We recommend that you adjust the clock prior to use. To adjust the
clock, follow these simple steps:
1. Press and hold the clock button until the digits start blinking.
2. To select the year, press and release the START button (to fast
forward, press and hold the START button). When the current year is
selected, set the year by pressing the clock button.
3. After the year is set, follow step 2 to set the month, day, hour (AM/PM)
and minute on the display screen.
NOTE: The clock will go back to January 1, 2007 at 12:00 once the batteries are removed for more
than 30 seconds.

E-7
Taking Your Blood Pressure
Setting the Alarm
The UA-789 monitor allows you to set up to three alarms per day to notify
you when to take your blood pressure. To set the alarm(s):
1. Press and hold the clock button until the year digits
start blinking. Then press and release the memory
button.
“P-1” will be shown at the middle of the display
screen indicating that this is the rst alarm.
NOTE: If you do not wish to set an alarm, press the memory button
several times to return to the main screen or allow the display to
disappear after 30 seconds.
2. Select the hour using the START button and press
the clock button to set the hour and move to the
minute selection. After selecting and setting the
minute, press the memory button to complete the
alarm setting.
3. The display will move onto the second alarm setting
and conclude with the third alarm setting. Repeat the
previous step if you need a second or third alarm.
When the alarm is set, a “P” will appear on the main
screen. If you do not see a “P” on the main screen,
press the clock button to activate the alarm function.
When the alarm sounds, it will last for one minute. To
turn the alarm off immediately, press the START button.
NOTE: To deactivate the alarm function, simply press the clock button once.
You can reactivate the alarm function by pressing the clock button again.

E-8
Taking Your Blood Pressure
Tips for Blood Pressure Monitoring:
qRelax for about 5 minutes before measurement.
qDo not smoke or ingest caffeine at least 30 minutes prior to measurement.
qRemove constricting clothing and place cuff on bare arm.
qUnless your physician recommends otherwise, use left arm to measure
pressure.
qDo not talk during measurement.
qDo not cross legs and keep you feet at on oor during measurement.
Cuff Size Indicator on the LifeSource AccuFit™Cuff
The LifeSource AccuFit™cuff has an indicator which tells you whether you
are using the correct cuff size or not. Place the cuff on your arm (see Page
E-9 to learn how to put the cuff on correctly) and if the Index Mark falls
within the Proper Fit Range, you are using the correct cuff size.
If the Index Mark falls outside of the Proper Fit Range, contact A&D Medical
at 1-888-726-9966 (in Canada, call Auto Control Medical at 1-800-461-0991)
for more information on how to obtain a cuff replacement.
In addition, the LifeSource AccuFit™Extra Large Cuff also features a
Brachial Artery Marker which will assist you in properly positioning the cuff.
Simply align the yellow marker on the cuff with the inside of your left elbow
and fasten the cuff securely.
Index Mark Proper Fit Range
(white)
Brachial Artery Marker
(yellow)
E-9
Taking Your Blood Pressure
Now you are ready. Follow these simple steps:
1. Sit comfortably with your left arm resting on a at surface so that the
center of your upper arm is at the same height as your heart.
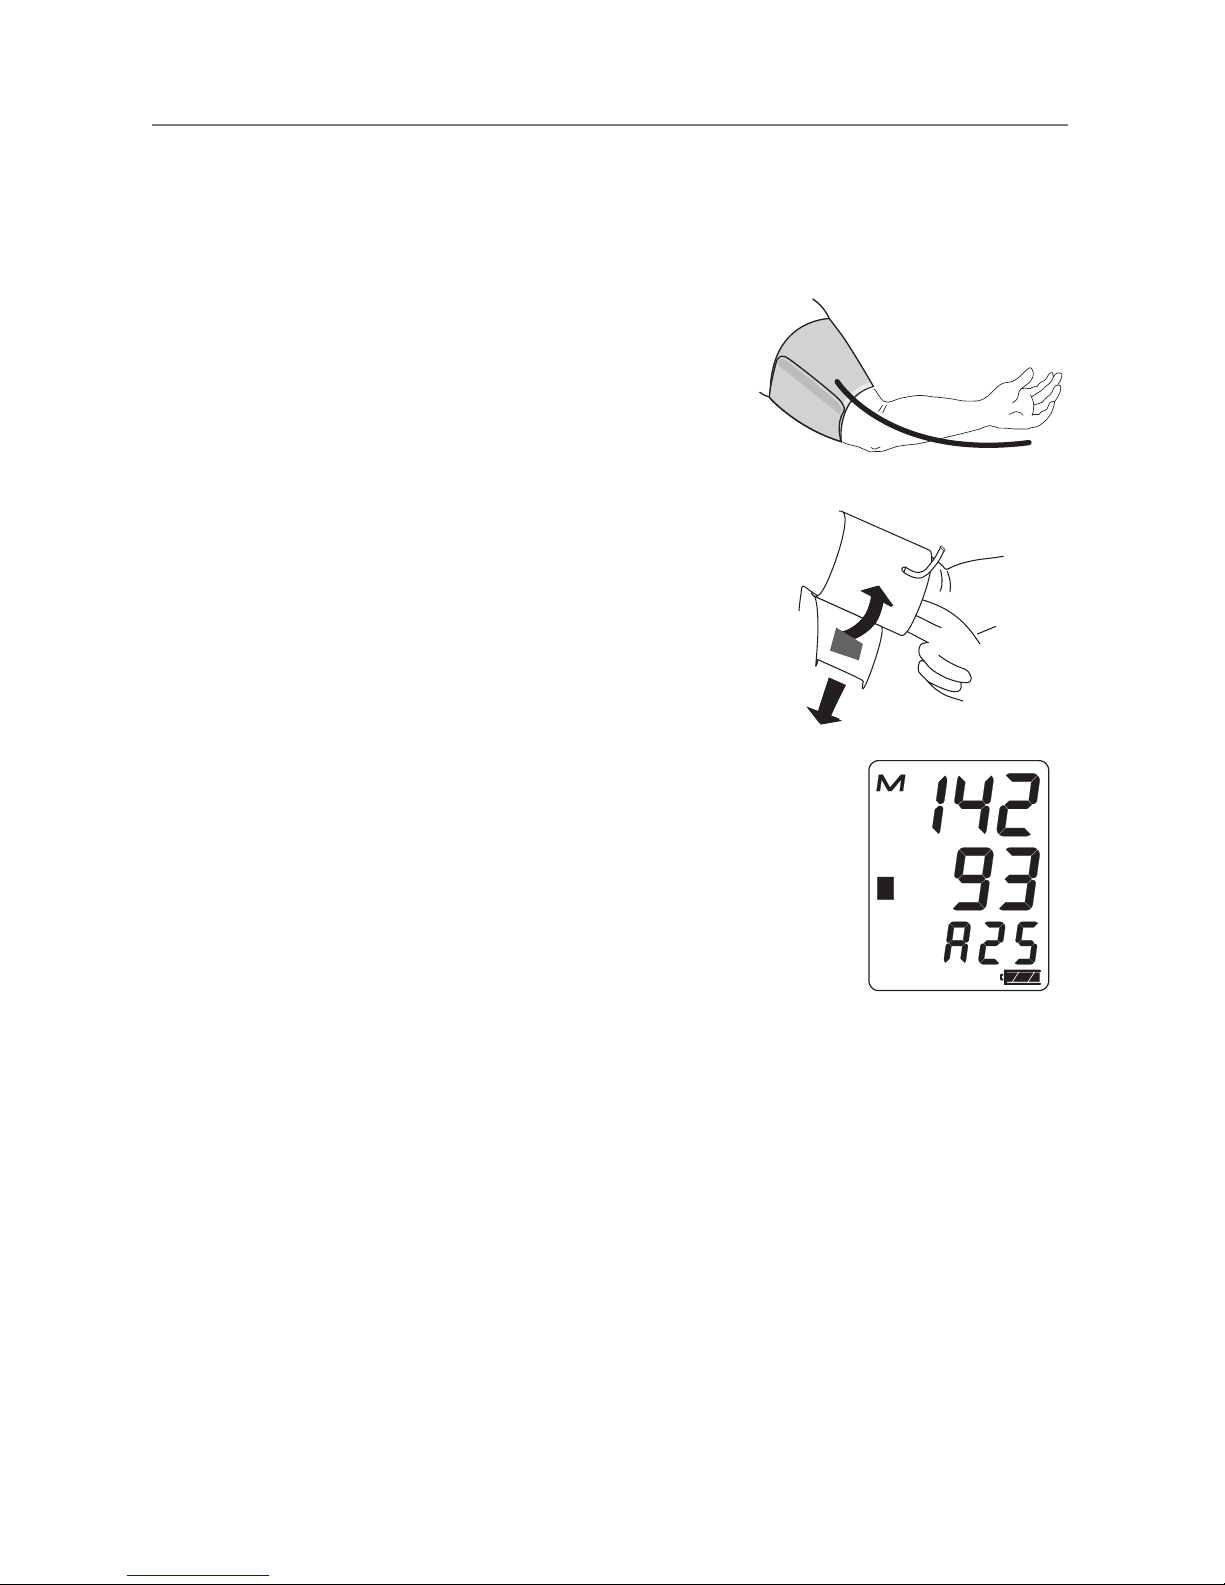
2. Lay left arm on the table with palm up.
Place the cuff on your upper arm. Align the
yellow Brachial Artery Marker on the cuff
over the brachial artery on the inside of the
arm. The tube should be facing downward
and toward the inside of your arm. Fasten
the cuff securely. The bottom of the cuff
should be about 1” above your elbow.
3. The cuff should be snug but not too tight.
You should be able to insert two ngers
between the cuff and your arm.
NOTE: If you have difculty placing the cuff on by yourself,
please have somebody close by who can assist you.
4. Press the START button. Your average
blood pressure reading will appear
with the number of measurements
stored in memory (i.e. A25 = total of 25
measurements stored in memory). As the
cuff pressurizes, measurement will begin
and the Cuff Ination Meter will show on
the display screen. It is normal for the cuff
to feel very tight.
Note: If an appropriate pressure is not obtained, the device automatically starts to inate again. If
you wish to stop ination at any time, press the START button again.
Cuff
Air tube

E-10
Taking Your Blood Pressure
5. When the measurement is complete, the systolic
and diastolic pressure readings and pulse rate
are displayed. The cuff deates and the monitor
automatically shuts off after 45 seconds, or you can
turn it off by pressing the START button.
6. Remove cuff and make note of your blood pressure
and pulse rate on the Blood Pressure Record chart in
the back of the manual, indicating the date and time of
measurement.
Important: Measure blood pressure at the same time each day.
Manual override of systolic pressure setting:
If your systolic pressure is expected to exceed 230 mmHg follow these steps:
1. Place the cuff on the left arm, unless your physician tells you otherwise.
2. Press and hold the START button until a number 30 to 40 mmHg higher
than your expected systolic pressure appears.
3. Release the START button when the desired number is reached.
280 mmHg is the highest pressure level the monitor can reach.
Measurement will then begin. Continue to measure your blood pressure
as described on Page E-9.
E-11
What is an Irregular Heartbeat
The UA-789 Blood Pressure Monitor provides a blood pressure and
pulse rate measurement even when an irregular heartbeat occurs. The
Irregular Heartbeat symbol
will appear in the display window in
the event an irregular heartbeat has occurred during measurement. An
irregular heartbeat is dened as a heartbeat that varies by 25% from the
average of all heartbeat intervals during the blood pressure measurement.
It is important that you relax, remain still and refrain from talking during
measurements.
NOTE: We recommend contacting your physician if you see this
symbol frequently.
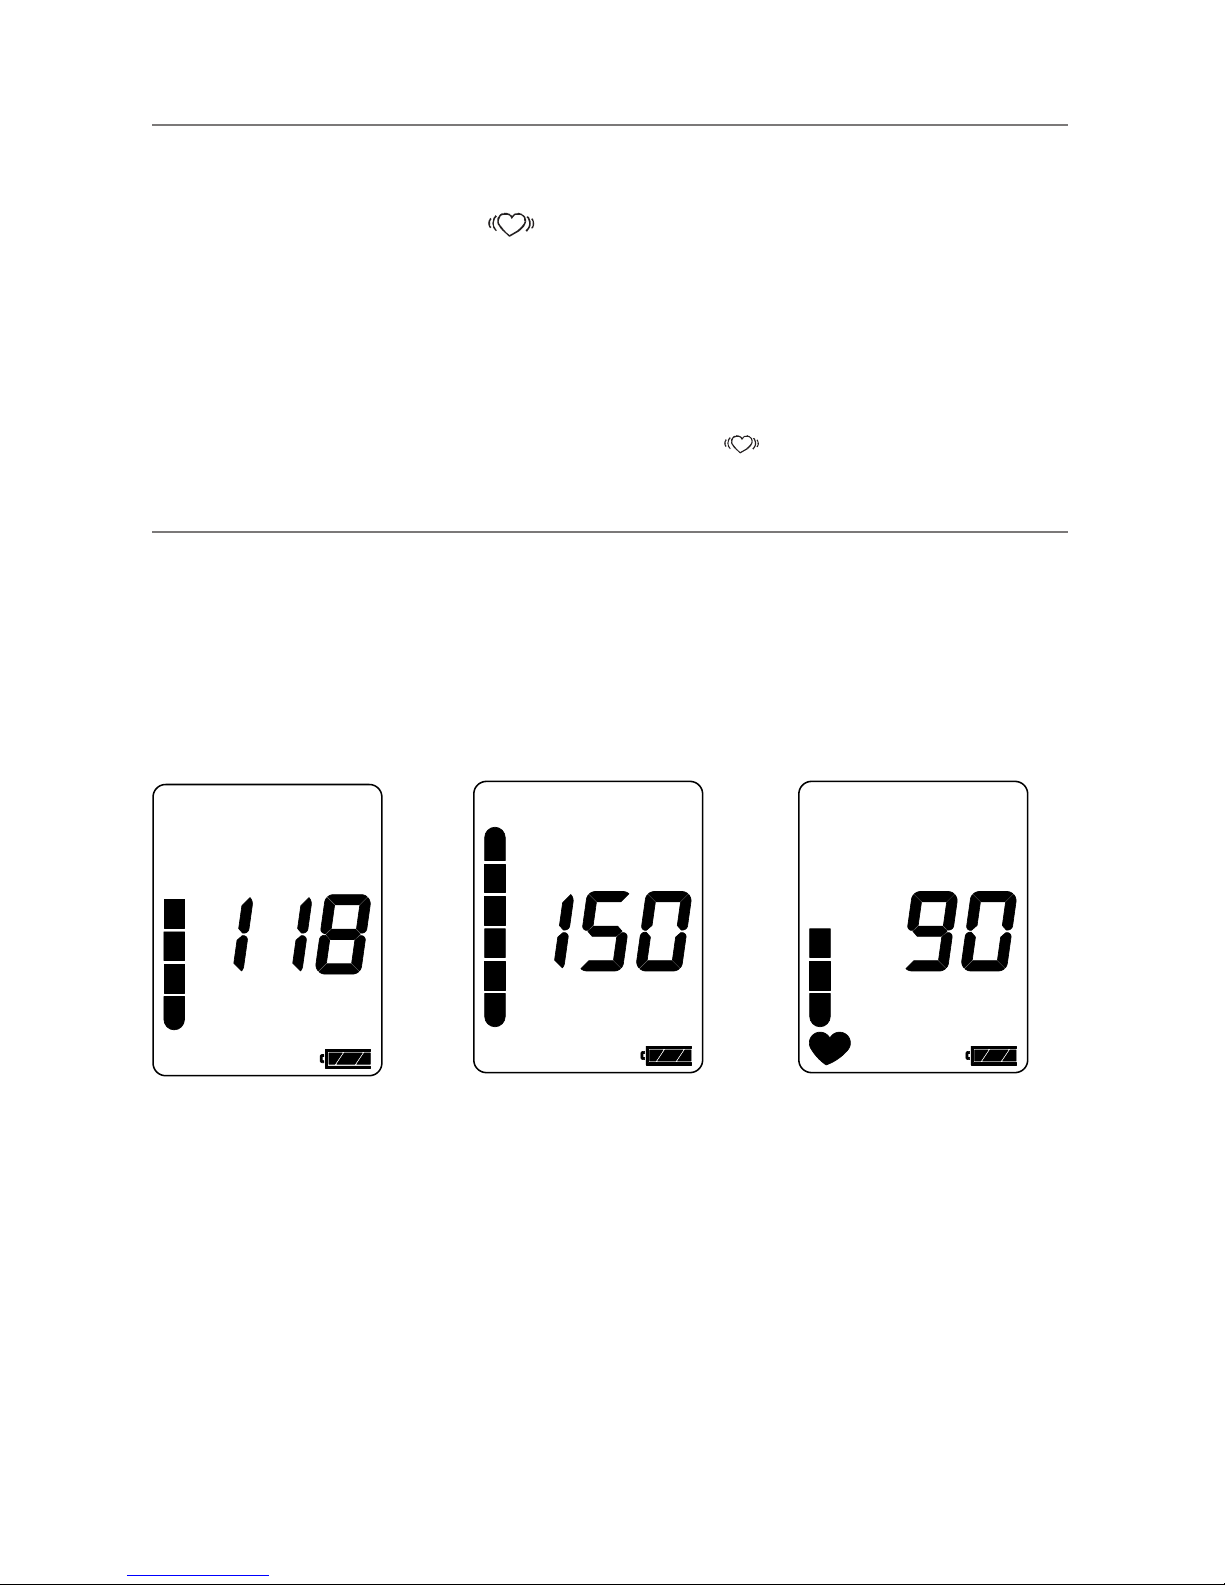
About Cuff Ination Meter
The Cuff Ination Meter is located on the left side of the display screen to
tell you when the blood pressure monitor is inating and deating the cuff.
The Cuff Ination Meter moves up during ination and moves down during
deation.
Ination in Progress Ination Complete Deation/Measurement
in Progress

E-12
About Average Reading
The UA-789 provides an average blood pressure
reading based on the total measurements stored
in memory. When taking a measurement, the
average blood pressure reading will appear and
the number of measurements stored in memory
will ash several times before the cuff begins
to inate. The average blood pressure reading
will also appear briey when you recall the
measurements stored in memory.
About Pressure Rating indicator™
The Pressure Rating Indicator™is a feature which
provides a snapshot of your blood pressure
classication based on your measurements.
This will let you quickly know what your blood
pressure readings mean. Each segment of the bar
indicator corresponds to the Seventh Report of the
Joint National Committee (JNC7) on Prevention,
Evaluation and Treatment of High Blood Pressure
from the National Heart, Lung and Blood Institute
- May 2003. For a more detailed look at this blood
pressure classication, please refer to “Assessing
High Blood Pressure” on page E-16.
: The indicator displays a segment, based on the current measurement,
corresponding to the JNC7 Classication.
NOTE: Due to other risk factors (e.g. diabetes, obesity, smoking, etc.) in addition to your blood pressure
measurement, the Pressure Rating Indicator is approximate. Please consult with your physician for
interpretation and diagnosis of your blood pressure measurements.
NOTE: Residents outside of the United States (e.g.. Canada and Mexico) should refer to the WHO
Classication Table on page E-16 for assessment of their blood pressure measurement.
Average
Number of mearsurment
stored in memory
E-13
About Memory
This monitor automatically stores up to sixty (60) blood pressure and pulse
measurements in memory. Measurements stored in memory are assigned
an index number in the order of the newest to the oldest.
To retrieve readings, follow these simple steps:
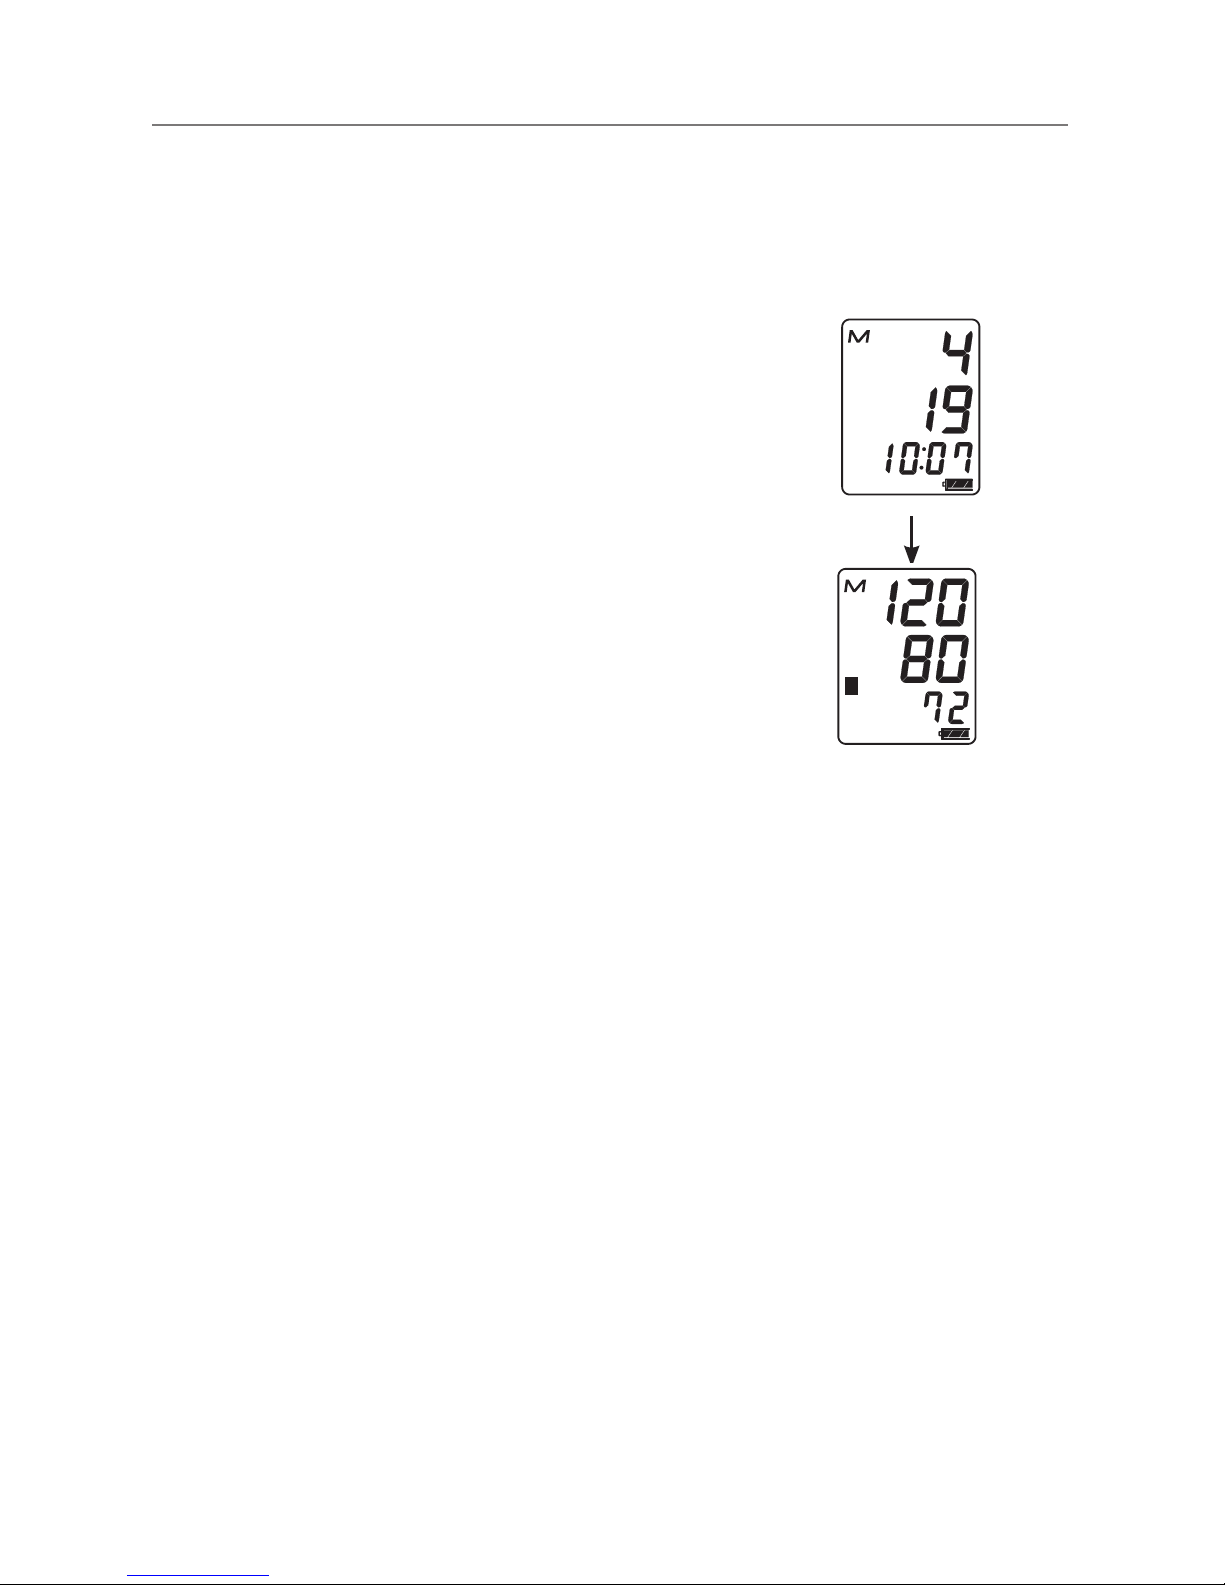
1. When the display screen is showing only the
time, press and quickly release the Memory
(“M”) button. You will see the date (month and
day) and time of the most recent blood pressure
that was taken followed by the measurement.
2. If you want to retrieve other measurements in
memory, press and release the Memory button
repeatedly until the desired date and time of the
measurement are reached. The measurement
will then be displayed.
3. The display will shut off automatically a few
seconds after the readings are displayed.
If there are no measurements stored in memory, you will see dashes in
the date and time elds followed by a measurement of three 0s displayed
vertically.
To clear the measurement history from memory, press and hold the
Memory button for at least ve seconds while the display screen is
showing only the time. Release the Memory button when you see the M
symbol in upper left hand corner of the display ash and disappears. This
indicates that the memory has been cleared.
NOTE: Stored measurements, time, date, and alarm settings will be lost if batteries become low or are
removed for more than 30 seconds.
MONTH
DATE
TIME
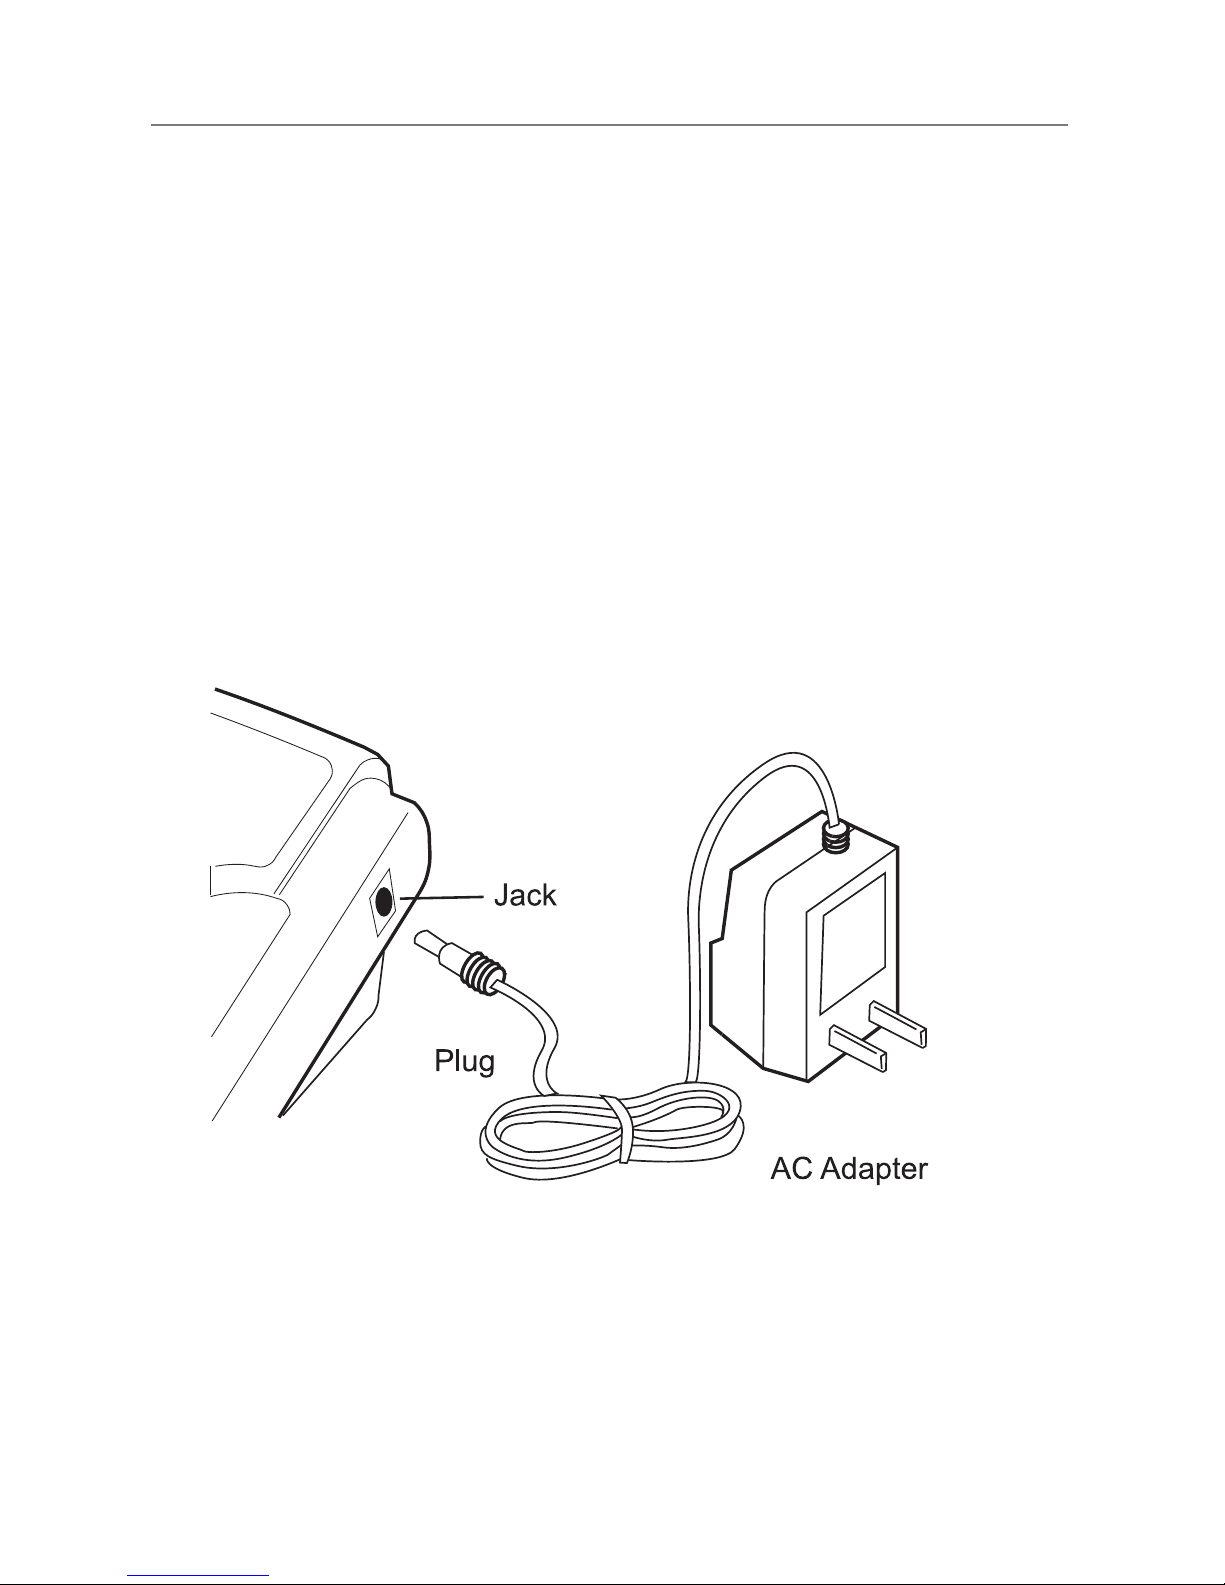
E-14
Using the Monitor with AC Adapter
The UA-789 has an AC adapter jack to allow you to supply power from
an outlet in your home. The UA-789 monitor is only compatible with the
included LifeSource AC Adapter (part # TB-235). The use of any other AC
adapter may damage your UA-789 monitor and will void your warranty.
Connecting the AC adapter to the monitor:
1. Gently insert the AC adapter plug into a 120V AC outlet.
2. Connect the AC adapter plug into the jack on the right side of the monitor.
Disconnecting the AC adapter from the monitor:
1. Turn the unit off by pressing the START button.
2. Disconnect the plug from the jack of the monitor quickly.
3. Gently remove the AC adapter from the power outlet.
(LifeSource part # TB-235)

E-15
About Blood Pressure
What is Blood Pressure?
Blood pressure is the force exerted by blood against the walls of the
arteries. Systolic pressure occurs when the heart contracts; diastolic
pressure occurs when the heart expands. Blood pressure is measured in
millimeters of mercury (mmHg).
What Affects Blood Pressure?
Blood pressure is affected by many factors: age, weight, time of
day, activity level, climate, altitude and season. Certain activities can
signicantly alter one’s blood pressure. Walking can raise systolic
pressure by 12 mmHg and diastolic pressure by 5.5 mmHg. Sleeping
can decrease systolic blood pressure by as much as 10 mmHg. Taking
your blood pressure repeatedly without waiting an interval of 5 minutes
between readings, or without raising your arm to allow blood to ow back
to the heart, can also affect it.
In addition to these factors, beverages containing caffeine or alcohol,
certain medications, emotional stress and even tight-tting clothes can
make a difference in the readings.
What Causes Variations In Blood Pressure?
An individual’s blood pressure varies greatly from day to day and season
to season. For hypersensitive individuals, these variations are even more
pronounced. Normally, blood pressure rises during work or play and falls
to its lowest levels during sleep.
Fluctuation within a day (case: 35 year old male)
E-16
About Blood Pressure
Assessing High Blood Pressure for Adults
The following standards for assessing high blood pressure (without regard
to age or gender) have been established as a guideline. Please note
that other risk factors (e.g. diabetes, obesity, smoking, etc.) need to be
taken into consideration and may affect these gures. Consult with your
physician for an accurate assessment.
JNC7 Classication Table – for Adults within the U.S.
BP Classication Systolic (mmHg) Diastolic (mmHg)
Normal less than 120 and less than 80
Prehypertension 120-139 or 80-89
Stage 1 Hypertension 140-159 or 90-99
Stage 2 Hypertension greater than
or equal to 160 or greater than
or equal to 100
SOURCE: The Seventh Report of the Joint National Committee on Prevention, Evaluation and
Treatment of High Blood Pressure for Adults. National Heart, Lung and Blood Institute - May 2003.
WHO Classication Table – for Adults outside of the U.S.
(e.g. Canada, Mexico)
BP Classication Systolic (mmHg) Diastolic (mmHg)
Optimal less than 120 and less than 80
Normal less than 130 or less than 85
High-Normal 130-139 or 85-89
Stage 1 Hypertension 140-159 or 90-99
Stage 2 Hypertension 160-179 or 100-109
Stage 3 Hypertension greater than
or equal to 180 or greater than
or equal to 110
SOURCE: Standards to assess high blood pressure, without regard to age or gender, have been
established by the World Health Organization (WHO).

E-17
About Blood Pressure
What Is Hypertension?
Hypertension (high blood pressure) is the diagnosis given when readings
consistently rise above normal. It is well known that hypertension can lead
to stroke, heart attack or other illness if left untreated. Referred to as a
“silent killer” because it does not always produce symptoms that alert you
to the problem, hypertension is treatable when diagnosed early.
Can Hypertension Be Controlled?
In many individuals, hypertension can be controlled by altering lifestyle
and minimizing stress, and by appropriate medication prescribed and
monitored by your doctor. The American Heart Association recommends
the following lifestyle suggestions to prevent or control hypertension:
qDon’t smoke.
qReduce salt and fat intake.
qMaintain proper weight.
qExercise routinely.
qHave regular physical checkups
qMonitor your blood pressure at periodic intervals.
Why Measure Blood Pressure at Home?
It is now well known that, for many individuals, blood pressure readings
taken in a doctor’s ofce or hospital setting might be elevated as a result
of apprehension and anxiety. This response is commonly called “white
coat hypertension.” In any case, self-measurement at home supplements
your doctor’s readings and provides a more accurate, complete blood
pressure history. In addition, clinical studies have shown that the detection
and treatment of hypertension is improved when patients both consult their
physicians and monitor their own blood pressure at home.

E-18
About Blood Pressure
Answers to Why Your Readings Are Different Between Home
and at the Doctor’s Ofce
Why are my readings different between home and at a doctor’s
ofce?
Your blood pressure readings taken in a doctor’s ofce or hospital setting
may be elevated as a result of apprehension and anxiety. This response is
known as white coat hypertension.
When I bring my monitor to a doctor’s ofce, why do I get a different
measurement from my monitor to that taken by a doctor or nurse?
The healthcare professional may be using a different sized cuff. The
size of the bladder inside the cuff is critical for the accuracy of the
measurement. This may give you a different reading. A cuff too large will
produce a reading that is lower than the correct blood pressure; a cuff that
is too small will produce a reading that is higher than the correct blood
pressure. There may also be other factors that can cause the difference in
measurements.
Keys to Successful Monitoring:
Blood pressure uctuates throughout the day. We recommend that you
are consistent in your daily measurement routine:
qMeasure at the same time every day.
qSit in the same chair/position.
qDo not cross legs and keep your feet at on the oor.
qRelax for 5 minutes before measurement.
qUse the correct cuff size to get an accurate reading.
qSit still during measurement – no talking, eating or sudden movements.
qRecord your measurement in a logbook.
Table of contents
Languages:
Other AND Blood Pressure Monitor manuals


