AND UP-200BLE User manual
FINGERTIP PULSE
OXIMETER
UP-200BLE

2
INSTRUCTIONS TO USER
Dear Users, thank you for purchasing the UP-200BLE Pulse Oximeter.
The manual describes the Pulse Oximeter’s requirements, features, functions,
specications, and the safety procedures to protect both the user and the
oximeter. It also states the correct methods for transportation, use, repair,
maintenance and storage.
Please read the manual carefully before using this oximeter. These instructions
describe the operating procedures to be followed strictly; failure to follow
these instructions can cause measuring abnormality, oximeter damage and
personal injury. The manufacturer is NOT responsible for the safety, reliability
and performance issues and any monitoring abnormality, personal injury and
oximeter damage due to user’s negligence of the operation instructions. The
manufacturer’s warranty service does not cover such faults.
Due to product updates, the specic products you received may not be in
accordance with the description of this User Manual.
If you have any questions regarding to the use of this product, please call us at
one of the numbers listed at the end of this manual.

3
Indication for Use
The Pulse Oximeter is a non-invasive device intended for the spot-check of
saturation of arterial hemoglobin(SpO2) and the pulse rate of adult in home
use environments.This oximeter is not intended for continuous monitoring.The
oximeter can be multi-used. The pulse oximeter is intended for wellness use.
WARNING:
• An uncomfortable or painful feeling may appear if using the oximeter
continuously, especially for the microcirculation barrier users. It is
recommended that the sensor should not be applied to the same finger
for over 2 hours.
• Don’t place the oximeter on the edema or tender tissue.
• Do not stare at the red and infrared light emitter (the infrared light is
invisible) after turning on the oximeter, as it may be harmful to the eyes.
• Results may be influenced by external coloring agents (such as nail
polish or color skin care products), don’t use the oximeter on surfaces
with coloring agents.
• Results may be influenced by fingers that are too cold, too thin, or if
fingernails are too long. You can use a larger finger such as thumb
or middle finger and place deeply into the probe, while also ensuring
fingers are moderate tempearture and nails are not too long.
• Please review the relative content about the clinical restrictions and
caution.

4
1. SAFETY
1.1 Instructions for Safe Operations
• Inspect the main unit and all accessories periodically to make sure that
there is no visible damage that may affect user’s safety and monitoring
performance. It is recommended that the oximeter should be inspected
weekly at least. When there is obvious damage, stop using it.
• The maintenance to this oximeter can only be performed by qualied service
personnel specied by manufacturer. Users are not permitted to maintain the
oximeter by themselves.
• The oximeter cannot be used with equipment not specied in this Manual.
Only the accessories recommended by the manufacturer can be used,
otherwise it may cause injury to the user or damage to the oximeter.
• This product is calibrated before leaving factory.
1.2 Warnings
• Explosive hazard—DO NOT use the oximeter in environment with
inammable gas such as anesthetic.
• When using the oximeter, please keep it away from equipment which can
generate strong electric eld or strong magnetic eld. Using the oximeter
in an inappropriate environment may cause interference to the surrounding
radio equipment or affect its working.
• DO NOT use the oximeter while examining by MRI or CT, as the induced
current may cause burn.

5
• DO NOT swing the lanyard to avoid damaging the oximeter. Do not use
the lanyard if you are allergic to lanyard material. Do not wrap the lanyard
around neck to avoid an accident.
• DO NOT use the measured values as the sole basis for clinical diagnosis.
Please consult with your physician.
• The oximeter contains silicone, PVC, TPU, TPE and ABS materials and has
passed biocompatibility testing in accordance to ISO 10993-1. An individual
who is allergic to silicone, PVC, TPU, TPE or ABS cannot use this oximeter.
• The disposal of this oximeter, its accessories and packaging should follow
the local laws and regulations, to avoid polluting the local environment. The
packaging materials must be placed out of reach of children.
• Please inspect the packing before use to ensure the oximeter and
accessories are in accordance with the packing list. Otherwise, the oximeter
may not work properly.
• Functional testers cannot be used to assess the accuracy of the SpO2 probe
and Pulse Oximeter.
• It is NOT recommended to use multiple pulse oximeters on the same user,
simultaneously, as danger may occur due to overlap of leakage current.
• This oximeter is not intended for treatment.

6
1.3 Cautions
• DO NOT place the oximeter in places exposed to direct sunlight, high
temperature, humidity, dust, cotton wool or near water, to avoid affecting its
performance. If the oximeter gets wet, please stop using it.
• When the oximeter is carried from cold environment to warm or humid
environment, please wait 4 hours before using.
• DO NOT operate buttons on front panel with sharp materials.
• The update period of data is less than 30 seconds, which is dependent on
pulse rate value.
• If the plethysmographic waveform is not normalized or not smooth and stable,
then the accuracy of the measured value may be degraded. The optimal
accuracy of the measured value is when the waveform is smooth and stable.
• If an abnormal condition appears on the screen during measurement,
please pull out your nger and reinsert it to measure again.
• The oximeter has 5-year service life.
• The oximeter may not work for all users. If you are unable to achieve stable
readings, discontinue use.
• A exible circuit connects the two parts of the oximeter. Do not twist or pull
on the connection.
• Before using the oximeter, ensure it is in a normal working state and the
operating conditions are met.

7
• To get the most accurate measurement, the oximeter should be used in a
quiet and comfortable environment.
• Standard pulse oximetry (SpO2) cannot screen for CO exposure.
If you are suffering from toxicosis, which is caused by monoxide,
the oximeter is not recommended to be used.
2. OVERVIEW
The Pulse Oximeter features a compact design, low power consumption,
and convenient operation. It is only necessary for user to put one nger into
a ngertip photoelectric sensor for measurement, and a display screen will
directly show measured value of Hemoglobin Saturation.
2.1 Features
• Displays: SpO2, pulse rate, bar graph, pulse waveform
• Easy to use
• Easy to view with a display that changes direction automatically
• Small, lightweight design with convenient carrying case
• Low power consumption
• Oximeter will enter standby mode after 60 seconds of inactivity
• Low-battery indication: appears before oximeter stops working properly
• Can transmit data to the A&D Heart Track app via Bluetooth®

8
• Can transmit data to gateway equipment or third party apps via Bluetooth®,
if integrated
2.2 Major Applications and Scope of Application
The Pulse Oximeter can be used in measuring pulse oxygen saturation and
pulse rate through nger. The product is suitable for family use. The oximeter
can be used before or after doing sports, but it is not recommended to be used
during sports activity.
2.3 Accessories
• 1 Lanyard
• 2 Batteries
• 1 User Manual
• 1 Carrying Case
3. SET UP
3.1 View of the Front Panel
9
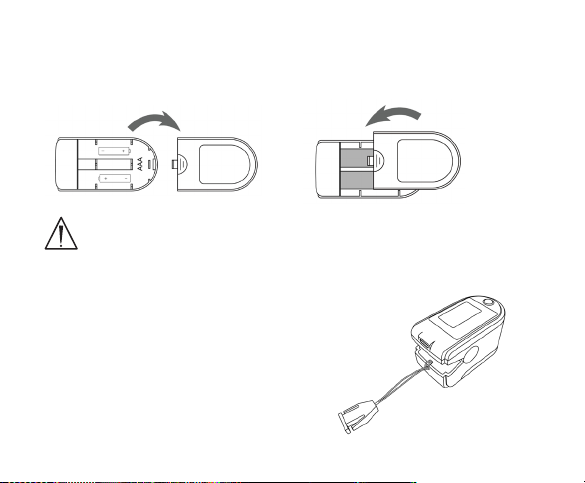
3.2 Battery
Step 1. Insert two AAA size batteries in the proper direction.
Step 2. Put the cover back on.
Please take care when you insert the batteries for the improper
insertion may damage the oximeter.
3.3 Attaching the lanyard
Step 1. Put the thin loop through the
hole on the oximeter.
Step 2. Put the lanyard strap through
the thin loop and tighten.

10
4. OPERATING GUIDE CAUTIONS
4.1 Download the “A&D Heart Track” application
4.2 Pairing
1. In the A&D Heart Track application, click on the “Menu” icon in the
upper left.
2. Choose “Add Bluetooth Devices.”
3. Click on the “+” icon in the lower right corner. Choose “Pulse Oximeter.”
4. Choose UP-200BLE.
5. Follow the onscreen instructions to complete the pairing.
4.3 Taking Measurement
1. Open the “A&D Heart Track” application.
2. On the home screen, click on the “O2” icon in the upper right corner.
3. Click “+ Measure.”
4. Follow the on screen instructions to complete measurement.
5. Open the oximeter.
11
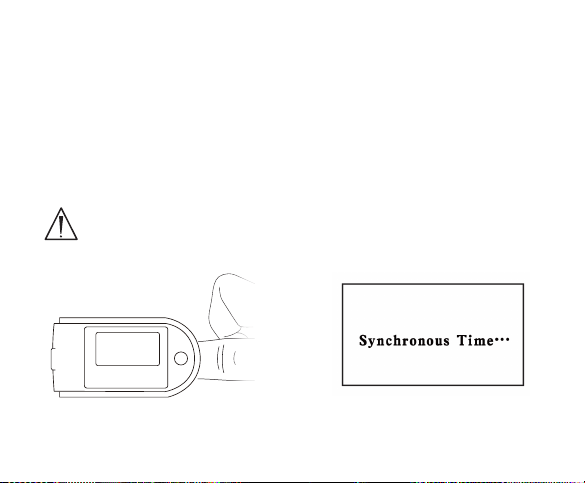
6. Place nger into the rubber cushions (make sure the nger is in the right
position), then clip the nger.
7. Do not shake the nger and keep the user in a stable state during the
process.
8. Press “Button” to exit from the standby mode.
9. “Synchronous Time” appears on the display. (Figure 6).
10. At the end of the measurement, the app will instruct you to remove your
nger. The measurement value will transmit to the app.
Fingernails and the luminescent tube should be on the
same side.

12
After replacing the batteries, take a measurement in the app to
synchronize the date and time.

13
5. CLEANING, MAINTENANCE, TRANSPORTATION AND
STORAGE
5.1 Cleaning and disinfection
• The oximeter must be turned off before cleaning - do not submerge into
liquid.
• Remove the batteries before cleaning.
• To clean, use 75% isopropanol alcohol dampened on a soft cloth. Then,
wipe the oximeter for disinfection. Let air dry or dry with a soft cloth.
• DO NOT spray liquid directly on the oximeter to avoid liquid from penetrating
into the oximeter.
High-pressure sterilization cannot be used on the oximeter.
Do not immerse the oximeter in liquid. It is recommended that the
oximeter should be kept in a dry
5.2 Maintenance
• There is no need to calibrate the oximeter.
• Clean and disinfect the oximeter before/after using it according to the User
Manual.
• Replace the batteries when low-battery appears.
• Remove the batteries if the oximeter is not used for a long time.
• When storing the oximeter, keep it away from children, pets and insects.

14
5.3 Transport and Storage
• The packed oximeter can be transported by ordinary conveyance or
according to transport contract. During transportation, avoid strong shock,
vibration and getting wet. It can not be transported mixed with toxic, harmful,
corrosive material.
• The packed oximeter should be stored in room with no corrosive gases and
good ventilation.
6. PRINCIPLE AND CAUTION
6.1 Principle of Measurement
Principle of the Oximeter is as follows: An experience formula of data process
is established taking use of Lambert Beer Law according to Spectrum
Absorption Characteristics of Reductive Hemoglobin (Hb) and Oxyhemoglobin
(HbO2) in glow & near-infrared zones. Operation principle of the instrument is:
Photoelectric Oxyhemoglobin Inspection Technology is adopted in accordance
with Capacity Pulse Scanning & Recording Technology, so that two beams
of different wavelength of lights can be focused onto human nail tip through
perspective clamp nger-type sensor. Then measured signal can be obtained
by a photosensitive element, information acquired through which will be shown
on screen through treatment in electronic circuits and microprocessor.

15
Glow and Infrared-ray
Emission Tube
Glow and Infrared-
ray Receipt Tube
Operating Principle
6.2 Cautions
1. The nger should be placed properly, or else it may cause inaccurate
measurement.
2. The SpO2sensor and photoelectric receiving tube should be arranged in a
way with the subject’s arteriole in a position there between.
3. The SpO2sensor should not be used at a location or limb tied with arterial
canal or blood pressure cuff or receiving intravenous injection.
4. Make sure the optical path is free from any optical obstacles like rubberized
fabric.
5. Excessive ambient light may affect the measuring result. It includes
uorescent lamp, dual ruby light, infrared heater, direct sunlight etc.
6. Extreme electrosurgical interference may also affect the accuracy.
7. Frequent movement (active or passive) of the user or intense activity may
affect the measured accuracy.

16
8. Debrillation and the short period after debrillation may affect the measured
accuracy as it does not have a debrillation function.
6.3 Clinical Restrictions
1. Since the measurement is taken on the basis of arteriole pulse, substantial
pulsating blood ow of subject is required. For a subject with weak pulse due
to shock, low ambient/body temperature, major bleeding, or use of vascular
contracting drug, the SpO2 waveform (PLETH) will decrease. In this case,
the measurement will be more sensitive to interference.
2. For those with a substantial amount of staining dilution drug (such as
methylene blue, indigo green and acid indigo blue), or carbon monoxide
hemoglobin (COHb), or methionine (Me+Hb) or thiosalicylic hemoglobin, and
some with icterus problem, the SpO2 determination by this monitor may be
inaccurate.
3. Drugs such as dopamine, procaine, prilocaine, lidocaine and butacaine may
also be a major factor for serious error of SpO2 measure.
4. As the SpO2 value serves as a reference value for judgement of anemic
anoxia and toxic anoxia, some users with serious anemia may also report
good SpO2 measurement.

17
7. TECHNICAL SPECIFICATIONS
1. Power Requirements: 2 × 1.5 V AAA alkaline battery (or rechargeable
battery), battery voltage:DC 3.0V.
2. Power Consumption: Less than 100 mA.
3. Measurement Performance in Weak Filling Condition: SpO2 and pulse
rate can be shown correctly when pulse-lling ratio is 0.4%. SpO2 error is
±4%, pulse rate error is ±2 bpm or ±2% (select larger).
4. Resistance to surrounding light: The deviation between the value
measured in the condition of man-made light, indoor natural light and
darkroom is less than ±1%.
5. It is equipped with a switch function: The product will enter standby mode
when no signal is in the product within 5 seconds.
6. Optical Sensor
Red light (wavelength is 660 nm, 6.65 mW)
Infrared (wavelength is 905 nm, 6.75 mW)

18
SpO2regression plot
Bland–Altman plot

19
7. Bluetooth®specifications
Bluetooth®protocol: Bluetooth®Low Energy
Operating frequency: 2.4 GHz ISM band
Modulation: GFSK(Gaussian Frequency Shift Keying)
Transmitting power: 0 dBm, -6 dBm, -23 dBm
Sensitivity: ≤-84 dBm @ 0.1% BER
Transfer rate: 1 Mbps
Safety features: Authentication and encryption
Support Services: Bluetooth®Data Transfer
8. FCC ID:2ABOGCMS50D-BT
9. IC: 28491-MS50DBT
8. TROUBLESHOOTING
Trouble Possible Reason Solution
The SpO2and
Pulse Rate
values are
not displayed
normally
1. The nger is not properly
positioned.
2. The user’s SpO2is too low
to be detected.
1. Place the nger properly
and measure again.
2. Remain still while taking
measurement.
3. If issue persist, consult
with physician.

20
Trouble Possible Reason Solution
The Sp02and
Pulse Rate are
not displayed
stably
1. The nger is not placed
inside deep enough.
2. The nger is shaking or the
user is moving
1. Place the nger properly
and try again.
2. Remain still while taking
the measurement
The oximeter
cannot be
turned on
1. The batteries are drained or
almost drained.
2. The batteries are not
inserted properly.
3. Malfunction of the oximeter.
1. Change batteries.
2. Reinstall batteries.
3. Please contact customer
support.
The display is
off suddenly
1. The product will enter
standby mode when no
signal is in the product
within 60 seconds.
2. The batteries are almost
drained.
1. The oximeter has
entered standby mode
(normal operation).
2. Change batteries.
Table of contents
Popular Medical Equipment manuals by other brands

Storz
Storz C-MAC 8403 Series Instructions for use

Otto Bock
Otto Bock Dyna Ankle 50S1 Instructions for use

MedViron
MedViron Rise II Bassinet Operation & maintenance manual

Dräger
Dräger Infinity Series user guide

Cardiac Designs
Cardiac Designs ECG Check user manual

smirthwaite
smirthwaite 8351 Instructions for use


Gaumard
Gaumard Clinical Chloe S222 user guide

Direct Supply
Direct Supply Panacea 3000 Maintenance Guide

Nonin
Nonin 3230 Instructions for use

Blatchford
Blatchford AqualimbTT 629705L-629716L Instructions for use

Otto Bock
Otto Bock 17B66-16 Instructions for use

Dräger Medical
Dräger Medical Evita 2 dura Instructions for use