AND FG-27CWP User manual
FG-27CWP FG-CWP 用Bluetooth®通信インターフェース 取扱説明書
1. はじめに
FG-27CWP はFG-CWP シリーズ専用の無線通信オプションです。特定の製品または
Bluetooth®が搭載されている PC やタブレット、スマートフォンとペアリングすることで
通信することができます。
2. 取付方法
※電源プラグを電源から抜いた状態で作業してください。
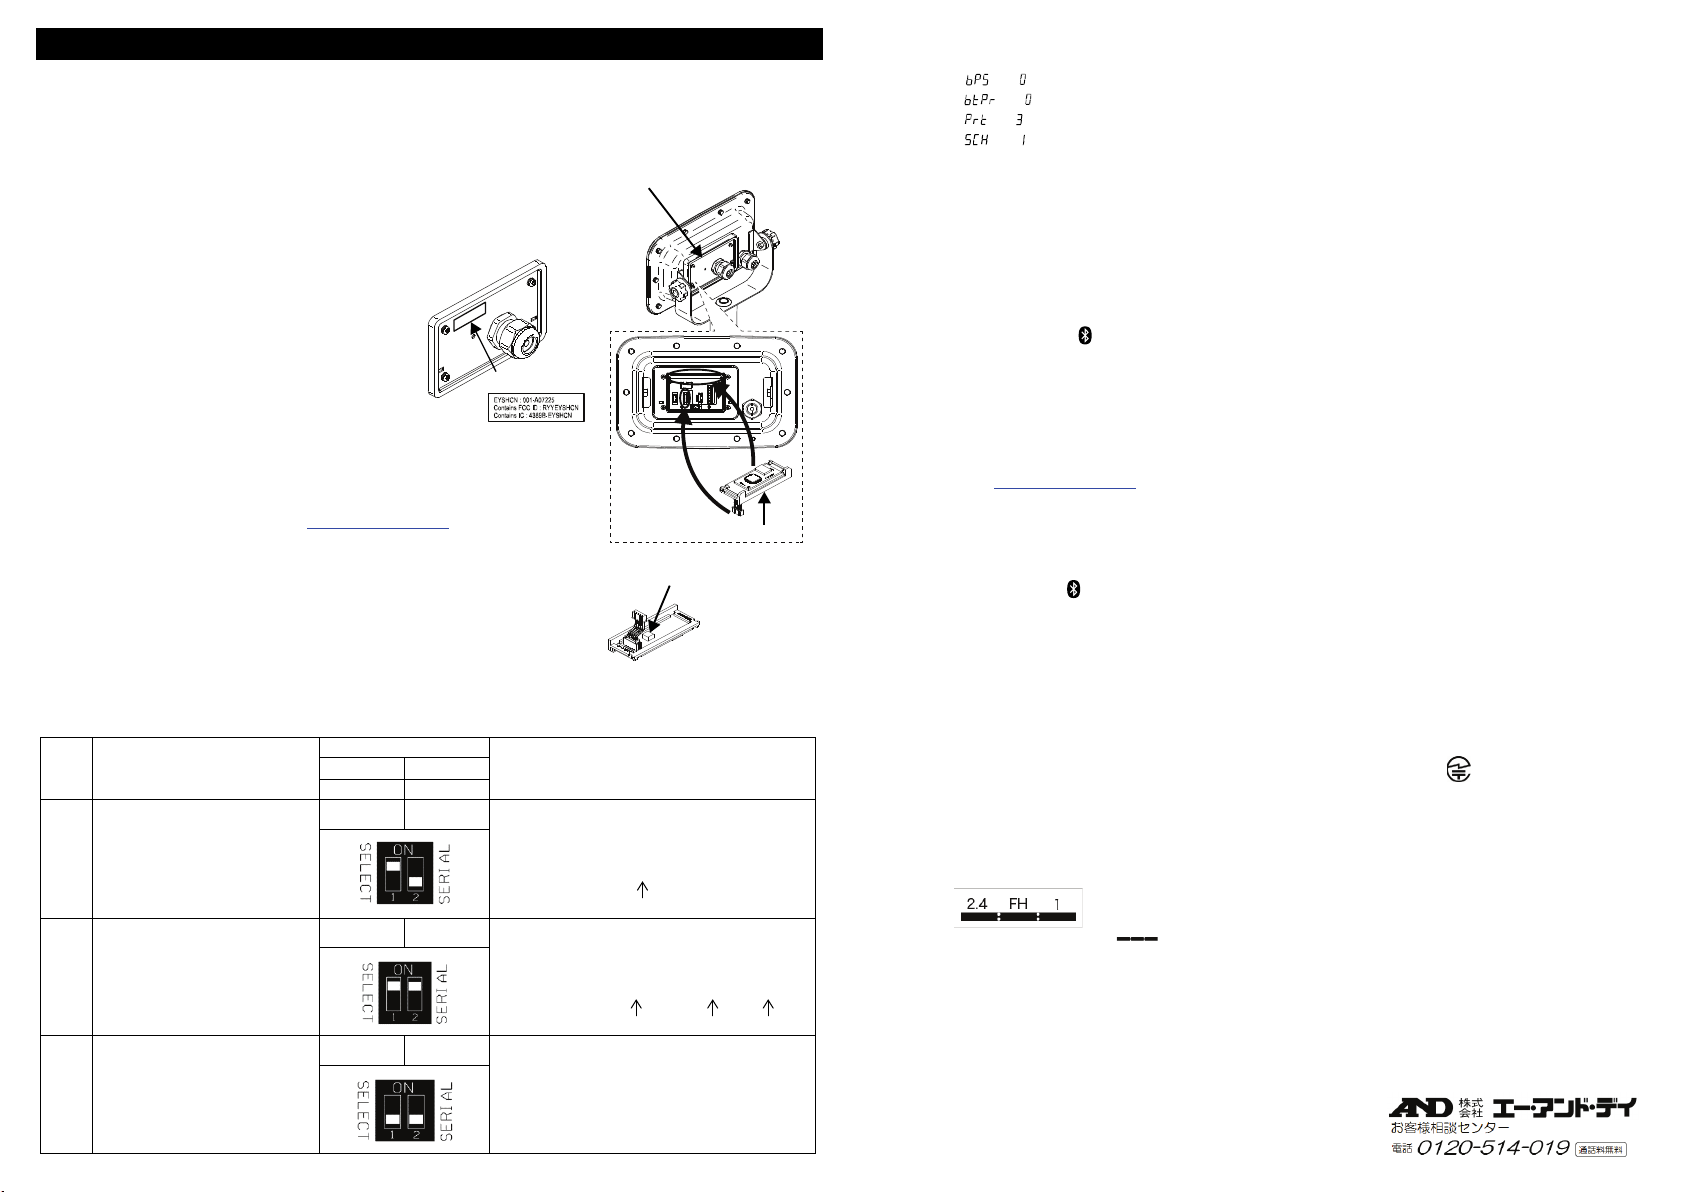
1) 表示部背面のロードセル/CAL カバーに止めてある M3 ネジ 4本を取り外しロードセル/
CAL カバーを開けます。
2) FG-27CWP を表示器内に差し込み、コネクタ(5 ピン)を接続します。
3) ロードセル/CAL カバーを M3 ネジ 4本で締めます。
3. 認証 ID ラベルの貼り付け
付属の認証 ID ラベルをロードセル/CAL カバー外面に
貼り付けてください。
※無線機器の使用を明確にするため、必ず貼り付けて
ください。
4. 無線接続が可能な機器
1) タブレット/スマートフォン/PC (Bluetooth®搭載)
:HID 機能に設定の場合 → 「7. HID 機能」参照
2) AD8931-JA :ワイヤレス通信用外部表示器
3) AD8541-PC-JA :パソコン用ワイヤレス通信インターフェース
(PC のUSB ポートに接続)
製品の詳細は A&D HP をご確認ください。https://www.aandd.co.jp/
※2)、3)に接続の場合はディップスイッチ No.1 をOFF にしてください。
→ 「5. ディップスイッチの設定」参照
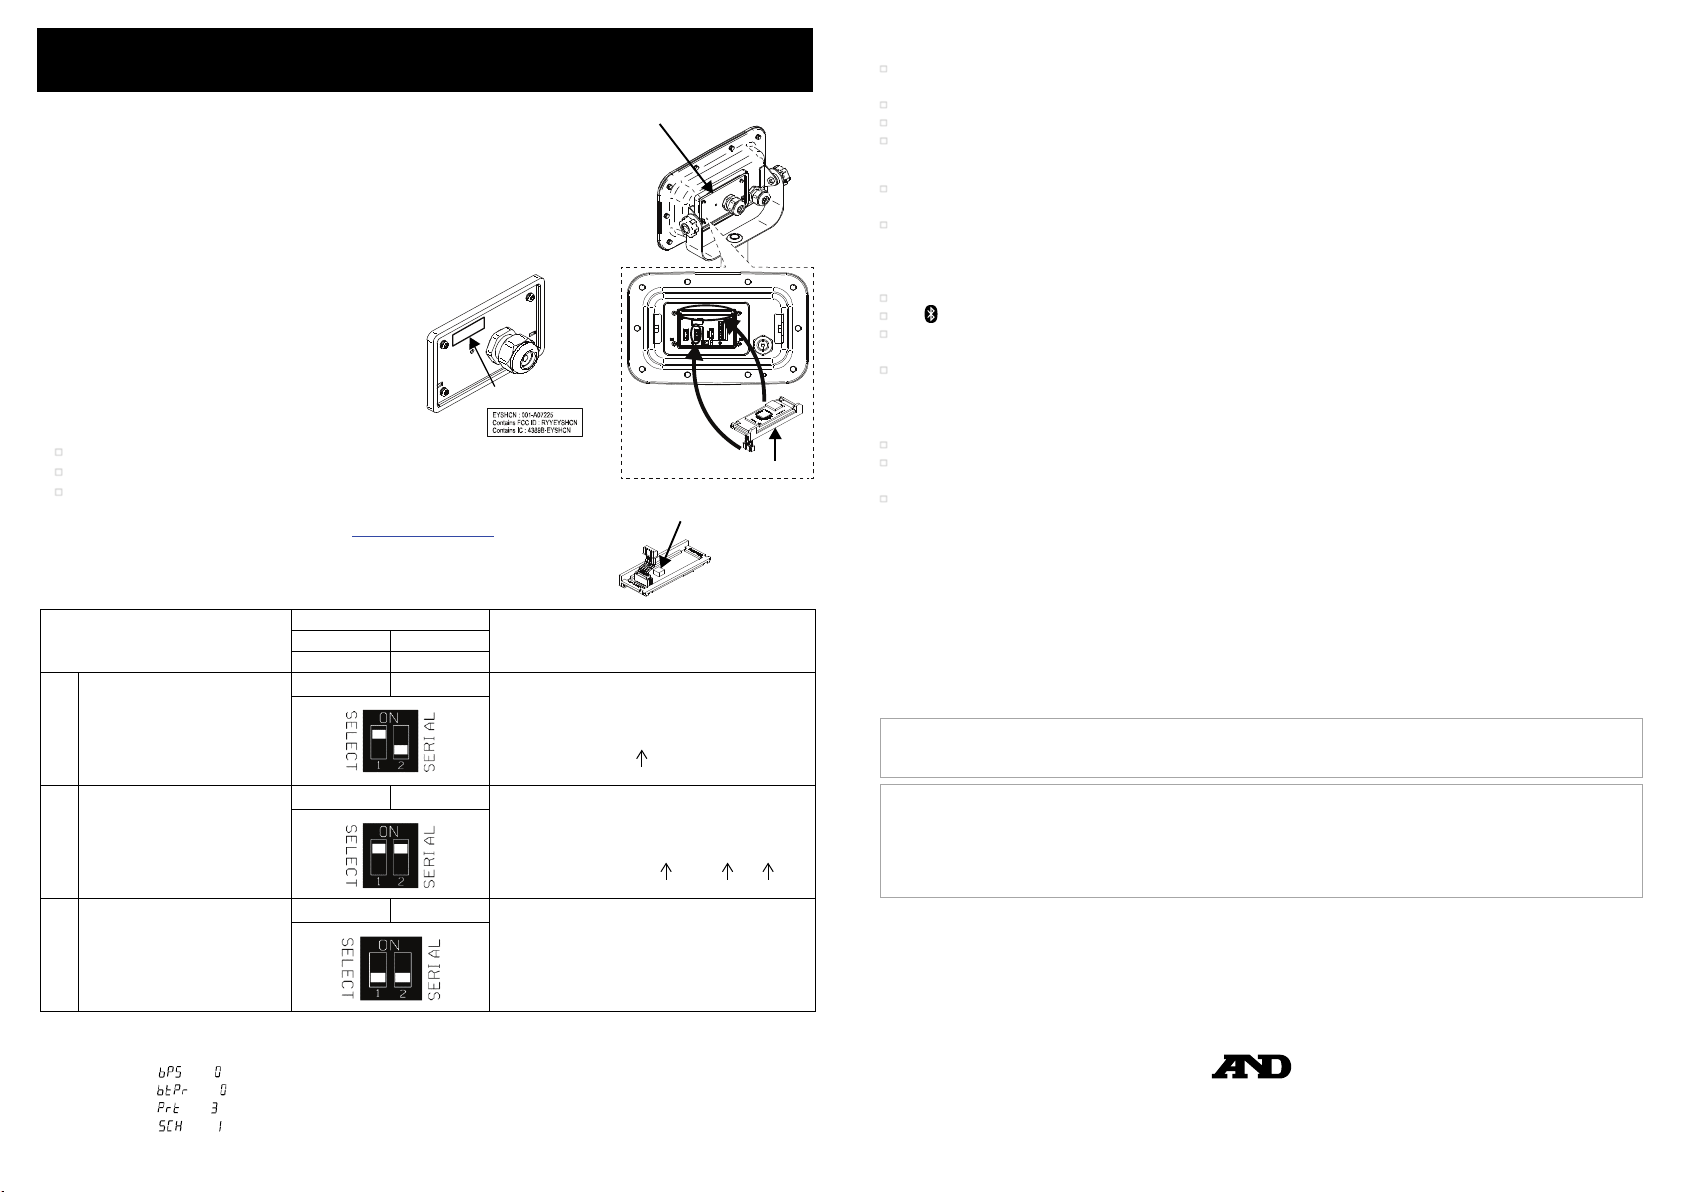
5. ディップスイッチの設定
* 接続する機器によってディップスイッチの設定を変更してください。
「4. 無線接続が可能な機器」より
1) タブレットなどの場合 :設定①または②
2) AD8931-JA の場合 :設定③
3) AD8541-PC-JA の場合 :設定③
*ディップスイッチの切り替えはペン先や小型ドライバなどの先が丸みを帯びたものを使用してスライドさせてください。
6. はかり(FG-CWP シリーズ)の設定の例
はかりの取扱説明書を参照して「内部設定」を設定します。
1) 内部設定「 」を「 」に設定してください。(2400bps)
2) 内部設定「 」を「 」に設定してください。(7bit/even)
3) 内部設定「 」を「 」に設定してください。(ストリームモード) ※AD8931-JA に接続の場合のみ
4) 内部設定「 」を「 」に設定してください。(Bluetooth®オプション選択)
7. HID 機能(HID Over GATT Profile)
* 基板のディップスイッチ No.1 をON することで、Bluetooth®が搭載されている PC やタブレット、スマートフォンなどに接続し
て、汎用テキストアプリ(メモ帳や表計算ソフト)に計量値を入力することができます。
* 入力されるデータは数値のみで、“ST”や“WT”などのヘッダー、“+”の符号、“g”や“kg”などの単位が付きません。
* ディップスイッチ No. 2 をON すると出力データに天びんのシリアルナンバー(S/N)を付与します。
接続機器(タブレット/スマートフォン/PC)とのペアリングについて
* 接続機器の Bluetooth®機能を ON した状態で、はかりの電源を ON します。接続機器のBluetooth®接続から、「A&D_HID」
から始まるデバイスを選択してペアリング作業を行ってください。A&D_HID の後に S/N が付く場合があります。
* ペアリングが確立すると表示の マークが点灯します。
* デバイス選択後からペアリングせずに 30 秒以上経過すると接続できませんので、一度はかりの電源を OFF にして作業し直して
ください。
接続機器のキーボードの設定について
* タブレット/スマートフォンの入力モードが日本語になっていると受信不良や文字化けをしますので、アルファベット入力モード
に設定してからデータを受信してください。
* 英語キーボードアプリのインストールが必要な場合もありますので、タブレット/スマートフォンの設定方法の詳細は A&D HP
を参照ください。https://www.aandd.co.jp/
* ペアリング中はキーボード切替のできない機器( iPhone などの場合 )がありますので、ペアリングをする前、またははかりの電
源を OFF にした状態でキーボードをアルファベット入力に切り替えてください。
8. 使用上の注意
* ペアリングの方法/通信の方法は上記接続機器の取扱説明書を参照ください。
* 無線接続が確立すると表示の マークが点灯します。
* 過去にペアリングした機器が近くにあると自動的に接続するので、HID 機能の ON/OFF に関わらず他の機器と接続する場合
は使用しない機器をOFF にするか、接続を解除してください。
* 通信できない場合はコネクタがしっかりと接続されているか確認してください。はかりの設定にも問題がない場合は、ペアリン
グの有無もしくは再ペアリングおよび接続機器の状態を確認してください。
* 場合によっては PC/タブレット/スマートフォンに Bluetooth®が搭載されていても接続できない機器があります。
9. 電波に関する注意事項
* 無線通信は、EYSHCNZXZ (太陽誘電株式会社)/Bluetooth®5.0 (Bluetooth Low Energy) を使用しています。
* 本製品には、電波法に基づく小電力データ通信システムの無線局として、工事設計認証を
受けた無線設備を内蔵しています。
* 本製品の使用周波数帯では、移動体識別用の構内無線局及び特定小電力無線局並びにアマチュア無線局が運営されています。
・本製品を使用する前に、近くで移動体識別用の構内無線局等が運用されていないことを確認してください。
・万一、本製品から移動体識別用の構内無線局に対して有害な電波干渉の事例が発生した場合、速やかに使用周波数を変更するか、
または電波の発射を停止し混信回避のための処置等を行ってください。
2.4 : 2.4GHz 帯を使用する無線設備を表します。
FH : 変調方式が FH-SS 方式であることを表します。
1 : 想定される与干渉距離が 10 m 以下であることを表します。
: 全帯域を使用しかつ移動体識別装置の帯域を回避不可で有ることを表します。
* 本製品をご使用の際は、見通し距離で 10 m 以下で通信を行ってください。
* 壁等の障害物がある場合といった使用環境によって通信距離は短くなります。
* Bluetooth®と同じ 2.4 GHz 帯の電波を使用している以下の機器の近くで使用すると、干渉を起こす可能性があります。
・無線 LAN
・Bluetooth®搭載機器(携帯電話等)
・電子レンジ等家電製品
* 本製品と計量器との通信は、周囲の電波環境及び機器環境により確立又は維持し
難くなることがあります。そのため、信頼性を重視するご使用には適しません。
設定 使用状況
ディップスイッチ
出力データ
No.1
No.2
SELECT
SERIAL
①
キーボード入力で使用する
出力データに S/N を付与しない
(工場出荷時設定)
ON OFF 数値データのみ
(ヘッダー、”+”符号、単位 なし)
出力例 1) 1.23
出力例 2) -4.56
計量値
②キーボード入力で使用する
出力データに S/N を付与する
ON ON 数値データの前に Tab を挟んで S/N 付与
(天びんに S/N の出力設定がない場合は①と同じ)
出力例 1) 12345678 1.23
出力例 2) 901234567 -4.56
S/N Tab
計量値
③双方向通信を行う
OFF OFF
AD8931-JA/AD8541-PC-JA に接続の場合は
この設定にしてください。
EYSHJN: 001-A07225
1WMPD4004749
A
認証 ID ラベル
ロードセル/CAL カバー
FG-27CWP
ディップスイッチ
FG-27CWP Bluetooth® Communication Interface for FG-CWP
INSTRUCTION MANUAL
FG-27CWP is a wireless communication option. Attach to the FG-CWP series scale.
1. Installation Procedure
Note: Before installing the FG-27CWP option board, remove the USB plug from the power supply.
1) Remove the protective cover from the four screws of the Load cell/CAL cover on the
rear of the display unit, and then loosen the four screws and open the Load cell/CAL
cover.
2) Insert the FG-27CWP into the display unit and connect the connector (5 pin).
3) Tighten the Load cell/CAL cover with four screws.
2. Attaching Certification ID label
Attach the Certification ID label included with this product
to the outer surface of the Load cell/CAL cover.
Note: Must be affixed to clarify the use of wireless devices.
3. Connectable device
□Smartphone / Tablet / PC with Bluetooth®: Refer to “6. HID Function”.
□AD8931 : Wireless Remote Display
□AD8541-PC : Wireless Communication Interface for PC
(Connect to USB port of computer)
Note 1 Refer to the A&D website for details. https://www.aandd.co.jp/
Note 2 Turn off DIP switch No. 1 when connecting to AD8931 or AD8541-PC.
Refer to “4. DIP Switch”, Case 3.
4. DIP Switch
5. Setting the scale (FG-CWP series)
Refer to the instruction manual of the scale (FG-CWP series), to set the functions.
1) Set function “ ” to ” ”.
2) Set function “ ” to ” ”.
3) Set function “ ” to ” ”. (In case of connection to AD8931)
4) Set function “ ” to ” ”.
6. HID function (HID Over GATT Profile)
□By turning on DIP switch No. 1, you can connect to a Smartphone, tablet, or PC with Bluetooth®and use a general-
purpose text application or spreadsheet software.
□The output data has no header (ST, WT, etc.), + sign and unit (g, kg, etc.).
□Set the keyboard language of device to English.
□By turning on DIP switch No.2, the output data has serial number (S/N) of scale. Refer to “4. DIP switch”, Case 2.
Pairing
□Turn on the Bluetooth®function of connection device and power on the scale. Select the “A&D_HID” device and pair. S/N
may have been added after “A&D_HID”.
□You will not be able to connect if more than 30 seconds have passed without pairing after selecting the device. In that case,
power off the scale and try again.
7. Precautions for use
□Refer to the instruction manual of the connection device for the pairing.
□The mark lights up when the wireless communication connection is completed.
□It will connect automatically when the paired device is nearby. When connecting to other device, turn off the unused devices
or disconnect.
□If you can’t communicate, check that the connector is firmly connected. If it still fails, check the scale settings, pairing or
re-pairing and connected devices.
8. Wireless communication
□Bluetooth®devices is EYSHCNZXZ (TAIYO YUDEN CO.,LTD.)/Bluetooth®5.0 (Bluetooth Low Energy)
□The effective range communication is 10 m or less in an unobstructed space. If there is an obstacle such as a wall, the
range of communication will be shorter.
□Interference may be caused near the following devices that use the 2.4 GHz frequency band, which is the same as for
Bluetooth®. Therefore, this device is not suited for uses that require reliability.
- Wireless LAN
- Bluetooth®devices such as mobile phones
- Home appliances such as microwave ovens
9. Compliance
9-1. Compliance with FCC Rules
This device contains transmitter module FCC ID: RYYEYSHCN
This device complies with Part 15 of the FCC rules. Operation is subject to the following two conditions:
(1) this device may not cause harmful interference, and (2) this device must accept any interference received, including
interference that may cause undesired operation. (FCC = Federal Communications Commission in the U.S.A.)
FCC warning
Changes or modification not expressly approved by the party responsible for compliance could void the user’s authority
to operate the equipment.
Note: This equipment has been tested and found to comply with the limits for a class A digital device, pursuant to part
15 of the FCC rules. These limits are designed to provide reasonable protection against harmful interference when the
equipment is operated in a commercial environment. This equipment generates, uses, and can radiate radio frequency
energy and, if not installed and used in accordance with the instruction manual, may cause harmful interference to radio
communications. Operation of this equipment in a residential area is likely to cause harmful interference in which case
the user will be required to correct the interference at his / her own expense.
9-2. IC
IC RADIATION EXPOSURE STATEMENT FOR CANADA
This device complies with Industry Canada license-exempt RSS standards. Operation is subject to the following two
conditions: (1) this device may not cause interference, and (2) this device must accept any interference, including interference
that may cause undesired operation of the device. This device contains transmitter module IC: 4389B-EYSHCN
Case
DIP switch
Output data
No. 1
No. 2
SELECT
SERIAL
1
Keyboard input
No S/N
(Factory Setting)
ON
OFF
Only numerical data
(No header, no +sign and no unit)
Example 1) 1.23
Example 2) -4.56
Data
2 Keyboard input
With S/N
ON
ON
Add S/N before numerical data
(Same as case 1 if the balance has no S/N setting)
Example 1) 12345678 1.23
Example 2) 901234567 -4.56
S/N Tab Data
3 Two-way
communication
OFF
OFF
Connect to AD8931 or AD8541-PC
A&D Company, Limited
3
-23-14 Higashi-Ikebukuro, Toshima-ku, Tokyo 170-0013, JAPAN
Telephone: [81] (3) 5391
-6132 Fax: [81] (3) 5391-1566
Certification ID Label
Load cell/CAL cover
FG-27CWP
DIP switch
Other AND Recording Equipment manuals

AND
AND HVW-27C User manual

AND
AND Device Net.Interface AD-4402 OP-21 User manual

AND
AND SCE-27 User manual

AND
AND AD-4329A-03 User manual

AND
AND CC-Link Interface AD-4402-OP-20 User manual

AND
AND EJ-27 User manual

AND
AND FG-27CWPJA User manual

AND
AND Profibus Interface AD-4402 OP-22 User manual

AND
AND GXA-24A User manual
Popular Recording Equipment manuals by other brands


Mitsubishi Electric
Mitsubishi Electric PAC-IF013B-E manual

Effectrode
Effectrode phaseOmatic Deluxe PM-3A owner's manual

MEN Mikro Elektronik
MEN Mikro Elektronik G100 CompactPCI user manual

Terronic
Terronic BASIC 200P user guide

weintek
weintek cMT-SVRX Series Installation instruction

Panasonic
Panasonic WJ-HD716 Specifications


