Andrew James 90 Day pet feeder User manual

1
90 Day pet feeder
Please read the manual carefully and keep the instrucons for future reference.

2
Contents
Control Panel Page 3
Features Page 3
Assembly and Disassembly Page 4
Geng Started Page 5
General Operaon Page 6
Reviewing the sengs Page 8
Feed Times Page 9
Voice Recording Page 9
Feeding Alarm Page 10
Opening the feed cover Page 11
Cleaning and Care Page 11
FAQs Page 12
Guarantee Page 13
Contact Details Page 14
3
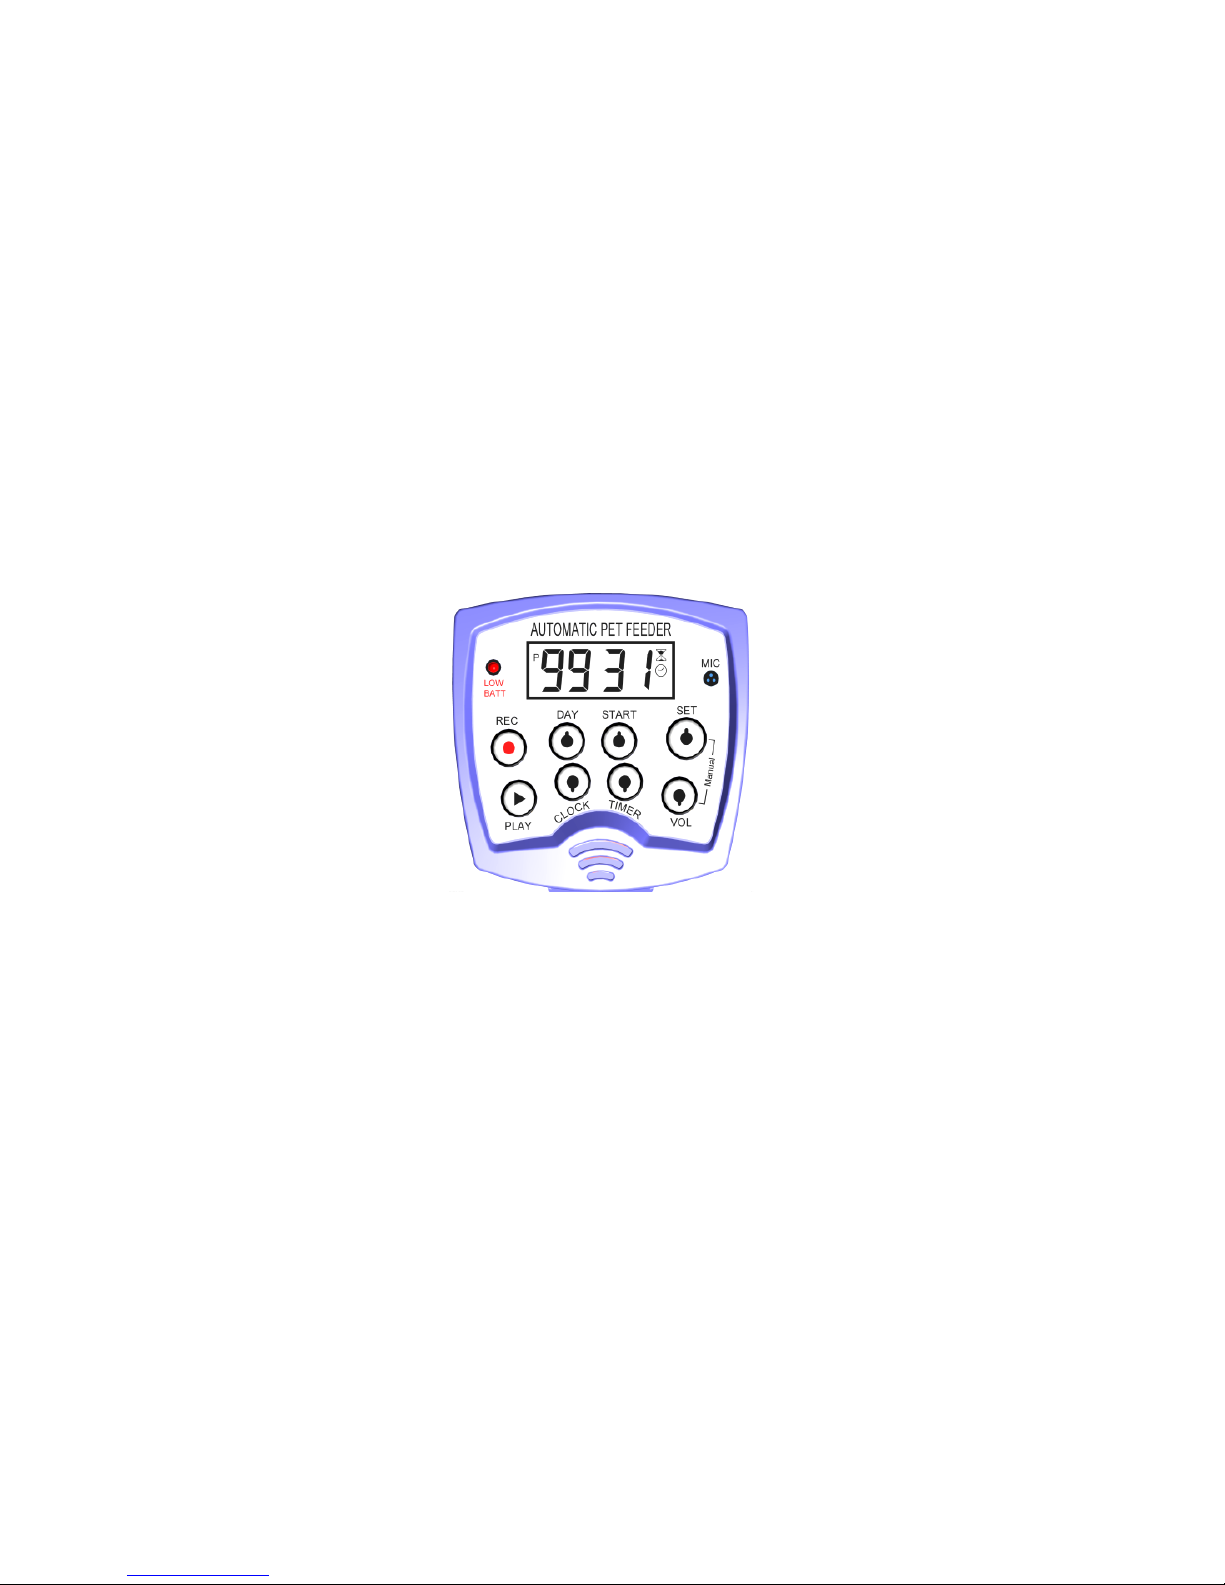
Control Panel Keys
CLOCK –displays clock (current me).
TIMER – switches between pre-set feeding mes.
VOL – sets the feeding volume/poron-size.
SET – enters SET mode, and conrms any feeding mes you enter and advances to
the next seng. Also used with VOL key to perform manual feedings.
START – starts the feeding schedule, conrms the clock and feeding-me.
REC – records your personal voice message.
PLAY – plays back your personal voice message.
ON SWITCH – turns the feeder o. For when the feeder will not be used for an
extended period of me. Turning this switch o will reset all me and feeding
sengs.
DAY – sets the number of days to feed.
Features
12 or 24 hour clock display.
Feeds according to your set me.
Amount of food dispensed is adjustable.
6 second personal voice message recorder.
Personal Voice message calls your pet when its feeding me.
The 4 Feeding mes can be set for any me of day or night.
D-size alkaline baeries (4pc’s required) lasts over 1 year.
Red LED indicates Low baeries.
Control Panel
4
Assembly & Disassembly
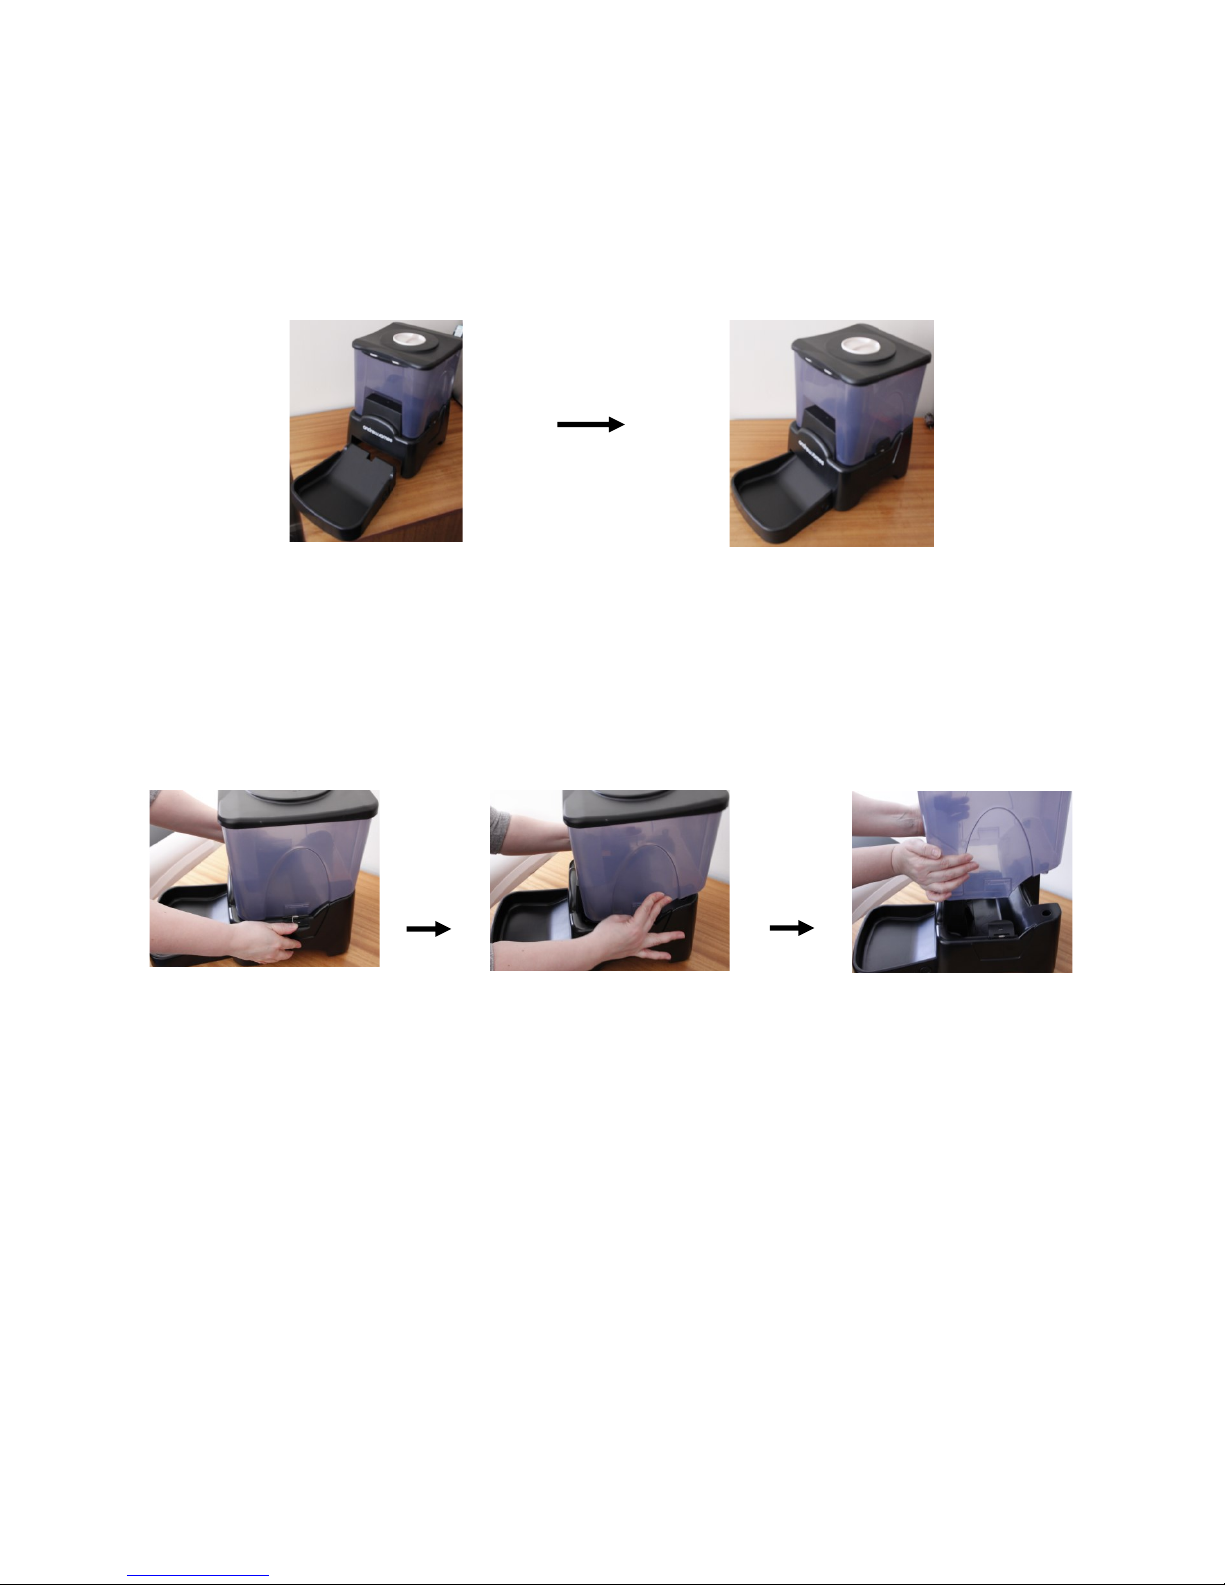
Assembly
1. Open the food tank and unpack the feeder tray.
2. On a at surface, line up the pet feeder with the feeder tray.
3. Push the feeder tray into the recess unl it snaps in place.
Disassembly
1. Open the spring loaded locks on the sides of the feeder base, using both
hands and your thumbs to push down the locks and release the food tank.
2. Remove the food tank from the base.
Note: The springs are very strong so be careful not to let the locks snap back and
hurt your ngers.
To re-assemble
1. Line up the food tank with the feeder base.
2. Press the locks out with your thumbs so the food tank can sit onto the
feeder base. The locks are spring loaded so be careful not to pinch your
ngers.
3. Ensure the locks securely lock onto the food tank.

5
Geng started
Open the baery door (under the unit).
Insert four D-size alkaline baeries into the baery tray. DO NOT use old or
cheap carbon baeries.
Close the baery door and switch on the feeder. The ON switch is next to the
baery door (under the unit).
The feeder will cycle once unl ”12:00” is ashing on the LCD display.
You now have 90 seconds to set the current me in order for the feeder to
work properly. If longer than 90 seconds passes then (1 :07) will be displayed
on the LCD. Simply turn the switch to O, wait 1 minute, then repeat from
step 3.
PM
TIMER
Digit-1 Digit-2 Digit-3 Digit-4
CLOCK
Control Panel LCD Display

6
General operaon
Seng the Current Time
1. All digits should now be ashing.
2. Press the CLOCK key to set the HOUR.
3. Press the TIMER key to set the MINUTE.
4. Press the SET key once to conrm the me, now the display will show
either 12 or 24 to indicate the display mode.
5. Press the CLOCK key to change between 12 or 24-hour display mode.
6. Press the START key to CONFIRM the clock setup.
7. (1 :07) will be ashing and you must now set the feeding mes.
Seng the Feed Time and Number of Feeds per Day
1. (1 07) should now be ashing. Digit-1 is the feeding number (mes per
day), Digits 3 & 4 are the feeding me (in hours).
2. The display shows the 1st feeding me (1 07) this means the 1st feeding
will be at 7am.
3. With (1 07) ashing, press and hold (for 2 seconds) the SET key unl Digit 3
& 4 start ashing (07).
4. Press the TIMER key to set the desired hour for feeding.
5. Press the SET key to conrm your seng and proceed to the 2nd feeding
me.
6. Repeat step 4 to set the desired hour for the SECOND feeding me.
7. At this point if you want to only feed 2 mes per day. Press the START key
and you’re nished.
8. If you wish to feed a 3rd or 4th me each day, do not press the START key
and repeat from step 4.
Tip: If you pressed the SET key a 3rd me, but you did not want to feed 3 mes
per day, just press the TIMER key and then press and hold the SET key (for 2
seconds) to start over, remember not to press the SET key aer the second
feeding, press the START key to end your number of feedings per day.

7
Note:
If all four feeding-mes have been set, the process will terminate and the schedule
will start automacally. The next feeding me will then be displayed.
(If only 1 feeding-me has been set then the feeding-mer display will not change
even if you press the TIMER key.)
Feeding-mes must be set in ascending order otherwise the remaining number of
the feeds will not be served.
Seng the Volume/Poron-Size
1. Press the VOL key to display feed-volume/poron-size.
2. Press and hold (for 2 seconds) the SET key unl Digit-4 blinks.
3. Press the VOL key to set the desired volume.
Please Note:
4. A Feed-volume of 1 equals ¼ cup of food, 2 means ½ cup of food, 3= ¾ cups
and so on.
5. The number 0 represents 10 porons which is equal to 2.5 cups.
6. Press the START key to conrm the volume/poron size.

8
To review the sengs
1. Press the TIMER key to cycle through and view the feeding mes. Only the
feeding mes per day that are set will be displayed. Digit-1 is the feeding
number each day, Digit 3 & 4 are the feeding mes (in hours). Example: (1
07)=(1st feeding at 7am).
2. Press the VOL key once to view the volume/poron-size and feeding day
(s) remaining.
3. Press the DAY key to display feeding day(s) remaining.
4. Press the CLOCK key once to display the current me, the CLOCK icon will
now turn on.
Control Panel LCD Display
PM
TIMER
Digit-1 Digit-2 Digit-3 Digit-4
5. If no key is pressed for more than 8 seconds, the display will switch back to
show the next feeding me with the mer icon ashing.
Note:
Using the TIMER key to cycle through the feeding mes will only display the
number of feedings you set. The sequence will repeat aer the last one is
displayed.
Only the 1st feeding me will be displayed if you’ve set just 1 feeding.
A ashing mer-icon means the feeding-me has not been reached while a solid
mer icon means the feeding-me has already passed.
The volume and day display shares the same screen so Digit-1 & 2 are the feeding
day(s) remaining while Digit-4 is the Volume/Poron-size.

9
Seng the Number of Days to Feed
1. Press the DAY key and the le side of the LCD shows the number of days
your Automac Feeder will feed for unl it stops. The default seng of
(0) means the feeder will feed connuously and never stop.
2. To change the number of days to feed, press the DAY key then press and
hold the SET key (for 2 seconds) unl the days ash on the LCD.
3. Press the DAY key to change the number of days. Hold down the DAY key
to speed through the numbers.
4. If you set a number of days to feed (1 to 99 days) then at 6am aer the
last day the feeder Alarm will start beeping.
5. To repeat the same schedule without any changes, just press the START
key.
6. To feed connuously, set the number of days to 0.
Note:
When the mer-icon and all the numbers on the LCD display are
connuously ON, the feeding schedule has started.
Once a feeding schedule has started, you can force it to end by pressing
the SET and START keys together.
Record Voice Message to be played at feeding mes
Press and hold the REC key, the Red LED will turn on.
Speak your message. You have up to 6 seconds.
When nished, release the REC key.
Play back recorded Voice Message
Press the PLAY key.
Your recorded message will now play.
At each Feeding your recorded message will play and repeat 3 mes.

10
Feeding Alarm
1. Your Automac Pet Feeder has an ALARM (a connuous beeping) to alert
you to when your feeding schedule has ended and no more food will be
dispensed.
2. The Feeding Alarm will start at 6:00AM the next day to avoid disturbing
anyone during the night.
3. You can press any key to stop the alarm.
4. To restart your original feeding schedule, press the START key.
Important Notes:
Power-on default sengs are:
Number of Days to Feed=0 days (0=connuous),
Number of Feedings per Day=2 feedings and Volume/Poron-size=1 (¼ cup).
The feeder will vibrate for about 15 seconds during food delivery to help the
unit dispense food more eciently.
If you hear a few beeps (10 in total) and the feeder-drum isn’t moving then
the Tray-Full detector has been triggered.
MAKE SURE THE FOOD SLIDE AREA IS CLEAR OF FOOD.
Do not use the feeder under strong sun light as the Tray-Full detector can
be acvated by bright light making the feeder act like the food-tray is full
and will stop delivering food.
Note:
When the mer-icon and all the numbers on the LCD display are connuously ON,
the feeding schedule has started.
Once a feeding schedule has started, you can force it to end by pressing the SET and
START keys together.
To manually feed your pet
Press the SET and VOL keys together, once only ¼ cup will be dispensed. The
normal schedule and quanty will not be aected.
11
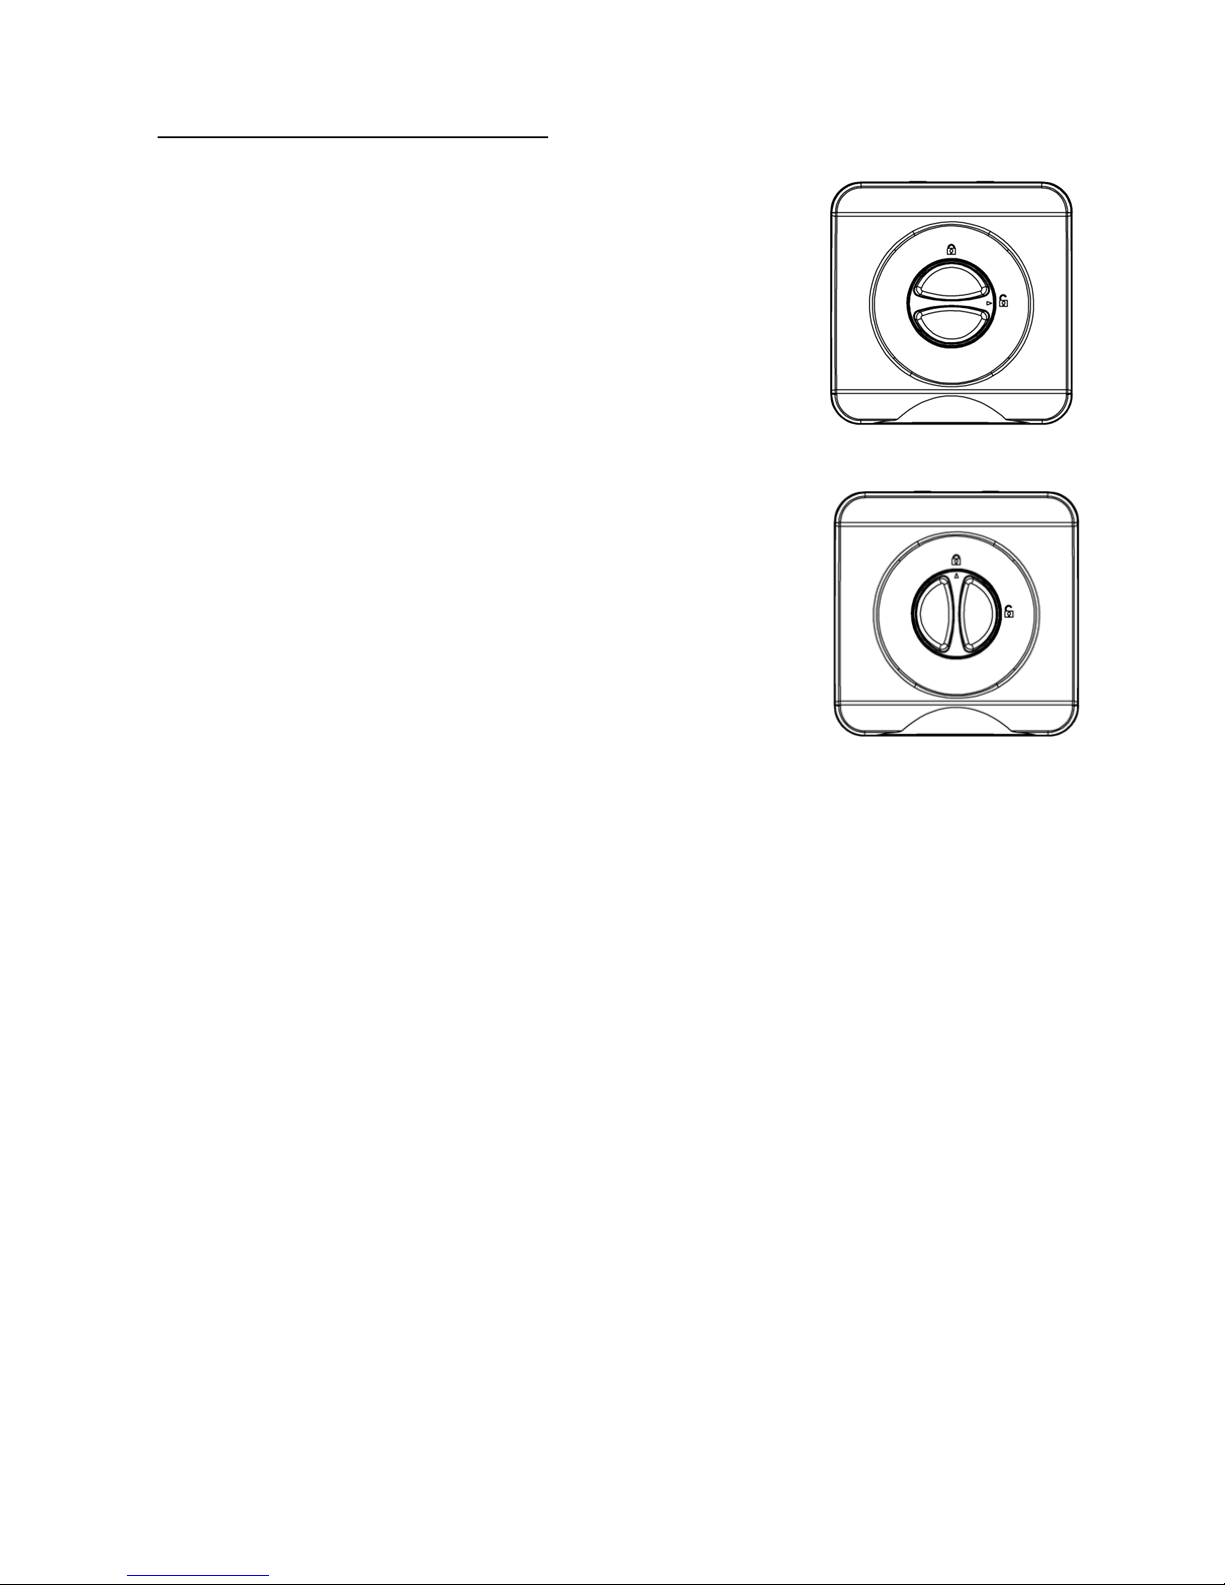
Opening and closing the food cover
1. To open ( Unlock ) the food cover Automac Pet
Feeder, rotate the round dial so the ARROW points
towards the Open Lock.
2. To close ( Lock ) the food cover Automac Pet
Feeder, rotate the round dial so the ARROW
points towards the Closed Lock.
Care and cleaning
When the food tank starts geng dirty and there is a lot of loose food at the
boom of the food tank, you can remove the food cover and food tank for cleaning.
Use a so damp cloth to clean the feeder base which contains the control panel and
baeries. Never get this part wet and do NOT wash with running water.
You can wash the Food Cover and Food Tank in warm soapy water. DO NOT put
these parts in the dishwasher or they will be permanently damaged.

12
FAQ’S
1. The clock can display in either 12 or 24-hour display format
The ( PM ) icon will show in the aernoon under the 12-hour display
mode.
2. The feeding days can be changed at any me but the previous schedule
will be replaced and will start from the 1st new feeding day set.
3. The feeding mes and feeding-volume can be changed at any me and
the new sengs will be for the rest of the feeding day/s schedule.
4. Once the schedule has started, the DAYS displayed will be reduced by 1
every day at 0:00 (midnight) unl the end is reached. It will then revert
back to the original number of set DAYS and the Feed Alarm will sound.
Just press the START key to start your original program/sengs again.
5. If the mer icon is OFF and all numbers are ashing then no feeding
schedule has been set.
6. When the mer icon is ON and all numbers on the LCD display are not
ashing then the schedule has started.
7. When the Clock icon is ON the current me is displayed.
8. When the Red (LOW BATT) light FLASHES, the baeries are low and must
be replaced.
Change all the baeries as soon as possible. You will have to reprogram all
your sengs again when the baeries are changed.
9. When the LCD display shows ( Err ), the food delivery door is not closing
properly. You need to remove any food that jams the door.
1) Switch OFF the Auto Feeder, remove all food, turn your Auto Feeder
upside down.
2) Clean both doors hinges with a so brush.
3) Aer cleaning switch ON the Auto Feeder and rell with food.
10. Note: You will have to reprogram all your original sengs before you
can use your feeder again.
11. Always use the Quick Setup Guide for fast easy programming. If you want
more advanced features, use the this Instrucon Manual.

13
UK and EU Guarantee
Your new Andrew James product comes with a 24 month guarantee and a 2 year
xed warranty, eecve from receipt conrmaon. Your receipt or order
number is required as proof of purchase date so it is imperave that you keep it
safe. This guarantee only applies if the item has been used solely for the use
intended, and all instrucons have been followed accordingly. Please note this
product is only for domesc not commercial use.
Abuse of your product will invalidate the guarantee. Returned goods can only be
accepted if repackaged properly within the original colour product box, and
presented with the original receipt of sale/order number. This does not aect
your statutory rights.
Returned products must be cleaned and returned to us in as close to delivery
condion as possible.
If your product develops a problem within the rst 12 months of the xed
warranty, we will pay all shipping costs to have it returned to us. Aer 12 months
the customer will be liable for the cost of returning the product to us. We will
then pay to have the repaired/replaced item shipped back to the customer.
If you wish to return your item for a full refund, you have the right to do so
within the rst 7 days. For our returns policy please go to
www.andrewjamesworldwide.com
Customers are responsible for any taxes applied to our products when they are
shipped outside of the EU.
All of our prices are inclusive of VAT.
Once a product has been returned to us, we will aim to repair or replace it within
30 days of receipt.
The guarantee does not cover any defect arising from improper use, damage,
build-up of lime scale or repair aempts made by third-pares. Also, the
guarantee does not cover normal wear and tear of individual parts.
Table of contents
Other Andrew James Pet Care Product manuals


