Andrew James 6 Day Pet Feeder User manual
1
Please read the manual fully before using the appliance and keep the
manual safe for future reference.
6 Day Pet Feeder

2
Contents page
Features Page 3
Control panel keys Page 3
Appliance components illustraon Page 4
Geng started Page 5
Disassemble and Assembling the
appliance
Page 6
General operaon
Filling the bowl with food
Seng the current clock me
Seng the feeding me
Review and starng the feeding
mer
Record voice message
Playback voice message
Baery replacement
Page 7
Page 7
Page 7
Page 8
Page 8
Page 9
Page 9
Notes & FAQ’S
Page 10
UK & EU Guarantee
Page 11
Contact details Page 12

3
Features
12 or 24 hour clock display.
6 second personal voice message recorder.
Personal voice message recorder.
Food bowl rotates according to your set me.
6 feeding mes can be set for any me of the day or night.
C size alkaline baeries (4pcs required) last for over 1 year.
Red LED indicates baeries need to be changed.
Control Panel Keys
MODE– switches between clock or feeding me display. Also increases
clock me during clock/feeding me set mode.
SET– enters sengs mode. Also conrms the me you enter and advances
to the next seng.
START NOW– starts the feeding mer immediately.
START TOMORROW- Starts the feeding mer the next day.
REC– records your personal voice message.
PLAY– plays back your recorded voice message.
ON SWITCH– turns the feeder on/ o. Press when the feeder will not be
used for an extended period of me. Turning the switch o will reset all me
and feeding sengs.
4
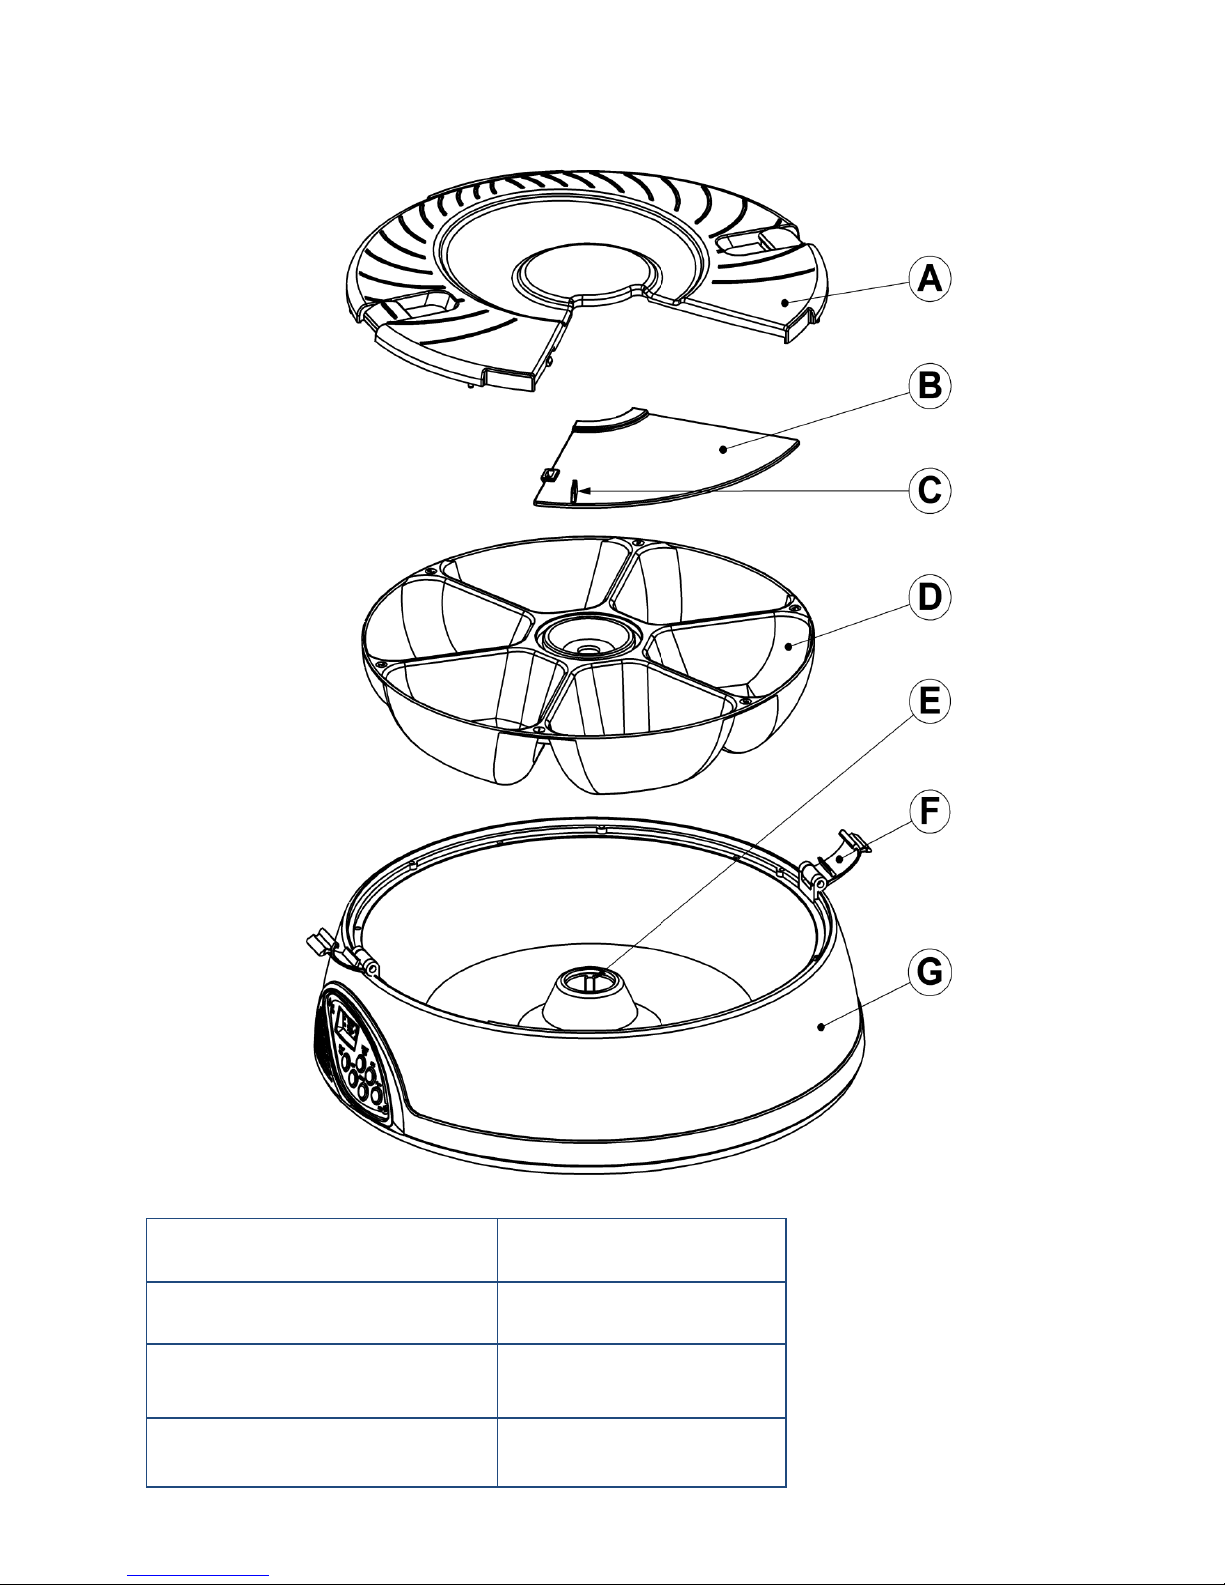
Appliance components Illustraon
A. Lid E. Base locking system
B. Slide cover F. Locks
C. Slide cover protrusion G. Base
D. Feeder base

5
Geng started
Carefully turn the pet feeder upside down. Remove both baery doors by
squeezing the two tabs and gently pulling each door away.
Keep the ON switch set to OFF.
Insert four C size alkaline baeries into the baery tray. DO NOT use old or
cheap carbon baeries.
Close the baery doors, rotate the feeder right-side up and switch it ON.
The feeder will cycle once unl “12:00” becomes displayed the LCD screen.
Please note: Your pet feeder makes the food available in the order of Tray 1-6.
When you only want one tray of food only ll tray 1, for two feeds tray 1 and 2 and
so on.
6
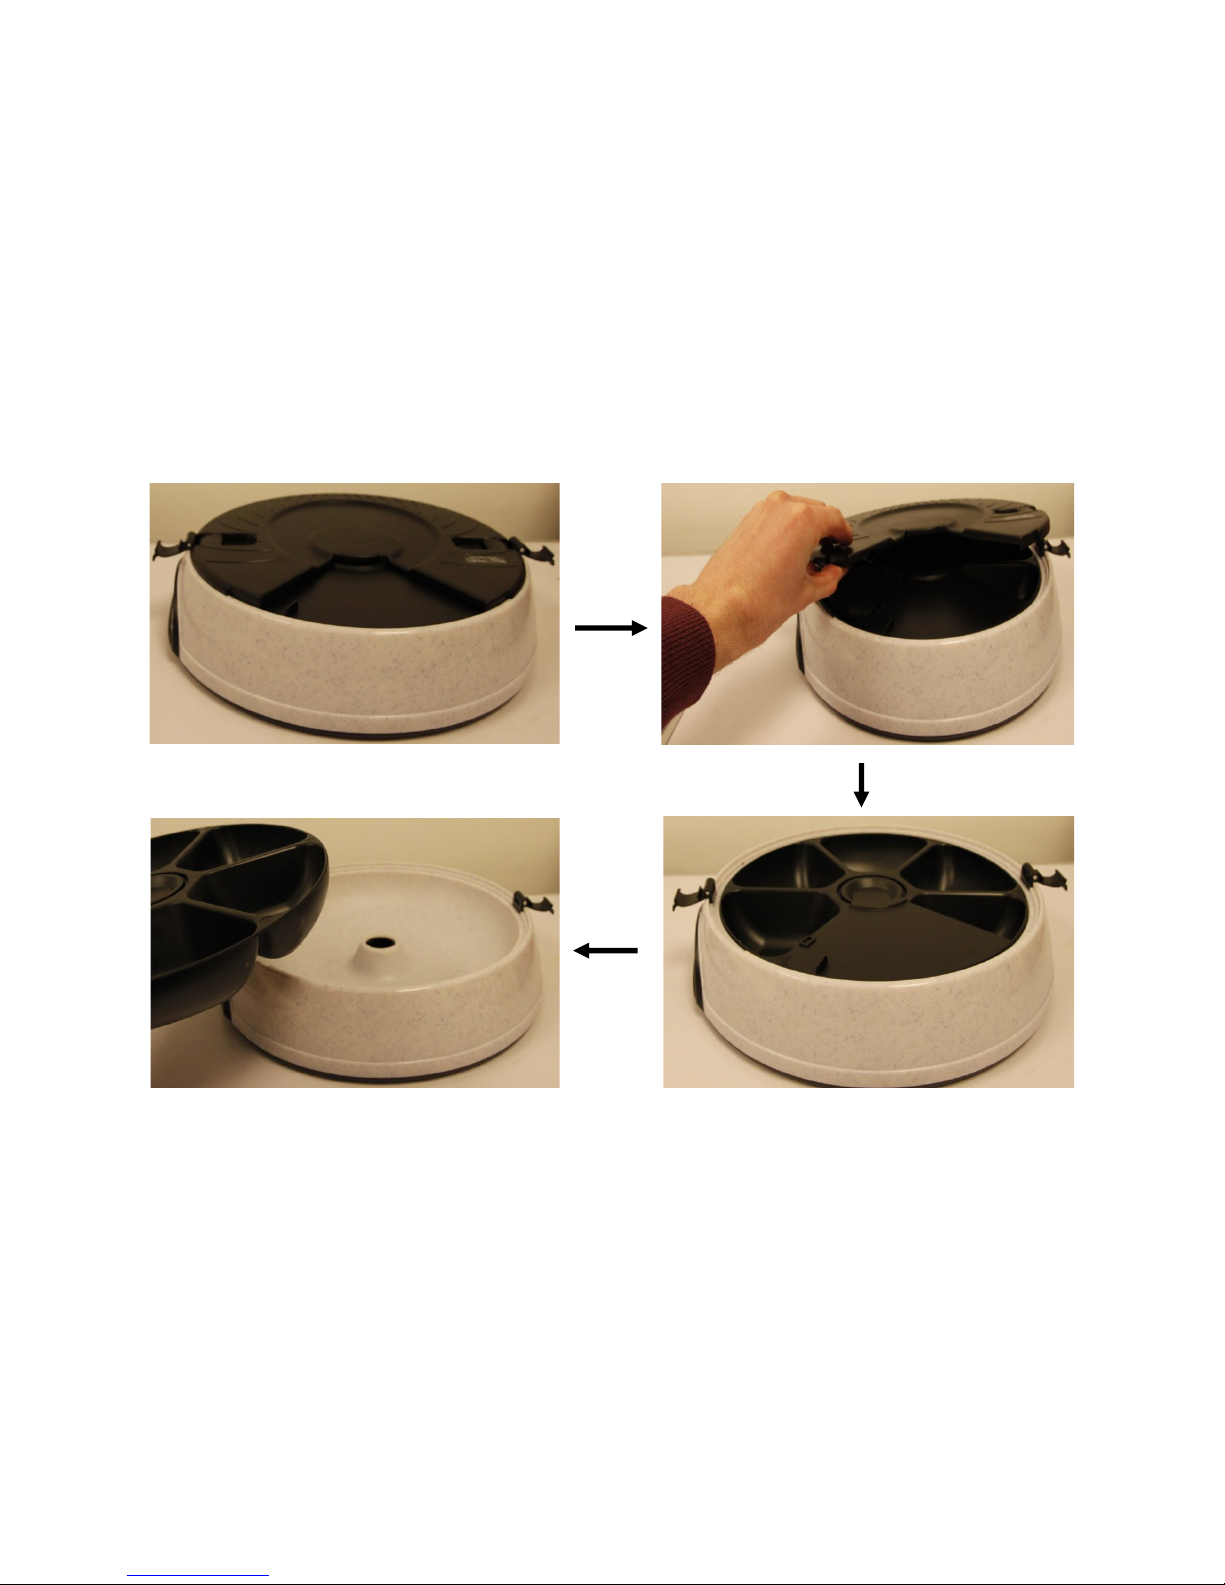
Disassemble
The appliance should already come fully assembled.
1. Unlock both locks (F) by pressing down on the locks and liing them up.
2. Remove the lid “A” from the appliance.
3. Remove the slide cover “B”.
4. Remove the feeder base “D”.
Re-Assembling the appliance
1. Place the feeder base “D” into the base of the appliance “G” so that it aligns
and ts correctly with the base locking system “E”.
2. Fit the slide cover “B” into the appliance.
3. Align the lid (A) with the locks (F) and secure the locks by pushing them
downwards.

7
General Operaon
Filling the bowl with Food
1. Disassemble the appliance according the secon “Disassemble”.
2. Fill the feeder base (D) trays 1-6 with food.
3. Re-assemble the appliance according to the secons “Re-assembling the
appliance ”
Seng the current Clock Time
1. During Clock display mode, press and hold the SET key for (2 seconds) to
enter Clock SET mode. The hour number will now be blinking.
2. Press the MODE key to increase the hour. Once you have set the hour, press
the SET key to conrm the hour. The minute number will now blink.
3. To change the minute number, press the MODE key to increase the minute.
Once you have set the minute, press the SET key to conrm the minute.
Both the hour and minute numbers will now blink.
4. If needed, Press the MODE key to change between 12 or 24 hour me.
5. Press the SET key to conrm your current me seng and the numbers will
stop blinking.
Seng the Feeding Time
1. Aer seng the clock me, press the MODE key one me. (1 1) will show
on the display. This is feeding me display mode.
2. Now press and hold the SET key for (2 seconds) to enter Feeding-me SET
mode. Feeding will start from the rst feeding number & me. The 1st digit
represents the feeding number (Food Tray 1)
3. The hour digits will now blink (2nd and 3rd digit). Press the MODE key to
increase the me, then press the SET key to conrm the me you set.
4. Aer conrming the 1st feeding me, the next feeding number & me will
show on the display. (1st digit will change to the next feeding number, e.g.
Food Tray 2 or 3 or 4 or 5 or 6 and back to 1) To change the feeding me,
repeat step 3.
5. Repeat step 3 unl all 6 feeding mes for each Food Tray are set. The display
will change back to clock display mode when all 6 feedings have been set.
1st dig- 2nd dig- 3rd dig-
Feeding
Number
Feeding
Time

8
Program examples:
Feed once a day at 13:00hr (24hrs display) and feed for 6 days.
Feed me 1 & 2 & 3 & 4 & 5 & 6 all equal = 13:00hr.
Feed twice a day at 10:00 and 20:00 and feed for three days.
Feed me 1 = 10, feed me 2 = 20, feed me 3 = 10, feed me 4 = 20, feed
me 5 = 10 and the last me 6 = 20.
Feed three mes a day at 6:00am, 12:00 and 18:00 (6:00pm).
Feed me 1 = 06, feed me 2 = 12, feed me 3 = 18 and so on…
Review and Starng the feeding mer
1. Use the MODE key to cycle through clock and your set feeding mes (clock -
then 1st feed me→2nd feed me→3rd feed me→ 4th feed me→ 5th feed
me→ 6th feed me→ back to clock…) The sequence will repeat.
2. Press the START NOW key to start the feeding mer immediately. The bowl
will rotate to the pre-set starng posion (Tray 6) and your recorded
message will play once. The BELL icon will now be On.
3. Or press the START TOMORROW key and the feeding mer will start at 0:00-
Midnight. The bowl will rotate to the pre-set starng posion (Tray 6) and
your recorded message will play once. The BELL and Zz icon will now be On.
Display Mode (to check Feeding mes you have set)
Use the MODE key to cycle through clock and feeding sengs (clock - then
1st feed me→2nd feed me→3rd feed me→ 4th feed me→ 5th feed me→
6th feed me→ back to clock…) The sequence will repeat.
Record Voice Message to be played at feeding mes
Press and hold the REC key, the Red LED will turn on.
Speak your message. You have up to 20 seconds.
When nished release the REC key.

9
Play back recorded Voice Message
Press the PLAY key.
Your recorded message will now play.
At each Feeding your recorded message will play back 3 mes.
Baery Replacement
Change all baeries when the Red LED (Low baery indicator) ashes. Use
only new Alkaline baeries.

10
Notes & FAQ:
When the bowl is rotang both the clock seng and mode seng are not
allowed.
Under clock display mode the colon icon (:) will ash. The colon icon (:) is
turned O when in feeding mer mode.
A PM icon will be displayed in the aernoon under 12-hour clock mode
and turned o in the AM. The PM icon will not be displayed under 24 hour
clock mode.
In feeding mer mode, three numbers will show up, the rst number is the
feeding number (1,2,3,4,5 or 6) and last two digits indicate the feeding
me in hours.
When the feeding mer starts, the BELL icon will turn On. Under feeding-
mer display mode a solid BELL icon means the feeding me has already
passed. A ashing BELL icon means the feeding me has not been
reached. This lets the user know how many feedings are le for feeding.
If the me for the next feeding is set earlier than the present feeding me,
the feeding will start the next day.
If the Mode key is pressed and held for more than 2 seconds the number
will rapidly increase automacally unl you release the key. When number
reaches its maximum, the number will fall back to the minimum value and
start increasing again.
If the feeding mer has already begun, pressing the START key will reset
the mer and begin again from the 1st feeding-me set.
If START TOMORROW key is pressed, both the BELL and Zz icon will be ON.
The Zz icon will turn OFF at 0:00 midnight to indicate the mer has
started.
START TOMORROW is used should you want to set your feeder up today
and have it start tomorrow. This is good for when you have programmed
feeding mes that have yet to pass so you can prepare in advance for a
possible trip or just being away the next day and not wanng the feeder to
run the day you programmed it.

11
UK and EU Guarantee
Your new Andrew James product comes with a 24 month guarantee and a 2 year
xed warranty, eecve from receipt conrmaon. Your receipt or order number is
required as proof of purchase date so it is imperave that you keep it safe. This
guarantee only applies if the item has been used solely for the use intended, and all
instrucons have been followed accordingly. Please note this product is only for
domesc not commercial use.
Abuse of your product will invalidate the guarantee. Returned goods can only be
accepted if repackaged properly within the original colour product box, and
presented with the original receipt of sale/order number. This does not aect your
statutory rights.
Returned products must be cleaned and returned to us in as close to delivery
condion as possible.
If your product develops a problem within the rst 12 months of the xed warranty,
we will pay all shipping costs to have it returned to us. Aer 12 months the
customer will be liable for the cost of returning the product to us. We will then pay
to have the repaired/replaced item shipped back to the customer.
If you wish to return your item for a full refund, you have the right to do so within
the rst 7 days. For our returns policy please go to
www.andrewjamesworldwide.com
Customers are responsible for any taxes applied to our products when they are
shipped outside of the EU.
All of our prices are inclusive of VAT.
Once a product has been returned to us, we will aim to repair or replace it within 30
days of receipt.
The guarantee does not cover any defect arising from improper use, damage, build-
up of lime scale or repair aempts made by third-pares. Also, the guarantee does
not cover normal wear and tear of individual parts.
Table of contents
Other Andrew James Pet Care Product manuals


