Manuale d’Istruzione d’Uso e Manutenzione
Operation and maintenance manual
Manuel d’utilisation et d’entretien
FILTRO REGOLATORE DI PRESSIONE MODULARE
MODULAR PRESSURE REGULATING FILTER
REGULATEUR D’AIR MODULAIRE AVEC FILTRE
PER LA VOSTRA SICUREZZA LEGGERE ATTENTAMENTE QUESTE
ISTRUZIONI PRIMA DI PROCEDERE ALL’INSTALLAZIONE,
ALL’UTILIZZO O ALLA MANUTENZIONE DEL FILTRO. QUESTO
MANUALE DEVE ESSERE CONSERVATO PER OGNI FUTURO
RIFERIMENTO.
FOR YOUR SAFETY, PLEASE READ THESE INSTRUCTIONS
CAREFULLY BEFORE PROCEEDING WITH THE
INSTALLATION, USE AND MAINTENANCE OF THE FILTER
POUR VOTRE SECURITE, VEUILLEZ LIRE ATTENTIVEMENT CES
INSTRUCTIONS AVANT DE PROCEDER A L'INSTALLATION, A L'UTILISATION
OU A L’ENTRETIEN DU PISTOLET A PEINTURE.
CE MANUEL DOIT ETRE GARDE EN VUE D’UNE EVENTUELLE CONSULTATION
DANS LE FUTUR.
Il presente libretto costituisce parte integrante del prodotto cui viene allegato e deve essere conservato per ogni
riferimento futuro. Leggere attentamente le avvertenze e le istruzioni contenute nel presente manuale
d’istruzioni prima di procedere all’installazione, alla messa in funzione, alla regolazione o alla manutenzione
poiché forniscono importanti indicazioni riguardanti la SICUREZZA D’USO e la MANUTENZIONE. Per un
utilizzo sicuro ed una corretta manutenzione, il filtro deve essere utilizzata solo da un operatore con
un’adeguata preparazione. Le informazioni inserite nel presente libretto sono necessarie per un utilizzo corretto
del filtro e dei suoi componenti ed integrano le informazioni che appartengono al normale bagaglio di
conoscenze tecniche degli addetti .Le norme di sicurezza inserite nel presente libretto integrano le norme di
sicurezza vigenti nei paesi d’utilizzo del prodotto che devono essere conosciute ed applicate dagli addetti. Per
ulteriori informazioni o problemi particolari da risolvere, rivolgersi ai centri autorizzati per l’assistenza tecnica
e la manutenzione del prodotto.
This Manual is an integral part of the product with which it is enclosed and must be conserved for
future consultation. Carefully read the recommendations and instructions contained in this instruction
booklet before carrying out installation, operating, adjusting or maintenance operations, since they give
important information regarding the SAFETY OF USE and MAINTENANCE. To ensure safe use and
correct maintenance, the filter must be used only by an operator with appropriate training. The
information included in this booklet are necessary for the correct use of the filter and its components
and integrates the information that normally constitutes the baggage of technical knowledge of the
operators. The safety rules inserted in this booklet are in addition to the safety regulations in force in
the countries where the product is used and which should already be known and applied by operators.
Contact only authorised product technical assistance and maintenance centers for further information
or special problems.
Le présent manuel fait partie intégrante du produit qu’il accompagne. Il doit être gardé en vue d’une éventuelle
consultation future. Lire attentivement les avertissements et les instructions figurant dans le présent manuel
d’utilisation et d’entretien avant de procéder à l'installation, à la mise en service, au réglage ou à l’entretien. Ils
fournissent des indications importantes concernant la SECURITE D'UTILISATION et l’ENTRETIEN. Pour assurer
une utilisation sûre et un bon entretien, le pistolet ne doit être utilisé que par un opérateur ayant une préparation
appropriée. Les informations figurant dans le présent manuel sont nécessaires pour une utilisation correcte du
pistolet et de ses composants et complètent les informations faisant partie du bagage normal de connaissances
techniques des personnes chargées de son utilisation. Les consignes de sécurité figurant dans le présent manuel
complètent les normes de sécurité en vigueur dans le pays d’utilisation du produit, qui doivent être connues et
appliquées par les personnes chargées de l’utilisation de l’appareil. Pour plus d’informations ou bien en cas de
problèmes particuliers, s'adresser aux centres agréés pour le service après-vente et l’entretien du produit.
Dopo aver tolto l’imballaggio assicurarsi dell’integrità dell’apparecchio controllando che non vi siano parti
visibilmente danneggiate, in caso di dubbio non utilizzare l’apparecchio e rivolgersi subito al proprio
rivenditore. Gli elementi che compongono l’imballaggio (sacchetti in plastica, polistirolo espanso, ecc.) devono
essere smaltiti negli appositi luoghi di raccolta e non devono essere lasciati alla portata dei bambini, poiché
potenziali fonti di pericolo.
After removing the packaging material make sure the product is in perfect condition and that there are
no visibly damaged parts. If in doubt, do not use the spray gun and contact the dealer from whom it
was purchased. The packaging materials (plastic bags, expanded polystyrene, etc) must be disposed of
in appropriate refuse-collection containers. The above mentioned materials must not be left within the
reach of children as they are potential sources of danger.
Après avoir enlevé l’emballage, s’assurer de l’intégrité de l’appareil en contrôlant qu’il n’y a pas de parties
visiblement endommagées. En cas de doute, ne pas utiliser l’appareil et s’adresser au propre détaillant. Les
éléments d’emballage (sacs plastique, polystyrène expansé, etc.) doivent être placés dans les lieux appropriés de
récolte. Ces matériaux ne doivent pas être laissés à la portée des enfants, car ils représentent une source
potentielle de dangers.
DESTINATION ET UTILISATION
Questo FILTRO è stato realizzato per essere utilizzato quale FILTRO REGOLATORE DI PRESSIONE
MODULARE ogni altro uso è da ritenersi improprio. La ditta declina ogni responsabilità per danni o incidenti
derivanti dall’uso improprio del filtro o dalla mancata osservanza delle prescrizioni relative alla sicurezza. Ogni
e qualsiasi manomissione o modifica dell’apparecchiatura non preventivamente autorizzata solleva il costruttore
da danni derivanti o riferibili agli atti suddetti.
This FILTER was produced for use as a MODULAR PRESSURE REGULATING FILTER. Any
other use is considered improper. The Manufacturer declines any responsibility for damages or
accidents due to the improper use of the filter or failure to observe the prescribed safety
requirements..Any and all tampering or modification with the equipment that has not been previously
authorised releases the Manufacturer from all damage derived or ascribable to the same.
Cet FILTRE a été réalisé pour être utilisé comme REGULATEUR D’AIR MODULAIRE AVEC FILTRE. Toute
autre utilisation doit être considérée comme impropre. La société décline toute responsabilité en ce qui concerne les
dommages ou accidents découlant de l'utilisation impropre du pistolet manuel ou du non-respect des consignes de
sécurité. Toute manipulation ou modification de l'appareil non préalablement autorisée décharge le fabricant de toute
responsabilité concernant les dommages dus de façon directe ou indirecte aux actes susmentionnés.
AVVERTENZE GENERALI DI SICUREZZA
CONSIGNES DE SECURITE GENERALES
RISKS IN INAPPROPRIATE USE
RISQUES POUR UTILISATION IMPROPRE
NON superare MAI le pressioni massime d’esercizio consigliate
Prima di effettuare le operazioni di smontaggio, di pulizia o di riassemblaggio
del filtro scaricare SEMPRE le pressioni dell’aria
NEVER exceed the maximum working pressures recommended.
Before performing operations to disassemble, clean or reassemble the filter ALWAYS bleed off
compressed air.
NE JAMAIS dépasser les pressions maximum de service conseillées
Avant d’effectuer les opérations de démontage, de nettoyage ou de remontage du filtre, évacuer
TOUJOURS la pression de l'air et la peinture présente dans l’appareil
E’ quindi OBBLIGATORIO durante l’uso seguire alcune indicazioni:
Leggere ATTENTAMENTE le schede tecniche dei prodotti che si impiegano
prima dell’utilizzo
Durante l’utilizzo e lo scarico della condensa utilizzare SEMPRE indumenti
adeguati per la protezione del corpo
Indossare SEMPRE guanti, occhiali e maschere per prevenire i rischi causati dai
vapori tossici o dal contatto dei prodotti di scarico dei gruppi con la pelle e/o gli
occhi
Many paint products contain organic solvents or chemical products that are harmful to health and can
cause intoxication due to the toxic fumes released during spraying.
It is therefore OBLIGATORY to take the following precautions:
CAREFULLY read the technical cards of the products to be used before use.
During use and drainage of condensation, ALWAYS wear appropriate protective clothing to
protect the body.
ALWAYS wear gloves, goggles and masks to prevent risks caused by toxic vapours or bywaste
products of the groups coming into contact with the skin and/or the eyes.
Il est par conséquent OBLIGATOIRE pendant l'utilisation d’adopter un certain nombre de précautions:
Veuillez lire ATTENTIVEMENT les fiches techniques des produits utilisés avant l'utilisation
Durant l’utilisation et la purge du condensat utiliser TOUJOURS des vêtements appropriés pour la
protection du corps
Porter TOUJOURS des gants, des lunettes et un masque pour prévenir les risques causés par les
vapeurs toxiques ou par le contact des produits de vidange des groupes avec la peau et/ou les yeux
E’ VIETATO utilizzare il filtro per prodotti alimentari o medicinali o gas
IT IS FORBIDDEN to use the filter for food or medicine products or gas.
IL EST INTERDIT d’utiliser le filtre pour produits alimentaires ou pharmaceutiques ou gaz
E’ VIETATO regolare il filtro se posizionato nelle aree dilavoro di macchinari come convogliatori, robot, ecc.
durante il funzionamento degli stessi
IT IS FORBIDDEN to adjust the filter if positioned in the working area of machines such as
conveyors, robots, etc., during operationofsaid machinery.
IL EST INTERDIT d’utiliser le filtre aux abords de machines telles que convoyeurs, robots, etc. pendant
leur fonctionnement
Per un utilizzo sicuro ed una corretta manutenzione il filtro deve essere utilizzata solo da un operatore con
un’adeguata preparazione. Dopo aver tolto l’imballaggio assicurarsi dell’integrità dell’apparecchio controllando
che non vi siano parti visibilmente danneggiate.
1. Il filtro deve essere installato verticalmente.
2. Collegare la condotta d’aria controllando la direzione del flusso sia concorde alle frecce stampate sul corpo
3. Avvitare il manometro sul corpo.
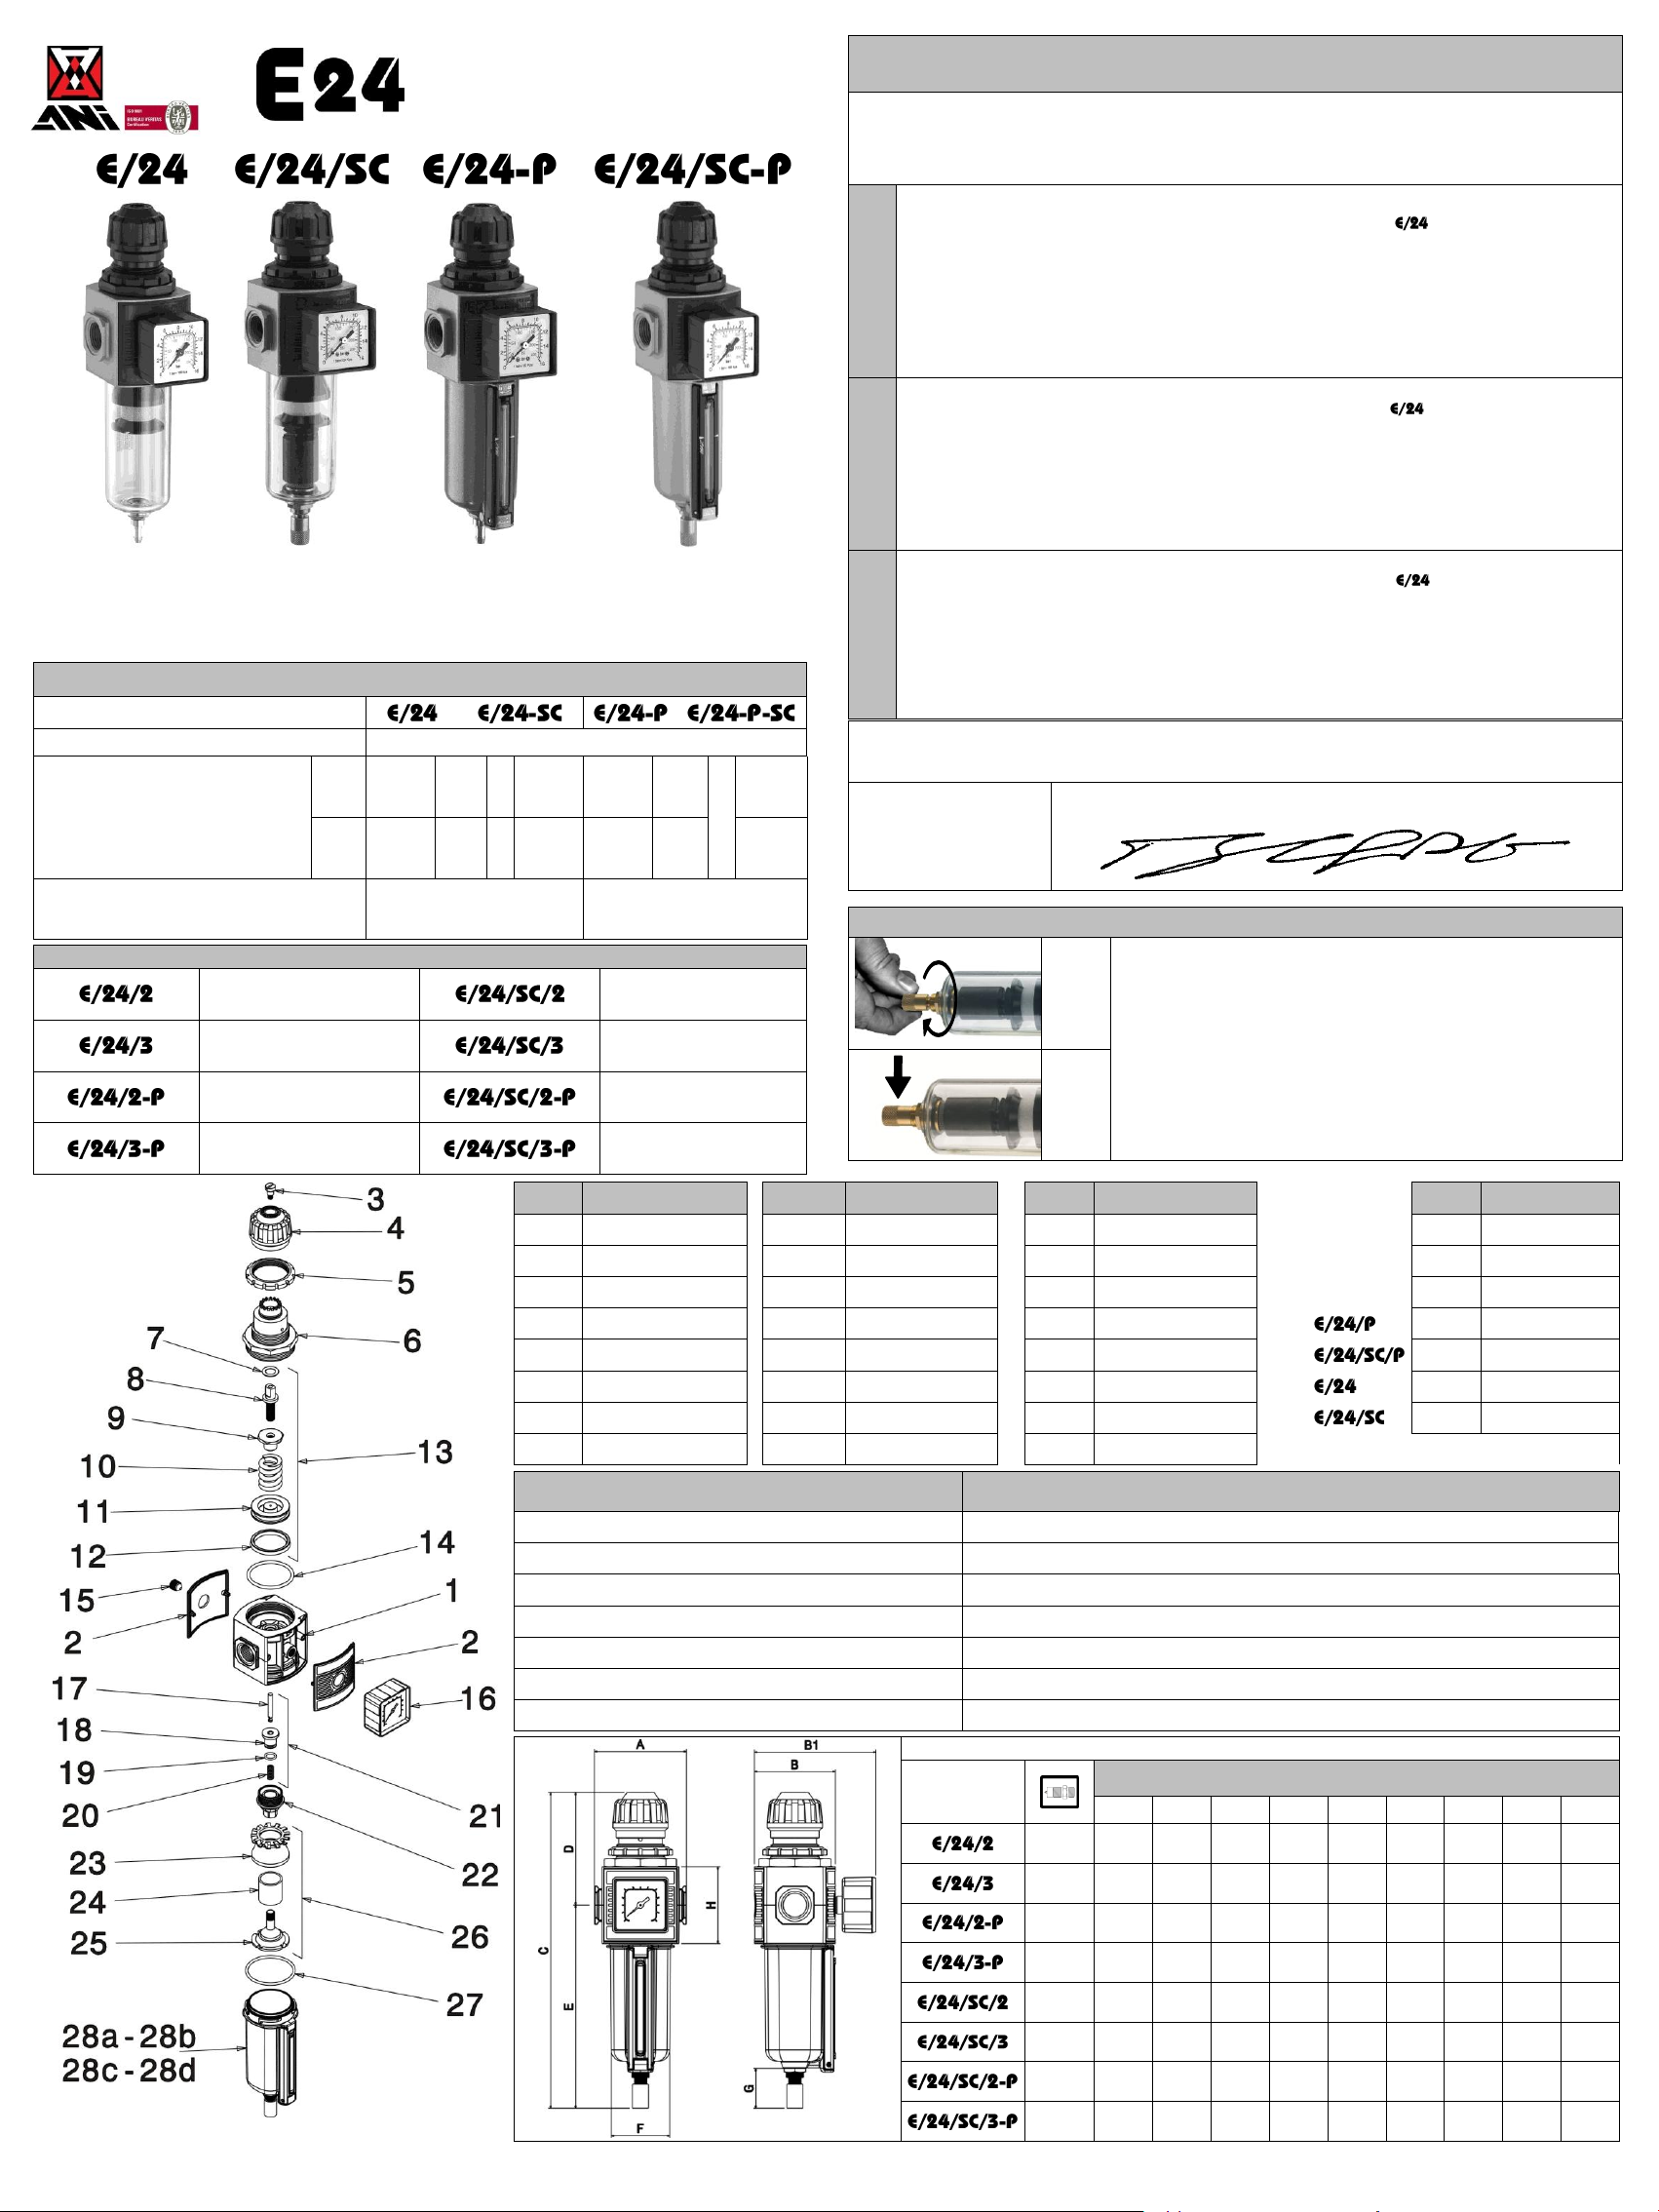
4. Se si vuole invertire la posizione del manometro, bisogna : togliere il grano posteriore 15, avvitarlo sul lato
opposto e avvitare il manometro 16 dove prima c’era il grano.
5. Prima di aprire il flusso d’aria della condotta controllare che i raccordi di ingresso e di uscita del filtro
siano correttamente collegati
N.B. Per tutti i modelli è consigliato collegare un tubo alla valvola di scarico per effettuare il recupero
della condensa che deve essere smaltita negli appositi luoghi di raccolta.
To ensure safe use and correct maintenance, the filter must be used only by an operator with
appropriate training. After removing the packaging, ensure that the machine is in good condition, by
checking to make sure there is no visible damage.
1. The filter must be installed vertically.
2. Connect the air conduits, checking the direction of the flow to make sure it is in agreement with the
arrows printed on the body of the machine.
3. Screw the pressure gauge onto the body of the machine.
4. Follow the procedure indicated below to invert the position of the pressure gauge, if desired:
remove the rear nut 15, screwing it onto the opposite side and screw on the pressure gauge 16,
where the nut was previously located.
5. Before opening the air flow of the conduit check to make sure the intake and output connections of
the filter are correctly connected.
NOTE: It is advisable to connect a tube to the drainage valve on all models, in order to recover
condensation, which must be disposed of in the designated collection sites.
Pour une utilisation sûre et une maintenance correcte, le filtre ne doit être utilisé que par un opérateur possédant
une préparation adéquate. Après avoir retiré l’emballage vérifier l’intégrité de l’appareil en contrôlant
qu’aucune partie ne présente des dommages visibles.
1. Le filtre doit être installé verticalement.
2. Raccorder le conduit d’air en contrôlant que la direction du flux correspond aux flèches imprimées sur le
corps
3. Visser le manomètre sur le corps.
4. Si l’on souhaite inverser la position du manomètre, il faut enlever le goujon arrière 15, le visser du côté
opposé et visser le manomètre 16 là où se trouvait le goujon.
5. Avant d’ouvrir le flux d’air provenant du conduit, contrôler que les raccords d’entrée et de sortie du filtre
sont correctement connectés
N.B. Pour tous les modèles, il est conseillé de raccorder un tuyau à la soupape de purge pour
récupérer le condensat qui doit être déposé dans les lieux de collecte prévus à cet effet.
La regolazione della pressione viene effettuata attraverso il pomello. Ruotare in senso orario per aumentare la
pressione ed in senso antiorario per diminuirla. A regolazione desiderata, per bloccare il pomello spingerlo
verticalmente verso il corpo. Per modificare la pressione di uscita del regolatore bisogna prima cosa sbloccare il
pomello tirandolo verticalmente verso l’alto. Successivamente ruotandolo si modifica la pressione fino ad
ottenere il valore desiderato.
Adjustment of pressure is made with the knob. Turn the knob clockwise to increase the pressure and
counter clockwise to decrease it. When adjusted as desired, the knob can be blocked by pushing it
vertically towards the body of the machine. In order to modify output pressure of the regulator, the
knob must be freed by pulling it vertically upwards. Then rotate it to modify the pressure, until you
have reached the desired value.
Le réglage de la pression s’effectue en agissant sur le bouton. Tourner dans le sens horaire pour augmenter la
pression et dans le sens inverse pour la diminuer. Quand le réglage désiré est obtenu, pour bloquer le bouton, le
pousser verticalement vers le corps. Pour modifier la pression de sortie du régulateur il faut débloquer d’abord
le bouton en le tirant verticalement vers le haut. Ensuite, en le tournant on modifie la pression jusqu’à
l’obtention de la valeur désirée.
NETTOYAGE DE L’INSTRUMENT
E’ VIETATO effettuare la manutenzione del filtro se il personale addetto non ha ricevuto
adeguate istruzioni.
E’ VIETATO effettuare la manutenzione del filtro se non si utilizzano ricambi originali.
NEVER allow the filter to be serviced by personnel without adequate training and instruction..
NEVER use non-original spare parts for maintenance.
Il est INTERDIT d’effectuer la maintenance du filtre si le personnel préposé n’a pas reçu des instructions
adéquates.
Il est INTERDIT d’effectuer la maintenance du filtre en utilisant des pièces qui ne sont pas originales.
Prima di effettuare la pulizia del filtro bisogna scaricare la condensa depositata all’interno del bicchiere :
- modello con scarico semi-automatico - spingere la valvola di scarico verso il bicchiere fino allo
svuotamento dello stesso.
- modello con scarico manuale –ruotare la vite zigrinata in senso orario per scaricare la condensa. Al
termine dell’operazione riavvitare la vite.
- modello con scarico automatico –in caso di intasamento del dispositivo si può intervenire per scaricare la
condensa manualmente, ruotando la vite zigrinata.
N.B. La condensa deve essere recuperata e poi smaltita negli appositi luoghi di raccolta.
1. Chiudere la condotta di alimentazione dell’aria e controllare (agendo sulla valvola di scarico) che non vi
sia pressione all’interno del filtro
2. Ruotare in senso orario il bicchiere n° 28, come indicato sullo stesso, per sbloccarlo
3. Tirare il bicchiere n°28 sfilandolo dal corpo 1
4. Lo smontaggio dell’elemento filtrante avviene svitando il supporto 25 e sfilando i particolari 24 e 23
5. La pulizia dell’elemento filtrante 24e del deflettore 23 deve essere fatta con immersione in detergente
non aggressivo e poi con soffiatura degli stessi
6. Per rimontare il tutto infilare l’elemento filtrante 24 e il deflettore 23 sul supporto 25
7. Avvitare il tutto (26) sul corpo 1
8. Inserire il bicchiere28 sulcorpo 1 fino infondo eruotareinsenso antiorario per effettuare il bloccaggio dello stesso
Before performing cleaning operationsonthe filter, the condensationdeposited inthe cup must be drained:
- model with semi-automatic drainage –push the drainage valve towards the cup until it is empty.
- model with manual drainage –rotate the knurled screw clockwise to drain condensation. When finished,
tighten the screw back up.
- model with automatic drainage –in the event of plugging up of the device, intervene to drain the
condensation manually, rotating the knurled screw.
NOTE: The condensation must be recovered and disposed of in the designated collection sites.
1. Close the air intake conduit (using the drainage valve) so that there is no pressure inside the filter.
2. Rotate the cup, n° 28, screw clockwise, as indicated on the cup itself, in order to unblock it.
3. Pull out the cup, n° 28, removing it from the body, 1.
4. The filtering element can bedismantled by unscrewing the support, n° 25 and removing pieces 24 and 23.
5. Cleaning of the filtering element, n° 24 and the deflector, n° 23, must be performed by immersion in
a non-aggressive detergent.
6. To reassembly the entire group, slide the filtering element, n° 24, and the deflector, n° 23, into place
on the support, n° 25.
7. Screw the group (26) onto the body (1).
8. Insert the cup 28 onto the body 1 until it reaches the bottom and rotate it counter clockwise to block
it in its seat.
Avant d’effectuer le nettoyage du filtre il faut purger le condensat accumulé à l’intérieur du récipient :
- modèle avec purge semi-automatique –pousser la soupape de purge vers le récipient jusqu’à son vidage.
- modèle avec purge manuelle –tourner la vis moletée dans le sens horaire pour purger le condensat. À la fin de
l’opération revisser la vis.
- modèle avec purge automatique –en cas d’obstruction du dispositif on peut intervenir manuellement pour
purger le condensat, en tournant la vis moletée.
N.B. Le condensat doit être récupéré puis mis au rebut dans les lieux de collecte prévus à cet effet.
1. Fermer le conduit d’alimentation de l’air et contrôler (en agissant sur la soupape de décharge) qu’il n’y pas
de pression à l’intérieur du filtre
2. Tourner dans le sens horaire le récipient n° 28, comme indiqué sur celui-ci, pour le débloquer
3. Tirer le récipient n°28 en l’extrayant du corps 1
4. Le démontage de l’élément filtrant s’effectue en dévissant le support 25 et en extrayant les pièces 24 et 23
5. Le nettoyage de l’élément filtrant 24 et du déflecteur 23 doit être fait en les plongeant dans un détergent non
agressif puis avec un jet d’air
6. Pour remonter le tout, enfiler l’élément filtrant 24 et le déflecteur 23 sur le support 25
7. Visser le tout (26) sur le corps 1
8. Introduire le récipient 28 sur le corps 1 jusqu’au fond et tourner dans le sens inverse horaire pour le bloquer
PROBLEMI DI FUNZIONAMENTO –CAUSE E RIMEDI
Perdita continua di aria dal foro posto sul mozzo 6
Inversione del senso di alimentazione del filtro
Controllare che le frecce del flusso di alimentazione stampate sul corpo 1 siano concordi al senso del flusso della condotta d’aria
Rottura della guarnizione 12
Smontare il mozzo completo di pomello 3-4-5-6,e togliere la molla 10
Prendere il pistone 11 e controllare che la guarnizione 12 non sia rovinata. In questo caso sostituirla
Mancanza regolazione della pressione con la rotazione del pomello
Smontare il mozzo completo di pomello 3-4-5-6,
Togliere la molla 10 e sostituirla
Perdita continua di aria dal foro di uscita mozzo del filtro
Rottura della valvola 18-19 o della molla 20
Ruotare in senso antiorario il bicchiere n° 28, come indicato sullo stesso, per sbloccarlo
Tirare il bicchiere n°28 sfilandolo dal corpo 1
Svitando il supporto 25 togliendo il gruppo filtrante 26
Svitare il tappo 22 e sfilare la valvola completa 21
Sostituire le parti danneggiate ( molla 20 e/o valvola 18)
Rimontare seguendo la procedura dell’esploso a ritroso
MALFUNCTIONS –CAUSES AND SOLUTIONS
Continuous loss of air from the hold on the hub (6)
Inversion of the direction of intake on the filter
Check to make sure that the flow arrowsonthe body (1) are in agreement with the directionof flow of the air conduit.
Dismount the complete hub of knobs 3-4-5-6 and remove the spring 10.
Take out the piston 11 and check to make sure the basket, n° 12 is not ruined. If it is damaged replace it.
No pressure adjustment when the knob is rotated.
Disassemble the complete hub of knob 3-4-5-6.
Remove spring 10 and replace it.
Continous air leak from the filter hub hole.
Breakage of valve 18-19 or spring 20
Rotate the cup, n° 28, counterclockwise, as indicated on the cup itself, in order to unblock it.
Pull out the cup, n° 28, removing it from the body, 1.
Unscrew support n° 25, removing the filtering group, 26.
Unscrew the plug n° 22 and remove the complete valve, 21.
Replace the damaged parts (spring 20 and/or valve 18).
Re-assemble following the inverse procedure.
PROBLÈMES DE FONCTIONNEMENT –CAUSES ET REMÈDES
Fuite continue d’air par le trou situé sur le moyeu 5
Inversion du sens d’alimentation du filtre
Contrôler que le sens d’alimentation indiqué par les flèches imprimées sur le corps 1 coïncident avec le sens du flux du conduit d’air
Démonter le moyeu complet 3-4-5-6, et enlever le ressort 10
Prendre le piston 11 et contrôler si le joint 12 est endommagé. Si c’est le cas le remplacer
La rotation du bouton ne permet pas le réglage de la pression
Démonter le moyeu avec bouton 3-4-5-6
Enlever le ressort 10 et le remplacer
Fuite continue d’air par le trou de sortie du moyeu du filtre
Rupture de la soupape 18-19 ou du ressort 20
Tourner dans le sens horaire le récipient n° 28, comme indiqué sur celui-ci, pour le débloquer
Tirer le récipient n°28 en l’extrayant du corps 1
Dévisser le support 25 en enlevant le groupe filtrant 26
Dévisser le bouchon 22 et retirer la soupape complète 21
Remplacer les parties endommagées (ressort 20 et/ou soupape 18)
Remonter en suivant la procédure de la vue éclatée dans le sens contraire
MESSA FUORI SERVIZIO DEL FILTRO
DECOMMISSIONING THE FILTER
MISE HORS SERVICE DU FILTRE
Per lo smantellamento del filtro è necessario che esso sia pulito da qualsiasi residuo di oli o prodotti
chimici inquinanti. I materiali di fabbricazione sono completamente riciclabili e devono essere divisi
a seconda del tipo e smaltiti negli appositi centri di raccolta.
In order to decommission and dismantle the filter, it is necessary for it to be clean from any oil residue
or polluting chemical products. The filter construction materials are completely recyclable but must be
divided according to type and eliminated using the respective collection centres.
Avant de démanteler le filtre, il faut en éliminer tous les résidus d’huiles ou de produits chimiques
polluants. Les matériaux de fabrication sont entièrement recyclables et doivent être divisés par
typologie et traités dans les centres de collecte prévus à cet effet.