anko KY-318 User manual

1
Pressure Cooker
KY-318
User Manual
PLEASE READ AND SAVE THESE
INSTRUCTIONS FOR FUTURE REFERENCE

2
IMPORTANT SAFEGUARDS
When using electrical appliances, basic safety precautions should always be
followed including the following:
1. READ ALL INSTRUCTIONS.
2. Do not use appliance for other than intended use.
3. This appliance is intended to be used in household and similar applications such as:
-staff kitchen areas in shops, offices and other working environments;
-farm houses;
-by clients in hotels, motels and other residential type environments;
-bed and breakfast type environments.
4. Only use this appliance indoors.
5. The manufacturer assumes no liability for possible damages that may have been caused by incorrect
usage or mishandling of the appliance.
6. The input voltage of the appliance is AC220-240V~50/60Hz. Please confirm it before using the
appliance.
7. For addition protection, this appliance should be connected to a household residual current device
(safety switch) with a rating of no more than 30mA. If unsure consult your electrician for advice.
8. Warning! Avoid spillage on the connector
9. Warning! Misuse may cause potential injury.
10.Warning! The heating element surface is subject to residual heat after use.
11. Always position the appliance in such a way that the plug is easily accessible and can be pulled in case
of emergency.
12. This appliance is not intended for use by persons (including children) with reduced physical, sensory
or mental capabilities, or lack of experience and knowledge, unless they have been given supervision
or instruction concerning use of the appliance by a person responsible for their safety.
13. Children should be supervised to ensure that they do not play with the appliance.
14. Keep this appliance away from all hot surfaces. Do not place it on hot plates such as gas and electric
stoves etc.
15. Do not expose the appliance to direct sunlight.
16. Always place and operate the appliance on a flat, solid, clean and dry surface.
17. Never block the ventilation openings at the bottom of the appliance.
18. If the supply cord is damaged it must be replaced by qualified electrical person only to avoid a hazard
or the product must be disposed of.
19. Do not use the appliance if it is damaged. To avoid hazards, defective components must be replaced
by qualified electrical person only.
20. Do not attempt to dismantle and repair the appliance by yourself.
21. Do not insert any foreign objects into the housing.
22. Danger of electric shock! Do not immerse the appliance, power cord or power plug in water or in
other liquids.
23. Never operate this appliance with wet hands or when standing on a wet floor.
24. Only use original accessories supplied with the product. The use of accessories other than those
supplied with the product can result in fire, electric shock or injury.

3
25. Use the inner pot only with this appliance. It is not suitable for any other use.
26. Always disconnect from mains power before cleaning and when it is not in use.
27. Ensure that the appliance and all parts are dry, before connecting it to mains power and before
attaching the accessories.
28. Makes sure that there is no danger that the cord could be accidentally pulled or that someone could
tip over it when the device is in use.
29. Never touch the supply cord plug with wet or damp hands.
30. Keep the power cord away from hot surfaces, open flames and sharp edges.
31. Always pull from the plug, not the power cord when disconnecting the appliance from a power outlet.
32. The appliance is not intended to be operated by means of an external timer or separate
remote-control system.
33. All attachments must be properly installed prior to switching ON the appliance.
IMPORTANT! Before each use, ensure that the gasket, the sieve, the float valve and the exhaust valve
are clean and properly inserted.
IMPORTANT! The steam pressure regulator should be checked regularly to ensure that it is not blocked.
34. Unless when using the sauté function, never operate this appliance without the lid, sieve, gasket and
valves properly in place.
35. Do not cover the valve during use.
36. Danger of burns! Do not touch hot parts (especially the lid) of the appliance. Only touch handles or
buttons and use oven gloves/mitts.
37. Switch all functions OFF, disconnect from mains power and allow the appliance to cool down before
assembling or disassembling parts and before cleaning.
38. Do not leave the appliance unattended when in use.
39. Do not move the appliance while it is in use.
40. Do not use the lid handle to carry the pot. Only use the pot handles.
IMPORTANT! Danger of burns! Never exceed the maximum level mark in the inner pot. Some food
expands in volume during cooking. If you are boiling food such as rice and dried vegetables, do not fill
the inner pot to more than 2/3rds.
41. Try to avoid boiling food that foams and clogs the sieve and valves, such as apple sauce, pearl barley,
oats and laver. If you prepare such food in the appliance, only fill the inner pot to half and always let
the pot cool down very slowly to release the pressure.
42. Never operate this appliance when empty.
43. Never operate this appliance with hot oil for deep-frying.
CAUTION: Danger of burns! Never move your face or hands close to the float valve and the exhaust
valve. Steam might escape and scald your skin!
CAUTION: Only open the lid once the float valve has completely receded. If the lid doesn’t move easily,
there is still too much pressure in the pot and it is dangerous to force open the lid.
IMPORTANT! The lid must not be opened until the pressure has decreased sufficiently.
FOR HOUSEHOLD USE ONLY
SAVE THESE INSTRUCTIONS G
GET

4
THINGS TO KNOW YOUR PRESSURE COOKER
1
Safety valve
7
Inner Pot
13
Condensation collector
2
Pressure regulator valve
8
Main unit
14
Power cord
3
Lid
9
Control panel
15
Steam rack
4
Silicone seal ring
10
Heating plate (inside)
16
Measuring cup
5
Steel plate
11
Handle
17
Rice spatula
6
Metal peg
12
Power cord connector
NOTE:
Pressure regulator valve: Clean the pressure regulator valve with a soft brush and cloth at least once a
month. This is to ensure the pressure regulator valve is not blocked.
Silicone seal ring: Remove oil and dirt from the sealing ring with detergent and soft brush. Any remaining
oil and dirt may appear yellowish after cleaning. This is normal. It is recommended to clean the sealing ring
once every 2 months.

5
INSTALLING THE LID
Pressure regulator valve (2): Remove the pressure regulator by pulling it up and off. To install the valve,
position thevalve on metal shaft and press it down.
Silicone seal ring (4): To remove the seal ring (4), hold the metal peg (6) to lift off the steel plate (5).
To install the seal ring, position the steel plate at the center and press it down.
BEFORE FIRST USE
Please make sure to inspect the following:
1. The safety valve (1) and pressure regulator (2) are properly in place and not blocked by food debris.
2. The silicone seal ring (4) is undamaged and properly in place
3. The outside surface of the inner pot and heating plate (inside) are free of any liquids and foreign
objects.
4. The pressure regulator is closed for pressure cooking (see Fig.F)
5. The safety valve (1) can move freely up and down.
AFTER EACH USE
1. Open the lid only when the pressure cooker is switched OFF, there is no pressure inside the pot and the
safety valve has gone down! Danger of injury - do not force open the lid open.
2. Clean the silicone seal ring.
3. Check if the silicone sealing ring, safety valve and pressure regulator are blocked with any food debris.
Clean any blocked parts.
FUNCTIONS
Control Panel
The control panel consists of an LED display and function keys. Use knob to select function mode, each
mode has an indicator light. Once the function is selected, its indicator light will illuminate (red).

6
18
19
20
21
TIMER/ PRESET/ + button
Display
KEEP WARM/ CANCEL/ - button
Cooking mode buttons
KEYS
TIMER/ PRESET/ +
By pressing this key, you can set a timer from 30 minutes to 24 hours. Each press of the button will increase
the time by 30min.
This key is also used for preset cooking. To program delayed cooking, first set the timer, then select the
desired cooking mode. The corresponding indicator light will be turned on and the program will start. (see
paragraph “COOKING MODES”)
To cancel a “Preset” function, press the “Keep Warm/Cancel/ - ” key
KEEP WARM/ CANCEL/ -
After cooking is done, the pressure cooker will automatically activate the keep warm function. To stop the
keep warm function, press the “KEEP WARM/ CANCEL/ “ button to cancel the program and the cooker
will switch to standby mode.
If you want to activate the keep warm function again, press ““KEEP WARM/ CANCEL/ “ button. The
pressure cooker can keep the cooked food warm up to 24 hours. However, for the best flavors, the
maximum keep warm time should not be longer than 6 hours.
COOKING MODES
Press cooking mode buttons to select a desired cooking function. When cooking mode is selected, the
corresponding indicator light will be turn ON. You will see a number flashing on the display which stands
for the default cooking time in minutes.
Refer to the table below for the default cooking time in each cooking mode:
Cooking mode
Default cooking time (min)
Adjustable range (min)
Rice
12
5-16
Porridge
5
3-15
Meat/ Stew
20
10-60
Chicken
15
10-30
Fast cooking
8
3-15
Slow Cooking
58
20-120
Steam
15
1-45
Fish
10
5-15
Soup
18
5-45
Beans/ Chili
40
20-60
If a different cooking time is desired, press the “+” (18) or “-“ (20) button to adjust the cooking time, refer
to adjustable range above.

7
Press and hold the “+” or “-“ button to adjust the time quickly.
Note: you can only adjust the cooking time within the adjustable range for each cooking mode.
Wait for a few second until the display stops blinking and the unit will start cooking.
When the cooker is being programmed or any program is in effect, press “Keep Warm/Cancel/-” to cancel
the program and take the cooker to standby mode.
Rice
When cooking white rice, use the measuring cup (16) provided. The optimum proportion is 1 cup of rice to
1 cup of water. After cooking is done, allow it to rest for 10 minutes before opening the lid.
Steam
Use a steam rack for steaming. Add water to the cooking pot, ensuring it is above the minimum water fill
level, but not above the steam rack.

8
COOKING PREPARATION
1. Install the condensation collector (13) onto the side of the base unit (see Fig. C). It collects and holds
the extra condensation during cooking.
2. Hold the lid handle and turn the lid clockwise towards the unlock icon until the pin (22) is fully extend.
3. Lift the lid off the pot. (see Fig. E)
4. Take out the inner pot and put in food and liquid. The total amount of food and liquid should NEVER
exceed the maximum level marking on the inner pot.
5. Place the inner pot inside the outer pot. (see Fig. H) Rotate the inner pot slightly to ensure good
contact between the inner pot and the heating element.
6. Place the lid on the pot, rotate it anti-clockwise towards the lock icon until the lid locks in place. The
arrow mark ▲on the lid and main unit should align. The pin (22) should not be visible from the side of
the lid. (see Fig. D)
7. Turn the pressure regulator valve (2) to the “pressure” position. The pressure symbol should align
with the arrow ▲(see Fig. F)
8. Connect the supply cord plug into a mains power outlet socket.
A beep sound can be hear and “0000” can be seen on display. The pressure cooker is now in the
standby mode and ready for use.

9
LID OPENING
Some residual heat and steam may be released when opening the lid on the pressure cooker which may
cause injury. Protect your hands with oven mitts and use the lid to shield and direct steam away from
your face and hands when opening the lid.
Safe lid release:
1. Wait until the pressure cooking program has completed or press the “Keep Warm/ Cancel/- ” key to
terminate the program.
2. Unplug the pressure cooker and remove the power cord.
3. Allow the cooker to cool down and wait until the safety valve (1) drops down. Depending on the
volume of food and liquid inside the cooker, this may take 12 to 30 minutes.
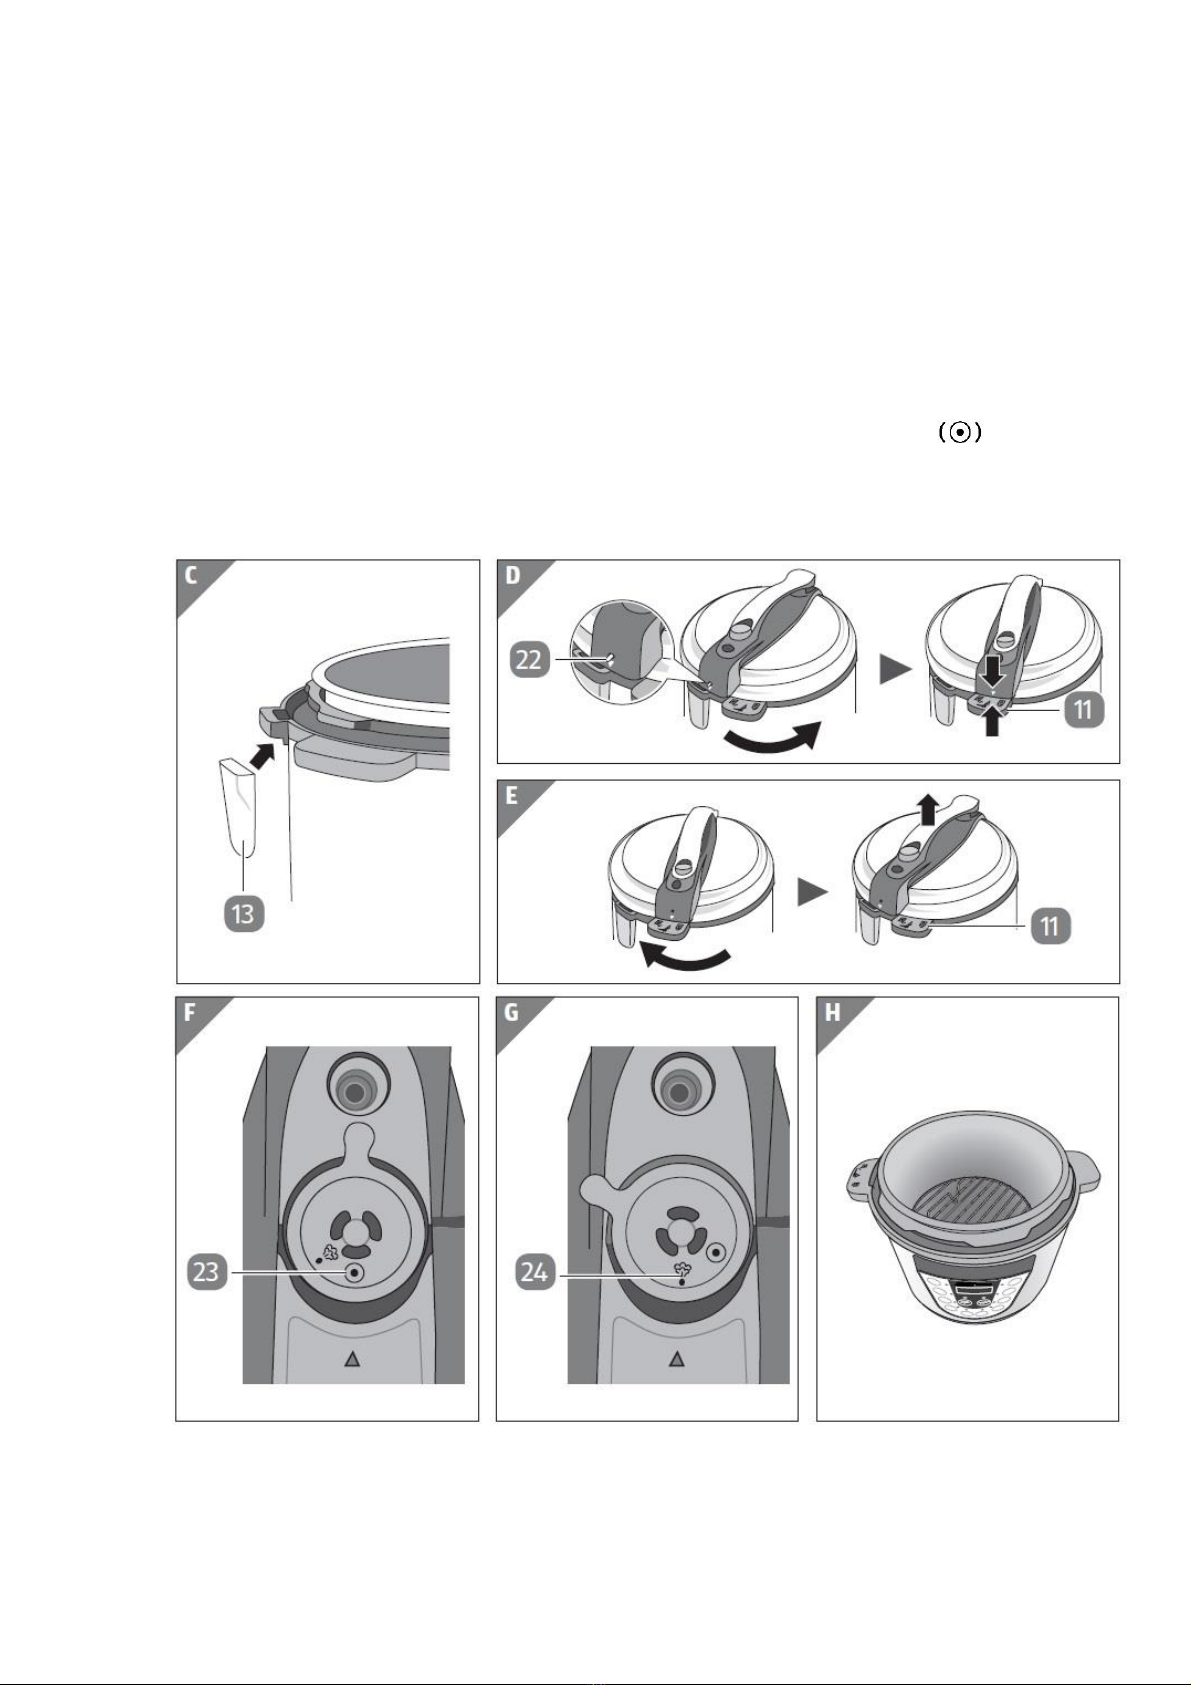
4. Once the safety valve has dropped down, hold the lid handle and rotate the lid to clockwise towards the
unlock icon, until the lid is disengaged and then lift the lid open. (see Fig.E)
Attention: Do not open the lid until pressure inside the pot is completely released. See Important
Safeguards.
Quick release:
WARNING! Burn hazard! Burst of steam will be given off vertically from center of the pressure regulator
1. To speed up the cooling down process, place a wet towel on the lid.
5. Slowly open the pressure regulator valve by turning the valve anti-clockwise towards the steam symbol.
The steam symbol should align with the arrow ▲. (see Fig. G)
6. Wait until the safety valve has dropped down, hold the lid handle and rotate the lid to clockwise
towards the unlock icon, wait until the lid is disengaged and then lift the lid open. (see Fig.E)
Attention: Keep hands and face away from any escaping steam. It is very hot and can cause scalding.
See Important Safeguards.
Note: A Quick Release is not suitable for food in large liquid volume or with high starch content (e.g.
porridge, congee, soup, etc.) because food may be expelled with steam. In this case, use the Safe Lid
Release method instead.
PRESSURE COOKING
1. Follow the steps under Before each use and Cooking preparation
2. Ensure that the exhaust valve is in the closed position. (see Fig.F)
3. Press a cooking mode key, the corresponding indicator light illuminates and the default cooking time
appears in the LED display.
4. Press the “PRESET” button if you like to delay the start of cooking. See Functions Keys
“TIMER/PRESET/+”.
5. The cooking time will flash. Wait for a few seconds until the blinking stops, and the unit will start
cooking.
6. Within a few minutes steam will start coming out for a minute or two when the safety valve (1) pops up
and seals the cooker. Within another minute or two the working pressure will be reached, and the
countdown timer will begin.
7. At any time, you can cancel the cooking program in progress and return to standby mode by pressing
the “Keep Warm/Cancel/- ” key.
8. When the program has finished, the cooker beeps and automatically enters the keep warm stage. The
keep warm function indicator light illuminates and “6666” can be seen on the display.
9. Press “Keep Warm/Cancel/- ” to stop the program.
10.Unplug the cooker from mains power and remove the power cord.
11.To open the pot, see Lid Opening, Safe Lid Release.When opening the lid, the inner pot may appear to
be stuck on the lid because a vacuum develops due to air cooling. Gently pull the lid up until the inner
pot is released

10
CLEANING
Danger of electric shock! Do not immerse the appliance, power cord or power plug in water or in other
liquids.
Unplug the appliance and let it cool down before cleaning.
1. Clean the cooker after every use.
2. Remove the inner pot. Wash it in warm soapy water with a non-abrasive sponge. Rinse and dry
thoroughly. Replace it into the base unit after cleaning.
3. Clean the lid, including the gasket, exhaust valve, sieve and float valve with detergent and rinse with
fresh water. Wipe all parts dry with a soft cloth. If necessary remove the gasket, valves and sieve for
cleaning.
4. Wipe the housing with a moistened cloth. Ensure that no water can enter the housing. Wipe the
housing dry with a soft cloth.
STORAGE
1. Always unplug the removable power cord and allow the unit to cool down before storage.
2. Place the removable power cord, measuring cups and serving spoons inside the inner pot.
3. To prevent mould and odours, never store the cooker closed with locked lid.
4. Always store the Pressure Cooker in an upright position.
5. Do not place anything on top of the Pressure Cooker.
TECHNICAL DATA
MODLE
POWER
SUPPLY
POWER
VOLUME
WORKING
PRESSURE
WARM
TEMPERATURE
KY-318
220-240V
50/60Hz
1000-1200W
5.5L/
10 cups
60kPa
60°C - 80°C

11
TROUBLESHOOTING
Some problems may be caused by minor faults that you can be corrected yourself. To do so, follow the
instructions in the following table. If it is still not possible to resolve the problem, contact Kmart customer
service. Do not attempt to repair the pressure cooker yourself.
Problem
Possible cause
Solution
The lid (3) does not close
properly.
The silicone sealing ring (4) is not
fitted correctly.
Reassemble the silicone sealing
ring correctly.
The lid cannot be opened
The pressure has not been fully
released.
Allow the pressure to release
naturally or turn the pressure
regulator (2) to the “steam
release” position.
“E1” is shown on the display.
Sensor error
Unplug the pressure cooker and
allow it to rest for 20 minutes
before using it again.
“E2” is shown on the display.
Short circuit of the sensor
Unplug the pressure cooker and
allow it to rest for 20 minutes
before using it again.
“E3” is shown on the display.
The pressure cooker is
overheated
Ensure there is enough food and
liquid inside the pot.
Ensure the pot is properly placed
inside the base unit.
Switch the pressure cooker off
and let it cool down for 20
minutes before using it again.
“E4” is shown on the display.
The pressure regulator is not
working properly/faulty.
Do not attempt to repair the
pressure cooker yourself.

12
12 Month Warranty
Thank you for your purchase from Kmart.
Kmart Australia Ltd warrants your new product to be free from defects in materials and workmanship for
the period stated above, from the date of purchase, provided that the product is used in accordance
with accompanying recommendations or instructions where provided. This warranty is in addition to
your rights under the Australian Consumer Law.
Kmart will provide you with your choice of a refund, repair or exchange (where possible) for this product
if it becomes defective within the warranty period. Kmart will bear the reasonable expense of claiming
the warranty. This warranty will no longer apply where the defect is a result of alteration, accident,
misuse, abuse or neglect.
Please retain your receipt as proof of purchase and contact our Customer Service Centre on 1800 124
125 (Australia) or 0800 945 995 (New Zealand) or alternatively, via Customer Help at Kmart.com.au for
any difficulties with your product. Warranty claims and claims for expense incurred in returning this
product can be addressed to our Customer Service Centre at 690 Springvale Rd, Mulgrave Vic 3170.
Our goods come with guarantees that cannot be excluded under the Australian Consumer Law. You
are entitled to a replacement or refund for a major failure and compensation for any other reasonably
foreseeable loss or damage. You are also entitled to have the goods repaired or replaced if the goods
fail to be of acceptable quality and the failure does not amount to a major failure.
For New Zealand customers, this warranty is in addition to statutory rights observed under New
Zealand legislation.

13
RECIPIES
PARPIKA CHICKEN
Serves 5-6
Ingredients
1.4kg Chicken pieces
30g Tomato paste
30ml Oil
30g Sweet paprika
15g Butter
5g Crushed red pepper
600g Onions, finely diced
240ml Chicken stock
1 Pinch of sugar
120ml Sour cream
150g Red bell pepper, diced
15g All-purpose flour
½ Green bell pepper, diced
Pinch of Salt
120g mushrooms, sliced
Method
Remove the lid from the pressure cooker. Start cooking under the “Slow Cooking” mode and then
sear the onions in the pot with oil, butter and a pinch of sugar until soft and brown. Then remove the
onions.
Brown the chicken in the pot. Then remove the chicken.
Add the sautéed onions, green and red bell peppers, mushroom, tomato paste, sweet paprika,
crushed red pepper, chicken and chicken stock in the pot.
Mix well and then press the CANCEL button to stop the pressure cooker.
Properly close the lid. Start cooking under the “Chicken” cooking mode with the cooking time
changed to 10 minutes.
Just before the chicken is done, whisk together sour cream, flour and salt in a small bowl until
smooth.
When the chicken is done, release the pressure before opening the lid.
Remove the chicken. Stir the sour cream mixture into the sauce and heat the mixture on” Slow
Cooking” setting until the sauce coats the spoon.
Return the chicken to the sauce and heat for another minute.
MEXICAN CHICKEN CURRITO
Serves 8
Ingredients
600g Skinless and boneless chicken fillets
300ml Chicken stock
1can (400g) Tomatoes
200g Brown rice
10g Ground cumin
150g Frozen corn, thawed
10g Hot chili powder
1can (400g) Black beans/ black eyed beans
10g Salt
Method
Add chicken fillets, tomatoes, ground cumin, hot chili powder, salt and chicken stock into the pot and
stir to combine.
Properly close the lid. Start cooking under the “Chicken” cooking mode for 15 minutes.
When cooking is done, carefully open the lid after releasing the pressure.
Add in brown rice, corn and beans and stir to combine. Replace the lid and start cooking under the
“Rice” cooking mode with the cooking time changed to 16 minutes.
When cooking is done, rest for another 10 minutes before releasing the pressure and opening the
lid.
Shred the chicken using two forks and stir to combine with other ingredients.
Fill tortilla wraps with chicken and toppings and roll up to serve.

14
BEEF STEW
Serves 3-4
Ingredients
680g Beef stew meat, cubed
15ml Worcestershire sauce
1 Onion, chopped
30g Dried parsley flakes
4 Carrots, sliced
1 Bay leaf
2 Celery stalks, sliced
pinch of Salt
4 Potatoes, sliced
Pepper for seasoning
1can (400g) Diced tomatoes
30g cornflour
300ml Beef stock
Method
Add all ingredients into the pot. Stir to combine
Properly close the lid. Start cooking under the “Meat/Stew” cooking mode with the cooking time
changed to 30 minutes.
When cooking is done, carefully open the lid after releasing the pressure.
MEATBALLS
Serves 5-6
Ingredients
Meatballs:
1kg Ground beef
2 Garlic cloves, minced
2 Large eggs
½ Onion, minced
60ml Milk
pinch of salt
85g Parmesan cheese
Pepper for seasoning
170g Bread crumbs
Sauce:
½ Can crushed tomatoes
pinch of salt
60ml Water
Pepper for seasoning
¼ Onion, diced
8g Sugar
2 Garlic cloves, minced
15ml Olive oil
8g Bail, chopped
Method
To make meatballs, add all meatball ingredients to a bowl and mix. Roll meat balls to desired size
and place on a baking sheet. Place in the oven to sear at 230°C for 10 min.
Remove the lid from the pressure cooker and start cooking under the “Slow Cooking” model. Sauté
the onions and garlic in olive oil and then add tomatoes and the rest of the ingredients and let them
cook for 5 minutes. Then press the CANCEL button to stop the pressure.
Add the seared meatballs and then properly close the lid.
Start cooking under the “Meat/Stew” cooking mode with the cooking time changed to 20 min.
When cooking is done, carefully open the lid after releasing the pressure.

15
PORK CHOPS WITH SAUERKRAUT
Serves 5-6
Ingredients
6 Pork chops
3 Potatoes, peeled & sliced
30ml Vegetable oil
15g Brown sugar
1 Can (400g) Sauerkraut, drained
Salt and pepper for seasoning
360ml Water
Method
Remove the lid from the pressure cooker.
Start cooking under the “Slow Cooking” mode and brown the pork chops with oil on both sides.
When browned, remove pork chops and drain oil. Season the pork chops with salt and pepper.
Place the sauerkraut into the bottom of pot and spread evenly.
Sprinkle with brown sugar.
Place the pork chops onto sauerkraut, then layer potatoes on top. Add water to the pot.
Properly close the lid. Start cooking under the “Fast Cooking” mode with the cooking time changed to
15 minutes.
When cooking is done, carefully open the lid after releasing the pressure.
Table of contents