anko RFC-568 User manual

Grooming Kits
Model no.: RFC-568
Instruction Manual
PLEASE READ AND SAVE THESE
INSTRUCTIONS FOR FUTURE REFERENCE

SAFETY GUIDE - PLEASE READ CAREFULLY BEFORE USING THIS APPLIANCE
Please follow all the precautions listed below for safety and to reduce the risk of injury or
electric shock.
WARNING: READ ALL INSTRUCTIONS; FAILURE TO FOLLOW ALL
INSTRUCTIONS LISTED BELOW MAY RESULT IN ELECTRIC SHOCK, OR
SERIOUS PERSONAL INJURY.
SAVE THIS INSTRUCTION
1. Only use the appliance as described in this manual.
2. This appliance contains batteries that are non-replaceable.
3. Do not immerse the appliance in water or any other liquid.
Warning: Keep the appliance dry.
4. Do not allow the appliance to be exposed to rain or moisture during use or storage.
5. Always check the appliance for damage prior to use. If any damage is observed, DO NOT
use the appliance.
6. The appliance is intended for indoor use only.
7. Always switch the appliance off after use.
8. This appliance has no user serviceable parts. Do not attempt to access the appliance
covers.
9. This appliance is for personal use only, not designed for commercial use.
10. Do not use it outdoors.
11. Do not use the appliance if it is not working properly, if it has been dropped or if it has
been immersed in any liquid.
12. Before using the appliance, ensure that the clipper head/ trimmer head are securely fitted.
13. Do not use the appliance on children.
14. The appliance is not to be used by persons (including children) with reduced physical,
sensory or mental capabilities, or lack of experience and knowledge, unless they have
been given supervision or instructions concerning use of the appliance by a person
responsible for their safety.
15. Children being supervised to ensure that they do not play with the appliance.
16. Do not operate the charger if it has a damaged cord or plug, if it is not working properly, if
it has been dropped or immersed in any liquid.
17. Use only the original charger supplied with the appliance.
18. Check that your supply voltage is the same as that stated on the charger.
19. When charging the appliance, the power switch must be OFF.
20. It is normal for the charger to become warm to touch when charging.
21. Use only attachments provided.
22. This product contains sharp blades, please take the utmost care in handling and use.
23. Do not stretch, twist and curl the cable around the appliance.
24. Keep the cable away from hot surfaces.
25. Do not replace the batteries with non-rechargeable batteries.
IMPORTANT! To avoid personal injury, do not use the groomer if it has a damaged blade
or trimming head.
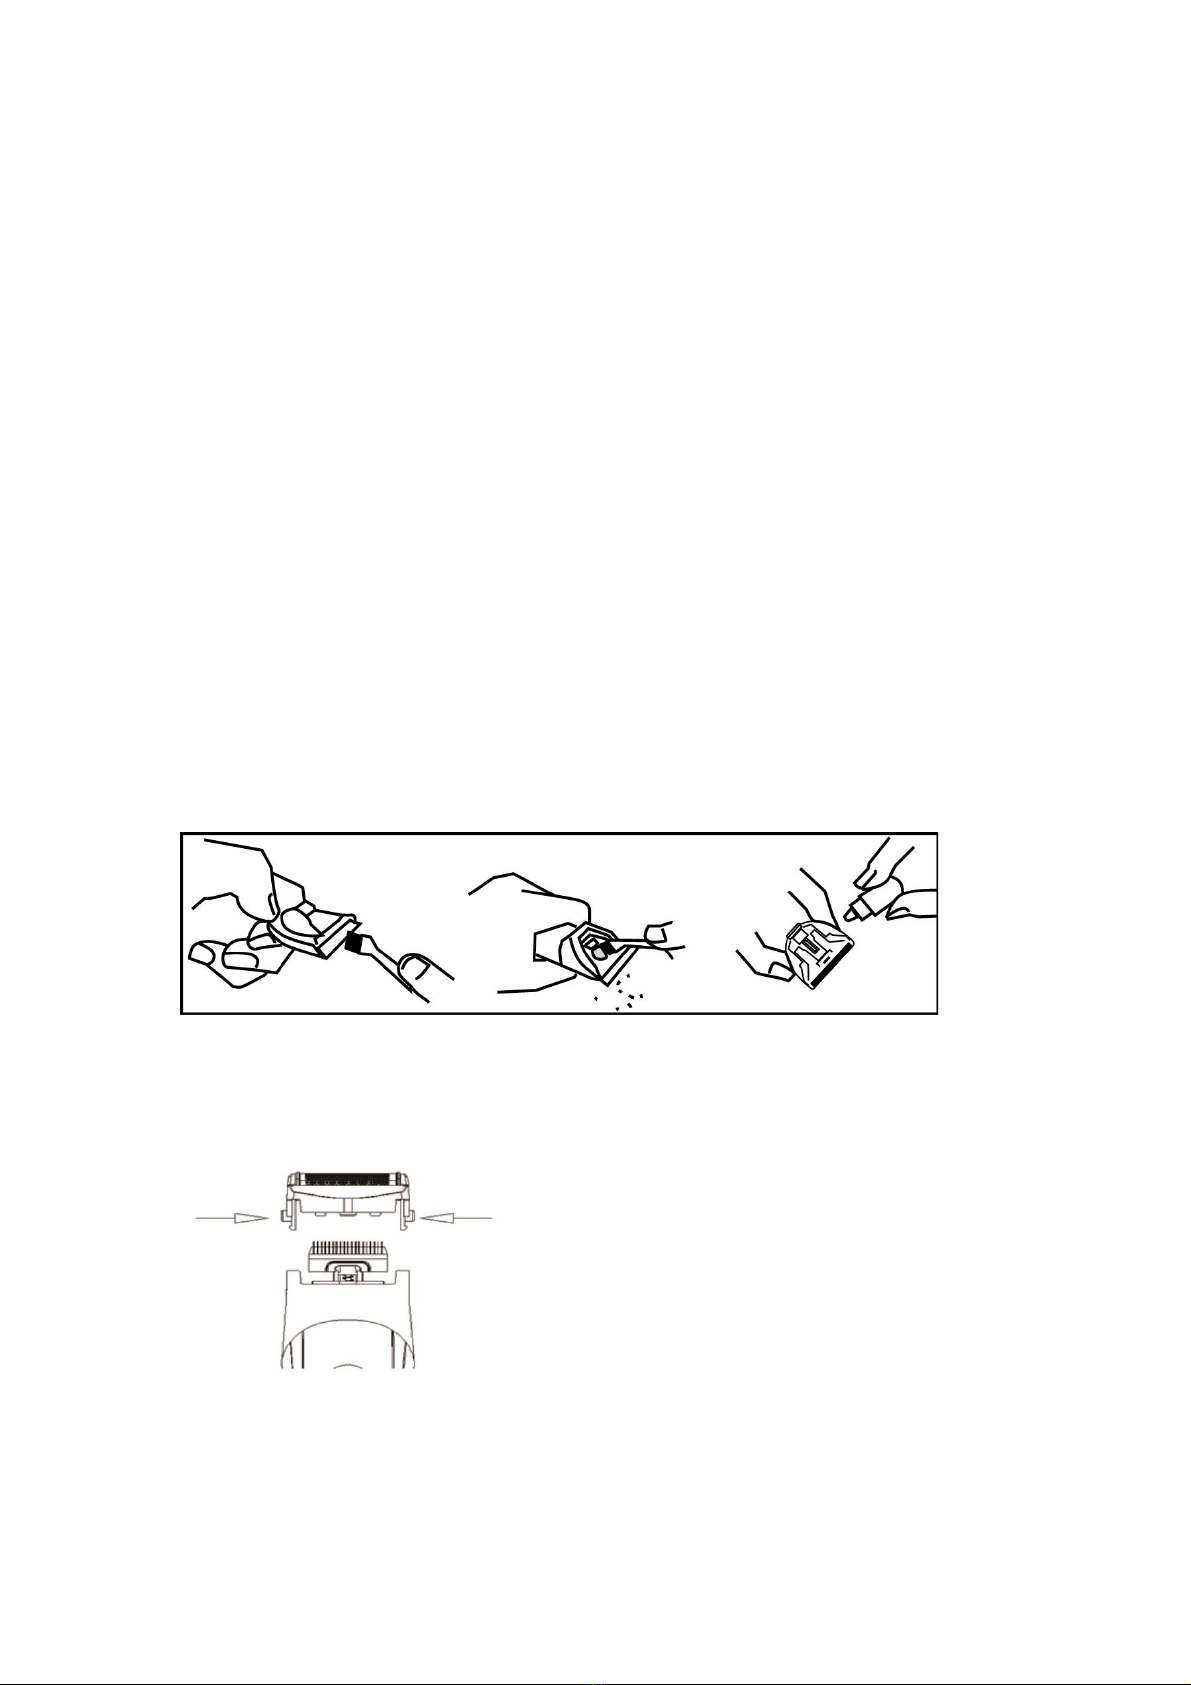
26. Detach the attachment heads for cleaning. Only the attachments can be washed under
tap water.
27. DO NOT submerge the appliance, nor make it flow under water-tap.
28. DO NOT use salt water or boiling water for cleaning. Also, do not use cleaning products
that are designed for toilets, bathrooms or kitchen appliances.
29. The groomer must be used only with the battery charger provided with the product
SW-050100AUL.

WARNING: Do not recharge non-rechargeable batteries.
WARNING: Before charging the product, please make sure your hands
are dry.
WARNING: Please use the charger we supplied with the appliance. Other
chargers may cause electrical failure and/or fire.
This product is not suitable to use in a bath or shower
SAVE THESE INSTRUCTIONS
FOR HOUSEHOLD USE ONLY

PARTS
17
1
Blade height adjusting switch
2
On/Off switch
3
Digital display
4
Hair Trimmer
5
Beard Trimmer
6
Precision Trimmer
7
Shaver
8
Nose and Ear Trimmer
9
Cleaning brush
10
Charger
11
Storage base
12
Hair trimmer attachment: 3mm length
13
Hair trimmer attachment: 6mm length
14
Hair trimmer attachment: 9mm length
15
Hair trimmer attachment: 12mm
length
16
Beard trimmer attachment: 3-6mm
length
17
Pouch
1
2
3
4
5
6
7
8
9
10
11
12
13
14
15
16

DISPLAY
1. Battery level
The number display 00..10..20....100
shows the percentage of battery
capacity.
2. Plug icon
The plug icon illuminates when the
groomer is charging OR when battery
level has dropped to 5% or lower.
3. Lock icon
When Travel lock is ON.
BEFORE FIRST USE
Charge the appliance for approx.1.5 hours before first use. Plug Icon will illuminate to indicate
the product is charging.
Please make sure the power is OFF before charging.
IMPORTANT! Use only the charger provided with the product SW-050100AUL.
CHARGING
1. Connect the DC plug of charger to the DC jack on the groomer.
2. Connect the charger to mains power (AC) outlet.
3. The Plug Icon will illuminate in RED.
4. It will take approx.1.5 hours to fully charge the batteries in the groomer.
IMPORTANT! Never charge the Groomer for more than 1.5 hours.
BATTERY CARE
To ensure maximum life of the rechargeable batteries in your grooming kit, follow these
guidelines:
•Do not recharge the unit between sessions. Wait until the batteries are exhausted before
recharging.
•Discharge the batteries completely twice a year (switch ON and run until the groomer stops).
•IMPORTATN! Do not use the groomer while charging.
•Do not charge the unit when the temperature is below 0°C or above 40°C
•Avoid recharging the unit in direct sunlight or near a radiating heat source.
OPERATING INSTRUCTIONS
Hair Trimmer
WARNING:
Switch off the device before replacing or changing the attachments
NOTES:
The hair to be dressed must be dry.
NOTES:
The cutting length may deviate depending on the cutting angle. Please start
with a comb attachment with a longer cutting length and then, in the course
of cutting process, use shorter cutting lengths step by step.

1. Select the desired hair trimming attachment.
2. Attach the hair trimmer to the main unit. Push on the attachment by inserting the bottom
bracket of the attachemnt into the slot of the main body then press the upper part of the
attachment onto the device until it audibly and firmly locks into place.
3. Insert comb attachments, press carefully over the hair trimmer head to the bottom end of
the comb attachemnt until it locks into place.
4. Turn on the hair clipper.
5. Start by cutting hair in neck or on the sides and cut towards the centre of the head. Then,
cut the front section of the hair towards the centre of the head.
6. Hold the device so the the comb attachment rests flat on the head. Move the device evenly
through the hair.
7. If possible, cut against direction of hair growth.
8. In order to catch all the hair, move the device several times through the same section of
the hair.
9. Comb the hair repeatedly and well.
10. To withdraw the blade, hold the groomer with both hands and press the blades out with
your thumb and support the blades at back to avoid falling.
Beard Trimmer
1. Slide the beard comb into the guiding grooves on both sides of the handle.
2. Slide the comb to the desired setting. The beard comb cuts hair to a length of
3-6mm.
3. Comb the beard in the direction of growth.
4. Cut the beard from the ear to chin downward.
5. Use the beard trimmer attachment without the comb attachment will cut the beard very
short or to cut the moustache and hairline.
Precision trimmer attachment
1. Use the precision trimmer attachment to shorten and shape your moustache, whiskers,
sideburns or eye brows.
2. Position the edge of the attachment at the desired height of the hair line and move the hair

trimmer.
Foil Shaver
1. Before using the shaver, always check it for wear and damage. If the shaver shows signs
of wear or damage, do not use or it may cause injury.
2. Pre-trim the contours desired with the hair trimmer or precision trimmer.
3. Gently press the shaver onto the skin and shave along contoured edges to remove any
stubbles. Do not press too hard.
4. Any areas that are harder to shave, such as chin, stretch the skin for a better result.
Nose/Ear Trimmer
1. Slowly insert the metal tip into one of your nostrils or ears.
2. Move the device in circles to cut the hair.
TRAVEL LOCK
•The Groomer has a switch lock function to prevent the unit from turning on accidentally.
•To set the lock, press and hold the On/Off switch for 3 seconds, the Lock Icon flashes then
goes off, the groomer is now locked.
•To exit lock mode, press and hold the On/Off switch for 3 seconds until digits shows up on
display and the groomer starts to function.
•When charging in travel lock mode, the unit will exit lock mode automatically.
CLEANING AND MAINTENANCE
Trimmer Head
•Always switch OFF the groomer before cleaning.
•Remove the accessory and the used blade. Clean it with the cleaning brush supplied with
the product.
•The cutting blades should be lightly oiled once every few haircuts.
Shaver Head
•Separate the foil from cutting blade by pressing both side buttons.
•Carefully clean using the cleaning brush provided.
•The cutting blades should be lightly oiled once every few months.
Grooming Unit
•Use a damp cloth to clean the main unit then dry it thoroughly.
•Storage the groomer and attachments in the pouch to prevent damage.

BATTERY DISPOSAL
The groomer must be disconnected from the mains power when removing the battery. The
battery is to be disposed safely. Used batteries should be taken to a recycling station and not
disposed of with household waste.
IMPORTANT: Always fully discharge the batteries before removal and ensure the
charger is disconnected from mains power.
TECHNICAL SPECIFICATIONS
Model no.
RFC-568
Working time
Up to 1.5 hour
Charging time
Approximately 1.5 hour
Battery Charger
SW-050100AUL
Input voltage
100-240V~ 50/60Hz
Output voltage
5V DC, 1000mA
Battery type
Li-ion, 700mAh, 3.7V (x1 cell)

12 Month Warranty
Thank you for your purchase from Kmart.
Kmart Australia Ltd warrants your new product to be free from defects in materials and
workmanship for the period stated above, from the date of purchase, provided that the
product is used in accordance with accompanying recommendations or instructions
where provided. This warranty is in addition to your rights under the Australian
Consumer Law.
Kmart will provide you with your choice of a refund, repair or exchange (where possible)
for this product if it becomes defective within the warranty period. Kmart will bear the
reasonable expense of claiming the warranty. This warranty will no longer apply where
the defect is a result of alteration, accident, misuse, abuse or neglect.
Please retain your receipt as proof of purchase and contact our Customer Service
Centre on 1800 124 125 (Australia) or 0800 945 995 (New Zealand) or alternatively,
via Customer Help at Kmart.com.au for any difficulties with your product. Warranty
claims and claims for expense incurred in returning this product can be addressed to
our Customer Service Centre at 690 Springvale Rd, Mulgrave Vic 3170.
Our goods come with guarantees that cannot be excluded under the Australian
Consumer Law. You are entitled to a replacement or refund for a major failure and
compensation for any other reasonably foreseeable loss or damage. You are also
entitled to have the goods repaired or replaced if the goods fail to be of acceptable
quality and the failure does not amount to a major failure.
For New Zealand customers, this warranty is in addition to statutory rights observed
under New Zealand legislation.
Table of contents
Other anko Grooming Kit manuals