Antifurto Arnia BeeSecure User manual

BEESECURE ANTI-THEFT DEVICE FOR BEEHIVES INSTRUCTIONS
Thank you for choosing BeeSecure, the first anti-theft device that allows you to remotely monitor
your hives in real time.
BeeSecure is simple to use and thanks to the rechargeable batteries it allows you to never
leave the hive unprotected, in fact you can replace them on the spot.
BeeSecure is safe, since bees and honey never come into contact with the electronic components.
It is also invisible from the outside of the hive because it’s completely integrated into the frame.
Below you will find the list of kit components and instructions for using your alarm.
KIT COMPONENTS
- BeeSecure anti-theft device;
- battery;
- connection cable;
- wooden holder.
INSTRUCTIONS
1) Download the b-secure App
Go to www.antifurtoarnia.it to download the app.
It is available for both iOS and Android devices
Activate the subscription for your device
If you have not already done so at the time of purchase, activate the subscription for each of
your devices.
Go to www.antifurtoarnia.it or contact us directly by calling 0546 042021
2) Open the app and create your account
• Click on "Register"

• Enter the requested information
• You are now registered!
Click on "Next" and you will find yourself on your account,
where you can see the main sections of the app.
3) The basic sections of your app
The 4 icons at the bottom of the screen represent the 4 sections into which the app is divided.
HOUSE LOGO - Main page: here you can find all your virtual hives, both those with which you
have associated an anti-theft device and those without it.
SQUARE LOGO - Scan: this page automatically opens the camera of your smartphone in order
to scan the barcode on the anti-theft device and associate it with one of the virtual hives that
you have created.
AVATAR LOGO- Profile: here you can find all your profile and contact information.
INFO ICON - Information and important links: here you can find links to sites for assistance,
news, offers and to renew the device's annual subscription.
4) Create your first virtual hive
In the home page, click on the "+" to create your first virtual hive.
Now give it a title and a description of your hive.
You can also add a photo of the hive to easily recognize it from the app.
Finally, click "Save".

Now on the main page you can see your first virtual hive.
5) Pair the device with your virtual hive
Click on the second "scan" icon menu at the bottom and go to the page "Scan code".
Select the virtual hive you want to connect to the device.
Then click on the blue button on the bottom right corner.

The camera will open.
Align the barcode found underneath the device.
Align the red line on the screen with the code.
The application will recognize the barcode
Click on "save".
Now your burglar alarm is associated with the virtual hive you picked.
6) Anti-theft device activation
Check that in the virtual hive page the alarm is in active mode.
Now, in the hive to which you connected the device to, a "GPS" icon should have appeared
under the “alarm” activation area.
By clicking on the GPS icon, you will have access to all information collected by the device.
You can also check the expiration date of your subscription and battery charge level.

7) The battery
Insert the battery in the alarm paying attention to the polarities, as shown here:
Wait for the device to send you a notification to your mobile phone (takes about 2 minutes).
Now check the state of charge of the battery from the App. If it’s above 90% you can proceed
with the installation of the device.
The battery is equipped “strings” to be able to remove it easily without damaging it.
In case the battery is low:
- recharge it by connecting the cable to the device as shown below:
- or replace it with a charged battery.

You can purchase an additional battery and a battery charger.
8) Inserting the anti-theft device into the frame
Unscrew the screws on the edge of the frame and remove the wooden holder.
Wrap the device (only the part containing the battery) with plastic wrap.
Insert the device into the cavity of the wooden holder, leaving the battery facing upwards.

Insert the holder with the device into the bottom of the frame and tighten the side screws again.
Insert the wax sheet in the frame. Now the frame with the device is ready to be placed inside the
hive. The first time you turn it on, the device will take a few minutes to detect your position since
it takes some time to reach all the satellites and save them.
From now on the device is active!
On the next page you will find the information in the app by clicking on the GPS icon of a virtual
hive that the device is associated with. You will be able to see this data:
- GPS position with Google Maps
- temperature,
- humidity,
- subscription expiration date,
- battery charge level,
- last daily connection.

9) Adjusting the sensitivity
There is the possibility to adjust the sensitivity of the device.
Move the cursor to:
- right to increase sensitivity;
- Left to decrease sensitivity.
Even if you put the sensitivity to the minimum (far left), if the hive is raised, the device will still be
capable of detecting movement.
10) Removing the battery
The removal phase of the battery is very important and delicate. Use the appropriate tabs to pull
and remove the battery.
Alternatively, use a pick or a similar tool, pushing it out from the sides.
Battery removal not carried out the recommended way could damage the coating.
Battery consumption in the various modes of use:
Situation 1: the device is active in the app and the hive is not moving. In this mode the device
is always off, it switches on only once a day for about 10 seconds to send temperature and
humidity data as well as the battery charge level to the app. In this mode, the battery lasts about
6 months.
Situation 2: the device is disabled in the app. In this mode the device sends data to the app
once an hour (whether the hive is stationary or in movement) to check whether it has been
switched on again and whether it can then resume normal activity. In this mode the battery
consumption is average, which means that it consumes less than in Situation 3, but more than
in Situation 1. Leaving the device in Situation 2 for too many days means that battery
consumption will increase significantly.

Situation 3: the device is active from the app and the hive is moving. It is the case of theft or
displacement of the hive. In this situation the device continuously sends its GPS position to the
app and the consumption of the battery is high to ensure the recovery of the stolen hive.
Battery warnings
Attention: incorrect use of rechargeable batteries can lead to damage of the device and the
objects that surround it. The battery that is not used according to the following indications may
result in explosions and fires.
For charging use only the charging function of the device or a charger specifically built for the
battery. During charging, never leave the battery unattended and do not place it near flammable
objects. The use of special fireproof bags is recommended.
Do not charge the battery in temperatures below 5 ° C or above 40 ° C
Do not use the battery in temperatures below -10 ° C or above 55 ° C
Do not leave the battery dead and remove it from the device when it drains.
Do not leave the battery dead for a long time.
Do not leave the battery exposed to the sun or rain.
Do not short circuit the battery and do not place it together with metal parts that could come into
contact with the terminals.
Do not immerse the battery in water.
Do not attempt to open the battery.
Do not drop or let children play with the battery.
Do not use a battery that has dents.
Do not puncture or damage the battery in any way and do not use it when the plastic protection
film is damaged, especially if the white protective ring around the positive terminal is absent.
The battery contains pollutants, dispose of the battery in appropriate disposal centers.
Battery: warnings
Do not use the battery if it has damaged insulation on the positive terminal
Important tips
Remember to deactivate the device before moving the hive, to avoid false alarms or
drain the battery. Remember to reactivate the alarm once the work in the hive is finished.
If the device is located in an area covered by cellular service, it will send the charge level data of
the battery to the app once every two days.
You can also buy a replacement battery and a battery charger in order to never leave the hive
unprotected and recharge dead batteries at home without removing the device from the hive.

If you place the device in an area without cellular coverage, the device will activate at the first
vibration and transmit the position as soon as it is in an area with a cellular signal. The device
uses a multi-operator sim card capable of connecting to all telephone operators.
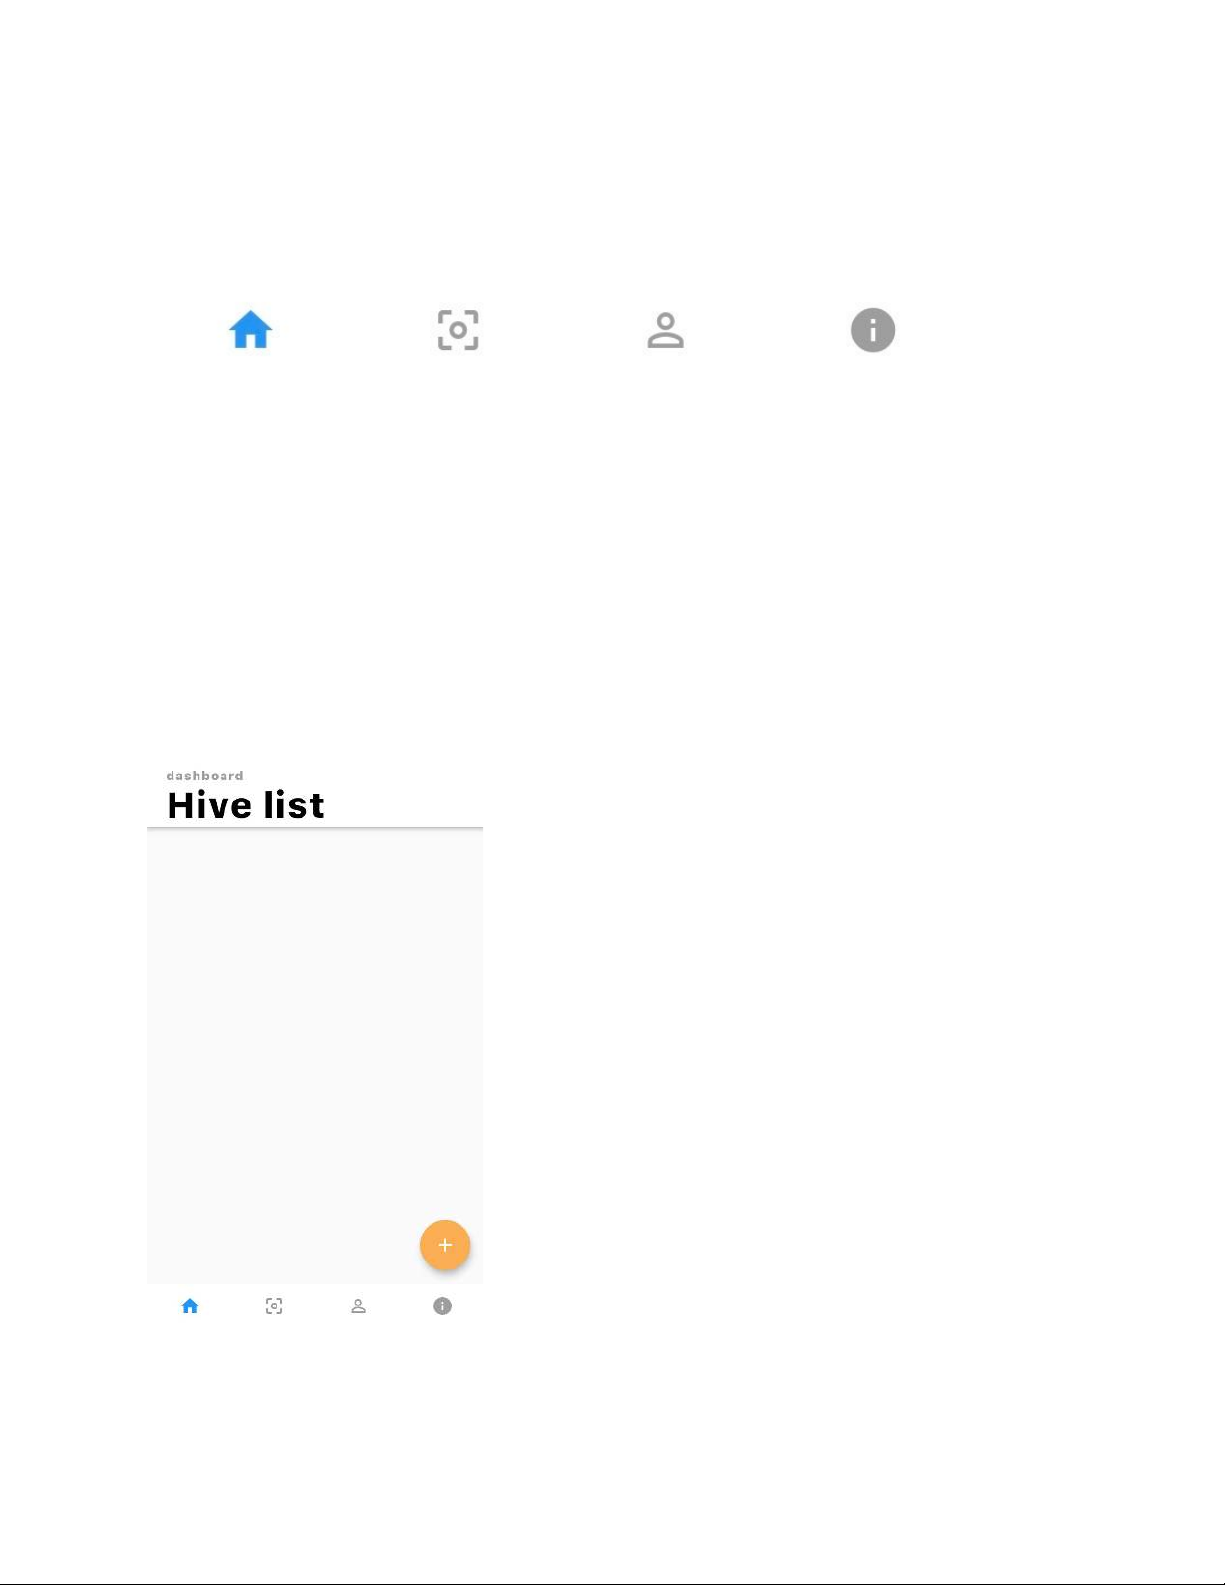
Do you want to monitor your hive with more than one smartphone? Download the application on
each smartphone, create the virtual hive and scan the barcode. This way more people will be
able to intervene in case of theft.
Frequently asked questions
Once I have fully charged the device, how long can it last?
With a regular use of the device you can have up to 6 months of activity. Remember that when
performing maintenance on the hive, to avoid unnecessary updates from the device, you must
deactivate it through the appropriate button in the app.
I deactivated and reactivated the device, I am moving it but it is not transmitting. Why?
Once deactivated, the device remains insensitive to vibrations for a time varying between 2 and
4 hours after reactivation. Once this period of time is over, the device will return to protecting the
hives without the need for further action on your part.
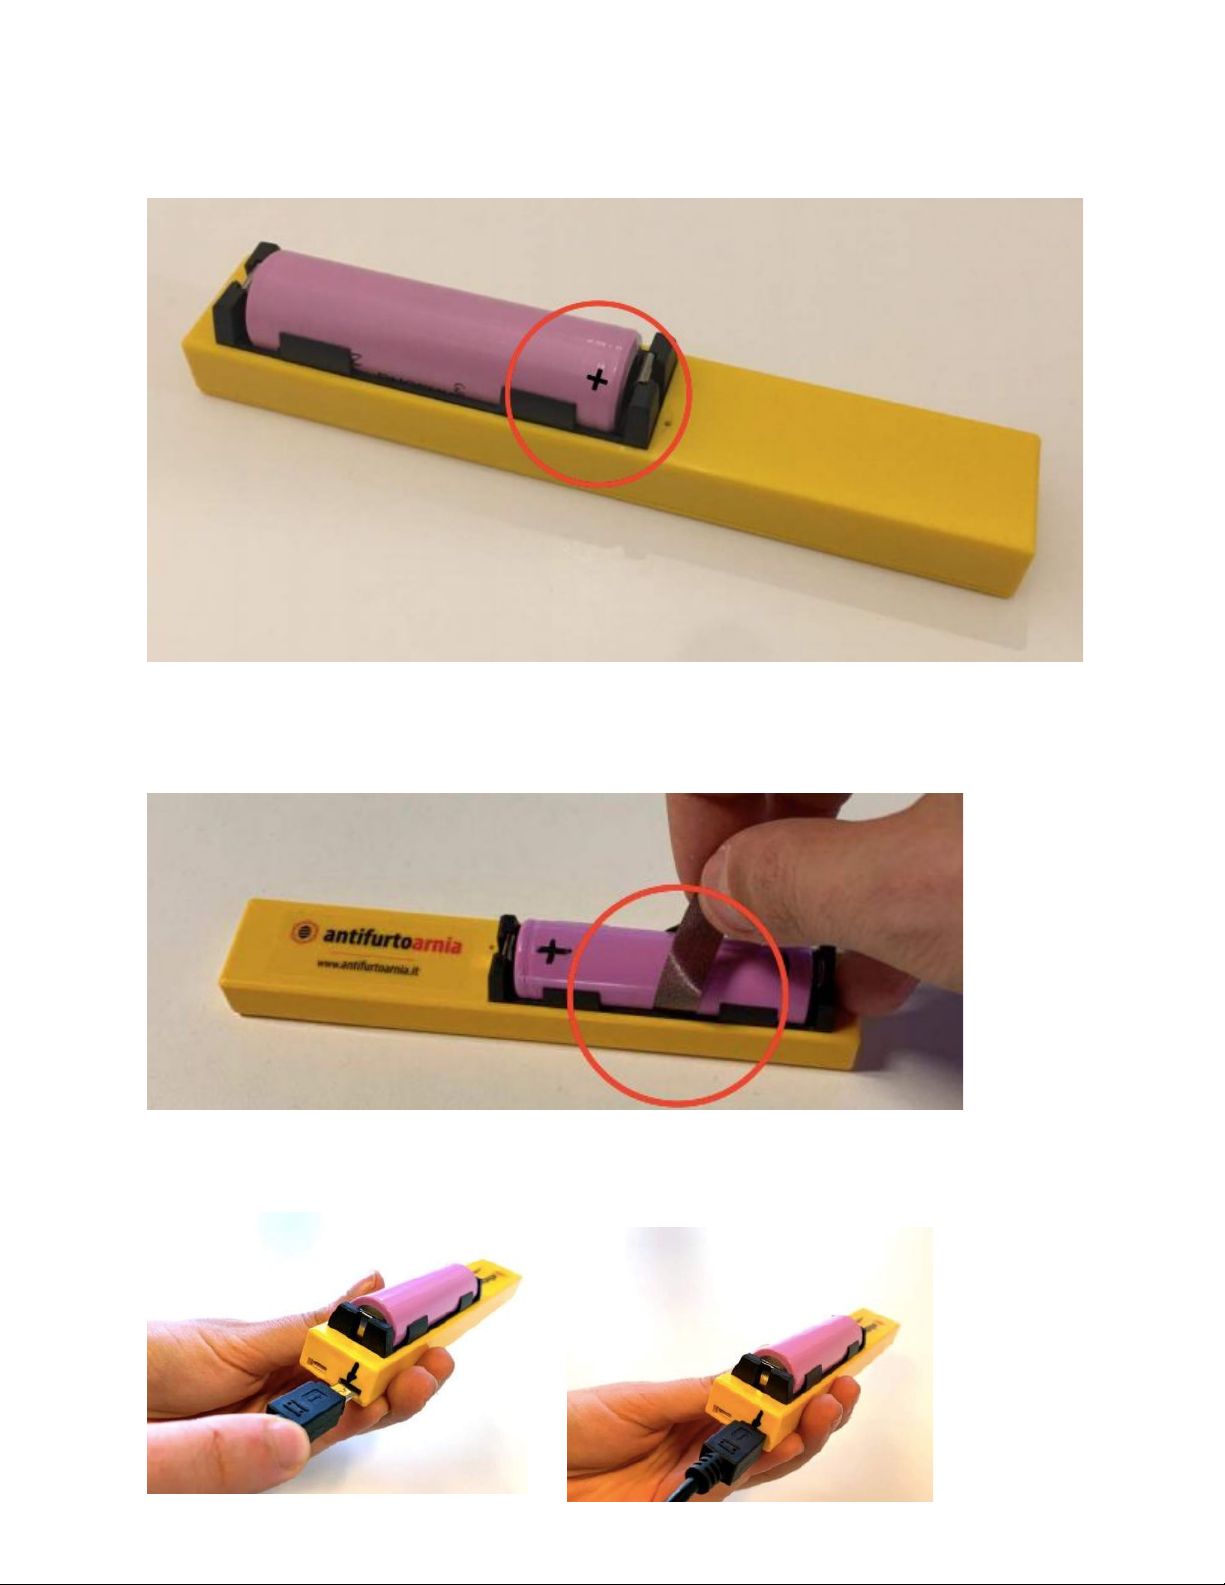
Where should I place the device?
The anti-theft device must only be inserted into the appropriate cavity in the wooden anti-theft
holder, to prevent bees from coming into direct contact with the device.
How accurate is the GPS?
The GPS in the open field has an accuracy of up to one meter, however it’s possible that, in the
presence of obstacles or because of poor signal, the decreased number of satellites detected-
the error in the position can increase to up to 30 meters.
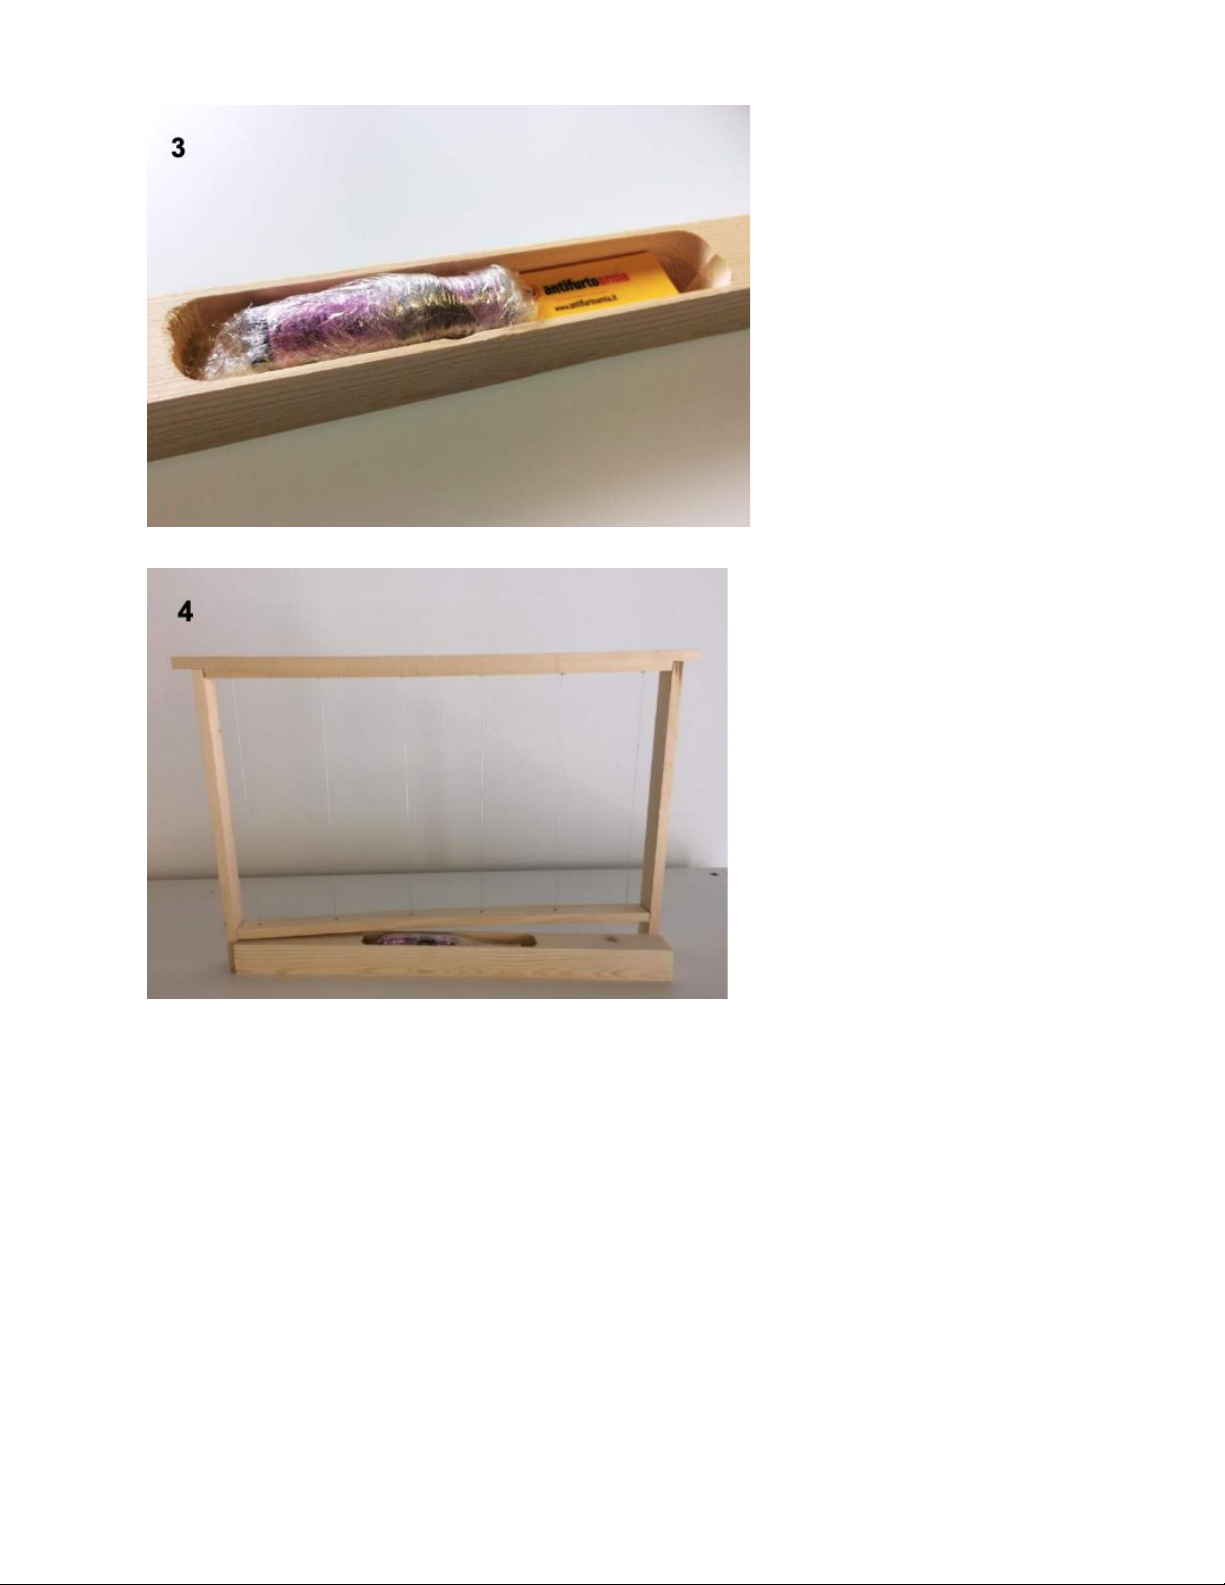
Can I install the burglar alarm in the frames?
The device is supplied with the bottom nest frame holder, which can be modified to be inserted
in the bottom of the frame. It is important not to install the device outside the wooden holder.
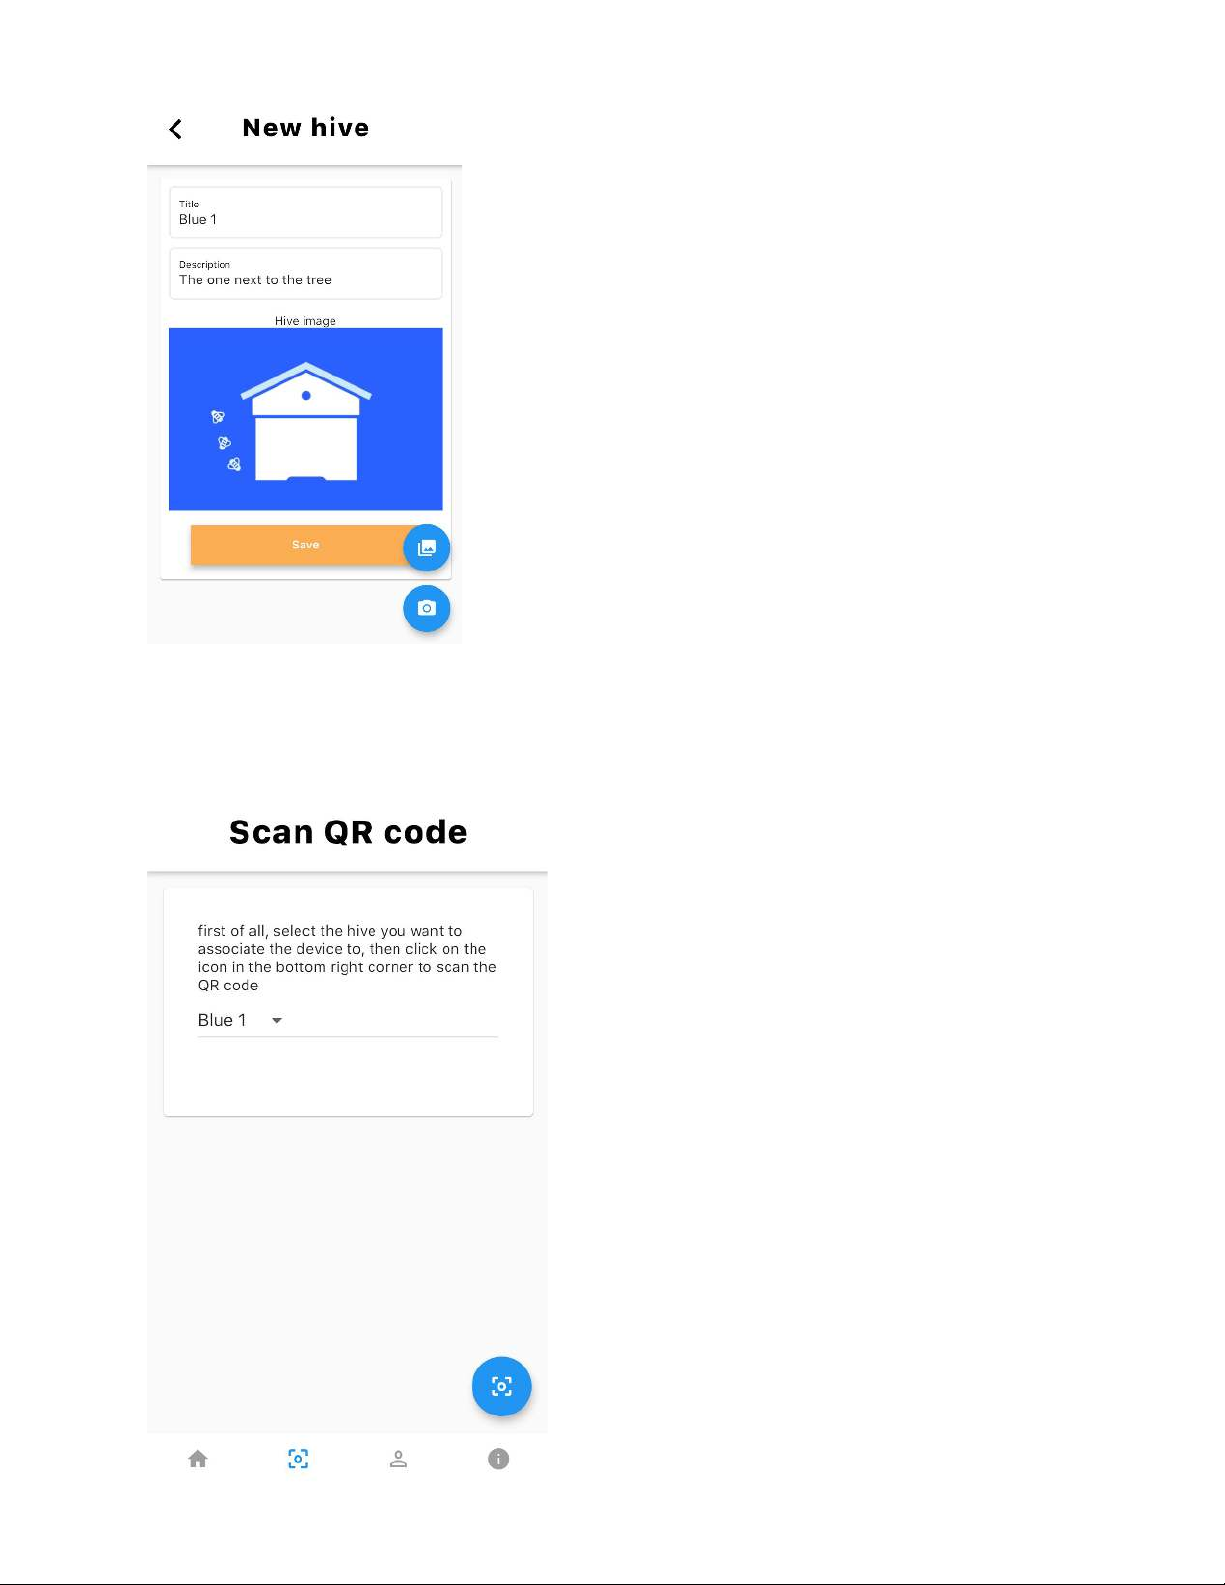
How does the app work?
When the device is activated (from the app) and a vibration or movement is detected in the hive,
a notification will arrive to your mobile phone and once the app is opened, the hive that is taken
will be red instead of green. By opening the app, the hive that was moved (and which appears
red), the system cancels the alarm and makes the hive green again, waiting for a new possible
vibration or displacement. When the alarm is deactivated, the hive screen is white.
Does the annual subscription need to be renewed for each individual device?
Subscription devices expired are automatically blocked and do not send or receive
communications.
For more information and assistance:
www.antifurtoarnia.it
info@antifurtoarnia
+39 0546 042021
Table of contents