Antylia Scientific Cole-Parmer PB-350 Series User manual

User Manual
PB-350 SERIES BALANCES


Table of Contents
1INTENDED USE ............................................................................................................................................................................................................................... 1
2PRECAUTIONS ............................................................................................................................................................................................................................... 1
2.1 Accumulator / Battery Pack ...................................................................................................................................................................................................... 2
2.2 Operation in a Strong Electrostatic Field.................................................................................................................................................................................. 2
2.3 Maintenance Activities ............................................................................................................................................................................................................. 2
3WARRANTY CONDITIONS ............................................................................................................................................................................................................. 3
4UNPACKING AND ASSEMBLY ...................................................................................................................................................................................................... 3
5GETTING STARTED ........................................................................................................................................................................................................................ 4
6BALANCE LEVELING ..................................................................................................................................................................................................................... 5
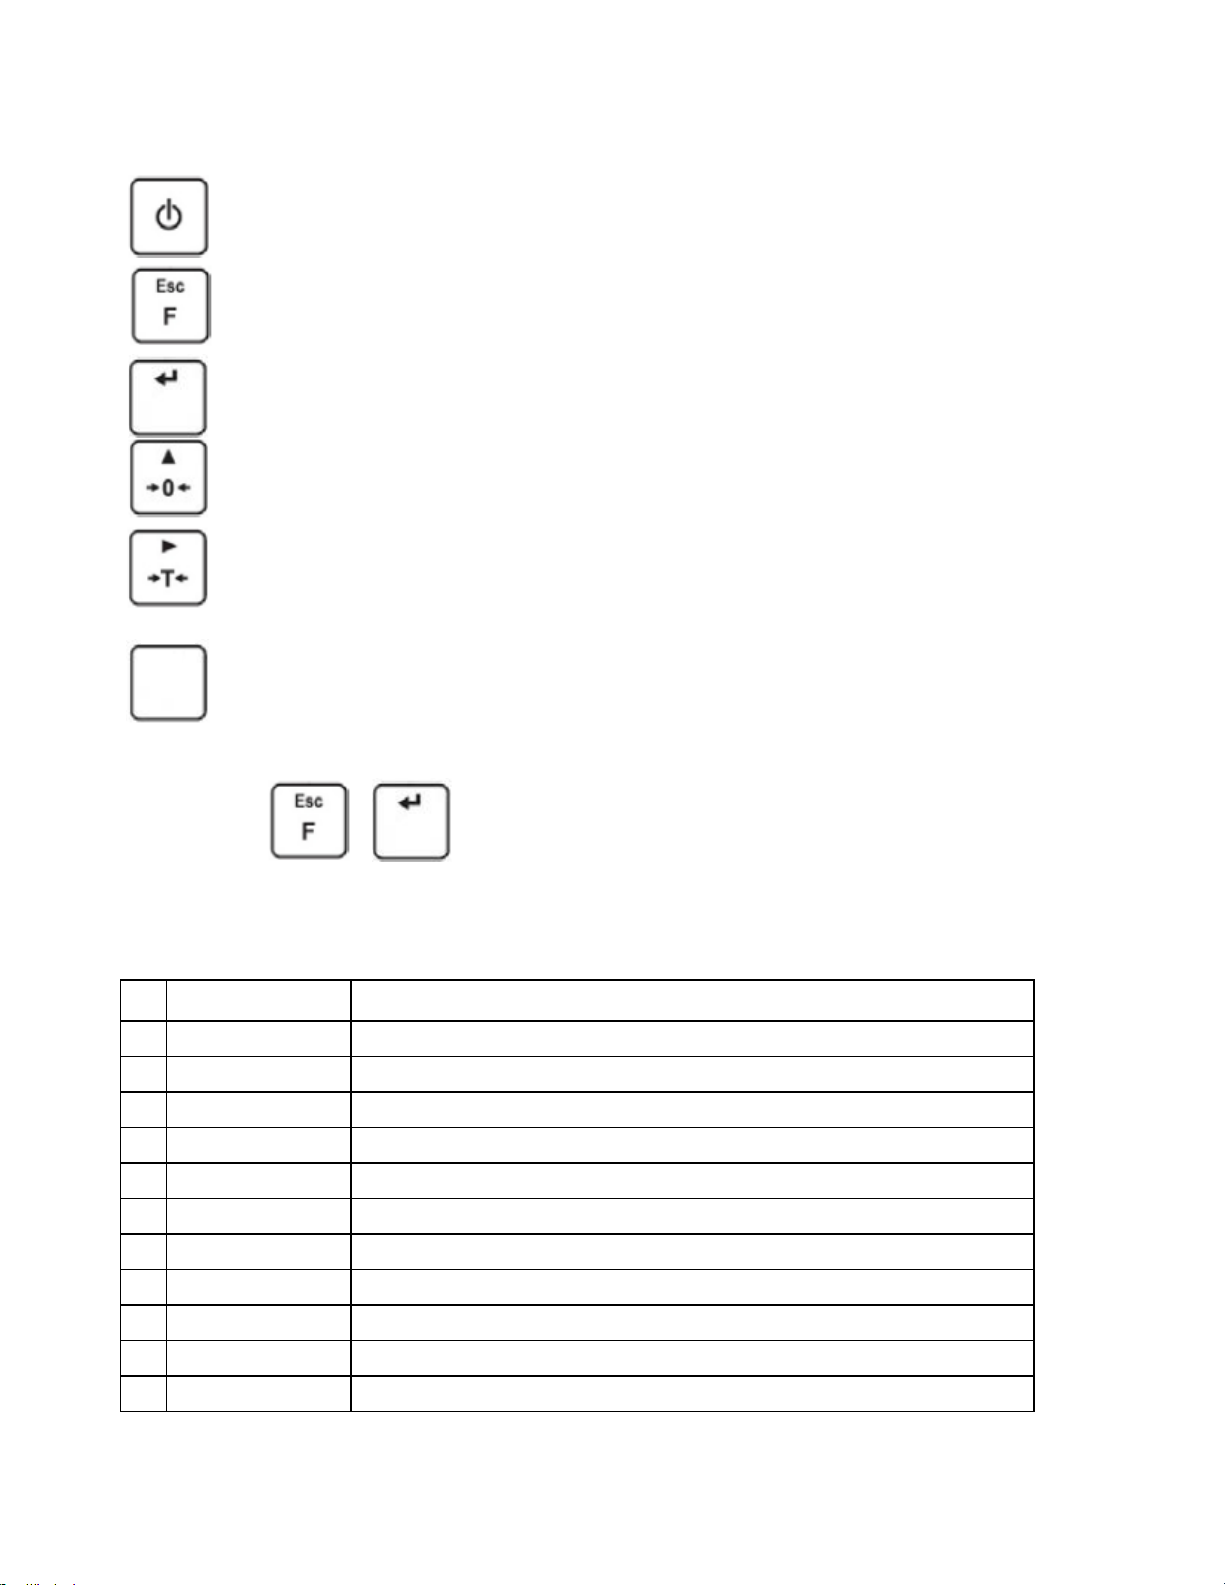
7KEYPAD ........................................................................................................................................................................................................................................... 5
8KEYS’ FUNCTIONS ......................................................................................................................................................................................................................... 6
9INSCRIPTIONS ON THE DISPLAY ................................................................................................................................................................................................. 6
10 USER MENU .................................................................................................................................................................................................................................... 7
10.1 Submenus ................................................................................................................................................................................................................................. 7
10.2 Browsing User Menu ................................................................................................................................................................................................................. 8
10.3 Keypad ...................................................................................................................................................................................................................................... 8
10.4 Return to the Weighing Mode ................................................................................................................................................................................................... 9
11 WEIGHING ....................................................................................................................................................................................................................................... 9
11.1 Taring ...................................................................................................................................................................................................................................... 10
11.2 Inscribing Tare Value .............................................................................................................................................................................................................. 10
11.3 Zeroing .................................................................................................................................................................................................................................... 11
11.4 Selection of Start Weighing Unit ............................................................................................................................................................................................. 11
11.5 Temporarily Selected Unit ....................................................................................................................................................................................................... 12
12 SCALE CALIBRATION ................................................................................................................................................................................................................. 12
12.1 External Calibration ............................................................................................................................................................................................................... 12
12.2 User Calibration ..................................................................................................................................................................................................................... 13
12.3 Manual Internal Calibration ................................................................................................................................................................................................... 13
12.4 Automatic Internal Calibration ............................................................................................................................................................................................... 13
12.5 Automatic Internal Calibration Time ...................................................................................................................................................................................... 14
12.6 Calibration Test ..................................................................................................................................................................................................................... 14
12.7 Calibration Report .................................................................................................................................................................................................................. 15
13 MAIN SCALE PARAMETERS...................................................................................................................................................................................................... 15
13.1 Filter ..................................................................................................................................................................................................................................15
13.2 Value Release ....................................................................................................................................................................................................................... 15
13.3 Ambient Conditions ............................................................................................................................................................................................................... 15
13.4 Autozero Function .................................................................................................................................................................................................................. 16
13.5 Tare Function ......................................................................................................................................................................................................................... 16
13.6 Tare: Enter Mode ................................................................................................................................................................................................................... 16
13.7 Tare: Values Memory ............................................................................................................................................................................................................ 17
13.7.1. Entering Tare Value to the Weighing Device Memory .............................................................................................................................................. 17
13.7.2. Selecting Tare Value from the Weighing Device Memory ......................................................................................................................................... 17
13.8. Last Digit ................................................................................................................................................................................................................................ 18
14 COMMUNICATION ........................................................................................................................................................................................................................ 18
14.1 RS232 (1) Port ....................................................................................................................................................................................................................... 18
14.2 RS232 (2) Port ....................................................................................................................................................................................................................... 18
14.3 USB A Port ............................................................................................................................................................................................................................ 18
14.4 USB B Port ............................................................................................................................................................................................................................ 19
15 PERIPHERAL DEVICES ............................................................................................................................................................................................................... 19
15.1 Computer ............................................................................................................................................................................................................................... 19
15.1.1. Computer Port ............................................................................................................................................................................................................ 19
15.1.2. Continuous Transmission ........................................................................................................................................................................................... 19
15.1.3. Printout Interval for Continuous Transmission ........................................................................................................................................................... 19
15.2. Printer ...................................................................................................................................................................................................................................20
15.2.1. Printer Port ................................................................................................................................................................................................................. 20
15.3. Additional Display .................................................................................................................................................................................................................. 20
15.3.1. Additional Display Port ............................................................................................................................................................................................... 20
16 PRINTOUTS ................................................................................................................................................................................................................................... 20
16.1 Calibration Report .................................................................................................................................................................................................................. 20
16.2 GLP Printout .......................................................................................................................................................................................................................... 21
16.3 Variables List ......................................................................................................................................................................................................................... 21
17 OTHER PARAMETERS ................................................................................................................................................................................................................ 22
17.1 Backlight ................................................................................................................................................................................................................................ 22
17.2 'Beep' Sound.......................................................................................................................................................................................................................... 22
17.3 Automatic Shutdown.............................................................................................................................................................................................................. 22
17.4 Date and Time ....................................................................................................................................................................................................................... 23
17.5 Default User Settings ............................................................................................................................................................................................................. 23
18 SCALE DATA................................................................................................................................................................................................................................. 23
19 WORKING MODES ....................................................................................................................................................................................................................... 23
19.1 Running Working Mode ......................................................................................................................................................................................................... 24
19.2 Working Modes Local Settings .............................................................................................................................................................................................. 24
19.2.1. Working Mode Accessibility ....................................................................................................................................................................................... 24
19.2.2. Save Mode ................................................................................................................................................................................................................. 25
19.2.3. Automatic Printout Time Interval ................................................................................................................................................................................ 25
19.2.4. Lo Threshold .............................................................................................................................................................................................................. 25
20 WORKING MODE – WEIGHING ................................................................................................................................................................................................... 26
20.1 Local Settings ........................................................................................................................................................................................................................ 26

21 WORKING MODE – PARTS COUNTING...................................................................................................................................................................................... 26
21.1 Local Settings ........................................................................................................................................................................................................................ 26
21.1.1. Selecting Working Mode ............................................................................................................................................................................................ 26
21.2. Setting Sample Mass by Entering Mass of a Single Part ..................................................................................................................................................... 26
21.3. Setting Sample Mass by Determining Mass of a Single Part ............................................................................................................................................... 27
22 WORKING MODE – +/- CONTROL ............................................................................................................................................................................................... 28
22.1 Local Settings ........................................................................................................................................................................................................................ 28
22.2 Declaring Checkweighing Thresholds ................................................................................................................................................................................... 28
23 WORKING MODE – PERCENT WEIGHING ................................................................................................................................................................................. 28
23.1 Local Settings ........................................................................................................................................................................................................................ 28
23.1.1. Selecting Working Mode ............................................................................................................................................................................................ 29
23.2. Reference Sample Mass Determined by Weighing ............................................................................................................................................................... 29
23.3. Reference Sample Mass Determined by Entering the Mass Value ....................................................................................................................................... 29
24 WORKING MODE – PEAK HOLD ................................................................................................................................................................................................. 29
24.1 Local Settings ........................................................................................................................................................................................................................ 29
24.2 Peak Hold Operation.............................................................................................................................................................................................................. 30
25 WORKING MODE – TOTALIZING ................................................................................................................................................................................................ 30
25.1 Local Settings ........................................................................................................................................................................................................................ 30
25.2 Totalizing Operation ............................................................................................................................................................................................................... 30
25.3 Report Example ..................................................................................................................................................................................................................... 31
26 WORKING MODE – ANIMAL WEIGHING .................................................................................................................................................................................... 31
26.1 Local Settings ........................................................................................................................................................................................................................ 31
26.2 Animal Weighing Operation ................................................................................................................................................................................................... 31
27 IMPORT/EXPORT .......................................................................................................................................................................................................................... 32
27.1 Weighing Records Export ...................................................................................................................................................................................................... 32
27.2 ALIBI Weighings Export ........................................................................................................................................................................................................ 32
27.3 Parameters Export / Import ................................................................................................................................................................................................... 32
28 DIAGRAMS OF CONNECTION CABLES ..................................................................................................................................................................................... 33
29 ERROR COMMANDS .................................................................................................................................................................................................................... 34
30 UNDER-PAN WEIGHING ............................................................................................................................................................................................................... 34
31 MAIN DIMENSIONS ....................................................................................................................................................................................................................... 36
32 TROUBLE SHOOTING .................................................................................................................................................................................................................. 38

1
1 INTENDED USE
Cole-Parmer® PB-350 Series precision scales enable fast and accurate mass measurements under
laboratory and industrial conditions. The devices are equipped with an internal battery which
allows their operation in places where there is no access to the mains. The PB-350 Series features
a stainless-steel weighing pan, and a backlit LCD guaranteeing clear weighing result presentation.
2 PRECAUTIONS
Prior to installation, use or maintenance activities, carefully read this user manual and follow the
provided guidelines.
Prior to the first use, carefully read this user manual. Use the weighing device only as
intended.
Place weighed loads in the center of the weighing pan.
Load the weighing pan with loads of gross weight which does not exceed the maximum
capacity.
Do not leave heavy loads on the weighing pan for longer periods of time.
Protect the indicator against considerable temperature variation, solar and UV radiation,
substances causing chemical reactions.
The PB-350 scale must not be operated in hazardous areas endangered with
explosion of gases, and in dusty environments.
In case of damage, immediately unplug the device from the mains.
Scales to be decommissioned must be decommissioned in accordance with valid legal
regulations.
Do not let battery discharge in case of prolonged storage of the device in low
temperature.
Accumulators do not belong to regular household waste. The European legislation
requires discharged accumulators to be collected and disposed separately from other
communal waste with the aim of being recycled. Symbols on batteries identify harmful
compounds: Pb = lead, Cd = cadmium, Hg = mercury. Dear user, you are obliged to
dispose of the worn out batteries as regulated.
If the scale is to be operated in conditions that are difficult due to electrostatics (e.g.
printing house, packing center, etc.), you must connect it to the earth wire. To enable this,
the device features functional earthing terminal, marked with symbol.

2
2.1 Accumulator / Battery Pack
The device connected to mains power monitors the battery state and charges it if possible. After
sudden lack of power supply from the mains the device automatically switches to accumulator
without breaking operation.
Cole-Parmer PB-350 scales (20kg and below capacity) are devices designed to be supplied
from SLA accumulators (Sealed lead acid type) 6V and capacity 3 to 4Ah charged while
connected to mains without stopping operation.
A worn
-out battery can be replaced only by the manufacturer or by the authorized
service.
Caution:
Some symbols on accumulators identify harmful elements/compounds: Pb = lead,
Cd = cadmium, Hg = mercury.
2.2 Operation in a Strong Electrostatic Field
Connect it to the clamp terminal signed .
2.3 Maintenance Activities
It is necessary to uninstall the weighing pan and other detachable components prior
to cleaning the balance, this guarantees safety.
Cleaning the weighing pan while still installed may cause
damage of the measuring system.
Cleaning ABS components
To clean dry surfaces and avoid smudging, use clean non-coloring cloths made of cellulose or
cotton. You can use a solution of water and detergent (soap, dishwashing detergent, glass
cleaner). Gently rub the cleaned surface and let it dry. Repeat cleaning process if needed.
Cleaning stainless steel components
Avoid using cleansers containing any corrosive chemicals, e.g. bleach (containing chlorine). Do not
use abrasive substances. Always remove the dirt using microfiber cloth to avoid damage of
protective coating.
In case of a daily maintenance:
2.
For best results, add a little dishwashing detergent.

3
Cleaning powder-coated components
For the preliminary cleaning stage, you need a wet sponge featuring large holes, this will
help you to remove loose, heavy dirt.
Do not use cleansers containing abrasive substances.
Next using cloth and cleanser-water solution (soap, dishwashing liquid) gently rub the cleaned
surface.
Avoid using cleanser without water since it may result in damage of the cleaned surface, please
note that large amount of water mixed with cleanser is a must.
3 WARRANTY CONDITIONS
A.
Cole-Parmer is obliged to repair or change those elements that appear to be faulty because
of.production and construction reason,
B.
Defining defects of unclear origin and outlining methods
of elimination, can be settled only in participation of a user and the manufacturer
representatives,
C.
Cole-Parmer does not take any responsibility connected with destructions or losses derives
from non-authorized or inappropriate (not adequate to manuals) production or service
procedures,
D.
Warranty does not cover:
•
Mechanical failures caused by inappropriate maintenance of the device or failures of
thermal or chemical origin or caused by atmospheric discharge, over voltage in mains, or
other random event,
•
Inappropriate cleaning.
E.
Loss of warranty appears after:
•
Access by an unauthorized service
•
Intrusion into mechanical or electronic construction of, unauthorized
people
•
Removing or destroying protection stickers.
4 UNPACKING AND ASSEMBLY
Models: PB-350-1000(i), PB-350-2000(i), PB-350-6000(i), PB-350-10000, PB-350-20000
•
Unpack and put the scale on a flat even stable surface far away from sources of heat,
•
Install the weight pan according to the drawing below:

4
5 GETTING STARTED
•
After unpacking and mounting the scale, level the scale. Adjust the leveling feet until the
leveling bubble reaches the correct location.
Turn the device on using the key – keep pressing the key for about 0.5 sec
•
Wait for the test completion
-stable result
kg - weight unit

5
6 BALANCE LEVELING
•
Operation temperature range for this device is outlined as
+15oC to +30oC;
•
After powering up this device requires 30 minute warming up
•
During the warm-up time the indication can change
•
User calibration should be performed after the warm-uptime.
•
Temperature and humidity changes during operation can increase measurement errors, which
can be minimized by performing the user calibration process.
7 KEYPAD
PB-350-1000, PB-350-2000, PB-350-6000, PB-350-10000, PB-350-20000
PB-350-2000i, PB-350-6000i

6
8 KEYS’ FUNCTIONS
Switching on/off
Function key (working mode selection)
Enter key/sending a weighing result to printer or computer
Zeroing
Taring
Manual internal calibration (.HC models only)
Notice:
After pressing
+
keys’ functions changes. The way of operation in this mode is
described in details further in this manual.
9 INSCRIPTIONS ON THE DISPLAY
No Text string Description
1
FIL
Filter level
2
bAud
Transmission baud rate
3
PCS
Piece counting
4
HiLo
+/- control according to a standard mass
5
rEPL
Automatic printout
6
StAb
The condition of printing data
7
Auto
Autozero correction
8
t1
Power save – time to switch off while no operation
9
toP
Latch of the max measurement
10
Add
Totalizing
11
AnLS
Weighing animals
CAL
ENTERENTER
ENTER

7
12
tArE
Memory of 9 tare values
13 Indication in autozero zone (indication = exact zero)
14 Stable result (ready to read)
15
PCS
Operation mode - counting pieces
16
kg (g)
Operation mode - weighing
17 Rechargeable battery pack or battery discharged (BAT-LO)
18
Net
Tare function has been used
19 Min
+/- control with reference to the standard mass: setting the
lower threshold or mass below the first threshold
20 OK
+/- control with reference to the standard mass: load
mass between the thresholds
21 Max
+/- control with reference to the standard mass: setting the
upper threshold or mass over the second threshold
10 USER MENU
10.1 Submenus
User’s menu is divided into 9 basic submenus. Each group has its own characteristic name
preceded by the letter P and a number.
P1.CAL
1.1.CA-E
External Calibration
1.2.CA-u
User Defined Calibration
1.4.AtS
Automatic Internal Calibration ("i" models only)
1.5.ACL
Automatic Internal Calibration conditions ("i"
models only)
1.6.CAC
Automatic Calibration Time Setting
P2.rEAD
2.1.FiL
Filter Level
2.2.APPr
Value Release
2.3Enut
Ambient Conditions
2.4.Aut
Autozero Function
2.5.tArA
Tare Function
2.6.ttr
Tare: Enter mode
2.7.tArn
Tare: Values Memory
2.8.LdiG
Last Digit
P3.Func
3.1.UUGG
Weighing
3.2.PcS
Parts Counting
3.3.HiLo
+/- Control
3.4.dEu
% Weighing
3.5.toP
Peak Hold
3.6.Add
Totalizing
3.7.AnLs
Animal Weighing
P4.Conn

8
4.1.rS1
RS232 (1) Port
4.2.rS2
RS232 (2) Port
P5.duce
5.1.PC
Computer
5.2.Prtr
Printer
5.3.AdSP
Additional Display
P6.Prnt
6.1.CrEP
Calibration Report
6.2.GLP
GLP Printout
P7.Othr
7.1.bLbt
Backlight
7.2.bEEP
‘Beep’ Sound
7.3.t1
Automatic Shutdown
7.4.SdAt
Current Date
7.5.Stnn
Current Time
7.6.FdAt
Date Format
7.7.Ftin
Time Format
7.8.dFLu
Default User Settings
P8.InFo
8.1.Fab
Serial Number
8.2.PurS
Program Version
8.4.PstP
Settings Printout
P9.Unit
9.1.UnSt
Start unit
9.2.Unin
Temporary Unit
10.2 Browsing User Menu
Use scale’s keys to move inside the menu.
10.3 Keypad
+
Press to enter the main menu.
+
Press to:
•enter tare manually.
•enter tare from tare database,
•change value by 1 digit up,
•scroll the menu up.
+
Press to check battery/accumulator state.
+
Press to view date/time.
Press to:
•scroll the menu down,
•change current parameter value.
ENTERENTER
ENTER

9
Press to:
•enter given submenu,
•modify given parameter.
Press to confirm modification.
Press to:
•exit, function remains unmodified,
•move one menu level up.
10.4 Return to the Weighing Mode
The changes that have been introduced should be saved in order to keep them in the
memory for good.
While leaving parameters press key until the text <SAuE?> appears on the
display. Then press:
–to save changes or
–to leave without changes.
11 WEIGHING
Place a load you want to weigh on the weighing pan. When the pictogram appears, it means that
the result is stable and ready to read. In order to assure long-term operation and appropriate
measurements of weighted loads, the following precautions should be taken into consideration:
•
Loads should be placed on the pan delicately and carefully in order to avoid mechanical
shocks:
•
Loads should be placed centrally on the pan (errors caused
ENTERENTER
ENTER
ENTER

10
by eccentric weighing are outlined by standard PN-EN 45501 ch. 3.5 and 3.6.2):
•
Do not load the pan with concentrated force:
•
Avoid side loads, particularly side shocks should be avoided
11.1 Taring
In order to determine the net mass put the packaging on the pan. After stabilizing press -
(Net pictogram will be displayed in the left upper corner and zero will be indicated).
After placing a load on the weight pan net mass will be shown.
Taring is possible within the whole range of the scale. After unloading the pan the display
shows the tarred value with minus sign.
Notice:
Taring cannot be performer when a negative or zero value is being displayed. In such case
-Err3- appears on the display and short audible signal will be emitted.
11.2 Inscribing Tare Value
You can also inscribe a tare value. While in weighing’s mode press:
•
Press simultaneously
and
,
•
You will see :

11
•
Using and set the tare value,
•
Press ,to confirm value
•
Program returns to weighing’s mode. The inscribed tare value can be seen on the display
with "–" sign,
•
Tare can be inscribed anytime in weighing’s mode.
11.3 Zeroing
To ZERO the scale press: .
The scale will display zero and following pictograms: and . Zeroing is only possible
within the scope of ±2% of full scale. While zeroing outside the scope of ±2% you will see <Err2>.
Zeroing is possible only in stable state.
Notice:
Zeroing is possible only within the ±2% interval of the maximal range. If zeroing is performed
beyond this range the -Err2- message and short audible signal will be emitted.
11.4 Selection of Start Weighing Unit
Parameter for setting unit that is displayed and used after device start-up.
Procedure:
•Enter <P9.Unit / 9.1.UnSt> submenu.
•Press key, available units are displayed successively one by one.
•g (gram)
•kg (kilogram)
•ct (carat)
•lb (pound)
•Select start unit and press key, next go back to the home screen, to do it press key.
•Upon next start-up the scale runs with set start unit.
ENTERENTER
ENTERENTER

12
11.5 Temporarily Selected Unit
Temporary unit runs from the moment it is set to the scale shut-down and restart.
Procedure:
•Enter <P9.Unit / 9.2.Unin> submenu.
•Press key, available units are displayed successively one by one.
•g (gram)
•kg (kilogram)
•ct (carat)
•lb (pound)
•Select temporary unit and press key, next go back to the home screen.
12 SCALE CALIBRATION
In precise scales changes of gravitational acceleration have noticeable influence. The
gravitational acceleration changes with altitude and latitude. Every scale must be calibrated to
the place of use especially when the place changes. Frequent calibration also prevents weighing
process from the influence of humidity and temperature.
For assuring the maximal accuracy of weighing a periodical user calibration is required.
Calibration should be performed:
•
Before weighing process
•
After a long break between series of measurements
•
After the ambient temperature change
•
If the scale has been relocated
Caution:
It should be remembered that the calibration process should be performed with the empty pan! The
calibration process can be terminated by pressing Esc when necessary.
12.1 External Calibration
External calibration should be carried out using an external adjustment weight of class F1 or F2
Procedure:
•Enter <P1.CAL / 1.1.CA-E> submenu, text <UnLoAd> (remove weight) is displayed.
•Remove any load from the weighing pan and press key.
•Mass of an empty weighing pan is determined, this is signaled with display of 'dash', < - >. Next, the
text <LoAd> (load weight) and mass value that is to be loaded, e.g. 2000 g (varies by scale model), are
displayed.
•Load the weighing pan with weight of specified mass value and press key.
•Weight mass is determined, this is signaled with display of 'dash',
< - >. Next, text <UnLoAd> (remove weight) is displayed.
•Remove the load form the weighing pan, <1.1.CA-E> submenu is displayed.
ENTERENTER
ENTERENTER
ENTERENTER

13
12.2 User Calibration
User calibration must be carried out using an external weight of class F1, and of mass value ≥30% of the
maximum capacity value.
Procedure:
•Enter <P1.CAL / 1.2.CA-u> submenu, edit box for declaring weight mass is displayed (the mass value must
be ≥30% of the maximum capacity value).
•Enter weight mass value and press key to confirm, text <UnLoAd> (remove weight) is
displayed.
•Remove the load from the weighing pan and press key.
•Mass of an empty weighing pan is determined, this is signaled with display of 'dash', < - >. Next, text
<LoAd> (load weight) and mass value that is to be loaded, e.g. 2000g, are displayed.
•Load the weighing pan with weight of specified mass value and press key.
•Weight mass is determined, this is signaled with display of 'dash', < - >. Next, text <UnLoAd>
(remove weight) is displayed.
•Remove the load from the weighing pan, <1.2.CA-u> submenu is displayed.
12.3 Manual Internal Calibration
Manual internal calibration is carried out using a built-in calibration weight. Only available on models:
PB-350-1000i, PB-350-2000i and PB-350-6000i
Procedure:
In the course of operation press key, calibration process is run automatically
•Process begins, when in progress it is signaled with display of ‘dash’ < - >.
•Upon completion, the scale automatically returns to the weighing mode.
12.4 Automatic Internal Calibration
Only available on models: PB-350-1000i, PB-350-2000i and PB-350-6000i
Automatic internal calibration is triggered:
•After connection of the scale to the mains
•When temperature variation occurs
•After passage of specified time interval
In case of an automatic internal calibration it is necessary to declare condition that is to trigger the automatic
calibration. To declare condition go to <1.5.ACL> parameter.
nonE
Calibration disabled
tnnP
Calibration triggered by temperature variation greater than 3oC
botH
Calibration triggered by both time and temperature
tinnE
Calibration carried out in a specified time interval.
CAL
ENTERENTER
ENTERENTER
ENTERENTER

14
Calibration upon connection of the scale to the mains
•Upon completed start-up procedure, scale stability conditions regarding calibration are
checked, the internal calibration is triggered automatically.
•Calibration process, when in progress, is signaled with display of 'dash',
< - >.
•Upon completion, the scale automatically returns to the weighing mode.
Calibration upon temperature change
•The scale is equipped with precise system monitoring temperature variation and registering
temperature value for each completed calibration process.
•Calibration process is triggered automatically at the moment when temperature measured by
the scale changes by more than 3°C.
•Right before the adjustment process, scale stability conditions are checked.
•Calibration process, when in progress, is signaled with display of 'dash',
< - >.
•Upon completion, the scale automatically returns to the weighing mode.
Calibration upon passage of specified time interval
•The scale is equipped with RTC, due to this time of each completed process is registered.
•Adjustment process is triggered automatically after passage of particular time interval, set
in <1.6.CAC> parameter.
•Calibration process, when in progress, is signaled with display of 'dash',
< - >.
•Upon completed calibration process, the scale automatically returns to the weighing
mode.
12.5 Automatic Internal Calibration Time
Parameter determining time interval between successive automatic internal adjustments. The time
interval is declared in hours and ranges between 0.5 [h] and 12 [h].
Procedure:
•Enter <P1.CAL / 1.6.CAC> submenu.
•Press key, available values, given in hours, are displayed successively one by one:
Available values: 05 H, 1 H, 2 H, 3 H, 4 H, 5 H, 6 H, 7 H, 8 H, 9 H, 10 H, 11 H,
12 H.
12.6 Calibration Test
Only available on models: PB-350-1000i, PB-350-2000i and PB-350-6000i
Calibration test function enables comparison of the internal adjustment results with the value
recorded in factory parameters. Such comparison is used for determining drift of scale sensitivity over
time.
Procedure:
•Enter <P1.CAL / 1.4.AtS> submenu, internal adjustment process starts automatically.
•Adjustment process, when in progress, is signaled with display of <CAL> text.
•Upon completed adjustment process, <1.4.CAtS> parameter is displayed automatically.

15
12.7 Calibration Report
Calibration report, and calibration test report are both automatically printed (using scale-connected
printer) at the end of each calibration process. To declare report content go to <P6.1.CrEP>
submenu. For detailed information concerning report content read later sections of this manual.
13 MAIN SCALE PARAMETERS
Scale parameters are set to adjust the weighing device to ambient conditions (filters) or individual
needs (autozero on/off, tare values memory). These parameters are to be found in <P2.rEAd>
submenu. <P2.rEAd> submenu comprises functions allowing you to adjust your weighing device to
ambient conditions of given workstation.
13.1 Filter
•Enter <P2.rEAd / 2.1.FiL> submenu.
•Press key, filter values are displayed successively one by one:
1 - Fast, 2 - Average, 3 – Slow.
•Set respective value and press key to confirm, next go to the home screen.
The higher filter value, the longer the weighing takes.
13.2 Value Release
Enter this parameter to adjust rate of stabilization of the measurement result. Depending on the selected option,
weighing time is either shorter or longer.
Procedure:
•Enter <P2.rEAd / 2.2.APPr> submenu.
•Press key, available values are displayed successively one by one:
F_P - fast and reliable, PrEc – reliable, FASt – fast.
•Press key to confirm, next go to the home screen.
13.3 Ambient Conditions
Parameter relating to ambient and environmental conditions of the workstation. Enter this parameter and set
'nStAb' value if the ambient conditions are unfavorable (air drafts, vibrations).
Procedure:
•Enter <P2.rEAd / 2.3.Enut> submenu.
•Press key, parameter values are displayed successively one by one: nStAb – unstable, StAb –
stable.
•Press key to confirm, next go to the home screen.
ENTERENTERENTERENTER
ENTER
ENTER

16
13.4 Autozero Function
'Autozero' function has been designed to enable automatic control and correction of zero indication. This
guarantees precise weighing results.
There are, however, some cases when this function can be a disturbing factor for the measuring process, e.g.
very slow placing of a load on the weighing pan (load adding, e.g. pouring, filling). In such case, it is recommended
to disable the function.
Procedure:
•Enter <P2.rEAd / 2.4.Aut> submenu.
•Press key, parameter values are displayed successively one by one:
YES – autozero function enabled, no – autozero function disabled.
•Press key to confirm, next go to the home screen.
13.5 Tare Function
'Tare' function has been designed to enable setup of appropriate parameters for tare operation.
Procedure:
•Enter <P2.rEAd / 2.5.tArA> submenu.
•Press key, available values are displayed successively one by one:
no
Regular tare mode. Select this parameter to make the scale overwrite the set (selected) tare value
with the most recently entered one.
tArF
Select this parameter to make the scale store the latest tare value in memory. The latest tare
value is displayed after scale restart.
AtAr
Automatic tare mode.
EAcH
Select this parameter to make the scale automatically tare each
accepted measurement.
•Press key to confirm, next go to the home screen.
13.6 Tare: Enter Mode
The tare is entered using +keys combination from the home screen level. There are two enter
modes.
Procedure:
•Enter <P2.rEAd / 2.6.ttr> submenu.
•Press key, parameter values are displayed successively one by one:
ENTER
ENTER
This manual suits for next models
5
Table of contents
Other Antylia Scientific Scale manuals