Antylia Scientific Cole-Parmer PB-100 User manual

Models / Modèles / Modelle
rev C1
July 2022
PB-100 COMPACT PORTABLE BALANCES


English
1 INSTALLATION 1
2 SPECIFICATIONS 4
3 DISPLAY and KEYPAD 5
4 OPERATION 6
5 PARAMETER SETTINGS 9
6 SIMPLE CALIBRATION 13
7 COMMUNICATIONS 14
8 ERROR MESSAGES 16
Français
9 INSTALLATION 17
10 CARACTERISTIQUES 20
11 ECRAN et CLAVIER 21
12 FONCTIONNEMENT 22
13 PARAMETRES DE REGLAGE 25
14 CALIBRAGE SIMPLE 30
15 COMMUNICATIONS 31
16 MESSAGES D’ERREUR 33
Deutsch
17 INSTALLATION 35
18 TECHNISCHE DATEN 38
19 ANZEIGE und TASTATUR39
20 BETRIEB 40
21 PARAMETEREINSTELLUNGEN 43
22 EINFACHE KALIBRIERUNG 47
23 ANSCHLÜSSE 48
24 FEHLERMELDUNGEN 50


English
1
1 INSTALLATION
1) Remove the balance, draft shield, top pan,AC adapter and pan support
from the packaging
2) Remove the shipping protection screw and transit disc from the top of the
balance and place the plastic top pan support on the balance. Do not use
excessive force when removing and installing the screw.
3) Gently place the plastic pan support into the receptacle and secure with the
supplied screw. Do not over-tighten the screw. It should be finger tight only.
Put the Stainless steel pan on top of the pan support
4) Place the draft shield on top of the balance, the location notches in the
breeze shield should align with the cut outs on the balance. For optimum
performance the balance should be used with the draft shield (if provided).
5) Place the balance onto a firm surface and adjust it to be level using the rear
feet before use,

English
2
1.1.1 LOCATING AND PROTECTING YOUR BALANCE
In order to keep your balance functioning at its best we suggest that you do the following:
Avoid extremes of temperature. Do not place in direct sunlight or near
air conditioning vents.
Make sure the balance is located on a strong table and free from
vibration.
Avoid unstable power sources. Do not use near large users of
electricity such as welding equipment or large motors. Do not let the
balance battery go flat – if you are not using it for a long time you should
charge the battery up periodically to make sure the battery does not lose its
charge.
Keep free from vibration. Do not place near heavy or vibrating
machinery.
Avoid high humidity that might cause condensation. Keep away from
direct contact with water. Do not spray or immerse the balance in water.
Do not place near open windows, air-conditioning vents or fans that
may cause a draft and unstable readings.
Keep the balance clean. Do not stack material on the balance / balance
pan when it is not in use. The Compact balance has a stacking feature for
stacking more than one unit on top of each other which does not apply
weight to the pan. For more details on this see the section on storing.

English
3
1.1.2 STORING WHEN NOT IN USE
*You can store them easily on top of each other to save space and protect them from damage.
Without Shield With Shield
*Only applies to 120mm top pan versions

English
4
2 SPECIFICATIONS
Model
Capacity 100g 200g 400g 800g 300g
Readability 0.001g 0.01g 0.01g 0.01g 0.1g
Resolution 1:100000 1:20000 1:40000 1:80000 1:3000
Repeatability +/- 0.002g 0.02g 0.02g 0.02g 0.1g
Linearity+/- 0.003g 0.02g 0.02g 0.03g 0.1g
Units g / ct / GN / N / dr / Lb / oZ / oZt / tl t / tl H / tl S /CUS
Model
Capacity 500g 1200g 2000g 4000g 6000g
Readability 0.1g 0.1g 0.1g 0.1g 1g
Resolution 1:5000 1:12000 1:20000 1:40000 1:6000
Repeatability +/- 0.1g 0.1g 0.2g 0.2g 1g
Linearity+/- 0.2g 0.2g 0.2g 0.2g 2g
Eccentric loading 0.2g 0.2g 0.2g 0.2g 2g
Units g / ct / GN / N / dr / Lb / oZ / oZt / tl t / tl H / tl S /CUS
Common Specifications
Interface RS-232 bi directional
Stabilization time 3s
Operating temperature 0°C - 40°C / 32°F - 104°F
Power supply 12VAC @ 150 ma (12VDC @ 800ma with internal
battery kit option)
Calibration Automatic external
Display 18mm 6 digits LCD
Housing ABS
Size without breeze shield 178 x 257 x 84mm (7” x 10.1” x 3.3”)
N.W. 1.1 kg (2.4 lb.)
PB-100-400
PB-100-100 PB-100-200 PB-100-800 PB-100-300
PB-100-500 PB-100-1200 PB-100-2000 PB-100-4000 PB-100-6000

English
5
3 DISPLAY and KEYPAD
3.1.1 Display
3.1.2 Keypad
KEY FUNCTION
ON/OFF TO POWER UP BALANCE
TARE/ZERO
TO RE ZERO OR DEDUCT WEIGHT OF EMPTY CONTAINER
SMPL
(sample) TO ENTER AND OPERATE COUNTING MODE
UNIT TO SELECT THE REQUIRED WEIGHING UNIT
%
(percent) TO ENTER AND OPERATE PERCENTAGE WEIGHING MODE
PRINT TO PRINT THE DISPLAYED READING WHEN CONNECTED TO
A COMPUTER OR PRINTER
Low battery indicator
Zero
Stable
Capacity tracker Weighing digits
Percentage symbol
Hold symbol
Net symbol
Units symbol

English
6
4 OPERATION
4.1.1 Zero/Tare
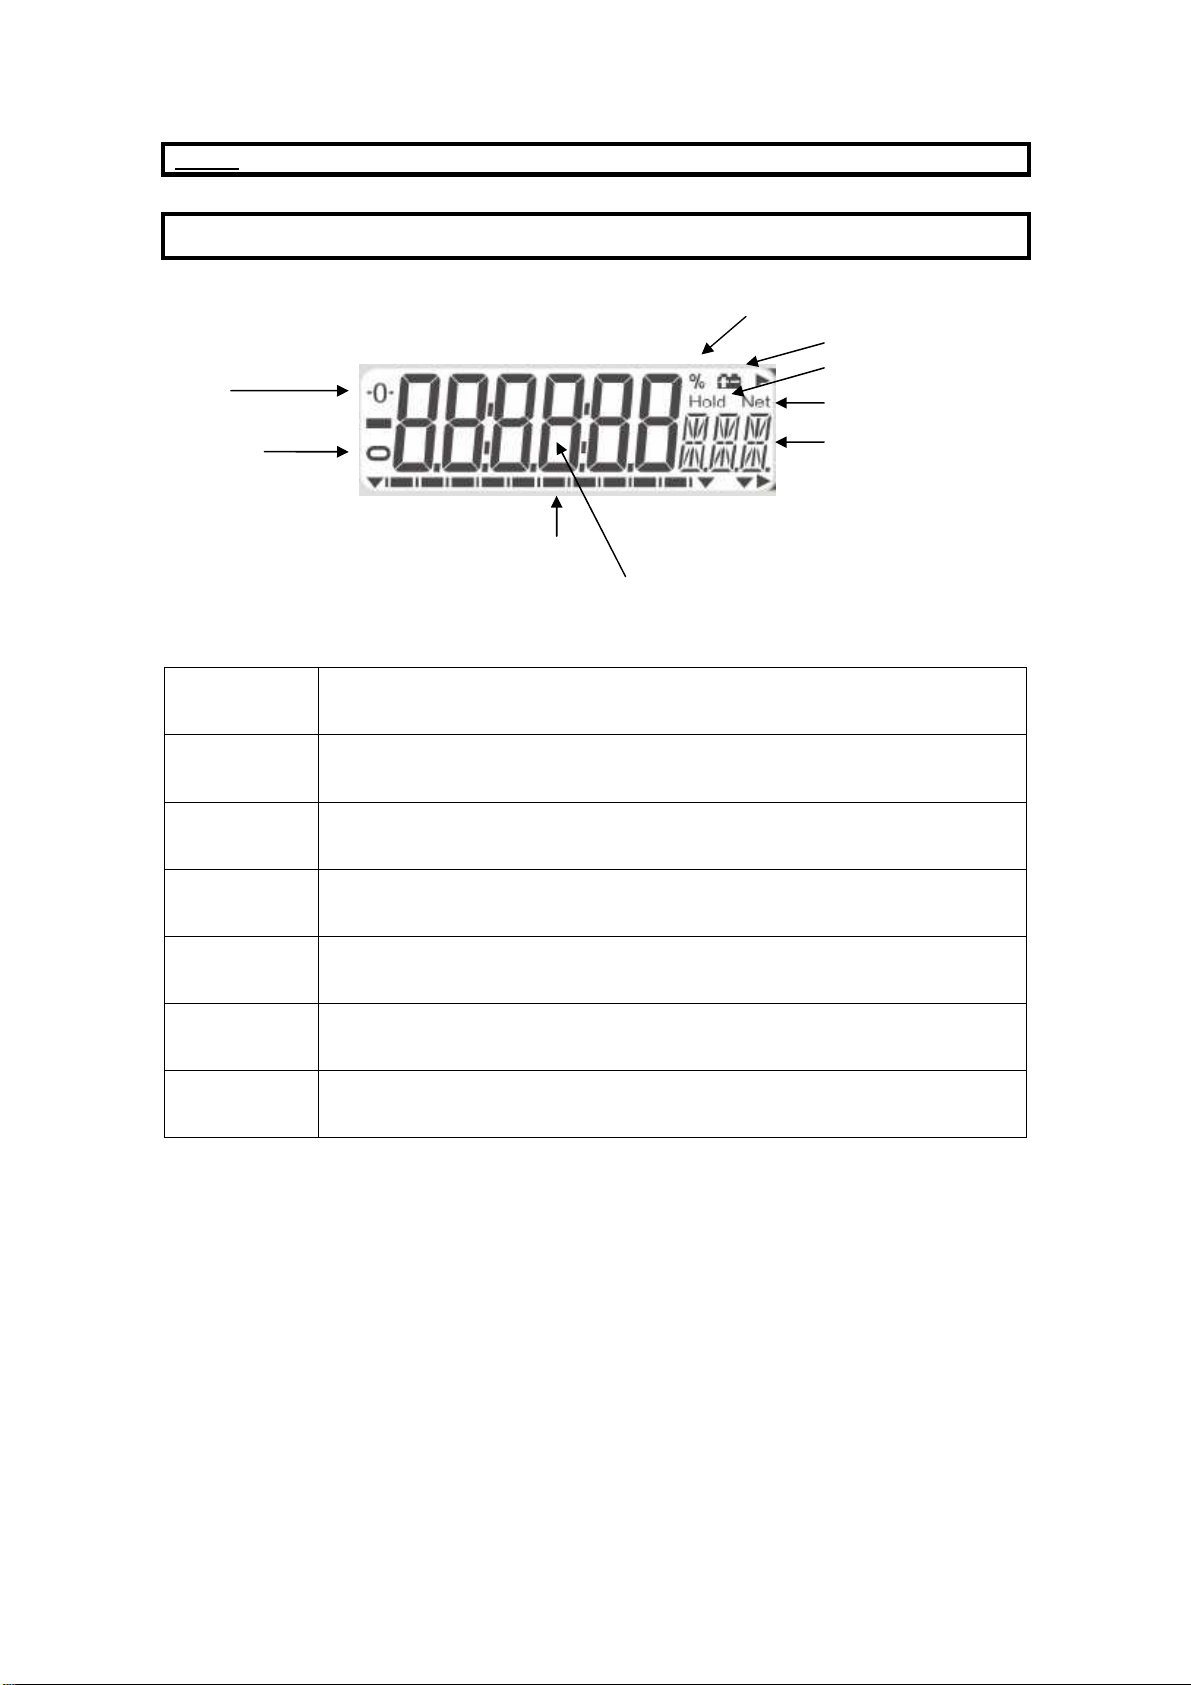
•To zero the balance, press the [Tare/Zero] key and the reading will
show zero, the symbol “>O<” will be displayed
•Put a container on the pan and the display will show its weight.
•Press [Tare/Zero] to tare the weight of the container from the balance,
the display will now show zero and also display the zero and NET
symbol.
•Put a sample into the container and the display will show the net weight
of the sample.
•Remove the whole container, the display will show a negative value
which is the weight of the container,
•Press the [Tare/Zero] to zero the reading and the display shows zero
and the NET symbol will turn OFF
4.1.2 Weighing
•After zeroing the reading place a sample weight onto the pan and the
display will show the weight of sample.
•The capacity tracker bar will indicate the percentage of the sample on
the pan against capacity of the balance. When the reading is stable, the
display will show the stable symbol.
•Users can select different weighing units by pressing the [Unit] key. The
reading will change according to the unit selected. Previous recorded
accumulated readings will be cleared when a new unit is selected.
•Units available:
g / ct / GN / N / dr / Lb / oZ / oZt / tl t / tl H / tl S /CUS.
The
unit “g” is always active; all other units can be selected to be active or
inactive.

English
7
4.1.3 Percent Weighing
This is used to measure the percentage between the sample weight and a
standard weight.
E.g. Put your standard weight onto the pan and press the [%] key, the display will
show 100.0%.per. This would then be taken as the standard weight. Remove the
standard weight and the reading goes to zero, the display will show 0.0%.
You now place your sample weight onto the pan, the display will show the
percentage of this sample weight in relation to the standard 100% weight.
Press the [%] key again and the display will return to normal weighing mode.
Note: if the standard weight is too small the percentage result may be not
accurate.
4.1.4 Counting mode
•Put a sample onto the pan and when the reading is stable, press the
[Smpl] key, the display will show “SP 10 pcs”;
•Press the [Unit] key to select sample values from 10, 20, 50, 100 and
200.
•Press the [Smpl] key again, the display will show the unit weight for 1
piece for 1 second and then show the quantity pcs.
•To go back to weighing mode, press the [Smpl] key.
4.1.5 Weighing accumulation
Accumulation of each weighing value can be done, two modes are
available: manual accumulation and automatic accumulation.
4.1.6 Manual accumulation
•In manual accumulation mode, place a weight onto the pan, after the
stable symbol shows press the [Print] key, the weight will then be
accumulated. The display will show ”1 ACC ” for 1 second and then
return to weighing mode,
•Remove the weight and the scale will show zero, then place another
weight onto the pan and follow the same procedure to accumulate

English
8
readings, the display will show “2 ACC” for 1 second
4.1.7 Automatic accumulation
In this mode, place the weight onto the pan, after the stable symbol shows
the reading will be accumulated automatically. The display will show ”ACC
X” for 2 seconds and then return to weighing mode.
•Remove the weight and the scale will show zero. Then place another
weight onto the pan and the balance will continue to accumulate
automatically
4.1.8 Accumulation check
•When the reading is zero, press the [Print] key, users can check the
amount of accumulations and the total value. The display will show the
amount of accumulations as ”X ACC ” for 1 second and then show the
total value “XXX.XX g” for 1 second, following this the display will return
to normal weighing mode.
4.1.9 Maximum accumulation value
The maximum accumulation value is 999999. If the value exceeds 999999,
the display will show FULL.
•
In weighing mode, press the [%] key to clear accumulation records.

English
9
5 PARAMETER
SETTINGS
Users can press the [Unit] key to view and change parameter settings when the
scale is counting down from POWER UP.
The balance has 5 parameters that can be set by the user.
FUNCTION
SECTION DESCRIPTION
UNIT F1 See section 5.1 Sets the units to be used
g / ct / GN / N / dr / Lb / oZ / oZt / tl t / tl H / tl S /CUS.
EL F2 See section 5.2 Sets the backlight
AUTO EL : backlight automatically turns on when weight
is applied to the top pan
OFF EL : backlight always off
ON EL: backlight always on
Ser F3 See section 5.3 Sets the print parameters
OFF F4 See section 5.4 Sets the auto power-off parameter
SETUP F5 See section 5.5 User set up parameters
tECH F6 See section 5.6 Technical parameters setting mode / factory setting
5.1.1 Unit setting
You can enable and disable the weighing units available to the user when they
press the [Unit] key as described in section 4.2.
•In “Unit F1” mode, press [Tare/Zero] to check the status of each weighing
unit.
•Press the [Unit] key to change the state of units.
•If unit CUS is selected as “ON”, press [Tare/Zero] and the scale will require
the conversion rate between CUS and g. Press [%] to select the digit and
press [Smpl] to change the value. [Print] will to move decimal point. After the
setting is made, press [Tare/Zero] to save changes.
•Press [Print] to exit unit mode.

English
10
Units and conversion rates
5.1.2 Backlight setting
The backlight may be enabled or disabled by the user. If the backlight is disabled,
the battery life will be greater. The following settings are available:
•When the LCD shows “EL F2”, press [Tare/Zero]
•Three modes are available: always on, always off and automatic.
• [Unit] is used to change the setting; [Tare/Zero] enters the setting, and
[Print] saves the setting.
AUTO EL
Sets the backlight to operate automatically when a weight is
placed on the balance or a key is pressed.
OFF EL
Sets the backlight to be off.
ON EL Sets the backlight to be on for full time.
unit conversion symbol
01 g 1.0 g
02 Carats 5.0 ct
03 Grains 15.432358 GN
04 Newtons
0.009808 N
05 Drams 0.5643834 Dr
06 Pounds 0.002205 Lb
07 Ounce 0.035274 OZ
08 Ounce
Troy 0.03215075 OZt
09 Taels T. 0.0266667 TL.t
10 Taels Hk. 0.026717 TL.H
11 Taels S. 0.026455 TL.S
12 CUS
User setting
CUS

English
11
5.1.3 Communication
When the display shows “SEr F3” press [Tare/Zero] to enter the communication
settings.
The following options are available for setting the output and accumulation
functions:
Mode Print Feature Accumulation
Prn 232
Data is sent whenever the [Print]
key is pressed.
Manual accumulation when
the [Print] key is pressed.
CON 232 Data is sent continuously.
Accumulation is disabled.
AUTO
232 The weighing results will be sent to
the communication port
automatically whenever a stable
reading is present. The balance has
to return to zero before another
reading is sent via the interface.
Automatic accumulation
when stable
Press the [Unit] key to change the setting. Press [Tare] to confirm and
move to the next parameter.
5.1.4 Communication modes
•Press [Unit] to go through parameters:
•Auto:sending data automatically when the scale is stable,
•Prn: Press [Print] to send data when the scale is stable.
•CON:the balance will send out data continuously.
•Press [Tare/Zero] to save changes and enter baud rate setting.
5.1.5 Baud rate setting
•Press [Unit] to go through the settings,
•Four baud rates are available:
•1200bps、2400bps、4800bps、9600bps
•Press [Tare/Zero] to change the setting and to go back to
communication mode setting,
•Press [Print] to exit communication mode.

English
12
5.1.6 Format settings
•
The scale will print either using a format that includes stability
indications or one with only the weight. There are 2 settings that can
work as follows
:
FOR 1
Data format is with line headings
and extra line feeds as shown in
section 7
FOR 2
Data format is printed as weight or
count only
5.1.7 Auto power off
Users can select the standby time before the scale will power off
automatically (when internal battery option is fitted).
•When the display shows “OFF F4” press [Tare/Zero] to select time
from 0m, 5m, 10m, 20m and 30m. When 0m is selected, the function of
auto power off is turned off.
•[Unit] is to show settings between 0 and 30. [Print] is to save changes
and exit this mode.
5.5 Set Up
Users can select various settings that may be suitable for certain
applications
•FIL controls the speed of response of the weighing, it can be set from
0-6, default is 3
•ZEO controls the zero tracking, it can be set from 0-6, default is 3
•ZTR controls the sensitivity, it can be set from 0-6, default is 4
•STA controls the speed of stability indication, it can be set from 0-6,
default is 2
5.6 Technical parameters
When the display shows “TECH F5” press [Tare/Zero] to enter the
Technical parameter settings menu and then enter the dealer PIN. This is
for dealers only

English
13
6 SIMPLE CALIBRATION
Press [Smpl] and [Print] together whilst the display is counting down from
POWER UP, the display will show "unload CAL.” 。
Make sure the top pan is empty and when the stable symbol shows press
[Tare/Zero] to enter calibration mode. The [Unit] key allows you to select a
calibration weight value. See the table as below.
Press [Tare/Zero] to select the correct value
The display will show “LOAD WEI”. Place the weight onto the pan and press
[Tare/Zero] when the stable symbol shows. If calibration is correct the display
will show “PASS” and then go back to weighing mode.
If the weight placed on is more than 110% of the calibration weight value selected,
the display will show “FAlL H”. If the weight placed on is less than 90% of
calibration weight value selected, the display will show “FAlL L”.
Users should recalibrate the balance following the correct operation.+
Calibration weights:
Model
Weights(g)
50
70
100
100
150
200
200
300
400
400
500
800
100
200
300
Model
Weights(g)
200
400
500
500
1000
1200
1000
1500
2000
2000
3000
4000
2000
5000
6000
100 200 400 800 300
500 1200 2000 4000 6000

English
14
7 COMMUNICATIONS
See parameters 5.3 Setting The Printing Parameters / Accumulation section for
full information on settings
The standard Interface parameters are:
Connection details are:
Generally a Null model cable is
required for connection to a
computer or printers.
Data Format for normal weighing operations, parts counting or recalling of totals
from memory will all be different. All lines end with a carriage return and a line
feed, (0dH and 0aH in ASCII).
Format 1 Output:
The lines will include a heading for each line then the value. Atypical output when
weighing is shown below. 3 lines of data are printed followed by 2 blank lines.
When the scale is at zero the weight is not printed,
If the scale is set for continuous output the weight only is printed followed by 2
blank lines. An example of continuous output is shown below.
RS-232 Connector: 9 pin d-subminiature socket
Pin 2 Output
Pin 3 Input
Pin 5 Signal Ground
RS-232 output of weighing data
ASCII code
4800 Baud
8 data bits
No Parity
G S _ _ _ _ _ _ 1 2 3 . 4 5 _ g _ <cr> <lf>
19 ASCII Characters, GS for Gross Weight, NT for Net Weight
N o . _ _ _ _ _ _ _ _ _ 0 1 <cr> <lf>
16 Characters, Increments every time a weight is stored
T o t a l _ _ _ 1 2 3 . 4 5 _ g _ <cr> <lf>
19 Characters, The total weight stored in memory
<cr> <lf>
Includes 2 blank lines
<cr> <lf>
G T , N T ± _ _ _ _ _ 1 2 3 . 4 5 _ g _ <cr> <lf>
<cr> <lf>
Includes 2 blank lines
<cr> <lf>
22 Characters, ST for stable/US for unstable followed by GS for Gross Weight/ NT for Net Weight and then a minus sign for negative
weight, or a space for positive weight.

English
15
Format 2 Output:
The output will be the same value as is on the display. If in parts counting it will
displayed as PCS, if in weighing it is only the weight.
An example output is :
For all examples if the weighing unit is one letter (i.e. grams=g) the 2
nd
of the units
positions is a space before and after. If it is 2 letters long the 1st and second
position is used with a space after the second letter, (i.e. 0.12345lb__ ) or if it is
3 letters long all 3 positons are used, (i.e 123.45dwt).
Input command format:
The scale can be controlled with the following commands. The commands must be sent in
upper case letters, i.e. “T” not “t”.
T<cr><lf> Tares the scale to display the net weight. This is the same as pressing
[Tare] key.
Z<cr><If> Sets the zero point for all subsequent weighing. Display shows zero.
T5.345<cr><if>
Would be same as entering a preset tare value of 5.345 from keypad
P<cr><lf>
Prints the results to a PC or printer using the optional RS-232 interface.
It also adds the value to the accumulation memory if the accumulation
function is not set to automatic.
± _ _ _ _ _ _ 1 2 3 . 4 5 _ g _ <cr> <lf>
Parts Counting example:
± _ _ _ _ _ _ _ _ _ 1 2 5 P C S <cr> <lf>
18 Characters, Begins with the sign, a minus sign for negative weight, or a space for positive weight.

English
16
8 ERROR MESSAGES
If an error message is shown, repeat the step that caused the message. If the
error message is still shown then contact your dealer for support.
code Description reason
Solution
OVER
err
A/D
overload
There might be weight on the
pan when the scale is turned
on.
Calibration fails.
Load cell damaged
Remove weights
Recalibrate
UNDER
err
A/D
low
. Pan is not put on.
Calibration fails
Load cell damaged
Put on pan, restart the
scale.
Recalibrate
Lack of power Recharge the battery
FAIL
Calibration fails Wrong calibration weight
Users’ calibration exceeds
factory calibration by 5%
Load cell damaged
Recalibrate with correct
weight
Table of contents
Languages:
Other Antylia Scientific Scale manuals
Popular Scale manuals by other brands

Health O Meter
Health O Meter 524KL User instructions

Sunbeam
Sunbeam FS7800 Instruction booklet

The China Office
The China Office TA 1 manual

Rongta Technology
Rongta Technology RLS1000 Software user manual

Vertex
Vertex 2158 Analog Service manual

Pitney Bowes
Pitney Bowes Integra N300 installation instructions