Ape Labs ApeStick4 User manual

APESTICK4
INSTRUCTION MANUAL

Deutsch
!
1

English
2

English
Safety Instructions
› The ApeStick4 generates heat during operation and while
charging. Therefore, make sure there is adequate ventilation
and do not cover the light.
› If you charge the ApeStick4 in the Tourcase (optional), the
ApeStick4 Tourcase must remain open.
› Do not use the ApeStick4 in areas where the use of radio
equipment is prohibited.
3

English
Warning
›All ApeLabs products use the same charging/power cord.
Ape Labs products are specifically designed and engineered
based on the Ape Labs power source (Ape Labs PSU). Do
not use a different charging/power cord to power or charge
the units (other than the Ape Labs charging road cases).
Using a different power source may void your warranty.
General
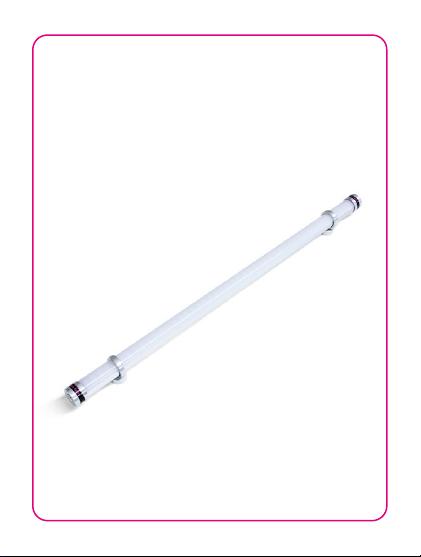
› The ApeStick4 is an all-purpose battery LED lamp in the
shape of a tube.
› The internal battery provides power for 8 or more hours.
4

English
› This device has 20 built-in auto programs. (See “List of
Programs” below for details). Scroll thru the difference pre-
sets with the left and right buttons on the ApeRemote. If
you’re on a static color, the Speed Up/ Slow Down buttons
will control the strobe speed. If you’re on a chase program,
they will control the color changing speed. By default, the
Speed is set to it’s lowest setting, which stops the speed
effect.
› This device can be wirelessly controlled with either the
ApeRemote or W-Ape Transceiver (in combination with your
favorite DMX controller).
›All Ape Labs fixtures can be mixed/matched and controlled in
the same room with the same remote (or DMX controller). To
control certain fixtures differently from others in the same
room, address the fixtures at the time they are turned on. For
use with the ApeRemote, each fixture can be assigned to one
of four groups. (See "Operation" section below for details on
setting the fixture group). If more than four groups are
needed in a room, additional remotes can be used to add four
addition groups per remote, as long as the added remotes are
5

English
paired to the specific fixtures (see "More Functions and
Updates" below for Pairing). For use with the W-Ape (and
DMX controller), each fixture can be assigned to a
DMX-512 address. Be default, the device is set to DMX
address one, but it can be assigned to any address when it is
turned on by going into Set-Up mode on the W-Ape.
› The device has a built-in microphone. It can be activated by
the remote control to create sound active effects.
Mounting
The ApeStick4 has two magnetic feet with an extremely high
holding force. The tube can be attached quickly to metallic
objects.
Use the enclosed metal sheets, if you want to mount the
ApeStick4 on a non-magnetic object.
The position of the magnetic feet can be varied individually. Turn
the foot by about 1 turn counterclockwise to untighten it. To
secure it, rotate the magnetic foot clockwise again.
6

English
Important: The magnetic feet have to be fixed above the metal
housing. To prevent the ApeStick4 from damage, do not
overtighten the feet.
Operation
Turn On and Off
› Press the button at one end of the ApeStick4 for about one
second. The ApeStick4 turns on and remembers the
previously selected program/brightness.
› To turn the device off, press the button again for about a
second.
The ApeStick4 ignores very short presses of the power button
to prevent unintentional operation.
Assignment of a Group
You can assign ApeStick4s into groups, i.e. to independently
control them in different rooms.
› Immediately after turning the ApeStick4 on, the current
groupsetting of the ApeStick4 flashes on the remote control.
(Factory setting is group 1.)
7

English
› Within this period (group LED flashing), you can assign
another group by pressing the “Group” button on the remote
control one more time.
› The ApeStick4 will flash blue for a short time to
acknowledge that.
Note: The remote control switches to a power-save mode after a
few minutes and will not detect the power-on event of an
ApeStick4. Press any key of remote control to stop the power-
save mode.
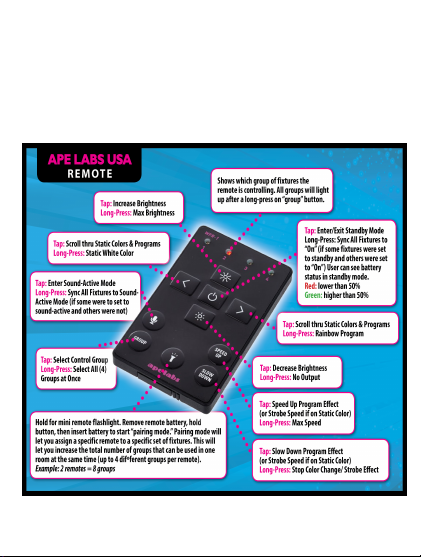
Using the Remote Control
› To select the group you’d like to control, tap the „Group“
button until the group LED is lit up. To control all groups at
once, press and hold the „Group“ button until all four group
LED’s light up.
› Programs, brightness, speed and sound active mode can be
controlled by the corresponding keys (see figure).
8

English
9

English
10

English
List of Programs
11

English
No
Program
1
White
2
Red
3
Orange
4
Amber
5
Lime
6
Green
7
Cyan
8
Cyan-Blue
9
Blue
10
Blue-Magenta
11
Magenta
12
Red Pastel
13
Green Pastel
14
Blue Pastel
15
Blue > Red
16
Magenta > White
17
White > Blue
18
Red Pastel > Green Pastel > Blue Pastel
12

English
Hint: A long press on the left arrow will provide a static white
color. A long press on the right arrow will provide a rainbow
program. A long press on "Slow Down" stops a flash effect/
color change.
Battery State/Charging
› If the brightness of the ApeStick4 is reduced to zero (by
"Blackout" or "Dimmer" button of the remote control), the
device will show the battery state at low brightness:
oLEDs glow green: battery level above 50%
oLEDs glow red: battery level below 50%
19
Amber > Magenta > Blue
20
Rainbow
No
Program
1
White
2
Red
3
Orange
4
Amber
13

English
Note: The calculation of the battery level needs at least one
full charge/discharge cycle.
› If the battery is completely empty, the device will blink 3
times red and turn itself off. Connect the provided power
supply (18V DC) or put the device into the Tourcase.
› If the battery charge is dropped to extremely low, the fixture
may not blink Red (or show any signs of charging) during the
first two hours of charging.
› The ApeStick4 flashes red while charging. As soon as the
battery is fully charged, the device will flash green.
› The device can also be used while a power supply is
connected. In that case the battery will not be charged (or
very slowly).
W-Ape Transceiver
Multiple W-Ape's can be used in the same room on different
universes if they are set to different groups.
W-Ape has the following built-in modes (selected with Up/Down
buttons on left of unit). Pressing the +/- buttons on the right of
14

English
the unit will scroll thru the different options of each mode. If a
light fixture is in set-up mode with the W-Ape, the screen will
display info for the light fixture rather than the W-Ape.
Group
› Use +/- buttons to select the specific group.
Control Mode
› Sound Master: If the W-Ape is set to Sound Master mode, if
the sound active feature is triggered, it will use the internal
mic built in to the W-Ape to sync the Sound Active feature
among all light fixtures (instead of using the internal mic built
in to each fixture). In this mode, units will be controlled with
ApeRemote, thru the W-Ape. This feature extends the
wireless range on the remote from it's rated 200ft range, to
the W-Ape's rated wireless range of 3,000ft.
›DMX: To use DMX controller, set W-Ape to "DMX" and
connect your DMX controller to W-Ape input with 3-pin
DMX cable.
› W-Ape (Receiver): If multiple W-Apes are being used in one
room, some W-Ape's can be set as a receiver. In this case,
15

English
set W-Ape to "W-Ape (Reciever)" and connect a 3-pin DMX
cable from the DMX output of the W-Ape to the DMX input
of the light fixture (to wirelessly control a fixture that does
not have wireless DMX built-in, such as a fixture from a
brand other than Ape Labs).
Info
› Battery: During set-up mode, this will display the precise
battery level of each light fixture.
› Serial: This will display the serial number of the fixture.
› Firmware: This will display the firmware version of the fixture.
DMX Mode
› During set-up mode with given fixture, this will let you select
the number of DMX mode for the fixture.
oOff: W-APE/DMX-Mode is not activated - the device
is only controllable by the remote control
o3C: 3 channels: Dimmer, Program, Speed
o4C: 4 channels: Red, Green, Blue, White (each is 1-
DMX channel/8 Bit)
16

English
o8C: 8 channels: Red, Green, Blue, White (each is 2-
DMX channels/16 Bit: coarse + fine)
More Functions and Updates
Disabling of the Battery Status Indicator
The red/green glowing indicator of the battery level can be
disabled. Instructions can be found at www.apelabsusa.com.
Pairing
Ape Labs lights and ApeRemotes can be paired permanently to
one another so that they will no longer synchronize with non-
paired devices. Pair as many lights to one remote as you would
like. This will allow users to create up to four groups on one
remote and up to 4 more groups on each additional remote that
is being used in the same room at the same time.
Intructions on How to Pair an ApeRemote with a Fixture:
› Step 1: Remove battery from ApeRemote
› Step 2: While holding down flashlight button, insert battery
into ApeRemote (if done correctly, group 1 and group 4 will
flash on remote).
17

English
› Step 3: Turn on fixture with long press on power button (5
seconds – if done correctly, fixture will blink blue).
› Step 4: Press Right Arrow button to pair remote and light.
› Step 5: Turn light off then back on. It will now only be
controlled with that specific remote.
› Step 6: To unpair, follow steps 1-3, then press Left Arrow
button to unpair.
NOTE: In case you lose paired remote, any remote can be
used to unpair fixtures.Reset or Update of Firmware
Reset or Update of Firmware
Press and hold the power button of the ApeLight Maxi for about
10 seconds. The device will restart and stay in update mode for
18

English
about 15 seconds in update mode (flashes red). Within this
timespan an update can be started. Without any update data, the
device will continue to run as normal.
You can find firmware updates at www.apelabsusa.com or at
your dealer.!
19
Table of contents
Popular Lighting Equipment manuals by other brands

Solar Technology International
Solar Technology International SolarMate SMAL003 user manual

Malmbergs
Malmbergs SLT60-12VL-E instruction manual

LIGMAN
LIGMAN LD-50211 installation manual

ADJ
ADJ ikon profile ww user manual

Panasonic
Panasonic ET-LAC300 operating instructions

Velleman
Velleman HQ POWER VDPL3000ST user manual