Aplus S-90D Service manual

OPERATING INSTRUCTIONS AND PARTS MANUAL
MODEL S-90D
Framing Nailer
CAREFULLY READ THIS MANUAL BEFORE OPERATING TOOL
APLUS Pneumatic Corp.
NO.579, SEC. 1, SHEN LIN RD., TAYA,TAICHUNG CITY 428TAIWAN, R.O.C.
Tel: 886-4-25602860 Fax: 886-4-25602859
Original instructions

OPERATING INSTRUCTIONS AND PARTS MANUAL
MODEL S-90D
Framing Nailer
CAREFULLY READ THIS MANUAL BEFORE OPERATING TOOL
APLUS Pneumatic Corp.
NO.579, SEC. 1, SHEN LIN RD., TAYA,TAICHUNG HSIEN 428 TAIWAN, R.O.C.
Tel: 886-4-25602860 Fax: 886-4-25602859
Original instructions

TOOL SPECIFICATIONS
MODEL OF TOOL .................................................................. S-90D
TOOL LENGTH ....................................................................... 21.46" (545 mm)
TOOL HEIGHT ........................................................................ 14.17" (360 mm)
TOOL WIDTH .......................................................................... 5.00" (127 mm)
WEIGHT (WITHOUT FASTENERS) ...................................…8.16 lbs (3.7 kg)
AIR INLET ............................................................................... 1/4" NPT
COMPRESSED AIR :
Maximum permissible operating pressure ............................. 115 PSIG (8 bar)
Recommended operating pressure range ........................….. 75∼110 PSIG (5∼7.5 bar)
AIR CONSUMPTION.............................................................. 2.342 scfm with 25
nails per minute
@ 90 psi (6.2 bar)
Noise dB(A):
A-weighted sound pressure level LpA……………….……….. 87.21 dB(A)
A-weighted sound power level LwA………………….……..… 100.21 dB(A)
Measurement uncertainty: 3dB
Vibration (m/s2):
Hand-arm vibration value…………………………………..….. 5.43 m/s2
Measurement uncertainty: 1.5 m/s2
Warning:
The vibration emission during actualuse of the power tool can differ from the declared total
value depending on the waysin which the tool is used;and of the need to identifysafety
measuresto protect the operator that are based on an estimation ofexposure in the actual
conditions of use (taking account of all parts of the operation cycle such as the times when
the toolis switched off and when it isrunning idle in addition to the triggertime).
List of fasteners for S-90D:
Shank Dia. MAGAZINE
ψ2.9∼ψ4.2 mm ,ψ0.11∼ψ0.17 " 56∼70 pcs
Foreword:
This pneumatic framing nailer isdesigned
for truss building, blocking, pallet making
and crate and box assembling. Its well
balanced, ergonomic, comfort non-slip
cushioned grip and heavy duty driving
compatible staples to proper applications
ensure you a satisfactory tackle and enjoy
work.Rigid depth of drive adjustment isto
adjust nailing penetration.
Suitable applications:
Truss building, blocking, pallet making and
crate and box assembling.
Caution:
Framing nailers are only applying on wood. Not suitable for stapling or nailing into concrete,
masonry bricks or steel. Do not fire if staples are jammed, as this will cause damage to the
relevant parts.
DANGER
Indicates an imminently hazardous situation which, if not avoided, will result in death or
serious injury.
WARNING
Indicatesan potentially hazardous situation which, if not avoided, will result in death or
serious injury.
NOTE
Alerts the operator to useful information.
SAFETY INSTRUCTIONS
DANGER
1. Read this manualand understand allsafetyinstructions before operation the tool. Ifyou
have any questions, please contact our authorized representatives.
2. Onlythose fastenerslisted in the operating instructions may be used in the fastener driv-
ing tools.
3. Onlythe main energy and the lubricantslisted in the operating instructions may be used.
4. Fastener driving tools marked with an inverted equilateral triangle standing on one point
may onlybe used with an effective safetyyoke.
5. Fastener driving tools equipped with contact actuation or continuous contact actuation,
marked with the symbol" Do not use on scaffoldings,ladders", shall notbe used for spe-
cific application for example:
─when changing one driving location to another involves the use of scaffoldings, stairs,
ladders, or ladder alike constructions, e.g. roof laths,
─closing boxes or crates,
─fitting transportation safety systems e.g. on vehicles and wagons.
6. For the maintenance of fastener driving tools, only spare parts specified by the manufac-
turer or his authorized representative shall be used.
7. Repairs shall carried out by agents authorized by the manufacturer or by other specialis-
ts,having due regard to the information given in the operating instruction.
8. Standsfor mounting the fastener driving toolsto a support for example a work table shall
be designed and constructed by the stand manufacturer in such a waythat the fastener
driving toolcan be safelyfixed for the intended use,thus forexample avoiding damage,
distortion or displacement.
9. Fastener driving tools operated bycompressed air shall only be connected to compress-
ed air lines where the maximum allowable pressure cannotbe exceed by a factorof
more than 10%, which can for example be achieved by a pressure reduction valve
which includesa downstream safetyvalve.
10. When using fastener driving tools operated bycompressed air,particular attention must
be paid to avoid exceeding the maximum allowable pressure.
11. When using fastener driving toolsoperated by compressed air should onlybe operated
at the lowest pressure required for the workprocessat hand, in order to prevent unnece-
ssarilyhigh noise levels, increased wear and resulting failures.
12. Hazards caused by fire and explosion when using oxygen or combustible gasesfor ope-
rating compressed airoperated fastener driving tools.
13. Carry the fastenerdriving tool atworkpiece using onlythe handgrip,and never with the
trigger actuated. Never carrythe tool by the hose orpull the hose to move the tool.
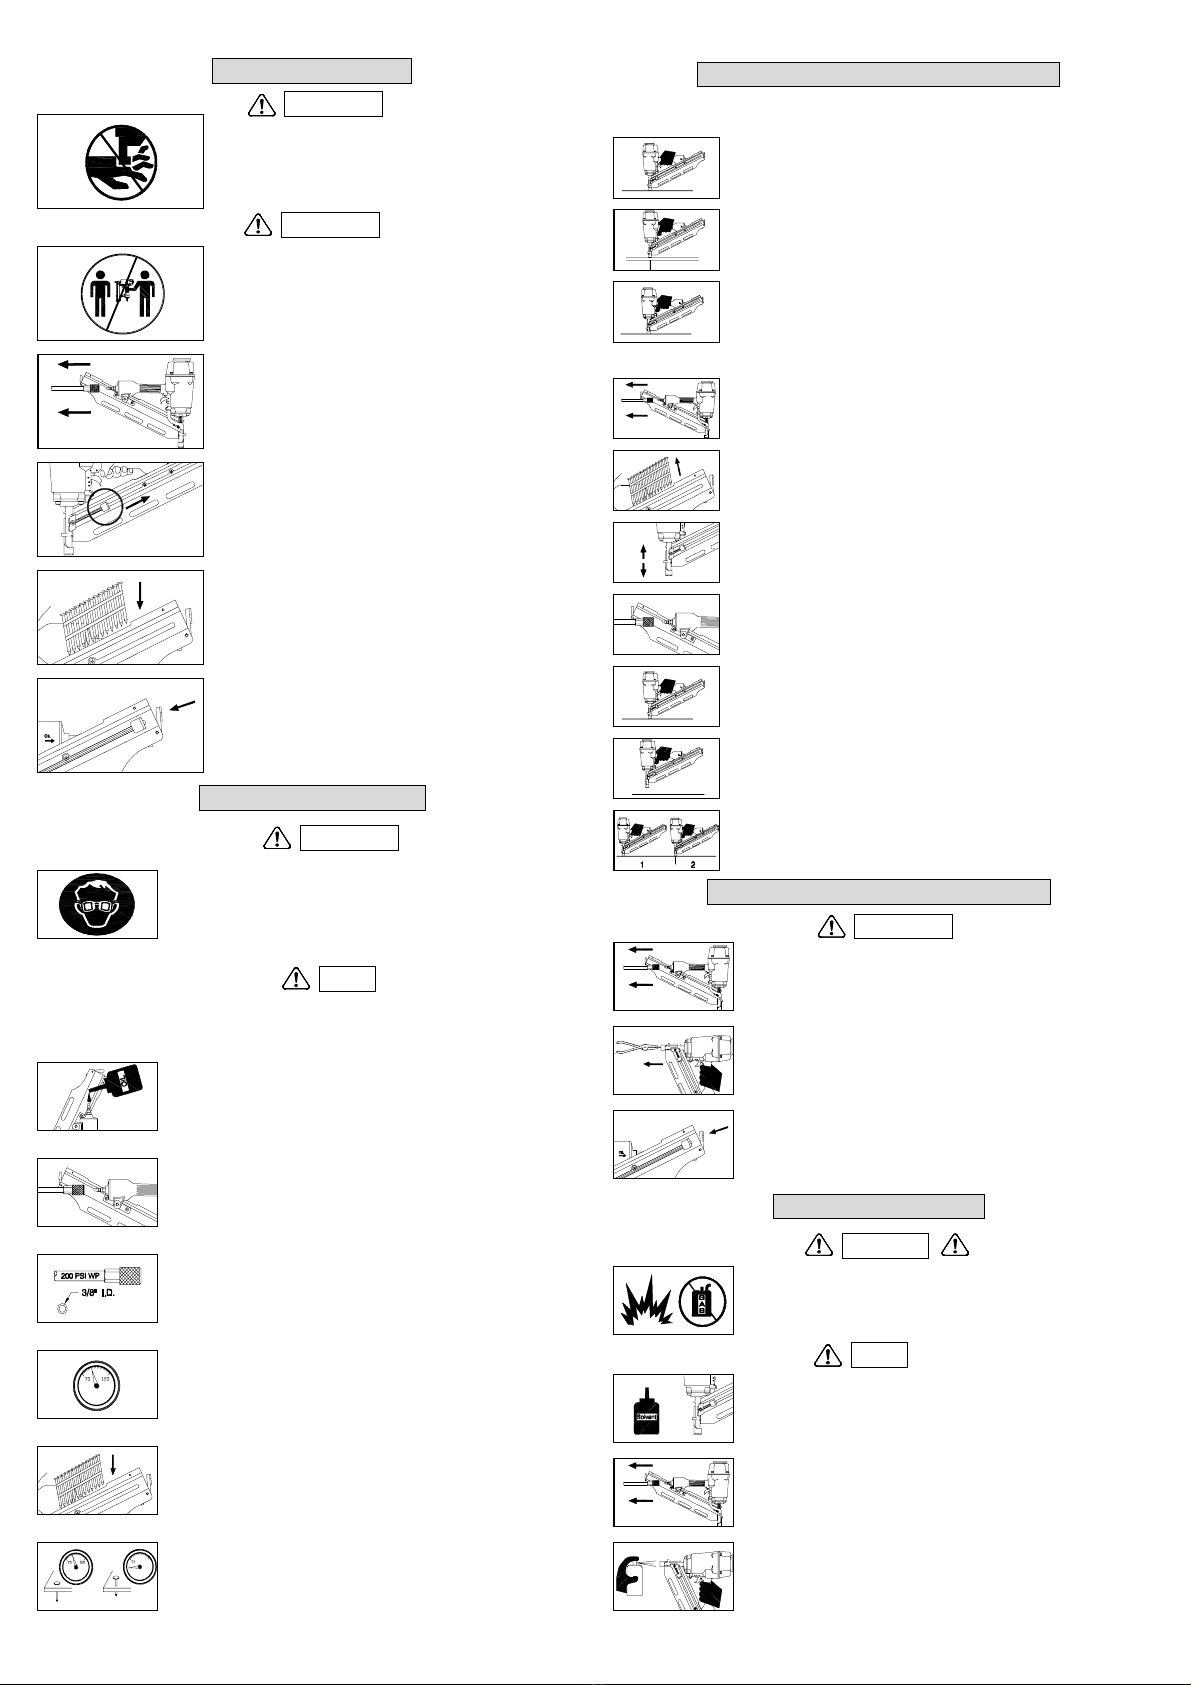
14. Disconnectthe tool from air supply before cleaning jams,
servicing, adjusting, and during non-operation.
15. Wear eye protection.
16. Do not use a check valve or anyother fitting which allows
air to remain in the tool.
17. Do not place your hand or any part of your body in the
fastener discharge area of the tool when connecting or
disconnecting air supply.
18. Never point tool at yourself or at any other person.
19. Do not use on scaffoldings, ladders.
AIR SUPPLY AND CONNECTION
NOTE
•Many airtool usersfind it convenient to use oilerto help provide oil
circulation through tool and increase the efficiencyand useful life of
the tool. Check oil level in the oiler daily.
•Many airtool user find itconvenient to use a filterto remove liquid
and impurities which can rust or wear internal parts of the tool. A
filter also increase the efficiency and usefulof the tool.The filter
must be checked on a dailybasis and if necessary drained.
•For better performance, install a 3/8" quick connector (1/4" NPT
threads) with an inside diameterof .315" on yourtool and a 3/8"
quick coupler on the air hose.
The following illustration shows the correct mode of connection to the air
supply system which will increase the efficiency and useful life of the tool.
LUBRICATION AND MAINTENANCE
NOTE
•Disconnect the air supplyfrom the toolbefore lubricating.
•Your tool requires lubrication before you use it for the first time.
•Wipe off excessive oil at the exhaust. Excessive oil will damage
O-ringsof tool. If in-line oiler is used, manual lubrication through the
air inlet is not required on a daily basis.
•Turn the tool so the inletis facing up and put one drop ofhigh
speed spindle oil,UNOCAL RX22, or 3-IN-1 oil into airinlet. Never
use detergent oil or additives. Operate the tool briefly after adding
oil.

LOADING THE TOOL
WARNING
•Do not place your hand orany part of your bodyin the
fastener discharge area of the tool when connecting or
disconnecting air supply.
WARNING
•Never point any operational fastener driving tool at
yourself or at any other person.
1. Disconnect air hose.
2. Pull the pusherback untilthe latch latchesit.
3. Insert a stick of fasteners into the magazine. Make sure
the pointed endsof the fastenersare loaded with the
pointsdownward. Also make sure fasteners are not dirty
or damaged.
4. Slightlypull back the pusher and push the latch to release
the pusher. And carefully allow the pusherto slide
forward until it makes contact with the rearmost nail stick.
OPERATING THE TOOL
WARNING
Protect your eyesand ears. Wear z87.1 safetyglasseswith side
shields. Wearhearing protection.Employers and usersare
responsible for ensuring the user or anyone near the tool wear this
safety protection.
NOTE
Check and replace anydamaged or worn components on the tool.
The safety warning labelson the tool mustalso be replaced if they
are not legible.
1. Add a few dropsof UNOCAL RX22 or 3-in-1 oil into the air inlet.
(See Fig. 1)
2. Attach a high flow quick connect fitting to the tool. (See Fig. 2)
3. Empty the magazine.
4. Connectthe tool to an air compressorusing a 3/8" I.D hose.
Make sure the hose hasa rated working pressure exceeding 200
PSI (13.8bar) and a female quick coupler. (See Fig. 3)
5. Regulate the air pressure to obtain 70 PSI (4.8 bar)at the tool.
(See Fig. 4)
6. Disconnect the air supply from the tool.
7. Load fastenersinto your tool following the instructions in this
manual. (See Fig. 5)
8. Reconnect the air supplyto the tool.
9. Test for proper fastener penetration by driving nails into a sample
piece ofwood. If the fasteners do not achieve the desired
penetration, adjust the air pressure to a highersetting until the
desired penetration isachieved. Do notexceed 110 PSI (7.6 bar)
at the tool. (See Fig. 6)
CONTACT SAFETY TRIP MECHANISM
OPERATING A CONTACT SAFETY TRIP TOOL:
-The operatorrequires finger to be off the trigger and the nose
of the tool to be placed on the workpiece.
-The contact safetytrip mechanism isthen depressed against the
workpiece and the triggeris pulled to drive a fastener.
-The trigger isreleased after each fastener is driven.
-Move the tool to next location and the above procedure repeated.
CHECKING OPERATION OF CONTACT SAFETY TRIP MECHANISM:
-Disconnect the air supplyfrom the tool.
-Empty the magazine.
-Make sure the trigger and contactsafetytrip mechanism move up
and down without any sticking.
-Connect air supply to the tool.
-Depressthe contact safety trip mechanismagainst the workpiece
without pulling the trigger. The tool must notcycle. Never use the
tool if a cycle occurs.
-Hold the toolclear of the workpiece.The contact safety trip
mechanism should return to its original down position. Pull the
trigger. The tool must not cycle. Never use the tool if a cycle
occurs.
-Depressthe contact safety mechanism again the workpiece and
pull the trigger, the tool must cycle.
CLEARING A JAM FROM THE TOOL
WARNING
Disconnect the tool from aircompressor before adjusting, clearing
jams, servicing, relocating and during non-operation.
1. Fastener jammed in fastener discharge area:
•Disconnect tool from air hose.
•Grab jammed fastener with pliers and remove.
2. Fastener jam inside magazine:
•Disconnect air tool from air hose.
•Pull back on fastener pusher until locked.
•Removed jammed fastener.
•Release fastener pusher.
CLEANING THE TOOL
DANGER
Never use gasoline or otherflammable liquids to clean the tool. Va
pors in the tool will ignite by a spark and cause the tool to explode
and result in death or serious personal injury.
NOTE
Solvents used to clean the nose ofthe tool and contacr safety trip
mechanism may soften the tar on the shingles and cause the
buildup to be accelerated. Make sure to dry the tool thoroughly
aftercleaning and before operating the toolagain.
1. Disconnectthe air supply from the tool.
2. Remove tar buildup with kerosene #2 fuel oilor diesel fuel. Do
not allow solvent to getinto the cylinderor damage may occur.
Dry off the tool completelybefore use.
Fig.1
Fig.2
Fig.3
Fig.4
Fig.5
Fig.6

H
Description Spec Q'ty Description Spec Q'ty Description Spec Q'ty
FB2501 PISTON STOP 1 OP009A O-RING P9 1 SB1701 PUSHER SPRING 1
FE1101 EXHAUST CAP 1 OP020A O-RING P20 1 SB1801 SPRING SEAT 1
FE1201 EXHAUST CAP RING 1 SA0901 HEAD VALVE SEAL 1 SB1901 WASHER 1
KF0516 FLAT HD.BOLT M5×0.8-16L 1 SA1001W RESTRICTIVE TRIGGER ASSY. 1 SB2101 COMPRESSION SPRING 1
KM0420 HEX.SOC.HD.BOLT M4×0.7-20L 1 SA1002 HEAD VALVE PISTON 1 SB2301 CYLINDER RING 1
KM0508 HEX.SOC.HD.BOLT M5×0.8-8L 2 SA1601W TRIGGER ASSY. 1 SB2401 CHECK SEAL 1
KM0510 HEX.SOC.HD.BOLT M5×0.8-10L 2 SA2001 LATCH BUSHING 1 SB2501 SUPPORT 1
KM0516 HEX.SOC.HD.BOLT M5×0.8-16L 1 SA2301 PILOT VALVE 1 SB2601 COLLAR 1
KM0616 HEX.SOC.HD.BOLT M6×1.0-16L 2 SA2401 TRIGGER VALVE STEM 1 SB2901 SAFETY 1
KM0620 HEX.SOC.HD.BOLT M6×1.0-20L 1 SA2501 TRIGGER VALVE SEAT 1 SB3001 WORK CONTACTING ELEMENT 1
KM0630 HEX.SOC.HD.BOLT M6×1.0-30L 4 SA2601 TRIGGER VALVE SEAT 1 SB3201 PISTON STOP 1
KM0825 HEX.SOC.HD.BOLT M8×1.25-25L 4 SA2701 SPRING 1 SD0101 DRIVER 1
KP3015 PARALLEL PIN ∮3×15L 2 SA2901 COMPRESSION SPRING 1 SD0201 DRIVER GUIDE 1
KP4022 PARALLEL PIN ∮4×22L 1 SA3001 COMPRESSION SPRING 1 SD0301 NOSE 1
KR0306 BUTTON HD.BOLT M3×0.5-6L 1 SA3101 SAFETY GUIDE 1 SD0301W DRIVER ASSY. 1
KS3008 SPRING PIN ∮3-8L 1 SA3201 CONTACT LEVER 1 SD0401 MAGAZINE SEAT 1
KS3016 SPRING PIN ∮3-16L 1 SA3301 TRIGGER 1 SD0501 PUSHER 1
KS3024 SPRING PIN ∮3-24L 3 SA3701 LATCH 1 SD0601 NAIL GUIDE 1
KS3028 SPRING PIN ∮3-28L 2 SA4201 SCREW 2 SD0701 SUPPORT 1
OA016A O-RING ARP568-016 1 SA4401 GROMMET 1 SD0901 DUST SHIELD 1
OA036A O-RING ARP568-036 1 SA4601 SPACER 1 YG0601 SPRING WASHER ∮66
OA146A O-RING ARP568-146 1 SB0101 BODY 1 YG0801 SPRING WASHER ∮84
OA227A O-RING ARP568-227 1 SB0201 END CAP 1 YL0407 LOCK NUT M4×0.7 1
OA237A O-RING ARP568-237 1 SB0302 CYLINDER CAP 1 YL0508 LOCK NUT M5×0.8 3
OA328H O-RING 46.99×5.33 1 SB0401 CAP SEAL 1 YL0610 LOCK NUT M6×1.0 3
OB032A O-RING 2.5×1.4 2 SB0501 CYLINDER 1 YW0301 FLAT WASHER ∮31
OB521A O-RING 51.5×3.1 1 SB0601 MAIN PISTON 1 YW0601 FLAT WASHER ∮66
▲OB651A O-RING 65x3 1 SB0801 TOP BUMPER 1 #N/A #N/A 0
▲OB691A O-RING 68.5×2.95 1 SB0901 BOTTOM BUMPER 1 #N/A #N/A 0
OP006A O-RING P6 2 SB1601 ROLLER 1 #N/A #N/A 0
★☆ If you need to order parts, please mark both Parts No. and Description. ☆★
S90DB08 (SD/S1-08)
Part_No Part_No Part_No
Table of contents
Other Aplus Nail Gun manuals