apollo endosurgery OverStitch ESS-G02-160 User manual

SINGLE PATIENT USE
DISPOSABLE
Caution:
Please read all instructions prior to use
GRF-00002-00R20
OverStitch™ Endoscopic Suturing System ESS-G02-160
OverStitch™ 2-0 Polydioxanone Suture PDO-G02-020
OverStitch™ 2-0 Polypropylene Suture PLY-G02-020
OverStitch™ 2-0 Polypropylene Suture PLY-G02-020-A
OverStitch™ 2-0 Polypropylene Suture PLY-G02-020-APL
OverStitch™ Suture Cinch CNH-G01-000
Tissue Helix THX-165-028
Product Code:
Dening the Future
of Endoscopic Surgery™
OverStitch™
English page 2
[Endoscopic Suturing System] (ESS)
INSTRUCTIONS FOR USE
Español página 8
[Sistema de sutura endoscópica]
INSTRUCCIONES DE USO
Deutsch Seite 14
[Endoskopisches Nahtsystem]
GEBRAUCHSANWEISUNG
Français page 20
[Système de suture endoscopique]
MODE D’EMPLOI
Italiano pagina 26
[Sistema di sutura endscopica]
ISTRUZIONI PER L’USO
Português página 32
[Sistema de sutura endoscópica]
INSTRUÇÕES DE UTILIZAÇÃO
Nederlands pagina 38
[Endoscopisch hechtsysteem]
GEBRUIKSAANWIJZING
Dansk side 44
[Endoskopisk sutureringssystem]
BRUGSANVISNING
Norsk side 50
[Endoskopisk sutureringssystem]
BRUKSANVISNING
Suomi sivu 56
[Endoskooppinen ommeljärjestelmä]
KÄYTTÖOHJEET
Svenska sidan 62
[Endoskopiskt sutureringssystem]
BRUKSANVISNING
Polski strona 68
[System do wziernikowego zakładania szwów]
INSTRUKCJA UŻYCIA
Čeština strana 74
[Endoskopický šicí systém]
NÁVOD K POUŽITÍ
Magyar oldal 80
[Endoszkópos varrógéprendszer]
HASZNÁLATI ÚTMUTATÓ
български страница 86
[Ендоскопска система за хирургични шевове]
ИНСТРУКЦИИ ЗА УПОТРЕБА
Eesti lk 92
[Endoskoopiline õmblussüsteem]
KASUTUSJUHEND
Srpski strana 98
[Sistem za endoskopsko ušivanje]
UPUTSTVO ZA UPOTREBU
Slovenčina strana 104
[Endoskopický šijací systém]
NÁVOD NA POUŽITIE
Slovenščina stran 110
[Endoskopski sistem za šivanje]
NAVODILA ZA UPORABO
Română pagina 116
[Sistem de sutură endoscopică] (SSE)
INSTRUCȚIUNI DE UTILIZARE
Українська сторінка 122
[Система накладання
ендоскопічного шва]
ІНСТРУКЦІЯ З ВИКОРИСТАННЯ
Ελληνικά σελίδα 128
[Σύστημα ενδοσκοπικής συρραφής]
ΟΔΗΓΙΕΣ ΧΡΗΣΗΣ
Türkçe sayfa 134
[Endoskopik Sütür Sistemi]
KULLANMA TALİMATI
140
[ ]
Bahasa Indonesia halaman 146
[Endoscopic Suture System]
(ESS/Sistem Jahitan Endoskopi)
PETUNJUK PENGGUNAAN

2
Table of Symbols
Single use only. Disposable. Do not resterilize.
Caution: Federal law (USA) restricts this device to sale by or on the order of a physician.
Patent Pending.
DISCLAIMER OFWARRANTY AND LIMITATION OF REMEDY
THERE IS NO EXPRESS OR IMPLIED WARRANTY, INCLUDING WITHOUT LIMITATION ANY IMPLIED WARRANTY OF MERCHANTABILITY OR FITNESS FOR A PARTICULAR
PURPOSE, ON THE APOLLO ENDOSURGERY, INC. PRODUCT(S) DESCRIBED IN THIS PUBLICATION. TO THE FULLEST EXTENT PERMITTED BY APPLICABLE LAW, APOLLO
ENDOSURGERY, INC. DISCLAIMS ALL LIABILITY FOR ANY INDIRECT, SPECIAL, INCIDENTAL, OR CONSEQUENTIAL DAMAGES, REGARDLESS OF WHETHER SUCH LIABILITY IS
BASED ON CONTRACT, TORT, NEGLIGENCE, STRICT LIABILITY, PRODUCTS LIABILITY OR OTHERWISE. THE SOLE AND ENTIRE MAXIMUM LIABILITY OF APOLLO ENDOSURGERY,
INC., FOR ANY REASON, AND BUYER’S SOLE AND EXCLUSIVE REMEDY FOR ANY CAUSE WHATSOEVER, SHALL BE LIMITED TO THE AMOUNT PAID BY THE CUSTOMER
FOR THE PARTICULAR ITEMS PURCHASED. NO PERSON HAS THE AUTHORITY TO BIND APOLLO ENDOSURGERY, INC. TO ANY REPRESENTATION OR WARRANTY EXCEPT
AS SPECIFICALLY SET FORTH HEREIN. DESCRIPTIONS OR SPECIFICATIONS IN APOLLO ENDOSURGERY, INC PRINTED MATTER, INCLUDING THIS PUBLICATION, ARE MEANT
SOLELY TO GENERALLY DESCRIBE THE PRODUCT AT THE TIME OF MANUFACTURE AND DO NOT CONSTITUTE ANY EXPRESS WARRANTIES OR RECOMMENDATIONS FOR USE
OF THE PRODUCT IN SPECIFIC CIRCUMSTANCES. APOLLO ENDOSURGERY, INC. EXPRESSLY DISCLAIMS ANY AND ALL LIABILITY, INCLUDING ALL LIABILITY FOR ANY DIRECT,
INDIRECT, SPECIAL, INCIDENTAL, OR CONSEQUENTIAL DAMAGES, RESULTING FROM REUSE OF THE PRODUCT.
Description Symbol Description Symbol Description Symbol
Consult Instructions for Use Manufacturer Use By
Do Not Re-use
Caution: Federal law (USA) restricts
this device to sale by or on the order
of a physician
Lot Number
Sterilized Using Ethylene Oxide Date of manufacture Do not use if package is damaged
Reference Number Do Not Resterilize Authorized Representative in the
European Community
Medical Device Contains hazardous substance
1. Intended Use
The Apollo Endosurgery OverStitch™ Endoscopic Suture System (ESS) is intended for
endoscopic placement of suture(s) and approximation of soft tissue.
1.1 Contraindications
Contraindications include those specic to use of an endoscopic suturing system, and
any endoscopic procedure, which may include, but not limited to, the following:
• This system is not for use where endoscopic techniques are contraindicated.
• This system is not for use with malignant tissue.
1.2 Warnings
• Do not use a device where the integrity of the sterile packaging has been
compromised or if the device appears damaged.
• Only physicians possessing sufcient skill and experience in similar or the same
techniques should perform endoscopic procedures.
• Contact of electrosurgical components with other components may result in injury
to the patient and/or operator as well as damage to the device and/or endoscope.
• Verify compatibility of endoscopic instruments and accessories and ensure
performance is not compromised.
NOTE: Refurbished scopes may no longer confirm to original specifications.
• Ensure that there is sufcient space for the Needle to open.
• Ensure that the Handle Grip of the Endoscopic Suturing System is closed and
locked during intubation and extubation.
• Users should be familiar with surgical procedures and techniques involving
absorbable sutures before employing Synthetic Absorbable Sutures for wound
closure, as the risk of wound dehiscence may vary with the site of application and
the suture material used.
• Reuse or reprocessing of the OverStitch system could result in device malfunction
or patient consequences to include:
–Infection or the transmission of disease
–Failure of the handle mechanism causing the device to become locked on
tissue that may require surgical intervention
–Reduced retention on the Endoscope, causing the Endcap to detach during
use that may require surgical intervention to retrieve
–Reduced retention of the Anchor to the Needle Body, resulting in an
inadvertent Anchor drop causing procedural delay or requiring subsequent
intervention
–Bending of the Needle Body, preventing the physician from driving the
Needle correctly or performing the intended procedure
–Failure of the Helix to extend fully, limiting the ability to acquire tissue and
perform intended procedure
• If subject device is used to oversew foreign objects, such as staples, stents,
clips or mesh, it is possible for the needle to become trapped in the foreign body,
requiring surgical intervention.
• In situations where the operative site poses a risk of harm to adjacent anatomic
structures, use of endoscopic accessories such as the OverStitch Tissue Helix
is recommended to retract the tissue intended to be sutured away from these
unseen structures.
1.3 Precautions
• The System may only be used if purchased from Apollo Endosurgery, Inc. or one of
its authorized agents.
• With the Endoscopic Suturing System installed, the endoscope’s primary channel
effectively becomes a 3.2 mm channel.
• An overtube with an internal diameter of at least 16.7 mm may be used with the
system to protect the esophagus.
1.4 System Compatibility
The OverStitch ESS is compatible with the sutures identified on Page 1.
The OverStitch is compatible with the following endoscopes:
• Olympus 2T160, 2TH180, or 2T240
• Fuji EI-740D/S
Availability of compatible devices may vary depending on geography.
1.5 Adverse Events
Possible complications that may result from using the Endoscopic Suturing System
include, but may not be limited to:
• Pharyngitis / Sore throat
• Nausea and / or Vomiting
• Abdominal pain and / or Bloating
• Hemorrhage
• Hematoma
• Conversion to laparoscopic or open procedure
• Stricture
• Infection / Sepsis
• Pharyngeal, colonic and/or esophageal perforation
• Esophageal, colonic and/or pharyngeal laceration
• Intra-abdominal (hollow or solid) visceral injury
• Aspiration
• Wound dehiscence
• Acute inflammatory tissue reaction
• Death
NOTE: Any serious incident that has occurred in relation to the device should be reported
to Apollo Endosurgery (see contact information at the end of this document) and any
appropriate government entity.
English

3
English
2. Packaged System
3. Nomenclature
Needle Driver & Anchor
Exchange
Package 1
Package 2
Package 3 Package 4
Polydioxanone (absorbable) -
VIOLET
Polypropylene (nonabsorbable) - BLUE
Endoscope
{ }
Needle Driver
Endcap
Anchor Exchange
Anchor Release Button
Needle Driver Handle
Endoscope Handle
Suture Assembly
Anchor Body
Suture
Helix Tip
Helix
Helix Handle
Cinch
Cinch Handle
Collar Plug
Suture Loading Loop
Helix
(AVAILABLE SEPARATELY)
Cinch
Suture Assembly

4
English
4. Assembly
4.1. Place the compatible endoscope on a suitable
surface for assembly.
NOTE: Ensure standard channel valves are tted to
working channels.
4.2. Remove Needle Driver from packaging.
4.3. Close Needle Body.
‘click’
NOTE: Ensure Endcap is not dropped or otherwise
damaged.
4.4. Push alignment tube into the primary working
channel until Endcap is ush with Endoscope face.
NOTE: Resistance should be felt when attaching the
Endcap as this indicates correct attachment.
NOTE: Ensure that the secondary working channel
is not obstructed on the Endoscope.
WARNING: Ensure Endcap is fully seated on
Endoscope.
4.5. Assemble Needle Driver handle onto Endoscope.
NOTE: Ensure external cable is not twisted around
Endoscope.
4.6. Connect Endoscope to Tower.
Load Anchor
4.7. Select appropriate Suture type / size.
4.8. Remove Suture Assembly and Anchor Exchange
from packaging.
4.9. Load the Anchor.
4.10. Remove Suture from Suture Cartridge by holding
and pulling the Suture, not the Anchor or Anchor
Exchange.
NOTE: Ensure Suture is not tangled after removal
from the cartridge.
4.11. Open valve cover and insert Anchor Exchange into
primary channel of Endoscope.
CAUTION: Do not use when valve covers are closed
as suture drag will be increased.
4.12. Using a ‘pencil-grip’ on the catheter for optimum
control, advance Anchor Exchange until Anchor is
positioned near distal end of Endoscope.
CAUTION: If resistance is encountered when
advancing the Anchor Exchange through the
working channel of the Endoscope, reduce the
Endoscope angulation until the device passes
smoothly.
4.13. Insert Endoscope into patient.
WARNING: Do not introduce the device with the
Needle Body in its open position.
5. Navigating to target anatomy
5.1. Advance until target anatomy is located.
CAUTION: When intubating or extubating with
the Endoscopic Suturing System, ensure that the
working length of the Endoscope and the actuation
catheter are advanced and retracted together.
5.2. Open Needle Body.
5.3. Advance Anchor Exchange and/or manipulate
Endoscope to create Suture slack.
5.4. Once sufcient slack has been created, retract
Anchor Exchange into the Endoscope.
5.5. Close Needle Body.
5.6. Use a ‘pencil-grip’ on the white portion of the cable
to advance Anchor Exchange until Anchor fully seats
onto Needle Body.
‘click’
5.7. A tactile ‘click’ or rm stop may be felt as the
Anchor seats fully onto Needle Body.
5.8. Check the monitor image to ensure Anchor is
properly installed on Needle Body.
5.9. Ensure that the proximal end of the Suture is visible
beyond the Endoscope channel valves.
5.10. Fully depress Anchor Release Button to release
Anchor.
5.11. With Anchor Release Button still fully depressed,
slightly retract Anchor Exchange.
‘hold’
6. Tissue and Suture Management
6.1. Open Needle Body.
CAUTION: If the Needle Body does not open,
ensure that the Anchor has been released from the
Anchor Exchange.
WARNING: Ensure appropriate Suture slack
has been created for desired Suture path and
pattern. Advance Anchor Exchange and/or
manipulate Endoscope to create Suture slack.
6.2. Position tissue in appropriate location for suturing,
using Apollo Helix or Endoscope compatible
accessory if required.
7. Use ofTissue Helix (Optional)
7.1. Advance Helix into secondary channel of Endoscope
in the retracted position, until distal tip is visible on
the monitor.
CAUTION: If resistance is encountered when
advancing the Helix through the working channel of
the Endoscope, reduce the Endoscope angulation
until the device passes smoothly, and ensure that
the secondary working channel is not obstructed on
the Endoscope.
7.2. Fully depress Helix Handle button to expose Helix Tip.
CAUTION: Do not depress Helix Handle button
while advancing Helix through Endoscope.

5
7.3. Acquire tissue by rotating Helix Handle clockwise
until correct tissue depth is achieved.
7.4. Maintain gentle forward pressure during tissue
acquisition.
7.5. Advance / retract Helix to position tissue into
desired location.
8. Suturing
8.1. Drive Needle through tissue by closing the Needle
Body.
8.2. Ensure that the Needle Arm does not inadvertently
close on any foreign object or device.
Retrieve Anchor
8.3. Use a ‘pencil-grip’ to advance the Anchor Exchange
until the Anchor is engaged and resistance is felt.
‘click’
NOTE: Resistance may vary due to the position of
the Endoscope.
8.4. Retract Anchor Exchange to acquire Anchor.
‘pop’
8.5. Use a ‘pencil-grip’ on the white section of the cable
and place the remaining ngers of the same hand
on the Endoscope housing to prevent damage to
Suture or tissue once the Anchor ‘pops’ off the
Needle Body.
CAUTION: Do not press the Anchor Release Button,
as this may cause inadvertant drop of the Anchor.
WARNING: If sufficient slack has not been
created prior to driving the Anchor through
tissue, retraction of the Anchor Exchange may be
difficult and the Anchor may not release correctly
from the Needle Body.
ReleaseTissue
8.6. Rotate Helix handle counter-clockwise until the
device is free from tissue.
8.7. Return the Helix handle button.
8.8. Check monitor to ensure tip is fully retracted into
shaft before withdrawing into Endoscope.
8.9. Withdraw Helix a short distance into Endoscope.
8.10. Open Needle Body.
CAUTION: Do not tension the Suture with the
Anchor in the Needle Body.
8.11. To continue placing stitches with this Anchor,
repeat sections 5-8.
If stitching is complete for this Anchor, proceed to
section 9 to approximate tissue, secure and cut the
Suture.
Multiple Anchors can be utilized with each Needle
Driver and Anchor Exchange.
9. Securing and Cutting Suture
9.1. Remove accessories (Apollo Helix or similar) from
Endoscope.
9.2. Ensure Anchor is in Anchor Exchange and open
Needle Body.
9.3. Advance Anchor distal of the alignment tube.
9.4. Fully depress Anchor Release Button and retract
Anchor Exchange to release Anchor.
CAUTION: Do not release the Anchor inside the
Endoscope’s working channel.
9.5. Remove Anchor Exchange from Endoscope.
NOTE: The Anchor Exchange can be utilized for
additional sutures.
9.6. Feed proximal end of Suture into removable Suture
Loading Loop.
9.7. After threading, release the proximal end of the
Suture to enable loading.
9.8. Pull Suture Loading Loop parallel to the device, to
pull Suture into Cinch.
9.9. Holding the proximal end of the Suture, feed the
Cinch down the working channel until ‘Plug and
Collar’ can be seen on the monitor.
9.10. Pull the Suture and apply counter traction to the
Cinch until the tissue is approximated and the
desired Suture tension is achieved between the
Anchor and the Cinch Collar.
NOTE: It is the Collar that sets the nal position of
the Cinch, not the Plug.
WARNING: Excessive tension may damage
tissue.
9.11. Remove safety spacer from Cinch handle.
CAUTION: The safety spacer must only be removed
immediately prior to deploying Cinch.
9.12. Firmly squeeze Cinch Handle to deploy Cinch and
cut Suture.
CAUTION: Suture tension must be maintained.
NOTE: Signicant force is required to pull and lock
the Plug into the Collar, a ‘pop’ can often be felt
once the Suture is cut.
9.13. Remove the Cinch.
9.14. Close Needle Body.
10. Multiple Sutures
10.1. Anchor Exchange and Needle Driver can be utilized
with multiple sutures. Removal of the Endoscope
after cinching is not required if further sutures are
to be deployed.
WARNING: If the Endoscope is removed
between stitching for cleaning, ensure the
Endcap is fully seated before next intubation.
Reseat if necessary.
NOTE: If removed and reinstalled, ensure that the
secondary working channel is not obstructed on the
Endoscope.
10.2. To use another Suture Assembly, return to step 4.7
for Anchor loading and follow all subsequent steps.
If suturing is complete, proceed to section 11 for
removal of the device.
English

6
11. Removal of Device
11.1 Remove any accessory devices from Endoscope.
11.2. Ensure the Needle Body is closed and retract
Endoscope from patient, making sure the external
cable is retracted together with the Endoscope.
11.3. Remove Endcap from Endoscope.
NOTE: Do not hold Needle Arm to remove the
Endcap.
11.4. Remove Needle Driver from Endoscope by exing
the scope attachment bracket around the working
channels.
12. MRI Safety Information
MR Conditional
MR
Non-clinical testing has demonstrated that the Sutures,
Cinches and Anchors (collectively termed Anchoring
System) deployed by the OverStitch Endoscopic Suturing
System are MR Conditional.
A patient with this Anchoring System can be safely
scanned immediately after placement in an MR system
meeting the following conditions:
Static Magnetic Field
- Static magnetic eld of 1.5 T or 3.0 T.
- Maximum spatial eld gradient of 2,000 gauss/cm
(20 T/m).
- Maximum MR system reported, whole body averaged
specic absorption rate (SAR) of 2 W/kg.
Under the scan conditions dened above, the
Anchoring System is expected to produce a maximum
temperature rise of less than 2º C after 15 minutes of
continuous scanning.
In non-clinical testing, the image artifact caused by the
Anchoring System extends approximately 10 mm from
this device when imaged with a gradient echo pulse
sequence and a 3.0 T MRI system.
13. Hazardous Substance Information
Contains Hazardous Substance
CMR Statement – The stainless steel and cobalt alloy
components within this device contain the following
substance(s) defined as a CMR (carcinogenic, mutagenic
or toxic to reproduction) 1A/1B and/or endocrine
disrupting in a concentration above 0.1% weight by
weight:
Cobalt (CAS No. 7740-48-8; EC No. 231-158-0)
Current scientific evidence supports medical devices
manufactured from these cobalt alloys or stainless steels
containing cobalt do not cause increased risk of cancer or
adverse reproductive effects.
14. Troubleshooting
14.1. Needle Body will not open:
Cause Resolution
14.1.1. Needle obstructed: i. Assess the space in which you are working and maneuver the catheter and Endoscope as a system, straighten
the Endoscope to the non-Retroexed position.
14.1.2. Suture movement restricted:
i. If the Anchor is on the Needle Body, ensure the suture is not held proximally near the handle during the opening
operation.
ii. Transfer the Anchor to the Anchor Exchange. Open the Needle Body. Slowly retract the Anchor Exchange
proximally and then advance the Needle Body distally to free the Suture.
14.1.3. Needle Driver catheter looped or kinked:
i. Check to ensure that the catheter running down the outside of the Endoscope is not looped or kinked. Straighten
the Endoscope to the non-Retroexed position. Advance the Endoscope forward and slightly pull any slack from the
actuation catheter proximally until minimal resistance is felt. Grasp both the actuation catheter and Endoscope and
adjust by advancing and retracting as a system.
14.1.4. Foreign body obstruction:
i. Remove the Anchor Exchange only:
a. Transfer the Anchor to the Needle Body and remove the Anchor Exchange from the Endoscope.
b. Load a grasper through the primary channel and push the Needle Body open.
ii. Remove the Anchor and Anchor Exchange, cutting the Suture if necessary:
a. Transfer the Anchor to the Needle Body and remove the Anchor Exchange from the Endoscope.
b. Through either channel use an appropriate accessory to cut the Suture.
c. Use an accessory to push open the Needle Body
d. Use appropriate means to remove the cut Suture.
iii. Once standard endoscopic techniques have been exhausted, utilize laparoscopic techniques to remove the
device.
14.2. Needle Body will not close:
Cause Resolution
14.2.1. General obstruction:
i. Follow steps 14.1.1, 14.1.2, 14.1.3 above (Needle Body will not open).
ii. Ensure the Needle Driver handle is locked closed and:
a. Stretch the Needle Driver catheter to change the effective length of the Needle Body drive cable.
b. Remove the Anchor Exchange and use graspers (through the primary channel) to grab the Needle Body. Cut the
Suture if necessary.
14.2.2. Needle Driver cable broken:
i. Deploy the Anchor and Cinch. Advance grasper through endoscope and secure Needle Driver. Pull Needle Driver
closed while removing the device. If using an overtube, advance the overtube as far distally as possible and withdraw
the endoscope and device into the overtube, using the distal tip of the overtube to close the Needle Body.
14.3. Anchor Exchange will not exchange:
Cause Resolution
14.3.1. Anchor Exchange will not install Anchor onto the
Needle Body:
i. Ensure there is sufcient Suture slack and the Suture outside Endoscope is not entangled.
ii. Ensure Anchor Exchange is properly positioned in alignment tube of Needle Driver.
iii. If Anchor and Suture are through tissue, either drop Anchor and deploy Cinch per Section 9 of Instructions for
Use or drop Anchor and use a suitable accessory to cut and remove the Suture.
iv. If Anchor and Suture are not through tissue, close handle of Needle Driver. Remove Endoscope. Replace Anchor
and/or Anchor Exchange.
14.3.2. Anchor Exchange will not release an Anchor: i. Ensure there is sufcient Suture slack and the Suture outside Endoscope is not entangled.
ii. Ensure the Anchor Exchange Release Button is FULLY depressed while retracting Anchor Exchange.
English

7
Cause Resolution
iii. Reduce the articulation / tortuosity of the Endoscope (if possible) and try to release the Anchor.
iv. Use accessories compatible with Endoscope secondary working channel to cut and remove the Suture.
v. Replace the Anchor Exchange.
14.3.3. Anchor Exchange will not retrieve Anchor from Needle
Body:
i. Ensure there is sufcient Suture slack and Needle Driver handle is in closed position.
ii. Use ‘pencil-grip’ to advance Anchor Exchange until the Anchor is engaged and resistance is felt. Retract Anchor
Exchange to acquire Anchor.
iii. If the Anchor cannot be retrieved, replace the Anchor Exchange. Alternatively, use a suitable accessory to cut
and remove the Suture.
iv. Replace the Anchor and resume suturing per Section 8 of Instructions for Use.
14.4. Cinch does not cut the Suture when fired:
Cause Resolution
14.4.1. Suture not cut: i. Use a suitable accessory through the secondary working channel to cut the Suture and remove the Cinch.
ii. Use standard endoscopic techniques to remove the cut Suture.
14.5. Inadvertent drop of Anchor:
Cause Resolution
14.5.1. Anchor Exchange button depressed out of sequence:
i. Retrieve the Anchor as a foreign body, or follow the procedure to Cinch in place. If the Anchor is dropped inside
the working channel, use the Anchor Exchange or 3.2 mm compatible grapser to push the Anchor out through the
Endoscope.
Do not attempt to pull the Anchor back through the Endoscope as it may get stuck in the channel or y-junction at
the Endoscope handle.
14.6. Suture entanglement:
Cause Resolution
14.6.1. Suture outside eld of view: i. Close the Needle Driver Handle and manipulate the Endoscope back to release.
14.6.2. Suture behind Tissue Guard:
i. Slightly close the Needle Body while retracting the Endoscope.
ii. If necessary, transfer the Anchor to the Anchor Exchange.
iii. Open the Needle Body and advance the Anchor Exchange beyond the Endcap to push the Suture free.
14.6.3. Suture twisted:
i. If the Suture is twisted, move the Endoscope and transfer the Anchor between the Needle Body and Anchor
Exchange, on the opposite side of the suture thread, as needed to untwist.
NOTE: If the twist was noted immediately after articulation of the Endoscope, rst try to articulate in reverse order
to remove.
ii. If the Anchor has been deployed, use the Cinch to push and guide the Suture free.
14.7. Endcap detachment from Endoscope:
Cause Resolution
14.7.1. Pushed off during use:
i. Close the Needle Body. Using a rat-toothed grasper, capture the alignment tube “zigzag” cutout and remove
any slack in the Actuation Catheter and slowly remove the device from the patient. If using an overtube, using a
rat-toothed grasper, capture the alignment tube “zigzag” cutout and remove any slack in the Actuation Catheter and
slowly remove the device from the patient.
14.8. Helix does not unscrew:
Cause Resolution
14.8.1. Helix stuck in tissue:
i. Use a suitable accessory through the primary channel to apply counter traction to the tissue around the Helix, and
pull the Helix free.
ii. Once endoscopic techniques have been exhausted, utilize laparoscopic techniques to remove the Helix.
English

8
Tabla de símbolos
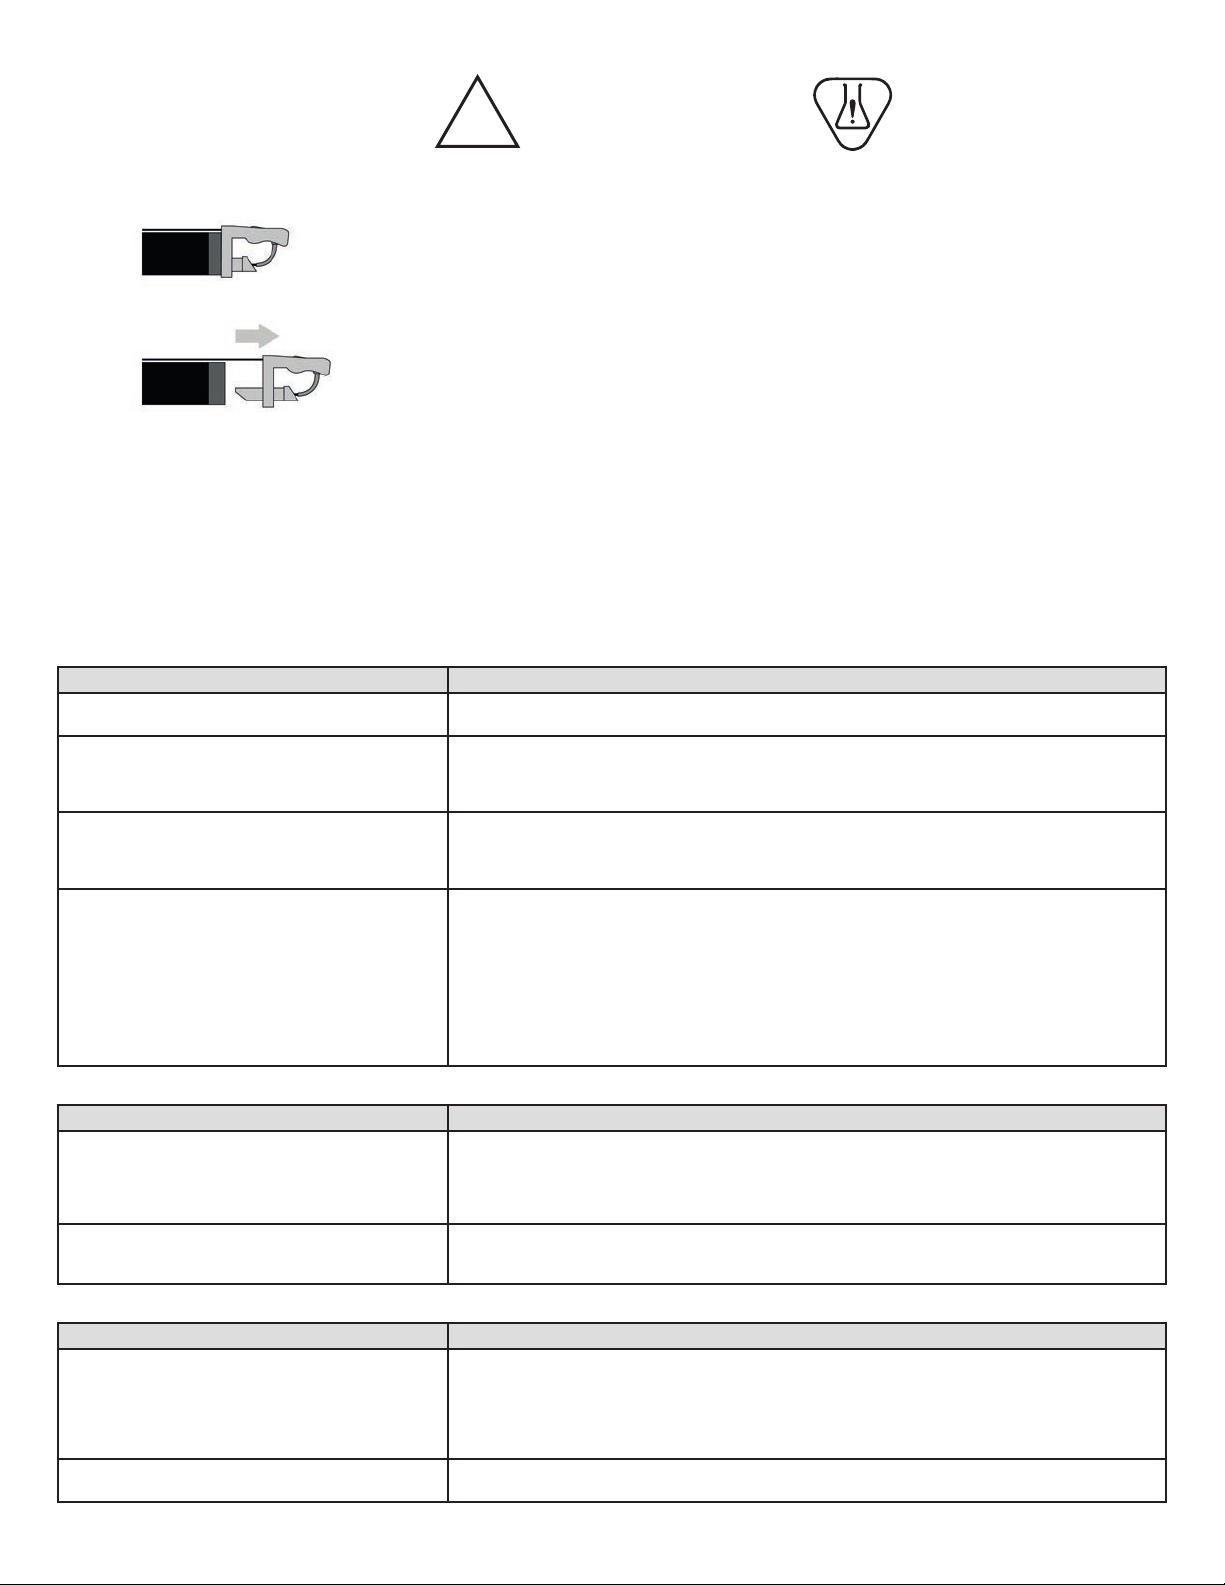
Para un solo uso. Desechable. No reesterilizar.
Precaución: La ley federal de EE. UU. restringe laventade este dispositivo a médicos o por prescripción facultativa.
Patente en trámite.
EXENCIÓN DE GARANTÍAY LIMITACIÓN DE RECURSOS
NO SE OTORGA NINGUNA GARANTÍA, NI EXPRESA NI IMPLÍCITA, INCLUIDAS SIN LIMITACIÓN LAS GARANTÍAS IMPLÍCITAS DE COMERCIABILIDAD O ADECUACIÓN A UN
PROPÓSITO PARTICULAR, EN LOS PRODUCTOS DE APOLLO ENDOSURGERY, INC. DESCRITOS EN ESTA PUBLICACIÓN. HASTA EL MÁXIMO GRADO PERMITIDO POR LA
LEY APLICABLE, APOLLO ENDOSURGERY INC. RECHAZA TODA RESPONSABILIDAD POR CUALQUIER DAÑO INDIRECTO, ESPECIAL, INCIDENTAL O RESULTANTE, CON
INDEPENDENCIA DE QUE DICHA RESPONSABILIDAD SE BASA EN CONTRATO, RESPONSABILIDAD EXTRACONTRACTUAL, NEGLIGENCIA, RESPONSABILIDAD ESTRICTA,
RESPONSABILIDAD POR PRODUCTOS U OTRO TIPO. LA ÚNICA Y MÁXIMA RESPONSABILIDAD DE APOLLO ENDOSURGERY, INC. POR CUALQUIER MOTIVO, Y EL ÚNICO Y
EXCLUSIVO RECURSO DEL COMPRADOR POR CUALQUIER CAUSA, SE LIMITARÁ AL IMPORTE PAGADO POR EL CLIENTE POR LOS ARTÍCULOS CONCRETOS ADQUIRIDOS.
NINGUNA PERSONA TIENE AUTORIDAD PARA VINCULAR A APOLLO ENDOSURGERY, INC. A NINGUNA DECLARACIÓN NI GARANTÍA, SALVO SEGÚN LO ESPECÍFICAMENTE
INDICADO EN LA PRESENTE. LAS DESCRIPCIONES O ESPECIFICACIONES EN EL MATERIAL IMPRESO DE APOLLO ENDOSURGERY, INC., INCLUIDA ESTA PUBLICACIÓN, TIENEN
POR OBJETO TAN SOLO DESCRIBIR EN TÉRMINOS GENERALES EL PRODUCTO EN EL MOMENTO DE LA FABRICACIÓN Y NO CONSTITUYEN NINGUNA GARANTÍA EXPRESA NI
RECOMENDACIONES DE USO DEL PRODUCTO EN CIRCUNSTANCIAS ESPECÍFICAS. APOLLO ENDOSURGERY, INC. RECHAZA EXPRESAMENTE CUALQUIER RESPONSABILIDAD,
INCLUIDA LA RESPONSABILIDAD POR DAÑOS DIRECTOS, INDIRECTOS, ESPECIALES, INCIDENTALES O RESULTANTES, DERIVADOS DE LA REUTILIZACIÓN DEL PRODUCTO.
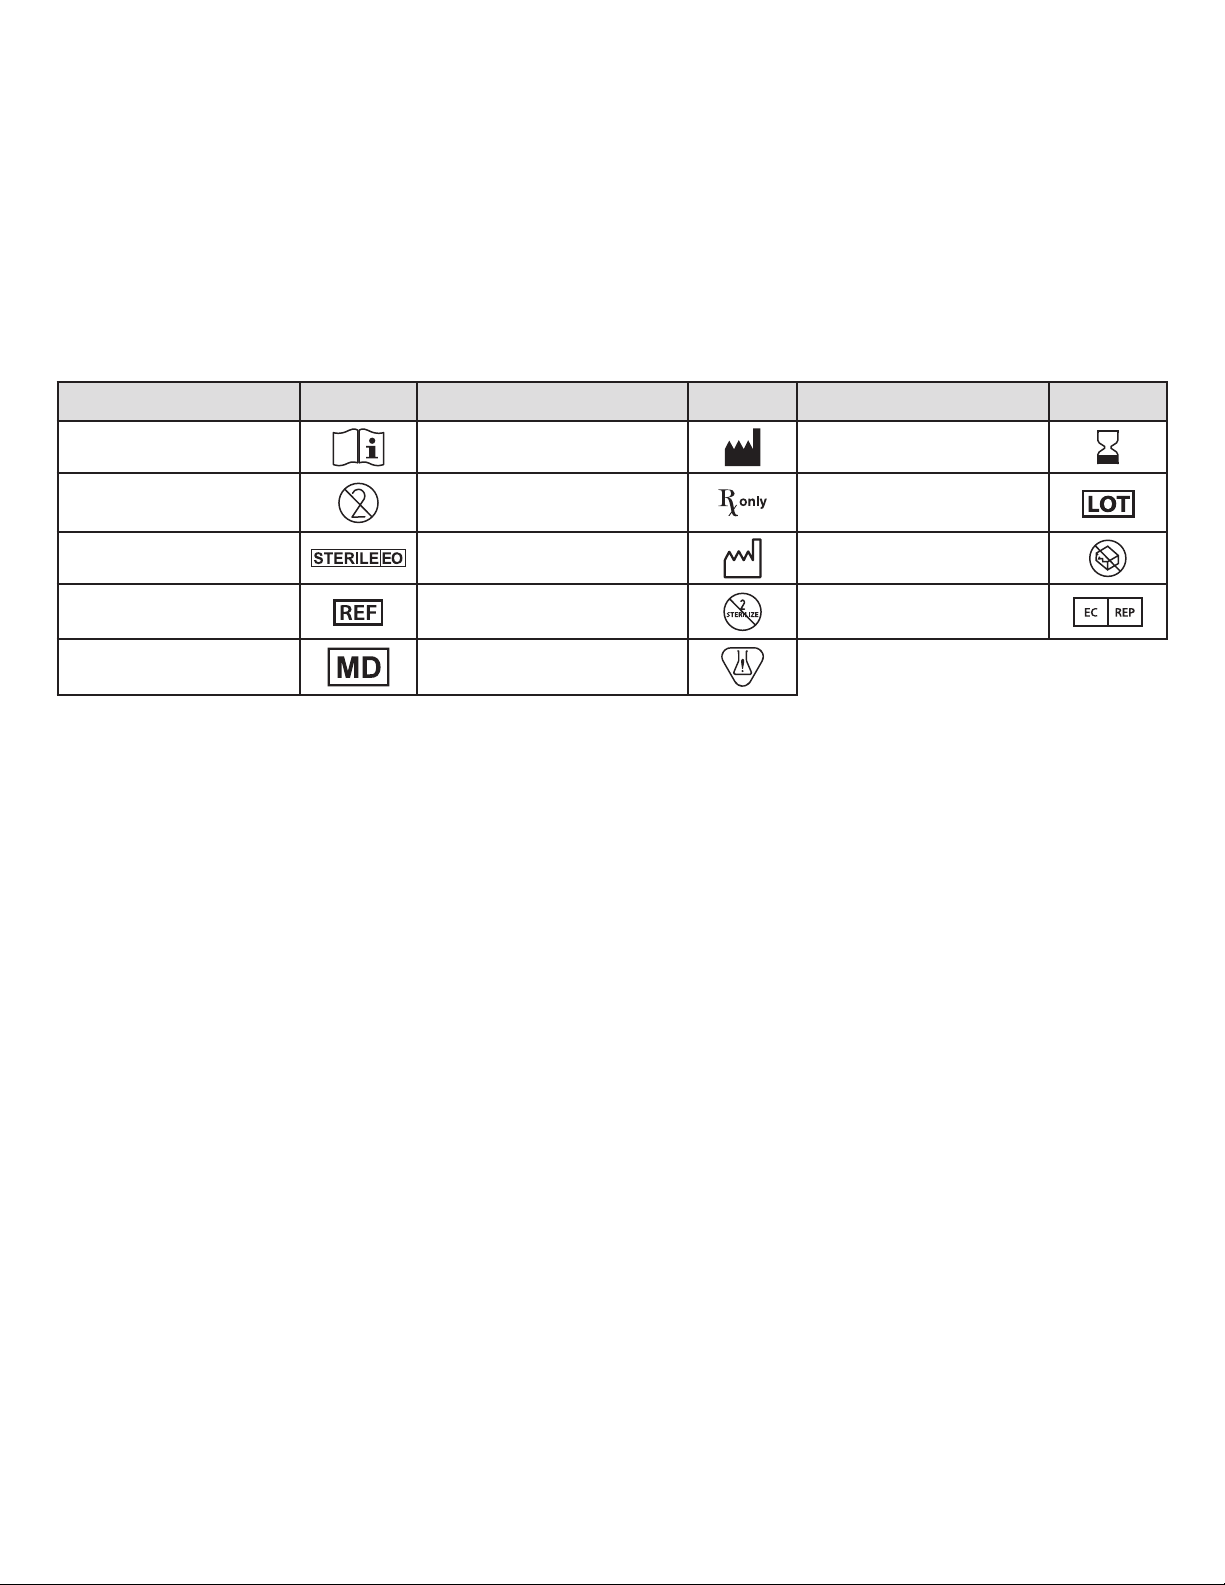
Descripción Símbolo Descripción Símbolo Descripción Símbolo
Consultar las Instrucciones de uso Fabricante Fecha de caducidad
No reutilizar
Precaución: La ley federal de EE. UU.
restringe la venta de este dispositivo
a médicos o por prescripción facultativa
Número de lote
Esterilizado con óxido de etileno Fecha de fabricación No utilizar si el envase está dañado
Número de referencia No reesterilizar Representante autorizado en la
Comunidad Europea
Producto sanitario Contiene una sustancia peligrosa
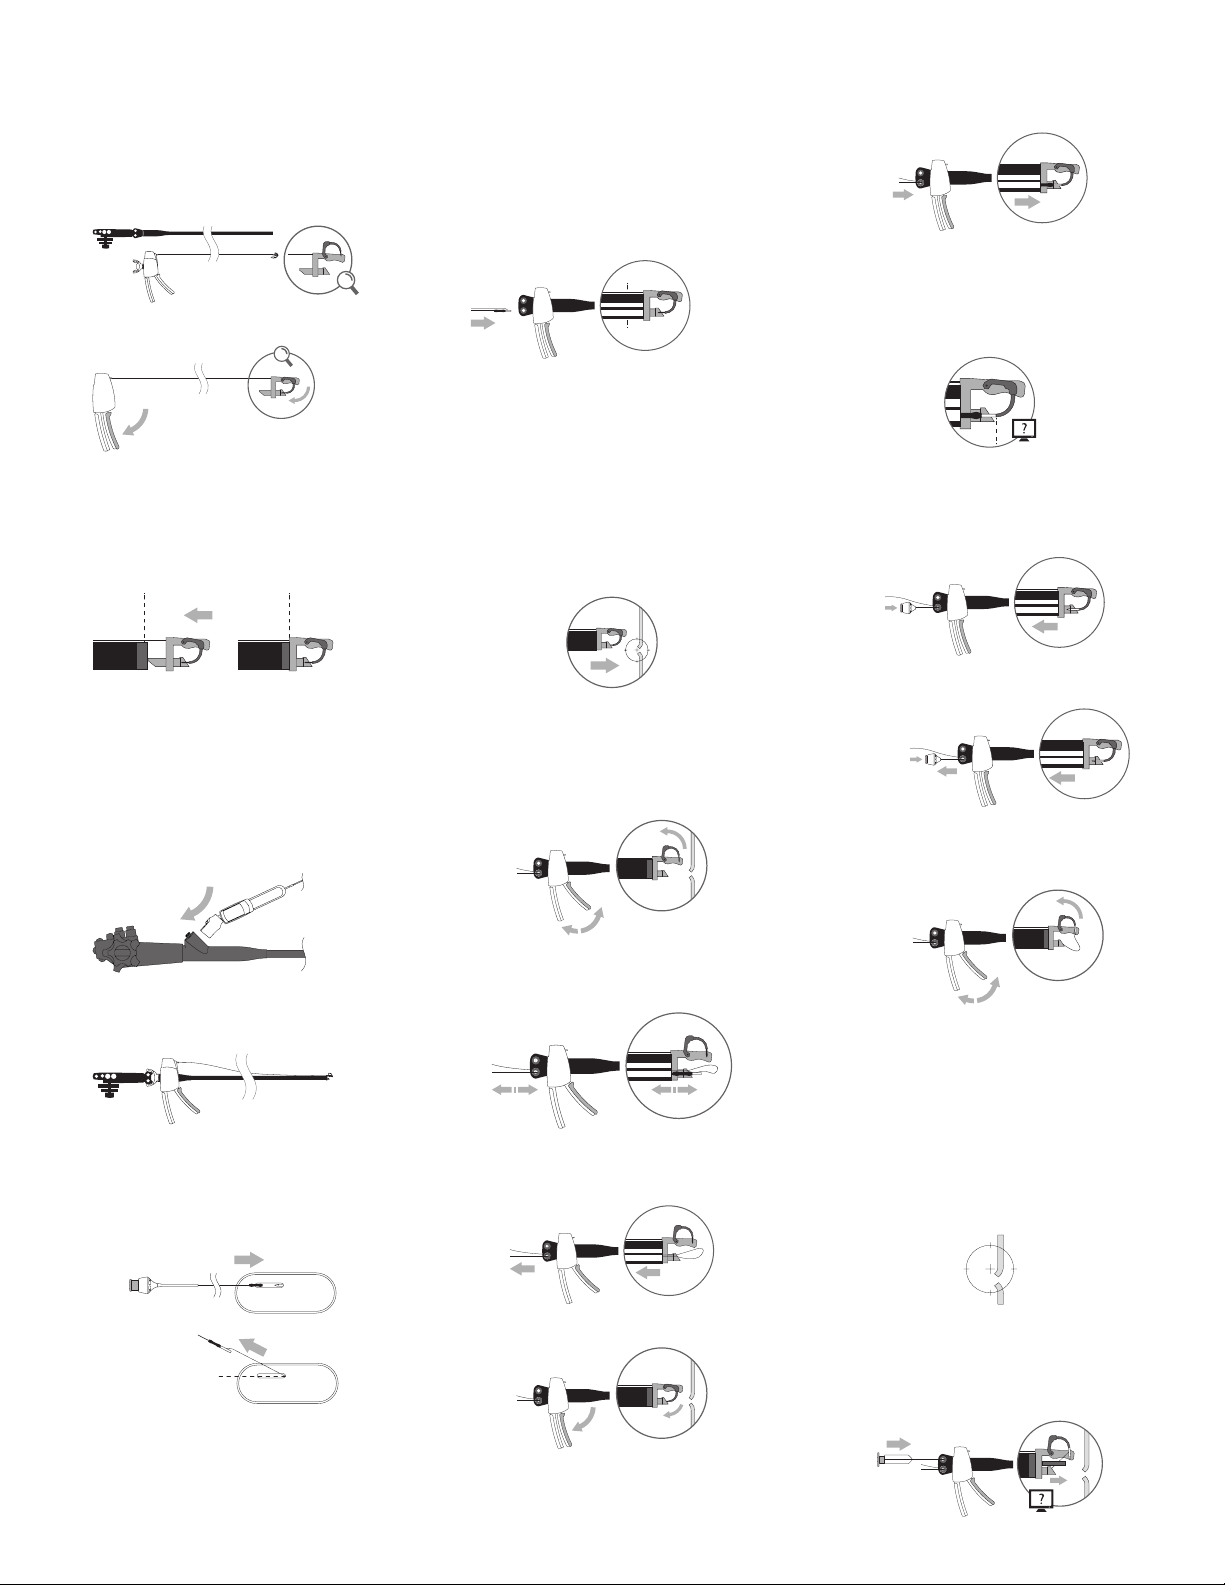
1. Uso indicado
El sistema de sutura endoscópica (SSE) OverStitch™ de Apollo Endosurgery está
indicado para la colocación endoscópica de una o más suturas y para la aproximación
de tejido blando.
1.1 Contraindicaciones
Entre las contraindicaciones se cuentan aquellas especícas del uso de un sistema de
sutura endoscópica y de cualquier tipo de procedimiento endoscópico, y pueden incluir,
entre otras, las siguientes:
• Este sistema no debe utilizarse cuando las técnicas endoscópicas
estén contrindicadas.
• Este sistema no debe utilizarse con tejido maligno.
1.2 Advertencias
• No utilice el dispositivo si la integridad del envase estéril se ha visto afectada o si el
dispositivo parece dañado.
• Solo médicos con el suciente conocimiento y experiencia en estas mismas
técnicas o en otras parecidas deberían realizar procedimientos endoscópicos.
• El contacto de los componentes electroquirúrgicos con otros componentes
puede ocasionar lesiones al paciente o al cirujano, así como daño al dispositivo
o al endoscopio.
• Verique la compatibilidad de los instrumentos y accesorios endoscópicos,
y asegúrese de que el rendimiento no se vea afectado.
NOTA: Los endoscopios reacondicionados pueden dejar de cumplir las
especificaciones originales.
• Compruebe que haya suciente espacio para que la aguja se abra.
• Compruebe que el agarre del mango del sistema de sutura endoscópica esté
cerrado y bloqueado durante la intubación y la extubación.
• Los usuarios deberán estar familiarizados con los procedimientos y técnicas
quirúrgicas que utilizan suturas absorbibles antes de emplear suturas sintéticas
absorbibles para el cierre de las heridas, ya que el riesgo de dehiscencia de la
herida puede variar con el sitio de aplicación y el material de sutura usado.
• La reutilización o el reprocesamiento del sistema OverStitch podría hacer que el
sistema funcione incorrectamente o que el paciente sufra consecuencias, lo que
incluye:
–Infección o transmisión de enfermedades.
–Fallo del mecanismo del mango que haga que el dispositivo quede
bloqueado sobre el tejido y sea necesaria una intervención quirúrgica.
–Reducción de la retención sobre el endoscopio que haga que el mecanismo
de cierre terminal se desprenda durante el uso y sea necesaria una
intervención quirúrgica para recuperarlo.
–Reducción de la retención del anclaje al cuerpo de la aguja, lo que puede
provocar una caída inadvertida del anclaje que cause una demora del
procedimiento o requiera intervención posterior.
–Doblamiento del cuerpo de la aguja, lo que puede impedir que el médico
conduzca la aguja correctamente o realice el procedimiento deseado.
–Imposibilidad de extender totalmente la hélice, lo que puede limitar la
capacidad para obtener tejido y realizar el procedimiento deseado.
• Si el dispositivo mencionado se utiliza para sobresuturar cuerpos extraños, como
grapas, endoprótesis, clips o mallas, es posible que la aguja se quede atrapada en
el cuerpo extraño, lo que requeriría una intervención quirúrgica.
• En las situaciones en las que el sitio quirúrgico represente un riesgo de daños
a las estructuras anatómicas adyacentes, se recomienda el uso de accesorios
endoscópicos como la hélice para tejido OverStitch, que permite retraer el tejido
que se pretende suturar y apartarlo de estas estructuras no visibles.
1.3 Precauciones
• El sistema solo puede utilizarse si ha sido comprado directamente de Apollo
Endosurgery, Inc. o de uno de sus agentes autorizados.
• Con el sistema de sutura endoscópica instalado, el canal principal del endoscopio
se convierte de hecho en un canal de 3,2 mm.
• Se puede utilizar un tubo de inserción con un diámetro interno de al menos
16,7mm con el sistema para proteger el esófago.
1.4 Compatibilidad del sistema
El sistema de sutura endoscópica OverStitch es compatible con las suturas identificadas
en la página 1.
OverStitch es compatible con los siguientes endoscopios:
• Olympus 2T160, 2TH180 o 2T240
• Fuji EI-740D/S
La disponibilidad de dispositivos compatibles puede variar según la región.
1.5 Posibles eventos adversos
Las posibles complicaciones que pueden resultar del uso del sistema de sutura
endoscópica incluyen, entre otras:
• Faringitis/dolor de garganta
• Náuseas o vómitos
• Dolor abdominal o hinchazón
• Hemorragia
• Hematoma
• Conversión a procedimiento laparoscópico o abierto
• Estenosis
• Infección/sepsis
• Perforación faríngea, colónica o esofágica
• Laceración esofágica, colónica o faríngea
• Lesión visceral intrabdominal (hueca o sólida)
• Aspiración
• Dehiscencia de la herida
• Reacción tisular inflamatoria aguda
• Muerte
NOTA: Todo incidente grave que se haya producido en relación con el producto deberá
notificarse a Apollo Endosurgery (consulte la información de contacto al final de este
documento), así como a las autoridades oficiales pertinentes.
Español

9
2. Sistema envasado
Accionador de la aguja y
dispositivo de cambio de anclaje
Envase 1
Envase 2
{ }
Conjunto de sutura
Envase 3 Envase 4
Polidioxanona (absorbible) –
VIOLETA
Polipropileno (no absorbible) – AZUL
Hélice
(DISPONIBLE POR SEPARADO)
Guía tensora
3. Nomenclatura
Endoscopio
Accionador de la aguja
Mecanismo de
cierre terminal
Dispositivo de cambio del anclaje
Botón de liberación del
anclaje
Mango del
accionador
de la aguja
Mango del
endoscopio
Conjunto de sutura
Cuerpo del anclaje
Sutura
Punta helicoidal
Hélice
Mango de la hélice
Guía tensora
Mango de la guía
tensora
Anillo Tapón
Lazo de carga de la sutura
Español

10
4. Montaje
4.1. Coloque el endoscopio compatible en una supercie
adecuada para el montaje.
NOTA: Asegúrese de que se hayan instalado
las válvulas de canal estándares en los canales
de trabajo.
4.2. Extraiga el accionador de la aguja del envase.
4.3. Cierre el cuerpo de la aguja.
‘clic’
NOTA: Asegúrese de que el mecanismo de cierre
terminal no se caiga ni se dañe de ninguna otra
forma.
4.4. Empuje el tubo de alineación para introducirlo en el
canal de trabajo principal hasta que el mecanismo
de cierre terminal esté enrasado con la cara del
endoscopio.
NOTA: Deberá sentirse resistencia al conectar el
mecanismo de cierre terminal ya que esto indica
una conexión correcta.
NOTA: Asegúrese de que el canal de trabajo
secundario no esté obstruido en el endoscopio.
ADVERTENCIA: Asegúrese de que el mecanismo
de cierre terminal esté totalmente asentado en el
endoscopio.
4.5. Monte el mango del accionador de la aguja sobre
el endoscopio.
NOTA: Asegúrese de que el cable externo no esté
enrollado alrededor del endoscopio.
4.6. Conecte el endoscopio a la torre.
Cargue el anclaje
4.7. Seleccione el tipo y tamaño de sutura adecuados.
4.8. Extraiga el conjunto de la sutura y el dispositivo de
cambio del anclaje del envase.
4.9. Cargue el anclaje.
4.10. Extraiga la sutura del cartucho de la sutura sujetando
y tirando de esta última, no del anclaje ni del
dispositivo de cambio del anclaje.
NOTA: Tras extraer la sutura del cartucho,
compruebe que no esté enredada.
4.11. Abra la cubierta de la válvula e inserte el dispositivo
de cambio del anclaje en el canal principal del
endoscopio.
PRECAUCIÓN: No lo utilice cuando las cubiertas
de las válvulas estén cerradas ya que aumentará la
resistencia de la sutura.
4.12. Sujetando el catéter con la mano como si fuera un
lápiz para lograr un control óptimo, haga avanzar
el dispositivo de cambio del anclaje hasta que el
anclaje esté situado cerca del extremo distal del
endoscopio.
PRECAUCIÓN: Si se encuentra resistencia al hacer
avanzar el dispositivo de cambio del anclaje a través
del canal de trabajo del endoscopio, reduzca la
angulación de este último hasta que el dispositivo
pase sin atorarse.
4.13. Introduzca el endoscopio en el paciente.
ADVERTENCIA: No introduzca el dispositivo con
el cuerpo de la aguja en su posición abierta.
5. Desplazamiento a la diana anatómica
5.1. Avance hasta que se localice la diana anatómica.
PRECAUCIÓN: Durante la intubación o extubación
con el sistema de sutura endoscópica, asegúrese
de que el catéter accionador y el endoscopio (su
longitud de trabajo) se hagan avanzar y se retraigan
juntos.
5.2. Abra el cuerpo de la aguja.
5.3. Haga avanzar el dispositivo de cambio del anclaje
o manipule el endoscopio para crear holgura en la
sutura.
5.4. Una vez que se haya creado la suciente holgura,
retraiga el dispositivo de cambio del anclaje al
interior del endoscopio.
5.5. Cierre el cuerpo de la aguja.
5.6. Sujete el tramo blanco del cable con la mano como
si fuera un lápiz para hacer avanzar el dispositivo
de cambio del anclaje hasta que el anclaje esté
totalmente asentado sobre el cuerpo de la aguja.
‘click’
5.7. Es posible que se perciba un ‘clic’ táctil o una
parada rme en el momento en que el anclaje se
asienta completamente sobre el cuerpo de la aguja.
5.8. Compruebe la imagen del monitor para garantizar
que el anclaje esté bien instalado sobre el cuerpo de
la aguja.
5.9. Asegúrese de que el extremo proximal de la sutura
esté visible más allá de las válvulas de los canales
del endoscopio.
5.10. Presione a fondo el botón de liberación del anclaje
para liberar el anclaje.
5.11. Sin soltar el botón de liberación del anclaje, retraiga
ligeramente el dispositivo de cambio del anclaje.
‘hold’
6. Manejo del tejido y de la sutura
6.1. Abra el cuerpo de la aguja.
PRECAUCIÓN: Si el cuerpo de la aguja no se abre,
compruebe que el anclaje se haya liberado del
dispositivo de cambio del anclaje.
ADVERTENCIA: Asegúrese de que la holgura de
la sutura que se hacreado sea suficiente para el
trayecto y el patrón de sutura deseados. Haga
avanzar el dispositivo decambio del anclaje o
manipule el endoscopio para crear más holgura
para la sutura.
6.2. Coloque el tejido en el lugar adecuado para
suturarlo, usando la hélice Apollo o un accesorio
compatible con el endoscopio si se requiere.
7. Uso de la hélice para tejido (opcional)
7.1. Haga avanzar la hélice al interior del canal
secundario del endoscopio en la posición retraída,
hasta que la punta distal esté visible en el monitor.
‘clic’
‘retener’
Español

11
PRECAUCIÓN: Si se encuentra resistencia al
hacer avanzar la hélice a través del canal de trabajo
del endoscopio, reduzca la angulación de este
último hasta que el dispositivo pase sin atorarse, y
asegúrese de que el canal de trabajo secundario no
esté obstruido en el endoscopio.
7.2. Presione del todo el botón del mango de la hélice
para dejar a la vista la punta helicoidal.
PRECAUCIÓN: No presione el botón del mango
de la hélice mientras esta avanza a través del
endoscopio.
7.3. Obtenga tejido girando el mango de la hélice en el
sentido de las agujas del reloj hasta que se consiga
la profundidad de tejido correcta.
7.4. Durante la obtención de tejido, mantenga una suave
presión hacia delante.
7.5. Haga avanzar / retraiga la hélice para colocar el tejido
en el lugar deseado.
8. Sutura
8.1. Pase la aguja a través del tejido cerrando el cuerpo
de la aguja.
8.2. Asegúrese de que el brazo de la aguja no se cierre
accidentalmente sobre ningún cuerpo extraño o
dispositivo.
Recupere el anclaje
8.3. Sujete el dispositivo de cambio del anclaje con la
mano como si fuera un lápiz y hágalo avanzar hasta
que el anclaje se enhebre y se sienta resistencia.
‘click’
NOTA: La resistencia puede variar según la posición
del endoscopio.
8.4. Retraiga el dispositivo de cambio del anclaje para
extraer el anclaje.
‘pop’
8.5. Sujete el tramo blanco del cable con la mano como
si fuera un lápiz y coloque los otros dedos de la
misma mano en la carcasa del endoscopio para
evitar que la sutura o el tejido sufran daños una vez
que el anclaje salga del cuerpo de la aguja.
PRECAUCIÓN: No presione el botón de liberación
del anclaje, ya que esto puede hacer que el anclaje
se caiga de forma inadvertida.
ADVERTENCIA: Si no se ha creado suficiente
holgura antes de pasar el anclaje a través del
tejido, la retracción del dispositivo decambio del
anclaje podría ser difícil yelanclaje podría no
liberarse correctamente del cuerpo de la aguja.
Libere el tejido
8.6. Gire el mango de la hélice en sentido contrario al de
las agujas del reloj hasta que el dispositivo se suelte
del tejido.
8.7. Suelte el botón del mango de la hélice.
8.8. Compruebe en el monitor que la punta esté
totalmente retraída en el eje antes de retirarla al
interior del endoscopio.
8.9. Retire la hélice una distancia corta al interior
del endoscopio.
8.10. Abra el cuerpo de la aguja.
PRECAUCIÓN: No tense la sutura con el anclaje
en el cuerpo de la aguja.
8.11. Para seguir colocando puntos con este anclaje,
repita las secciones 5-8.
Si se ha terminado de poner puntos para este
anclaje, pase a la sección 9 para aproximar el tejido,
sujetarlo y cortar la sutura.
Se pueden utilizar varios anclajes con cada
accionador de aguja y dispositivo de cambio del
anclaje.
9. Fijación y corte de la sutura
9.1. Retire los accesorios (hélice Apollo o similar)
del endoscopio.
9.2. Asegúrese de que el anclaje esté en el dispositivo
de cambio del anclaje y abra el cuerpo de la aguja.
9.3. Haga avanzar el anclaje distalmente con respecto al
tubo de alineación.
9.4. Presione a fondo el botón de liberación del anclaje
y retraíga el dispositivo de cambio del anclaje para
liberar el anclaje.
PRECAUCIÓN: No libere el anclaje dentro del canal
de trabajo del endoscopio.
9.5. Retire el dispositivo de cambio del anclaje del
endoscopio.
NOTA: El dispositivo de cambio del anclaje puede
utilizarse para otras suturas.
9.6. Introduzca el extremo proximal de la sutura en el
lazo de carga de la sutura retraíble.
9.7. Tras pasar la sutura, libere el extremo proximal
de la sutura para permitir la carga.
9.8. Tire del lazo de carga de la sutura paralelamente
al dispositivo, para introducir la sutura en la guía
tensora.
9.9. Sosteniendo el extremo proximal de la sutura, baje
la guía tensora por el canal de trabajo hasta que
pueda verse el texto ‘Plug and Collar’ (tapón y anillo)
en el monitor.
9.10. Tire de la sutura en un sentido y ejerza tracción
en la guía tensora en sentido contrario, hasta que
el tejido se aproxime y se consiga la tensión de la
sutura deseada entre el anclaje y el anillo de la guía
tensora.
NOTA: El anillo es lo que determina la posición nal
de la guía tensora, no el tapón.
ADVERTENCIA: Una tensión excesiva podría
dañar eltejido.
9.11. Retire el espaciador de seguridad del mango de
la guía tensora.
PRECAUCIÓN: El espaciador de seguridad solo
debe retirarse inmediatamente antes de desplegar
la guía tensora.
9.12. Apriete rmemente el mango de la guía tensora
para desplegar la guía tensora y cortar la sutura.
PRECAUCIÓN: La tensión de la sutura debe
mantenerse.
NOTA: Se requiere una fuerza signicativa para tirar
del tapón y bloquearlo en el interior del anillo; con
frecuencia puede percibirse un chasquido una vez
cortada la sutura.
9.13. Retire la guía tensora.
‘clic’
‘chasquido’
Español

12
9.14. Cierre el cuerpo de la aguja.
10. Varias suturas
10.1. El dispositivo de cambio del anclaje y el accionador
de la aguja pueden utilizarse con varias suturas. No
es necesario retirar el endoscopio después de usar
la guía tensora si se van a desplegar más suturas.
ADVERTENCIA: Si el endoscopio se retira entre
cada serie de puntos para su limpieza, asegúrese
de que el mecanismo de cierre terminal esté
totalmente asentado antes de la próxima
intubación. Vuelva a asentarlo si fuera necesario.
NOTA: Si lo retira y lo vuelve a colocar, asegúrese de
que el canal de trabajo secundario no esté obstruido
en el endoscopio.
10.2. Para utilizar otro conjunto de sutura, vuelva al paso
4.7 para cargar el anclaje y siga todos los pasos
posteriores.
Si la sutura ha concluido, vaya a la sección 11 para
retirar el dispositivo.
11. Retirada del dispositivo
11.1 Retire los dispositivos accesorios del endoscopio.
11.2. Asegúrese de que el cuerpo de la aguja esté
cerrado y retraíga el endoscopio del paciente,
asegurándose de retraer el cable externo junto con
el endoscopio.
11.3. Retire el mecanismo de cierre terminal del
endoscopio.
NOTA: No sujete el brazo de la aguja para retirar el
mecanismo de cierre terminal.
11.4. Retire el accionador de la aguja del endoscopio
exionando el soporte de sujeción de este último
alrededor de los canales de trabajo.
12. Información sobre seguridad de RM
Seguro bajo ciertas condiciones de la RM
MR
Las pruebas no clínicas realizadas han demostrado
que las suturas, las guías tensoras y los anclajes
(denominados conjuntamente «sistema de anclaje»)
que se despliegan por el sistema de sutura endoscópica
OverStitch son aptos para la realización de RM en
determinadas condiciones.
Un paciente puede someterse de manera segura a una
exploración de RM inmediatamente después de la
colocación de este sistema de anclaje si se cumplen las
siguientes condiciones:
Campo magnético estático
- Campo magnético estático de 1,5 o 3 T.
- Gradiente de campo espacial con un valor máximo de
2.000 G/cm (20 T/m).
- Tasa de absorción especíca (SAR) máxima promediada
para el cuerpo entero y noticada por el sistema de RM
de 2 W/kg.
Si se cumplen las condiciones de exploración anteriores,
se prevé que el sistema de anclaje produzca un aumento
de temperatura máximo inferior a 2 °C tras una exploración
continua de 15 minutos.
En las pruebas no clínicas realizadas, el artefacto de
imagen generado por el sistema de anclaje se extiende
aproximadamente 10 mm desde este dispositivo si la
imagen se genera con una secuencia de pulsos de eco
de gradiente y un sistema de RM de 3 T.
13. Información sobre sustancias peligrosas
Contiene una sustancia peligrosa
Declaración sobre CMR: los componentes de acero
inoxidable y aleación de cobalto del interior de este
dispositivo contienen la(s) siguiente(s) sustancia(s)
definida(s) como CMR (carcinogénicas, mutagénicas
o tóxicas para la reproducción) 1A/1B y/o alteradoras
endocrinas en una concentración superior al 0,1% en
peso/peso:
Cobalto (nº CAS 7740-48-8; nº CE 231-158-0)
Las pruebas científicas actuales apoyan que los
dispositivos médicos fabricados con estas aleaciones de
cobalto o con aceros inoxidables que contienen cobalto no
causan un mayor riesgo de cáncer o efectos reproductivos
adversos.
14. Solución de problemas
14.1. El cuerpo de la aguja no se abre:
Causa Resolución
14.1.1. Aguja obstruida: i. Evalúe el espacio en el que está trabajando y maniobre el catéter y el endoscopio a la vez como si fueran un
sistema; enderece el endoscopio hasta colocarlo en la posición no retroexionada.
14.1.2. Movimiento de la sutura restringido:
i. Si el anclaje está sobre el cuerpo de la aguja, asegúrese de que la sutura no se mantenga proximal cerca del
mango durante la operación de apertura.
ii. Transera el anclaje al dispositivo de cambio del anclaje. Abra el cuerpo de la aguja. Retraiga lentamente el
dispositivo de cambio del anclaje proximalmente y luego haga avanzar el cuerpo de la aguja distalmente para liberar
la sutura.
14.1.3. Catéter del accionador de la aguja enrollado o doblado:
i. Compruebe para asegurarse de que el catéter que baja por el exterior del endoscopio no esté enrollado ni
doblado. Enderece el endoscopio a la posición no retroexionada. Haga avanzar el endoscopio y tire ligeramente
para eliminar cualquier holgura del catéter accionador proximalmente hasta que se perciba una resistencia mínima.
Sujete el catéter accionador y el endoscopio, y ajuste mediante el avance y la retracción de los dos a la vez.
14.1.4. Obstrucción por cuerpo extraño:
i. Retire el dispositivo de cambio del anclaje solamente:
a. Transera el anclaje al cuerpo de la aguja y retire este último del endoscopio.
b. Introduzca un agarrador a través del canal principal y empuje el cuerpo de la aguja para abrirlo.
ii. Retire el anclaje y el dispositivo de cambio del anclaje, cortando la sutura si fuera necesario:
a. Transera el anclaje al cuerpo de la aguja y retire este último del endoscopio.
b. Corte la sutura con el accesorio adecuado (introdúzcalo a través de cualquiera de los canales).
c. Utilice un accesorio para empujar y abrir el cuerpo de la aguja.
d. Retire la sutura cortada usando los medios adecuados.
iii. Una vez agotadas las técnicas endoscópicas habituales, utilice técnicas laparoscópicas para retirar el dispositivo.
14.2. El cuerpo de la aguja no se cierra:
Causa Resolución
14.2.1. Obstrucción general:
i. Siga los pasos 14.1.1, 14.1.2, 14.1.3 anteriores (el cuerpo de la aguja no se abre).
ii. Asegúrese de que el mango del accionador de la aguja esté cerrado y bloqueado, y:
a. Estire el catéter del accionador de la aguja para cambiar la longitud ecaz del cable de accionamiento del cuerpo
de la aguja.
b. Retire el dispositivo de cambio del anclaje y utilice agarradores (a través del canal principal) para agarrar el cuerpo
de la aguja. Corte la sutura si es necesario.
14.2.2. Cable del accionador de la aguja roto:
i. Despliegue el anclaje y la guía tensora. Haga avanzar el agarrador por el endoscopio y asegure el accionador de
la aguja. Empuje el accionador de la aguja al tiempo que retira el dispositivo. Si usa un sobretubo, haga avanzar el
sobretubo distalmente tanto como sea posible, y retraiga el endoscopio y el dispositivo al interior del sobretubo,
usando la punta distal de este último para cerrar el cuerpo de la aguja.
Español

13
14.3. El dispositivo de cambio del anclaje no realiza el cambio:
Causa Resolución
14.3.1. El dispositivo de cambio del anclaje no instala el
anclaje sobre el cuerpo de la aguja:
i. Asegúrese de que haya suciente holgura en la sutura y de que la sutura del exterior del endoscopio no esté
enredada.
ii. Asegúrese de que el dispositivo de cambio del anclaje esté adecuadamente colocado en el tubo de alineación del
accionador de la aguja.
iii. Si el anclaje y la sutura están atravesando el tejido, o bien deje caer el anclaje y despliegue la guía tensora según
la sección 9 de las instrucciones de uso o bien deje caer el anclaje y utilice un accesorio adecuado para cortar y
retirar la sutura.
iv. Si el anclaje y la sutura no están atravesando el tejido, cierre el mango del accionador de la aguja. Retire el
endoscopio. Vuelva a colocar el anclaje o el dispositivo de cambio del anclaje.
14.3.2. El dispositivo de cambio del anclaje no libera
un anclaje:
i. Asegúrese de que haya suciente holgura en la sutura y de que la sutura del exterior del endoscopio no esté
enredada.
ii. Asegúrese de que el botón de liberación del dispositivo de cambio del anclaje esté TOTALMENTE pulsado
mientras repliega el dispositivo de cambio del anclaje.
iii. Reduzca la articulación/tortuosidad del endoscopio (si es posible) y trate de liberar el anclaje.
iv. Utilice accesorios compatibles con el canal de trabajo secundario del endoscopio para cortar y retirar la sutura.
v. Vuelva a colocar el dispositivo de cambio del anclaje.
14.3.3. El dispositivo de cambio del anclaje no recupera el
anclaje del cuerpo de la aguja:
i. Asegúrese de que haya suciente holgura en la sutura y de que el mango del accionador de la aguja esté en
posición cerrada.
ii. Sujete el dispositivo de cambio del anclaje con la mano como si fuera un lápiz y hágalo avanzar hasta que el
anclaje se enhebre y se sienta resistencia. Retraiga el dispositivo de cambio del anclaje para extraer el anclaje.
iii. Si el anclaje no puede recuperarse, vuelva a colocar el dispositivo de cambio del anclaje. Alternativamente, utilice
un accesorio adecuado para cortar y retirar la sutura.
iv. Vuelva a colocar el anclaje y reanude la sutura siguiendo la sección 8 de las instrucciones de uso.
14.4. La guía tensora no corta la sutura cuando se activa:
Causa Resolución
14.4.1. Sutura no cortada:
i. Utilice un accesorio adecuado a través del canal de trabajo secundario para cortar la sutura y retirar la guía
tensora.
ii. Utilice técnicas endoscópicas estándares para retirar la sutura cortada.
14.5. Caída inadvertida del anclaje:
Causa Resolución
14.5.1. El botón del dispositivo de cambio del anclaje se ha
presionado en una secuencia distinta a la establecida:
i. Recupere el anclaje como si fuera un cuerpo extraño, o siga el procedimiento establecido para tensar con la
guía. Si el anclaje se ha caído dentro del canal de trabajo, use el dispositivo de cambio del anclaje o un agarrador
compatible de 3,2 mm para empujar el anclaje a través del endoscopio hasta que salga de él.
No intente volver a introducir el anclaje a través del endoscopio tirando de él ya que podría quedar atascado en el
canal o en el acople en Y en el mango del endoscopio.
14.6. Enredo de la sutura:
Causa Resolución
14.6.1. Sutura fuera del campo de visión: i. Cierre el mango del accionador de la aguja y haga retroceder el endoscopio para liberarlo.
14.6.2. Sutura detrás del protector de tejido:
i. Cierre ligeramente el cuerpo de la aguja al tiempo que retrae el endoscopio.
ii. Si es necesario, transera el anclaje al dispositivo de cambio del anclaje.
iii. Abra el cuerpo de la aguja y haga avanzar el dispositivo de cambio del anclaje más allá del mecanismo de cierre
terminal para empujar la sutura y liberarla.
14.6.3. Sutura enrollada:
i. Si la sutura está enrollada, mueva el endoscopio y transera el anclaje entre el cuerpo de la aguja y el dispositivo
de cambio del anclaje, en el lado opuesto del hilo de sutura, según sea necesario para desenrollarla.
NOTA: Si se notó cómo la sutura se enrollaba justo después de la articulación con el endoscopio, intente primero
articular este último en el orden inverso para retirarla.
ii. Si el anclaje se ha desplegado, utilice la guía tensora para empujar y guiar la sutura hasta liberarla.
14.7. Separación del mecanismo de cierre terminal del endoscopio:
Causa Resolución
14.7.1. Se liberó el mecanismo de cierre terminal durante el
uso:
i. Cierre el cuerpo de la aguja. Capture el corte en «zigzag» del tubo de alineación con una pinza de dientes de
ratón, elimine cualquier holgura en el catéter accionador y retire lentamente el dispositivo del paciente. Si se utiliza
un tubo de inserción, capture el corte en «zigzag» del tubo de alineación con una pinza de dientes de ratón, elimine
cualquier holgura en el catéter accionador y retire lentamente el dispositivo del paciente.
14.8. La hélice no se desenrosca:
Causa Resolución
14.8.1. Hélice atascada en el tejido:
i. Utilice un accesorio adecuado a través del canal principal para aplicar tracción en sentido contrario al tejido
alrededor de la hélice y tire de la hélice hasta liberarla.
ii. Una vez agotadas las técnicas endoscópicas, utilice técnicas laparoscópicas para retirar la hélice.
Español

14
Tabelle der Symbole
Nur für den Einmalgebrauch. Einwegartikel. Nicht erneut sterilisieren.
Achtung: Nach US-Bundesgesetz ist derVerkauf dieses Medizinprodukts auf Ärzte oder auf Anweisung eines Arztes beschränkt.
Zum Patent angemeldet.
GARANTIEAUSSCHLUSS UND BESCHRÄNKUNG DES RECHTSMITTELS
FÜR DAS BZW. DIE IN DIESER PUBLIKATION AUFGEFÜHRTE(N) PRODUKT(E) VON APOLLO ENDOSURGERY, INC. WIRD JEGLICHE AUSDRÜCKLICHE ODER IMPLIZIERTE GARANTIE,
EINSCHLIESSLICH UND OHNE EINSCHRÄNKUNG JEGLICHER IMPLIZIERTEN GARANTIE HINSICHTLICH DER MARKTTAUGLICHKEIT ODER EIGNUNG FÜR EINEN BESTIMMTEN
ZWECK, AUSGESCHLOSSEN. APOLLO ENDOSURGERY, INC. LEHNT JEGLICHE HAFTUNG FÜR INDIREKTE, BESONDERE, ZUFÄLLIG ENTSTANDENE ODER FOLGESCHÄDEN
IM VOLLEN RECHTLICH ZULÄSSIGEN UMFANG AB, UNABHÄNGIG DAVON, OB DERARTIGE HAFTUNGSANSPRÜCHE AUF EINEM VERTRAG, DEM SCHADENSERSATZRECHT,
FAHRLÄSSIGKEIT, DER GEFÄHRDUNGSHAFTUNG, DER PRODUKTHAFTUNG ODER SONSTIGEM BERUHEN. DIE EINZIGE UND MAXIMALE HAFTBARKEIT SEITENS APOLLO
ENDOSURGERY, INC. AUS JEGLICHEM GRUNDE SOWIE DER EINZIGE UND AUSSCHLIESSLICHE HAFTUNGSANSPRUCH DES KÄUFERS AUS JEGLICHEM GRUNDE IST AUF DEN
VOM KUNDEN FÜR DIE BESTIMMTEN WAREN GEZAHLTEN KAUFPREIS BESCHRÄNKT. KEINE PERSON IST BEFUGT, APOLLO ENDOSURGERY, INC. AN JEGLICHE ANDERE ALS
DIE AUSDRÜCKLICH HIER AUFGEFÜHRTEN DARSTELLUNGEN ODER GARANTIEN ZU BINDEN. DIE IN DEN DRUCKERZEUGNISSEN, EINSCHLIESSLICH DIESER PUBLIKATION,
VON APOLLO ENDOSURGERY, INC. AUFGEFÜHRTEN BESCHREIBUNGEN UND SPEZIFIKATIONEN DIENEN AUSSCHLIESSLICH DER ALLGEMEINEN BESCHREIBUNG DES
PRODUKTS ZUM ZEITPUNKT DER HERSTELLUNG UND STELLEN KEINE AUSDRÜCKLICHEN GARANTIEN ODER EMPFEHLUNGEN FÜR DIE VERWENDUNG DES PRODUKTS
UNTER BESONDEREN BEDINGUNGEN DAR. APOLLO ENDOSURGERY, INC. LEHNT AUSDRÜCKLICH JEGLICHE HAFTUNG, EINSCHLIESSLICH JEGLICHER HAFTUNG FÜR
DIREKTE, INDIREKTE, BESONDERE, ZUFÄLLIG ENTSTANDENE ODER FOLGESCHÄDEN AB, DIE SICH AUS DER WIEDERVERWENDUNG DES PRODUKTS ERGEBEN.
Beschreibung Symbol Beschreibung Symbol Beschreibung Symbol
Gebrauchsanweisung beachten Hersteller Verwendbar bis
Nicht zur Wiederverwendung
Achtung: Nach US-Bundesgesetz ist
der Verkauf dieses Medizinprodukts
auf Ärzte oder auf Anweisung eines
Arztes beschränkt.
Losnummer
Mit Ethylenoxid sterilisiert Herstellungsdatum Bei beschädigter Verpackung
nicht verwenden
Referenznummer Nicht erneut sterilisieren Bevollmächtigter in der
Europäischen Gemeinschaft
Medizinprodukt Enthält Gefahrstoffe
1.Verwendungszweck
Das Apollo Endosurgery OverStitch™ endoskopische Nahtsystem ist für die endoskopische
Platzierung von Nähten und die Adaption von Weichgewebe vorgesehen.
1.1 Kontraindikationen
Bei den Kontraindikationen handelt es sich um jene, die speziell mit der Verwendung
eines endoskopischen Nahtsystems und jeder Art von endoskopischen Verfahren
einhergehen. Sie umfassen u. a.:
• Dieses System darf nicht verwendet werden, wenn ein endoskopisches Verfahren
kontraindiziert ist.
• Dieses System darf nicht bei malignem Gewebe verwendet werden.
1.2 Warnhinweise
• Das Produkt darf nicht verwendet werden, wenn die Unversehrtheit der sterilen
Verpackung beeinträchtigt ist oder wenn es beschädigt erscheint.
• Endoskopische Verfahren dürfen nur von Ärzten durchgeführt werden, die über
hinreichend Kompetenz und Erfahrung in ähnlichen oder gleichen Techniken verfügen.
• Der Kontakt von elektrochirurgischen Komponenten mit anderen Komponenten
kann Verletzungen des Patienten und/oder Operateurs sowie Schäden am Produkt
und/oder Endoskop zur Folge haben.
• Die Kompatibilität der endoskopischen Instrumente und Zubehörteile muss
überprüft und die uneingeschränkte Funktion sichergestellt werden.
HINWEIS: Überholte Endoskope entsprechen möglicherweise nicht mehr den
ursprünglichen Spezifikationen.
• Es muss sichergestellt werden, dass genügend Platz zur Öffnung der Nadel vorliegt.
• Es muss sichergestellt werden, dass der Handgriff des endoskopischen
Nahtsystems bei der Intubation und Extubation geschlossen und verriegelt ist.
• Vor der Verwendung von synthetischem resorbierbarem Nahtmaterial für den
Wundverschluss müssen dem Operateur die chirurgischen Verfahren und Techniken
mit resorbierbarem Nahtmaterial bekannt sein, da das Risiko einer Wunddehiszenz
je nach Anwendungssitus und verwendetem Nahtmaterial variieren kann.
• Die Wiederverwendung oder erneute Aufbereitung des OverStitch-Systems könnte
Fehlfunktionen des Instruments oder Konsequenzen für den Patienten zur Folge
haben, u. a.:
–Infektion oder Übertragung von Krankheiten
–Ausfall des Griffmechanismus, wodurch das Instrument am Gewebe
verriegelt wird, was u. U. einen chirurgischen Eingriff erforderlich macht
–Unzureichende Befestigung am Endoskop, sodass sich die Endkappe
während des Gebrauchs ablöst, was zur Bergung u. U. einen chirurgischen
Eingriff erforderlich macht
–Unzureichende Befestigung des Ankers am Nadelkörper, wodurch der
Anker versehentlich fallengelassen wird, was das Verfahren verzögert oder
einen nachträglichen Eingriff erforderlich macht
–Verbiegung des Nadelkörpers, wodurch der Arzt am korrekten Vorschub der
Nadel oder an der Durchführung des beabsichtigten Verfahrens gehindert wird
–Bei nicht vollständig ausgefahrener Helix werden die Möglichkeit zur
Gewebeerfassung sowie das beabsichtigte Verfahren eingeschränkt
• Wenn mit dem vorliegenden Produkt Fremdkörper wie Klammern, Stents, Clips
oder Mesh übernäht werden, kann sich die Nadel in dem Fremdkörper verhaken,
was einen chirurgischen Eingriff erforderlich macht.
• In Situationen, in denen der Operationssitus ein Schädigungsrisiko für angrenzende
anatomische Strukturen darstellt, wird der Einsatz von endoskopischen
Zubehörteilen wie die OverStitch-Gewebe-Helix zum Weg- und Zurückziehen
des Gewebes, in das die Naht gesetzt werden soll, von diesen nicht sichtbaren
Strukturen empfohlen.
1.3Vorsichtsmaßnahmen
• Das System darf nur verwendet werden, wenn es von Apollo Endosurgery, Inc.
oder einem autorisierten Vertreter erworben wurde.
• Mit installiertem endoskopischem Nahtsystem beträgt der effektive Durchmesser
des primären Endoskopkanals 3,2 mm.
• Zum Schutz der Speiseröhre kann ein Übertubus mit einem Innendurchmesser von
mindestens 16,7 mm mit dem System verwendet werden.
1.4 Systemkompatibilität
Das OverStitch ESS ist mit den auf Seite 1 genannten Nahtmaterialien kompatibel.
Das OverStitch ist mit den folgenden Endoskopen kompatibel:
• Olympus 2T160, 2TH180 oder 2T240
• Fuji EI-740D/S
Die Verfügbarkeit von kompatiblen Produkten kann je nach Land variieren.
1.5 Unerwünschte Ereignisse
Zu den möglichen Komplikationen, die bei der Verwendung des endoskopischen
Nahtsystems auftreten können, gehören unter anderem:
• Pharyngitis/Halsschmerzen
• Übelkeit und/oder Erbrechen
• Abdominale Schmerzen und/oder Gefühl des Aufgeblähtseins
• Blutung
• Hämatom
• Umstellung auf ein laparoskopisches oder offenes Verfahren
• Striktur
• Infektion/Sepsis
• Pharynx-, Kolon- und/oder Ösophagusperforation
• Pharynx-, Kolon- und/oder Ösophaguslazeration
• Verletzung der intraabdominellen (hohlen oder soliden) Viszera
• Aspiration
• Wunddehiszenz
• Akute entzündliche Gewebereaktion
• Tod
HINWEIS: Jeder schwerwiegende Vorfall, der in Verbindung mit dem Produkt entstanden
ist, sollte Apollo Endosurgery (siehe Kontaktinformationen am Ende dieses Dokuments)
und den zuständigen Behörden gemeldet werden.
Deutsch

15
{ }
2.Verpacktes System
3. Nomenklatur
Nadelschieber und
Ankerwechsler
Packung 1
Packung 2
Packung 3 Packung 4
Polydioxanon (resorbierbar) -
VIOLETT
Polypropylen (nicht resorbierbar) -
BLAU
Endoskop
Nadelschieber
Endkappe
Ankerwechsler
Ankerfreigabeknopf
Nadelschiebergriff
Endoskop-Griff
Fadeneinheit
Ankerkörper
Faden
Helixspitze
Helix
Helix-Griff
Cinch
Cinch-Griff
Manschette Stopfen
Fadendurchführschlaufe
Helix
(SEPARAT ERHÄLTLICH)
Cinch
Fadeneinheit
Deutsch

16
4. Zusammenbau
4.1. Das kompatible Endoskop für den Zusammenbau
auf einer geeigneten Oberäche platzieren.
HINWEIS: Sicherstellen, dass standardübliche
Kanalventile an den Arbeitskanälen angebracht sind.
4.2. Den Nadelschieber aus der Verpackung nehmen.
4.3. Den Nadelkörper schließen.
‘click’
HINWEIS: Sicherstellen, dass die Endkappe nicht
fallengelassen oder anderweitig beschädigt wird.
4.4. Den Ausrichtungstubus so weit in den primären
Arbeitskanal einbringen, bis die Endkappe bündig
mit der Stirnseite des Endoskops abschließt.
HINWEIS: Beim Aufsetzen der Endkappe sollte
Widerstand spürbar sein. Dieser zeigt die
ordnungsgemäße Befestigung an.
HINWEIS: Sicherstellen, dass der sekundäre
Arbeitskanal des Endoskops nicht blockiert ist.
WARNHINWEIS: Sicherstellen, dass die
Endkappe vollständig auf das Endoskop
aufgesetzt wurde.
4.5. Den Nadelschiebergriff am Endoskop befestigen.
HINWEIS: Sicherstellen, dass das externe Kabel
nicht um das Endoskop gewunden ist.
4.6. Das Endoskop an den Turm anschließen.
Aufnahme des Ankers
4.7. Das geeignete Nahtmaterial/die geeignete
Fadenstärke auswählen.
4.8. Fadeneinheit und Ankerwechsler aus der
Verpackung nehmen.
4.9. Den Anker aufnehmen.
4.10. Den Faden aus der Fadenkassette herausnehmen.
Hierzu den Faden festhalten und ziehen. Nicht den
Anker oder Ankerwechsler ziehen.
HINWEIS: Sicherstellen, dass sich der Faden nach
der Entfernung aus der Kassette nicht verheddert.
4.11. Den Ventildeckel öffnen und den Ankerwechsler in
den primären Kanal des Endoskops einsetzen.
ACHTUNG: Nicht bei geschlossenen Ventildeckeln
verwenden, da dies die Fadenspannung erhöht.
4.12. Zur optimalen Steuerung einen „Bleistiftgriff“ am
Katheter verwenden und den Ankerwechsler so
weit vorschieben, bis der Anker nahe dem distalen
Ende des Endoskops positioniert ist.
ACHTUNG: Wenn beim Vorschub des Anker-
wechslers durch den Arbeitskanal des Endoskops
Widerstand gespürt wird, die Winkelung des
Endoskops so reduzieren, dass sich das Instrument
problemlos durchführen lässt.
4.13. Das Endoskop in den Patienten einführen.
WARNHINWEIS: Das Instrument nicht mit
geöffnetem Nadelkörper einführen.
5. Navigation zur Zielanatomie
5.1. So weit vorschieben, bis die Zielanatomie lokalisiert
ist.
ACHTUNG: Bei der Intubation oder Extubation
mit dem endoskopischen Nahtsystem muss
sichergestellt werden, dass das Endoskop und der
Auslösekatheter zusammen vorgeschoben und
zurückgezogen werden.
5.2. Den Nadelkörper öffnen.
5.3. Den Ankerwechsler vorschieben und/oder das
Endoskop manipulieren, damit ein Durchhang im
Faden entsteht.
5.4. Ist im Faden ein hinreichender Durchhang
vorhanden, den Ankerwechsler in das
Endoskop zurückziehen.
5.5. Den Nadelkörper schließen.
5.6. Unter Verwendung eines „Bleistiftgriffs“ am
weißen Kabelabschnitt den Ankerwechsler so
weit vorschieben, bis der Anker vollständig auf
dem Nadelkörper sitzt.
‘click’
5.7. Ein spürbares Klicken oder ein fester Anschlag weist
darauf hin, dass der Anker vollständig auf dem
Nadelkörper sitzt.
5.8. Das Monitorbild prüfen, um die ordnungsgemäße
Installation des Ankers auf dem Nadelkörper
sicherzustellen.
5.9. Sicherstellen, dass das proximale Ende des Fadens
über die Kanalventile des Endoskops hinaus sichtbar
ist.
5.10. Zur Freigabe des Ankers den Ankerfreigabeknopf
vollständig drücken.
5.11. Bei noch immer vollständig gedrücktem
Ankerfreigabeknopf den Ankerwechsler leicht
zurückziehen.
‘hold’
6. Gewebe- und Fadenmanagement
6.1. Den Nadelkörper öffnen.
ACHTUNG: Öffnet sich der Nadelkörper nicht,
sicherstellen, dass der Anker vom Ankerwechsler
freigegeben wurde.
WARNHINWEIS: Sicherstellen, dass für
den gewünschten Fadenverlauf und das
gewünschte Nahtmuster ein entsprechender
Durchhang im Faden vorhanden ist. Den
Ankerwechsler vorschieben und/oder das
Endoskop manipulieren, damit ein Durchhang
imFadenentsteht.
6.2. Das Gewebe zur Anlegung der Naht in eine
geeignete Position bringen. Hierfür je nach
Bedarf die Apollo Helix oder ein für das Endoskop
geeignetes Hilfsmittel verwenden.
7. Verwendung der Gewebe-Helix (optional)
7.1. Die Helix in zurückgezogener Position so
weit in den sekundären Kanal des Endoskops
vorschieben, bis die distale Spitze auf dem
Monitor zu sehen ist.
ACHTUNG: Wenn beim Vorschub der Helix durch
den Arbeitskanal des Endoskops Widerstand
gespürt wird, die Winkelung des Endoskops so
reduzieren, dass sich das Instrument problemlos
durchführen lässt, und sicherstellen, dass der
sekundäre Arbeitskanal des Endoskops nicht
blockiert ist.
‚klick‘
‚halten‘
‚klick‘
Deutsch

17
7.2. Den Knopf am Helix-Griff zur Freilegung der Helix-
Spitze vollständig drücken.
ACHTUNG: Den Knopf am Helix-Griff während
des Vorschubs der Helix durch das Endoskop nicht
drücken.
7.3. Zur Erfassung des Gewebes den Helix-Griff im
Uhrzeigersinn so weit drehen, bis die korrekte
Gewebetiefe erreicht ist.
7.4. Während der Erfassung des Gewebes einen
leichten Vorwärtsdruck beibehalten.
7.5. Das Gewebe durch Vorschieben/Zurückziehen der
Helix in die gewünschte Position bringen.
8. Anlegen der Naht
8.1. Die Nadel durch Schließen des Nadelkörpers durch
das Gewebe schieben.
8.2. Sicherstellen, dass sich der Nadelarm nicht
versehentlich auf irgendeinem Fremdkörper oder
Instrument schließt.
Erfassen des Ankers
8.3. Unter Verwendung eines „Bleistiftgriffs“ den
Ankerwechsler so weit vorschieben, bis der Anker
umschlossen und Widerstand zu spüren ist.
‘click’
HINWEIS: Der Widerstand kann je nach Position
des Endoskops variieren.
8.4. Zur Erfassung des Ankers den Ankerwechsler
zurückziehen.
‘pop’
8.5. Unter Verwendung eines „Bleistiftgriffs“ am
weißen Abschnitt des Kabels das Endoskopgehäuse
mit den übrigen Fingern der gleichen Hand
halten, um Schäden an der Naht oder am
Gewebe zu vermeiden, sobald der Anker vom
Nadelkörper „abspringt“.
ACHTUNG: Den Ankerfreigabeknopf nicht drücken,
da dies ein versehentliches Ablösen des Ankers zur
Folge haben kann.
WARNHINWEIS: Wurde vor dem Vorschub des
Ankers durch das Gewebe nicht dafür gesorgt,
dass im Faden ein hinreichender Durchhang
vorhanden ist, kann sich der Rückzug des
Ankerwechslers schwierig gestalten und der
Anker lässt sich womöglich nicht richtig vom
Nadelkörper lösen.
Loslassen des Gewebes
8.6. Den Helix-Griff entgegen dem Uhrzeigersinn
drehen, bis das Instrument kein Gewebe mehr
berührt.
8.7. Den Knopf am Helix-Griff loslassen.
8.8. Über den Monitor sicherstellen, dass die Spitze vor
dem Rückzug in das Endoskop vollständig in den
Schaft zurückgezogen wurde.
8.9. Die Helix ein kleines Stück in das Endoskop
zurückziehen.
8.10. Den Nadelkörper öffnen.
ACHTUNG: Den Faden nicht mit dem im
Nadelkörper bendlichen Anker spannen.
8.11. Um weitere Nähte mit diesem Anker anzulegen, die
Abschnitte 5-8 wiederholen.
Nach abgeschlossener Nahtanlegung mit diesem
Anker mit Abschnitt 9 zur Gewebeadaption,
Befestigung und Abtrennung der Naht fortfahren.
Mit dem Nadelschieber und dem Ankerwechsler
können mehrere Anker verwendet werden.
9. Befestigen und Abtrennen der Naht
9.1. Zubehörteile (Apollo Helix oder ähnliches) aus dem
Endoskop entfernen.
9.2. Sicherstellen, dass sich der Anker im Ankerwechsler
bendet, und den Nadelkörper öffnen.
9.3. Den Anker distal zum Ausrichtungstubus
vorschieben.
9.4. Den Ankerfreigabeknopf vollständig drücken
und den Ankerwechsler zur Freigabe des Ankers
zurückziehen.
ACHTUNG: Den Anker nicht im Arbeitskanal des
Endoskops freigeben.
9.5. Den Ankerwechsler aus dem Endoskop entfernen.
HINWEIS: Der Ankerwechsler kann für zusätzliche
Nähte verwendet werden.
9.6. Das proximale Ende des Fadens durch die
abnehmbare Fadendurchführschlaufe fädeln.
9.7. Nach erfolgtem Einfädeln das proximale Ende des
Fadens freigeben, damit der Faden aufgenommen
werden kann.
9.8. Die Fadendurchführschlaufe parallel zum Instrument
ziehen, um den Faden in den Cinch einzuführen.
9.9. Das proximale Ende des Fadens festhalten und
den Cinch so weit in den Arbeitskanal einführen,
bis „Plug and Collar“ (Stopfen und Manschette) auf
dem Monitor zu sehen ist.
9.10. Den Faden ziehen und Gegenzug auf den Cinch
aufbringen, bis das Gewebe adaptiert und die
gewünschte Nahtspannung zwischen Anker und
Cinch-Manschette erreicht ist.
HINWEIS: Die endgültige Position des Cinch
wird von der Manschette und nicht vom Stopfen
bestimmt.
WARNHINWEIS: Eine übermäßige Spannung
kann das Gewebe beschädigen.
9.11. Den Sicherheitsabstandhalter vom Cinch-Griff
entfernen.
ACHTUNG: Der Sicherheitsabstandhalter darf
erst unmittelbar vor der Platzierung des Cinch
entfernt werden.
9.12. Den Cinch-Griff zur Platzierung des Cinch und zur
Abtrennung des Fadens fest drücken.
ACHTUNG: Die Fadenspannung muss
aufrechtgehalten werden.
HINWEIS: Um den Stopfen in die Manschette zu
bringen und zu verriegeln, muss hinreichend Kraft
aufgewendet werden. Die Abtrennung des Fadens
ist oftmals anhand eines „Knacks“ zu spüren.
9.13. Den Cinch entfernen.
‚Klick‘
‚Knacks‘
Deutsch

18
9.14. Den Nadelkörper schließen.
10. Mehrere Nähte
10.1. Der Ankerwechsler und der Nadelschieber können
für mehrere Nähte verwendet werden. Sind noch
weitere Nähte vorgesehen, muss das Endoskop
nach erfolgter Cinch-Platzierung nicht entfernt
werden.
WARNHINWEIS: Wird das Endoskop
zu Reinigungszwecken zwischen den
Nahtanlegungen entfernt, muss sichergestellt
werden, dass die Endkappe vor der nächsten
Intubation vollständig aufgesetzt wurde. Die
Endkappe bei Bedarf neu anbringen.
HINWEIS: Falls das Endoskop entfernt und erneut
eingeführt wurde, sicherstellen, dass der sekundäre
Arbeitskanal des Endoskops nicht blockiert ist.
10.2. Zur Verwendung einer weiteren Fadeneinheit zu
Schritt 4.7 zur Aufnahme des Ankers zurückkehren
und sämtliche nachfolgende Schritte befolgen.
Nach erfolgter Nahtanlegung mit Abschnitt 11 zur
Entfernung des Instruments fortfahren.
11. Entfernung des Instruments
11.1. Sämtliche Zubehörteile aus dem Endoskop
entfernen.
11.2. Sicherstellen, dass der Nadelkörper geschlossen
ist, und das Endoskop aus dem Patienten
entfernen. Dabei sicherstellen, dass das
externe Kabel zusammen mit dem Endoskop
herausgenommen wird.
11.3. Die Endkappe vom Endoskop abnehmen.
HINWEIS: Nicht den Nadelarm festhalten, um die
Endkappe abzunehmen.
11.4. Den Nadelschieber durch Öffnen der an den
Arbeitskanälen bendlichen Befestigungswinkel
vom Endoskop entfernen.
12. Informationen zur Sicherheit von
MRT-Untersuchungen
Bedingt MR-sicher
MR
In nicht klinischen Prüfungen wurde gezeigt, dass
die mit dem OverStitch endoskopischen Nahtsystem
platzierten Fäden, Cinches und Anker (zusammen als
Verankerungssystem bezeichnet) bedingt MR-sicher sind.
Bei einem Patienten mit diesem Verankerungssystem
kann unmittelbar nach der Platzierung unter den folgenden
Bedingungen gefahrlos eine MRT-Untersuchung
durchgeführt werden:
Statisches Magnetfeld
- Statisches Magnetfeld von 1,5 T oder 3,0 T
- Maximaler räumlicher Feldgradient von 2.000 Gauß/cm
(20 T/m)
- Maximale für MRT-Systeme angegebene
ganzkörpergemittelte spezische Absorptionsrate (SAR)
von 2 W/kg
Unter den oben angegebenen Scanbedingungen
bewirkt das Verankerungssystem nach einem
unterbrechungsfreien Scan von 15 Minuten voraussichtlich
einen maximalen Temperaturanstieg von weniger als
2 ºC.
Bei nicht klinischen Prüfungen erstreckt sich das durch
das Verankerungssystem verursachte Bildartefakt bei
der Bildgebung mit einer Gradientenecho-Pulssequenz
und einem 3,0-T-MRT-System ca. 10 mm über dieses
Produkt hinaus.
13. Informationen zu Gefahrstoffen
Enthält Gefahrstoffe
CMR-Erklärung: Die Edelstahl- und
Kobaltlegierungsbestandteile in diesem Gerät enthalten
die folgende(n) Substanz(en), die als CMR (karzinogen,
mutagen oder reproduktionstoxisch) 1A/1B und/
oder endokrinschädigend definiert ist/sind, in einer
Konzentration von über 0,1 Gewichtsprozent:
Kobalt (CAS Nr. 7740-48-8; EC Nr. 231-158-0)
Nach dem derzeitigen Stand der Wissenschaft
verursachen Medizinprodukte, die aus diesen
Kobaltlegierungen oder kobalthaltigen nichtrostenden
Stählen hergestellt werden, kein erhöhtes Krebsrisiko
oder negative Auswirkungen auf die Fortpflanzung.
14. Problembehebung
14.1. Nadelkörper öffnet sich nicht:
Ursache Lösung
14.1.1. Blockierung der Nadel: i. Den Arbeitsbereich bewerten und Katheter und Endoskop als Einheit manövrieren. Das Endoskop so ausrichten,
dass es gerade verläuft und nicht retroektiert ist.
14.1.2. Eingeschränkte Fadenführung:
i. Bendet sich der Anker auf dem Nadelkörper, sicherstellen, dass der Faden während der Öffnung nicht proximal
nahe des Griffs gehalten wird.
ii. Den Anker zum Ankerwechsler überführen. Den Nadelkörper öffnen. Den Ankerwechsler langsam nach proximal
zurückziehen. Anschließend den Nadelkörper nach distal vorschieben, um den Faden freizugeben.
14.1.3. Nadelschieber-Katheter geschlungen oder geknickt:
i. Sicherstellen, dass der entlang des Endoskops verlaufende Katheter weder geschlungen noch geknickt ist.
Das Endoskop so ausrichten, dass es gerade verläuft und nicht retroektiert ist. Das Endoskop vorschieben
und den Auslösekatheter zur Straffung nach proximal ziehen, sodass nur minimaler Widerstand zu spüren ist.
Auslösekatheter und Endoskop als Einheit festhalten und zur Anpassung vorschieben und zurückziehen.
14.1.4. Behinderung durch einen Fremdkörper:
i. Nur den Ankerwechsler entfernen:
a. Den Anker zum Nadelkörper überführen und den Ankerwechsler aus dem Endoskop entfernen.
b. Ein Greinstrument durch den primären Kanal einführen und den Nadelkörper aufdrücken.
ii. Anker und Ankerwechsler entfernen. Den Faden bei Bedarf abtrennen:
a. Den Anker zum Nadelkörper überführen und den Ankerwechsler aus dem Endoskop entfernen.
b. Ein geeignetes Hilfsmittel durch einen der Kanäle einbringen und den Faden abtrennen.
c. Ein geeignetes Hilfsmittel verwenden, um den Nadelkörper aufzudrücken.
d. Den abgetrennten Faden mithilfe eines geeigneten Hilfsmittels entfernen.
iii. Reichen die standardüblichen endoskopischen Techniken nicht aus, sind zur Entfernung des Produkts
laparoskopische Techniken hinzuzuziehen.
14.2. Nadelkörper schließt sich nicht:
Ursache Lösung
14.2.1. Allgemeine Blockierung:
i. Die oben aufgeführten Schritte 14.1.1, 14.1.2 und 14.1.3 (Nadelkörper öffnet sich nicht) befolgen.
ii. Sicherstellen, dass der Nadelschiebergriff geschlossen und verriegelt ist, und:
a. Den Nadelschieber-Katheter dehnen, um die effektive Länge des Steuerungskabels des Nadelkörpers zu verändern.
b. Den Ankerwechsler entfernen und den Nadelkörper mit einem Greinstrument (eingeführt durch den primären
Kanal) fassen. Den Faden bei Bedarf abtrennen.
14.2.2. Beschädigtes Nadelschieberkabel:
i. Anker und Cinch platzieren. Greifer durch Endoskop vorschieben und Nadelschieber sichern. Nadelschieber
während der Entfernung des Instruments schließen. Übertubus so weit wie möglich nach distal vorschieben.
Endoskop und Instrument in die OverTube zurückziehen. Dabei die distale Spitze der Bei Verwendung eines
Übertubus diesen zur Schließung des Nadelkörpers verwenden.
Deutsch

19
14.3. Der Ankerwechsel lässt sich nicht durchführen:
Ursache Lösung
14.3.1. Der Anker lässt sich mit dem Ankerwechsler nicht auf
dem Nadelkörper aufbringen:
i. Sicherstellen, dass ein hinreichender Durchhang im Faden gegeben und der Faden außerhalb des Endoskops
nicht verwickelt ist.
ii. Sicherstellen, dass der Ankerwechsler im Ausrichtungstubus des Nadelschiebers ordnungsgemäß positioniert ist.
iii. Falls der Anker und der Faden das Gewebe durchdrungen haben, den Anker entweder loslösen und den Cinch
gemäß Abschnitt 9 der Gebrauchsanweisung platzieren oder den Anker loslösen und ein geeignetes Hilfsmittel
verwenden, um den Faden abzuschneiden und zu entfernen.
iv. Falls Anker und Faden das Gewebe nicht durchdrungen haben, den Nadelschiebergriff schließen. Das Endoskop
entfernen. Den Anker und/oder den Ankerwechsler austauschen.
14.3.2. Der Anker lässt sich nicht vom Ankerwechsler lösen:
i. Sicherstellen, dass ein hinreichender Durchhang im Faden gegeben und der Faden außerhalb des Endoskops
nicht verwickelt ist.
ii. Sicherstellen, dass der Freigabeknopf des Ankerwechslers während des Zurückziehens des Ankerwechslers
VOLLSTÄNDIG gedrückt ist.
iii. Die Auslenkung/Windung des Endoskops (wenn möglich) reduzieren und versuchen, den Anker zu lösen.
iv. Mit dem sekundären Arbeitskanal des Endoskops kompatible Hilfsmittel verwenden, um den Faden
abzuschneiden und zu entfernen.
v. Den Ankerwechsler austauschen.
14.3.3. Der Anker lässt sich mit dem Ankerwechsler nicht
vom Nadelkörper zurückholen:
i. Sicherstellen, dass ein hinreichender Durchhang im Faden gegeben und der Nadelschiebergriff geschlossen ist.
ii. Unter Verwendung eines „Bleistiftgriffs“ den Ankerwechsler so weit vorschieben, bis der Anker umschlossen
und Widerstand zu spüren ist. Zur Erfassung des Ankers den Ankerwechsler zurückziehen.
iii. Falls der Anker nicht zurückgeholt werden kann, den Ankerwechsler austauschen. Alternativ ein geeignetes
Hilfsmittel verwenden, um den Faden abzuschneiden und zu entfernen.
iv. Den Anker austauschen und mit der Nahtlegung gemäß Abschnitt 8 der Gebrauchsanweisung fortfahren.
14.4. Cinch trennt den Faden bei Betätigung nicht ab:
Ursache Lösung
14.4.1. Faden wurde nicht abgetrennt:
i. Ein geeignetes Hilfsmittel zum Abtrennen des Fadens durch den sekundären Arbeitskanal einbringen und den
Cinch entfernen.
ii. Den abgetrennten Faden unter Anwendung standardüblicher endoskopischer Techniken entfernen.
14.5. Versehentliche Freigabe des Ankers:
Ursache Lösung
14.5.1. Ankerwechslerknopf an falscher Stelle gedrückt:
i. Den Anker als Fremdkörper entfernen oder das Verfahren zur Befestigung an Ort und Stelle befolgen. Wurde der
Anker versehentlich innerhalb des Arbeitskanals freigegeben, den Ankerwechsler oder ein für einen 3,2-mm-Kanal
geeignetes Greinstrument verwenden, um den Anker durch das Endoskop herauszudrücken.
Es darf nicht versucht werden, den Anker durch das Endoskop zurückziehen. Dadurch kann er im Kanal oder im
Y-Stück des Endoskopgriffs steckenbleiben.
14.6. Verwicklung des Fadens:
Ursache Lösung
14.6.1. Faden bendet sich außerhalb des Sichtfeldes: i. Den Nadelschiebergriff schließen und das Endoskop zur Freigabe zurück manipulieren.
14.6.2. Faden bendet sich hinter dem Gewebeschutz:
i. Den Nadelkörper während des Rückzugs des Endoskops leicht schließen.
ii. Den Anker bei Bedarf zum Ankerwechsler überführen.
iii. Den Nadelkörper öffnen und den Ankerwechsler zur Freigabe des Fadens über die Endkappe hinaus vorschieben.
14.6.3. Verdrehter Faden:
i. Ist der Faden verdreht, das Endoskop bewegen und den Anker zwischen Nadelkörper und Ankerwechsler bringen
(auf der gegenüberliegenden Seite des Fadens), soweit dies zur Aufdrehung des Fadens nötig ist.
HINWEIS: Wurde die Fadenverdrehung unmittelbar nach der Auslenkung des Endoskops bemerkt, sollte die
Entfernung zunächst durch die Auslenkung in umgekehrter Reihenfolge versucht werden.
ii. Wurde der Anker bereits platziert, den Cinch verwenden, um den Faden freizugeben und zu führen.
14.7. Ablösung der Endkappe vom Endoskop:
Ursache Lösung
14.7.1. Ablösung während des Gebrauchs:
i. Den Nadelkörper schließen. Mit einer rattenzahnförmigen Greifzange den „Zickzack“-Ausschnitt des
Ausrichtungstubus erfassen, allen Durchhang im Auslösekatheter entfernen und das Instrument langsam aus dem
Patienten herausziehen. Bei Verwendung eines Übertubus mit einer rattenzahnförmigen Greifzange den „Zickzack“-
Ausschnitt des Ausrichtungsröhrchens erfassen, allen Durchhang im Auslösekatheter entfernen und das Instrument
langsam aus dem Patienten herausziehen.
14.8. Helix lässt sich nicht herausdrehen:
Ursache Lösung
14.8.1. Helix im Gewebe festgeklemmt:
i. Ein geeignetes Hilfsmittel durch den primären Kanal einbringen, Gegenzug auf das Gewebe um die Helix
aufbringen und die Helix durch Ziehen befreien.
ii. Reichen die standardüblichen endoskopischen Techniken nicht aus, sind zur Entfernung der Helix laparoskopische
Techniken hinzuzuziehen.
Deutsch

20
Tableau des symboles
Exclusivement à usage unique. Jetable. Ne pas restériliser.
Attention : En vertu de la législation fédérale des États-Unis, ce dispositif ne peut être vendu que par unmédecin ou sur ordonnance médicale.
Brevet en attente.
EXCLUSION DE GARANTIE ET LIMITATION DE RECOURS
IL N’EXISTE AUCUNE GARANTIE EXPRESSE OU IMPLICITE, Y COMPRIS ET SANS S’Y LIMITER, TOUTES GARANTIES IMPLICITES DE QUALITÉ MARCHANDE ET D’ADAPTATION
À UN USAGE PARTICULIER, APPLICABLE AU(X) PRODUIT(S) APOLLO ENDOSURGERY, INC. DÉCRIT(S) DANS CE DOCUMENT. DANSTOUTE LA MESUREPERMISE PAR LES LOIS
APPLICABLES, APOLLO ENDOSURGERY, INC. DÉCLINE TOUTE RESPONSABILITÉ EN CAS DE DOMMAGES INDIRECTS, PARTICULIERS, ACCESSOIRES OU CONSÉCUTIFS, SANS
TENIR COMPTE DU FAIT QU’UNETELLE RESPONSABILITÉ SOIT BASÉE SUR UN CONTRAT, UN DÉLIT, UNE NÉGLIGENCE, UNE RESPONSABILITÉ STRICTE, UNE RESPONSABILITÉ
DU FAIT DES PRODUITS OU AUTRE. LA SEULE ET ENTIÈRE RESPONSABILITÉ MAXIMUM D’APOLLO ENDOSURGERY, INC., POUR QUELQUE RAISON QUE CE SOIT, ET LE SEUL
ET UNIQUE RECOURS DE L’ACHETEUR POUR QUELQUE RAISON QUE CE SOIT, SONT STRICTEMENT LIMITÉS AUX SOMMES PAYÉES PAR LE CLIENT POUR LES ARTICLES
PARTICULIERS ACHETÉS. AUCUN INDIVIDU N’EST HABILITÉ À LIER APOLLO ENDOSURGERY, INC. À QUELQUE DÉCLARATION OU GARANTIE QUE CE SOIT, SAUF DISPOSITION
SPÉCIFIQUE PAR LES PRÉSENTES. LES DESCRIPTIONS OU CARACTÉRISTIQUES CONTENUES DANS LA DOCUMENTATION IMPRIMÉE D’APOLLO ENDOSURGERY, INC., Y
COMPRIS CE DOCUMENT, SONT DONNÉES UNIQUEMENT À DES FINS DE DESCRIPTION GÉNÉRALE DU PRODUIT AU MOMENT DE SA FABRICATION, ET NE CONSTITUENT PAS
DES GARANTIES EXPRESSES OU DES RECOMMANDATIONS POUR L’USAGE DU PRODUIT DANS DES CIRCONSTANCES SPÉCIFIQUES. APOLLO ENDOSURGERY, INC. DÉCLINE
TOUTE RESPONSABILITÉ, Y COMPRIS TOUTE RESPONSABILITÉ EN CAS DE DOMMAGE DIRECT, INDIRECT, PARTICULIER, ACCESSOIRE OU CONSÉCUTIF, RÉSULTANT DE LA
RÉUTILISATION DU PRODUIT.
Description Symbole Description Symbole Description Symbole
Consulter le mode d’emploi Fabricant Date de péremption
Ne pas réutiliser
Attention : En vertu de la législation
fédérale des États-Unis, ce dispositif ne
peut être vendu que par un médecin ou
sur ordonnance médicale
Numéro de lot
Stérilisé à l’oxyde d’éthylène Date de fabrication Ne pas utiliser si l’emballage
estendommagé
Numéro de catalogue Ne pas restériliser Mandataire dans la communauté
européenne
Dispositif médical Contient une substance dangereuse
1. Indications
Le système de suture endoscopique (SSE) Apollo Endosurgery OverStitch™ est destiné
àla pose de suture(s) etl’affrontement des tissus mous par voie endoscopique.
1.1 Contre-indications
Les contre-indications incluent celles qui sont propres àl’utilisation d’un système de
suture endoscopique, et à touteintervention endoscopique. Celles-ci peuvent inclure,
entre autres:
• Le système n’est pas destiné à être utilisé quand des techniques endoscopiques
sont contre-indiquées.
• Le système n’est pas destiné à être utilisé sur des tissusmalins.
1.2 Avertissements
• Ne pas utiliser un dispositif quand l’intégrité de l’emballage stérile a été
compromise ou si le dispositif paraît endommagé.
• Seuls les médecins suffisamment compétents etexpérimentés dans cette
technique ou d’autres techniques similaires sont habilités à réaliser des
interventions endoscopiques.
• La mise en contact des composants électrochirurgicaux avec d’autres composants
risque de provoquer des lésions chez le patient et/ou le technicien ainsi que
d’endommager le dispositif et/ou l’endoscope.
• Vérifier la compatibilité des instruments et accessoires endoscopiques et s’assurer
que leurs performances nesont pas diminuées.
REMARQUE: Les lunettes de visée remises à neuf peuvent ne plus correspondre
aux spécifications d’origine.
• S’assurer qu’il y a suffisamment de place pour ouvrirl’aiguille.
• S’assurer que le manche de la poignée du système desuture endoscopique est
fermé et verrouillé pendant l’intubation et l’extubation.
• Les utilisateurs doivent être familiarisés aux procédures et techniques chirurgicales
employant des sutures résorbables avant d’utiliser des sutures résorbables
synthétiques pour la fermeture des plaies, car le risque de déhiscence de la plaie
peut varier selon le site d’application et le matériau de suture utilisé.
• La réutilisation ou le retraitement du système OverStitch pourrait entraîner un
dysfonctionnement du dispositif ou avoir des conséquences pour le patient,
notamment :
–Infection ou transmission de maladies
–Dysfonctionnement du mécanisme de la poignée entraînant le blocage du
dispositif sur le tissu et pouvant nécessiter une intervention chirurgicale
–Rétention réduite sur l’endoscope, pouvant entraîner le détachement
de l’embout terminal en cours d’utilisation, ce qui peut nécessiter une
intervention chirurgicale pour le récupérer
–Rétention réduite de l’ancrage sur le corps de l’aiguille, entraînant un
largage accidentel de l’ancrage susceptible de provoquer un retard de la
procédure ou de nécessiter une intervention ultérieure
–Courbure du corps de l’aiguille, empêchant le médecin de diriger l’aiguille
correctement ou d’effectuer la procédure voulue
–Impossibilité d’étendre totalement le préhenseur hélicoïdal, ce qui limite la
capacité à faire l’acquisition de tissu et à réaliser la procédure voulue
• Si le dispositif est utilisé pour fixer des objets étrangers (agrafes, stents, clips ou
treillis), il est possible que l’aiguille reste coincée dans le corps étranger et qu’une
intervention chirurgicale soit nécessaire.
• Si le site opératoire risque d’endommager les structures anatomiques adjacentes,
il est recommandé d’utiliser des accessoires endoscopiques, comme le
préhenseur hélicoïdal pour tissus OverStitch, pour écarter le tissu à suturer de
ces structures invisibles.
1.3 Mises en garde
• Le système peut uniquement être utilisé s’il a été acheté auprès de Apollo
Endosurgery, Inc. ou ses agents agréés.
• Lorsque le système de suture endoscopique est installé, le canal principal de
l’endoscope devient un canal de3,2mm.
• Un surtube d’un diamètre interne d’au moins 16,7mm peut être utilisé avec le
système pour protéger l’œsophage.
1.4 Compatibilité du système
Le dispositif OverStitch ESS est compatible avec les sutures indiquées à la page1.
Le dispositif OverStitch est compatible avec les endoscopes suivants:
• Olympus 2T160, 2TH180, ou 2T240
• Fuji EI-740D/S
La disponibilité des appareils compatibles peut varier en fonction de la région géographique.
1.5 Événements indésirables
Les complications possibles qui peuvent résulter de l’utilisation du système de suture
endoscopique comprennent, mais sans s’y limiter:
• Pharyngite / Mal de gorge
• Nausées et/ou vomissements
• Douleurs abdominales et/ou ballonnements
• Hémorragie
• Hématome
• Conversion en procédure laparoscopique ou ouverte
• Sténose
• Infection / septicémie
• Perforation pharyngée, colique et/ou œsophagienne
• Lacération de l’œsophage, du côlon et/ou du pharynx
• Lésion viscérale intra-abdominale (creuse ou solide)
• Aspiration
• Déhiscence de plaie
• Réaction inflammatoire aiguë des tissus
• Décès
REMARQUE: tout incident grave survenu en rapport avec ce dispositif doit être signalé
à Apollo Endosurgery (voir les coordonnées à la fin du présent document) ainsi qu’aux
autorités gouvernementales concernées.
Français
This manual suits for next models
6
Table of contents
Languages:
Other apollo endosurgery Medical Equipment manuals