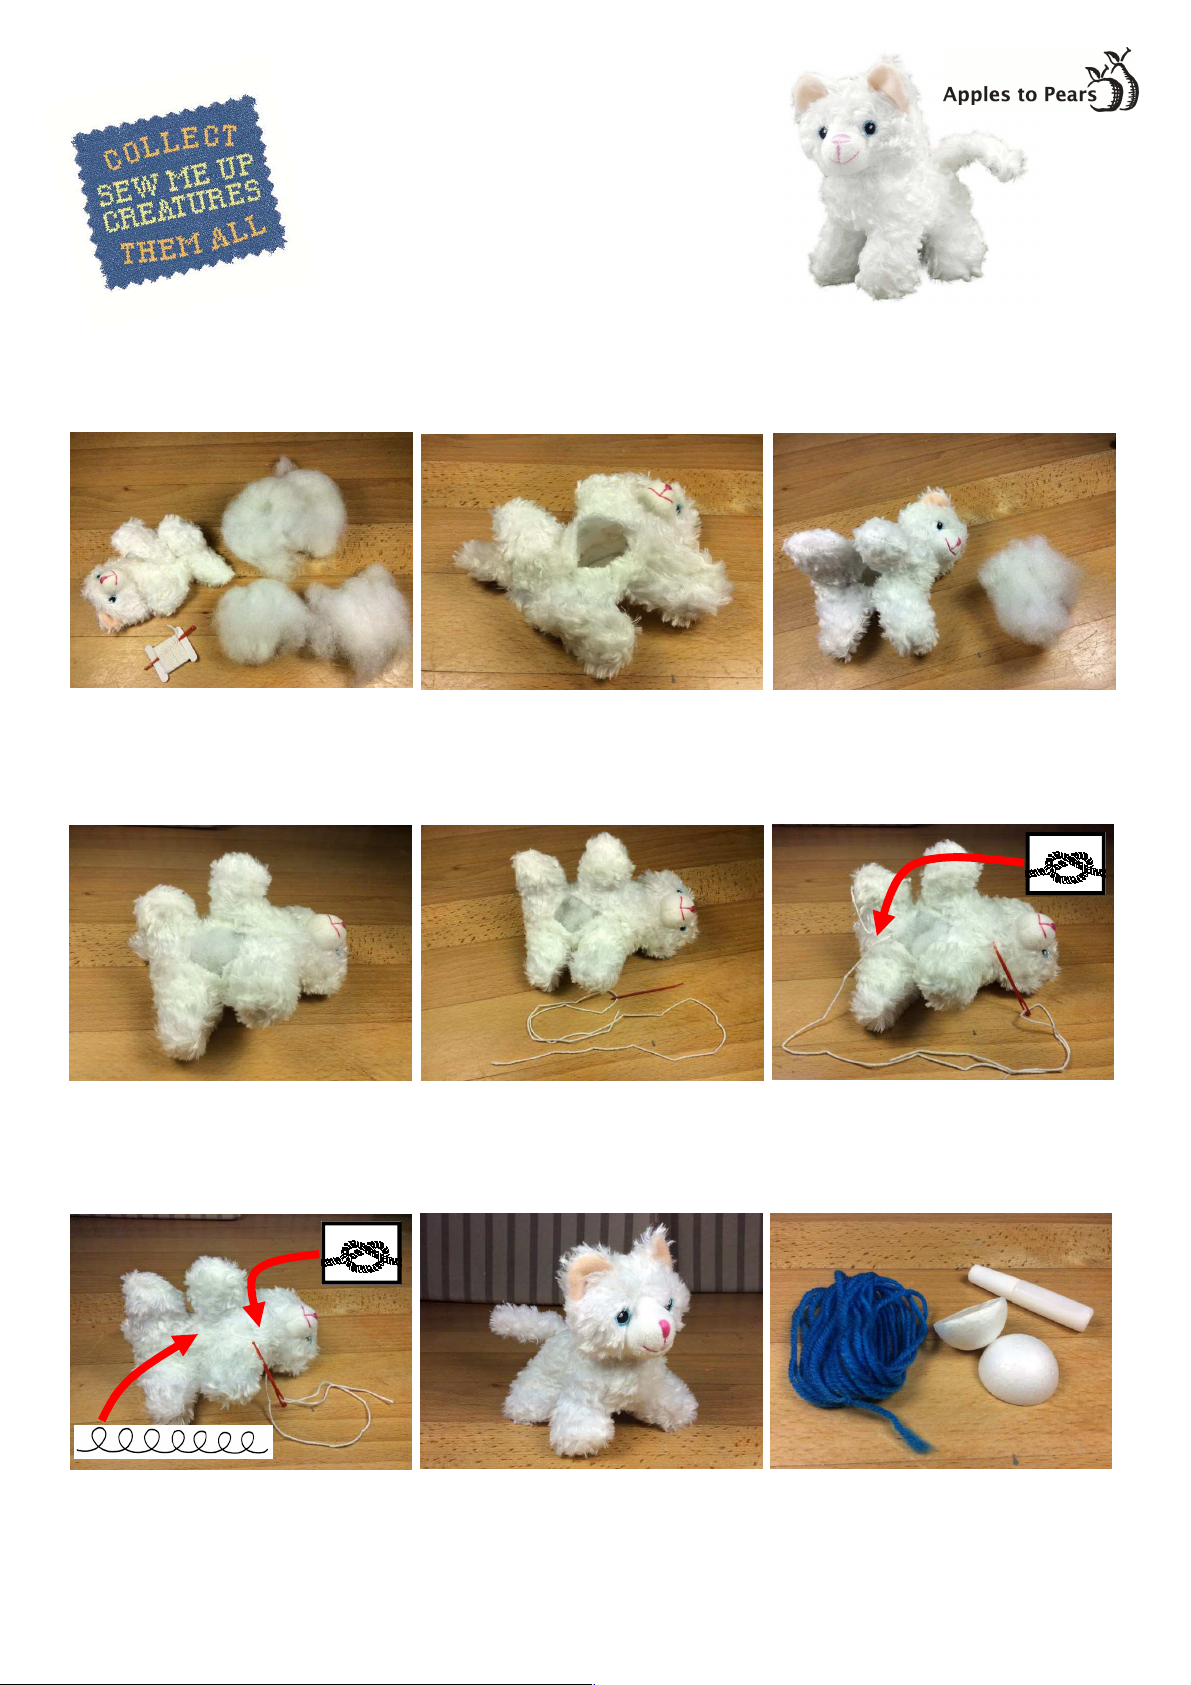
manuals.online logo
Brands
  1. Home
  2. •
  3. Brands
  4. •
  5. Apples to Pears
  6. •
  7. Toy
  8. •
  9. Apples to Pears Sew me up Kitten User manual

Apples to Pears Sew me up Kitten User manual

Other Apples to Pears Toy manuals

Apples to Pears Eiffel Tower in a Tin User manual

Apples to Pears

Apples to Pears Eiffel Tower in a Tin User manual

Apples to Pears Fighter Plane Construction Kit User manual

Apples to Pears

Apples to Pears Fighter Plane Construction Kit User manual

Popular Toy manuals by other brands

FUTABA GY470 instruction manual

FUTABA

FUTABA GY470 instruction manual

LEGO 41116 manual

LEGO

LEGO 41116 manual

Fisher-Price ColorMe Flowerz Bouquet Maker P9692 instruction sheet

Fisher-Price

Fisher-Price ColorMe Flowerz Bouquet Maker P9692 instruction sheet

Little Tikes LITTLE HANDIWORKER 0920 Assembly instructions

Little Tikes

Little Tikes LITTLE HANDIWORKER 0920 Assembly instructions

Eduard EF-2000 Two-seater exterior Assembly instructions

Eduard

Eduard EF-2000 Two-seater exterior Assembly instructions

USA Trains EXTENDED VISION CABOOSE instructions

USA Trains

USA Trains EXTENDED VISION CABOOSE instructions

Modellbau Laffont Z1601 Assembly instructions

Modellbau Laffont

Modellbau Laffont Z1601 Assembly instructions

NOCH 12905 instruction manual

NOCH

NOCH 12905 instruction manual

Eduard Ki-61-Id quick start guide

Eduard

Eduard Ki-61-Id quick start guide

Viessmann Vollmer 45616 Mounting instruction

Viessmann

Viessmann Vollmer 45616 Mounting instruction

Vollmer 42004 Mounting instruction

Vollmer

Vollmer 42004 Mounting instruction

Phoenix Model CLASSIC-EP instruction manual

Phoenix Model

Phoenix Model CLASSIC-EP instruction manual

H-KING Sopwith Camel British WW1 Fighter instruction manual

H-KING

H-KING Sopwith Camel British WW1 Fighter instruction manual

MODSTER Predator 4x4 Crawler user manual

MODSTER

MODSTER Predator 4x4 Crawler user manual

DHK Hobby 8136 User instruction manual

DHK Hobby

DHK Hobby 8136 User instruction manual

THUNDER TIGER Raptor 50 V2 kit manual

THUNDER TIGER

THUNDER TIGER Raptor 50 V2 kit manual

Timberkits Skateboarder instructions

Timberkits

Timberkits Skateboarder instructions

Hangar 9 Funtana 125 Assembly manual

Hangar 9

Hangar 9 Funtana 125 Assembly manual

manuals.online logo
manuals.online logoBrands
  • About & Mission
  • Contact us
  • Privacy Policy
  • Terms and Conditions

Copyright 2025 Manuals.Online. All Rights Reserved.

1
3
Remove the stuffing from its
packet and pull it into small
balls.
Now open up the slot in the
back of your kitten’s body.
2
Start to push the stuffing
into the body through the
slot, fill the legs & head first.
4
6
Carry on stuffing until all
the balls of stuffing are
inside it looks like they
will never fit but they do!
Cut a 30cm length of thread
and thread it onto the plastic
needle in this kit.
5
Sew a loop of thread at one
end of the slot and tie it
firmly with a double knot.
7
9
Sew the sides of the slot
together and then tie
another loop and knot at the
end. Cut off the thread ends.
Your cute kitten is finished!
8
Now it’s time to make a play
ball for your kitten. Use the
polystyrene half balls, wool
and glue.
Sew me up
Kitten
This kit contains all you need to make a cute kitten for you to love and
keep. Your kitten body has been pre-made for you however you will
need to stuff and sew her up. Follow these easy steps.
Produced by Apples to Pears Ltd., Stroud, U.K.
www.applestopears.com
Recommended for ages 8 years & over. Not suitable for children under 3 years, WARNING small arts, choking hazard.
Co yright © A les to Pears Ltd 2016
Your cute kitten will love to travel with you wherever you go. Use the
tin as a bed and don’t forget to take her play-ball with you...
10
12
Protect your work area, this
part is messy! Apply glue to
the flat surface one half of
the ball.
Now glue the end of the
wool to this surface.
11
Join the other half of the ball
sandwiching the wool
in between.
13
15
Start to wind the wool
around the ball. Apply glue
at the top and bottom.
Continue to wind the wool at
90 degrees to the last step,
applying a little more glue.
14
Continue until the ball is
covered. Leave the ball to
dry for 2 3 hours.