Applied Magic ScreenPlay User manual

Introduction 1
INTRODUCTION
Information in this document is subject to change without notice.
Companies, names, and data that are used in examples are fictitious unless
otherwise noted. No part of this document may be reproduced or
transmitted in any form or by any means—electronic or mechanical—for
any purpose without the express written permission of Applied Magic Inc.
© 2000 Applied Magic Inc.
ScreenPlay and Sequel use code from the Free Type Project.
ScreenPlay and Sequel contain software code which is protected by U.S. and
international copyright laws. Applied Magic retains ownership to all
copyrights. The purchaser has a limited license to use the software code only
as sold with ScreenPlay and Sequel. Any modifications, copying, reverse
engineering or other use not authorized by law, this license or the express
written consent of Applied Magic is strictly prohibited. Unauthorized
reproduction or distribution of copyrighted material in the United States is
subject to civil and criminal remedies pursuant to Title 17 of the United
States Code.
ScreenPlay, Sequel, Applied Magic, Grimoire, White Magic, and ColorGard
are trademarks of Applied Magic, Inc. Pixélan Software and Video SpiceRack
PRO are trademarks of Pixélan Software. Rapid Transits is a trademark of
Kermit Woodall and are copyright ©2000 by Kermit Woodall. Other
trademarks belong to their respective owners.
Patents pending in the United States and worldwide relating to ScreenPlay
and Sequel.
Document No. 365055-001
Printed in the United States of America

Table of Contents 2
Introduction 1
Welcome 3
Registration 3
Regulatory Information 3
Safety Precautions 6
Video Formats 9
Connecting Your Video Editing Unit 10
Package Contents 10
Optional Features 11
Front Panel 11
Rear Panel 13
Making Connections 15
Basic Connections 17
Connection to a Standard TV or Broadcast Monitor 17
Connection to an S-Video TV or Broadcast Monitor 17
Connection to a VGA Computer Monitor 18
Connection to a SCART TV or Monitor 18
Connection to an Audio System 18
Connection to a VCR with Standard Output 19
Connection to a VCR with S-Video Output 20
Connection to a Camcorder with Standard Output 20
Connection to a Camcorder with S-Video Output 21
Connection to a Camcorder with DV-1394 (ScreenPlay only) 21
System Basics 22
Keyboard 22
Mouse 26
Identifying Parts of the Screen 27
Operating Your Video Editor 31
Powering Up 31
Powering Down 31
Capturing (Recording) Material 32
Starting a Project 35
Using the Editor Screen 36
Backing Up a StoryBoard 56
Restoring a Backed Up StoryBoard 56
Using the Graphics Screen 57
Completing Your Project 62
Customizing Your System 63
Using the Setup Screens 63
Troubleshooting 66
Specifications 67
Limited Warranty 69
Obtaining Service 70
Index 71
Tutorial 77

Introduction 3
Welcome!
Congratulations on your selection of an Applied Magic video editing system.
Now you can enjoy the performance of top-of-the-line editing systems without
the high prices or technical headaches.
Registration
In addition to retaining your sales receipt and the warranty information
supplied in this booklet, please complete and mail the limited warranty
registration card.
Regulatory Information
Warning
The unauthorized modification of any unit and the sale and use of any such
unit is prohibited by law. Any such modification or alteration of this product
or any unauthorized use of ScreenPlay or Sequel could subject the user and/or
seller and/or party modifying the unit to fines, imprisonment, and civil
damages.
Federal Communications Commission Radio and Television
Interference Statement for a Class A Device
This equipment has been tested and found to comply with the limits for a
Class A digital device, pursuant to part 15 of the FCC rules. These limits are
designed to provide reasonable protection against harmful interference in a
residential installation. This equipment generates, uses, and can radiate radio
frequency energy and, if not installed and used in accordance with
instructions, may cause harmful interference to radio communications.
However, there is no guarantee that interference will not occur in a particular
installation.
If the equipment does cause harmful interference to radio or television
reception, which can be determined by turning the equipment off and on, try
to correct the interference by one of the following measures:
■Reorient or relocate the receiving antenna.
■Increase the separation between the equipment and receiver.
■Connect the equipment to an outlet on a circuit different from that to
which the receiver is connected.
■Consult the dealer or an experienced radio/TV technician for help.
Changes or modifications not expressly approved by Applied Magic could
void the user’s authority to operate the equipment.

Introduction 4
This product was FCC certified under test conditions that include the use of
shielded I/O cables and connectors between system components. To be in
compliance with FCC regulations, use shielded cables and connectors, and
install them properly.
Responsible Party:
Applied Magic Inc.
5845 Owens Avenue
Carlsbad, CA 92008
U.S.A.
Manufacturer:
SMS
9877 Waples Court
San Diego, CA 92121
U.S.A.
Declares that the products:
■ScreenPlay (a nonlinear video editor)
■Sequel (a nonlinear video editor)
Declaration of Conformity Statement
(Per 47 CFR, Section 2.906 as amended)
Complies with the requirements of 47 CFR, Part 15 for Class A equipment:
■15.107(a) Conducted Limits (0.15-30 MHz)
■15.109(a) Radiated Emission Limit (30-1000MHz)
Additional Information: To be in compliance with FCC regulations, the user
must use shielded cables and connectors and install them properly.

Introduction 5
European Union Declaration of Conformity Consumer Audio
Associated Equipment
EU Directives Covered by this Declaration:
■89/336/EEC Electromagnetic Compatibility Directive, as amended by
92/31/EEC & 93/88/EEC 72/23/EEC Low Voltage Equipment Directive, as
amended by 93/68/EEC.
Products covered by this declaration: ScreenPlay Nonlinear Video Editor,
Sequel Nonlinear Video Editor.
Basis on which conformity is being declared: The products identified above
comply with the requirements of the above EU Directives by meeting the
following standards:
■EN55013: 1997 EMC emissions test requirements for “Consumer Audio
Associated Equipment” as follows: Mains Terminal Disturbance Voltage Test
(Clause 3.2, 150 kHz - 30 MHz); Disturbance Power Tests (Clause 3.5, 30
MHz - 300 MHz).
■EN50082-1: 1992 IEC801-2(1984) IEC 801-3 (1984) IEC 801-4 (1988)
EMC immunity tests per the “Essential Protection Clause” of the EMC
Directive as follows: Electrostatic Discharge (8 kV Air discharge); RF
Immunity (3 V/m 27-500 MHz CW); Fast Transient immunity (1 kV AC
line; 0.5 kV I/O lines>3m).
■EN 60950 (1993), IEC 950 (1993) Safety of Information Technology
Equipment, Including Electrical Business Equipment.
Attention: The attention of the specified, purchaser, installer, or user is
drawn to special measures and limitations about usage, which must be
observed when the product is taken into service to maintain compliance with
the above directives. Details of these special measures and limitations are on
page 7 of this user manual.
Authority:
Applied Magic, Inc. Europe AG
Schulhausstrasse 27
CH-8600 Dubendorf, Switzerland
Applied Magic Inc:
5845 Owens Avenue
Carlsbad, CA 92008
U.S.A.

Introduction 6
Safety Precautions
Use the following guidelines to protect your ScreenPlay or Sequel unit and
your personal safety. Keep the safety and operating instructions for future
reference. Pay attention to all warnings on the equipment and in the
instructions.
The exclamation point inside an equilateral triangle is
intended to alert the user to the presence of important
operating and maintenance (service) instructions in the
literature accompanying the product.
Caution: To reduce the risk of electrical shock, do not
remove cover or front. Refer servicing to qualified service
personnel. This installation should be made by a qualified
service person.
The lightning flash with the arrowhead symbol, within an
equilateral triangle, is intended to alert the user to the
presence of non-insulated dangerous voltage within the
product’s enclosure that may be of sufficient magnitude to
constitute a risk of electrical shock to persons.
Caution: Risk of electrical shock. Do not open.

Introduction 7
Multiple Voltage Equipment
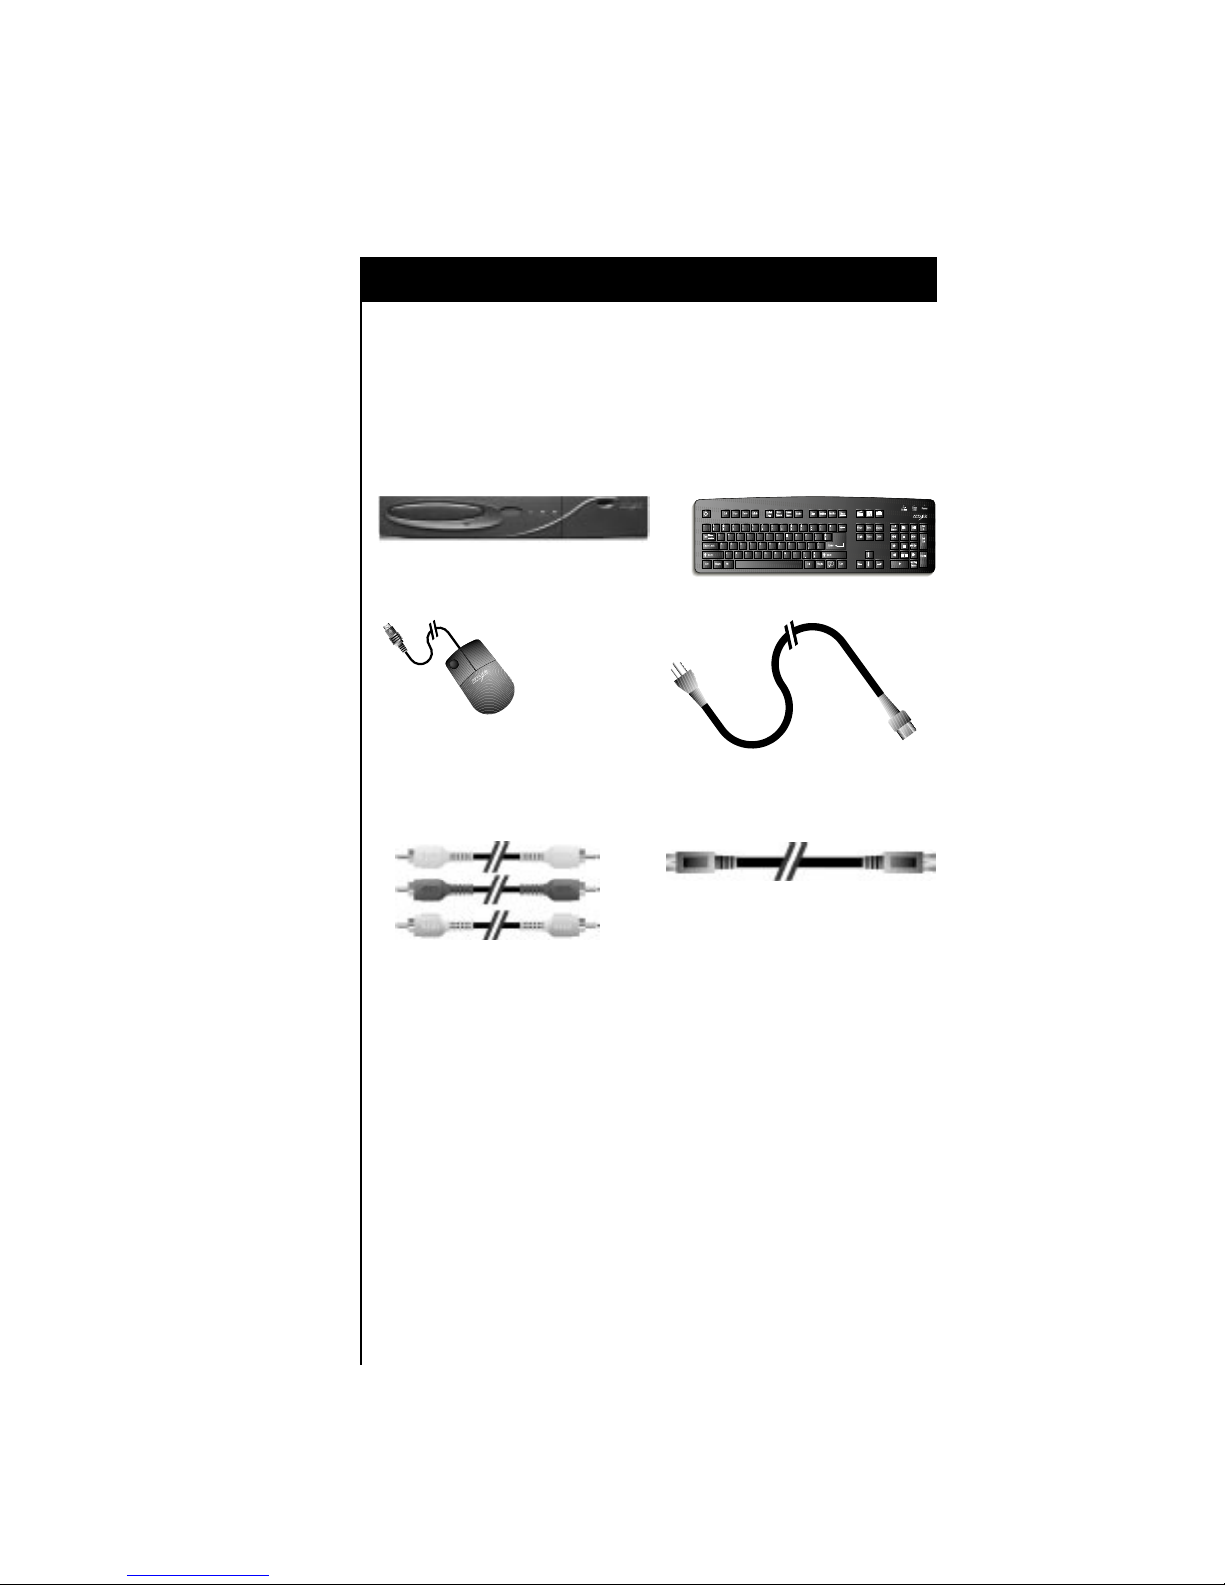
The power cord included with your ScreenPlay or Sequel is for use with
standard U.S. VAC supplies. If it is necessary to operate the product in the
U.S.A. with a 220 VAC supply, a UL-listed power cord must be used. For
countries outside the U.S.A., it is required to use a power cord that complies
with the electrical standards established by that country.
Warning
■To prevent fire or shock hazard, do not expose this equipment to rain or
moisture. Do not spill food or liquids on the unit.
■To prevent electric shock, plug unit and peripheral power cables into
grounded power sources. Do not use adapter plugs or remove the
grounding prong on the three-prong plug. If you use an extension cable, it
must have a three-prong plug.
■To prevent electrical shock, do not use the electrical power plug (polarized)
with an extension cord, receptacle, or other outlet unless the blades can be
fully inserted to prevent blade exposure.
■Do not overload power outlets and extension cords. This can result in a fire
risk or electrical shock.
■Cables connected to the unit should not exceed two meters in length. Make
sure nothing rests on the cables, and make sure they cannot be stepped on
or tripped over.
■Use a surge suppressor or line conditioner to protect your electronic
equipment.
■Do not push any objects into the openings of the unit. This can cause
electric shock by shorting out interior components.
Ventilation and Placement
■Do not block or cover the slots and openings of the unit. They provide
ventilation and protect it from overheating.
■Keep the unit away from radiators and heat sources. Do not block cooling
vents by placing the unit in a closed-in wall unit or on a bed, sofa, or rug.
■Do not place this product on an unstable surface such as a cart, stand,
tripod, bracket, or table. It may fall, causing serious injury to a person or to
the unit itself.
Cleaning
Do not use liquid or aerosol cleaners. Use a damp cloth to clean the exterior
enclosure.

Introduction 8
Ergonomics
■If you have connected a monitor to your video editing unit, place the
monitor directly in front of you, approximately two feet away at eye level or
slightly lower when you are sitting down, and adjust the screen to
minimize glare.
■Place the keyboard directly in front of you. Use a properly adjusted chair
with a good back support, and sit erect with feet on the floor, arms hanging
naturally at your sides, and forearms horizontal with wrists in a neutral
position while using the keyboard.
■Vary your work activities, and take breaks so that you do not work for
extended periods of time.
Repairs and Service
For assistance on return or repair, refer to the sections entitled “Limited
Warranty” and “Obtaining Service.” Do not try to service this product yourself.
If you open or remove the cover, you may be exposed to dangerous voltage or
other hazards.

Introduction 9
Abu Duabi (PAL)
Afghanistan (PAL)
Albania (SECAM)
Algeria (PAL)
Antigua (NTSC)
Antilles (NTSC)
Argentina (PAL-N)
Aruba (NTSC)
Australia (PAL)
Austria (PAL)
Azores (PAL)
Bahamas (NTSC)
Bahrain (PAL)
Bangladesh (PAL)
Barbados (NTSC)
Belgium (PAL)
Bermuda (NTSC)
Bolivia (NTSC)
Bosnia-Herzegovina (PAL)
Brazil (NTSC or PAL-M)
Brunei (PAL)
Bulgaria (SECAM)
Burma (NTSC)
Cameroon (SECAM)
Canada (NTSC)
Canary Islands (PAL)
Cayman Islands (NTSC)
Channel Islands (PAL)
Chile (NTSC)
China (PAL)
Columbia (NTSC)
Congo (SECAM)
Costa Rica (NTSC)
Croatia (PAL)
Cuba (NTSC)
Curacao (NTSC)
Cyprus (PAL)
Czech Republic (PAL)
Denmark (PAL)
Djibouti (SECAM)
Dominican Republic (NTSC)
Dubai (PAL)
Egypt (SECAM)
El Salvador (NTSC)
Equador (NTSC)
Finland (PAL)
France (SECAM)
French Guyana (SECAM)
Gabon (SECAM)
Germany (East) (SECAM)
Germany (West) (PAL)
Ghana (PAL)
Gibraltar (PAL)
Greece (SECAM)
Greenland (PAL)
Guadeloupe (SECAM)
Guam (NTSC)
Guatemala (NTSC)
Haiti (NTSC)
Honduras (NTSC)
Hong Kong (PAL)
Hungary (SECAM)
Iceland (PAL)
India (PAL)
Indonesia (PAL)
Iran (SECAM)
Iraq (SECAM)
Ireland (PAL)
Israel (PAL)
Italy (PAL)
Ivory Coast (SECAM)
Jamaica (NTSC)
Japan (NTSC)
Jordan (PAL)
Kenya (PAL)
Korea (North) (PAL)
Korea (South) (NTSC)
Kuwait (PAL)
Laos (PAL)
Lebanon (SECAM)
Liberia (PAL)
Libya (SECAM)
Luxembourg (PAL)
Madagascar (SECAM)
Madeira (PAL)
Malaysia (PAL)
Malta (PAL)
Martinique (SECAM)
Mauritius (SECAM)
Mexico (NTSC)
Monaco (PAL)
Mongolia (SECAM)
Morocco (SECAM)
Mozambique (PAL)
Namibia (PAL)
Netherlands (PAL)
New Zealand (PAL)
Nicaragua (NTSC)
Nigeria (PAL)
Norway (PAL)
Oman (PAL)
Pakistan (PAL)
Panama (NTSC)
Paraguay (PAL-N)
Peru (NTSC)
Philippines (NTSC)
Poland (PAL)
Polynesia (SECAM)
Portugal (PAL)
Puerto Rico (NTSC)
Qatar (PAL)
Reunion (SECAM)
Romania (SECAM)
Russia (SECAM)
Saban (PAL)
Saipan (NTSC)
Sarawak (PAL)
Saudi Arabia (SECAM)
Senegal (SECAM)
Sierre Leone (PAL)
Singapore (PAL)
Slovak Republic (SECAM)
Slovenia (PAL)
South Africa (PAL)
Spain (PAL)
Sri Lanka (PAL)
Sudan (PAL)
Surinam (NTSC)
Swaziland (PAL)
Sweden (PAL)
Switzerland (PAL)
Taiwan (NTSC)
Tanzania (PAL)
Thailand (PAL)
Tibet (PAL)
Trinidad (NTSC)
Turkey (PAL)
Uganda (PAL)
United Arab Emirates (PAL)
United Kingdom (PAL)
USA (NTSC)
Uruguay (PAL-N)
Venezuela (NTSC)
Yemen (PAL)
Zaire (SECAM)
Zambia (PAL)
Zanzibar (PAL)
Zimbabwe (PAL)
Video Formats
There are three standards for video in the world, NTSC, PAL, and SECAM.
The following is a listing of formats in alphabetical order by country.

CONNECTING YOUR VIDEO EDITING UNIT
Package Contents
Check to make sure that you receive the following components.
If any items are missing or damaged, refer to the sections entitled “Limited
Warranty” and “Obtaining Service.”
■User Manual and Registration Card ■Software CD
NOTE:
Your video editing system was shipped with a CD containing sample
transitions from two third-party software developers. You also have the
option of purchasing additional transitions from these companies.
Rapid Transits, produced by Kermit Woodall, are a form of video transition
known as a Gradient Transition. These are carefully constructed and saved
in the proper resolution and image format necessary for the ScreenPlay
system. Rapid Transits are designed for use by Wedding and Event
videographers and can be purchased on-line at rapidtransits.v-share.com.
Video SpiceRack PRO transitions, produced by Pixélan Software, are a wide
variety of top-rated, fresh, super-softenable “spice” transitions which allow
you to form terrific directional dissolves and other beautifully subtle effects,
as well as serving as dynamic mattes to seamlessly flow other ScreenPlay
effects. Hundreds of additional Pixélan Software transitions, including a
wide range of organic effects, are available through the Applied Magic web
site at www.applied-magic.com.
Connecting Your Video Editing Unit 10
■S-Video Cable
■ScreenPlay/Sequel Unit ■Wired Keyboard (PS/2)
■Mouse (PS/2) ■Power Cord
■SRCA A/V Cable Set (your video
editing unit may be packaged with
separate audio and video cables)

Connecting Your Video Editing Unit 11
Optional Features
While the cordless keyboard is not shipped with every unit, it is available as
an optional feature.
NOTE:
The illustrations within this manual depict the ScreenPlay video editing
unit. If you have purchased the Sequel video editing unit, you may notice
that your unit varies slightly from these illustrations.
Front Panel
CD-ROM drive — Accepts CD-ROM disks.
INFRARED (IR) lens — Transmits/receives signals to/from optional
cordless keyboard.
POWER INDICATOR — Glows green when unit is powered on.
HARD DISK INDICATOR — Glows red when hard disk reads or writes
data.
IR FEEDBACK INDICATOR — Glows amber when receiving signal from
cordless keyboard.

Connecting Your Video Editing Unit 12
(ScreenPlay only/optional for Sequel)
Type II PC Card (sometimes called PCMCIA) slot for
importing digital still photos. The PC Card slides only
partially into this opening. When the card has been inserted, a
message will appear on-screen, indicating that the system has
recognized the card. If your PC Card contains many files, it may take
slightly longer for this message to appear.
Receives composite signal (video and audio L, R) input from
standard camcorder.
Accepts S-Video input from S-VHS camcorder or VCR.
(ScreenPlay only/optional for Sequel) DV-1394 I/O that connects to
a digital camcorder.
Provides headphone audio (adjustable through the Audio Levels
screen).
Accepts microphone input.

Connecting Your Video Editing Unit 13
Rear Panel
S-Video output to TV’s S-Video input.
S-Video output to VCR’s S-Video input.
S-Video input from VCR’s S-Video output.
Video and audio outputs to TV/monitor. Top output is for video,
middle for left audio, bottom for right audio.
Video and audio outputs to VCR. Top output is for video, middle
for left audio, bottom for right audio.
Video and audio inputs from VCR. Top input is for video, middle
for left audio, bottom for right audio.
Audio inputs from external CD or tape audio source (top is left
audio; bottom is right audio).

Audio and video “out” for SCART connection to a European TV.
Video “out” for connection to VGA computer monitor.
SCSI for connection to external storage devices. Use shielded
SCSI cables.
For connection to mouse.
For connection to keyboard.
Other serial connections for optional MIDI.
Turns power on and off. is off; is on.
Power supply fuse. Do not remove.
Plug appropriate power cord here and plug other end into wall outlet.
Connecting Your Video Editing Unit 14

Making Connections
First, you will need to connect your unit to your keyboard and mouse. To do
this, refer to the following information:
Next, you will want to connect your unit to a TV or Monitor. Your video
editing unit offers a variety of connection options, which are detailed as
follows:
Your video editing unit also offers an additional audio connection:
BASIC CONNECTIONS
This section describes the basic connections made
between your unit, your keyboard, and your mouse.
Page 17
CONNECTING TO A STANDARD TV OR BROADCAST MONITOR
This section describes the connection between your unit
and your TV or broadcast monitor.
Page 17
CONNECTION TO AN S-VIDEO TV OR BROADCAST MONITOR
This section describes a higher-quality connection
between your unit and your TV or broadcast monitor.
Page 17
CONNECTION TO A VGA COMPUTER MONITOR
This section describes how to connect your unit to a VGA
monitor.
Page 18
CONNECTION TO A SCART TV OR MONITOR
This section describes how to connect your unit to a
European SCART TV or Monitor.
Page 18
CONNECTION TO AN AUDIO SYSTEM
This section describes how to connect your unit to your
audio system.
Page 18
Connecting Your Video Editing Unit 15

Connecting Your Video Editing Unit 16
When you plan to capture (record) or output your video, you will want to
connect a VCR or camcorder:
CAUTION
Do not cover the vent holes on the unit. Do not use this equipment in
a manner not specified by the manufacturer.
CONNECTION TO A VCR WITH STANDARD OUTPUT
This section describes the connection between your unit
and your VCR.
Page 19
CONNECTION TO A VCR WITH S-VIDEO OUTPUT
This section describes a higher-quality connection
between your unit and your VCR.
Page 20
CONNECTION TO A CAMCORDER WITH STANDARD OUTPUT
This section describes the connection between your unit
and your camcorder.
Page 20
CONNECTION TO A CAMCORDER WITH S-VIDEO OUTPUT
This section describes a higher-quality connection
between your unit and your camcorder.
Page 21
CONNECTION TO A CAMCORDER WITH DV-1394
(SCREENPLAY ONLY)
This section describes the digital connection between
your unit and your camcorder.
Page 21

Connecting Your Video Editing Unit 17
Basic Connections
port on the rear panel to the mouse
port on the rear panel to the keyboard
Power outlet on the rear panel to the power supply
Connection to a Standard TV or Broadcast Monitor
Your video editing unit can be connected to a standard TV or broadcast
monitor.
on the rear panel to the composite input on the TV/monitor
on the rear panel to the left and right audio input on the TV/monitor
Connection to an S-Video TV or Broadcast Monitor
Your video editing unit can be connected to an S-Video TV or a broadcast
monitor to obtain better picture quality for editing purposes.
on the rear panel to the S-Video input on the TV/monitor
on the rear panel to the left and right audio inputs on the TV/monitor

Connecting Your Video Editing Unit 18
Connection to a VGA Computer Monitor
Your video editing unit can be connected to a computer monitor if desired.
on the rear panel (15-pin high-density port) to the input on a
VGA monitor
NOTE:
For audio connections, refer to the section entitled “Connection to an Audio
System” (below).
Connection to a SCART TV or Monitor
Your video editing unit can be connected to a European SCART TV or
monitor.
on the rear panel to the SCART input on the TV/monitor for video
and audio
Connection to an Audio System
on the rear panel to audio left and right “out” on the audio system

Connection to a VCR with Standard Output
To capture (record) video from a VCR with composite connections into the
video editing unit or output video onto a tape, make the following
connections.
For capturing/recording:
on the rear panel to the composite output on the VCR
on the rear panel to the left and right audio outputs on the VCR
For mastering:
on the rear panel to the composite input on the VCR
on the rear panel to the left and right audio inputs on the VCR
Connecting Your Video Editing Unit 19

Connecting Your Video Editing Unit 20
Connection to a VCR with S-Video Output
To capture (record) video from a VCR with S-Video connections into the video
editing unit or to master output, make the following connections.
For capturing/recording:
on the rear panel to the S-Video output on the VCR
on the rear panel to the left and right audio outputs on the VCR
For mastering:
on the rear panel to the S-Video input on the VCR
on the rear panel to the left and right audio inputs on the VCR
Connection to a Camcorder with Standard Output
From camcorders with composite connections:
on the front panel to the composite video output on the camcorder
on the front panel to the left and right audio outputs on the
camcorder
This manual suits for next models
1
Table of contents