Aprica Fladea User manual

31
780540
LASREVINU-IMES
Y
gk8
1-0
4
0
/
44
R-
ECE
ドッベ・トーシドルイャチ&ービベ
格合準基全
安
のパッ
ロ
ーヨ
Instruction Manual
This is a child restraint system for child from 2.5kg ~ 18kg
to use. This child restraint system is designed to comply
with ECE R44 or equivalent standard and is certified to be
installed on vehicle seat equipped with automatic 3-point
seat belt/ seat belt with retractor.
Thank you for purchasing Aprica’s product. Please read
this instruction manual carefully before use and make sure
to follow the instructions accordingly.
Keep this instruction manual in a safe place after reading.
Do not use the product in ways other than those mentioned
in this instruction manual.
ECR-R44 (European Union standard)
Semi-Universal Group 0, Group 1, from 2.5kg ~ 18kg
Before use
<P.2>
Before installation
<P.20>
Installation
<P.35>
Care and maintenance
<P.62>

1 2
スイバドア
BEFORE USE
About child car seat
● Child car seat is used to install on a vehicle seat with the
vehicle seat belt in order to protect a child during car
accidents etc., aiming at reducing injury occurred. It is,
however, not a guarantee that a child car sea can
completely protect a child from injury.
● This child car seat can be used in Japan or other countries
where ECE-R44 standard is legitimate.
Advice to parents
● It is suggested to apply a child car seat from the first
time when you are bringing your child out on a car.
● For long drive, please take a break once every hour and
unseat the child from child car seat. Make sure to seat
child at a proper position according to different growth
stages.
Icons in this instruction manual
● There are icons of DANGER, WARNING, and CAUTION in this instruction manual. Each of these icons describes
according to level of severity the danger or damage that may be led to if the directions are not followed properly. These
content are important and make sure to follow them properly.
DANGER
WARNING
CAUTION
Content of which death or severe injury will likely
happen if not following properly.
Content of which death or severe injury may happen
if not following properly.
Content of which user injury or product’s damage
may happen if not following properly.
Icon Description
PROHIBITION
Content of prohibited manner.
ADVICE
Advice for smart use of product.
BEFORE USE
TABLE OF CONTENT
BEFORE USE
About child car seat
Advice to parents
Icons in this instruction manual
Installation steps
Name of parts
Using conditions
Conditions of vehicle seat
Conditions of seat belt
Caution items
Daily maintenance
BEFORE INSTALLATION
To use leg support
To rotate seat
To recline seat
To adjust shoulder harness position
To attach covers and pads
INSTALLATION
Before installation
To attach car seat
Check after installation
.................................................2
.....................................................2
...............................2
.....................................................3
..........................................................5
......................................................9
.....................................11
...........................................13
........................................................15
.................................................19
.................................................20
.........................................................21
........................................................22
......................23
.....................................31
..................................................35
..................................................37
...........................................44
TABLE OF CONTENT
SIDE/ REARWARD/ FORWARD FACING
Side facing bed mode
Side facing bed mode/ To seat child
Check after installation - Side facing bed mode
Rearward facing mode / To seat child
Set car seat to face the rear
Check after installation - Rearward facing mode
Set car seat to face the front
Forward facing mode/ To seat child
Check after installation - Forward facing mode
To remove from vehicle
CARE AND MAINTENANCE
To remove seat cover
To attach seat cover
Care and maintenance, storage and disposal
Product specification
Car list
Trouble shooting
Customer enquiry
..............................................45
........................46
.......49
......................50
.....................................54
......55
....................................56
..........................57
........60
............................................61
...............................................62
................................................64
............65
................................................65
......................................................................66
.......................................................67
.....................................................69

3 4
INSTALLATION STEPS
Make sure to read thoroughly.
Before use
P.2 ~ P.10
Check type of vehicle seat
and seat belt
P.11 ~ P.14
Caution items
P.15 ~ P.18
BEFORE USE
Child weighing
2.5kg ~ 9kg
Neck muscle
developed ~ 10kg
Child weighing
9kg ~ 18kg
Forward facing Rearward facing Side facing bed
Before installation
P.20 ~ P.34
● Adjust position of shoulder
harness slots.
● Attachment or removal of
covers etc..
Installation
P.35 ~ P.44
● Install onto vehicle seat
● Set leg support
● Check after installation
Side-facing bed mode
P.45 ~ P.49
● Bed mode setting
● Seat child
● Check after bed mode installa-
tion
Rearward facing
P.55 ~ P.55
● Seat child
● Set rear facing
● Check after rear facing
installation
Forward facing
P.56 ~ P.60
● Set forward facing
● Seat child
● Check after forward facing
installation
Daily care and maintenance
P.19
BEFORE USE

****
5 6
〉nrutaeD〈
〉aedalF〈
NAME OF PARTS
Sales package Please check and see if there is any missing parts.
BEFORE USE
<Accessory>
Belt grip Installation DVD Customer
registration card
Instruction
manual (this
book)
<COVERS> (Refer to P.31) The below covers should have been set onto seat already in sales package.
Adjust pad Shoulder
harness
cover
Head pad Waist pad Hip inner
seat
Adjust pad Shoulder
harness
cover
Head pad Waist pad
Shoulder harness
cover
Shoulder harness
Tongue
Waist harness
Buckle
Crotch harness
Crotch harness cover
Leg support
Seat cover
Adjust belt
Adjust lever
Instruction manual
pocket
Fixed bar
BEFORE USE

7 8
NAME OF PARTS
BEFORE USE
BEFORE USE
Belt guide D
(left and right)
Tongue holder
Seat
Belt guide
Adjust button
Leg support
Seat surface
Belt guide A (left and right)
Belt guide B (left and right)
Belt lock
Belt stopper
Belt lock cover
Belt lock lever
Seat back
rear lock
Rear cover
Base
Joint metal clip
<Inside rear cover>
Rotating, reclining
lever
Lock button
Shoulder harness bar
Shoulder
harness insert
outlets
5th
4th
3rd
2nd
1st

9 01
USING CONDITIONS
BEFORE USE
BEFORE USE
● Do not use the child car seat unless child meets the following conditions. Child
car seat may not function as designed if not being used for suitable child.
There are 3 types of different using positions.
Weighing between 2.5kg ~ 9kg
● Child’s legs should not be
protruding out of seat surface.
<Shoulder harness insert outlets>
● Choose either pair from the lower
1 ~ 3 pairs according to child’s
growth stage. (Refer to P.23 ~ 24)
<Cover etc>
● Apply adjust pad
● Apply waist pad
● Head pad is optional
<Side-facing bed mode>
● Recline seat back for 2 pitch (bed).
Neck muscle developed ~ 10kg
● Child’s neck muscle should have
developed.
<Shoulder harness insert outlets>
● Use the 2nd, 3rd and 4th pair from
bottom. (Refer to P.23 ~ 24)
<Covers etc>
● Adjust pad is optional (remove if it
is becoming too tight to fit)
● Waist pad is optional
<Rearward facing mode>
● Recline seat back for 1 pitch.
Weighing from 9kg ~ 18kg
● Child who weighs less than 9kg
should not use in forward facing
mode
<Shoulder harness insert outlets>
● Use the 3rd, 4th and 5th pair of
harness insert outlets. (Refer to
P.23 ~ 24)
<Covers etc.>
● Adjust pad is optional (remove if it
is becoming too tight to fit)
<Forward facing>
● Make sure the rear lock is engaged.
● After being seated, child’s ear level
should be slightly below the top of seat
and not protruding.
WARNING ● Child’s legs should not be protruding out of seat surface. DANGER ● Do not use the seat if the conditions are not fulfilled.

11 21
BEFORE USE
BEFORE USE
CONDITIONS OF VEHICLE SEAT
<Recommended installation position>
● For safety of your child, it is recommended to install the
child car seat onto the rear vehicle seat. Please note front
passenger seat of which front airbag is equipped cannot
be used for installation.
<Caution items for installation on seat of which side air
bag is equipped>
● Vehicle seats with either side airbag or curtain airbag can
be used for installation.
<Seats prohibited for installation> ● Positions or features
● Vehicle seat whose headrest is non-removable and
interferes the car seat belt lock lever.
● Vehicle seat facing
sideway or rear against the
driving direction.
● Vehicle seat of which the
pillars may interfere car
seat installation.
● Front passenger seat of
which front airbag is
equipped.
● Vehicle seat of which the
door trim etc. may interfere
car seat installation.
<Seats prohibited for installation> ● Seat shapes
● Vehicle seat of which seat depth is too short
for installation. (Supplementary seat or child
seat)
● Vehicle seat of which seat depth is too long
for installation. (When car seat base cannot
physically reach the vehicle seat backrest.)
● Vehicle seat with a sagging surface prohibiting normal installation. (Extreme packet seats, sports car seats,
racing car seats, supplementary seats, child’s seats, or vehicle whose seats have been replaced with other
non vehicle seats.)
● Vehicle seat on which the car seat leg
support cannot reach the seat floor after
installation.
● Vehicle seat on which the car seat base is
having a gap of more than 25mm from the
vehicle seat surface after installation.
● Vehicle seat of which the seat floor
is equipped with fuse box, storage
seat, console box or spare tire
compartment etc..

???
31 41
CONDITIONS OF SEAT BELT
BEFORE USE
BEFORE USE
<Seats prohibited for installation>
● Vehicle seat of which the
installation width is too narrow for
installation.
● Vehicle seat of which the seat belt
buckle end is extremely long and fixed.
(on certain RV cars)
● Vehicle seat of which the car seat
belt is extending from a high position
prohibiting normal installation.
Car seat belt is extending from
above the tire arch
<Conditions of seat belt>
● This device can be used on vehicle seat which is equipped with ECE R44 or equivalent certified automatic
3-point seat belt/ seat belt with retractor.
Type of seat belt Characteristics Points to note
3-point seat belt
ELR equipped seat belt
(Instant lock and retractor
equipped)
ALR/ELR equipped seat belt
(Child lock device equipped)
Others
Can be pulled out gradually but will be locked in
sudden brake etc..
When being completely pulled out, seat belt will be
locked excepted toward the retracted direction. Lock
is released after being completely retracted.
Seat belts other than the above mentioned.
Make sure to pull out the seat belt gradually.
Lock is released when seat belt is completely
retracted.
Do not use with this product.
<Do not use this product with the below types of seat belt>
● 2-point seat belt ● Seat belt of which both ends
are retractor-equipped. ● Passive seat belt. (Seat of
which seat belt will automati-
cally buckle up after
passenger is seated.)
● Sports car seat belt
<Do not use this product with the below types of 3-point seat belt>
● Vehicle seat with seat belt extending from
the center part of vehicle seat.
● Seat belt of which the length is too
short for installation.

51 61
BEFORE USE
BEFORE USE
CAUTION ITEMS
DANGER Death or severe injury will likely happen if not following properly.
● Do not use this product if child weighs less than 2.5kg or more than 18kg. Car seat may not function as designed in accidents.
● Never install this product on
front passenger seat
equipped with front airbag.
● Do not use this product if it
cannot be installed securely
on a vehicle seat.
● Do not use this product
unless the seat belt is tightly
fit.
● Do not use this product if
there is any rift or damage
found on seat belt.
● Do not use this product on
supplementary seat or child
vehicle seat.
● In forward facing mode, do not
use this product unless the
rear lock is engaged.
DANGER Death or severe injury will likely happen if not following properly.
● Make sure leg support is not
in stored position when using.
● Make sure the leg support is
touching at the vehicle floor
and nothing is placed in
between.
● Make sure the child seat
buckle is in locked position
when using.
● Make sure child is not
standing or kneeling inside car
seat, or sitting in abnormal
positions.
● Only use in bed position when
seat is facing sideway.
● Do not use this car seat in
ways other than those
mentioned in this instruction
manual.

71 81
CAUTION ITEMS
BEFORE USE
BEFORE USE
WARNING Death or severe injury may happen if not following properly.
● Never leave child unattended in car.
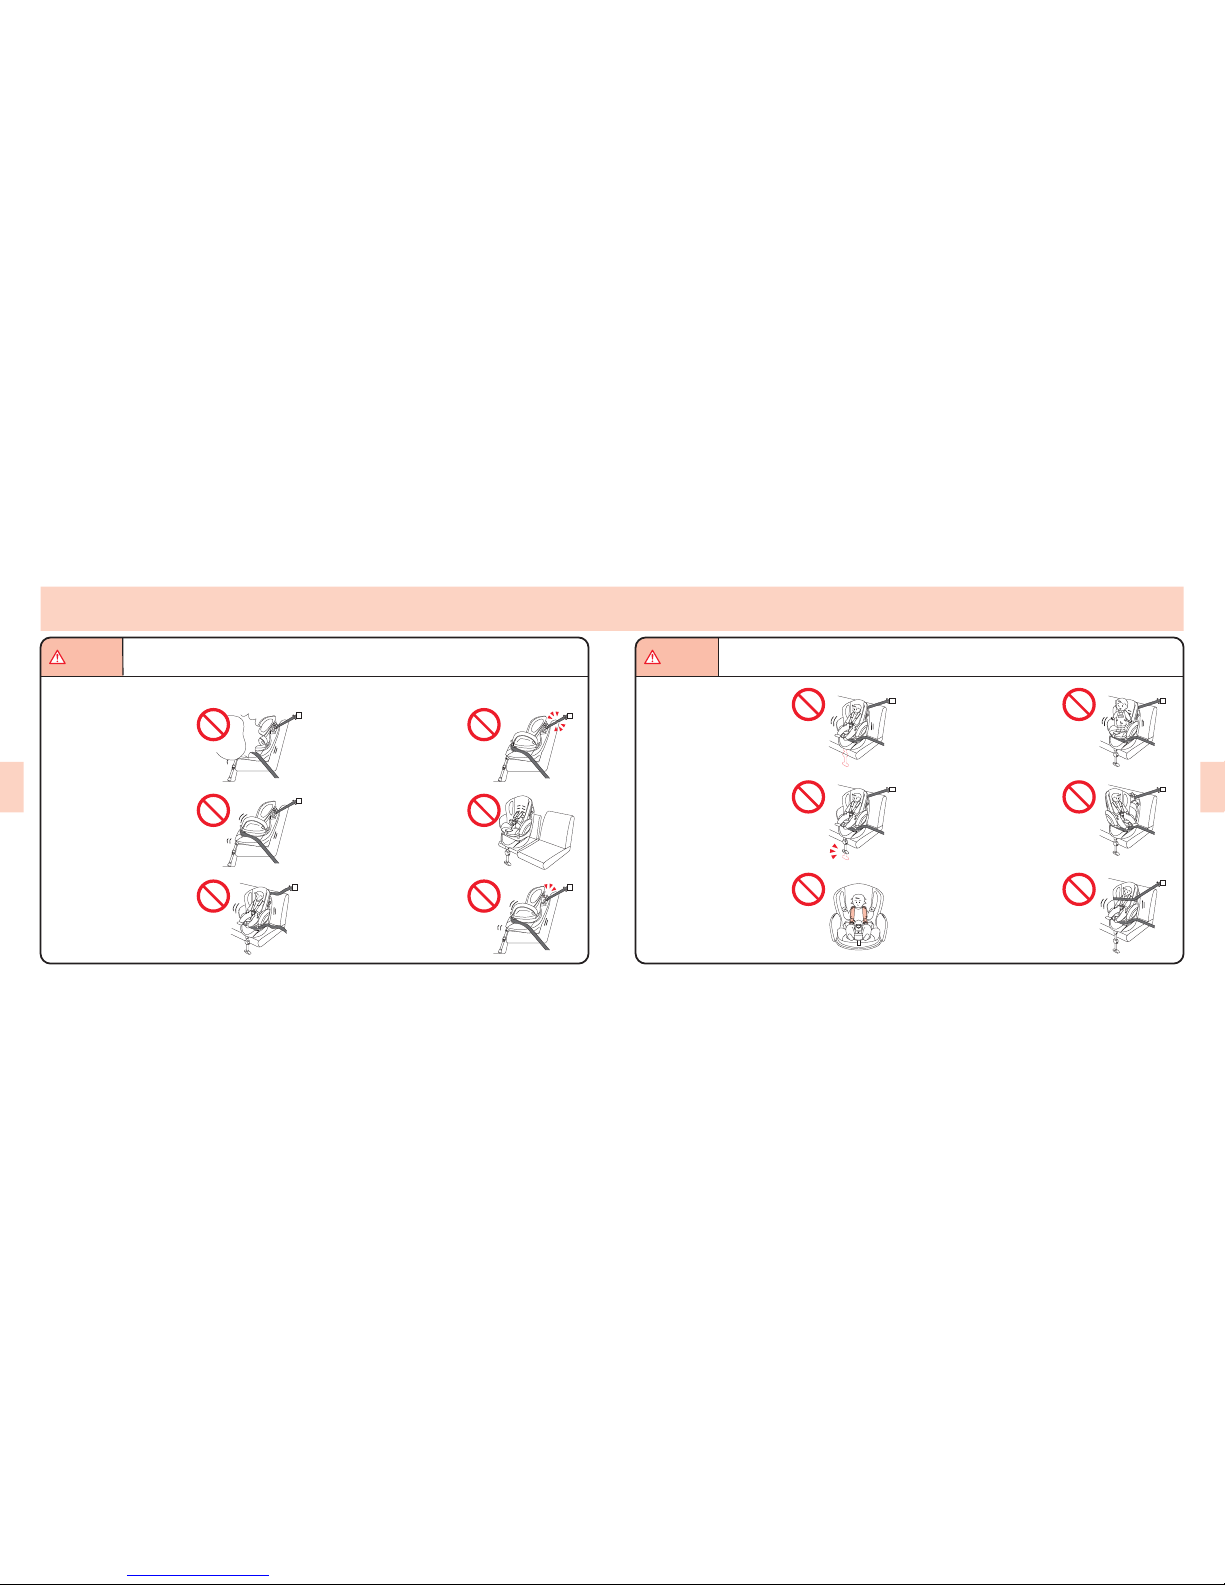
● Do not use when shoulder or waist harness is twisted or loose.
● Waist belt should be positioned along the hip and waist area only.
● Do not seat more than one child at one time into the car seat.
● Do not install the car seat onto a vehicle seat that may obstruct exit
in emergency. (e.g. In car equipped with sliding door on one side
only, do not install the car seat on the vehicle seat next to the
door.)
● Do not place any cushion or towel etc. in between the car seat base
and vehicle seat surface.
● Do not use this product if there is any rift or damage found on the
child seat belt.
● Shoulder harness should only be positioned at the shoulders of
child.
● Do not operate belt adjustment, seat recline or seat rotation when
car is in motion.
● Make sure to keep child’s hands away from the car seat buckle.
● Do not use this product if the headrest of the vehicle seat interferes
with the car seat belt lock lever. If the headrest of vehicle seat
interferes with car seat, there may be cases the child car seat
cannot perform as designed in a car accident.
● Do not lift the car seat backrest when a child is tightly fit with
harness.
● When seated, make sure the ear level of child is not protruding out
of the top level of the car seat.
● Do not use this product when the car seat buckle is contami-
nated with dirt, juice, water or mud etc.. There may be cases
the child car seat cannot perform as designed in a car accident.
● Do not use this product when the leg support is contaminated
with dirt, juice, water or mud etc. and cannot be adjusted. There
may be cases the child car seat cannot perform as designed in
a car accident.
● Stop using once the product has been exposed to shock, impact
or accident etc..
● Do not try to disassemble or remodel the product or apply
un-official service parts.
● Do not remove seat cover or cushion, replace with other
materials, or use when there is rift or damage.
● Do not allow child to play with the product.
● Parents or other child care person should not lean on the child
car seat.
● Make sure to keep child away from the poly bag in the sales
package.
● Contact the store of purchase or our local distributors
in case of any questions or queries with regard to this
product.
CAUTION User injury or product damage may happen if not following properly.
● Do not expose cat seat to direct sunlight. Metal parts may become hot and child
may get burnt accidentally.
● Make sure the car seat structural frame or plastic parts are not pinched by
automatic vehicle seats or vehicle doors etc..
● Do not place a car seat inside the car unless it is secured with the car seat belt.
Also, do not place any goods inside the car that can possibly become cause of
injury during an accident.
● Do not install the car seat on a vehicle seat if it may interfere operation of the
gear shift lever or hand brake etc..
● Do not install the car seat directly onto a leather vehicle seat. (Use the optional
seat protection mat sold separately.)
● Keep the car seat away from heat source and do not store the car seat in
outdoor area for a long time.
● Do not use the car seat as a normal chair without fixing with a seat belt.
● Make sure to keep the car seat buckle fastened at all times even when it is
empty.
● Do not allow child to install or operate the car seat.
● Do not load goods that is too heavy onto the car seat.
● Do not use the car seat at sandy or dirty places. Seat base or other movable
parts may get contaminated and malfunction.
● Do not use thinner or other solvent to clean the main body.
● Don not peel off the product labels from main body.
In case of emergency
Stay calm in case of emergency and…
(1) Release the harness buckle and remove the
tongues
(2) Remove the harness from child.
(3) Unseat child from car seat.
(4) Move to a safe place with child.
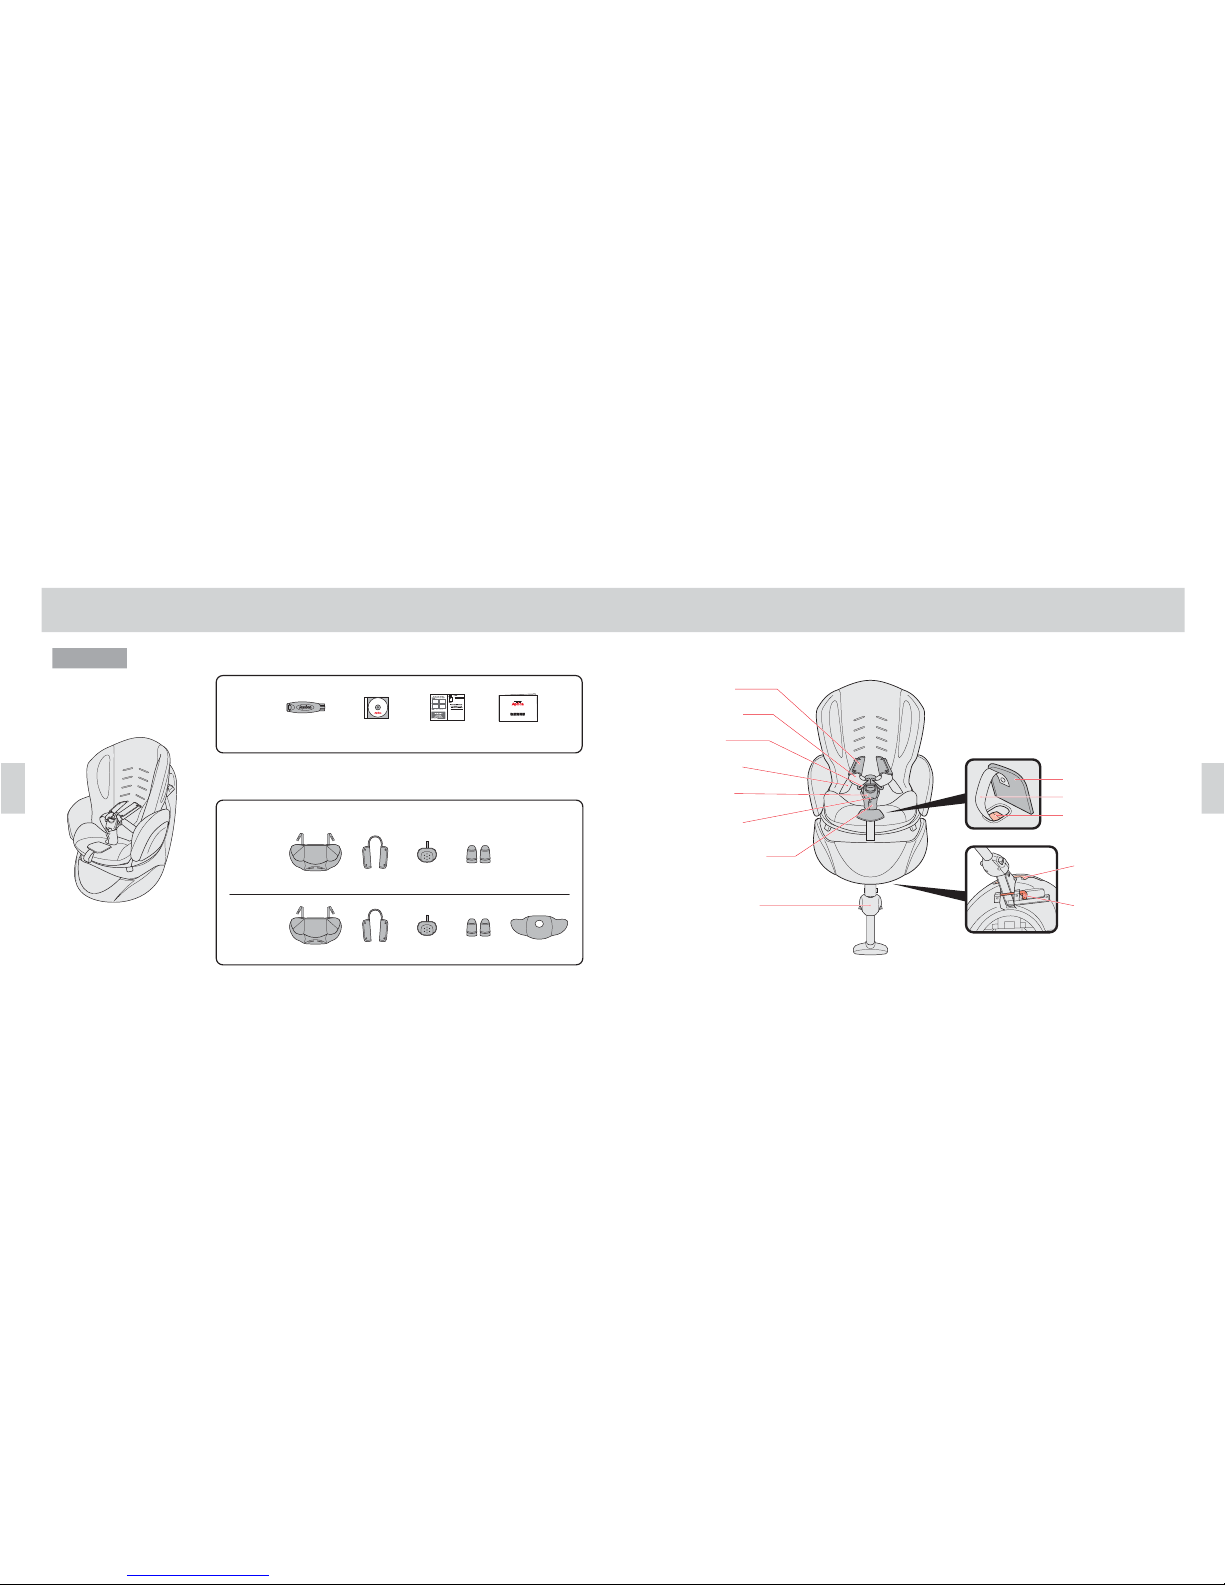
Shoulder harness
Tongue
Release button
Buckle
In case the tongues got jammed inside the
harness buckle
● Use a seat belt cutter (not included in sales
package) to cut off the child seat shoulder
belt and remove child from car seat.

91 02
1 2
スイバドア
①
③
②
カカチチッッ
ッチカ
BEFORE USE
BEFORE INSTALLATION.
DAILY MAINTENANCE
● Make sure car seat is secured onto vehicle seat before seating a child.
Otherwise, the car seat may not function as designed and become very dangerous during a sudden brake or accident, or even
become the cause of death.
● Make sure to check the followings to ensure the car seat can function as designed.
Belt lock
Leg support
<Check points after installation> (Refer to P.44)
● Make sure the seat belt is routing through the belt guide (A), (B),
(C), (D) and secured with the belt lock.
● Hold the base with both hands and try to move the seat back and
forth. The seat should not be dislocated for more than 3cm.
● Make sure leg support is reaching vehicle floor.
● Make sure seat belt is tight and not twisted. (wrinkle is
acceptable)
● Make sure the vehicle seat belt has been fastened to buckle.
<Side facing bed mode> (Refer to P.49)
● Make sure the shoulder harness is going through the right
pair of shoulder harness insert outlet close to child’s
shoulders.
● Make sure the shoulder harness covers are right on the
child’s shoulders.
● Make sure child’s feet are not protruding out of the seat
front.
● Make sure the adjust pad is installed and the bed guard is
lifted.
● Make sure the protruded part of the adjust pad is placed
right behind child’s neck.
● Make sure the waist pad is attached.
<Rearward facing> (Refer to P.55)
● Make sure the shoulder harness is going through the right
pair of shoulder harness insert outlet just above child’s
shoulders.
● Make sure the shoulder harness covers are right on the
child’s shoulders.
● Make sure the waist harness is placed at right position to
secure the hip of child.
<Forward facing> (Refer to P.60)
● Make sure the shoulder harness is going through the right
pair of shoulder harness insert outlet just above child’s
shoulders.
● Make sure the shoulder harness covers are right on the
child’s shoulders.
● Make sure the waist harness is placed at right position to
secure the hip of child.
● Make sure visually check the lock pin and confirm it is
engaged.
● Touch and check the rear lock is engaged.
TO USE LEG SUPPORT
(1) Remove the fixed bar and release the lock.
(2) Lift the leg support.
(3) Insert the fixed bar and lock it.
Please lay down the main body and ensure
there is sufficient space to do the installation.
Fixed bar
Leg support
● Be careful and make sure fingers or hands
are not pinched.
● Make sure to lock the fixed bar. Otherwise
the car seat may not function as designed.
● Make sure the place around is clear before
installation.
WARNING
CAUTION
Press on the adjust button to adjust the length.
Adjust button
Leg support
● Make sure the leg support is secured and the adjust
button clicks into place after adjustment
● Make sure the leg support is touching on the
vehicle floor. Otherwise the car seat may not
function as designed and caused danger.
WARNING

12 22
1 2
12
スイバドア
カカチチッッ
ッチカ
カカチチッッ
ッチカ
カカチチッッ
ッ
チカ
? ?
?
?
BEFORE INSTALLATION.
TO ROTATE SEAT TO RECLINE SEAT (In side facing bed mode and rearward facing mode only)
(1) Press on the lock button (A) located at the
back side of the seat backrest and (2) lift the
lever (B).
Press lock button Lift lever
<Seat back>
● Make sure to press on the lock button first
before lifting the lever.
CAUTION
Lift and hold the lever and then rotate the seat.
Once starting to rotate, release the lever and lock
button. When seat reach side facing or rearward
facing position, it will lock into places automatically.
Seat
● Make sure child is clear from
the seat when doing the
operation in case child’s hands
or fingers may be pinched and
get hurt.
WARNING
● Pay attention when rotating a seat in which a child is
already seated in case child’s hands or fingers may
be pinched and get hurt.
● Make sure the lock button and lever click into place
after rotation. Otherwise the car seat may not function
as designed and cause danger to child.
(1) Do NOT press on the rear lock button and
lift the lever directly. (2) Recline seat backrest.
Slightly move the seat up and down to confirm it
clicks back into place.
● Make sure the seat is secured and engaged. Seat may
not be rotated unless the lever clicks back into place.
Lift lever
<Seat back>
1st pitch
(rearward facing)
2nd pitch
(Side facing bed)
● Make sure child is clear
from the seat when doing
the operation in case
child’s hands or fingers
may be pinched and get
hurt.
● Be careful not to pinch
your own fingers in
between the seat and base
when reclining the seat.
WARNING
WARNING
● Do not change the recline angle when the car
is in motion. Otherwise the seat may not
function as designed in a car accident.
● Make sure the lever
clicks back into place
and the seat is secured.
Otherwise the seat may
not function as designed
and may cause danger.
Loosen the adjust belt in case
the recline is not smooth.
Adjust belt

32 42
■
■
■
TO ADJUST SHOULDER HARNESS POSITION
BEFORE INSTALLATION.
● Shoulder harness position varies depending on the sitting position.
● Make sure to fit the child choosing the right pair of shoulder harness.
Side facing
bed mode
Shoulder harness insert outlets
(1) Use the lowest
3 sets of
shoulder
harness insert
outlet.
(2) Choose the pair of insert outlet closest
to the child’s shoulders.
Right Wrong
WARNING
● In side facing bed mode, use only
the lowest 3 sets of shoulder
harness insert outlet.
● Do not use any insert outlet that is
too far from child’s shoulders.
Otherwise the seat may not
function as designed and may
cause danger.
● Heights listed above are for reference only. Adjust the shoulder harness to fit child’s shoulders correctly.
● Make sure to attach the soft covers and pads etc.. Apply according to child’s growth stage. (Refer to P.31)
2.5kg ~ 9kg
~50cm
~60cm
~70cm
Lowest pair
2nd pair from bottom
3rd pair from bottom
Weight Height ref Insert outlets (ref)
Rearward
facing mode
Shoulder harness insert outlets
(1) Use the 2nd ~
4th lowest sets
of shoulder
harness insert
outlet.
(2) Choose the pair of insert outlet right
above the child’s shoulders.
Right
Wrong
WARNING
Neck
muscle
developed ~
10kg
~60cm
~70cm
~80cm
2nd pair from bottom
3rd pair from bottom
4th pair from bottom
Weight Height ref Insert outlets (ref)
● In rearward facing mode, use only
the 2nd ~ 4th lowest sets of
shoulder harness insert outlet.
● Do not use any insert outlet that is
lower than the child’s shoulders
level. Otherwise the seat may not
function as designed and may
cause danger.
Forward
facing mode
Shoulder harness insert outlets
(1) Use the 3rd ~
5th lowest sets
of shoulder
harness insert
outlet.
(2) Choose the pair of insert outlet right
above the child’s shoulders.
Right
Wrong
WARNING
9kg ~ 18kg
~70cm
~80cm
~100cm
3rd pair from bottom
4th pair from bottom
5th pair from bottom
Weight Height ref Insert outlets (ref)
● In forward facing mode, use only
the 3rd ~ 5th lowest sets of
shoulder harness insert outlet.
● Do not use any insert outlet that is
lower than the child’s shoulders
level. Otherwise the seat may not
function as designed and may
cause danger.
● Seat the child onto the car seat and adjust shoulder harness to the right pair of insert outlets.

52 62
1 2
3 4
②
③
BEFORE INSTALLATION.
TO ADJUST SHOULDER HARNESS POSITION
(1) Release the left and right shoulder harness
cover.
(2) Press and hold the adjust lever, and then
(3) Pull the shoulder harness toward yourself to
loosen it.
Adjust lever
Shoulder
harness
cover
<Front view>
Shoulder harness
Release the 3 clicks at the rear cover.
Clicks
Rear cover
● Do not rotate the seat with the rear cover
open.
CAUTION
Release the left and right shoulder harness from the
joint metal clip.
Pull the left and right shoulder harness out to the
seat front.
Shoulder harness
Joint metal clip
<Back view>
Shoulder harness
<Front view>

7
2 82
5
6
ス
イバドア
スイ
バ
ドア
7
8
BEFORE INSTALLATION.
TO ADJUST SHOULDER HARNESS POSITION
Pull the shoulder harness cover out to the back of
the seat. (Left and right)
Place the shoulder harness cover back to the seat front through the
appropriate pair of insert outlets. (Refer to P.23)
Place the left and right shoulder harness through the
shoulder harness cover and insert outlets to the back
of seat.
Route the left and right shoulder harness through the
shoulder harness bar.
Attach the harness covers etc. while adjusting the
shoulder harness.
When using the adjust pad, before putting the
shoulder harness through the insert outlets, route
them through the adjust pad first. (Refer to P.32)
Shoulder
harness cover
<Back view> <Back view>
Shoulder
harness cover Shoulder
harness cover
Shoulder
harness
<Back view>
Shoulder harness bar
WARNING
WARNING
WARNING
● Do the mix up the left and right shoulder harness
cover.
● Make sure the left and right shoulder harness cover
are leveled. Otherwise the seat may not function as
designed and may cause danger.
● Do not use the shoulder harness insert outlets for
any other purpose other than routing the shoulder
harness.
Otherwise the seat may not function as designed
and may cause danger.
● Make sure to route the harness through the
shoulder harness bar before use. Otherwise the
seat may not function as designed and may cause
danger.

92 03
11
9
01
BEFORE INSTALLATION.
TO ADJUST SHOULDER HARNESS POSITION
Secure the belt end of the harness to the joint metal
clip.
Close the rear cover. Cover the shoulder harness with the
shoulder harness cover and fasten the
<To release the tongues>
Press the release button to release the
tongues from buckle.
Tongue
Release button
<Back view>
<Back view>
<Front view>
Joint metal
Rear cover
Shoulder
harness
Adjust belt
Shoulder
harness cover
WARNING
CAUTION
WARNING
● Make sure the shoulder harness and adjust belt are
not twisted when in use. Otherwise the seat may not
function as designed and may cause danger.
● When closing the rear cover, make sure not
to jam the shoulder harness with the seat.
● Do not use without attaching the shoulder
harness cover. Otherwise the seat may not
function as designed and may cause danger.

13 23
ス
イバ
ドア
1
?
?
2
TO ATTACH COVERS AND PADS
● Refer to the following table and apply the pads and covers according to child’s growth stage.
Installation mode Adjust pad Waist pad Shoulder pad Head pad Hip inner cushion
<Lifted> <Lowered>
Side facing bed
Rearward facing
Forward facing
Required
(Lift bed guard)
Not necessarily needed
(Lower bed guard)
Not necessarily needed
(Lower bed guard)
Required
Not necessarily
needed
Cannot use
Required
Required
Required
Not necessarily
needed
Cannot use
Cannot use
Not necessarily
needed
Not necessarily
needed
Not necessarily
needed
● Remove tongues, shoulder harness and shoulder harness cover (Refer to P.25 ~ 30) and follow P.32 (1) ~ P.34 (6) to attach
the pads and covers.
It is recommended to apply the adjust pad in
both rearward and forward facing modes.
WARNING
● Do not use without attaching the shoulder
harness cover. Otherwise the seat may not
function as designed and may cause danger.
<Attach adjust pad>
(1) Set the adjust pad to match the positions of the shoulder
harness insert outlets. (Refer to P.23)
(2) Insert the snap belt to the back of seat making sure they are
tightly fit. (Left and right)
Insert Outlet Snap position
Shoulder harness
insert outlets
<Attach waist pad>
● Put the waist pads
through the shoulder
harness.
Snap
Shoulder harness Waist pad
● For the 3rd pair of shoulder harness insert outlets from the bottom,
insert the snap belt into the 3rd (3) insert outlets.
<Shoulder harness position>
1st
2nd
3rd
4th
5th
Top (1)
2nd (2)
3rd (3)
Bottom (4)
Bottom (5)

33 43
3
②
②
① ③
② ④
⑤
⑥
①
①
4 6
5
①
②
TO ATTACH COVERS AND PADS
<To attach shoulder harness covers and shoulder harness>
(1) Pull the shoulder harness cover from seat back to seat front
through the insert outlets.
(2) Further pull the harness cover through the insert outlets of
the adjust pad.
(3) Pull the shoulder harness through the harness cover to the
seat back.
(4) Route the shoulder harness through the shoulder
harness bar.
(5) Fasten the shoulder harness to the joint metal clip.
(Refer to P.29)
(6) Wrap the shoulder harness with the harness cover and
fasten the snaps.
Insert outlet
Shoulder
harness cover
<To attach head pad>
(1) Lift the head guard.
(2) Secure the head pad using the
velcro onto the headrest.
● Head pad can be used in side facing bed mode
(from the lowest 1st, 2nd and 3rd positions).
<To attach hip inner cushion>
(for Fladea only)
(1) Pull the crotch strap through the
insert outlet.
(2) Fasten the tongues into the
buckle.
(1) Rotate the seat to face
the front.
(2) Pull the adjust belt and
tighten the shoulder
harness. Fasten snaps.
<Side facing bed mode>
Bed guard
Velcro
Head pad Crotch strapHip inner cushion
Adjust
belt

53 63
1
2
ス
イバドア
INSTALLATION
INSTALLATION
BEFORE INSTALLATION
● For safety of your child, it is recommended to install the
child car seat onto the rear vehicle seat.
● The steps described in this instruction manual are referring
to installation on the left rear passenger seat on a vehicle.
● This car seat may not be applicable to certain type of car
seat belt or seat surface. Please refer to P.11~P.14 for
details.
DANGER
● Never install this product on front passenger seat
equipped with front airbag.
● Do not use this product if it cannot be installed securely
on a vehicle seat.
● Do not use this product if there is any rift or damage
found on seat belt.
● Do not use this product on supplementary seat or child
vehicle seat.
● Do not install the car seat with the leg support in stored
position. Otherwise the car seat may not function as
designed.
<Ensure there is sufficient space around for installation>
(1) Before installation, make sure there is sufficient space
around and car doors on both side can be fully opened.
Car should be parked on a flat and horizontal surface.
(2) Before installation, slide the front passenger seat to the
front and recline the backrest forward.
<Vehicle seat preparation>
Remove the vehicle seat headrest if it is a
removable style.
Headrest
WARNING
WARNING
Recline the seat backrest slightly if it is a reclining
type.
● If the vehicle seat is a
sliding type, make sure the
position of backrest should
not come after where the
seat belt is extending.
Otherwise the car seat may
not function as designed.
● Do not install the car seat
onto a vehicle seat that may
obstruct exit in emergency.
● If headrest is not removed
from vehicle seat, there may
be cases the headrest interferes
with the car seat backrest. Car
seat may fail to perform as designed.
● If headrest of vehicle seat is non-removable, try to
recline the backrest slightly down such that the
headrest will not interfere with the car seat backrest.
● Store the removed headrest inside trunk or cargo
room.

73 83
1
ス
イバドア
スイバドア
ス
イバドア
3
2
mm52~5
①
②
③
カカチチッッ
ッチカ
INSTALLATION
INSTALLATION
TO ATTACH CAR SEAT
● There are 3 different using modes including side facing bed mode, rearward facing mode and forward facing mode.
Disregarding the using mode, the installation methods are the same.
● The steps described in this instruction manual are referring to installation on the left rear passenger seat on a
vehicle. Consider the illustrations reversed from left to right for installation on the right seat.
<Lift the leg support>
(1) Pull the leg support fixed bar at the bottom of seat
base to release the lock.
(2) Lift the leg support.
(3) Restore the fixed bar to lock the leg support.
Fixed bar
Make sure there is sufficient space around
for installation.
Leg support
● Check and make sure the leg support is secured.
WARNING
CAUTION
● Be careful not to pinch hands and fingers. Injury may
be caused.
● Make sure to lock the fixed bar. Otherwise the car
seat may not function as designed.
● Make sure the area is clear before installation.
<Place car seat onto vehicle seat>
Place car seat onto the rear vehicle seat as
illustrated.
For safety of your child, it is recommended to
install the child car seat onto the rear vehicle seat.
CAUTION
WARNING
● Do not install the car seat
directly onto a leather
vehicle seat. (Use the
optional seat protection mat
sold separately.) Otherwise
there may be damage
caused to the leather
surface. Protection mat
● Make sure the leg support is touching at the
vehicle floor. Otherwise the car seat may not
function as designed.
<Adjust length of leg support>
Squeeze the left and right adjust button
to extend the leg support so that it
reaches at the floor of vehicle.
Adjust button
Leg support Floor
● After adjustment, make sure the adjust button clicks
into place and the leg support is secured.
● It is suggested to extend the leg support
such that there is a space of around
5~25mm in between the car seat and the
vehicle seat.
● Set the leg support such that the leg end is
away from the vehicle seat.
This manual suits for next models
1
Table of contents
Other Aprica Car Seat manuals