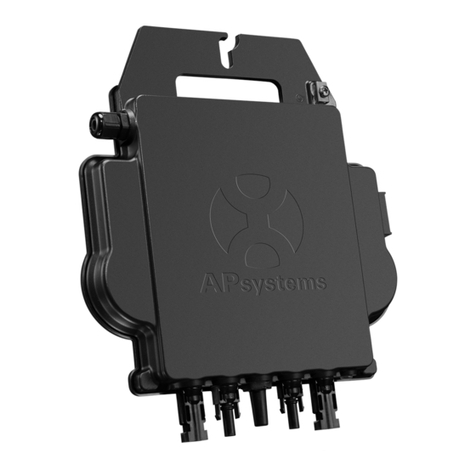
APsystems OPT700 Instruction Manual

Installation / User Manual
Rev 1.1
ALTENERGY POWER SYSTEM Inc.
www.APsystems.com
© All Rights Reserved
OPT700/OPT700L DC Optimizer

OPT700/OPT700L Installation/User Manual
1
Table of Contents
Important Safety Instructions..............................................................................................................2
Safety Instructions................................................................................................................................................ 2
Radio interference statement...............................................................................................................................3
Symbols replace words on the equipment, on a display, or in manuals..............................................................4
APsystems Optimizer System Introduction.........................................................................................5
APsystems Optimizer System Installation...........................................................................................7
Additional installation components from APsystems.......................................................................................... 7
Required parts and tools to complete the installation........................................................................................ 7
Installation Procedures......................................................................................................................................... 8
Step 1 - Attaching the APsystems Optimizer to the Racking or the PV Module Frame.............................. 8
Step 2 - Connecting the APsystems Optimizer to the PV Module............................................................... 8
Step 3 - Connecting the APsystems Optimizer DC output Cables................................................................9
Step 4 - Completing the APsystems Installation Map.................................................................................. 9
Step 5 - Verifying Proper Optimizer Connection........................................................................................ 10
Step 6 - Connecting the APsystems Optimizer to inverter......................................................................... 10
Troubleshooting................................................................................................................................. 11
Replace a APsystems Optimizer........................................................................................................ 12
APsystems OPT700/OPT700L Technical Data....................................................................................13

OPT700/OPT700L Installation/User Manual
2
Important Safety Instructions
This manual contains important instructions to be followed during installation and
maintenance of the APsystems optimizer. To reduce the risk of electrical shock and ensure the
safe installation and operation of the optimizer, the following symbols appear throughout
this document to indicate dangerous conditions and important safety
instructions.
Specifications are subject to change without notice - please ensure you
are using the most recent update found at www.APsystems.com
WARNING: This symbol indicates a situation where failure to
follow instructions may cause a serious hardware failure or
personal danger if not applied appropriately. Use extreme
caution when performing this task.
NOTE: This symbol indicates information that is important for
Optimizer operation. Follow these instructions closely.
Safety Instructions
Do NOT disconnect the PV module from the APsystems optimizer
without first disconnecting the AC power.
Only qualified professionals should install and/or replace the APsystems
optimizer.
Perform all electrical installations in accordance with local codes.
Before installing or using the APsystems optimizer, please read all
instructions and cautionary markings in the technical documents and on
the APsystems microinverter system and the solar array.
Be aware that the body of the running APsystems optimizer is the heat
sink and can reach high temperatures. To reduce risk of burns, do not
touch the body of the optimizer.
Do NOT attempt to repair the APsystems optimizer. If it fails, contact
APsystems Customer Support to obtain an RMA number and start the
replacement process. Damaging or opening the APsystems optimizer
will void the warranty.
WARNING
SYMBOL
NOTE
SYMBOL

OPT700/OPT700L Installation/User Manual
3
Radio interference statement
The equipment could radiate radio frequency energy and this might cause harmful
interference to radio communications if not following the instructions when
installing and using the equipment. But there is no guarantee that interference
will not occur in a particular installation. If this equipment causes harmful
interference to radio or television reception, the following measures might
resolve the issues:
A) Relocate the receiving antenna and keep it well away from the equipment.
B) Consult the dealer or an experienced radio / TV technician for help.
Changes or modifications not expressly approved by the party responsible
for compliance may void the user’s authority to operate the equipment.

OPT700/OPT700L Installation/User Manual
4
Important Safety Instructions
Symbols replace words on the equipment, on a display,
or in manuals
Trademark
Caution, risk of electric shock
Equipment protected throughout by double insulation or reinforced
insulation
Refer to the operating instructions
Caution, hot surface.

OPT700/OPT700L Installation/User Manual
5
APsystems Optimizer System Introduction
The APsystems optimizer is a DC-DC converter installed between PV
modules and a central string inverter to maximize the energy harvested
from each module. It can achieve module-level Maximum Power Point
Tracking (MPPT) and plays a critical part in the whole power system.
The APsystems PV Power Optimizer system is comprised of four key
elements:
APsystems Optimizer (OPT700/OPT700L)
Inverter
APsystems Energy Communication Unit (ECU)
APsystems Energy Monitor and Analysis (EMA) web-based
monitoring and analysis system
Figure 1

OPT700/OPT700L Installation/User Manual
6
APsystems Optimizer System Introduction
This integrated system improves safety, maximizes solar energy harvest,
and increases system reliability.
The APsystems Optimizer increases PV energy
production by 5%-25%
Each APsystems PV Power Optimizer is individually connected to one or two solar
modules. Each PV module has individual Maximum Power Point Tracking
(MPPT) controls, which ensures that the optimum power is exported
to the utility grid regardless of the performance of the other PV modules
in the array. When PV modules in the array are affected by shade, dust,
orientation, or any situation in which one module underperforms
compared with the other units, the APsystems optimizer ensures top
performance from the array by maximizing the performance of each module.
The APsystems Optimizer system is reliable, safe
and simple to install
APsystems PV Power Optimizers are installed to work with a string / central
inverter. They are designed to operate at full power at ambient outdoor
temperatures of up to 149°F (65°C). The inverter case is designed for
outdoor installation and complies with the IP67/NEMA 6P environmental
enclosure rating.
Smart system performance monitoring and analysis
The performance trends and data of APsystems PV Power Optimizers can be
monitored and analyzed with the APsystems Energy Communication Unit
(ECU) and APsystems Energy Monitor and analysis (EMA). The EMA software
informs you of abnormal events, and controls system shutdown when it
is needed.

OPT700/OPT700L Installation/User Manual
7
APsystems Optimizer System Installation
A PV system using APsystems optimizers is simple to install. Each
optimizer easily mounts on the PV racking directly beneath
the PV module(s) or the module frame. Low-voltage DC wires
connect from the PV module directly to the optimizer, eliminating
the risk of a high-voltage DC charge.
Installation MUST comply with local regulations and technical rules.
WARNING: Perform all electrical installations in accordance
with local codes.
WARNING:Be aware that only qualified professionals should
install and/or replace the APsystems optimizer..
WARNING: Before installing or using an APsystems optimizer,
please read all instructions and warnings in the technical
documents and on the inverter system itself as well as on the PV
array.
WARNING: Be aware that installation of this equipment
includes the risk of electric shock.
WARNING: Do not touch any live parts in the system, including
the PV array, when the system has been connected to the electrical
grid.
WARNING: Ensure the solar module and inverter has been
disconnected before installing an APsystems optimizer.
Additional installation components from APsystems
DC extension cable (sold separately)
Required parts and tools to complete the installation
In addition to your PV array and its associated hardware, you will need
the following items:
Mounting hardware suitable for module racking
A torque wrench and a Phillips screwdriver
A multimeter
WARNING: Be sure to verify the voltage and current specifications
of your PV module match with those of the optimizer.
WARNING: You must match the DC operating voltage range of
the PV module with the allowable input voltage range of the
APsystems optimizer.
WARNING: The maximum open circuit voltage of the PV module
must not exceed the specified maximum input voltage of the APsystems
optimizer.

OPT700/OPT700L Installation/User Manual
8
Installation Procedures
WARNING: Do NOT connect inverters until you have completed all
of the installation procedures as described in the following sections.
Step 1 - Attaching the APsystems Optimizer to the
Racking or the PV Module Frame
a) Attaching to the Racking.
Figure 2
b) Attaching to the PV Module Frame.
Figure 3
Step 2 - Connecting the APsystems Optimizer to the PV Module
Figure 4
WARNING: Connect the PV module to the optimizer INPUT1
interface when the optimizer connects with one solar module.
WARNING: The output connect to the inverter, the input connect to
PV module after attaching the APsystems optimizer to the racking or
the PV module frame.
WARNING: Electrical Installation & Maintenance shall be conducted by
licensed electrician and shall comply with Australia National Wiring Rules.
M8
M4

OPT700/OPT700L Installation/User Manual
9
Installation Procedures
Step 3 - Connecting the APsystems Optimizer DC output Cables
Figure 5
NOTE: Make sure that all DC cables are connected correctly.
NOTE: DC extension cable length can be customized based on
the actual installation environment. Please contact APsystems
to purchase the cables.
Step 4 - Completing the APsystems Installation Map
Fill in the APsystems registration cards, which provide system information
and the installation map. Feel free to provide your own layout if a larger or
more intricate installation map is required. The layout map provided is
designed to accomodate labels in vertical or horizontal orientation to meet
all the field PV connections.
a. Each APsystems optimizer has removable serial number labels.
Peel the labels off, affix one to the respective location on the
APsystems installation map, then affix another label to the PV
module frame so that it can be easily seen. The warranty cards
can be found in the appendix of this manual or at the APsystems
website, www.APsystems.com
b. Fill in the warranty cards and email to APsystems at
emasupport@altenergy-power.com
c. APsystems will create the EMA account and email you the account
information. Then you can use the EMA website to view detailed
performance of your PV system. You can learn more information on
energy monitoring and analysis system from APsystems website
www.APsystems.com

OPT700/OPT700L Installation/User Manual
10
Installation Procedures
Figure 6
NOTE: 1. Step 1~4 can change sequence for convenience of installation.
2. Warranty card is located in Appendix last page of this manual.
Step 5 - Verifying Proper Optimizer Connection
When connected to the PV modules and exposed to light, the APsystems
optimizer will output a PV open circuit voltage. Therefore, the total string
voltage should be equal to the PV open circuit voltage times the number of
power optimizers connected in series in the string. The correctness of the
APsystems optimizer connection can be verified by measuring the polarity
and magnitude of the total string output voltage.
For example, each APsystems optimizer connect to two PV modules and
produce a PV open circuit voltage of 80V. If ten APsystems optimizers are
connected in a string, and then 800V should be produced.
If the measured open circuit voltage is abnormal, please see Troubleshooting
(p.10).
WARNING: DO NOT connect to other optimizer strings or the
inverter before verifying the optimizer connection. Output value
or wrong polarity will damage the optimizers or inverters.
Step 6 - Connecting the APsystems Optimizer to inverter
When verification is correct, connect the optimizer to the inverter. Pay
attention to polarity.

OPT700/OPT700L Installation/User Manual
11
Troubleshooting
Qualified personnel can use the following troubleshooting steps if the
PV system does not operate correctly.
WARNING: Only qualified personnel should directly handle the
APsystems optimizer.
WARNING: Do not attempt to repair the APsystems Optimizer. If
troubleshooting methods fail, please return the optimizer to your
distributor for replacement.
When Verifying Proper Power Optimizer Connection:
1. When measuring the PV open circuit voltage, one or more
of the optimizers voltage value inconsistent with others.
Reason
Solution
One or more of the PV modules are not
connected properly to their optimizer.
Connect all the PV modules to their
optimizers securely.
There is something wrong with PV Power
Optimizer.
Please return the optimizer to your
distributor for replacement or contact
APsystems Customer Support to
service.
2. The PV open circuit voltage is zero.
Reason
Solution
One or more of the optimizers are
unconnected or skipped during the string
connection process.
Connect all the power optimizers.
3. The PV open circuit voltage is not zero but is lower than the
quantity of optimizer power.
Reason
Solution
One or more of the PV modules are not
connected properly to their
optimizer.
Connect all the PV modules to their
optimizers securely.
One or more of the optimizer are not
connected properly to their polarity.
Make sure all the optimizer are connected
properly to their polarities.
Maintenance
No need to Maintenance.
Adjustment
No need to Adjustment
.

OPT700/OPT700L Installation/User Manual
12
Replace a APsystems Optimizer
Follow the procedure to replace an APsystems optimizer:
A. Disconnect the APsystems optimizer from the PV Module, in the
order shown below:
1. Disconnect the AC by turning off the inverter switch.
2. Disconnect the DC by turning off the inverter switch.
3. Wait for more than 30 seconds, then disconnect the PV module DC wire
connectors from the optimizer and disconnect the optimizer output
cables.
4. Remove the optimizer from the PV array racking.
B. Install a replacement optimizer to the rack and connect to the PV module
and DC output cables.
C. Verify the connection according to the description in Step 5 of Installation
Procedures.
D. Turn on the AC and DC switch on inverter, and run the system.
NOTE: The layout on APsystems Energy Monitor and Analysis (EMA)
will be changed after the replacement of one or more optimizers.
Please login the EMA and reset the system.

OPT700/OPT700L Installation/User Manual
13
OPT700/OPT700L Technical Data
Model
OPT700
OPT700L
Input Data (DC)
Maximum Input Power
310W × 2
Maximum Input Voltage
50VDC
MPPT Voltage Range
16-40VDC
Operation Voltage Range
12-50VDC
Maximum Input Curren
10A x 2
Maximum Input Short Circuit Current(DC)
10A x 2
Output Data (DC)
Maximum Output Voltage
90VDC
Maximum Output Current
10.3A
Maximum Output Power(DC)
600W
Efficiency
Peak Efficiency
99.5%
Mechanical Data
Operating Ambient Temperature Range
-40 oF to +149 oF (-40 °C to +65 °C )
Storage Temperature Range
-40 oF to +185 oF (-40 °C to +85 °C )
Dimensions (with connectors)
7.52” x 6.30” x 1.04”
(191mm x 160mm x 26.4mm)
Weight
1.1lbs/0.5kg
Enclosure Rating
IP67 , NEMA 6P
Protection Class
II
Overvoltage Category
II
Operational environment
Outdoor Use
Pollution Degree Classification
PD3
Wet Locations Classification
For Wet Locations
Relative Humidity Ratings
0-95%
Maximum Altitude Rating
<2000m
Cooling
Natural Convection - No Fans
Features & Compliance
Communication
Zigbee (Wireless)
Monitoring
Via EMA Software
Emissions & Immunity (EMC) Compliance
FCC Part15; ANSI C63.4; ICES-003; EN 61000-6-1,EN
61000-6-2,EN 61000-6-3,EN 61000-6-4,AS/NZS
61000.6.3
Safety Class Compliance
UL1741,CSA C22.2 No.107.1-01; EN 62109-1,EN 62479
Radio Spectrum
EN 301489-1, EN 301489-17, EN 300328,,AS/NZS 4268
© All Rights Reserved
Specifications subject to change without notice - please ensure you
are using the most recent update found at www.APsystems.com
2017/04/28 REV1.1

OPT700/OPT700L Installation/User Manual
14
Contact Information
ALTENERGY POWER SYSTEM Inc.
www.APsystems.com
APsystems Jiaxing China
No. 1, Yatai Road, Nanhu District, Jiaxing, Zhejiang
Tel: +86 573 8398 6967
Mail: info@altenergy-power.com
APsystems Shanghai China
B403 No. 188, Zhangyang Road, Pudong, Shanghai
Tel: +86 021 3392 8205
Mail: info@altenergy-power.com
APsystems Australia
Suite 502, 8 Help Street, Chatswood NSW 2067 Australia
Tel: 61 (0)2 8034 6587
Mail: info@altenergy-power.com
APsystems America
600 Ericksen Ave NE, Suite 200 Seattle, WA 98110
Tel: 844-666-7035
Mail: [email protected]m
APsystems Europe
Rue des Monts dor ZAC de Folliouses Sud-Les Echets 01700 Miribel, France
Tel: +33-481 65 60 40
Mail: emea@APsystems.com

APsystems PV Power Optimizer & Energy Communication Unit
Warranty Card
The APsystems Installation Map is a diagram of the physical location of each optimizer in your PV installation. Each APsystems optimizer has a
removable serial number label located on the mounting plate. Peel the label and affix it to the respective location on the APsystems installation map.
Installation Map Template
1
2
3
4
5
6
7
8
9
10
11
12
13
14
15
16
17
18
19
20
21
22
To register your APsystems Optimizer, please mail this warranty registration card to: emasupport@altenergy-power.com
This manual suits for next models
1
Table of contents
Other APsystems Media Converter manuals
Popular Media Converter manuals by other brands

Philips
Philips Streamium WAK3300/12 user manual

Fujitsu
Fujitsu Airstage UTY-VGGXZ1 installation manual

Absolute Process Instruments
Absolute Process Instruments IsoSplitter APD 6393 quick start guide

epiphanan
epiphanan DVI2USB3.0 user guide

ADF Web
ADF Web HD67038-2-A1 user manual

Urrea
Urrea UP125 User manual and warranty