manuals.online logo
Brands
  1. Home
  2. •
  3. Brands
  4. •
  5. APW Wyott
  6. •
  7. Grill
  8. •
  9. APW Wyott TBTGIL User manual

APW Wyott TBTGIL User manual

Other manuals for TBTGIL

1

This manual suits for next models

1

Other APW Wyott Grill manuals

APW Wyott HCB-2424 User manual

APW Wyott

APW Wyott HCB-2424 User manual

APW Wyott HR-20 User manual

APW Wyott

APW Wyott HR-20 User manual

APW Wyott HR-20 User manual

APW Wyott

APW Wyott HR-20 User manual

APW Wyott Champion GCB-18H User manual

APW Wyott

APW Wyott Champion GCB-18H User manual

APW Wyott HR-31E User manual

APW Wyott

APW Wyott HR-31E User manual

APW Wyott HR-20 User manual

APW Wyott

APW Wyott HR-20 User manual

APW Wyott Champion GCB-18H User manual

APW Wyott

APW Wyott Champion GCB-18H User manual

APW Wyott HOTROD HR-45 User manual

APW Wyott

APW Wyott HOTROD HR-45 User manual

APW Wyott HOTROD User manual

APW Wyott

APW Wyott HOTROD User manual

APW Wyott HR-20S User manual

APW Wyott

APW Wyott HR-20S User manual

APW Wyott HOTROD User manual

APW Wyott

APW Wyott HOTROD User manual

APW Wyott HRS-75 5T User manual

APW Wyott

APW Wyott HRS-75 5T User manual

APW Wyott Slanted HOTROD User manual

APW Wyott

APW Wyott Slanted HOTROD User manual

APW Wyott HR-31E User manual

APW Wyott

APW Wyott HR-31E User manual

APW Wyott TBTGIL User manual

APW Wyott

APW Wyott TBTGIL User manual

APW Wyott TG-2025 User manual

APW Wyott

APW Wyott TG-2025 User manual

Popular Grill manuals by other brands

LMS BBQ08873P owner's manual

LMS

LMS BBQ08873P owner's manual

Cookworks LW-8010A Care & instruction manual

Cookworks

Cookworks LW-8010A Care & instruction manual

Campingaz CV Instructions for use

Campingaz

Campingaz CV Instructions for use

Metos XBL Series Installation and operation manual

Metos

Metos XBL Series Installation and operation manual

Fiesta ET34567 Use and care instructions

Fiesta

Fiesta ET34567 Use and care instructions

Mayer Barbecue BRENNA MKG-318A BASIC Assembly instructions

Mayer Barbecue

Mayer Barbecue BRENNA MKG-318A BASIC Assembly instructions

Landmann Avalon PTS Plus 5.1 Plus 12122 Assembly and operating manual

Landmann

Landmann Avalon PTS Plus 5.1 Plus 12122 Assembly and operating manual

Kenyon B70200 owner's manual

Kenyon

Kenyon B70200 owner's manual

Better Homes and Gardens GBC1486W owner's manual

Better Homes and Gardens

Better Homes and Gardens GBC1486W owner's manual

Orbegozo GR 2300 instruction manual

Orbegozo

Orbegozo GR 2300 instruction manual

bora PT11 Operating and installation instructions

bora

bora PT11 Operating and installation instructions

Klarstein 10031664 manual

Klarstein

Klarstein 10031664 manual

Garland MWE3W Installation and operation manual

Garland

Garland MWE3W Installation and operation manual

Char-Broil 463722714 Product guide

Char-Broil

Char-Broil 463722714 Product guide

MPM MOP-03 user manual

MPM

MPM MOP-03 user manual

Kenmore 415.16123800 Use and care guide

Kenmore

Kenmore 415.16123800 Use and care guide

Tucker Barbecues GTR Series Assembly, installation and operating instructions

Tucker Barbecues

Tucker Barbecues GTR Series Assembly, installation and operating instructions

Monogram ZGG540NCP1SS owner's manual

Monogram

Monogram ZGG540NCP1SS owner's manual

manuals.online logo
manuals.online logoBrands
  • About & Mission
  • Contact us
  • Privacy Policy
  • Terms and Conditions

Copyright 2025 Manuals.Online. All Rights Reserved.

1
R
APW WYOTT
Foodservice Equipment Company
1938 Wyott Drive
Cheyenne, WY 82007
INSTALLATION
AND
OPERATING
INSTRUCTIONS
P/N 4881565 4/08
IMPORTANT FOR FUTURE REFERENCE
Please complete this information and retain this manual for the life of the equipment. For
Warranty Service and/or Parts, this information is required.
Model Number Serial Number Date Purchased
TORTILLA GRILL
MODELS: TBTGIL & TBTGDL
WARNING: Improper installation, operation, service or maintenance can cause property
damage, injury or death. Read and understand these instructions thoroughly before
positioning, installing, maintaining or servicing this equipment.
!!
!
!NOTICE: This product is intended for commercial use only. Not for household use.
ANSI/NSF4
R
This equipment has been engineered to provide you with year-round, dependable service when used
according to the instructions in this manual and standard commercial kitchen practices.
Phone:
Fax:
Toll Free:
Website:
E-mail:
+1 (307) 634-5801
+1 (307) 637-8071
+1 (800) 752-0863
www.apwwyott.com
[email protected]
C
R
Congratulations on your purchase of APW Wyott commercial cooking or refrigeration equipment. APW
Wyott takes pride in the design and quality of our products. When used as intended and with proper care
and maintenance, you will experience years of reliable operation from this equipment. To ensure best
results, it is important that you read and follow the instructions in this manual carefully.
TABLE OF CONTENTS:
ITEM PAGE ITEM PAGE
Safety Precautions 2 Preventative Maintenance Schedule 5
Owners Information 3 Cleaning 5
Warranty Information Troubleshooting 6
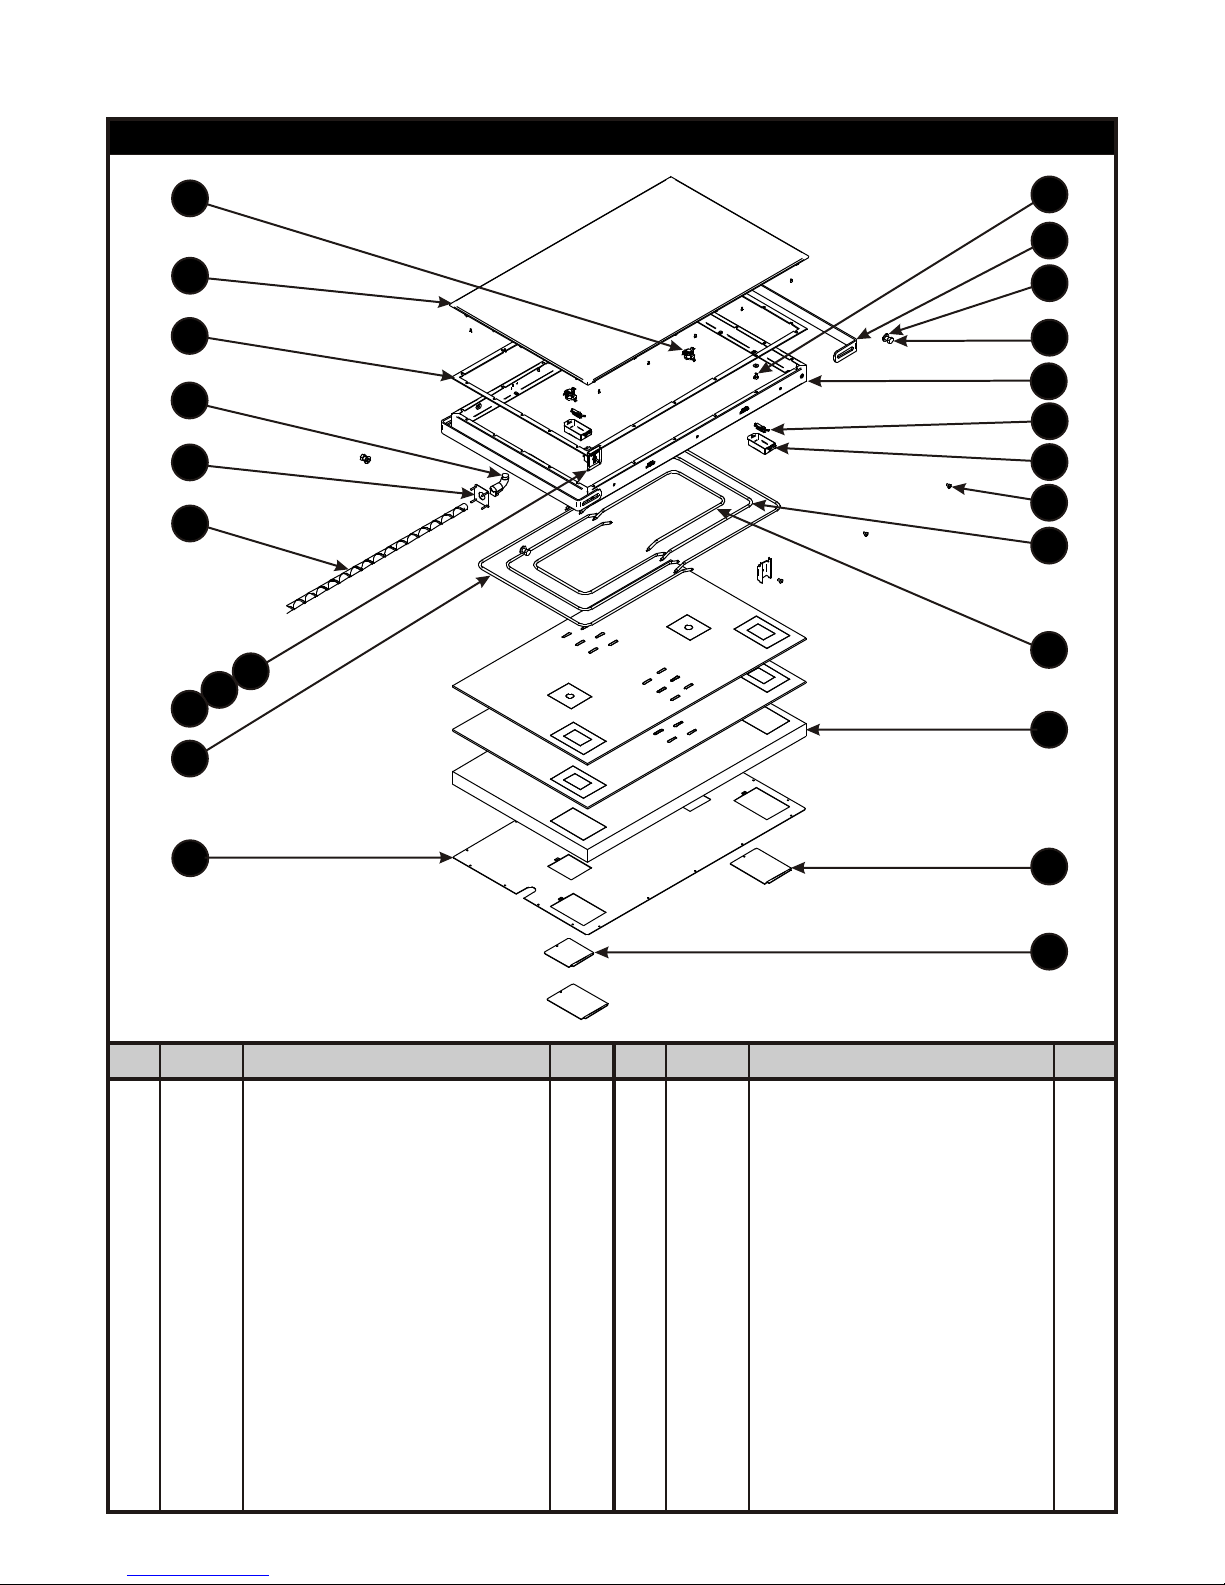
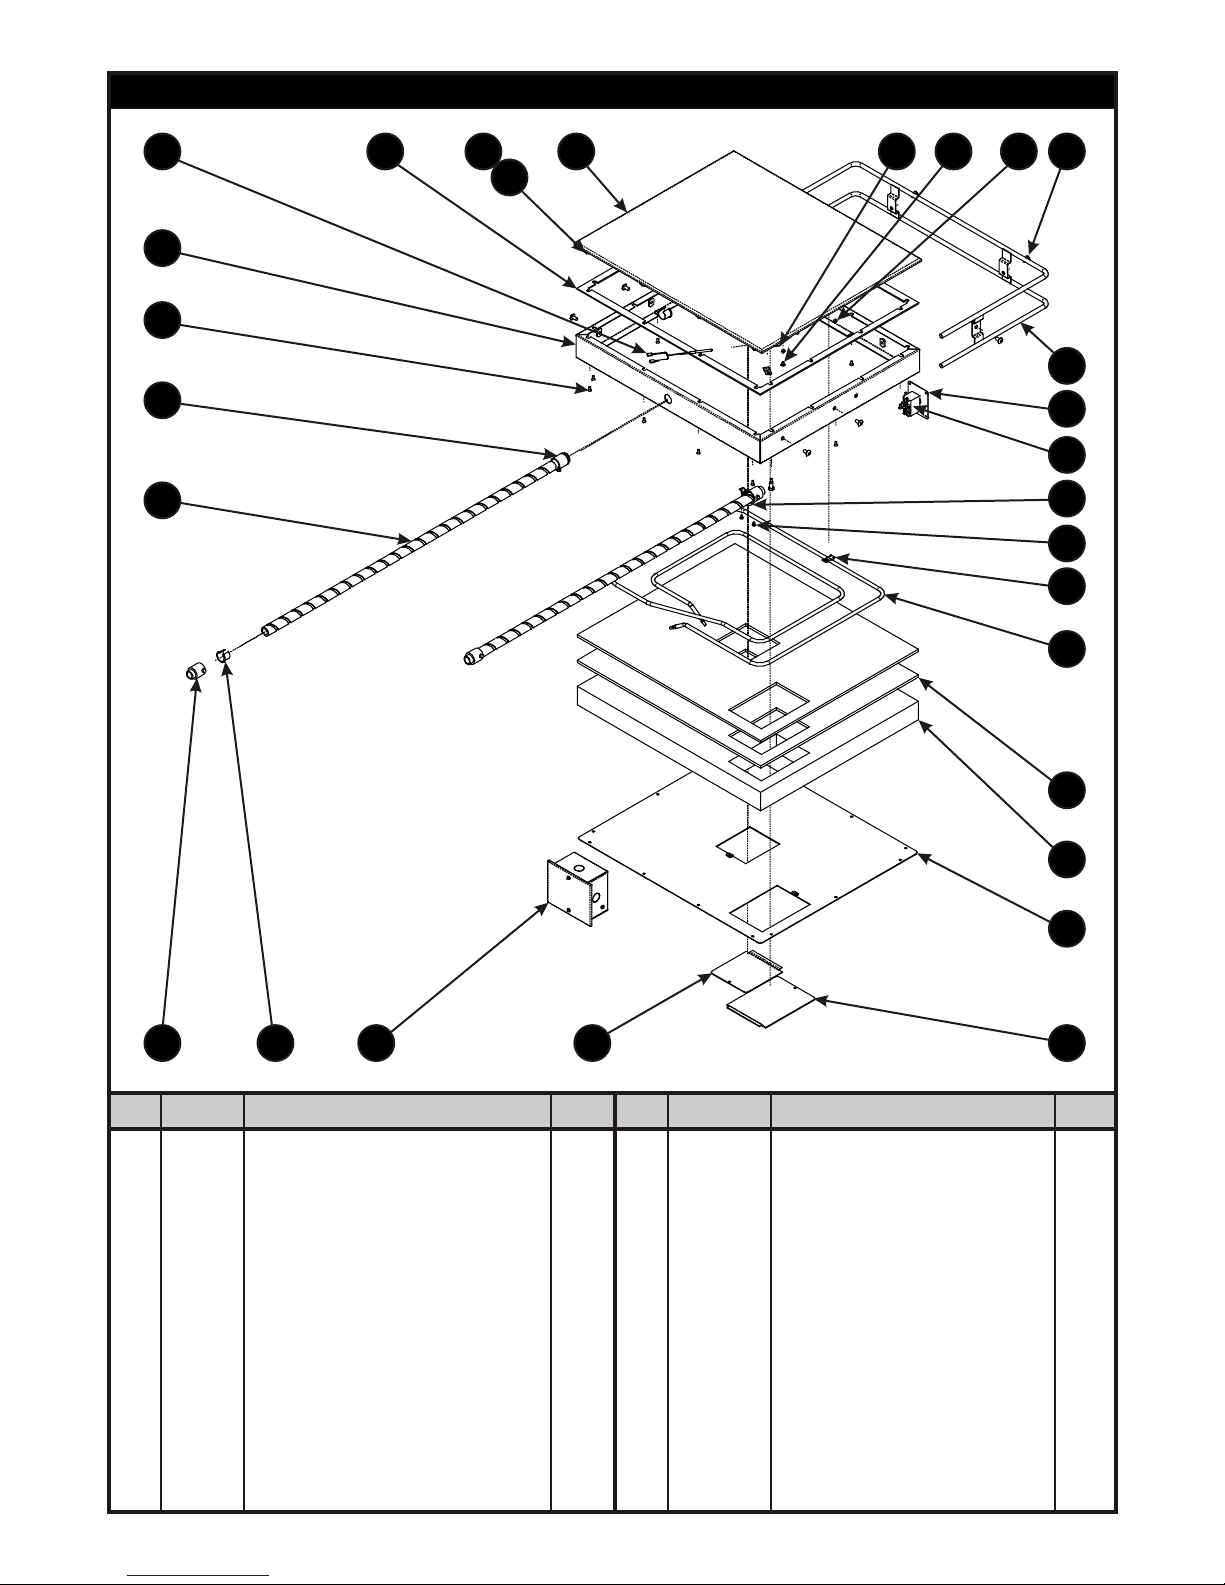
Specifications 3 Parts Lists w/Exploded Views 7
Installation Instructions 4 Wiring Diagrams 12
Operation 5 Warranty 15
3
2
IMMEDIATELY INSPECT FOR SHIPPING DAMAGE:
All containers should be examined for damage before and during unloading. The freight carrier has
assumed responsibility for its safe transit and delivery. If equipment is received damaged, either apparent
or concealed, a claim must be made with the delivering carrier.
A) Apparent damage or loss must be noted on the freight bill at the time of delivery. It must then be signed
by the carrier representative (Driver). If this is not done, the carrier may refuse the claim. The carrier can
supply the necessary forms.
B) Concealed damage or loss if not apparent until after equipment is uncrated, a request for inspection
must be made to the carrier within 15 days. The carrier should arrange an inspection. Be certain to hold all
contents and packaging material.
Installation and start-up should be performed by a qualified installer who thoroughly read, understands and
follows these instruction.
If you have questions concerning the installation, operation, maintenance or service of this product, write
Technical Service Department APW Wyott Foodservice Equipment Company, P.O. Box 1829, Cheyenne,
WY 82003.
!
!WARNING: This symbol refers to a potential hazard or unsafe practice, which could result
in serious injury or death.
!
!DANGER: This symbol warns of imminent hazard which will result in serious injury or
death.
!
!CAUTION: This symbol refers to a potential hazard or unsafe practice, which may result in
minor or moderate injury or product or property damage.
!
!NOTICE: This symbol refers to information that needs special attention or must be fully
understood even though not dangerous.
SAFETY PRECAUTIONS
3
CAUTION: APW Wyott equipment is designed, built, and sold for commercial use and
should be operated by trained personnel only. Clearly post all CAUTIONS, WARNINGS
and OPERATING INSTRUCTIONS near each unit to insure proper operation and to
reduce the chance of personal injury and/or equipment damage. This product is used for
the hot holding of food products only.
!
!
!
!
WARNING: Always disconnect power before servicing the unit. Surfaces will remain hot
after power has been turned off. Allow unit to cool before cleaning or servicing. Never
clean the unit by immersing it in water. The unit is not protected against water jets; DO
NOT CLEAN DRYWELL WITH A WATER JET. Always clean equipment properly before
first use.
OWNER'S INFORMATION
General Information:
1. Always clean equipment thoroughly before first use. (See general cleaning instructions).
2. Check rating label for your model designation and electrical rating.
General Operation Instructions:
1. All foodservice equipment should be operated by trained personnel.
2. Do not allow your customers to come in contact with any surface labeled “CAUTION HOT”.
3. Never touch Grilll platen or body while operating.
WARRANTY INFORMATION
Reliability Backed By APW Wyott's Warranty:
All APW Wyott Drywells are backed by a one year parts and labor warranty, including On-Site
Service calls within 50 miles of authorized service technicians.
Service Information:
Service Hotline (800) 733-2203
SPECIFICATIONS
Dimensions:
TBTGDL: 40.00” W x 26.25” D x 3.61” H
TBTGIL: 24.60” W x 20.80” D x 3.61” H
Electrical Ratings for Grills:
TBTGDL: 2676/3563W, 208/240V, 12.8/14.8A (Single Phase)
TBTGIL: 1200/1600W, 208/240V, 5.7/6.7A (Single Phase)
NOTE: These units are to be wired to the switch and then to the breaker.
Power Cord:
The Grill is designed to be hard wired to respective breaker.
Shipping Weight:
TBTGDL: 92 lbs. (42kg)
TBTGIL: 45 lbs. (21kg)
40.000
25.000
TBTGDL DIMENSIONS
TBTGIL DIMENSIONS
20.81
24.60
24.600
3.61
13.75
INSTALLATION INSTRUCTIONS
If the carton appears damaged, or damage is discovered once the carton is opened, stop immediately and
contact the freight company to file a damage claim.
1. Remove all external packaging that is protecting unit.
2. Remove unit from shipping container while in packaged position. The unit can be lifted and
oriented where wells are facing up. Note: Do not bend or scratch top frame perimeter and
cross supports.
4
5
OPERATION
1. The switch that operates the heaters is located on the Drive Through side of the assembly
line.
2. The On/Off switch is used to turn the unit on or off. Once the unit is turned on the platen
and frame surfaces will reach 425°F.
3. Note: Before touching the On/Off button, please read the following statements: The unit's
external surface temperatures will be hot. Use caution when touching these areas to avoid
injury.
4. The Grill has thermostats located in the center of the platen.
!
!
CAUTION: External Surface Temperatures could cause Severe Burns. Do not touch
platen or fins once power is applied.
!
!
WARNING: :
Control Operation This Grill has one heated zone and is operated by a
toggle switch. The switch is labeled Tortilla Grill. It also has ON/OFF on the label.
3. Remove all internal packaging to the unit.
4. Visually inspect all external and internal portions of unit for damage.
5. Wipe down the exterior of the unit using a cloth with warm water. NOTE: ONLY USE
APPROVED CLEANING SOLUTIONS i.e. SIZZLE.
6. Place unit in operating location. Make sure that the operating location is in an area where
the ambient temperature is held constant (minimum 70°F). Please avoid areas such as near
exhaust fans and air conditioning ducts. Support arms are used to weld to existing structure.
Ensure that Grill is level, left to right & front to back.
PREVENTATIVE MAINTENANCE SCHEDULE
Please follow the cleaning section for the daily preventative maintenance schedule.
DO NOT USE ABRASIVES OR CLEANING SOLUTIONS ON THIS APPLIANCE.
DO NOT IMMERSE THE GRILL IN WATER.
DO NOT ATTEMPT TO MAINTENANCE, OR SERVICE THE UNDERSIDE OF THE GRILL.
!
!
WARNING: DO NOT use unapproved abrasive pads or cleaning solutions.
!
!
WARNING: DO NOT touch Grill surfaces without wearing a protective fry glove.
!
!
WARNING: DO NOT move GRILL from production line.
!
!
WARNING: DO NOT immerse GRILL assembly or platen in water.
CLEANING
Procedure Frequency: Daily at closing.
Supplies: ♦ Soap and Warm Water ♦ Protective Fry Gloves ♦ Grill Pad
♦ Angled Grill Tool ♦ Food Service Towels
Procedure (Daily):
1. Turn off Grill and allow time for cooling. NOTE: DO NOT add ice or water to the Grill surface to
accelerate cooling, this can damage the platen. Allow time for platen to cool.
2. Dampen a cloth with soapy water and or Sizzle.
3. Apply the damp cloth to the platen and stainless steel trim, but do not pour soapy water onto platen
surface.
NOTE: Typical cleaning should require small amount of non-abrasive cleaner.
4. Apply adequate pressure to the damp cloth to remove soil; hard scrubbing is not necessary.
5. Wet a clean towel and ring out the excess water in sink or bucket.
6. Wipe platen surface with damp towel to remove left over soap, sizzle and soil from platen surface
and stainless steel trim.
7. Rinse the towel and wipe the platen surface again until platen is absolutely clean.
TROUBLESHOOTING
Always ask and check the following:
Not getting power:
1. Is the unit connected to a live power source of the proper voltage?
2. Check the rating label. Is the unit connected to the correct power source?
3. Check the circuit breaker.
4. Is power switch “ON”?
5. If the above checks out, and you still have problems, call your local service agent.
6
TBTGDL w/MECHANICAL THERMOSTATS
Item P/N Description Quan Item P/N Description Quan
18*
19*
20
21
22
23
24*
25*
26*
27
28*
29
30
31
32
33*
81357-00
4881531
8205500
85157-00
82652-01
4881514
4881518
81320-00
81430-00
4881539
8133700
1302900
4881538
4881537
4881568
2092550
39
2
6
4
4
1
2
57
2
2
4
1
1
1
1
1
1
2
3
4
5
6
7
8
9
10*
11
12
13
14
15*
16
17
4881521
4881519
4881520
4881534
4881529
4881530
8204100
1489100
4881517
4881558
4881592
4881593
4881594
1486500
8507500
-
4881544
W/Assy, Main Frame
Cover, Thermostat
Plate, 40 x 25 Dual Line Grill
Gasket
Bottom Panel
Cover, Access
Bolt, 1/4-20 x ½" SS Hex
Thermostat, Snap Action Open 450°F
Cover, Plate
Clip, Element
Element, Outer 84V, 543W
Element, Middle 69V, 442W
Element, Inner 55V, 353W
Switch, High Limit (550°F)
Washer, Flat, Sae, 1/4
-
Plate, Face
1
2
1
1
1
2
22
2
2
54
2
2
2
2
22
1
1
Screw, 8-32 x 3/8" Ft Hd
Screw, 1/4-20 x 1/2 Tr Hd
Washer, ½" SAE Zn
Bolt, Hex Hd ½-13 x 3/4
Insulation, 2" Super Wool
Insulation, .250 Pyrogel
Screw, Tr Hd 8-32 x 1/4 SS
8-32 x 3/4" SS Pan Hd
Bracket, Mount
Screw, 8-32 x 1/4 Ph Pan Hd
Switch, On-Off 30 Amp DPST
Label, On/Off
Plate, Switch
Conduit, Flex 1/2" Tr Sz, 72" Long
Nut, 1/2" Chase Nipple
*NOT SHOWN
5
4
3
16
11
7
1
8
2
23
13
12
9
6
14
17
20
21
22
27
30 29
31
32
PARTS LISTS w/EXPLODED VIEWS
7
TBTGIL w/MECHANICAL THERMOSTATS
Item P/N Description Quan Item P/N Description Quan
11
6
7
2
5
1
21
9
17
4
20
15
12
16
3
13
14
29
28
10
8
16
17
20
21
28
29
18*
19*
22*
23*
24*
25*
26*
27*
4881513
4881512
4881530
8205500
4881537
4881538
81342-00
85196-00
81357-00
4881564
8134200
81423-00
81357-00
1302900
2
1
1
8
1
1
30
16
16
4
6
1
1
1
1
2
3
4
5
6
7
8
9
10
11
12
13
14
15
4881507
4881546
82041-00
4881557
11019-00
4881568
1486500
4881562
8133700
4881558
4881598
1489100
4881519
4881517
Plate, 20 x 23.5 x I Line Grill
W/Assy, Main Frame
1/4-20 Hex Head
Gasket
Connector, Flex 1/2" Trade Size
Conduit, Flex 1/2" Tr Sz, 72" Long
Switch, High Limit (550°F)
Weldment, Burn Guard
Screw, 8-32 x 1/4 Ph Pan Hd
Clip, Element
Element, I Line Grill 208V
Thermostat, Snap Action Open 450°F
Cover, Thermostat
Cover, Plate
1
1
16
1
1
1
2
1
1
2
34
1
1
1
1
Insulation, .250" Pyrogel
Insulation, Super Wool 2"
Cover, Access
Screw, 1/4-20 x 1/2 Tr Hd
Plate, Switch
Label, On/Off
8-32 x 1/4 SS Pan Hd
Washer .75 x .281
Screw, 8-32 x 3/8" Ft Hd
Spacer, 0.305 x 0.255 x 0.156
Mach Screw, 8-32 x 1/4
8-32 x .750 Lg. Screw
Screw, 8-32 x 3/8" Ft Hd
Switch, On-Off 30 Amp DPST
*NOT SHOWN
8
TBTGDL w/ELECTRONIC THERMOSTATS
Item P/N Description Quan Item P/N Description Quan
20
21
22
23
24
25
26
27
28
29
30
31
32
33*
34
35
36
82652-01
4881518
4881514
81357-00
81320-00
2092550
4881568
4881537
4881538
1302900
1475050
4881833
4881832
8133700
1000200
11019-00
4881569
4
2
1
39
59
1
1
1
1
1
2
2
1
4
4
3
1
Bolt, Hex Hd ½-13 x 3/4
Insulation, .250 Pyrogel
Insulation, 2" Super Wool
Screw, 8-32 x 3/8" Ft Hd
Screw, Tr Hd 8-32 x 1/4 SS
Nut, 1/2" Chase Nipple
Conduit, Flex 1/2" Tr Sz, 72" Long
Plate, Switch
Label, On/Off
Switch, On-Off 30 Amp DPST
Probe, RTD
Tab, Locator
Control Box, Dual Line
Screw, 8-32 x1/4 Ph Pan Hd
Bushing, Anti-Short Size 3
Connector, 1/2" Flex Straight
Conduit, Flex 1/2" Tr Sz, 42" Long
*NOT SHOWN
1
2
3
4
5
6
7
8
9
10
11
12
13
14
15
16
17
18
19
4881520
4881534
4881521
4881529
4881592
4881593
4881594
1486500
4881558
4881517
4881530
8507600
8204100
1609200
4881544
4881531
8205500
4881539
85157-00
Plate, 40 x 25 Dual Line Grill
Gasket
W/Assy, Main Frame
Bottom Panel
Element, Outer 84V 543W
Element, Middle 69V 442W
Element, Inner 55V 353W
Switch, High Limit (550°F)
Clip, Element
Cover, Plate
Cover, Access
Washer, Flat 1/4"
Bolt,1/4-20 x ½" SS Hex
Cord Connector
Plate, Face
Burn Guard
Screw, 1/4-20 x 1/2 Tr Hd
Bracket, Mount
Washer, ½" SAE Zn
1
1
1
1
2
2
2
2
56
2
2
22
22
1
1
2
6
2
4
12
15
14
36
2
19 20
13
23
3
8
1
24
9
32
31
30
17
34
16 18
7
10 11 422 21
5
6
25
26
28 27
29
35
9
TBTGIL w/ELECTRONIC THERMOSTATS
Item P/N Description Quan Item P/N Description Quan
16
17
18
19
20
21
22
23*
24
25
26
27
28
29
82041-00
4881530
8205500
81358-00
4881564
1302900
4881537
4881538
4881833
1475050
4881562
BOX ASSEM
1000200
11019-00
1/4-20 Hex Head
Cover, Access
Screw, 1/4-20 x 1/2 Tr Hd
Screw, 8-32 x 3/8" Ft Hd
Spacer, 0.305 x 0.255 x 0.156
Switch, On-Off 30 Amp DPST
Plate, Switch
Label, On/Off
Tab, Locator
Probe, Rtd
Weldment, Burn Guard
Box Assembly For I-line
Bushing, Anti-Short Size 3
Connector, 1/2" Flex Straight
16
1
8
16
4
1
1
1
1
1
1
1
4
3
1
2
3
4
5
6
7
8
9
10
11
12
13
14
15
4881507
4881546
4881551
4881557
11019-00
4881568
1486500
8133700
4881598
4881558
4881517
4881513
4881512
81342-00
85196-00
Plate, 20 x 23.5 x I Line Grill
W/Assy, Main Frame
Bottom, I-Line Grill
Gasket
Connector, Flex 1/2" Trade Size
Conduit, Flex 1/2" Tr Sz, 72" Long
Switch, High Limit (550°F)
Screw, 8-32 x 1/4 Ph Pan Hd
Element, I Line Grill 208V
Clip, Element
Cover, Plate
Insulation, .250" Pyrogel
Insulation, Super Wool 2"
8-32 x 1/4 Ss Pan Hd
Washer .75 x .281
1
1
1
1
1
2
1
2
1
35
1
2
1
37
16 *NOT SHOWN
29 28 27
26
22
21
20
19
18
17
14
12
11
9
8
7
4
3
2
1
6
5
13
10
24
1615
25
10