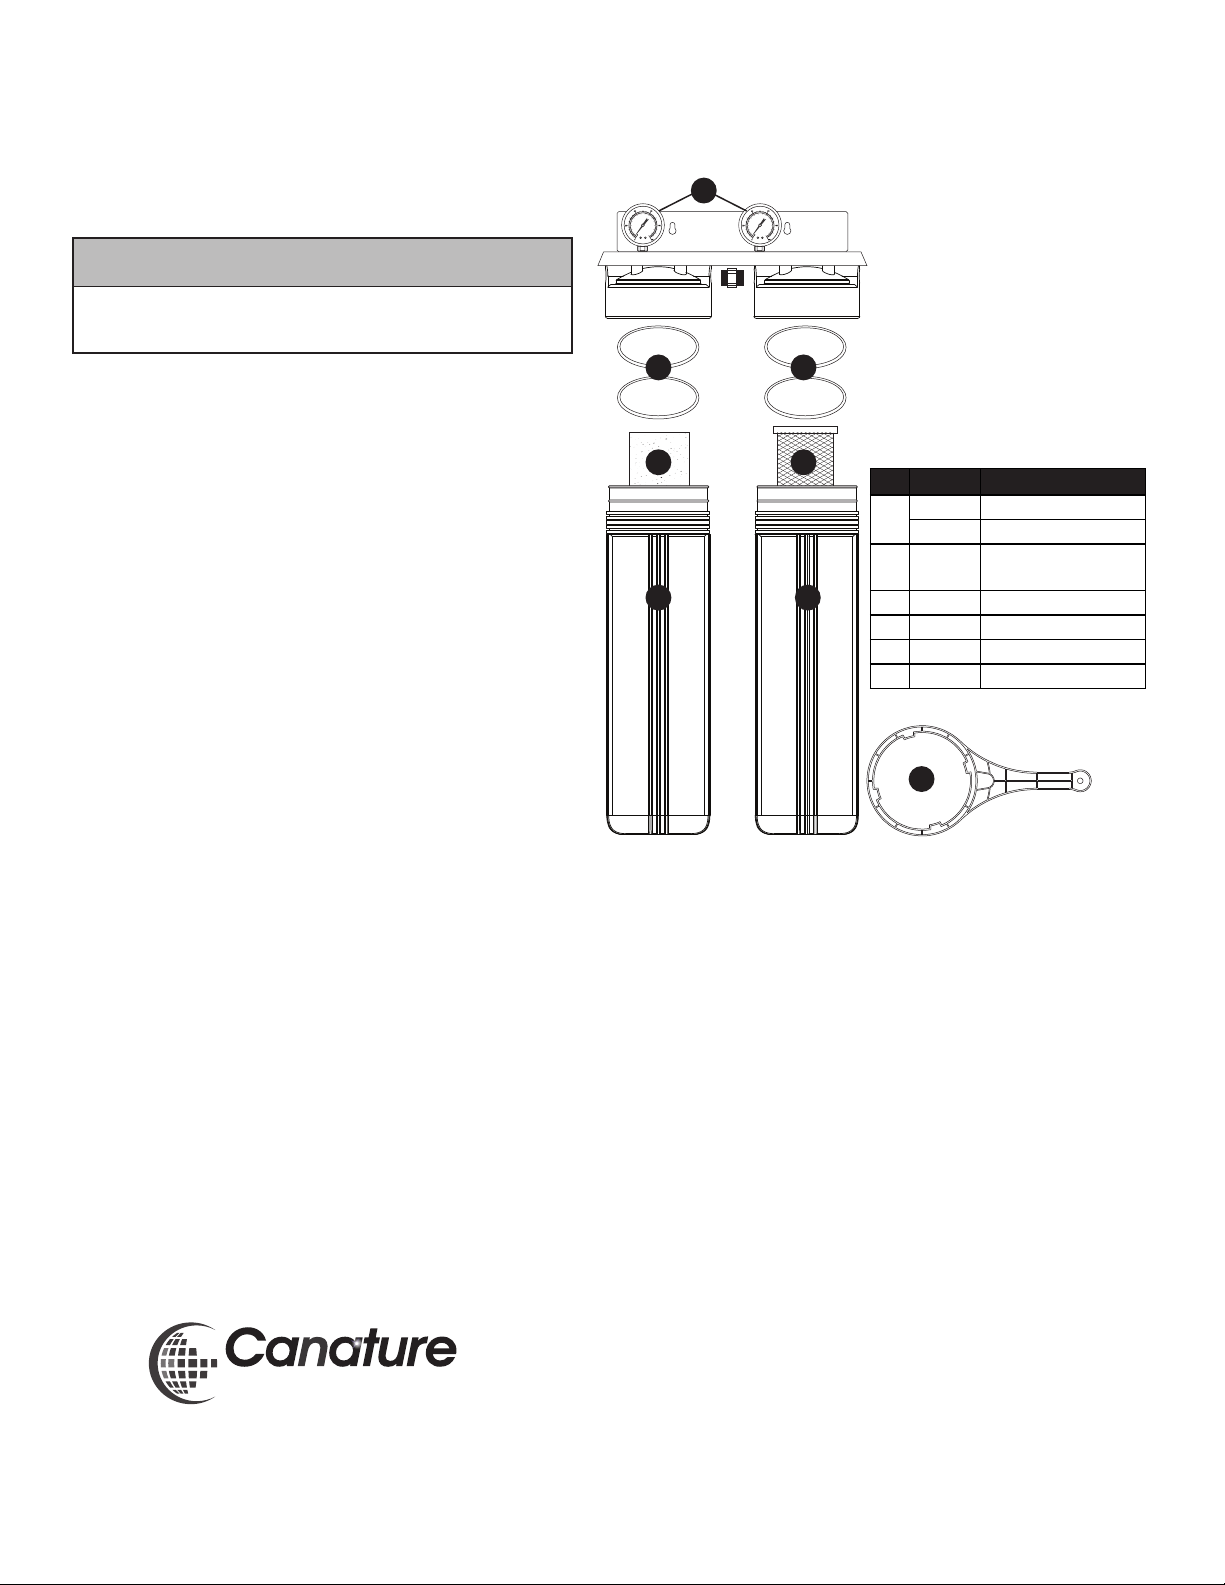
manuals.online logo
Brands
  1. Home
  2. •
  3. Brands
  4. •
  5. Aqua Flo
  6. •
  7. Water Filtration System
  8. •
  9. Aqua Flo 160197 User manual

Aqua Flo 160197 User manual

Owner’s Manual
High-Flow Whole House
Filtration System
Canature WaterGroup Canada Inc.
855 Park St.
Regina, SK, S4N 6M1
CANADA
Toll-Free: (877) 288-9888
Canature WaterGroup U.S.A. Inc.
9760 Mayower Park Drive
Suite 1101
Carmel, IN 46032 USA
Toll-Free: (877) 288-9888
BRAND: AQUA FLO
MODELS:
160197 High-Flow Dual
Stage 20BB SED,
Carbon, 3/4”In/Out
160198 High-Flow Dual
Stage 20BB SED,
Carbon, 1”In/Out
Please read carefully before proceeding with installation. Your failure to follow any attached instructions or operating
parameters may lead to the product’s failure. Keep this manual for future reference.
If you are unsure about installing the Aqua Flo High-Flow Whole House Filtration System, contact your dealer.
Test the water periodically to verify that the system is performing satisfactorily.
Discard small parts remaining after the installation.
Failure to install the system correctly voids the warranty.
Handle all components of the system with care. Do not drop, drag or turn components upside down.
CAUTION
Do not use with water that is microbiologically unsafe
or of unknown quality without adequate disinfection
before or after the system.
TABLE OF CONTENTS
SYSTEM SPECIFICATIONS 2
OPERATION 3
INSTALLATION 3
MAINTENANCE 3
REPLACEMENT PARTS LIST 4
LIMITED WARRANTY 4
2
ITEM # FREQUENCY FILTER DESCRIPTION
36287 6 Months Sediment P-PMB-5-20BV,
4.5”X 20”, 5 Micron
36091 6 Months Carbon P-RF-20BV, 4.5”X 20
kg/cm
psi
2
34
5
6
7
1
kg/cm
psi
2
34
5
6
7
1
16.25”
27.5”
Height: 27.5"
Width: 16.25"
Depth: 8"
SYSTEM SPECIFICATIONS
DIMENSIONS
Maximum Water Pressure: 85psi (8.6 bar)
Maximum Water Temperature: 100°F (38°C)
Inlet/Outlet Connections:
160197: 3/4" (19.05mm) NPT
160198: 1" (25.4mm) NPT
Maximum Flow Rate: up to 8 gpm
Filter Cartridge Life Span
Cartridges should be changed at least every 6 months or sooner
depending on incoming water quality.
Notice to Installer
Do not discard this manual after installation.This manual contains
important operation, maintenance and precautionary information.
Please present this manual to the user/owner/operator after
installation.
It is strongly suggested that you read this manual before installing
the system to ensure the best possible installation.
Installation must comply with all local and state plumbing codes
and regulations.
Connect the system to cold water supply only. Water temperature
cannot exceed 100°F (38°C).
System must be installed in a vertical, upright, and level position.
Do not use with water that is microbiologically unsafe or of
unknown water quality.
Notice to user/owner/operator: please retain this manual for a
future reference for parts, maintenance, or troubleshooting.
It is recommended that all personnel responsible for operation
and maintenance of this product read the precautions,
maintenance, and operations section of this manual.
Installation Precautions
Do not install system on line pressure above 85psi. If water pressure
is over 85psi (8.6 bar), CanatureWaterGroup recommends the
installation of a pressure regulator.
Do not install the system on a hot water line. Failure to limit the
water temperature to 100°F (38°C) can result in housing failure and
property damage.
Do not connect the system backwards with the feed water line
connected to the outlet.
Do not use liquid pipe thread compounds for threaded connections.
UseTeflon® tape only.
Do not allow the system to freeze.Turn off water supply and drain
the system if temperature falls below 32°F (0°C).
Do not install system in direct sunlight or where the system will be
exposed to harsh chemicals or may be subjected to being hit by
moving equipment, carts, mops, or any other item that may cause
damage.
Allow 3”(76mm) minimum clearance under the housings for filter
replacement.
If water hammer is evident, install water hammer arrestors before
the system.
Do not overtighten fitting connections.
Always back off fittings with a wrench when installing fittings to
avoid overtightening or loosening existing fittings.
Do not install the unit behind equipment where it may be difficult to
access the system for future filter replacements.
Position the system in a suitable location. The direction of flow
through the system is left to right. Keep this in mind when determining
installation locations. Do not mount the system near any source
of heat. Also, do not mount this system over anything that may be
adversely affected by water.
Replacement Filters
2 3
OPERATION
With sucient pressure, this system operates automatically. To
ensure it operates dependably, you need to perform periodic lter
changes and monitor system pressure dierential as outlined in the
maintenance instructions.
INSTALLATION
* Please note: all cartridge lters are pre-installed in the
housings at the factory.
1. Turn o all equipment to be fed by the system. Locate the water
supply shuto valve to your home or RV and turn it o.
2. Thread the inlet and outlet ttings into the inlet and outlet of the
system.
NOTICE
DO NOT OVERTIGHTEN THE
FITTINGS INTO THE FILTER HEADS.
3. Anchor the system on a wall stud or suitable mounting material
spanning wall studs. System must be vertical, upright and level.
4. Run a suitable line of at least 1⁄2" in diameter from the tap water
source to the inlet on the left side of the system.
NOTICE
DO NOT OVERTIGHTEN WATER CONNECTION
FITTING INTO THE SYSTEM.
6. Select the appropriate size tubing for the equipment being fed
and connect it to the outlet tting of the system.
NOTICE
DO NOT OVERTIGHTEN CONNECTION FITTING INTO THE SYSTEM.
7. Once all inlet and outlet piping has been completed, check and
make sure all lter housings are tight. Slowly open the inlet valve
to house or RV and allow the system to reach operating pressure.
Check for leaks.
8. Record the startup date for future lter replacements.
NOTICE
Overtightening components can damage the system causing
water damage and/or system failure.
MAINTENANCE
Routine maintenance of this system involves periodic lter changes.
Cartridges should be changed at least every 6 months or sooner
depending on incoming water quality.
Filter Cartridge Replacement Procedure
IMPORTANT: Determine whether all equipment connected
to the system must be turned o prior to shutting o water
supply from lters
1. If required, turn o downstream equipment.
2. Turn OFF water supply to the system and open faucet to relieve
pressure.
3. Starting with the housing on the left, unscrew housing by
turning counterclockwise. Remove and discard spent lter and
drain water that remains in the bowl. The sediment cartridge
must be in the 1st housing on the left where water inlet
connects. Continue on to the 2nd housing, the carbon block lter
has a rubber gasket on each end.
4. Clean inside of housing sump with warm water. If desired,
disinfect housing using a teaspoon of household bleach. Add to
lter bowl and ll with water. Let stand 5 minutes and then
discard and rinse.
5. Insert new cartridges into lter housings, making sure lters are
installed from left to right, sediment lter then carbon block
lter.
NOTICE
Do not overtighten filter housing. Overtightening may
damage o-ring(s), cause water leaks,
or affect system performance.
6. Lubricate o-ring using only a NSF approved silicone grease.
Check o-ring for damage and replace if damaged or distorted.
Make certain the o-ring is properly positioned and reinstall lter
housings.Tighten housings hand tight.
7. Slowly turn on water supply to restore water ow to water
system and check for any leaks.
4
ITEM PART # DESCRIPTION
136298 3/4” FILTER HOUSING
36299 1” FILTER HOUSING
260010559 ORINGS FOR FILTER HOUSING
(2 required per housing).
336287 SEDIMENT FILTER
436091 CARBON BLOCK FILTER
5101047 PRESSURE GAUGES
693017 SUMP WRENCH
kg/cm
psi
2
34
5
6
7
1
kg/cm
psi
2
34
5
6
7
1
1
3
2 2
1
4
5
6
:DWHU*URXS
Canature WaterGroup Canada Inc.
855 Park St.
Regina, SK, S4N 6M1
CANADA
Toll-Free: (877) 288-9888
Canature WaterGroup U.S.A. Inc.
9760 Mayower Park Drive
Suite 1101
Carmel, IN 46032 USA
Toll-Free: (877) 288-9888
Winter Shut-Down Procedures
The following procedure is recommended if you are winterizing your
residence or RV.
NOTICE
IMPORTANT: Filter housings will break if water is left in them
in freezing weather conditions.
1. Turn o the water supply to the lter system. If you are draining
your fresh water holding tank, this will stop the water supply into
the lter system.
2. Drain the water from the system.
3. Remove both lter housings by rotating counterclockwise.
4. Slide out old lters and discard. O-rings should be saved for
future use.
5. Filter housing should be left unscrewed from the lids to ensure no
cracking due to freezing weather conditions.
6. Follow Filter Cartridge Replacement Procedure when you are
ready to use system again.
MAINTENANCE (CONTINUED) REPLACEMENT PARTS
WARRANTY
Subject to the conditions and limitations described below, Canature WaterGroup™ warrants its AquaFlo® High-FlowWhole House Filtration Systems (excluding cartridge lters), when installed in
accordance with CanatureWaterGroup™ specications, to be free from defects in materials and workmanship under normal use within the operating specications for a period of one (1) year from
the date of purchase (with bill of sale). This warranty shall apply to the original enduser of the system only.
Other than the cartridge lters, any part found defective within the terms of this warranty will be repaired or replaced by CanatureWaterGroup™. If any part is found defective, Canature
WaterGroup™ also reserves the right to replace the water ltration appliance with a comparable CanatureWaterGroup™ water ltration system of equal or greater quality. You pay only freight for
repaired or replaced parts from our factory.
This warranty shall not apply to any part damaged by accident, re, ood, freezing, Act of God, bacterial attack, membrane fouling and/or scaling, sediment, misuse, misapplication, neglect,
alteration, installation, or operation contrary to our printed instructions, or by the use of accessories or components which do not meet CanatureWaterGroup™ specications. If the drinking water
system is altered by anyone other than Canature WaterGroup™ the warranty shall be void.
ALL IMPLIED WARRANTIES, INCLUDINGWITHOUT LIMITATION WARRANTIES OF MERCHANTABILITY AND FITNESS FOR PARTICULAR PURPOSE, ARE LIMITED TO THE DURATION OF THE PERIOD SPECIFIED
ABOVE FORTHE PARTS DESCRIBED IN THIS LIMITED WARRANTY.
As a manufacturer, we do not know the characteristics of your water supply. The quality of water supplies may vary seasonably or over a period of time.Your water usage may vary as well. Water
characteristics can also change if the ltration system is moved to a new location. For these reasons, we assume no liability for the determination of the proper equipment necessary to meet your
requirements, and we do not authorize others to assume such obligation for us. Further, we assume no liability and extend no warranties, express or implied, for the use of this product with a non-
potable water source.
CANATURE WATERGROUP’S™ OBLIGATIONS UNDER THISWARRANTY ARE LIMITEDTO THE REPAIR OR REPLACEMENT OF THE FAILED PARTS OFTHEWATER FILTRATION SYSTEM, AND WE ASSUME NO
LIABILITY WHATSOEVER FOR DIRECT, INDIRECT, INCIDENTAL, CONSEQUENTIAL, SPECIAL, GENERAL OR OTHER DAMAGES.
Revision A 80155438 2022-05-05

This manual suits for next models

1

Other Aqua Flo Water Filtration System manuals

Aqua Flo AQUV AQUV-12R22 User manual

Aqua Flo

Aqua Flo AQUV AQUV-12R22 User manual

Aqua Flo AQUV-8R1 User manual

Aqua Flo

Aqua Flo AQUV-8R1 User manual

Aqua Flo GEN4 Series User manual

Aqua Flo

Aqua Flo GEN4 Series User manual

Aqua Flo AQUV AQUV-8R12 User manual

Aqua Flo

Aqua Flo AQUV AQUV-8R12 User manual

Aqua Flo AQUV-8 User manual

Aqua Flo

Aqua Flo AQUV-8 User manual

Aqua Flo GENH4-13R122 User manual

Aqua Flo

Aqua Flo GENH4-13R122 User manual

Aqua Flo GEN5-8R12 User manual

Aqua Flo

Aqua Flo GEN5-8R12 User manual

Aqua Flo GEN4-8R1 User manual

Aqua Flo

Aqua Flo GEN4-8R1 User manual

Aqua Flo AQUV-12R2 User manual

Aqua Flo

Aqua Flo AQUV-12R2 User manual

Popular Water Filtration System manuals by other brands

Honeywell HRO-50 Product installation & operation manual

Honeywell

Honeywell HRO-50 Product installation & operation manual

Deltec SC 3071S operating instructions

Deltec

Deltec SC 3071S operating instructions

CorroVenta WS4 ES user manual

CorroVenta

CorroVenta WS4 ES user manual

Carefree Deluxe Sand Filter System owner's manual

Carefree

Carefree Deluxe Sand Filter System owner's manual

BRÖTJE ZLF SGB E Assembly instructions

BRÖTJE

BRÖTJE ZLF SGB E Assembly instructions

Endura XL100 Installation operation & maintenance

Endura

Endura XL100 Installation operation & maintenance

Vortex RH9521-12 installation guide

Vortex

Vortex RH9521-12 installation guide

TIGMON Lauben JUG 32GW user manual

TIGMON

TIGMON Lauben JUG 32GW user manual

EHEIM pickup 45 manual

EHEIM

EHEIM pickup 45 manual

ACO Oleosmart-C-OST Operating and maintenance instructions

ACO

ACO Oleosmart-C-OST Operating and maintenance instructions

GrowMax Water ECO GROW 240 L/h manual

GrowMax Water

GrowMax Water ECO GROW 240 L/h manual

elysator PUROTAP easy II operating instructions

elysator

elysator PUROTAP easy II operating instructions

Sera KOI Professional 24000 INFORMATION FOR USE

Sera

Sera KOI Professional 24000 INFORMATION FOR USE

EHEIM classic 2215 manual

EHEIM

EHEIM classic 2215 manual

InSinkErator F-201 installation instructions

InSinkErator

InSinkErator F-201 installation instructions

Katadyn 8013629 user manual

Katadyn

Katadyn 8013629 user manual

Katadyn Steripen Classic 3 quick start guide

Katadyn

Katadyn Steripen Classic 3 quick start guide

Waterdrop WD-K19RF installation manual

Waterdrop

Waterdrop WD-K19RF installation manual

manuals.online logo
manuals.online logoBrands
  • About & Mission
  • Contact us
  • Privacy Policy
  • Terms and Conditions

Copyright 2025 Manuals.Online. All Rights Reserved.