N-FEED-LCD
Urządzenie N-FEED-LCD objęte jest 24 miesięcznym okresem gwarancyjnym
na bezawaryjność licząc od daty zakupu. Zachowaj dowód sprzedaży. Gwaran-
cja obejmuje uszkodzenia powstałe z winy producenta, tzn. błędy w montażu
czy wady materiałowe. Gwarancja nie obejmuje niewłaściwego użytkowania
urządzenia N-FEED-LCD (nie przestrzeganie zasad właściwego użytkowania i
konserwacji). Klient zgłaszający reklamację zobowiązany jest wysłać urządzenie
wraz z dowodem zakupu na adres producenta lub dystrybutora.
pieczęć punktu sprzedaży / stamp of the place of purchasing
ENG
GWARANCJA / WARRANTY CONDITIONS
Demontaż / Disassembly
PL
Zgodnie z ustawą o zużytym sprzęcie elektrycznym i elektronicznym
N-FEED-LCD nie należy wyrzucać do śmietnika. Selekcjonowanie i utylizacja
tego typu urządzeń przyczyni się do ochrony środowiska naturalnego. Uwaga!
Wyrzucanie sprzętu elektronicznego lub elektrycznego do śmietnika grozi karą
grzywny. Użytkownik jest zobowiązany do dostarczenia zużytego sproduktu
elektrycznego do wyspecjalizowanego punktu zbiórki, gdzie odpad zostanie
przyjęty bezpłatnie.
PL
The manufacturer provides a 24 month guarantee, beginning on the date of
purchase.The guarantee covers defects arising from manufacturer fault i.e.
defective materials or workmanship. It does not cover mechanical and other
damage caused by improperhandling or construction changes introduced by
the user.If a claim is to be made, please return to the shop, where you have
bought this product, and present receipt showing date of purchase, proof of
date and purchase is a prerequisite for accepting the claim.
ENG
It is forbidden to dispose of used electric and electrical equipment in a trash
bin. Segregating and proper utilization of this king of waste leads to conserving
the resources of natural environment and allows avoiding negative influence
on health as it can be endangered by improper waste handling. The user is
responsible for delivering the used product to a specialized collection point
where it will be accepted free of charge. You can obtain information about such
a facility at the local authorities, or by asking either the seller or the manufactu-
rer service.
nazwa urządzenia / name of product
ENG
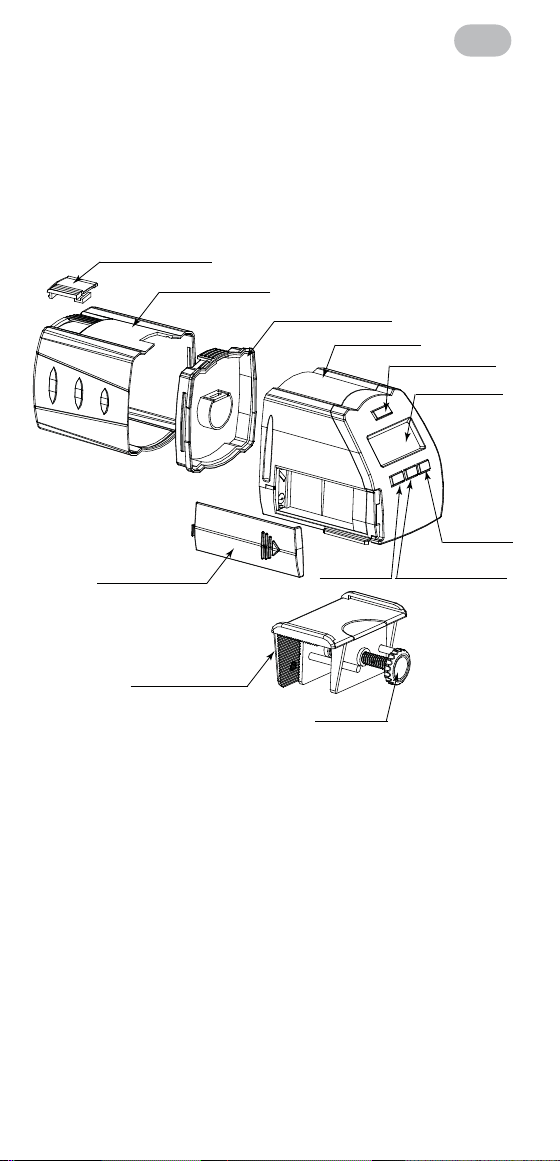
Feeding outlet
Food container
Container cover
feeder host
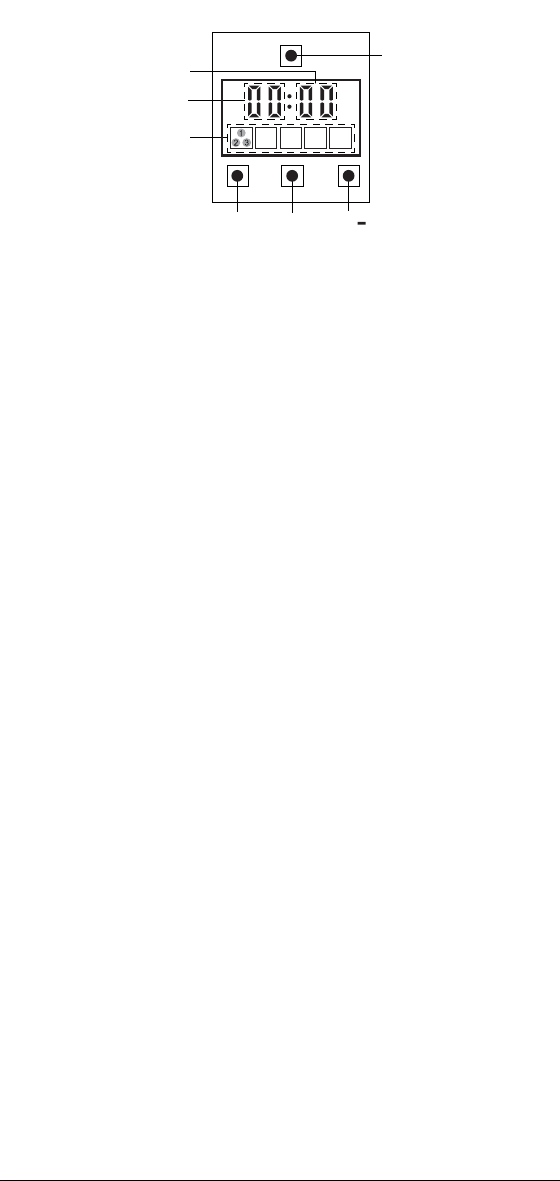
Manual botton
Time screen
“-” botton
“+” botton Setting botton
Screw
Battery cover
Position holder
Features:
● Accurate electronic control and clear LCD display.
● 5 different setting time with 1 – 3 rounds feeding, to meet various
needs.
● Suitable for food pellet and flake.
Operations:
1. Open the battery housing, fix 2 AA batteries well.
Press the “MANUAL” button, to make sure the food container can function
well.
2. Take down the food container, close the feeding outlet and open the
bottom cover to fill with food. Then re-assembly it to feeder host.
3. Auto feeding function as below instructions:
1) Standard time setting (see picture 1):
● Press “SETTING” button, when the HOUR 2 digits twinkle, press “+” or
“-“ button to set local standard HOUR time.
● Then press “SETTING” button, when the MINUTE 2 digits twinkle,
press “+” or “-“ button to set local standard MINUTE time.
● Finally, let the digits twinkle for one minute, local standard time will
set up.
2) Feeding time & feeding round setting (see picture 2, 3, 4)
After setting up the local standard time, you can start to set up
feeding time and round.
● Please refer to Picture 2.
Press “SETTING” button, when the bottom squares outline and HOUR
2 digits twinkle together, you can start to set the 1st feeding time and
round. Press “+” or “-“button to set your 1st feeding HOUR time.
● Then, press “SETTING” button, when the bottom squares outline and
MINUTE 2 digits twinkle together, press “+” or “-“button to set your
1st feeding MINUTE time.
● Press “SETTING” button again, when the bottom squares outline
twinkles, press “+” or “-“ to your preferred feeding round (1, 2 or 3
round). When “1” shows in 1st small square, means 1 round. When “2”
shows in 1st small square, means 2 rounds. When “3” shows in 1st
small square, means 3 rounds.
● Then, let the digits twinkle for one minute, the 1st feeding time and
rounds will set up.
3) Please refer to below pictures.
The 2nd, 3rd, 4th and 5th feeding time and rounds are same operations as
the 1st feeding.
The 5 small squares shown feeding round(s) against 5 different feeding
time.
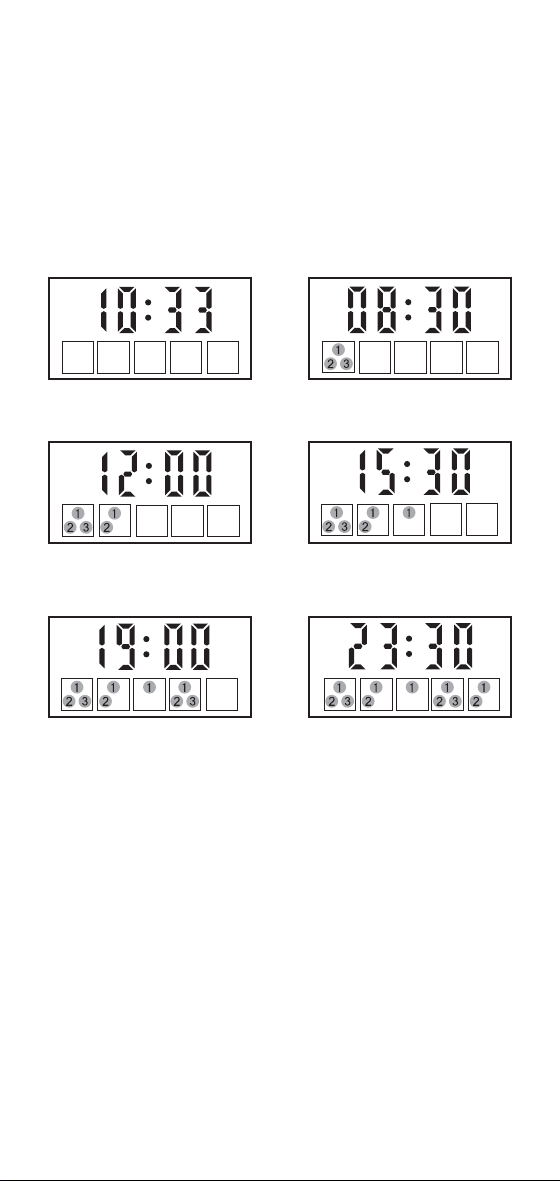
Please refer to below 6 typical examples to elaborate setting operations.
● Means local standard time 10:33
● Means the 1st feeding is at 8:30 and 3 rounds.
● Means the 2nd feeding is at 12:00 and 2 rounds.
● Means the 3rd feeding is at 15:30 and 1 round.
● Means the 4th feeding is at 19:00 and 3 rounds.
● Means the 5th feeding is at 23:30 and 2 rounds.
If you do not need all 5 different feedings, you can set up your feeding
among 1-5. Do not need to follow feeding sequence strictly.
4) Manual feeding:
If you wish to enjoy feeding manually, please press the “MANUAL”
button, the food container will run and feed accordingly.
(picture 2)
Setting“+”
“ ”
Manual botton
Hour
Minute
Feeding cycle
setting
1. Means local
standard time 10:33
2. Means the 1st feeding
is at 8:30 and 3 cyles.
3. Means the 2nd feeding
is at 12:00 and 2 cyles.
4. Means the 3rd feeding
is at 15:30 and 1 cyle.
5. Means the 4th feeding
is at 19:00 and 3 cyles.
6. Means the 5th feeding
is at 23:30 and 2 cyles.
4. Fix the LCD auto feeder to the edge of tank, adjust the feeding outlet
width according to necessary, then the feeder can start to work.
5. Special reminder
Keep away from water. In case any water go inside, please handle
immediately.
Take out the batteries if the LCD Auto-Feeder will be unused for long time.
Please renew batteries when LCD Auto-Feeder can not run powerfully.