ubbink KoiFeeder Solar User manual

Solar
KoiFeeder
KoiFeeder
• Mode d’emploi
• Bedienungsanleitung
• Handleiding
• Operating Instructions
Manual KoiFeeder 2022.indd 1 19.12.22 09:50

Mode d‘emploi pour KoiFeeder Solar
4
2
Cher client,
Chère cliente,
Ce mode d’emploi contient des informations importantes pour la mise en service et l’utilisation de l’appareil. Lisez attentivement le mode d’emploi avant d‘utiliser le distributeur automatique solaire de nourriture.
Cela vaut notamment pour les consignes de sécurité. Dans le cas contraire, vous risquez de vous blesser ou d’endommager le distributeur automatique de nourriture. Conservez le mode d’emploi pour une utilisation
ultérieure. Si vous remettez le distributeur automatique de nourriture à des tiers, remettez-leur également impérativement ce mode d’emploi. Ce mode d’emploi peut également être téléchargé au format PDF sur
notre site Internet www.outsideliving.com.
Consignes de sécurité
Cet appareil peut être utilisé par des enfants à partir de 8 ans et par des personnes aux capacités
physiques, sensorielles ou mentales limitées ou manquant d’expérience et de connaissances à
condition que ces personnes soient surveillées ou qu’elles aient été informées sur la façon d‘utiliser
l‘appareil en toute sécurité et sur les risques qu’il présente.
Le distributeur automatique solaire de nourriture est exclusivement destiné à un usage privé et ne
convient pas à un usage professionnel. Utilisez uniquement le distributeur automatique solaire de
nourriture conformément au présent mode d’emploi.Toute autre utilisation est considérée comme non
conforme et peut entraîner des blessures ou des dommages matériels. Le distributeur automatique
solaire de nourriture n’est pas un jouet. Le fabricant ou le revendeur décline toute responsabilité pour
les dommages causés par une utilisation non conforme ou par une mauvaise utilisation.
Veillez à ce que le distributeur automatique solaire de nourriture soit placé sur une surface plane et
stable et à ce qu’il ne puisse pas tomber dans l’eau.
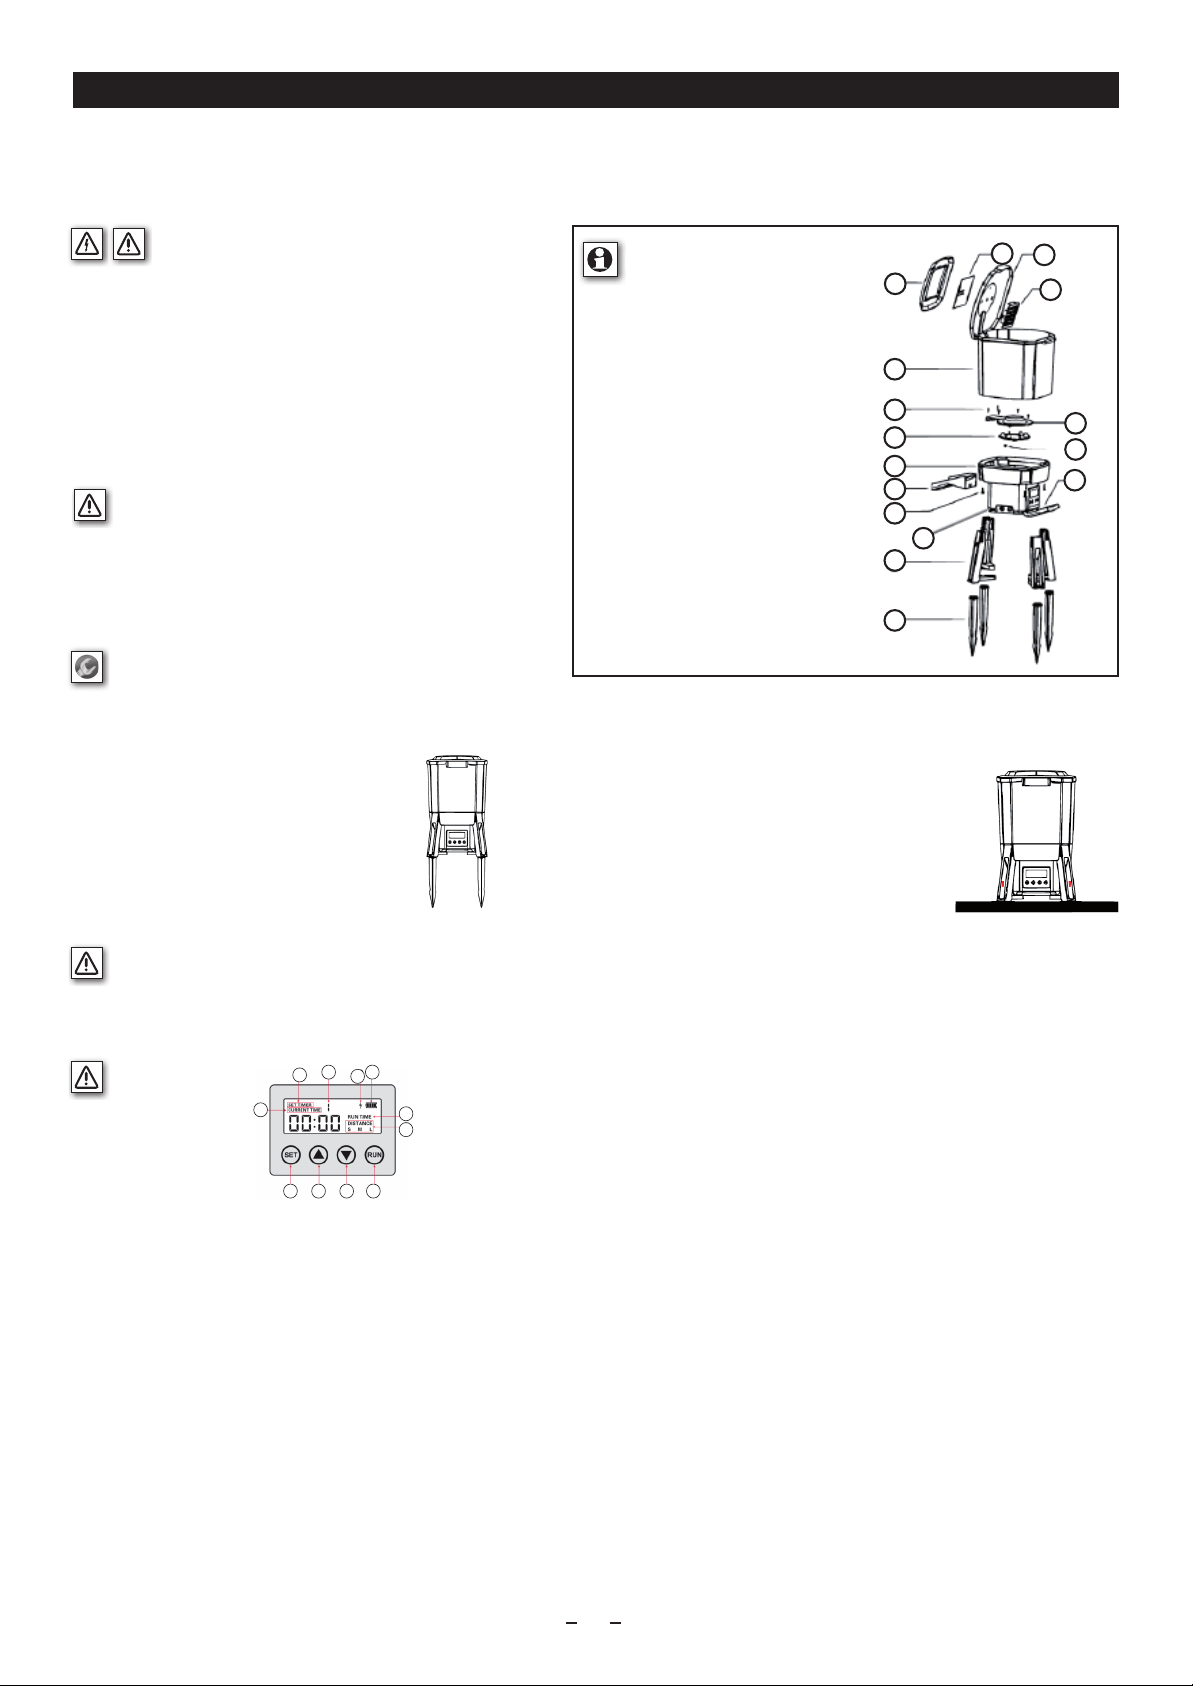
Pièces de l’appareil / Fourniture
Montage
Après avoir sorti le distributeur automatique solaire de nourriture de l’emballage, montez la glissière à nourriture (11) sur la partie inférieure du boîtier (10) en l’insérant dans le guide. À la n du guide, la glissière à
nourriture (11) s’enclenche automatiquement.
Pour le montage près du bassin, deux installations sont possibles :
1. Installation avec des piquets de xation dans le sol :
Enfoncez les piquets de xation dans le sol (16) fournis dans le sol
et xez-les aux pieds (15).
Assemblez les piquets de xation dans le sol (16) et les pieds (15)
en insérant les piquets de xation dans le guide des pieds.
Vissez ensuite les piquets de xation dans le sol aux pieds et
enfoncez le distributeur automatique solaire de nourriture dans
le sol avec les piquets.
Remplissage
Pour choisir la nourriture pour poissons adaptée renseignez-vous auprès de votre magasin d’aquariophilie. Nous conseillons de remplir le distributeur automatique solaire de nourriture avec de la nourriture pour
poissons ayant une granulométrie comprise entre 3 et 10 mm. Pour cela, ouvrez le couvercle du seau à nourriture (3) et versez la nourriture jusque juste en dessous du bord supérieur du seau à nourriture (5). An que
la nourriture reste bien sèche, nous conseillons de placer un sachet déshydratant dans le compartiment à sachet déshydratant (4). Sortez le compartiment à sachet déshydratant (4), placez-y un sachet déshydratant
adapté et remettez le compartiment à sachet déshydratant en place. Les dimensions maximales du sachet déshydratant sont : 75 x 75 x 15 mm.
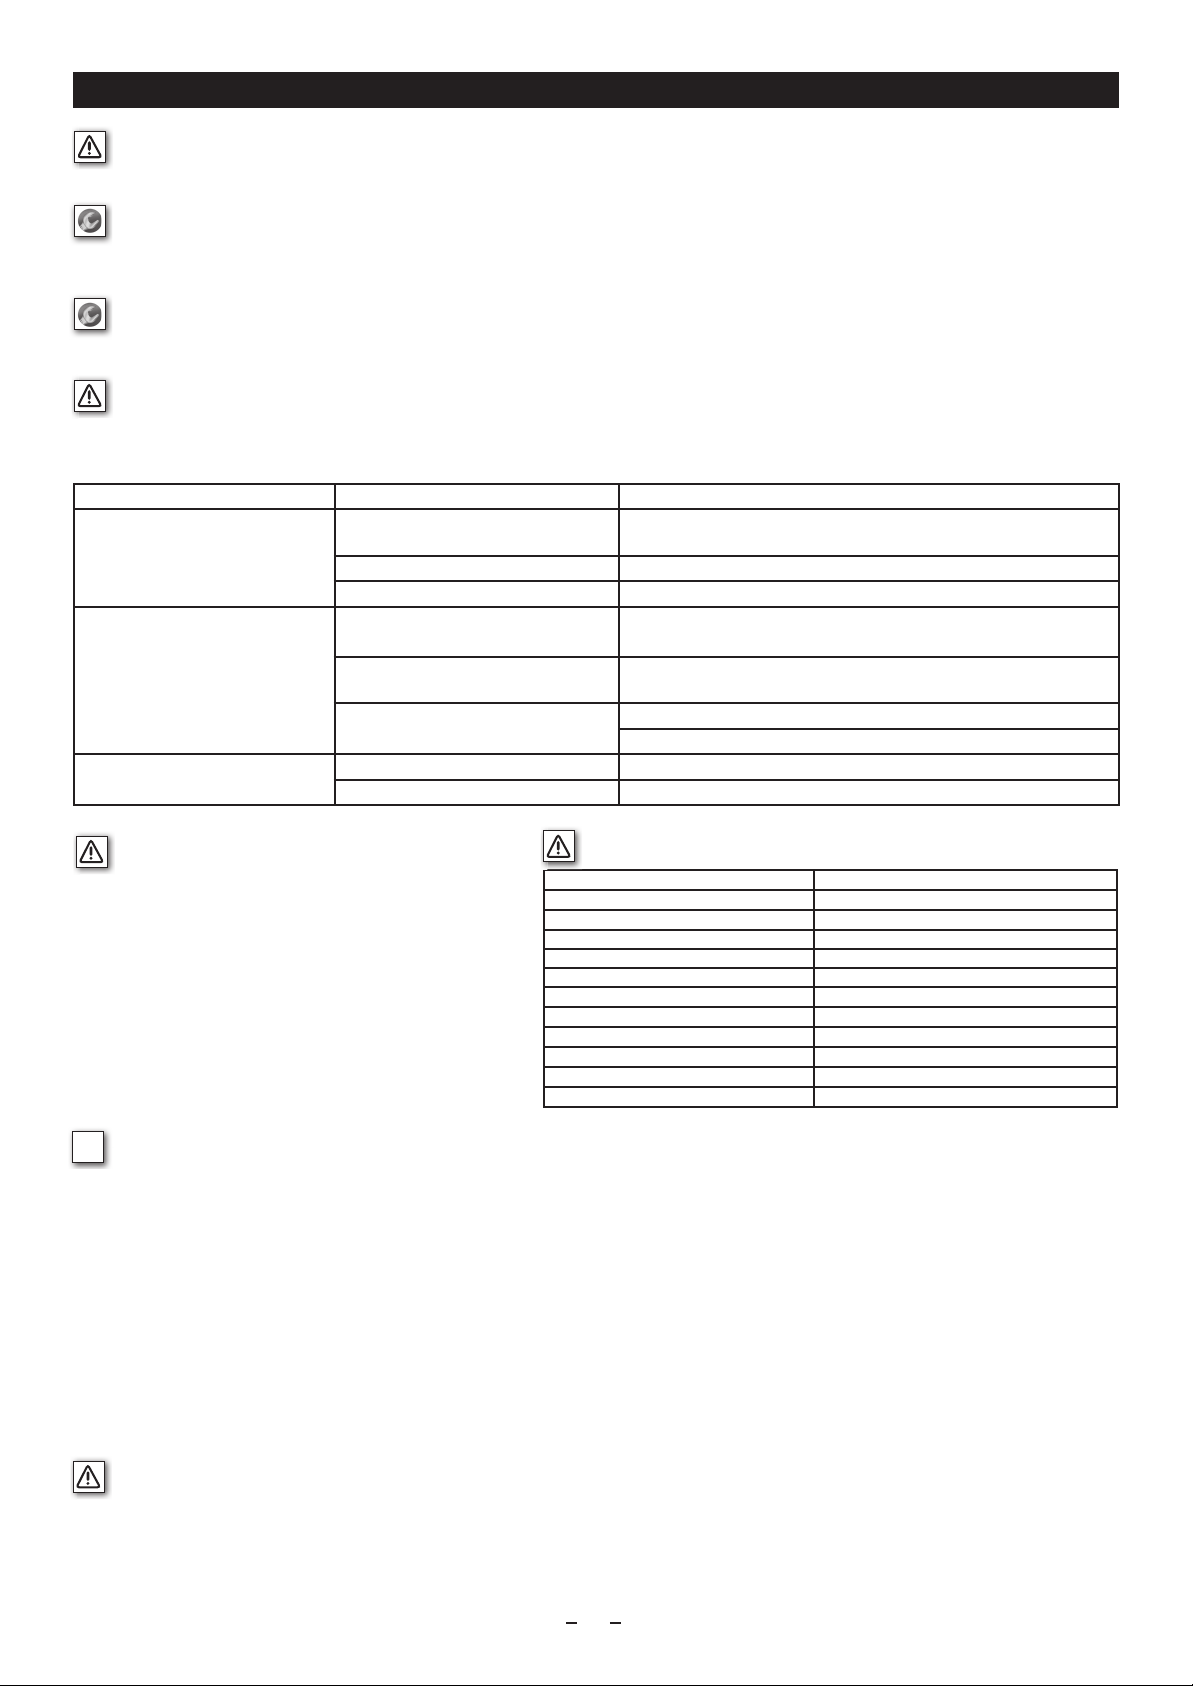
Contrôler le distributeur automatique solaire de nourriture et le matériel fourni
Risque de dommages
Si vous ouvrez l’emballage de manière imprudente avec un couteau aiguisé ou un autre objet
pointu, cela risque d’endommager le distributeur automatique solaire de nourriture. Sortez le dis-
tributeur automatique solaire de nourriture de l’emballage. Vériez si le distributeur automatique
solaire de nourriture ou les accessoires ne sont pas endommagés. Si c’est le cas, adressez-vous
immédiatement à votre revendeur.
1 Cache
2 Module solaire
3 Couvercle du seau à nourriture
4 Compartiment pour sachet déshydratant
5 Seau à nourriture
6 Vis 1
7 Cache de la roue d’alimentation
8 Roue d’alimentation
9 Vis 2
10 Partie inférieure du boîtier
11 Glissière à nourriture
12 Vis 3
13 Panneau de commande avec couvercle
14 Interrupteur
15 Pied
16 Piquet de xation dans le sol
Désignation
P
11
12
10
8
6
7
9
13
15
5
1
23
4
2. Installation sur une surface plane :
Pour les surfaces dures et planes, il est possible de xer les pieds au sol avec des
vis et le cas échéant des chevilles (non fournies). Pour cela, placez le distributeur
automatique solaire de nourriture sur la surface souhaitée et marquez les points de
xation en dessinant les points à percer à travers les trous des pieds (15). Mettez le
distributeur automatique solaire de nourriture de côté et percez les trous marqués
à la profondeur nécessaire. Montez les chevilles, placez le distributeur automatique
solaire de nourriture sur les trous et vissez les pieds (15) à l’aide des vis.
Mise en service
Réglages du distributeur automatique solaire de nourriture
Principe : mettez le distributeur automatique solaire de nourriture en marche en plaçant le bouton (14) sur la position « I » et en ouvrant le couvercle du panneau de commande (13). Si aucun bouton n’est actionné
durant 12 secondes, le champ de saisie s‘éteint. En actionnant à nouveau le bouton de sélection, vous accédez au champ de saisie souhaité.
Réglage de l’heure
Appuyez une fois sur le bouton de sélection (A) et réglez les heures à l’aide du bouton Augmenter (B) ou Diminuer (C). Actionner une nouvelle fois le bouton (A) vous permet d’accéder au champ de saisie des minutes
qui se règlent de la même façon.
Réglage de la distance d‘éjection
Appuyez 3 x sur le bouton de sélection (A) pour accéder au champ de saisie de la distance d‘éjection (E) et choisissez la distance souhaitée en appuyant sur le bouton Augmenter (B) ou Diminuer (C). Les valeurs
correspondent aux distances suivantes :
S : faible distance d’env. 1 m
M : distance moyenne d’env. 2 m
L : grande distance d’env. 3 m
Réglage de l’heure de nourrissage
Appuyez 4 x sur le bouton de sélection (A) pour accéder à l’achage de l’heure de nourrissage (J). Réglez l’heure souhaitée en sélectionnant d’abord l’heure à l’aide du bouton Augmenter (B) ou Diminuer (C) et en
appuyant ensuite sur le bouton de sélection (A) pour régler les minutes. Il s’agit du 1er niveau de remplissage (I), le chire 1 s’ache.
Réglage de la durée de nourrissage
Une fois l’heure de nourrissage réglée, appuyez à nouveau sur le bouton de sélection (A) pour accéder à la durée de nourrissage. L’achage de l’activité (F) apparaît et vous pouvez choisir une durée comprise entre 0
et 20 secondes, le réglage sur 0 seconde n’entraînant aucun nourrissage.
Réglage du niveau de nourrissage
Vous pouvez programmer jusqu’à 6 niveaux de nourrissage (I). Après avoir programmé un niveau de nourrissage (I), vous accédez au niveau de nourrissage (I) suivant en actionnant le bouton de sélection (A). Après le
6e niveau de nourrissage, vous revenez à l’achage de l’heure actuelle.
Nourrissage manuel
Si vous maintenez le bouton Démarrer (D) enfoncé durant 3 secondes, le nourrissage manuel démarre durant 3 secondes.
Désignation
A Bouton de sélection
B Bouton Augmenter
C Bouton Diminuer
D Démarrer
E Distance d‘éjection
F Achage de l’activité
G Indicateur du niveau de charge de la batterie
H Indicateur de recharge
I Niveau de nourrissage
J Heure de nourrissage
K Heure actuelle
14
16
A B C D
F
E
G
H
I
J
K
Manual KoiFeeder 2022.indd 219.12.22 09:51

3
Mode d‘emploi pour KoiFeeder Solar
4
Commande de pièces de rechange
Lors de la commande de pièces de rechange ou dans le cadre du dépannage confor-
mément au point « Dépannage », vous avez besoin des informations suivantes :
Dépannage
Ne réparez pas le distributeur automatique solaire de nourriture vous-même ! Si vous utilisez des pièces inadaptées pour la réparation, cela augmente fortement le risque de court-circuit. Certains problèmes sont
causés par des dysfonctionnements mineurs que vous pouvez vous-même régler. Pour cela, respectez les consignes suivantes en fonction du problème constaté.
Si le problème persiste, veuillez vous adresser au service après-vente et préparer les informations nécessaires conformément au point Commande de pièces de rechange.
Granulométrie de la nourriture pour poissons 3 – 10 mm
Angle de répartition 120° horizontal
Capacité du réservoir 6 litres
Nombre de nourrissages par jour 1– 6
Temps de recharge Max. 30 heures
Autonomie Jusqu’à max. 3 mois avec une batterie totalement rechargée
Indice de protection IPX4
Bloc d’alimentation (non fourni) 12V / 1,66 A / DC-Stecker 5,5x21
Portée 1 m (S); 2 m (M) 3 m (L)
Pile Batterie Li-Ion rechargeable
Puissance 1,2W
Dimensions 275 x 252 x 420 mm
Garantie
Nos produits sont soumis à des contrôles de qualité stricts. Si vous rencontrez malgré tout un problème avec cet appareil, nous en sommes désolés. Les conditions d’intervention de la garantie sont les suivantes :
1. Ces conditions de garantie sont exclusivement destinées aux consommateurs, c’est-à-dire aux personnes physiques qui n’utilisent pas ce produit à des ns professionnelles ou dans le cadre d’une activité
d’indépendant.
2. Notre garantie comprend la réparation des défauts matériels et de fabrication ainsi que l‘échange de l’appareil.
3. La garantie est valable au maximum 2 ans après la date d’achat.Toute intervention de la garantie au terme de la période de garantie est exclue.
4. Lorsque l’article répond aux conditions de garantie, il est réparé gratuitement ou remplacé gratuitement par le même article ou par un article comparable.
La réparation ou l’échange de l’appareil n’entraîne ni une prolongation de la durée de la garantie, ni une nouvelle période de garantie pour l’appareil ou pour les pièces de rechange installées.
Sont exclus de notre garantie :
- Les dommages sur l’appareil causés par le non-respect du mode d’emploi (comme le remplacement par une batterie d’une autre marque), le non-respect des consignes de maintenance et de sécurité ou
l’exposition de l’appareil à des conditions anormales ou encore à un manque d’entretien.
- Les dommages sur l’appareil causés par une utilisation abusive ou non conforme (comme la surcharge de l’appareil ou l’utilisation d’outils ou d’accessoires non autorisés), la pénétration de corps étrangers
dans l’appareil (comme du sable, des pierres ou de la poussière), l’exercice de la force ou des interventions extérieures (comme des dommages dus à une chute).
- Les dommages sur l’appareil ou sur des pièces de l’appareil causés par une usure normale, habituelle ou naturelle.
2
En cas de non-utilisation
Si vous n’utilisez par le distributeur automatique solaire de nourriture pendant un certain temps, l’interrupteur (14) doit être placé sur O (« 0 ») pour que la batterie ne se décharge pas.
Maintenance et entretien
Nettoyage du boîtier
Utilisez uniquement de l’eau et un chion doux. Veillez à ne pas exercer trop de pression sur le boîtier, car cela pourrait le casser. An de permettre au module solaire de fonctionner à pleine puissance, nettoyez le
boîtier, et plus particulièrement le cache (1), de temps en temps ou lorsque de la poussière ou de la saleté se sont accumulées dessus.
Problème Cause Solution
L’écran est éteint
Batterie déchargée Rechargez la batterie en exposant le distributeur automatique solaire de nourriture au soleil durant
env. une heure.
Interrupteur principal éteint Placez l’interrupteur (14) sur la position I
Câble de raccordement débranché Desserrez les vis (12), xez le câble de raccordement et resserrez les vis.
L'écran est allumé, mais le nourrissage ne se met
pas en marche
Seau à nourriture vide Remplissez le seau à nourriture avec de la nourriture adaptée
Roue d’alimentation coincée Retirez les vis des pieds (15) et les vis (12), sortez le seau à nourriture (5), vériez si la roue
d’alimentation n’est pas bloquée et retirez les éventuels corps étrangers.
Entrée bloquée Retirez la nourriture et vériez si la nourriture est de la bonne taille.
Retirez la nourriture agglutinée.
La roue d’alimentation tourne, mais elle n'éjecte
pas de nourriture
Entrée bloquée Retirez la nourriture agglutinée de manière à ce que la nourriture puisse s'écouler
Pas susamment de nourriture dans le réservoir Remplissez le seau à nourriture avec susamment de nourriture
1. Nom de l’article
2. Référence de l’appareil
3. Copie de la facture
4. Description du dysfonctionnement
Caractéristiques techniques
Réparations
Si le boîtier ou le module solaire sont endommagés, il n’est pas possible de les réparer. Vous ne pouvez donc plus utiliser le produit concerné et vous devez l‘éliminer de manière conforme.
Informations pour le retrait en toute sécurité des piles ou des batteries
1. Retirez les 4 vis des pieds (15) et mettez-les de côté
2. Retirez les 4 vis (12) de la partie inférieure du boîtier (10) là où se trouve l’autocollant
3. Ouvrez la partie inférieure du boîtier (10)
4. Débranchez la batterie de la platine et sortez la batterie
5. La batterie et l’appareil peuvent maintenant être éliminés séparément
Manual KoiFeeder 2022.indd 319.12.22 09:51

Élimination des appareils usagés
Uniquement pour les pays de l’UE. Ne jetez pas les appareils électroniques et électriques dans les ordures ménagères ! Le propriétaire d‘un appareil électrique ou électronique usagé peut le rapporter
dans le point de collecte de sa commune ou de son quartier qui se chargera du recyclage.
La déclaration de conformité UE peut être demandée à l’adresse suivante :
www.outsideliving.com
Collecte séparée des appareils usagés:
Les appareils électroniques et électriques qui doivent être éliminés sont appelés des appareils usagés. Les propriétaires d’appareils usagés sont tenus de les déposer dans un point de collecte an qu’ils soient
triés et recyclés. Les appareils usagés ne peuvent pas être jetés dans les ordures ménagères, mais doivent être rapportés dans des points de collecte et de reprise spéciaux. Possibilité de reprise des appareils
usagés : Les propriétaires privés d’appareils usagés peuvent les déposer dans les points de collecte du service public de collecte des déchets ou dans les points de reprise mis en place par le fabricant ou les
revendeurs conformément à la loi sur l‘élimination des appareils électroniques et électriques ou directement chez le fabricant.
Élimination des emballages:
Éliminez l’emballage en triant les matériaux. Jetez le papier et le carton avec les vieux papiers et les lms plastiques et les sachets avec les déchets recyclables.
Élimination des piles et des batteries :
Type de pile Système chimique
Batterie Lithium-ion (Li-ion)
Les piles et les batteries ne peuvent pas être jetées dans les ordures ménagères. Les consommateurs sont légalement tenus de déposer les piles et les batteries dans un point de
collecte.
Les piles et les batteries peuvent être déposées gratuitement dans un point de collecte de votre commune/quartier ou dans les magasins an d’être éliminées de manière
écologique et de permettre le recyclage des matières premières précieuses qu’elles contiennent. En cas d‘élimination non conforme, des substances toxiques peuvent polluer
l’environnement et aecter la santé des hommes, des animaux et des plantes.
Les piles et les batteries contenues dans les appareils électroniques et électriques doivent si possible être éliminées séparément. Les piles et les batteries doivent être déchar-
gées avant d’être déposées dans un point de collecte. Pour les piles et les batteries au lithium, décollez les pôles avant de les éliminer an d‘éviter un court-circuit extérieur. Un
court-circuit peut entraîner un incendie ou une explosion.
Mode d‘emploi pour KoiFeeder Solar
4
4
Manual KoiFeeder 2022.indd 4 19.12.22 09:51

Bedienungsanleitung für KoiFeeder Solar
2
Sehr geehrter Kunde,
sehr geehrte Kundin,
Diese Bedienungsanleitung enthält wichtige Informationen zur Inbetriebnahme und Benutzung. Lesen Sie die Bedienungsanleitung sorgfältig durch, bevor Sie den Solar Futterautomaten verwenden. Dies gilt
insbesondere für die Sicherheitshinweise. Andernfalls können Sie sich verletzen, oder den Solar Futterautomaten beschädigen. Bewahren Sie die Bedienungsanleitung für die weitere Nutzung auf.Wenn Sie den
Solar Futterautomaten an Dritte weitergeben, händigen Sie unbedingt auch diese Bedienungsanleitung mit aus. Diese Bedienungsanleitung kann auch als PDF-Datei von unserer Internetseite www.outsideliving.
com heruntergeladen werden.
Sicherheitsanweisung
Dieses Gerät kann von Kindern ab 8 Jahren und darüber, sowie von Personen mit verringerten phy-
sischen, sensorischen oder mentalen Fähigkeiten oder Mangel an Erfahrung und Wissen benutzt
werden, wenn sie beaufsichtigt oder bezüglich des sicheren Gebrauchs des Gerätes unterwiesen
wurden und die daraus resultierenden Gefahren verstehen.
Der Solar Futterautomat ist ausschließlich für den privaten Gebrauch bestimmt und nicht für ge-
werbliche Anwendungen geeignet. Verwenden Sie den Solar Futterautomaten nur wie in dieser Be-
dienungsanleitung beschrieben. Jede andereVerwendung gilt als nicht bestimmungsgemäß und
kann zu Sach-/ oder Personenschäden führen. Der Solar Futterautomat ist kein Kinderspielzeug.
Der Hersteller oder Händler übernimmt keine Haftung für Schäden, die durch nicht bestimmungs-
gemäßen oder falschen Gebrauch entstanden sind.
Achten Sie darauf, dass der Solar Futterautomat auf einem ebenen und stabilen Untergrund steht
und nicht insWasser fallen kann.
Geräteteile/ Lieferumfang
Montage
Nach dem Sie den Solarfutterautomaten aus der Verpackung entnommen haben, montieren Sie die Futterrutsche (11) am Gehäuseunterteil (10), indem Sie diese in die Führung hineinscheiben. Am Ende der
Führung rastet die Futterrutsche (11) automatisch ein.
Zur Montage amTeich bieten sich zwei verschiedene Installationen an:
1. Installation mit Erdankern:
Stecken Sie die im Lieferumfang enthaltenen Erdanker (16)
in den Boden und verbinden Sie diese mit dem Standfüßen (15).
Verbinden Sie die im Lieferumfang enthaltenen Erdanker (16)
mit den Standfüßen (15), indem Sie die Erdanker in die Führung
der Standfüße hineinstecken. Anschließend verschrauben Sie die
Erdanker mit den Standfüßen und drücken den Solar Futter-
automaten zusammen mit den Erdankern in den Boden.
Befüllung
Zur Auswahl des geeigneten Fischfutters erkundigen Sie sich bei einem Aquaristik Fachhandel. Wir empfehlen ein entsprechendes Fischfutter mit einer Korngröße von 3 – 10 mm zur Befüllung des Solar Futter-
automaten. Önen Sie hierzu die Futtereimerabdeckung (3) und Füllen Sie das Futtermittel bis maximal kurz unter die Oberkante des Futtereimers (5). Um ein langfristiges Trockenhalten des Futtermittels zu
gewährleisten, empfehlen wir Ihnen einTrockenmittel in denTrockenmittelträger (4) hineinzulegen. Entnehmen Sie denTrockenmittelträger (4), legen ein geeignetesTrockenmittel hinein und stecken Sie den
Trockenmittelträger erneut in seine Vorrichtung. Die maximale Größe desTrockenmittels beträgt: 75 x 75 x 15 mm.
Solar Futterautomat und Lieferumfang prüfen
Beschädigungsgefahr
Wenn Sie die Verpackung unvorsichtig mit einem scharfen Messer oder einem anderen spitzen
Gegenstand önen, kann der Solar Futterautomat oder das Zubehör beschädigt werden. Nehmen
Sie den Solar Futterautomaten aus der Verpackung. Kontrollieren Sie, ob der Solar Futterautomat
oder das Zubehör Schäden aufweisen. Sollte dies der Fall sein, wenden Sie sich umgehend an den
Händler.
1 Abdeckung
2 Solarmodul
3 Futtereimerabdeckung
4 Trockenmittelträger
5 Futtereimer
6 Schraube 1
7 Förderradabdeckung
8 Förderrad
9 Schraube 2
10 Gehäuseunterteil
11 Futterrutsche
12 Schraube 3
13 Bedienfeld mit Abdeckung
14 Schalter
15 Standfuß
16 Erdanker
Bezeichnung
G
11
12
10
8
6
7
9
13
15
5
1
23
4
2. Installation auf ebenem Untergrund
Bei hartem und ebenem Untergrund bietet sich an, die Standfüße mit Schrauben
und ggf. Dübeln (nicht im Lieferumfang enthalten) mit dem Untergrund zu verbin-
den. Stellen Sie dazu den Solar Futterautomaten auf die entsprechende Fläche und
markieren Sie die Befestigungspunkte durch Anzeichnen von Bohrpunkten durch die
Löcher der Standfüße (15). Stellen Sie den Solar Futterautomaten zur Seite und boh-
ren Sie die angezeichneten Markierungen auf die entsprechendeTiefe. Montieren Sie
Dübel, stellen den Solar Futterautomaten auf die Bohrlöcher und verschrauben die
Standfüße (15) mit den Schrauben.
Inbetriebnahme
Einstellungen des Solar Futterautomaten
Grundlegen: Schalten Sie den Solar Futterautomaten ein, in dem Sie den Schalter (14) auf die Stellung„I“ stellen und die Abdeckung des Bedienfeldes (13) önen. Werden 12 Sekunden lang keineTasten betätigt,
wird die Eingabe beendet. Durch erneutes Betätigen der Auswahl-Taste gelangen Sie zur gewünschten Eingabe.
Einstellen der Uhrzeit
Drücken Sie einmalig die Auswahl-Taste (A) und stellen die Stunden mit der Hoch (B)- oder Runter (C)Taste ein. Durch erneutes Betätigen der Auswahl-Taste (A) gelangen Sie in die Minuten Anzeige, die sich in
gleicher Art einstellen können.
Einstellen der Wurfweite
Drücken Sie 3x die Auswahl-Taste (A) um zur Auswahl der Wurfweite (E) und wählen die Reichweite durch Drücken der Hoch- (B) oder Runter-(C) Taste. Dabei entsprechen die Angaben folgender Reichweiten:
S: Geringe Reichweite von ca. 1m
M: Mittlere Reichweite von ca. 2m
L: Große Reichweite von ca. 3m
Einstellen der Fütterungszeit
Drücken Sie 4x die Auswahl-Taste (A) um zur Anzeige der Fütterungszeit (J) zu gelangen. Stellen Sie die gewünschte Uhrzeit ein, in dem Sie zunächst die Stunden mit der Hoch- (B) oder Runter- (C) Taste auswählen
und nach Betätigen der Auswahl-Taste (A) die jeweiligen Minuten eingeben. Dies ist die 1. Fütterungsstufe (I), es wird die Zier 1 angezeigt.
Einstellen der Fütterungsdauer
Haben Sie die Einstellung der Fütterungszeit durchgeführt, drücken Sie erneut die Auswahl-Taste (A) um zur Fütterungsdauer zu gelangen. Es erscheint die Aktivitätsangabe (F) und Ihnen stehen 0-20 Sekunden zur
Auswahl, wobei bei 0 Sekunden keine Fütterung beginnt.
Einstellen der Fütterungsstufe
Sie können bis zu 6 Fütterungsstufen (I) programmieren. Nachdem Sie eine Fütterungsstufe (I) programmiert haben, kommen Sie durch Betätigen der Auswahl-Taste (A) zur nachfolgenden Fütterungsstufe (I), bis
Sie nach der 6. Stufe zurück zur aktuellen Uhrzeit gelangen.
Manuelle Fütterung
Wenn Sie die Start-Taste (D) für 3 Sekunden gedrückt halten, startet die manuelle Fütterung für ebenfalls 3 Sekunden.
Bezeichnung
A Auswahl-Taste
B Hoch-Taste
C Runter-Taste
D Start
E Wurfweite
F Aktivitätsangabe
G Batterie-Ladestandsanzeige
H Ladeanzeige
I Fütterungsstufe
J Fütterungszeit
K Aktuelle Zeit
14
16
A B C D
F
E
G
H
I
J
K
5
Manual KoiFeeder 2022.indd 5 19.12.22 09:51

6
Ersatzteilbestellung
Bei der Ersatzteilbestellung, oder im Zuge der Problembeseitigung
gemäß dem Punkt„Problembehandlung“, benötigen wir folgende Informationen:
Bedienungsanleitung für KoiFeeder Solar
2
Problembehandlung
Reparieren Sie den Solar Futterautomaten nicht selbst!Wenn Sie für die Reparatur ungeeigneteTeile verwenden, kann sich die Gefahr eines elektrischen Kurzschlusses stark erhöhen. Einige Probleme werden
möglicherweise durch geringfügige Störungen verursacht, die Sie selbst beheben können. Befolgen Sie dazu die nachfolgenden Anweisungen gemäß dem jeweiligen Problem.
Sollte sich das Problem damit nicht beheben lassen, wenden Sie sich bitte an den Kundendienst und halten Sie die benötigten Informationen gemäß dem Punkt Ersatzteilbestellung.
Korngröße des Fischfutters 3 – 10 mm
Verteilwinkel 120 ° horizontal
Tankgröße 6 Liter
Fütterungsanzahl pro Tag 1 – 6
Auadedauer Max. 30 Stunden
Betriebsdauer Bis max. 3 Monate bei völlig aufgeladener Batterie
Schutzart IPX4
Netzteil (nicht im Lieferumfang enthalten) 12V / 1,66 A / DC-Stecker 5,5x21
Reichweite 1 m (S); 2 m (M) 3 m (L)
Batterie Wiederauadbarer Lithium-Ionen Akkumulator
Leistung 1,2W
Abmessungen 275 x 252 x 420 mm
Garantie
Unsere Produkte unterliegen einer strengen Qualitätskontrolle. Sollte dieses Gerät dennoch einmal nicht einwandfrei funktionieren, bedauern wir dies sehr. Für die Geltendmachung von Garantieansprüchen gilt
folgendes:
1. Diese Garantiebedingungen richten sich ausschließlich anVerbraucher, d.h. natürliche Personen, die dieses Produkt weder im Rahmen ihrer gewerblichen noch anderen selbstständigenTätigkeit nutzen wollen.
2. Unsere Garantieleistung erstreckt sich über die Behebung von Material- und Herstellungsfehler bzw. den Austausch des Gerätes.
3. Garantieansprüche gelten maximal 2 Jahre ab Kaufdatum. Die Geltendmachung von Garantieansprüchen nach Ablauf des Garantiezeitraumes ist ausgeschlossen.
4.Wenn der Artikel unter die Garantiebestimmungen fällt, wird er kostenlos repariert oder kostenlos durch einen gleichen oder nach unserer Wahl einen vergleichbaren Artikel ersetzt.
Die Reparatur oder der Austausch des Gerätes führt weder zu einerVerlängerung der Garantiezeit, noch wird eine neue Garantiezeit durch diese Leistung für das Gerät oder für etwaige eingebaute Ersatzteile in Gang
gesetzt.Von unserer Garantie ausgenommen sind:
- Schäden am Gerät, die durch Nichtbeachtung der Gebrauchsanleitung, Nichtbeachtung derWartungs- und Sicherheitsbestimmungen oder durch Aussetzen des Gerätes an anomale Umweltbedingungen oder
durch mangelnde Pege entstanden sind.
- Schäden am Gerät, die durch missbräuchliche oder unsachgemäße Anwendung (wie z.B. Überlastung des Gerätes oder Verwendung von nicht zugelassenen Einsatzwerkzeugen oder Zubehör), Eindringen von
Fremdkörpern in das Gerät (wie z.B. Sand, Steine oder Staub), Gewaltanwendung oder Fremdeinwirkungen (wie z.B. Schäden durch Herunterfallen) entstanden sind.
- Schäden am Gerät oder anTeilen des Gerätes, die auf einen gebrauchsgemäßen, üblichen oder sonstigen natürlichen Verschleiß zurückzuführen sind.
2
Bei Nichtverwendung
Wenn Sie den Solar Futterautomaten über einen längeren Zeitraum nicht verwenden, sollte der Schalter (14) auf Aus („0“) gestellt werden, damit die Batterie sich nicht entlädt
Wartung und Pege
Reinigung des Gehäuses
Verwenden Sie nurWasser und ein weiches Tuch. Achten Sie darauf, nicht zu stark Druck auf das Gehäuse auszuwirken, da dieses sonst zerstört werden kann. Reinigen Sie das Gehäuse, insbesondere aber die
Abdeckung (1) von Zeit zu Zeit, oder wenn sich Staub oder Dreck abgelagert hat, um die volle Leistung des Solarmoduls zu ermöglichen.
Problem Ursache Lösung
Die Anzeige ist aus
Batterie leer Laden Sie die Batterie auf, indem Sie den Futterautomaten für ca. eine Stunde der direkten Sonnen-
einstrahlung aussetzen.
Hauptschalter aus Betätigen Sie den Schalter (14) auf die Stellung I
Verbindungskabel gelöst Lösen Sie die Schrauben (12) xieren Sie dieVerbindungskabel und ziehen die Schrauben erneut an.
Display ist an, aber Fütterung erfolgt nicht
Futtereimer leer Befüllen Sie den Futtereimer mit geeignetem Futter
Laufrad klemmt Entfernen Sie die Schrauben der Standfüße (15) und die Schrauben (12), entnehmen den Futterei-
mer (5), prüfen das Laufrad auf Blockagen und entfernen Fremdkörper
Einlass blockiert Entfernen Sie das Futter und prüfen Sie, dass das Futter die richtige Größe hat.
Entfernen Sie verklumptes Futter
Laufrad dreht, aber es wirft kein Futter aus Einlass blockiert Entfernen Sie verklumptes Futter, so dass Futter nachlaufen kann
Nicht genügend Futter im Behälter Füllen Sie den Futtereimer mit ausreichend Futter
1. Artikelname
2. Artikelnummer des Gerätes
3. Rechnungskopie
4. Fehlerbeschreibung
Technische Daten
Reparaturen
Wenn das Gehäuse oder Solarmodul beschädigt sind, ist keine Reparatur möglich. Sie dürfen das betroeneTeil dann nicht weiterverwenden und müssen es sachgemäß entsorgen.
Angaben zur sicheren Entnahme der Batterien oder der Akkumulatoren
1. Entfernen Sie die 4 Schrauben der Standfüße (15) und legen diese zur Seite
2. Entfernen Sie die 4 Schrauben (12) des Gehäuseunterteils (10), dort, wo sich der Sticker bendet
3. Önen Sie das Gehäuseunterteil (10)
4. Lösen Sie dieVerbindung zwischen der Batterie und der Platine und entnehmen die Batterie
5. Der Akkumulator und das Gerät können jetzt getrennt entsorgt werden
Manual KoiFeeder 2022.indd 6 19.12.22 09:51

7
Bedienungsanleitung für KoiFeeder Solar
2
Entsorgung von Altgeräten
Nur für EU-Länger. Werfen Sie Elektroartikel nicht in den Hausmüll! Der Eigentümer des Elektrogerätes kann zur Entsorgung des Altgerätes diesen bei z.B. einer Sammelstelle seiner Gemeinde/ Stadt-
teils abgeben, die sich der fachgerechten Verwertung annehmen.
Die EU-Konformitätserklärung kann bei folgender Adresse angefordert werden:
www.outsideliving.com
Getrennte Erfassung von Altgeräten:
Elektro- und Elektronikgeräte, die zu Abfall geworden sind, werden als Altgeräte bezeichnet. Besitzer von Altgeräten haben diese einer vom unsortierten Siedlungsabfall getrennten Erfassung zuzuführen.
Altgeräte gehören insbesondere nicht in den Hausmüll, sondern in spezielle Sammel- und Rückgabesysteme. Möglichkeiten der Rückgabe von Altgeräten: Besitzer von Altgeräten aus privaten Haushalten
können diese bei den Sammelstellen der öentlich-rechtlichen Entsorgungsträger oder bei den von Herstellern oderVertreibern im Sinne des ElektroG eingerichteten Rücknahmestellen, bzw. beim Hersteller
Entsorgung von Verpackungen:
Entsorgen Sie dieVerpackung sortenrein. Geben Sie Pappe und Karton zu Altpapier, Folien und Beutel in dieWertstosammlung
Entsorgung von Batterien und Akkus:
Batterietyp Chemisches System
Akkumulator Lithium-Ionen (Li-ion)
Batterien und Akkus dürfen nicht zusammen mit dem Hausmüll entsorgt werden. Verbraucher sind gesetzlich dazu verpichtet, Batterien und Akkus einer getrennten Samm-
lung zuzuführen.
Batterien und Akkus können unentgeltlich bei einer Sammelstelle Ihrer Gemeinde/Ihres Stadtteils oder im Handel abgegeben werden, damit sie einer umweltschonenden
Entsorgung sowie einerWiedergewinnung von wertvollen Rohstoen zugeführt werden können. Bei einer unsachgemäßen Entsorgung können giftige Inhaltsstoe in die
Umwelt gelangen, die gesundheitsschädigendeWirkungen auf Menschen,Tiere und Panzen haben.
In Elektrogeräten enthaltene Batterien und Akkus müssen nach Möglichkeit getrennt von ihnen entsorgt werden. Geben Sie Batterien und Akkus nur in entladenem Zustand ab.
Kleben Sie bei lithiumhaltigen Batterien und Akkus vor der Entsorgung die Pole ab, um einen äußeren Kurzschluss zu vermeiden. Ein Kurzschluss kann zu einem Brand oder
einer Explosion führen.
Manual KoiFeeder 2022.indd 7 19.12.22 09:51

8
Gebruikershandleiding voor KoiFeeder Solar
3
Geachte klant,
Deze gebruiksaanwijzing bevat belangrijke informatie over de eerste ingebruikneming en het verdere gebruik. Leest u de gebruiksaanwijzing zorgvuldig door voordat u de voederautomaat op zonne-energie in
gebruik neemt. Dit geldt met name voor de veiligheidsinstructies. U zou zich anders kunnen bezeren of de voederautomaat raakt dan misschien beschadigd. Bewaar deze gebruiksaanwijzing goed, zodat u later
nog dingen kunt opzoeken. Wanneer u de voederautomaat op zonne-energie aan iemand anders verkoopt of afstaat, moet u daar deze gebruiksaanwijzing beslist ook bij doen. Deze gebruiksaanwijzing kan ook als
PDF-bestand van onze website www.outsideliving.com worden gedownload.
Veiligheidsinstructie
Dit apparaat kan worden gebruikt door kinderen vanaf 8 jaar, door mensen met verminderde
fysieke, zintuiglijke of geestelijk vermogens of door personen die niet over de hiervoor benodigde
ervaring en kennis beschikken, mits hierbij op al deze mensen toezicht wordt gehouden. Bovendien
moet hen dan worden uitgelegd hoe dit apparaat veilig te gebruiken is en wat daarbij de mogelijke
gevaren zijn.
De voederautomaat op zonne-energie is uitsluitend voor privé-gebruik en zeker niet voor commer-
ciële doeleinden bedoeld. Gebruik de voederautomaat op zonne-energie alleen zoals beschreven in
deze gebruiksaanwijzing. Elk ander gebruik wordt gezien als oneigenlijk en kan tot beschadiging
en zelfs tot persoonlijk letsel leiden. De voederautomaat op zonne-energie is geen speelgoed
voor kinderen. De fabrikant of de verkoper aanvaardt geen aansprakelijkheid voor schade die door
oneigenlijk of verkeerd gebruik is ontstaan.
Zorg ervoor dat de voederautomaat op een vlakke en stabiele ondergrond staat en niet in het water
kan vallen.
Componenten/Inhoud van de levering
Montage
Nadat u de voederautomaat uit de verpakking heeft gehaald, moet u de voergoot (11) aansluiten op het onderste gedeelte van de behuizing (10), door de goot door de geleiding te schuiven. Aan het eind van de
geleiding klikt de voergoot (11) vanzelf vast.
Installeren van de voederautomaat bij de vijver kan op twee verschillende manieren:
1. Installeren met grondankers:
Steek de meegeleverde grondankers (16) in de grond en verbindt ze
met de steunpoot (15).
Verbinden van de meegeleverde grondankers (16) met de steunpoten
(15) gaat door de grondankers in de geleiding daarvan te duwen.
Vervolgens schroeft u de grondankers vast aan de steunpoten en
duwt u de voederautomaat samen met de grondankers de grond in.
Vullen
Voor het vinden van geschikt visvoer kunt u het beste te rade gaan bij een aquariumhandel. Zelf adviseren wij voor het vullen van de voederautomaat visvoer met een korrelgrootte van 3-10 mm. Open daarvoor de
afdekking voor voederemmer (3) en doe er zoveel visvoer in dat het tot vlak onder de bovenste rand (5) van de voederemmer komt. Om er zeker van te zijn dat het voermiddel lang droog blijft, adviseren wij u een
droogmiddel in de daarvoor bedoelde houder (4) te doen. Haal de houder voor droogmiddel (4) uit de voederautomaat, leg er een geschikt droogmiddel in en schuif de houder dan weer in het apparaat. Het formaat
van het droogmiddel is maximaal: 75 x 75 x 15 mm.
De voederautomaat en de inhoud van de verpakking controleren
Gevaar voor beschadiging
Wanneer u de verpakking onvoorzichtig openmaakt met een scherp mes of een ander puntig
voorwerp, kan de voederautomaat of een van de toebehoren beschadigd raken. Haal de
voederautomaat uit de verpakking. Controleer of de voederautomaat of een van de toebehoren
beschadigingen vertoont. Mocht dit het geval zijn, neemt u dan direct contact op met de winkel
waar u het gekocht hebt.
1 Afdekking
2 Zonnepaneel
3 Afdekking voor voederemmer
4 Houder voor droogmiddel
5 Voederemmer
6 Schroef 1
7 Afdekking voor schoepenrad
8 Schoepenrad
9 Schroef 2
10 Onderste gedeelte behuizing
11 Voergoot
12 Schroef 3
13 Bedieningspaneel met klep
14 Schakelaar
15 Steunpoot
16 Grondanker
Aanduiding
C
11
12
10
8
6
7
9
13
15
5
1
23
4
2. Installeren op een vlakke ondergrond
Bij een harde en vlakke ondergrond kunnen de steunpoten met schroeven en
eventueel ook duvels (niet meegeleverd) uitstekend aan de ondergrond worden
vastgemaakt. Positioneer de voederautomaat daarvoor op een geschikte plek en
markeer de bevestigingspunten door de boorpunten te markeren door de gaten
van de steunpoten (15) heen. Zet de voederautomaat even opzij en boor op de
gemarkeerde punten een gat van de vereiste diepte. Monteer de duvels, positioneer
de voederautomaat boven de boorgaten en zet de steunpoten (15) met de schroeven
vast.
Inbedrijfstelling
Instellingen voederautomaat
Basisinstelling: schakel de voederautomaat in door de schakelaar (14) op de stand„I“ te zetten en de klep van het bedieningspaneel (13) open te zetten. Als er 12 seconden lang geen toets wordt bediend, wordt de
invoer beëindigd. Door de selectietoets opnieuw aan te klikken komt u bij de gewenste invoer.
Tijd instellen
Druk één keer op de selectietoets (A) en stel dan de uren in met de toets omhoog (B) of omlaag (C). Door de selectietoets (A) opnieuw aan te klikken komt u bij de weergave van het aantal minuten, die u op dezelfde
manier kunt instellen.
Werpafstand instellen
Druk 3x op de selectietoets (A) om de werpafstand te selecteren, door het indrukken van de toets omhoog (B) of omlaag (C). De weergegeven waarden staan voor de volgende afstanden:
S: geringe afstand van ca. 1 m
M: gemiddelde afstand van ca. 2 m
L: grote afstand van ca. 3 m
Voedertijd instellen
Druk vier keer op de selectietoets (A) en stel dan de voedertijd (J) in met de toets omhoog (B) of omlaag (C). Stel het gewenste tijdstip in, door eerst de uren te selecteren met de toets omhoog (B) of omlaag (C) en
daarna door het aanklikken van selectietoets (A) de minuten in te stellen. Dit is het eerste voederniveau (I), dat wordt weer gegeven onder het cijfer 1.
Duur van het voederen instellen
Nadat u de voedertijd heeft ingesteld, drukt u op de selectietoets (A) om terecht te komen bij de duur van het voederen. De weergave van de activiteit (F) verschijnt en u kunt kiezen uit 0 tot 20 seconden, waarbij er
op de stand 0 seconden niet wordt gevoederd.
Instellen voederniveau
U kunt zes voederniveaus (I) inprogrammeren. Nadat u een voederniveau (I) heeft geprogrammeerd, komt u door te drukken op selectietoets (A) bij het eerstvolgende voederniveau (I), tot u na het zesde niveau weer
teruggaat naar het huidige tijdstip.
Handmatig voederen
Wanneer u de starttoets (D) 3 seconden lang ingedrukt houdt, start het handmatig voederen dat dan eveneens 3 seconden duurt.
Aanduiding
A Selectietoets
B Toets omhoog
C Toets omlaag
D Start
E Werpafstand
F Weergave activiteit
G Weergave laadtoestand accu
H Weergave laadtoestand
I Voederniveau
J Voedertijd
K Huidige tijd
14
16
A B C D
F
E
G
H
I
J
K
Manual KoiFeeder 2022.indd 819.12.22 09:51

9
Gebruikershandleiding voor KoiFeeder Solar
3
Bestellen van vervangende onderdelen
Bij het bestellen van vervangende onderdelen of vanwege het oplossen van een
probleem zoals beschreven bij„Probleemoplossing“ hebben wij de volgende
informatie nodig:
Probleemoplossing
Ga de voederautomaat niet zelf proberen te repareren!Wanneer u bij het repareren onderdelen gebruikt die in feite ongeschikt zijn, wordt het gevaar voor kortsluiting alleen maar groter. Er kunnen zich soms wat
problemen voordoen die mogelijk worden veroorzaakt door kleine storingen die u zelf kunt verhelpen. Volgt u daartoe dan de volgende instructies behorend bij het desbetreende probleem.
Mocht een en ander niet leiden tot een oplossing van het probleem, neemt u dan contact op met de klantenservice en zorgt u s.v.p. dat u de daarvoor benodigde informatie bij de hand houdt, zoals aangegeven bij
de informatie over het bestellen van vervangende onderdelen.
Korrelgrootte van het visvoer 3 – 10 mm
Strooihoek 120° horizontaal
Tankinhoud 6 liter
Aantal keer voederen per dag 1 – 6
Oplaadtijd Max. 30 uur
Bedrijfsduur Tot max. drie maanden bij een volledig opgeladen accu
Type beveiliging IPX4
Voeding (niet meegeleverd) 12V / 1,66 A / DC-stekker 5,5x21
Reikwijdte 1 m (S); 2 m (M) 3 m (L)
Accu Oplaadbare lithium-ionbatterij
Vermogen 1,2 W
Afmetingen 275 x 252 x 420 mm
Garantie
Onze producten worden onderworpen aan een strenge kwaliteitscontrole. Mocht dit apparaat desondanks ooit een keer niet storingsvrij functioneren, dan betreuren wij dat ten zeerste.Voor het indienen van
garantieclaims geldt het volgende:
1. Deze garantievoorwaarden zijn uitsluitend bedoeld voor gebruikers, dat wil zeggen natuurlijke personen die noch in het kader van commerciële verrichtingen, noch bij andere activiteiten in de hoedanig
heid van zelfstandig ondernemer van dit product gebruik willen maken.
2. De door ons verleende garantie omvat het ongedaan maken van materiaal- en fabricagefouten, dan wel het in zijn geheel vervangen van het apparaat.
3. Garantieclaims zijn maximaal twee jaar geldig, gerekend vanaf de datum van aankoop. Na verstrijken van de garantieperiode is elk beroep op garantie uitgesloten.
4. Wanneer het artikel onder de garantievoorwaarden valt, wordt het kosteloos gerepareerd of kosteloos vervangen door eenzelfde artikel, dan wel door een artikel dat daaraan naar ons oordeel gelijkwaardig is.
De reparatie of de vervanging van het apparaat zal niet leiden tot een verlenging van de garantieperiode, en evenmin zal een nieuwe garantieperiode ingaan vanwege de aan het apparaat verrichte werkzaamheden
of vanwege de daarin ingebouwde vervangende onderdelen.
Van onze garantie uitgesloten zijn:
- beschadigingen aan het apparaat die ontstaan zijn als gevolg van het negeren van de gebruiksaanwijzing, het negeren van de onderhouds- en veiligheidsinstructies, of door blootstelling van het apparaat
aan abnormale weersomstandigheden dan wel vanwege gebrekkig onderhoud.
- Beschadigingen aan het apparaat die ontstaan zijn als gevolg van een verkeerd of ondeskundig gebruik (zoals overbelasting van het apparaat of gebruik van hulpstukken of toebehoren die niet zijn toegelat
en), het binnendringen van vreemde voorwerpen in het apparaat (zoals zand, stenen of stof), het uitoefenen van geweld of de inwerking van buiten (zoals schade door vallen).
- Beschadigingen aan het apparaat of delen daarvan waarbij de oorzaak ligt in slijtage door gebruik, normale slijtage en andere natuurlijke slijtage.
2
Buitenbedrijfstelling
Wanneer u weet dat u de voederautomaat langere tijd niet zult gebruiken, moet schakelaar (14) op Uit („0“) worden gezet, zodat de accu zich niet ontlaadt
Onderhoud en schoonmaken
Schoonmaken van de behuizing Gebruik alleen water en een zachte doek. Zorg ervoor dat u niet al te veel druk op de behuizing uitoefent, want die kan daar niet tegen. Maak om de module met maximaal vermogen
te kunnen laten draaien de behuizing, en dan vooral de afdekking (1), geregeld schoon, of als u merkt dat zich daar stof of vuil op heeft verzameld.
Probleem Oorzaak Oplossing
De display staat uit
Batterij is leeg Laad de accu op door de voederautomaat ongeveer een uur lang bloot te stellen aan het directe
zonlicht.
Hoofdschakelaar uit Zet de schakelaar (14) op de stand I
De aansluitkabel zit los Draai de schroeven (12) los, zet de aansluitkabel vast en trek de schroeven opnieuw aan.
De display is aan, maar er wordt niet gevoederd
Voederemmer leeg Vul de voederemmer met geschikt voer
Schoepenrad zit klem Verwijder de schroeven van de steunpoten (15) en de schroeven (12), neem de voederemmer (5)
uit, kijk of het schoepenrad ergens door geblokkeerd wordt en neem dat dan weg
Inlaat geblokkeerd Haal het voer eruit en controleer of dit wel van het juiste formaat is.
Haal samengeklonterd voer weg
Het schoepenrad draait wel, maar werpt geen
voer uit
Inlaat geblokkeerd Haal samengeklonterd voer weg, zodat het voer vrij kan doorlopen
Niet genoeg voer in de emmer Vul de voederemmer met voldoende voer
1. Naam van het artikel
2. Artikelnummer van het apparaat
3. Kopie van de factuur
4. Omschrijving van de storing
Technische gegevens
Reparaties
Wanneer de behuizing of de zonnemodule beschadigd is, kan dat niet worden gerepareerd. Het betreende onderdeel moet u dan niet meer gebruiken maar het op correcte wijze tot afval laten verwerken.
Instructies voor het veilig uitnemen van batterijen of accu‘s
1. Verwijder de vier schroeven van de steunpoten (15) en leg ze even opzij
2. Verwijder de vier schroeven (12) van het onderste gedeelte van de behuizing (10), daar waar de sticker zit
3. Maak het onderste gedeelte van de behuizing (10) open
4. Maak de verbinding tussen de accu en de printplaat los en neem de accu uit
5. De accu en het apparaat zelf kunnen nu apart tot afval worden verwerkt
Manual KoiFeeder 2022.indd 9 19.12.22 09:51

Afgedankte apparatuur als afval verwijderen
Alleen voor EU-lidstaten Geef elektronische (rand-)apparatuur nooit mee met het gewone huisvuil! Met elektronische apparatuur kunt u voor de afvalverwerking terecht bij het milieudepot bij u in de
gemeente, waar een en ander op correcte wijze tot afval wordt verwerkt.
De EU verklaring voor conformiteit kan worden opgevraagd bij het volgende adres:
www.outsideliving.com
Gescheiden inzameling van afgedankte apparatuur:
Elektrische en elektronische apparatuur die tot afval moet worden verwerkt, wordt aangemerkt als afgedankte apparatuur. Eigenaren van afgedankte apparatuur moeten die brengen naar een inzamelpunt
dat gescheiden is van een stortplaats voor ongesorteerd afval. Afgedankte apparaten mogen niet worden meegegeven met het gewone huisvuil maar moeten worden gedeponeerd in speciale verzamel- en
recyclingsystemen. Mogelijkheden voor het retourneren van afgedankte apparaten: particulieren die eigenaar zijn van afgedankte apparaten voor huishoudelijk gebruik kunnen deze inleveren bij de ociële
inzamelpunten bij hen in de gemeente, ze afgeven bij de fabrikant zelf of bij de door deze of door de distributeur daarvoor aangewezen locaties zoals bedoeld in de WEEE-richtlijn.
De verpakking als afval verwijderen:
Doe de verpakking bij het gescheiden afval. Breng karton en dozen naar het oud papier, folie en plasticzakken in de daarvoor bedoelde container
Batterijen en accu‘s als afval verwijderen:
Accutype Chemisch systeem
Oplaadbare batterij Lithium-Ionen (Li-ion)
Batterijen en accu‘s mogen niet met het huishoudelijk afval worden meegegeven. Verbruikers zijn er wettelijk toe verplicht batterijen en accu‘s naar een gescheiden inzamel-
punt voor afval te brengen.
Opgebruikte accu‘s kunt u kosteloos inleveren bij de inzamelpunten bij u in de gemeente, en overal waar accu‘s worden verkocht. Daardoor kunnen ze tot afval worden verwerkt
op een wijze die het milieu ontziet en kunnen de waardevolle grondstoen geschikt worden gemaakt voor hernieuwd gebruik Bij een ondeskundige afvalverwerking kunnen
giftige bestanddelen in het milieu terechtkomen die schadelijk zijn voor de gezondheid van mens, dier en plant. Batterijen en accu‘s moeten uit de apparaten worden gehaald
en waar mogelijk apart daarvan tot afval worden verwerkt. Batterijen en accu‘s moet u alleen in lege toestand voor de afvalverwerking afgeven. Bij batterijen en accu‘s die
lithium bevatten, moet u voordat u ze afgeeft voor de afvalverwerking de polen afplakken, om kortsluiting te voorkomen. Kortsluiting kan brand of een explosie veroorzaken.
Gebruikershandleiding voor KoiFeeder Solar
3
10
Manual KoiFeeder 2022.indd 1019.12.22 09:51

Operating instructions for KoiFeeder Solar
1
Dear customer,
This operating manual contains important information on commissioning and use. Read the operating manual carefully before using the solar sh feeder.This applies particularly to the safety advice. Otherwise,
you may injure yourself or damage the solar feeder. Keep the operating manual for future use. If you pass the solar feeder on to a third party, be sure to hand over this operating manual as well.These operating
instructions can also be downloaded as a PDF le from our website www.outsideliving.com.
Safety instructions
This device may be used by children from the age of 8 upwards and also by people with physical,
sensory or mental disabilities or lacking suitable knowledge and experience, provided they are
supervised or have been instructed in the use of the device and understand the resulting hazards.
The solar feeder is intended for private use only and is not suitable for commercial applications.
Only use the solar feeder as described in this operating manual. Any other use is considered impro-
per and can lead to damage to property and/or personal injury.The solar feeder is not a toy. The
manufacturer or dealer accepts no liability for damage resulting from improper or incorrect use.
Make sure that the solar feeder is placed on a level and stable surface and cannot fall into the
water.
Device parts/ Scope of delivery
Assembly
After removing the solar feeder from the packaging, mount the feed chute (11) on the lower part of the housing (10) by inserting it into the guide.The feed chute (11) automatically locks into place at the end of the
guide.
Two dierent installation options are available for mounting on the pond:
1. Installation with ground anchors:
Insert the ground anchors (16) included in the scope of delivery into
the ground and connect them to the stands (15).
Connect the ground anchors (16) included in the delivery to the
stands (15) by inserting the ground anchors into the guide of the
stands.Then screw the ground anchors to the stands and press the
solar feeder into the ground along with the ground anchors.
Filling
Please consult a specialist aquarium retailer for information on the selection of suitable sh food. We recommend an appropriate sh food with a grain size of 3 – 10 mm for lling the solar feeder. To do so, open the
feed bucket cover (3) and ll the feed up to a maximum of just below the top edge of the feed bucket (5).To ensure that the feed is kept dry for a long time, we recommend that you place a desiccant in the desiccant
holder (4). Remove the desiccant holder (4), place a suitable desiccant inside and put the desiccant holder back into its device. The maximum size of the desiccant is: 75 x 75 x 15 mm.
Check the solar feeder and scope of delivery
Risk of damage
If you open the packaging carelessly with a sharp knife or other pointed object, the solar feeder
or accessories may be damaged. Remove the solar feeder from the packaging. Check whether the
solar feeder or the accessories are damaged. If this is the case, contact the dealer immediately.
1Cover
2 Solar panel
3 Feed bucket cover
4 Desiccant holder
5 Feed bucket
6 Screw 1
7 Feed wheel cover
8 Feed wheel
9 Screw 2
10 Lower part of the housing
11 Feed chute
12 Screw 3
13 Control panel with cover
14 Switch
15 Stand
16 Ground anchor
Designation
D
11
12
10
8
6
7
9
13
15
5
1
23
4
2. Installation on level ground
If the ground is hard and level, it is advisable to connect the stands to the ground
with screws and, if necessary, dowels (not included in the scope of delivery). To do
so, place the solar feeder on the appropriate surface and mark the fastening points
by marking drilling points through the holes in the stands (15). Set the solar feeder
aside and drill the marked holes to the appropriate depth. Mount the dowels, place
the solar feeder on the boreholes and screw the stands (15) with the screws.
Commissioning
Settings of the solar feeder
Basic settings: Switch on the solar feeder by setting the switch (14) to the„I“ position and opening the cover of the control panel (13). If no buttons are pressed for 12 seconds, the input is terminated. Pressing the
selection key again takes you to the desired input.
Setting the time
Press the selection key (A) once and set the hours with the up (B) or down (C) key. Pressing the selection button (A) again takes you to the minutes display, which can be set in the same way.
Einstellen der Wurfweite
Press the selection button (A) 3 times to select the throw distance (E) and select the distance by pressing the up (B) or down (C) button.The indications correspond to the following distances:
S: Short distance of approx. 1 m
M: Medium range of approx. 2 m
L: Long range of approx. 3 m
Setting the feed time
Press the selection button (A) 4 times to go to the feed time display (J). Set the desired time by rst selecting the hours with the up (B) or down (C) button and then entering the respective minutes after pressing the
selection button (A).This is the 1st feeding level (I); the digit 1 is displayed.
Setting the feed duration
Once you have set the feed time, press the selection button (A) again to go to the feed duration. The activity indicator (F) appears and you can choose from 0-20 seconds. No feeding starts at 0 seconds.
Setting the feed level
You can programme up to 6 feed levels (I). After you have programmed a feed level (I), you can move to the next feed level (I) by pressing the selection button (A) until, after the 6th level, you return to the current
time.
Manual feeding
If you press and hold the start button (D) for 3 seconds, manual feeding will also start for 3 seconds.
Designation
A Selection button
B Up button
C Down button
D Start
E Throw distance
F Activity indicator
G Battery charge indicator
H Charge indicator
I Feed level
J Feed time
K Current time
14
16
A B C D
F
E
G
H
I
J
K
11
Manual KoiFeeder 2022.indd 11 19.12.22 09:51

12
Operating instructions for KoiFeeder Solar
1
Ordering spare parts
When ordering spare parts, or in the course of troubleshooting according to the
item“Troubleshooting”, we require the following information:
Troubleshooting
Do not repair the solar feeder yourself! If you use unsuitable parts for the repair, the risk of an electrical short circuit can increase greatly. Some problems may be caused by minor faults that you can x yourself. To
do this, follow the instructions below according to the problem in question.
If this does not solve the problem, please contact the customer service department and keep the required information at hand according to the item“Ordering spare parts”.
Grain size of sh feed 3 – 10 mm
Distribution angle 120° horizontal
Tank size 6 litres
Number of feeds per day 1 – 6
Charging time Max. 30 hours
Operating time Up to max. 3 months with fully charged battery
Protection class IPX4
Power supply not included in scope of the delivery 12V / 1.66 A / DC connector 5.5x21
Range 1 m (S); 2 m (M) 3 m (L)
Battery Rechargeable lithium-ion
Output 1,2W
Dimensions 275 x 252 x 420 mm
Warranty
Our products are subject to stringent quality controls. However, we are very sorry if this device does fail to work properly.The following applies to the assertion of warranty claims:
1. These warranty conditions are intended exclusively for consumers, i.e. natural persons who do not intend to use this product in the course of their commercial or other self-employed activities.
2. Our warranty service covers the repair of material and manufacturing defects or the replacement of the device.
3. Warranty claims are valid for a maximum of 2 years from the date of purchase. The assertion of warranty claims after the expiry of the warranty period is excluded.
4. If the article is covered by the warranty, it will be repaired free of charge or replaced free of charge by an equivalent or similar article of our choice.
Repair or replacement of the device does not result in an extension of the warranty period, nor does this service initiate a new warranty period for the device or for any installed spare parts.
The following exclusions apply to our warranty:
- Damage to the device caused by non-compliance with the operating instructions (such as the exchange of another accumulator), non-compliance with the maintenance and safety regulations or by
exposure of the device to abnormal environmental conditions or by lack of care.
- Damage to the device caused by misuse or improper application (such as overloading the device or using non-approved application tools or accessories), penetration of foreign bodies into the device (such
as sand, stones or dust), use of force or external inuences (such as damage due to dropping).
- Damage to the device or parts of the device resulting from normal, customary or other natural wear and tear.
2
Periods out of use
If you do not use the solar feeder for an extended period of time, the switch (14) should be set to o („0“) to prevent the battery from draining
Maintenance and care
Cleaning the housing
Only use water and a soft cloth. Be careful not to apply too much pressure to the housing, otherwise it may be destroyed. Clean the housing and particularly the cover (1) from time to time, or when dust or dirt has
accumulated, to maintain the full performance of the solar panel.
Problem Cause Solution
The display is o
Battery drained Charge the battery by exposing the feeder to direct sunlight for about one hour.
Main switch o Set the switch (14) to the“I”position
Connecting cable disconnected Loosen the screws (12), x the connecting cables and re-tighten the screws.
Display is on, but no feeding is taking place
Feed bucket empty Fill the feed bucket with suitable feed
Wheel is jammed Remove the screws from the stands (15) and the screws (12), remove the feed bucket (5), check the
wheel for blockages and remove foreign objects
Inlet blocked Remove the feed and check that the feed is the right size.
Remove clumped feed
Wheel is turning, but it does not eject feed Inlet blocked Remove clumped feed so that feed can continue to ow
Not enough feed in the bucket Fill the feed bucket with a sucient amount of feed
1. Article name
2. Article number of device
3. Copy of the invoice
4. Error description
Technical data
Repairs
If the housing or solar module are damaged, a repair is not possible. You may not continue using the aected part and it must be correctly disposed of.
Information on the safe removal of the batteries or rechargeable batteries
1. Remove the 4 screws from the stands (15) and put them aside
2. Remove the 4 screws (12) from the lower part of the housing (10) where the sticker is located
3. Open the lower part of the housing (10)
4. Loosen the connection between the battery and the circuit board and remove the battery
5. The rechargeable battery and the device can now be disposed of separately
Manual KoiFeeder 2022.indd 1219.12.22 09:51

13
Operating instructions for KoiFeeder Solar
1
Disposal of waste equipment
Only for EU countries. Do not throw electrical items in household waste!The owner of the electrical device can dispose of the waste equipment by handing it over, for example, to a collection point in
his municipality/borough, which will ensure that it is properly recycled.
The EU Declaration of Conformity can be requested from the following address:
www.outsideliving.com
Separate collection of waste equipment:
Electrical and electronic equipment that has become waste is referred to as waste equipment. Owners of waste equipment must dispose of it separately from unsorted municipal waste. Waste equipment in
particular does not belong in household waste, but in special collection and return systems. Options for returning waste equipment: Owners of waste equipment from private households can return it to the
collection points of the public waste management authorities or to the collection points set up by manufacturers or distributors within the meaning of the Electrical and Electronic Equipment Act, or directly
to the manufacturer.
Disposal of packaging :
Dispose of the packaging according to type. Put cardboard and card into waste paper, and foil and bags in the recyclables collection
Disposal of batteries and rechargeable batteries:
Battery type Chemical system
Rechargeable battery Lithium-ion (Li-ion)
Batteries and rechargeable batteries may not be disposed of in the household waste. Consumers are legally obliged to take batteries and rechargeable batteries for separate
collection. Batteries and rechargeable batteries can be handed in free of charge at a collection point in your municipality/district or in shops so that they can be disposed of in
an environmentally friendly way and valuable raw materials can be recovered. In case of improper disposal, toxic ingredients may be released into the environment, causing
adverse health eects to humans, animals and plants. Batteries and rechargeable batteries contained in electrical appliances must be disposed separately from the appliance
whenever possible. Only return batteries and rechargeable batteries when they are discharged.
For batteries and rechargeable batteries containing lithium, tape o the terminals before disposal to prevent external short-circuiting. A short circuit can lead to a re or
explosion.
Manual KoiFeeder 2022.indd 1319.12.22 09:51

14
Manual de uso para KoiFeeder Solar
5
Estimado cliente:
Estimada clienta:
El presente manual contiene información importante sobre la puesta en marcha y el uso. Lea atentamente el manual antes de utilizar el alimentador solar automático. Especialmente las indicaciones de seguridad.
En caso contrario, podría sufrir lesiones o dañar el alimentador solar automático. Conserve el manual para su uso posterior. Si pasa el alimentador solar automático a un tercero, asegúrese de entregarle también el
presente manual. Este manual también puede descargarse en formato PDF desde nuestra página web www.outsideliving.com.
Instrucciones de seguridad
Este aparato puede ser utilizado por niños a partir de 8 años y por personas con capacidades físicas,
sensoriales o mentales reducidas o con falta de experiencia y conocimientos si están supervisados
o si han recibido instrucciones sobre el uso del aparato de forma segura y comprenden los peligros
que conlleva.
El alimentador solar automático está destinado únicamente al uso privado y no es adecuado para
aplicaciones comerciales. Únicamente utilice el alimentador solar automático como se describe
en este manual. Cualquier otro uso se considera inadecuado y puede provocar daños materiales o
lesiones. El alimentador solar automático no es un juguete. El fabricante o el distribuidor no se hace
responsable de los daños derivados de un uso inadecuado o incorrecto.
Asegúrese de que el alimentador solar automático se encuentre sobre una supercie plana y
estable y que no pueda caer al agua.
Piezas del aparato/volumen de suministro
Montaje
Tras retirar el alimentador solar automático del embalaje, monte la rampa de alimentación (11) en la parte inferior de la carcasa (10) deslizándola en la guía. Al nal de la guía, la rampa de alimentación (11) encaja
automáticamente en su lugar.
Existen dos instalaciones diferentes para el montaje en el estanque:
1. Instalación con anclajes al suelo:
Introduzca en el suelo los anclajes (16) incluidos en el volumen de
suministro y conéctelos a las patas (15).
Conecte los anclajes al suelo (16) incluidos en el volumen de suministro
a las patas (15) insertando los anclajes al suelo en la guía de las patas.
A continuación, atornille los anclajes al suelo a las patas y presione el
alimentador solar automático con los anclajes al suelo.
Llenado
Pregunte en una tienda especializada en acuarios para seleccionar el alimento adecuado para peces. Recomendamos un alimento adecuado para peces con un tamaño de grano de 3-10 mm para llenar el alimentador
solar automático. Para ello, abra la cubierta del comedero (3) y llénelo hasta justo por debajo del borde superior del comedero (5). Le recomendamos que coloque un desecante en el soporte de secado (4) para
garantizar que el pienso se mantenga seco durante mucho tiempo. Retire el soporte de secado (4), coloque un desecante adecuado en su interior y vuelva a colocar el soporte de secado en su dispositivo. El tamaño
máximo del desecante: 75 x 75 x 15 mm.
Comprobación del alimentador solar automático y del volumen de suministro
Riesgo de daños
Si abre el embalaje con una cuchilla alada u otro objeto puntiagudo sin cuidado, el alimentador
solar automático o el accesorio puede sufrir daños. Retire el alimentador solar automático del
embalaje. Compruebe si el alimentador solar automático o el accesorio está dañado. Si es el caso,
póngase en contacto inmediatamente con el distribuidor.
1 Cubierta
2 Módulo solar
3 Cubierta del comedero
4 Soporte de secado
5 Comedero
6 Tornillo 1
7 Cubierta de la rueda de transporte
8 Rueda de transporte
9 Tornillo 2
10 Parte inferior de la carcasa
11 Rampa de alimentación
12 Tornillo 3
13 Panel de control con cubierta
14 Interruptor
15 Pata
16 Anclaje al suelo
Denominación
P
11
12
10
8
6
7
9
13
15
5
1
23
4
2. Instalación sobre una supercie plana
Si la base es dura y plana, se recomienda jar las patas al suelo con tornillos y, en
caso necesario, tacos (no incluidos en el volumen de suministro). Para ello, coloque
el alimentador solar automático sobre la supercie adecuada y marque los puntos
de jación perforando los oricios de las patas (15). Coloque el alimentador solar
automático a un lado y taladre en los lugares marcados a la profundidad adecuada.
Monte los tacos, coloque el alimentador solar automático en los oricios taladrados
y atornille las patas (15) con los tornillos.
Puesta en marcha
Ajustes del alimentador solar automático
Ajustes básicos: encienda el alimentador solar automático colocando el interruptor (14) en la posición «I» y abriendo la cubierta del panel de control (13). Si no pulsa ninguna tecla durante 12 segundos, la entrada
naliza. Si vuelve a pulsar la tecla de selección, accederá a la entrada deseada.
Ajuste de la hora
Pulse una vez la tecla de selección (A) y ajuste las horas con la tecla de arriba (B) o abajo (C). Si vuelve a pulsar la tecla de selección (A), pasará al indicador de minutos, que puede ajustarse de la misma manera.
Ajuste de la distancia de eyección
Pulse 3 veces la tecla de selección (A) para seleccionar la distancia de eyección (E) y seleccione el alcance pulsando la tecla de arriba (B) o abajo (C). Los indicadores de corresponden con los siguientes alcances:
S: Alcance bajo de aprox. 1 m
M: Alcance medio de aprox. 2 m
L: Largo alcance de aprox. 3 m
Ajuste de la hora de alimentación
Pulse 4 veces la tecla de selección (A) para pasar al indicador de la hora de alimentación (J). Ajuste la hora deseada seleccionando primero las horas con la tecla de arriba (B) o abajo (C) e introduciendo posteriormente
los minutos tras pulsar la tecla de selección (A). Este es el primer nivel de alimentación (I) y aparece la cifra 1.
Ajuste de la duración de la alimentación
Una vez ajustada la hora de alimentación, vuelva a pulsar la tecla de selección (A) para pasar a la duración de la alimentación. Aparece el indicador de actividad (F) y puede elegir entre 0-20 segundos, no iniciándose
la alimentación a los 0 segundos.
Ajuste del nivel de alimentación
Puede programar hasta 6 niveles de alimentación (I). Una vez programado un nivel de alimentación (I), se pasa al siguiente nivel de alimentación (I) pulsando la tecla de selección (A) hasta volver a la hora actual
después del 6.º nivel.
Alimentación manual
Si mantiene pulsada la tecla de inicio (D) durante 3 segundos, también se iniciará la alimentación manual durante 3 segundos.
Denominación
A Tecla de selección
B Tecla de arriba
C Tecla de abajo
D Inicio
E Distancia de eyección
F Indicador de actividad
G Indicador de carga de la
batería
H Indicador de carga
I Nivel de alimentación
J Hora de alimentación
14
16
A B C D
F
E
G
H
I
J
K
Manual KoiFeeder 2022.indd 14 19.12.22 09:51

15
Manual de uso para KoiFeeder Solar
5
Pedido de repuestos
Al pedir repuestos o durante la resolución de problemas según el punto„Resolución
de problemas“, necesitamos la siguiente información:
Resolución de problemas
No repare usted mismo el alimentador solar automático. Si utiliza piezas inadecuadas para la reparación, puede aumentar el riesgo de producirse un cortocircuito. Algunos problemas pueden deberse a pequeñas
averías que puede arreglar usted mismo/a. Para ello, siga las siguientes instrucciones en función del problema en cuestión.
Si esto no soluciona el problema, póngase en contacto con el servicio de atención al cliente y obtenga la información necesaria tal y como se describe en la sección de pedido de repuestos.
Tamaño del alimento para peces 3-10 mm
Ángulo de distribución 120 ° horizontal
Tamaño del depósito 6 litros
Número de tomas al día 1-6
Tiempo de carga Máx. 30 horas
Tiempo de funcionamiento Hasta máx. 3 meses con la batería totalmente cargada
Tipo de protección IPX4
Fuente de alimentación (no contenido en el volumen 12V/1,66 A/conector CC 5,5x21
Alcance 1 m (S); 2 m (M) 3 m (L)
Batería Batería recargable de iones de litio
Potencia 1,2 W
Dimensiones 275 x 252 x 420 mm
Garantie
Nuestros productos se someten a un estricto control de calidad. Si, a pesar de todo, este dispositivo no funcionase correctamente en algún momento, le pedimos disculpas. Para la reclamación de los derechos
derivados de la garantía será de aplicación lo siguiente:
1. Estas condiciones de garantía se dirigen exclusivamente a los consumidores, es decir, a las personas físicas que no tienen intención de utilizar este producto en el curso de su actividad comercial o de otro
tipo de actividad por cuenta propia.
2. Nuestra garantía cubre la reparación de los defectos de material y fabricación o la sustitución del aparato.
3. Las reclamaciones de garantía son válidas durante un periodo máximo de 2 años a partir de la fecha de compra. Queda excluida la posibilidad de hacer valer los derechos de garantía después de la
expiración del período de garantía.
4. Si el artículo está cubierto por las disposiciones de la garantía, se reparará gratuitamente o se sustituirá gratuitamente por un artículo idéntico o, a nuestra discreción, un artículo equiparable.
La reparación o sustitución del producto no supone una ampliación del periodo de garantía, ni este servicio inicia un nuevo periodo de garantía para el producto o para las piezas de recambio instaladas.
Quedan excluidos de nuestra garantía:
- Los daños en el aparato causados por la inobservancia de las instrucciones de uso (como la sustitución de un acumulador diferente), la inobservancia de las normas de mantenimiento y seguridad o por la
exposición del aparato a condiciones ambientales anormales o por una conservación deciente.
- Los daños en la unidad causados por un uso incorrecto o inadecuado (como la sobrecarga de la unidad o el uso de herramientas o accesorios de aplicación no autorizados), la penetración de cuerpos extraños
en la unidad (como arena, piedras o polvo), el uso de la fuerza o las inuencias externas (como los daños causados por una caída).
- Los daños en el aparato o en sus piezas que sean consecuencia del desgaste normal provocado por el uso, habitual o natural.
2
En caso de no uso
Si no utiliza el alimentador solar automático durante un largo periodo de tiempo, el interruptor (14) debe ponerse en posición de apagado («0») para que la batería no se descargue.
Mantenimiento y cuidados
Limpieza de la carcasa
Únicamente utilice agua y un paño suave. Asegúrese de no aplicar demasiada presión en la carcasa o, en caso contrario, podría dañarse por completo. Limpie la carcasa (especialmente la cubierta [1]) periódicamente
o cuando se haya acumulado polvo o suciedad para permitir el pleno rendimiento del módulo solar.
Problema Causa Solución
El indicador está apagado
Batería vacía Cargue la batería exponiendo el alimentador solar automático a la luz solar directa durante
aproximadamente una hora.
Interruptor principal apagado Coloque el interruptor (14) en la posición I.
Cable de conexión ojo Aoje los tornillos (12), je los cables de conexión y vuelva a apretar los tornillos.
El indicador está encendido, pero no se produce la
alimentación
Alimentador vacío Llene el comedero con pienso adecuado.
Rueda atascada Retire los tornillos de las patas (15) y los tornillos (12), retire el alimentador (5), compruebe si la
rueda está atascada y retire los objetos extraños.
Entrada bloqueada Retire el pienso y compruebe que tenga el tamaño correcto.
Retire el pienso apelmazado.
La rueda gira, pero no suelta pienso Entrada bloqueada Retire el pienso apelmazado para que pueda pasar el pienso.
No hay suciente pienso en el recipiente Llene el comedero con suciente pienso.
1. Nombre del artículo
2. Número de artículo del aparato
3. Copia de la factura
4. Descripción del error
Datos técnicos
Reparaciones
Si la carcasa o el módulo solar están dañados, no es posible repararlo. A continuación, no debe seguir utilizando la pieza afectada y debe eliminarla correctamente.
Indicaciones sobre la extracción segura de baterías o acumuladores
1. Retire los 4 tornillos de las patas (15) y apártelos
2. Retire los 4 tornillos (12) de la parte inferior de la carcasa (10), donde se encuentra la pegatina
3. Abra la parte inferior de la carcasa (10)
4. Aoje la conexión entre la batería y la placa de circuito impreso y retire la batería
5. La batería y el aparato pueden desecharse por separado.
Manual KoiFeeder 2022.indd 15 19.12.22 09:52

Eliminación de residuos de aparatos
Solo para países de la UE. No deseche los aparatos eléctricos junto a la basura doméstica. El propietario del aparato eléctrico puede entregarlo para su eliminación, por ejemplo, en un punto de recogida
de su municipio/barrio, que se encargará del reciclaje profesional.
La Declaración de Conformidad de la UE puede solicitarse a través de la siguiente dirección:
www.outsideliving.com
Recogida selectiva de residuos de aparatos:
Los equipos eléctricos y electrónicos que se han convertido en residuos se denominan residuos de aparatos. Los propietarios de residuos de aparatos deben eliminarlos de forma separada de los residuos
municipales no clasicados. En concreto, los residuos de aparatos no pertenecen a la basura doméstica, sino a sistemas especiales de recogida y devolución. Opciones para la devolución de residuos de apa-
ratos: los propietarios de los residuos de aparatos procedentes de hogares privados pueden devolverlos a los puntos de recogida de las autoridades públicas de gestión de residuos o a los puntos de recogida
establecidos por los fabricantes o distribuidores de acuerdo con el Reglamento sobre residuos de equipos eléctricos y electrónicos («ElektroG»), o directamente al fabricante.
Eliminación del embalaje:
Elimine el embalaje según su naturaleza. Deseche la cartulina y el cartón en el contenedor de residuos de papel, y las láminas y las bolsas en los puntos de recogida de materiales reciclables.
Eliminación de baterías y acumuladores:
Tipo de batería Sistema químico
Acumulador Iones de litio
Las baterías y los acumuladores no deben eliminarse con los residuos domésticos. Los consumidores están obligados por ley a deshacerse de las baterías y los acumuladores por
separado.
Las baterías y los acumuladores pueden dejarse gratuitamente en un punto de recogida municipal o en las tiendas para eliminarse de forma respetuosa con el medioambiente y
recuperar las valiosas materias primas. Una eliminación inadecuada puede provocar la liberación de sustancias tóxicas en el medioambiente, lo que puede tener efectos nocivos
en los seres humanos, los animales y las plantas.
Las baterías y los acumuladores incluidos en aparatos eléctricos deben eliminarse de forma independiente. Únicamente elimine las baterías y los acumuladores si están
descargados.
En el caso de baterías y acumuladores con litio, tape los terminales antes de desecharlos para evitar un cortocircuito externo. Un cortocircuito puede provocar un incendio o una
explosión.
Manual de uso para KoiFeeder Solar
5
16
Manual KoiFeeder 2022.indd 16 19.12.22 09:52

Istruzioni per l‘uso delle KoiFeeder Solar
7
Gentile cliente,
le presenti istruzioni per l’uso contengono informazioni importanti relativamente alla messa in funzione e all‘utilizzo del prodotto. Prima di utilizzare il distributore automatico di mangime solare, leggere attenta-
mente le istruzioni per l‘uso. Ciò vale in particolare per le avvertenze di sicurezza. Altrimenti si possono subire lesioni o danneggiare il distributore automatico di mangime solare. Conservare le istruzioni d‘uso per
future consultazioni. Se si consegna il distributore automatico di mangime solare a terzi, consegnare anche le presenti istruzioni per l’uso. Queste istruzioni per l‘uso si possono anche scaricare come le PDF dal
nostro sito Internet www.outsideliving.com.
Avvertenza di sicurezza
Il dispositivo non può essere utilizzato da bambini di età inferiore a 8 anni e da persone con facoltà
siche, sensoriali o mentali limitate o senza la necessaria esperienza e conoscenza, a meno che non
siano sorvegliate o non siano state istruite sull‘uso in sicurezza e informate sui pericoli connessi.
Il distributore automatico di mangime solare è concepito esclusivamente per uso privato e non
è adatto a impieghi industriali. Utilizzare il distributore automatico di mangime solare soltanto
come descritto nelle presenti istruzioni per l‘uso. Qualsiasi impiego diverso da quello previsto è
da considerarsi inappropriato e può provocare danni a persone o cose. Il distributore automatico
di mangime solare non è un giocattolo. Il produttore e il rivenditore non si assumono nessuna
responsabilità per eventuali danni provocati dall‘uso non appropriato o errato.
Assicurarsi che il distributore automatico di mangime solare sia posizionato su fondo piano e stabile
e non possa cadere in acqua.
Componenti del dispositivo / contenuto
della fornitura
Montaggio
Dopo avere estratto il distributore automatico di mangime solare dall‘imballaggio, montare la guida di uscita del mangime (11) sulla parte inferiore dell‘alloggiamento (10), inserendola nell‘apposito sistema di
guida. All‘estremità del sistema di guida, la guida di uscita del mangime (11) si innesta automaticamente.
Per il montaggio sul laghetto sono disponibili due diverse modalità di installazione:
1. Installazione con ancoraggio a terra:
Inlare il sistema di ancoraggio a terra fornito in dotazione (16) nel
terreno e collegarlo coi piedi di supporto (15).
Collegare il sistema di ancoraggio a terra fornito in dotazione (16) con
i piedi di supporto (15), inserendolo nella guida dei piedi di supporto.
Avvitare dunque il sistema di ancoraggio a terra ai piedi di supporto
e spingere il distributore automatico di mangime solare a terra,
insieme ai sistemi di ancoraggio.
Riempimento
Per la scelta del mangime per i pesci adeguato, consultare un negozio specializzato in acquariologia. Consigliamo di riempire il distributore automatico di mangime solare con mangime per pesci con grana di
dimensioni 3 – 10 mm. Aprire a tal ne la copertura della vaschetta del mangime (3) e riempire con mangime alla massimo no a poco prima del bordo superiore della vaschetta (5). Per garantire che il mangime
rimanga secco a lungo, consigliamo di aggiungere una sostanza essiccante nel supporto del materiale essiccante (4). Rimuovere il supporto del materiale essiccante (4), inserire una sostanza essiccante adeguata e
riposizionare il supporto del materiale essiccante nell‘apposito dispositivo. Le dimensioni massime del materiale essiccante sono: 75 x 75 x 15 mm.
Vericare il distributore automatico di mangime solare e l‘oggetto della
fornitura
Pericolo di danni
Se si apre la confezione incautamente con un coltello alato o con un altro oggetto appuntito,
il distributore automatico di mangime solare o gli accessori possono subire dei danni. Estrarre
il distributore automatico di mangime solare dalla confezione. Controllare se il distributore
automatico di mangime solare o gli accessori presentano dei danni. In caso contrario, rivolgersi
immediatamente al rivenditore.
1 Copertura
2 Modulo solare
3 Copertura della vaschetta del mangime
4 Supporto del materiale essiccante
5 Vaschetta del mangime
6 Vite 1
7 Copertura della ruota di alimentazione
8 Ruota di alimentazione
9 Vite 2
10 Parte inferiore dell‘alloggiamento
11 Guida di uscita del mangime
12 Vite 3
13 Pannello di comando con copertura
14 Interruttore
15 Piede di supporto
16 Ancoraggio a terra
Denominazione
C
d
11
12
10
8
6
7
9
13
15
5
1
23
4
2. Installazione su un fondo piano
In caso di fondo duro e piano, collegare i piedi di supporto a terra con viti ed
eventualmente tasselli (non inclusi nell‘oggetto della fornitura). Posizionare in
questo caso il distributore automatico di mangime solare sulla relativa supercie
e contrassegnare i punti di ssaggio tracciando punti per i fori in concomitanza coi
fori dei piedi di supporto (15). Riporre il distributore automatico di mangime solare
lateralmente e forare sulla marcature tracciate alla profondità adeguata. Montare i
tasselli, posizionare il distributore automatico di mangime solare sui fori realizzati e
avvitare i piedi di supporto (15) con le viti.
Messa in servizio
Impostazioni del distributore automatico di mangime solare
Operazioni di base: accendere il distributore automatico di mangime solare, portando l‘interruttore (14) in posizione„I“ e aprendo la copertura del pannello di comando (13). Se non si azionano tasti per 12 secondi, si
esce dalla modalità di inserimento. Premendo di nuovo il tasto di selezione, si può procedere all‘inserimento dei dati desiderati.
Regolazione dell‘ora
Premere una volta il tasto di selezione (A) e regolare le ore con il tasto Su (B) o Giù (C). Azionando di nuovo il tasto di selezione (A) si accede all‘indicazione dei minuti, regolabile allo stesso modo.
Impostazione della distanza di espulsione
Premere 3 volte il tasto di selezione (A) per selezionare la distanza di espulsione (E) e scegliere la gittata premendo il tasto Su (B) o Giù (C). In questo caso le indicazioni corrispondono alle seguenti gittate:
S: Gittata ridotta di circa 1m
M: Gittata media di circa 2m
L: Gittata grande di circa 3m
Impostazione del tempo di erogazione del mangime
Premere 4 volte il tasto di selezione (A) per accedere all‘indicazione del tempo di erogazione del mangime (J). Impostare l‘orario desiderato selezionando per prima cosa le ore con il tasto Su (B) o Giù (C) e dopo
l‘azionamento del tasto di selezione (A) inserire i rispettivi minuti. Questo rappresenta il 1° livello di mangime (I) e viene visualizzata la cifra 1.
Regolazione della durata di erogazione del mangime
Dopo avere eseguito la regolazione del tempo di erogazione del mangime, ossia l‘orario, premere di nuovo il tasto di selezione (A) per accedere alla durata di erogazione. Compare l‘indicazione dell‘attività (F) e si può
selezionare 0-20 secondi, con 0 secondi che indicano che non sarà eseguita alcuna erogazione di mangime.
Impostazione del livello di mangime
Si possono programmare no a 6 livelli di mangime (I). Dopo avere programmato un livello di mangime (I), azionando il tasto di selezione (A) si passa al livello di mangime successivo (I) no a quando, arrivati al 6°
livello, non si ritorna all‘ora attuale.
Erogazione manuale del mangime
Se si tiene premuto il tasto di avvio (D) per 3 secondi, si avvia l‘erogazione manuale sempre per 3 secondi.
Denominazione
A Tasto di selezione
B Tasto Su
C Tasto Giù
D Avvio
E Distanza di espulsione
F Indicazione dell‘attività
G Indicatore di carica della batteria
H Indicatore di carica
I Livello di mangime
J Tempo di erogazione del mangime
K Ora attuale
14
16
A B C D
F
E
G
H
I
J
K
17
Manual KoiFeeder 2022.indd 17 19.12.22 09:52

Istruzioni per l‘uso delle KoiFeeder Solar
7
Ordine ricambi
Per l’ordine dei ricambi o quando si deve eliminare un problema, come al punto
Problemi e soluzioni, abbiamo bisogno delle seguenti informazioni:
Problemi e soluzioni
Non riparare autonomamente il distributore automatico di mangime solare! Se per la riparazione si utilizzano componenti inadatti, il pericolo di cortocircuito elettrico può aumentare notevolmente. Alcuni proble-
mi possono essere provocati da anomalie di lieve entità e quindi possono essere risolti dall’utente stesso. Osservare le seguenti istruzioni a seconda del problema vericatosi.
Se il problema non si risolve, rivolgersi al centro di assistenza clienti e tenere a portata di mano le informazioni richieste, riportate al punto Ordine ricambi.
Dimensioni della grana del mangime per pesci 3 – 10 mm
Angolo di erogazione 120 ° orizzontale
Dimensioni del serbatoio 6 litri
Numero di erogazioni di mangime al giorno 1 – 6
Durata ricarica Max. 30 ore
Durata di esercizio Fino a max. 3 mese con batteria completamente carica
Tipo di protezione IPX4
Adattatore di rete (non incluso nella fornitura) 12V / 1,66 A / spina CC 5,5x21
Raggio d'azione 1 m (S); 2 m (M) 3 m (L)
Batteria Accumulatore ricaricabile agli ioni di litio
Potenza 1,2 W
Dimensioni 275 x 252 x 420 mm
Garanzia
I nostri prodotti vengono sottoposti a severi controlli di qualità. Se questo apparecchio non dovesse funzionare perfettamente, ne saremmo molto spiacenti. Per la rivendicazione dei diritti di garanzia valgono le
seguenti condizioni:
1. Le presenti condizioni di garanzia sono rivolte esclusivamente ai consumatori, cioè alle persone siche che non intendono utilizzare questo prodotto nell‘ambito della loro attività commerciale o
altra attività autonoma.
2. La nostra garanzia si estende all’eliminazione dei vizi materiali e di fabbricazione e alla sostituzione dell‘apparecchio.
3. Le richieste di garanzia valgono al massimo 2 anni a partire dalla data di acquisto. È esclusa qualsiasi rivendicazione dei diritti di garanzia successivamente alla scadenza del periodo di garanzia.
4. Se l’articolo è coperto dalla garanzia, verrà riparato gratuitamente o sostituito, sempre gratuitamente, con un articolo identico o con uno equivalente di nostra scelta.
La riparazione o la sostituzione dell‘apparecchio non prolunga il periodo di validità della garanzia, né questo servizio avvia un nuovo periodo di garanzia per l‘apparecchio o per eventuali ricambi installati.
Dalla nostra garanzia sono esclusi:
- Danni all’apparecchio provocati dalla mancata osservanza delle istruzioni per l’uso (come ad es. la sostituzione con un accumulatore di tipo diverso), dalla mancata osservanza delle indicazioni di manuten
zione e sicurezza o dall’esposizione dell‘apparecchio a condizioni ambientali anomale o da una pulizia insuciente.
- Danni all’apparecchio provocati da abuso o utilizzo inappropriato (come ad es. sovraccarico dell‘apparecchio o utilizzo di utensili o accessori non ammessi), penetrazione di corpi estranei nell’apparecchio
(come ad es. sabbia, pietre o polvere), uso della violenza o inussi esterni (come ad es. danni dovuti a una caduta).
- Danni all’apparecchio o a parti dell‘apparecchio che sono dovuti a un‘usura normale, abituale o naturale.
2
In caso di inutilizzo
Se non si utilizza il distributore automatico di mangime solare per un lasso di tempo prolungato, si dovrebbe posizionare l‘interruttore (14) su OFF („0“), in modo che la batteria non si scarichi
Cura e manutenzione
Pulizia dell‘alloggiamento
Utilizzare solo acqua e un panno morbido. Assicurarsi di non esercitare una pressione eccessiva sull’alloggiamento per non rischiare di danneggiarlo. Pulire l’alloggiamento di tanto in tanto, ma in particolare la
copertura (1), o se si deposita polvere o sporcizia, per garantire la massima potenza del modulo solare.
Problema Causa Soluzione
L'indicatore è spento
Batteria scarica Ricaricare la batteria esponendo per circa un'ora alla luce solare diretta il distributore automatico di
mangime solare.
Interruttore generale spento Azionare l'interruttore (14) in posizione I
Cavo di collegamento staccato Allentare le viti (12), ssare il cavo di collegamento e stringere le viti.
Il display è acceso, ma l'erogazione di mangime
non avviene
Vaschetta del mangime vuota Riempire la vaschetta del mangime con un mangime adeguato
Girante bloccata Rimuovere le viti dei piedi di supporto (15) e le viti (12), estrarre la vaschetta del mangime (5),
controllare eventuali blocchi nella girante e rimuovere corpi estranei
Ingresso bloccato Rimuovere il mangime e controllare che sia della dimensione corretta.
Rimuovere il mangime accumulato
La girante ruota, ma non espelle mangime Ingresso bloccato Rimuovere il mangime accumulato in modo che il mangime stesso possa continuare a scorrere
Quantità di mangime insuciente nel serbatoio Riempire la vaschetta del mangime con una quantità di mangime suciente
1. Nome articolo
2. Codice articolo dell‘apparecchio
3. Copia della fattura
4. Descrizione dell’errore
Dati tecnici
Riparazioni
Se l’alloggiamento o il modulo solare sono danneggiati, non è possibile ripararli. In tal caso non si deve più usare il componente in questione e lo si deve smaltire come previsto dalle disposizioni vigenti.
Istruzioni su come rimuovere in sicurezza le batterie o gli accumulatori
1. Rimuovere le 4 viti dei piedi di supporto (15) e riporle lateralmente
2. Rimuovere le 4 viti (12) della parte inferiore dell‘alloggiamento (10), proprio nel punto in cui trova l‘adesivo
3. Aprire la parte inferiore dell‘alloggiamento (10)
4. Allentare il collegamento tra la batteria e la piastra e rimuovere la batteria
5. A questo punto, l‘accumulatore e il dispositivo possono essere smaltiti separatamente
18
Manual KoiFeeder 2022.indd 1819.12.22 09:52

Istruzioni per l‘uso delle KoiFeeder Solar
7
Smaltimento degli apparecchi usati
Solo per paesi dell‘UE. Non gettare gli articoli elettrici nei riuti domestici! Per smaltire l’apparecchio usato, il proprietario dell’apparecchio elettrico può ad es. consegnarlo presso un centro di raccolta
del proprio comune/quartiere che si occupi del corretto riciclo.
La dichiarazione di conformità UE può essere richiesta al seguente indirizzo:
www.outsideliving.com
Raccolta dierenziata degli apparecchi usati:
Gli apparecchi elettrici ed elettronici che sono diventati riuti vengono deniti come apparecchi usati. I proprietari devono conferire tali apparecchi sottoponendoli a un sistema di raccolta separato dai riuti
comunali non assortiti. Gli apparecchi usati, in particolare, non vanno smaltiti insieme ai riuti domestici, bensì con sistemi speciali di raccolta e restituzione. Possibilità di restituzione degli apparecchi usati:
i proprietari degli apparecchi usati provenienti dalle abitazioni private possono consegnare tali apparecchi presso i centri di raccolta delle autorità pubbliche incaricate dello smaltimento o i centri di raccolta
predisposti dai produttori o dai fornitori ai sensi della legge ElektroG, oppure direttamente al produttore.
Smaltimento degli imballaggi:
Smaltire l’imballo a seconda del tipo di materiale. Prevedere per carta e cartone il riciclo della carta, per pellicole e sacchetti la raccolta dierenziata.
Smaltimento di batterie e accumulatori:
Tipo di batteria Sistema chimico
Accumulatore Ioni di litio (Li-ion)
Non smaltire le batterie e gli accumulatori insieme ai riuti domestici. I consumatori sono obbligati per legge a smaltire le batterie e gli accumulatori nella raccolta dierenziata.
Le batterie e gli accumulatori possono essere consegnati gratuitamente presso un centro di raccolta del proprio comune/quartiere o un rivenditore, anché possano essere
smaltiti nel rispetto dell’ambiente o riciclati per recuperarne materie prime preziose. Se lo smaltimento non viene eettuato in maniera appropriata, sostanze tossiche possono
contaminare l’ambiente e avere eetti dannosi per la salute dell’uomo, degli animali e delle piante.
Le batterie e gli accumulatori contenuti negli apparecchi elettrici devono essere smaltiti, se possibile, separatamente dagli apparecchi. Consegnare le batterie e gli accumulatori
soltanto quando sono scarichi. Prima dello smaltimento, staccare i poli dalle batterie e dagli accumulatori al litio onde evitare un cortocircuito esterno. Il cortocircuito può
provocare un incendio o un’esplosione.
19
Manual KoiFeeder 2022.indd 19 19.12.22 09:52

20
Instruções de uso das KoiFeeder Solar
6
Caro/a cliente,
Este manual de instruções contém informações importantes sobre a colocação em funcionamento e a utilização. Leia atentamente o manual de instruções antes de utilizar o alimentador automático solar. Isto
aplica-se sobretudo às indicações de segurança. Caso contrário, poderá sofrer ferimentos ou danicar o alimentador automático solar. Conserve o manual de instruções para utilização posterior. Caso transmita o
alimentador automático solar a terceiros, entregue sempre também este manual de instruções. Este manual de instruções também pode ser descarregado como cheiro PDF da nossa página da Internet www.
outsideliving.com.
Instruções de segurança
Este aparelho pode ser utilizado por crianças a partir dos 8 anos, assim como por pessoas com
capacidades físicas, sensoriais ou mentais reduzidas ou falta de experiência e conhecimentos,
se forem supervisionadas ou se tiverem sido instruídas sobre a utilização segura do aparelho e
compreenderem os perigos daí resultantes.
O alimentador automático solar destina-se exclusivamente ao uso privado e não é adequado para
aplicações comerciais. Utilize o alimentador automático solar apenas conforme descrito neste
manual de instruções. Qualquer outra utilização é considerada inadequada e pode resultar em
danos materiais ou ferimentos. O alimentador automático solar não é um brinquedo. O fabricante
ou o revendedor não assume qualquer responsabilidade por danos resultantes de uma utilização
inadequada ou incorreta.
Certique-se que o alimentador automático solar está sobre uma base plana e estável e que não
possa cair na água.
Montagem
Depois de ter retirado o alimentador automático solar da embalagem, monte a calha de alimentação (11) na parte inferior da caixa (10), inserindo-a na guia. No m da guia, o alimentador automático (11) engata
automaticamente.
Para montar no lago, temos duas diferentes instalações à disposição:
1. Instalação com estacas de xação:
Insira as estacas de xação (16) fornecidas no chão e une-as aos pés
e apoio (15).
Una as estacas de xação (16) fornecidas aos pés de apoio (15),
inserindo as estacas de xação na guia dos pés de apoio. De seguida,
enrosque as estacas de xação com os pés de apoio e pressione o
alimentador automático solar junto com as estacas de xação no chão.
Enchimento
Para escolher o alimento adequado para peixes, informe-se no comércio especializado Aquaristik. Recomendamos um respetivo alimento para peixes granulado com o tamanho 3 – 10 mm para encher o alimentador
automático solar. Para tal, abra a tampa do balde de alimentação (3) e encha com alimento até no máximo pouco abaixo da aresta superior do balde de alimentação (5). Para manter o alimento sempre seco,
recomendamos que coloque um dessecante no suporte para dessecante (4). Retire o suporte para dessecante (4), coloque um dessecante adequado lá dentro e insira de novo o respetivo suporte no seu dispositivo. O
tamanho máximo do dessecante é: 75 x 75 x 15 mm.
Vericar o alimentador automático solar e o volume de fornecimento
Risco de danos
Se não tiver cuidado ao abrir a embalagem com uma lâmina aada ou outro objeto pontiagudo, o
alimentador automático solar ou o acessório pode ser danicado. Retire o alimentador automático
solar da embalagem.Verique se o alimentador automático solar ou o acessório apresentam danos.
Se for esse o caso, entre imediatamente em contacto com o revendedor.
1 Tampa
2 Módulo solar
3 Tampa do balde de alimentação
4 Suporte para dessecante
5 Balde de alimentação
6 Parafuso 1
7 Tampa do rotor
8 Rotor
9 Parafuso 2
10 Parte inferior da caixa
11 Calha de alimentação
12 Parafuso 3
13 Campo de comando com tampa
14 Interruptor
15 Pé de apoio
16 Estaca de xação
Designação
11
12
10
8
6
7
9
13
15
5
1
23
4
2. Instalação sobre base plana
Se a base for dura e plana, é aconselhável unir os pés de apoio com parafusos e
event. cavilhas (não fornecidas). Para tal, coloque o alimentador automático solar
sobre a respetiva superfície e marque os pontos de xação, desenhando pontos
de perfuração pelos furos dos pés de apoio (15). Ponha o alimentador automático
solar de lado e fure as marcações desenhadas na respetiva profundidade. Monte as
cavilhas, coloque o alimentador automático solar sobre os furos e enrosque os pés de
apoio (15) com os parafusos.
Colocação em funcionamento
Configurações do alimentador automático solar
Bases: Ligue o alimentador automático solar, posicionando o interruptor (14) em“I”e abrindo a tampa do campo de comando (13). Se durante 12 segundos não premir nenhuma tecla, a entrada é terminada. Se
voltar a premir a tecla Seleção, vai para a entrada pretendida.
Acertar a hora
Prima uma vez a tecla Seleção (A) e acerte as horas com a tecla Para cima (B) ou Para baixo (C). Se voltar a premir a tecla Seleção (A), vai para o indicador dos minutos, que podem ser acertados do mesmo modo.
Ajustar o alcance
Prima 3x a tecla Seleção (A) para ir para a seleção do alcance (E) e escolha o alcance premindo a tecla Para cima (B) ou Para baixo (C). As informações correspondem aos seguinte alcances:
S: Baixo alcance de ca. 1m
M: Alcance médio de ca. 2m
L: Grande alcance de ca. 3m
Ajustar o tempo de alimentação
Prima 4x a tecla Seleção (A) para ir para o indicador do tempo de alimentação (J). Acerte a hora pretendida, começando por escolher as horas com a tecla Para cima (B) ou Para baixo (C) e depois os respetivos minutos
com a tecla Seleção (A). Este é o 1.º nível de alimentação (I), aparecendo o número 1.
Ajuste da duração de alimentação
Depois de ter ajustado do tempo de alimentação, prima a tecla Seleção (A) para ir para a duração de alimentação. Aparece a informação da atividade (F) e tem 0-20 segundos para a seleção, sendo que no caso de 0
segundos não começa nenhuma alimentação.
Ajuste do nível de alimentação
Pode programar até 6 níveis de alimentação (I). Depois de ter programado um nível de alimentação (I), deve premir a tecla Seleção (A) para ir para o próximo nível de alimentação (I) até voltar à hora atual depois do
6.º nível.
Alimentação manual
Se premir a tecla Iniciar (D) durante 3 segundos, inicia a alimentação manual também por 3 segundos.
Designação
A Tecla Seleção
B Tecla Para cima
C Tecla Para baixo
D Iniciar
E Alcance
F Informação da atividade
G Indicador do estado de carga da bateria
H Indicador da carga
I Nível de alimentação
J Tempo de alimentação
K Hora atual
14
16
A B C D
F
E
G
H
I
J
K
Peças do aparelho / Volume de fornecimento
Manual KoiFeeder 2022.indd 20 19.12.22 09:52
Table of contents
Languages:
Popular Pet Care Product manuals by other brands

Zoovilla
Zoovilla PTH0662020110 Assembly instructions

Servco
Servco The love house J-1602 manual

Dogtra
Dogtra 2300NCP EXPANDABLE owner's manual

INVISIBLE FENCE
INVISIBLE FENCE Smart Doorman owner's manual

outstanding pet
outstanding pet DR-500M user manual

Innotek
Innotek Automatic No-bark Collar BC-200E Operation guide

THE DOGLINE
THE DOGLINE SportDOG NoBark SBC-R-E operating guide

Coziwow
Coziwow CW12X0466 user manual

Bissell
Bissell PET HAIR ERASER 2475 Series quick start

E-Collar Technologies
E-Collar Technologies Pro Educator PE-900 quick start guide

Cardinal Gates
Cardinal Gates XpandaGate Assembly instructions

Flamingo
Flamingo Visio Light Jumbo manual