Aqua Perfecta Pura User manual

Installation Manual
Pura
AquaPerfecta.com 0800 007 3737

Preface
Categories
1. Unpacking ························································································· 2
2. Product Contents ·················································································· 2
3. Required Tools ···················································································· 3
4. RO Membrane Usage ············································································ 3
5. Combo Cartridge Filter Usage ·································································· 4
6. Pressurised Tank ·················································································· 5
7. Tap Installation ················································································ 5
8. Feed Water Connecting ·········································································· 6
9. Drain Saddle Connecting ········································································ 6
10. Ports Connecting ·················································································· 7
11. First Commissioning ············································································ 8
12. Consumables ······················································································ 8
13. Post Carbon Connecting ········································································· 8
14. Technical Data ···················································································· 8
15. Troubleshooting ··················································································· 9
16. Required Raw Water Quality and Conditions ··············································· 10
17. Warranty ························································································ 10
AquaPerfecta.com 0800 007 3737
Congratulations on purchasing the Pura water purification system from Aqua Perfecta.
With patented technology, remarkable quality and unique design we are sure you will be
happy sharing our ethos of demanding uncompromising quality in your drinking water.
Each item is subject to strict quality and function inspection before delivery, thus there
may be some water remaining in the system.
Please read the installation instructions carefully and check out the installation video on
our website.

1 Unpacking
Take out all the packaging materials. Make sure there is no external damage to the reverse osmosis system.
2 Product Contents
○
11
1. Pura Housing
2. Pressurised Tank
3. Tap
4. Tap Nut
5. ⅜" Union Connector
6. RO Membrane
7. Wrench
8. Combo Cartridge Filter
9. PE Tube x White x ⅜" x 1.5 m
10. PE Tube x Yellow x ¼" x 1.5 m
11. PE Tube x Blue x ¼" x 3.0 m
12. Water Feed Adaptor
13. Drain Saddle
④
⑤
⑩
⑨
⑧
⑦
○
12
○
13
②
AquaPerfecta.com 0800 007 3737
①③⑥

Slot
3 Required Tools
For installation, you need the following tools and materials:
• Metal wrench 13mm / 14mm / 17mm
• Scissors
• Power Drill
• Drill Bits 6mm / 12mm
•PTFE Tape
Caution
This system is equipped with quick fitting connectors. With the quick fitting connectors, you can easily and safely
connect the PE tubes. Plug the tubes into the counterparts until you feel a click. When click occurs, then the tube is
correctly fastened in the anchoring device.
If you want to remove the tube again, you must, at first, remove the
retaining clip.
And then, at the junction, you will see a small white plastic ring. Press the plastic
ring evenly then pull out the tube.
If the mains water pressure is higher than 6 bars, one pressure- reducing device must be installed before the inlet port of
the Pura.
4 RO Installation
1
Open the lid of the Pura housing.
Remove the combo cartridge filter from the Pura.
The combo cartridge filter has been loaded into the Pura
for transportation.
2
There are two small black rubber seals
on one side of the membrane.
3
In the center of the Pura, you can see a circular slot
for the membrane.
4
Insert the side which has the two small black rubber
seals into the circular slot.
Open the lid
Illustration without housing for better
understanding
AquaPerfecta.com 0800 007 3737
Two small black
rubber seals

5 Combo Cartridge Filter Usage
1
Remove the film wrapping from the filter before use.
And then put the combo cartridge filter back into the Pura
housing.
2
Make sure that the O-ring on the edge of the lip is
properly seated and then evenly close the lid by hand. And
then use the wrench to tighten the lid gently.
Caution
There are 6 semi-circular bumps on the top of
the lid of the Pura, and there are 6 rectangular
bumps on the wrench.
Match with each other properly before
opening or closing the lid.
6 Pressurised Tank
Choose the right location for the tank. The tank must be placed upright. Keep it away from direct heat sources
(eg boilers).
Please follow the steps as below:
•Swivelling the ball valve onto the tank threaded fitting.
•Please tighten the ball valve properly to avoid water
leakage
6 rectangular bumps
6 semi-circular bumps
AquaPerfecta.com 0800 007 3737

7 Tap Installation
Choose the appropriate installation location before starting.
The tap should be located where it is easy to use.
To install the tap on the kitchen counter, you need to drill a 12mm hole in the kitchen counter or
the corner of the stainless steel sink. Seek professional advice before drilling granite.
Follow these steps:
1
Drill a 12mm hole in the worktop or stainless steel sink.
Insert the threaded rod of the tap through
the metal plate first.
2
Insert the threaded rod through the hole on the worktop/sink.
3
Screw the nut tightly on the threaded rod of the tap.
4
Connect the ⅜” union connector to the threaded rod of the tap
tightly.
AquaPerfecta.com 0800 007 3737

8 Connecting The Water Inlet
The integrated adaptor comes with mains water supply and
adaptor connections.
Turn off the mains water by closing the angle valve under the
sink.
Unscrew the cold water pipe and then connect the integrated
adaptor to the angle valve.
Connect back the cold water pipe onto the other side
of the integrated valve.
Now unscrew the nut from the plug valve of the adaptor and
then insert the ¼” blue tube into the protruding ring.
Then screw the nut back to the plug valve.
9 Drain Saddle Connecting
Integrated
Adaptor
Angle Valve
Cold water pipe
Plug valve
Angle Valve
Nut
AquaPerfecta.com 0800 007 3737
•Drill a 6mm hole on the sink drain pipe.
•Seal foam rubber around the hole.
•Fix together the two clamp rings (tighten with two screws).
•Insert the nut on the blue tube.
•Insert the blue tube into the port of the clamp.
•Screw the nut tightly on the clamp ring.
Choose the best installation location before installation and, usually, the best installation location is in the
upper area of the sink drain pipe. Do not install in the corner area of the pipe!
Please follow the steps below:

10 Connecting The Ports
On the black base of the Pura, you will see three ports. Connecting steps are as follows:
1
Inlet Port (left side)
This is the inlet port of the Pura.
Connect it to the integrated adapter with ¼” blue tube.
Drain Port (right side)
This is the drainage port of the Pura.
Plug the ¼” yellow tube into this port.
3
Pure Port (middle)
This is to be connected to the pressurised tank.
Connect it to the tank’s ball valve with
¼” blue tube.
4
Pure Port (front)
This port is for connecting to post-carbon (w/stem adapter) or
to tap directly (change the stem adapter to female connector)
Stem Adapter
Female Connector
Inlet Port
Drain Port
Pure Port
Pure Port
AquaPerfecta.com 0800 007 3737
2

11Commissioning
Check all tubing again before turning the water on.
The tubing must be laid without twists or bending.
Turn on the water supply and check all connections for leaks.
Let the tank fill and empty 3 times before drinking the water.
After that, enjoy your Pura water!
Manual Timer
Set the next filter change time (day/month).
The cartridge filter should be replaced max. every 12
months.
12 Spare Parts
You will need to replace the combo cartridge filter and RO membrane periodically.
Code
Item
Replacement cycle
AP-220 Combo Cartridge Filter
Max. every 12 months or 28,000 liters
AP-221
RO Membrane 100GPD
12 months
13 Post Carbon
You also can choose post carbon for improving the taste of the product water.
Please do connections as follows:
1. Install the bracket for post carbon onto the housing.
2. Remove the external film from the post carbon.
3. Connect the quick fittings to the ports at both ends of the post carbon.
4. Make sure the flow direction of the post carbon is correct.
The arrow must point to the direction of the water flow
14 Technical Data
• Daily product water volume: 100 gallons (@4 kgs of inlet pressure, @25 °
C)
• Tank holding volume: 6 liters (@4 kgs of inlet pressure, @25 °C)
• RO membrane size: 1.8” x 12”
•Recovery rate: 25%
• Min. required inlet pressure: 2.0 bars
Day
Month
AquaPerfecta.com 0800 007 3737

15 Troubleshooting
This reverse osmosis system undergoes multiple quality and functional checks prior to shipment. If you still find a
problem, check the possible causes and their remedies. However, if you do not find a solution, please contact us.
Detection/Error Problem Causes Solutions
No product water Tank empty Water supply pipe valve closed Open water supply valve
Tubes connected incorrectly Inspect the tubes
Water supply stagnation Clean water pipe
Tubes bent Inspect the tubes
Shut-off valve stuck Clean/replace shut-off valve
Ball valve of tank closed Open the ball valve
The cartridge filter installed in
Pura housing improperly
Take it out and put it back again
properly
The membrane is in wrong
direction
Take it out and put it back in
correct flow direction
Not much water produced Water producing/filling
into tank slowly Inlet water pressure is too small Use pump set
Tubes connected improperly Tubing inspection
Dripping from the tap Tank ball valve closed /
Shut-off valve stuck
Open tank valve /
Clean/Replace shut-off valve
The tank becomes
full. Water does not
flow out of the tank
The air pressure in the tank is
too low.
The inside tank rubber sheet is
defective.
Inflate the tank up to 7psi
Replace tank
Tubes bent Tubelines inspection
No faults have occurred
so far
Membrane/cartridge filter
exhausted
Replace membrane/cartridge
filter
System doesn’t stop /
Waste water : product
water > 4:1
Waste water keeps
running Inlet pressure is too low Use pump set
Shut-off valve contaminated /
stuck
Clean/Replace shut-off valve
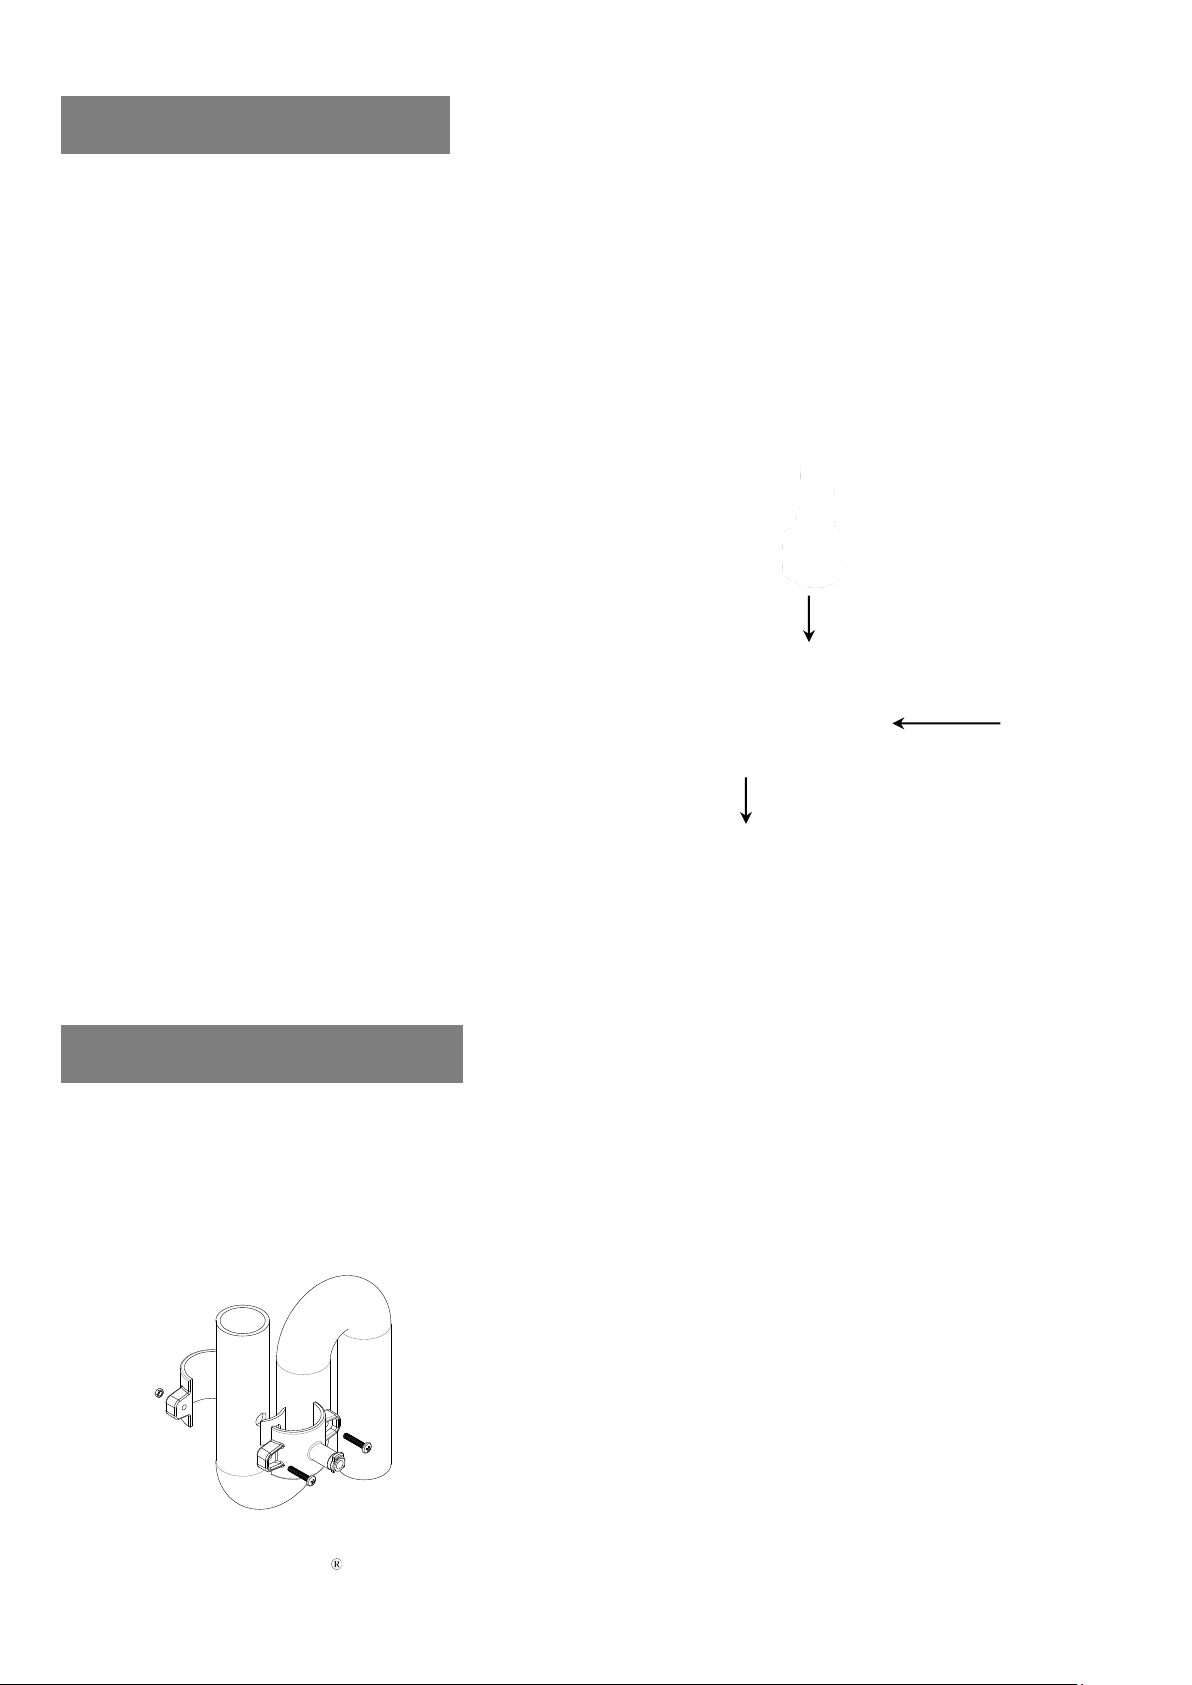
Sewage noise Noise from waste water
pipe
location not suitable for drain
saddle installation
Change location or push the
black tube close to the inner wall
of sink drain pipe
Product water not clean Black granules, soapy Membrane/cartridge exhausted Replace membrane/cartridge
filter
Insufficient flushing for initial
use of membrane / cartridge
Thoroughly flush the system
AquaPerfecta.com 0800 007 3737

Detection/Error Problem Causes Solutions
The tank is located near heat
source area
Install the tank in other location
Tubes connected to wrong ports
Tubelines inspection
Ports / Tubes are leaking
Ports and tubes
connected improperly
Tubes bent or not fully
connected
Tubes didn't plug into ports
properly
Tubelines inspection
Pull out the tubes and plug into
the ports strongly until you felt a
click kind of hand feeling
The system is exposed to strong
ultraviolet radiation or low
temperatures
Installation of sun protection and
anti-frost devices / equipment
Tubes broken
Change tubes
16 Required Mains Water Quality and Conditions
1. Must be mains water
2. Water temp. : 5°C ~35°C
3. Inlet pressure < 5 bars
4. Turbidity (NTU) <3
5. TDS < 800 ppm
17 Warranty
1. 18 months, starting from the goods received by importers.
2. All warranty commitments must be valid in accordance with the operation and maintenance instructions.
AquaPerfecta.com 0800 007 3737

AquaPerfecta.com 0800 007 3737
Table of contents
Popular Water Filtration System manuals by other brands

Superpool
Superpool SMG500 product manual

Applied Membranes
Applied Membranes W-G3072ET Operation, maintenance & instruction manual

IKEA
IKEA NYTTIG FIL 400 quick start guide

BWT
BWT bestaqua 14ROC Installation and operating instructions

GE
GE FQK1K installation instructions

WilTec
WilTec Sunsun CPF Series Operation manual