Aqua Science Fleck 5600 SXT User manual

Est. 1985
800-767-8731
www.aquascience.net
Fleck 5600 SXT Digital
Water Softener System
Installation Manual

2www.aquascience.net800-767-8731
Fleck 5600 SXT Digital Water Softener System Installation Manual
Soft Water System Diagram
Your Brand New Water Softening System
Here is a general diagram to guide you through the installation of your new water softening system. Your particular set
up may vary. Be sure to set up on a level rm surface near the incoming water source, a drain and a regular un-switched
power outlet.
Hard water problems can be costly. It shortens the life of all your appliances, the pipes in your home and even your clothes
because of mineral build up.
Aqua Science’s Water Softening Systems help to remove calcium, magnesium, dissolved iron, dissolved manganese,
and other heavy metals from water. After your system is running properly, expect high quality water and eciency for your
home’s needs.
If you need any help with your set up, please visit our easy to follow, resource rich website, www.aquascience.net
or just give us a call at 800-767-8731.
Pressure
Tank
Water
Water Heater
Standard Electrical
Outlet
*Recommended Surge
Protector
Soft Cold Water
Soft Hot Water
Water
Softener
Tank
Control
Valve
Brine
Tank
D
r
a
i
n
Hard Raw Outside
Hard Raw
Outside Water

3www.aquascience.net800-767-8731
Fleck 5600 SXT Digital Water Softener System Installation Manual
Parts List
Note: Softening salt sold separately. Available at most home good stores. We suggest [2 to 3], 40 lb bags. We do sell
salt on our website www.aquascience.net if you are having trouble nding it locally.
Fleck 5600 Digital
Control Valve
Brine Hose to Fleck
Valve Connection
Assembly
Resin
(See Chart Below for amounts)
3/4” or 1” Stainless
Steel Bypass
Brine Tank & Brine
Tank Cover
Upper Basket
(12” + Tanks Only)
Backwash Line
(Clear 1/2”)
Fiberglass Mineral
Tank
Float Tube AssemblySalt Grid Base w/ (4)
Legs* (*assembly required)
Float Tube
Funnel
Riser Tube and Cap
Brine Hose
(Colored Tube 3/8”)
Gravel Sleeve
(for 12x52 Tanks/Systems)
9x4832,000 1 cubic foot of Resin [1 Bag]
10x5448,000 1.5 cubic feet of Resin [1 & 1/2 Bags]
12x5264,000 2 cubic feet of Resin [2 Bags] & 1 sleeve of gravel (as base)
Tank SizeGrain Capacity Filtration Media

4www.aquascience.net800-767-8731
Fleck 5600 SXT Digital Water Softener System Installation Manual
Water Softener Tank Assembly and Valve Installation
NOTE: Please allow a few hours after set up for your system to do its initial processing.
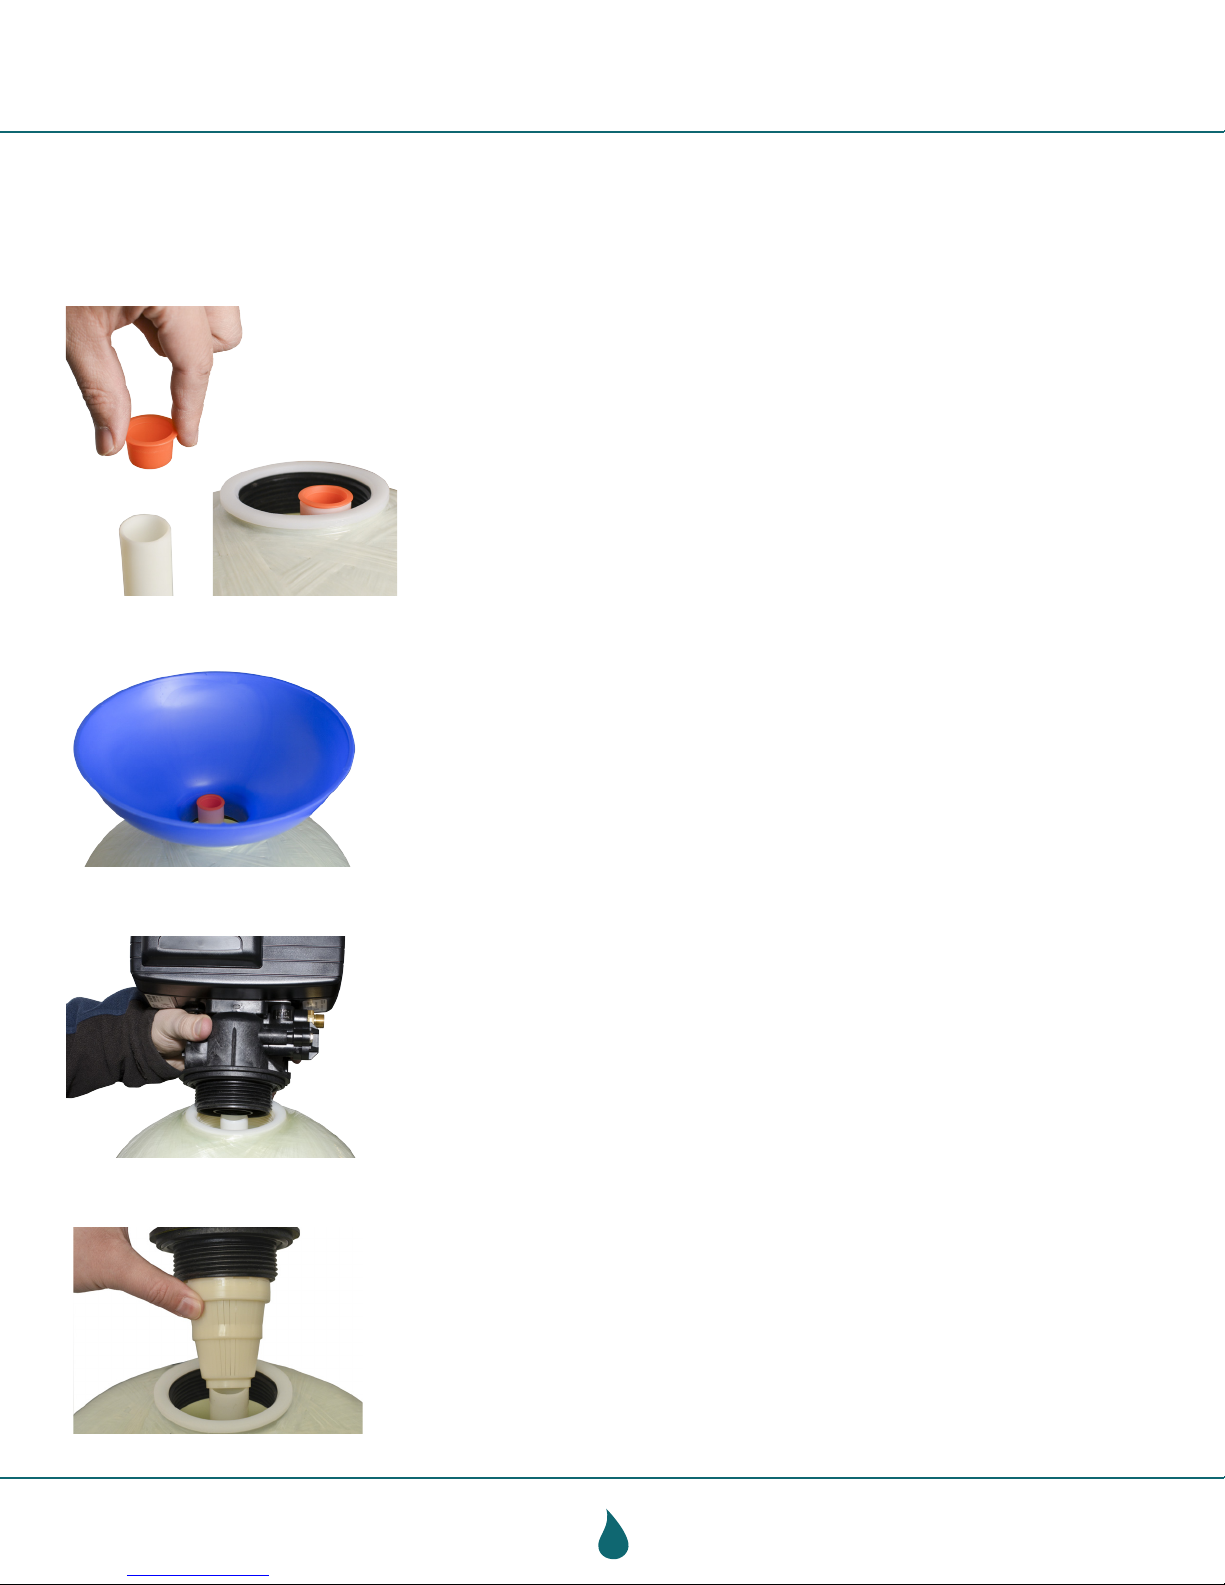
Cover the end of the Riser Tube with the Cap to keep the Resin out and place Riser
Tube down the center of the Fiberglass Mineral Tank. Make sure the top of the Riser
Tube sits ush with the top of the Fiberglass Mineral Tank. There will be a small dip
at the bottom of the tank that the Riser Tube should sit into. You will have to help
support the tube to keep it straight. You can center the Riser Tube after you’ve put
in the Resin Beads in the next step.
NOTE: If you have a 12x52 tank/system, you will want to add the sleeve of
gravel before adding the Resin.
Use the Funnel to pour the Resin Beads into the Fiberglass Mineral Tank. You have
been provided with the appropriate amount of Resin with your system. Refer to the chart
at the bottom of the Parts List page to match tank size to proper ltration media amount.
Remove the Cap from the Riser Tube after you’re done pouring the Resin into the Tank.
Install the Fleck 5600 SXT Digital Control Valve by tting it onto the top of the tank and
that the Riser Tube from the Tank is tted into the bottom hole of the Control Valve.
Twist the Control Valve clockwise onto the top of the Fiberglass Mineral Tank until tightly
secured with hand strength.
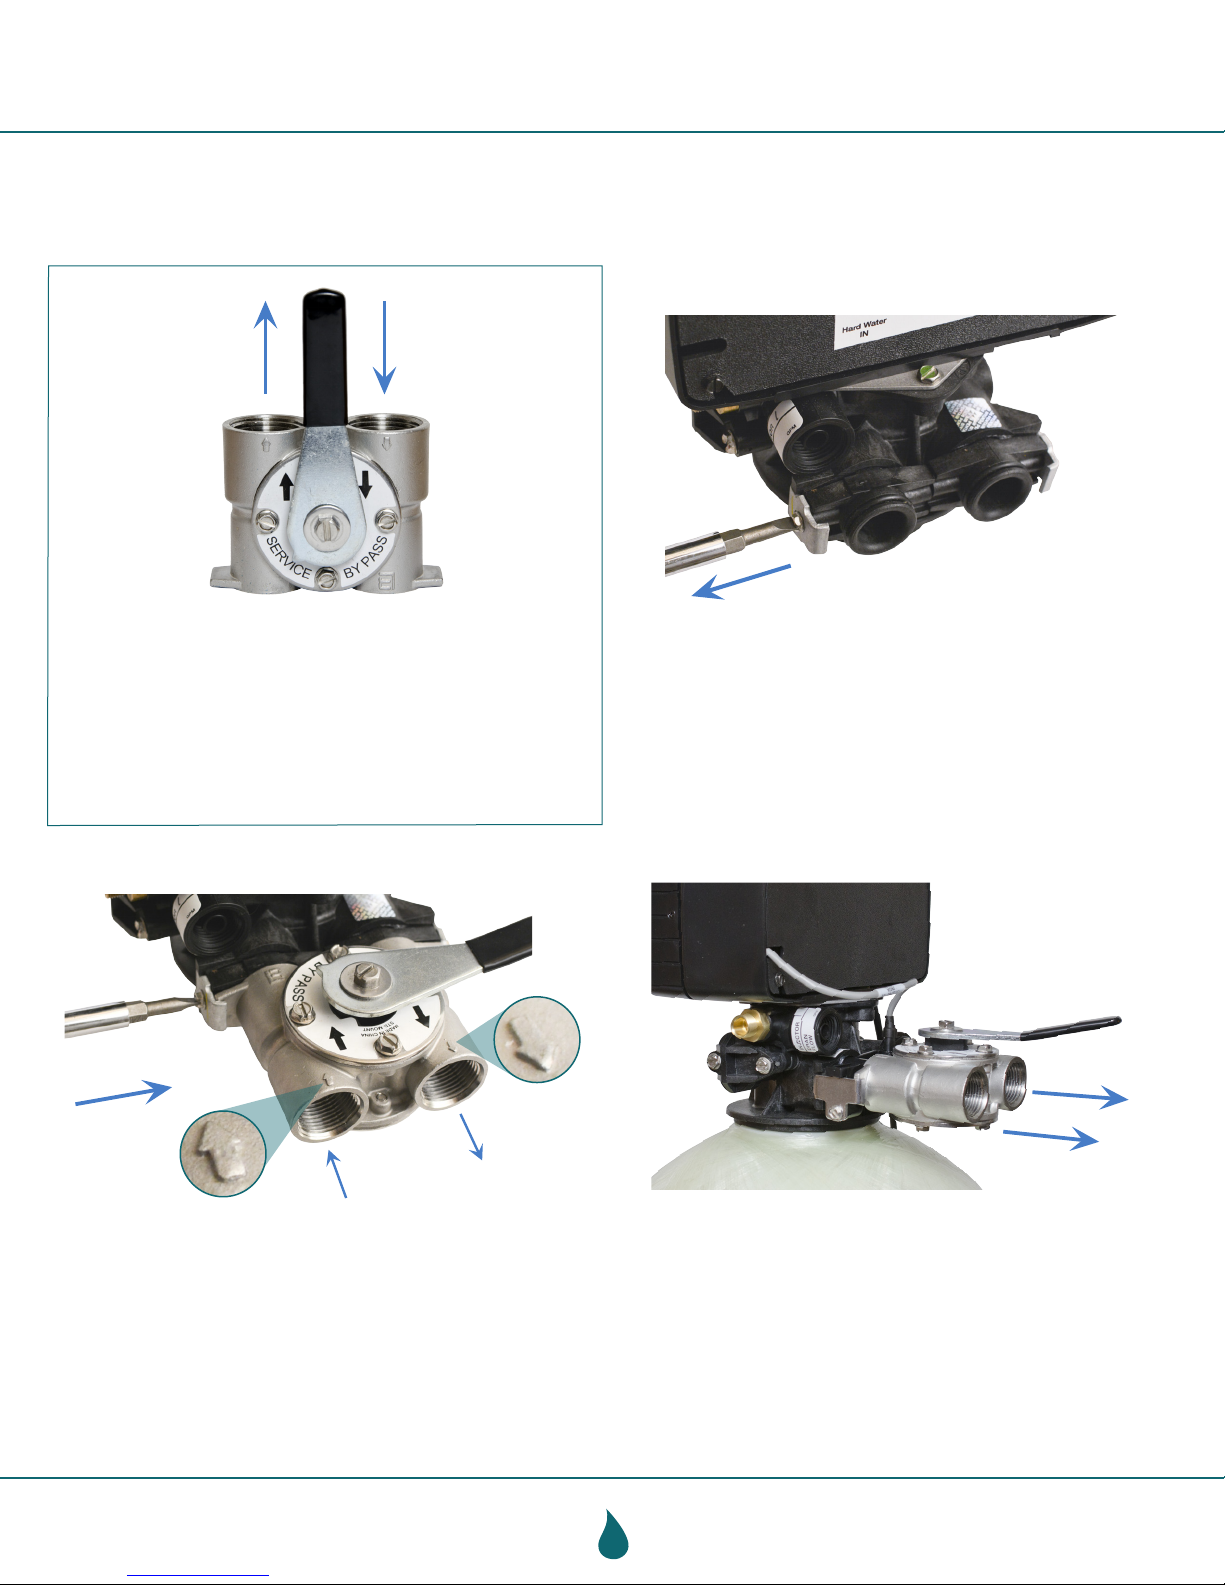
Important: DO NOT use teon tape or compound on these threads.
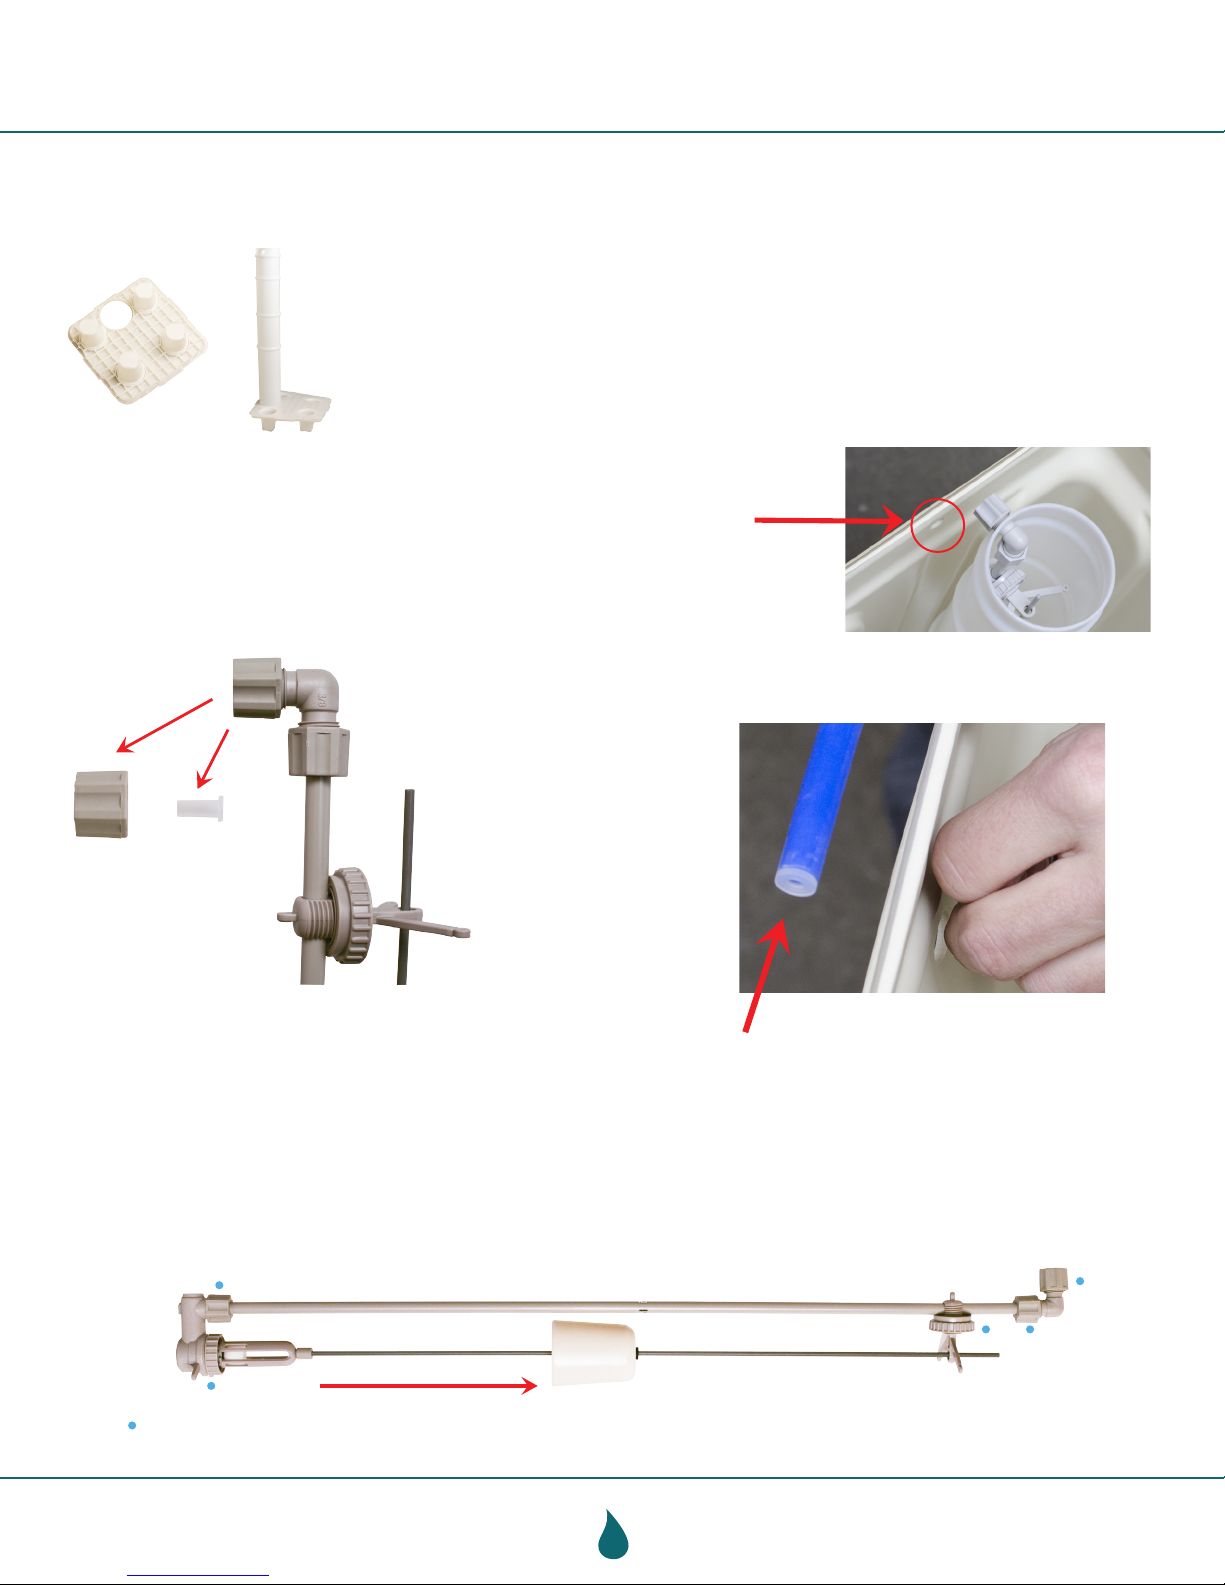
If you bought a 12” + tank, twist the Upper Basket onto the Control Valve before you
t the Control Valve onto the tank. Make sure the Riser Tube ts into the bottom of the
Upper Basket.
Notes:
Don’t use if you have heavy iron.
Must use for Fine Mesh Resin and Anion Resins.

5www.aquascience.net800-767-8731
Fleck 5600 SXT Digital Water Softener System Installation Manual
Water Softener Tank Assembly and Valve Installation (continued)
Water Out Water In
Bypass Valve - Top View
1.) Unscrew the clips from the back of the Control Valve
before you move the Control Valve into place with the
Stainless Steel Bypass that you just installed into your
water lines.
3.) Ensure that the measurements match the height of the
valve ports in the back of the Control Valve.
Then plumb to valve.
(Connected to your water supply)
Next install the Bypass Valve into your existing water lines.
Make sure that your “Water In” always goes into the right-
side of the Bypass as if you were looking at the Bypass
from a top view.
2.) Insert the Control Valve into place with the Bypass
and then fasten with the clips. Make sure not to pinch
the O-ring that are on the valve ports. Turn handle so it’s
pointing toward bypass.
(Connected to your water supply)

6www.aquascience.net800-767-8731
Fleck 5600 SXT Digital Water Softener System Installation Manual
Brine Tank Assembly
Snap the (4) Legs into the Salt Grid Base. Then insert the Float Tube into the Salt Grid
Base. Push it through until it touches the ground.
Make sure that the hole in the Float Tube is facing straight outward (See next step).
Insert the Salt Grid Base you just assembled into the Brine Tank. Make
sure that the hole in the Float Tube lines up with the hole in the Brine Tank.
Adjust the rubber grommet on the Float Assembly to about 12 to 16 inches from the bottom of the Assembly.
Make sure all connections are hand tight. Be sure not to over tighten or use tools. It could damage the threads.
Top
Bottom
12” - 16”
Remove the Nut from the top of the Float Assembly and set aside.
Watch for a small Plastic Insert that’s hiding behind the Nut. You’ll
need to insert it into the Brine Hose. It’s a good idea to do this
right away so this small piece doesn’t get lost.
Note: Make sure push that Plastic
Insert all the way into the Brine Hose.
NOTE: You will need to remove the Float Assembly to properly adjust

7www.aquascience.net800-767-8731
Fleck 5600 SXT Digital Water Softener System Installation Manual
Brine Tank Assembly (continued)
Take the nut that you removed from the top of the oat
assembly and t it onto the end of the brine hose. Fit
enough so that just a little of the Brine Hose ts through the
nut. It will be a snug t so be sure it is tight.
Place the small plastic Insert into the end of the brine hose
where you just tted the nut.
Assemble the Valve Connection Pieces into the other end of the Brine Hose.
Assembly completed
Valve connection assembly pieces
Hand tighten the nut onto the elbow and place the oat tube
cap onto the oat tube.
Next pour two 40 lb bags of softening salt into your brine tank
and place the cover of the brine tank on securely.
Important: Make sure not to over tighten the connections with
tools. Doing so could damage the threads.
Assembly order

8www.aquascience.net800-767-8731
Fleck 5600 SXT Digital Water Softener System Installation Manual
Brine Tank Assembly (continued)
1.) Screw the valve connection assembly to the
control valve.
2.) Snug using an adjustable wrench.
3.) Thread the Barb into the drain port of the control valve.
Note: Typically comes assembled by Aqua Science
NOTE: If you have to install the disk button, you will need
to remove the valve button in order to place the disk button.
This will screw out. Be sure not to pry it out. I could cause
damage to the unit.
Place the disk button in rst with the rounded inside edges
facing down and then replace the valve button behind the
disk button.
4.) Insert the backwash line onto the barb.
It will be a snug t. You will have to use a little
force to get it all the way on.
Button
Retainer
(Install direction)
Backow Reducer Button
Disk Button

9www.aquascience.net800-767-8731
Fleck 5600 SXT Digital Water Softener System Installation Manual
Fleck 5600 SXT Digital Programming
Step 1
To enter the programming mode you must rst set the time to 12:01 PM. To do this use
the up arrow or down arrow to change the time. You will see TD in the upper left corner
when the time is being set.
After you set the time to 12:01 PM
1.) Press the cycle button once
2.) Press and hold the up and down arrow buttons at the same time until the screen
changes to look like Step 2 below
Cycle
Button
Up/Down
Arrow
Step 2
Press and hold the Up and Down Arrows at the same time for about 3 to 5 seconds
until you see the setting DF (Display Format) GAL.
The value of GAL should show up as the default. If not, use the UP or DOWN Arrow to
select GAL.
Press the Cycle button to advance to the next step.
Step 3
The next setting you’ll see is VT (Valve Type). Set that to dF1b (Downow 1 Backwash).
Press the Cycle button to advance to the next step.
Step 4
The next setting you’ll see is CT (Control Type). Set that to Fd (Metered Flow Delayed).
Press the Cycle button to advance to the next step.
Step 5
The next setting you’ll see is NT (Number of Tanks). Set that to 1.
Press the Cycle button to advance to the next step.

10 www.aquascience.net800-767-8731
Fleck 5600 SXT Digital Water Softener System Installation Manual
Fleck 5600 SXT Digital Programming (continued)
Step 6
The next setting you’ll see is C (Capacity). Set to the capacity of your system.
Refer to the chart at the bottom of the Parts List page to match tank size to proper ltration
media amount.
Press the Cycle button to advance to the next step.
Step 7
The next setting you’ll see is H (Hardness). Refer to your water test information for this
value. Valves should be in GPG (grains per gallon). Note: 1 GPG = 17.1 Mg/L
Press the Cycle button to advance to the next step.
Step 8
The next setting you’ll see is RS (Reserve Selection). Set the value to SF.
Press the Cycle button to advance to the next step.
Step 9
The next setting you’ll see is SF (Safety Factor). The number value you see refers to
percentage of reserve at which your system will regenerate. For example if you have a
system that provides 1000 gallons of soft water and you set the Safety Factor to 15 (15%),
after you’ve used 85%, your system will regenerate (RT - step 11) vs. using all 1000
gallons before it regenerates.
Press the Cycle button to advance to the next step.
Step 10
The next setting you’ll see is DO (Day Override). Set this to 14.
Press the Cycle button to advance to the next step.

11 www.aquascience.net800-767-8731
Fleck 5600 SXT Digital Water Softener System Installation Manual
Fleck 5600 SXT Digital Programming (continued)
Step 11
The next setting you’ll see is RT (Regen Time). By default this will be set to 2:00 AM.
Customize this time according to your schedule where you won’t be using any water or
other system backwashing. It takes a couple hours for your system to regenerate.
Press the Cycle button to advance to the next step.
Step 12
The next setting you’ll see is BW (Backwash). Set the value to 10.
Press the Cycle button to advance to the next step.
Step 15
The next setting you’ll see is BF (Brine Fill). Set the value 12 minutes to 9x48, 15 minutes
to 10x54, 19 minutes to 12x52.
Press the Cycle button to advance to the next step.
Step 13
The next setting you’ll see is BD (Brine Draw). Set the value to 60.
Press the Cycle button to advance to the next step.
Step 14
The next setting you’ll see is RR (Rapid Rinse). Set the value to 10.
Press the Cycle button to advance to the next step.
Step 16
The next setting you’ll see is FM (Flow Meter). Set the value to t0.7.
Press the Cycle button to accept and you’re all set with programming your Valve.

12 www.aquascience.net800-767-8731
Fleck 5600 SXT Digital Water Softener System Installation Manual
Step 18
Slowly turn the Bypass valve lever slightly to the letter “B” in the word Bypass. This
will allow water to slowly ll your tank.
Step 19
Once the tank is full, turn the Valve lever fully to Service. You can check the status
of the water ll by shining light through the tank.
Fleck 5600 SXT Digital Programming (continued)
If you need any help with your set up, please visit our easy to follow, resource rich website, www.aquascience.net
or just give us a call at 800-767-8731.
Step 17
While the tank is lling press and hold the cycle button until you see - - - -
This will allow the air to escape as the tank is lling. Once you see water coming
out of the backwash line you can open the valve all the way and allow the system
to go through a full cycle.
This manual suits for next models
1
Table of contents
Other Aqua Science Water Filtration System manuals