Aquabot XTREME User manual

IN GROUND RESIDENTIAL
ROBOTIC SWIMMING POOL CLEANER
OPERATOR’S MANUAL &
TROUBLESHOOTING GUIDE
Please Read Carefully Before Using Your Pool Cleaner
ENGLISH
PART # 820332

The following specifications are for the cleaner models - AQUABOT XTREME
POOL TYPE APPLICATION: All residential pool types; Covers floor and lower portion of walls.
DIRECTIONAL GUIDANCE MECHANISM: Features the patented Cable Float
This device turns your cleaner on the floor (rather than the wall), limiting wasteful wall time and providing more attention to
the floor, where the majority of the debris resides. This oers faster, more ecient and complete coverage of virtually any pool
configuration, while extending the life of your cleaner. Your cleaner will move across the floor, reach the side wall, tilt 90° and climb
for a couple of seconds and then reverses to about the pool’s midpoint and stops. Its internal pump will then turn o and it will
drive in reverse, allowing its Cable Float to lift that side of your cleaner while its opposing side maintains contact with the floor,
resulting in an a pivot. The pump will then turn back on and your cleaner will continue back to the wall and complete this sequence
three times. On the fourth time, your cleaner will continue to drive across the entire width of the pool, climb the opposing wall for
a few seconds, reverse and repeat this entire sequence throughout its operation.
POWER SUPPLY: No Timer or Remote Control
To operate your cleaner simply plug the Power Supply into a properly grounded outdoor (GFCI / R.C.D) outlet and the cleaner’s
Floating Cord into the Power Supply. Press the ON / OFF switch on the Power Supply upwards to ON. Your cleaner is now working.
Note that your cleaner will automatically shut o after 4 hours of operation. To restart;
Turn your Power Supply’s ON/OFF switch to OFF, wait 30 seconds and then press ON, that’s it!
FILTRATION: Includes One Fine Filter Bag.
BOTTOM LID ASSEMBLY: Features the next generation Bottom Lid Assembly
Does not include NeverStuck™ Rollers or Variable Port Extensions, which are available for purchase through your Aqua Products
Authorized Dealer or online at www.AquaProducts.com
DO NOT RETURN TO DEALER
Contact Aqua Products dedicated support personnel toll-free at (800) 845-4856 for live assistance or via e-mail at
CustomerService@AquaProducts.com for personal support and answers to any questions regarding technical or
operating issues of your cleaner.
To view the latest information for your cleaner, such as troubleshooting videos, updated Operator Manuals, eco-ecient savings tips and more
visit us online anytime at AquaProducts.com
IMPORTANT! This model does NOT climb to waterline! It utilizes the patented Cable Float directional guidance mechanism to cover all
pool configurations without climbing to the waterline and therefore has NO Floating Handle!
IMPORTANT! NEVER lift your cleaner out of the water or carry it outside the pool by its Floating Cable as this will cause damage to the
Cable internally requiring costly repair! Always hold and carry your
cleaner by its side Handles!
IMPORTANT! ALWAYS unplug the Floating Cable from its Power Supply when removing your cleaner from the pool to protect your
cleaner from harmful, unwanted potential out-of-water operation due to power surges or unintentional start up, which would cause
severe damage to your motor’s seals, requiring costly motor replacement!
IMPORTANT! ALTHOUGH a Filter Bag may appear clean it is capable of microfiltering particles 20 times smaller than what the naked
eye can see! It is crucial to thoroughly clean the Bag with each use to ensure its ability to properly clean and for your cleaner to con-
sistently have adequate suction and water flow to cover your entire pool! As your pool has a great amount of surface area and water
volume to be micro filtered it may take several uses and Bag cleanings until your cleaner is able to maintain your pool without frequent
Bag cleanings prior to completion of its suggested cleaning cycle (up to 3 hours).
WARNING! ONLY plug your cleaner into a Ground Fault Circuit Interrupter (GFCI) / Residual Current Device (R.C.D) protected outlet
to prevent possible shock or death! ALWAYS keep your Power Supply at least 12’ / 3m from the pool‘s edge as your Power Supply is
water resistant, NOT waterproof!
#820236

2
TABLE OF CONTENTS
Operating Features ..................................................................................................................... 3-4
Quick Start Instructions ........................................................................................................... 5
Setting Up Your Cleaner ............................................................................................................ 6-7
Setting up the Power Supply .................................................................................................... 6
Cleaner Start Position ................................................................................................................ 6
Directional Guidance ................................................................................................................. 7
Maintaining Your Pool Cleaner ............................................................................................... 8-14
Cleaning and Changing the Filter Bag ...................................................................................... 8
Flotation ...................................................................................................................................... 9
Propeller Care ............................................................................................................................. 10
Floating Cable Care .................................................................................................................... 10
Scrubbing Brushes Care & Replacement ................................................................................ 10-11
Changing Drive Tracks ............................................................................................................... 11
Changing Drive Belts ................................................................................................................. 12-13
Cleaner Storage .......................................................................................................................... 14
Preparing Your Cleaner for Shipping .................................................................................... 14-15
Troubleshooting Guide (Summary) ........................................................................................ 16-17
Troubleshooting Guide (In Depth) ......................................................................................... 18-21
WARNING: Never operate your cleaner when it is not totally submersed in the pool water! Doing so will void
warranty and may cause severe damage to motors and require costly repairs!
WARNING: Never allow anyone to swim in the pool while the cleaner is in the pool!
WARNING: Using the Floating Cable to lift the cleaner out of the water will cause severe damage to your cleaner and
may result in costly repair!
WARNING: The Power Supply must be at least 12 feet / 4 meters from the pool’s edge at all times!
WARNING! A Ground Fault Circuit Interrupter (GFCI) / Residual Current Device (R.C.D), must be installed to
protect your electric outlet and to prevent and possible electrical shock!

3
OPERATING FEATURES
Although the shape and color of cleaners and components featured herein may not be identical to those of your cleaner,
their operating and service procedures are. The reference numbers below are used throughout this manual.
1. Side Handle
2. Outlet Top
3. Propeller
4. Side Plate
5. Wheel Tube Retaining Ring
6. Brushes
7. Pump Motor
8. Drive Motor
9. Filter Bag
10. Bottom Lid Assembly (see page 4)
11. Filter Screen
12. Floating Cable (see below)
13. G-Tooth™ Drive Track
14. Wheel Tube
FLOATING CABLE FEATURES
Figure 2
2 Prong
Male
Connection
14b
14a
14c
14a. Floating Cable
14b. Cable Float
14c. Cable Float (2 prong male connection)
Figure 1
12
14
10
1
2
3
4
6
8
7
5
9
11
13

4
Figure 3
BOTTOM LID ASSEMBLY
12. Bottom Lid
12a. Wire Frame Bag Support
12b. “H” - Float (Fig. 3a)
12c. Side Pocket Floats (Fig. 3a)
12d. Debris Intake Port Flap
12e. Filter Bag
12a
12
12e
12
12c
12d
12b
12d
* Fuse Holder is located on the back of the Power Supply
POWER SUPPLY FEATURES
Figure 4
15a. Power Supply Handle
15b. Power Switch - ON/OFF
15c. Fuse Holder*
15d. Power Supply (Housing)
15e. Floating Cable Socket
15f. Power Supply Cable
15a 15d 15e 15f
15b

5
QUICK START INSTRUCTIONS
SETTING UP YOUR NEW ROBOTIC POOL CLEANER IS AS EASY AS 1, 2, 3!
WARNING: The Power Supply must be placed at least 12 feet / 4 meters from the pool’s edge!
Power Supply
GFCI / RCD
outlet
Floating
Cable
Figure 5c
WARNING: A Ground Fault Circuit Interrupter (GFCI) / Residual Current Device (R.C.D.) must be installed to
protect your electric outlet and to prevent any possible electrical shock!
TIP! To help protect your Floating Cable from potentially getting wrapped around your cleaner’s brushes, it is suggested to
turn off your pool’s filtration system while your cleaner is in operation.
NOTE: It is suggested to unplug the Power Supply when the
cleaner is not in use.
Power Supply Floating Cable
12’ / 4m
from pool’s edge
Make sure that the Power
Supply is positioned at the
center of the long side of the
pool that that the cleaner enters
at the pool at its midpoint.
Figure 5b
Figure 5a
Press the Switch to ON to start your cleaner.

6
Figure 6a
Figure 6b
Long
side of
pool
Power
Supply
NOTE: It is suggested to unplug your Power Supply when not in use to prevent accidental starts!
WARNING: The Power Supply must be placed at least 12 feet / 4 meters from the pool’s edge at all times!
WARNING: A Ground Fault Circuit Interrupter (GFCI) / Residual Current Device (R.C.D.) must be installed to
protect your electric outlet and to prevent any possible electrical shock!
2. CLEANER START POSITION
1. Holding the Handle, submerge your cleaner upside
down, and gently rock it back and forth under the water
to allow any trapped air to escape, which is critical for
proper balancing or it may not clean and cover your pool
as designed.
2. While submerged turn upright, then let go allowing your
cleaner to settle to a level area on the pool floor near the
shallow end. Starting it on an incline (like a deep end
hopper) may cause the cleaner, program and sensors to
mistakenly consider the incline as the floor, and conversly
on the floor as a wall. This would offset its cleaning
program and coverage, resulting in missed areas. Be
sure to start the cleaner on a level surface every time.
3. Turn ON Power Supply to begin cleaning.
Plug the Power Supply Cord into a standard Ground Fault Circuit Interrupted (GFCI) / Residual Current Device (R.C.D.)
protected outlet. If your GFCI outlet is too far away and your cleaner does not have enough Cable to properly enter the
pool at the midpoint of its longest side then you may use a proper outdoor grounded extension cord, but always keep the
Power Supply at least 12’ / 4 m from the pool’s edge!
The Power Supply (Fig. 4) should be placed in a sheltered
area, at least twelve (12) feet / four (4) meters away from
the pool at all times (Fig 6a). While the Power Supply
is weather-resistant, it is not waterproof and therefore
should be placed in an elevated dry area where it will not
be allowed to sit in puddles of water. Less is More: For
optimum cleaning performance locate the Power Supply
at the mid-point of your pool’s longest side (Fig. 6b). This
will allow your cleaner to make the best use of its length of
Floating Cable without using excess Cable length. Excess
Cable in the pool may result in it unnecessarily twisting,
kinking or getting entangled within your cleaner’s rotating
scrubbing Brush system. Excess Cable should be kept
coiled outside the pool near the Power Supply.
1. SETTING UP THE POWER SUPPLY
TIP! To help protect your Cable from potentially getting twisted, it is suggested to turn off your pool’s filtration system while
your cleaner is in operation to reduce the pool’s filter circulation effect that may push and circulate the Cable.
SETTING UP YOUR ROBOTIC POOL CLEANER

7
DIRECTIONAL GUIDANCE
CABLE FLOAT
The Cable Float (Fig. 2) is a flotation device that enables your cleaner to turn on the floor where the majority of debris resides.
This offers faster, more efficient and complete coverage of virtually any pool configuration. Your cleaner will move down
the wall and about halfway across the pool floor and then reverse. When it reverses its internal Pump Motor will temporarily
turn off allowing the Cable Float to lift its side of the cleaner allowing only the opposing side to have traction. As the cleaner
reverses, the side with traction will cause your cleaner to turn in an arc-radius manner. The internal Pump will turn back on and
full traction will be regained, allowing the cleaner to continue in a straight line to the wall.
CLEANING PATTERN
Pattern Description:
A. Your cleaner searches for the wall and climbs it for a couple of
seconds reaching only about 1.5’ / .5m or so.
B. Your Cleaner moves across the floor to about half the width of the
pool and then reverses backwards for a few seconds. The cleaner
turns slightly and moves towards the wall again.
C. Your cleaner climbs the wall for a couple of seconds.
D. Your cleaner reverses to move back across the floor to about
half the width of the pool and then reverses backwards for a few
seconds. The cleaner turns slightly and moves towards the wall
again.
E. Your cleaner climbs the wall for a couple of seconds.
F. Your cleaner moves across the floor to about half the width of the
pool and then reverses backwards for a few seconds. The cleaner
turns slightly and moves towards the wall again.
G. Your cleaner climbs the wall for a couple of seconds.
H. Your cleaner moves to the opposite wall to restart the full pattern.
Cable Float
A
B
C
D
EG
H
F
NOTE: Your robot is equipped with a safety feature that automatically reverses it after a number of minutes should it not locate a wall and
tilt to approximately 90º. This protects your cleaner should it encounter the underside of a ladder for example and be unable to climb.

8
MAINTAINING YOUR POOL CLEANER
CLEANING AND CHANGING THE FILTER BAG
Thoroughly cleaning the Filter Bag (see step 4 below) after every use is the most important maintenance step you can take to ensure
optimum performance of your cleaner. The Filter Bag’s (Page 4, Fig. 3) holding capacity is large in comparison to all other brands of
independent pool cleaners, but far smaller than that of a pool’s main filter. Perhaps it is more important to know that your cleaner’s
Filter Bag can filter out particles down to 20 times smaller than what many main filters can. This means that the fine particles such as
algae and bacteria, invisible to the naked eye, which slip through the main filter and back into the pool to settle into the pores of the
pool’s surface, will be scrubbed loose and vacuumed up by your cleaner and retained in its Filter Bag. Therefore, although you may
see only a fine coating of dirt, the Filter Bag itself may be deeply saturated with ultra fine particulate matter from your pool’s large
surface area and the flow of water through it becomes restricted and suction is reduced. This will result in remaining dirt and debris
not being completely removed from the pool.
Also, strong water flow is required to force the cleaner against the wall when climbing. A dirty Filter Bag weighs the cleaner down,
making it hard for your cleaner to climb due to the added weight and reduced water flow. This lack of climbing may limit your cleaner’s
ability to cover the entire pool and pick up any more dirt. Therefore, it is important to clean the Filter Bag thoroughly (see step 4 below)
with every use so that the fine particles that get trapped within the fibers of the Filter Bag are removed.
To Clean The Filter Bag:
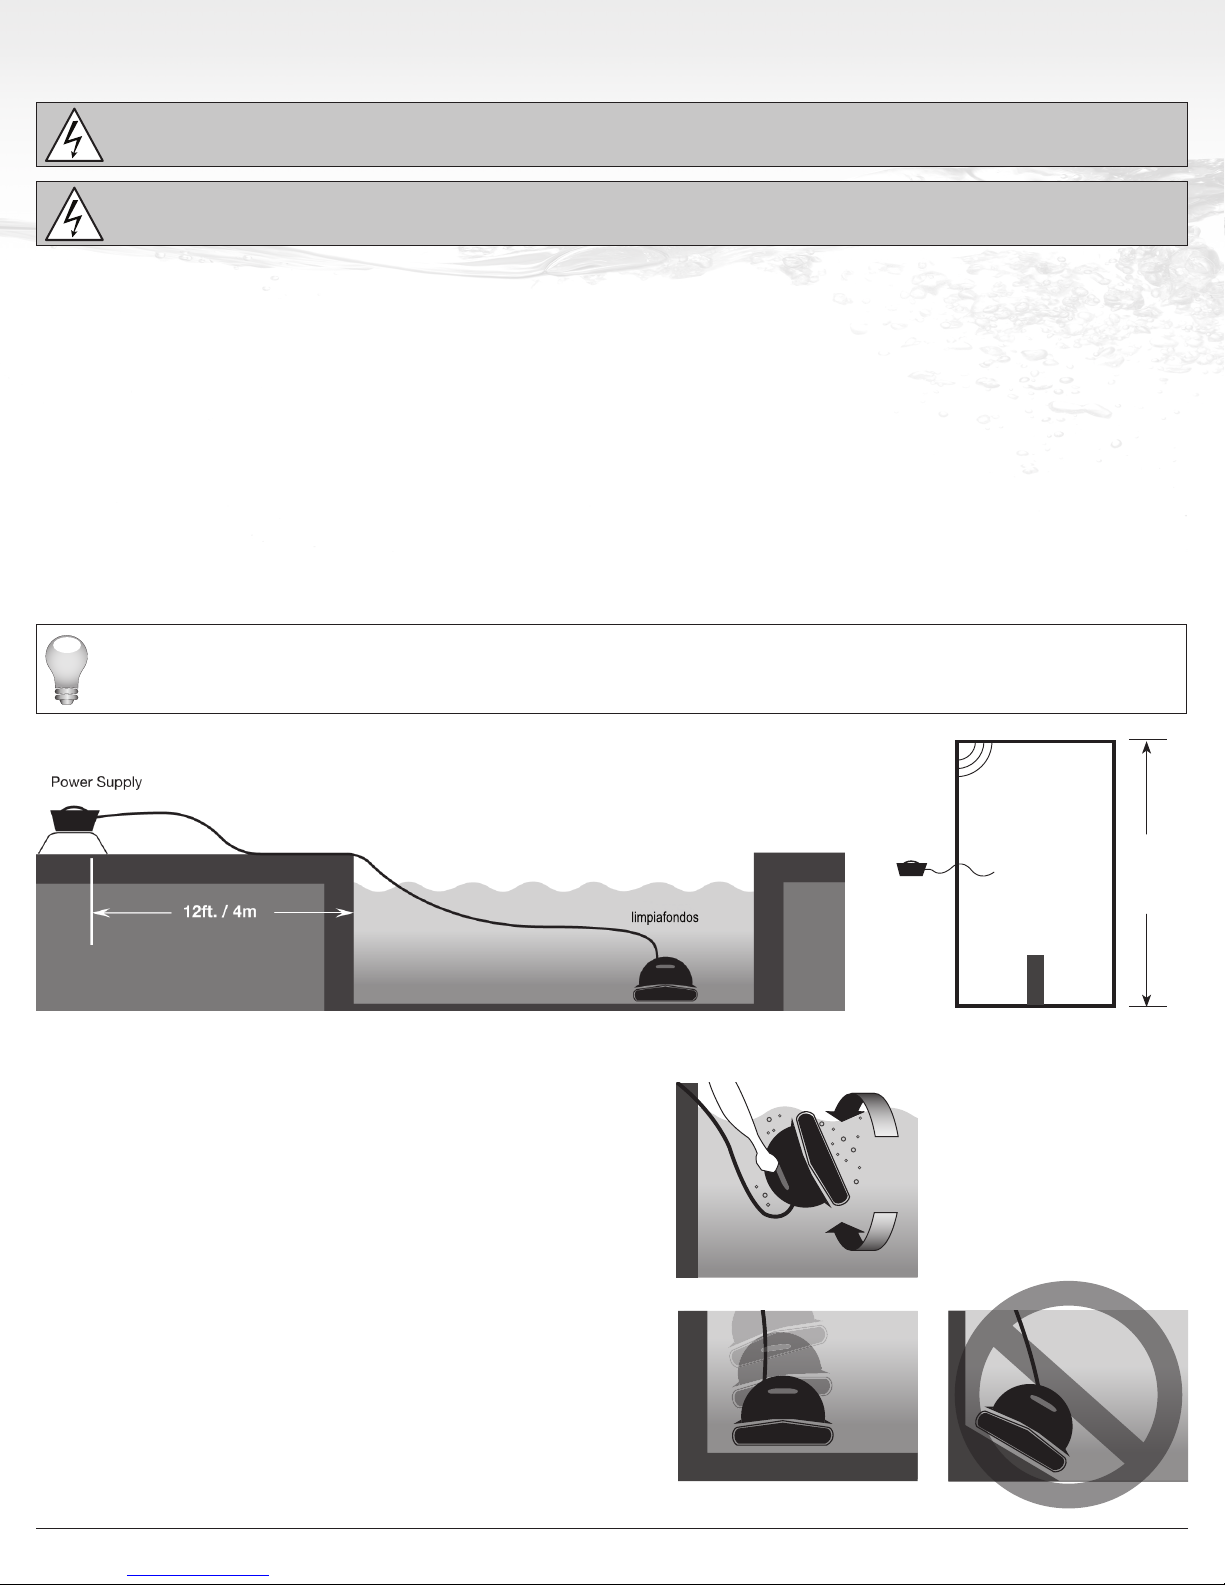
1. Unplug the Power Supply (Fig. 7a).
2. If your cleaner is in the pool, gently pull it toward you using
the Floating Cable (Fig. 7b) until the Handle is within reach.
Use the Handle (not the Floating Cable) to slowly pull your
cleaner out of the pool after allowing most of the water to
drain from your cleaner back into the pool.
IMPORTANT: Using the Floating Cable to lift the
cleaner out of the water will cause severe damage to
your cleaner and may result in costly repair!
Power Supply
GFCI / R.C.D.
outlet
Floating
Cable
Floating Cable Handle
3. Lay your cleaner on its back or side on a soft surface to avoid
scratching it. Individually pull each Lock Tab gently away
from your cleaner’s body to free the Bottom Lid (Fig. 8).
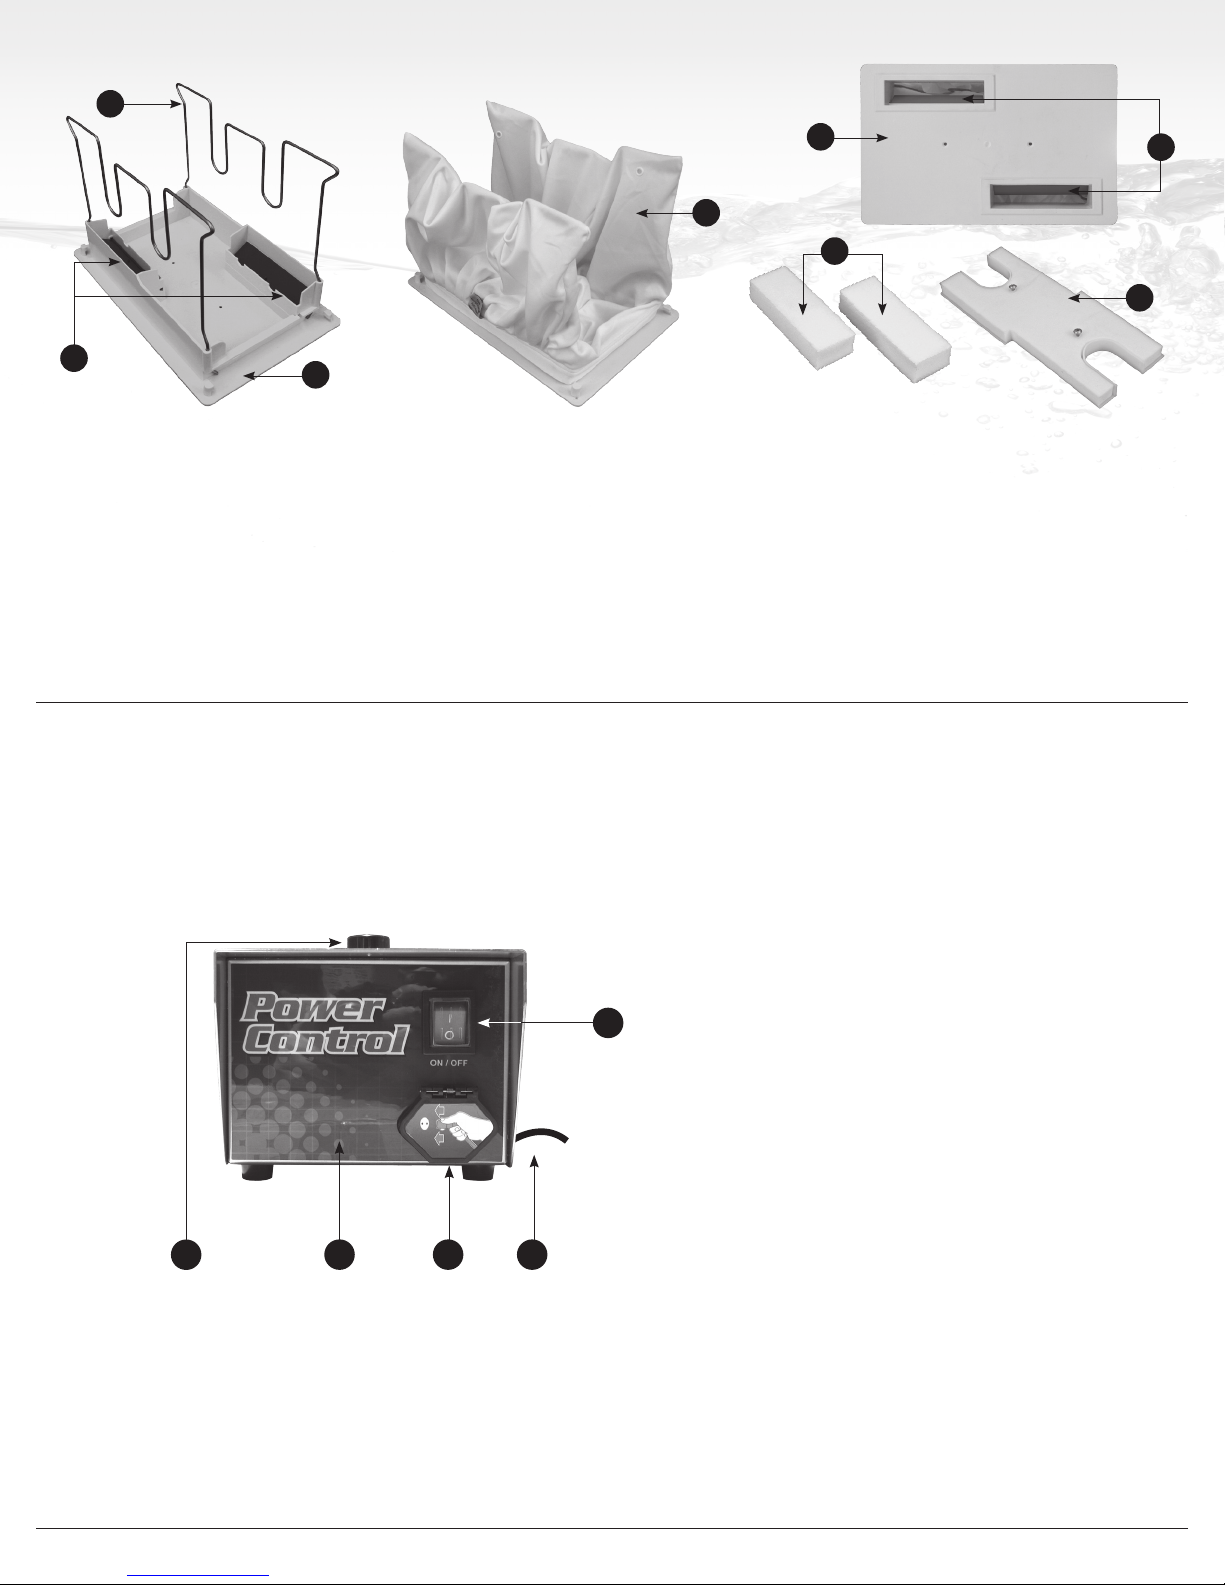
4. Remove the Filter Bag from the Wire Frame Bag Supports
(Fig. 9a), turn it inside out and with a high pressure garden
hose, wash off all the dirt from the inside out or dunk it in
a clean bucket of water and wring the Bag continuously
until the rinse water is clear. If necessary, you may machine
wash (Gentle Cycle / Cold Water only) the Bag with NO
DETERGENT. You may re-install the bag immediately or
allow it to air dry (never iron or machine dry the Filter Bag).
5. Re-install the Bag on the Wire Frames of the Bottom Lid
Assembly, making sure that the “felt” (soft) side of the Fine
Filter Bag is facing in. To ensure a proper fit of the Filter
Bag onto the Bottom Lid Assembly, locate the Small Label
near the Filter Bag’s elastic bottom. Position the Filter Bag
so that the Small Label is at the center of either long side of
the Bottom Lid (Fig. 9a). Then pull the elastic bottom over
each Wire (Fig. 9b) and slide the Filter Bag down along the
Wires until the Bag reaches the Bottom Lid. At that point
the Filter Bag’s elastic bottom should be stretched over the
plastic ridges located at the base of the Bottom Lid. This
holds the Filter Bag in place. Pull the Filter Bag corners to
the top corners of the Wire Frame and pull the extra Bag
material from each corner inwards along the top center of
the Wire Frames (Fig. 9b).
6. Re-install the Bottom Lid Assembly into the bottom of your
cleaner. Be sure that the Filter Bag’s fabric is not interfering
with the locking of the Lock Tabs and that you clearly hear
each Tab lock shut.
Figure 9bFigure 9a
Figure 8
Figure 7a
Figure 7b
Small Label
Wire Frame Bag
Support
Lock Tabs
Bottom Lid
Assembly
IMPORTANT: Although a Filter Bag may appear clean it is capable of microfiltering out particulates 20 times smaller
than what the naked eye can see! It is crucial to thoroughly clean the Bag with each use to ensure its ability to
properly cover and clean your pool!

9
FLOTATION
Your cleaner is a universal pool cleaner which performs under varying chemical
and temperature conditions in your pool. Your cleaner offers the best possible
performance when it is virtually weightless in your pool. Therefore, careful
balancing of its weight is important for proper operation. Generally, a new cleaner
is universally balanced when used for the first time and additional Flotation (Fig.
10a-b) is not required on start-up.
In some instances the pool environment (e.g. temperature, chemicals, water, etc.)
may offset your cleaner’s natural buoyancy. Therefore, flotation devices (Fig.
10a-b) have been included in the packaging with your new cleaner to assist its
buoyancy.
Figure 10a
Figure 10b
Adding Flotation on Bottom Lid Assembly (Fig. 11a-b):
1. Remove the Filter Bag. Then place the “H”-Float (Fig. 10a), foam
side down, against the inside base of the Bottom Lid Assembly
(Fig. 11a). Secure the “H”-Float with the 2 screws provided by
fastening them in from the outside of (from under) the Bottom Lid
Assembly. This should provide adequate buoyancy.
2. Should your cleaner require more Flotation, then add the 2
remaining Side Pocket Floats (Fig. 10b), 1 at a time until adequate
buoyancy is achieved. Pocket Floats do not require any screws or
glue. Simply place them into the open rectangular areas next to
the Debris Intake Port Flaps (Fig. 11b).
Figure 11a Figure 11b
IMPORTANT: Careful removal of air trapped in the housing is critical.
Each time you place your cleaner in the pool use the Handle (while
submersed) to turn it upside down and gently rock it back and forth to
allow any possible trapped air to escape (See Page 6, #2)!
IMPORTANT: Temperature and chemical composition changes can greatly affect the buoyancy of your cleaner!
Therefore, if you have previously installed Flotation devices in your cleaner to assist its buoyancy, it may be
necessary to remove the devices one-by-one until proper buoyancy is restored!

10
FLOATING CABLE CARE
Occasionally you should stretch the Floating Cable (Page 3; Fig. 2) out to its full length to prevent a memory from forming
and ensure your Cable will not impede your cleaner from reaching all areas of your pool. At that time you should also check
the Floating Cable for external damage. Continual rubbing against sharp or rough surfaces may abrade the Floating Cable
resulting in damage and possible short-circulating your cleaner. Animal bites may puncture or fray the cable as well. For
these reasons it is important to periodically inspect the Floating Cable.
PROPELLER CARE
It is a good practice to inspect the Propeller (Page 3; Fig. 1) once or twice
per season to check for obstructions, which may reduce water flow and thus
vacuuming ability and pool coverage.
1. First unplug the cleaner from the Power Supply (Fig. 12a).
2. Then remove the Screws that secure the Outlet Top to the body (Fig. 12b-
c). The Outlet Top has 4 Screws. Using a screwdriver or similar instrument,
not your finger, turn the Propeller to check that it spins freely and inspect the
Propeller for clogs: hair, twigs or other debris, which may keep it from spinning
freely. Remove any accumulated material and replace the Outer Top.
Figure 12c
Figure 12a
Figure 12b
IMPORTANT: To protect against personal injury and damage to your
cleaner always unplug your cleaner from its Power Supply prior to
performing any maintenance or repair procedures!
IMPORTANT: Be careful not to over-tighten the Screws or you may
“strip” the screw holes or crack the Outlet Top when re-assembling!
IMPORTANT: Never lift your cleaner out of the pool using the Floating Cable! Your may use the Floating Cable
to pull the cleaner to the side of the pool, but always use the Handle to remove it from the pool (See Page 8,
Fig. 7b)! Using the Floating Cable to remove the cleaner from the pool will result in internal connections being
broken and costly damage being caused to your cleaner! (See Page 8, Fig. 7b)
Power Supply
GFCI
outlet
Your cleaner’s Scrubbing Brushes provide traction and give it
the ability to loosen debris. It is important that you not let the
Brushes get worn down otherwise your cleaner may lose the
ability to scrub, climb, turn and move to clean and cover all areas
of the pool. Eventually you will need to changes the Brushes on
your cleaner. When they need replacement will depend upon
how often you use your cleaner and upon the conditions of
your pool. High chemical concentrations and rough surfaces
will cause faster Brush wear. We recommend that you inspect
Brushes frequently to check for excessive wear.
NOTE: Super Brushes stiffen in water less than 70ºF which may
lessen their ability to climb pool walls.
Super Brush
SCRUBBING BRUSHES CARE AND REPLACEMENT

11
To Change Super Brushes for full length and “split” Wheel Tubes: (Fig. 13)
1. Using a pair of pliers, grab one end of the stainless steel Rod that is securing
the old Brushes onto the Wheel Tube. Pull away from the Wheel Tube slowly
until the entire existing Brush is freed and removed (Fig. 13).
2. Wrap the new Super Brush around the Wheel Tube.
3. Join the ends of the replacement Super Brush using the Metal Rod supplied
in the package. Slide the Rod through the Tabs molded into the ends of the
Brush (Fig. 13). Make sure that the Rod is inserted through every Tab.
To protect against personal injury and damage to your cleaner always unplug your cleaner from its Power Supply
prior to performing any maintenance or repair procedures!
TIP! Leave Super Brushes in direct sunlight to warm
up before mounting. They will be more pliable and
easier to work with.
Figure 13
TIP! Lubricate the Rod with soapy water and use a pair of pliers to hold
the Rod to make it easier to insert.
CHANGING DRIVE TRACKS
Drive Tracks (Fig. 14) may become worn over the normal course of use and
will require replacement based on the frequency of use, the pool’s chemical
balance, pool surface and length of season. Worn (stretched, loose or “flat-
spotted”) Drive Tracks may effect the cleaning pattern impeding its ability to
cover the entire pool. If during your periodic inspection you find that your
Drive Tracks are worn, please contact your Authorized Dealer for replacement
Drive Tracks .
1. Unplug your cleaner from its Power Supply and remove your cleaner
from the pool.
2. Place your cleaner on its side, on a soft surface which will not scratch the
Body’s finish.
3. With your thumbs pushing against the Side Plate (Fig. 15), hook your
fingers under the Drive Track and pull it toward the Side Plate. When you
get the Drive Track over the “lip” of the Side Plate, hold it there with one
hand, and with the other hand, grip the Wheel Tube (Fig. 15) and rotate it
away from the cleaner until the Drive Track “walks” over the Side Plate.
Continue this until the Drive Track is free.
4. To mount the new Track, hook it around the lower Wheel Tube end and
pull it upward as you guide it between the cleaner’s Body and Side Plate.
5. Push inward on the Drive Track and force it over the edge of the Side
Plate. Rotate the Wheel Tube, towards you, until the Drive Track
properly seats itself on the Wheel Tube between the Side Plate and the
cleaner’s body
6. Repeat steps 1 through 5 with the Drive Track on the other side of the
cleaner.
Figure 15
Figure 14
G-Tooth™
Drive Track

12
CHANGING DRIVE BELTS
Drive Belts (Page 13; Fig. 19a-b) may become worn over the
normal course of use and will require replacement based on
the frequency of use, the pool’s chemical balance and length
of season. Worn Drive Belts will impede your cleaner’s ability
to move or climb and may effect the cleaning pattern impeding
its ability to cover the entire pool. If during your periodic
inspection you find that your Drive Belts are stretched, loose
or “flat-spotted please contact your Authorized Dealer for
replacement Drive Belts.
1. Remove Drive Tracks (See CHANGING DRIVE TRACKS).
2. Place the cleaner on a non-abrasive surface and turn
cleaner upside down. Remove Bottom Lid Assembly
(Fig. 16).
3. Remove the Wheel Tube Retaining Rings (Fig. 17).
4. Locate and remove 4 screws (see Fig. 18) on Drive Motor
side, which holds Side Plate in place.
Figure 16
Figure 17
Wheel Tube Retaining Ring
“E” Clip
TIP! We suggest using needle nose pliers to remove
the Wheel Tube Retaining Rings.
TIP! Please see Page 13 for Top View and Inside View
of the Drive Belt Assembly (Figs. 19a-b)!
IMPORTANT: Always replace both Tracks at the same time! Replacing
only one will adversely effect the cleaner’s cleaning pattern!
NOTE: Before removing the screws, notice how the Drive
Belts, Drive Pulley, Stepped Sleeve Rollers, Small Rollers and
Bushings are positioned for re-assembly (Page 13; Fig. 19 a-b)
5. Remove old Drive Belts and replace them with new
Drive Belts, being careful to properly position the
replacements: One Belt from the Drive Pulley to the Front
Wheel Tube and one from the Drive Pulley to the Rear
Wheel Tube. The Belts must press against the thicker
side of the Stepped Sleeve Rollers for proper tension
(Page 13; Fig. 19 a-b).
6. To re-assemble, reverse steps 5 through 2.
4 Screws on Drive Motor side
Figure 18

13
Drive Pulley Drive Belt
Side Plate
Wheel Tube
Small Rollers
Stepped Sleeve
Rollers
Figure 19a
Inside View
Figure 19b
Top View
NOTE: When re-assembling be sure that the Drive Tracks are positioned
so that they press against the thick side of the Stepped Sleeve Rollers.
When re-assembling,
please make sure
that the teeth of the
Drive Belts are facing
inward.
DRIVE BELT ASSEMBLY

14
PREPARING YOUR CLEANER FOR SHIPPING
In the event that you should have to send your cleaner in for repair, you must package the cleaner properly to ensure it
reaches the repair facility safely and without incurring damage during transport. This will delay your repair turnaround
time and require you to contact your shipper directly to dispute damages.
NOTE: A log of all information from your contact with the Authorized Service Center (i.e. RMA, name, dates, cleaner model and
serial number, etc.) should be kept with your operator manual and / or other important documents for your reference (See page
22: NOTES).
Ask the Service Center whether the Power Supply needs to accompany the cleaner. If yes, the Power Cord should
be coiled (Fig. 20a) and the Power Supply should be entirely well wrapped in bubble-wrap or equivalent protective
material (Fig. 20b). The Power Supply should be positioned in the center of the base of the shipping box and the
shipping box base must be firmly sealed (Fig. 20b).
Figure 20a Figure 20b
Correct Incorrect
(do not coil cable in a
figure 8 configuration)
Incorrect
(do not place cleaner
on top of power supply)
CLEANER STORAGE
When not in use it is important that your cleaner, its Floating Cable and Power Supply are properly stored in a clean and dry
area, away from direct sunlight, protected from below freezing temperatures and exposure to chemicals and their fumes (i.e.
chlorine). This will help prevent any unnecessary wear or damage to your cleaner or its components. Prior to storing your
cleaner, thoroughly clean your Filter Bag and dry off your cleaner. Ensure that its Floating Cable is untangled, not twisted
nor in a figure eight, but rather coiled either around your cleaner’s body or in large circular loops and positioned under your
cleaner. Be sure to rest your cleaner on its side so that its Brushes do not get flat spots.

15
Your cleaner should be completely wrapped in
bubble-wrap or equivalent protective material. The
protected cleaner should be positioned in the center
at the base of the protective barrier that is shielding
the cleaner from the Power Supply and the Floating
Cable underneath. Insulated protective material like
bubble-wrap should be placed between the cleaner
and the shipping box at walls and top to secure the
cleaner and around shipping during transit (Fig. 23).
Include a copy of all information obtained during your
contact with the Authorized Service Center, including
your contact information and cleaner’s serial number
in an envelope (Fig. 24). A copy of the information
relevant to the current technical issue should be sent
in the packaging with your cleaner in an envelope.
Please include a letter indicating the following:
• Technical issue
• Troubleshooting procedures that you completed
• Who you spoke with, when and what was determined
• Your contact information (name, email, phone number,
address cleaner model name and serial number)
IMPORTANT: Keep a copy of your shipping information for tracking purposes! See page 22.
Figure 23
The cleaner’s Floating Cable should be coiled
and encircled around the Power Supply located
at the base of the shipping box (Fig. 21).
A protective barrier (preferably thick
cardboard) should be placed on top of the
Floating Cable and Power Supply (Fig. 22).
Figure 21 Figure 22
Figure 24
Correspondence

16
TROUBLESHOOTING GUIDE
~ SUMMARY ~
The most common troubleshooting issues are presented in this summary. Should you wish a more detailed description
of a procedure or have other troubleshooting issues please refer to the In Depth Troubleshooting Guide on pages 18-21.
1. PUMPS WATER, BUT DOES NOT MOVE OR MOVES SLOWLY
A. Remove any foreign matter that may be obstructing Drive Track (Page 3; Fig. 1, 13) movement.
B. Check Drive Belts and Drive Tracks (Pages 11-13). Make sure they have not slipped out of place and that they
are not loose.
C. With cleaner upside down on a soft surface (to protect from scratching its body) plug Power Supply in and
turn it on for less than a minute to observe whether the Drive Pulley (Page 13; Figs. 19a-b) is turning. If it is
not moving please visit your local Authorized Service Center.
2. MOVES BUT DOES NOT PICK UP DIRT AND DEBRIS (DOES NOT PUMP WATER)
A. Clean the Filter Bag thoroughly (Page 8).
B. Ensure that the Debris Intake Port Flaps (Page 4; Fig 3, 12d) on the underside of the Bottom Lid Assembly (Fig
3) are free to open and close.
C. Remove Outlet Top (Page 10; Figs. 12b-c) by removing screws located at the top and clean any hair or debris
on or around the propeller (see Page 10 PROPELLER CARE). When reassembling the Outlet Top, BE CAREFUL
NOT TO OVER-TIGHTEN THE SCREWS.
4. FALLS OR FLIPS BACKWARD OFF OF THE WALL
A. Make sure Pump Motor (Page 3; Fig. 1, 7) is working properly and that the Propeller is not being slowed or
stopped due to debris caught around it. Please refer to PROPELLER CARE (Page 10; Figs. 12a-c).
B. Check Scrubbing Brushes (Pages 10-11, SCRUBBING BRUSHES CARE AND REPLACEMENT) for wear.
C. Remove Flotation (see Page 9, FLOTATION).
WARNING: Before performing any troubleshooting maintenance procedures on your cleaner, it should be
disconnected from the Power Supply (transformer) and the Power Supply should be unplugged from the electrical
outlet to prevent the possibility of personal injury or damage to the cleaner!
5. DEBRIS COMES OUT OF THE CLEANER WHEN REMOVING IT FROM THE POOL - BOTTOM LID ASSEMBLY (Page 4;
Fig. 3) DOES NOT CLOSE PROPERLY
A. Make sure Filter Bag is mounted properly onto the Bottom Lid Assembly (Page 8; Figs. 8 and 9a-b).
B. Make sure Debris Intake Port Flaps on underside of your cleaner move freely to open and close (Page 4; Figs 3,
12d).
C. Make sure Pump Motor (Page 3; Fig. 1, 7) is working properly and that the Propeller is not being slowed or
stopped due to debris caught around it. Please refer to PROPELLER CARE (Page 10).
WARNING: Before performing any troubleshooting maintenance procedures on your cleaner, it should be
disconnected from the Power Supply (transformer) and the Power Supply should be unplugged from the electrical
outlet to prevent the possibility of personal injury or damage to the cleaner!
C. Make sure Floating Cable Plug (Page 5; Fig. 5a) fits tightly into Power Supply.
D. First, unplug the Power Supply from the outlet! Then, using a cotton swab, dry any moisture within Fuse
Holder (Page 4; Fig. 4) and on fuse itself.
E. Check Floating Cable (Page 3; Fig. 2) and Power Supply Cable for possible cuts or damage.
6. DOES NOT PUMP WATER OR MOVE, OR POWER SUPPLY (Page 4; Fig. 4) DOES NOT TURN ON
A. Check to see if electrical outlet has power.
B. Check the Fuse in the Power Supply (Page 4; Fig 4). If necessary, replace with the same type / amperage Fuse.
If unsure as to Fuse type, please contact your Authorized Service Center.

17
7. DOES NOT CLEAN ENTIRE POOL (MISSES AREAS)
A. Clean Filter Bag thoroughly (Page 8).
B. Install Flotation to help the cleaner climb walls partially if it’s not climbing (Page 9).
C. Operate the cleaner several cycles (up to 7 hours each).
8. GETS STUCK ON, MAIN DRAINS, RETURN FITTINGS, LIGHTS, STAIRS OR IN CORNERS
A. Check Scrubbing Brushes for wear (Pages 10-11 SCRUBBING BRUSHES and REPLACEMENT).
B. Adjust Flotation (Page 9, FLOTATION).
9. POWER SUPPLY APPEARS TO SHUT OFF BEFORE COMPLETING A CLEANING CYCLE
A. Unplug the Power Supply and check the Fuse. (Page 4; Fig. 4)
10. DOES NOT SINK OR FLOATS AWAY FROM THE WALL
A. Remove any additional flotation and trapped air (Page 6, CLEANER START POSITION).
B. Check for squeaking or grinding.

18
PUMPS WATER, BUT CLEANER DOES NOT MOVE OR MOVES SLOWLY
Remove the cleaner from the pool and place it upside down (on a non-abrasive surface so that it won’t become
scratched or scuffed) and unplug it from the Power Supply.
1. Check for and remove any debris such as hair, string, or leaves that may be obstructing the free movement of the
Drive Pulley, Drive Belts or Drive Tracks (Page 3; Fig. 1, 13).
2. Check that the Drive Belts and Drive Tracks (Pages 11-13) are properly aligned and are taut (see Page 13). Adjust or
replace if necessary.
Then, plug the cleaner into the Power Supply, grab the Handle, lift your cleaner off the ground and turn it on outside
the water while still upside down. Allow the cleaner to run a maximum of 1 minute to check the following:
3. Check that the Drive Pulley (Page 13; Figs. 19a-b) is turning. If it is not, grip one Wheel Tube with both hands and
rotate it forward and reverse to see if the Drive Motor (Pages 3; Fig. 1, 8), to which the Drive Pulley is connected,
loosens and begins to operate correctly.
If you have checked all of the options offered and the problem has not been corrected then please visit your local
Authorized Service Center.
TROUBLESHOOTING GUIDE
~ IN DEPTH ~
IMPORTANT: Before performing any troubleshooting maintenance procedures on your cleaner, it should be
disconnected from the Power Supply (transformer) and the Power Supply should be unplugged from the electrical
outlet to prevent the possibility of personal injury or damage to the cleaner.
MOVES BUT DOES NOT PICK UP DIRT AND DEBRIS (DOES NOT PUMP WATER)
1. Turn off the Power Supply, remove the cleaner from the pool, and unplug it from the Power Supply.
2. Clean the Filter Bag thoroughly (Page 8) so that the fine particles of dirt that get trapped within the fibers of the Filter
Bag are removed. Keep in mind that the Filter Bag is capable of trapping particulates 20 times smaller than what the
naked eye is capable of seeing. To ensure that the Filter Bag is not the issue and is cleaned, remove the Bag from your
cleaner and operate it. If it now operates properly, then the Filter Bag requires a more thorough cleaning to remove
the particulates from the fibers of the Bag.
3. Check the Intake Valve Flaps (Page 4; Fig. 3, 12d) on the underside of your cleaner. The Flaps should move freely to
open and close. Clean and free the Valve Flaps if necessary.
4. Make sure Pump Motor (Page 3; Fig. 1, 7) is working properly and that the Propeller is not being slowed or stopped due
to debris caught around it. Please refer to PROPELLER CARE (Page 10).
5. Using a screwdriver, remove the screws that secure the Outlet Top to the body (Page 10; PROPELLER CARE) and
inspect the Propeller for clogs, hair or other debris which may keep it from spinning freely. If the Pump is operating
properly replace the Outlet Top (Page 10; Figs. 12b-c). Be careful not to over tighten and “strip” the screws. If it
appears to be frozen and no debris is blocking it movement, or if the Propeller moves freely when spun manually but
not when the cleaner is turned on, or if the propeller is loose and wobbles when spun manually, please visit your local
Authorized Service Center.
6. Check the operation of the Pump Motor (Page 3; Fig. 1, 7). While your cleaner is on in the pool, hold your cleaner by
its Handle (Page 8; Fig. 7b) so that its Outlet Top (Page 10; Figs. 12b-c) protrudes just slightly out of the water. Look to
see that water is gushing out from the Outlet Top.
FALLS OR FLIPS BACKWARDS OFF WALLS OR STAIRS
Clean Filter Bag (Page 8, CLEANING AND CHANGING THE FILTER BAG).
Remove Flotation (Page 9, FLOTATION): Remove Flotation one by one until proper buoyancy is returned. Be sure to always
submerge your cleaner and holding its Handle turn upside down to remove any air that may be trapped within the cleaner’s
body. Careful removal of air trapped in the housing is critical to ensure natural balancing of your cleaner (Page 6; Step 2,
CLEANER START POSITION).
Check the operation of the Pump Motor
Please refer to the Troubleshooting section titled: MOVES BUT DOES NOT PICK UP DIRT AND DEBRIS
If this situation persists, please visit your local Authorized Service Center.

19
DEBRIS COMES OUT OF THE CLEANER WHEN REMOVING IT FROM POOL
(BOTTOM LID DOES NOT CLOSE PROPERLY)
Filter Bag
Ensure that the Filter Bag is properly mounted on the Wire Bag Support Frame (Page 8; Figs. 9a-b). The Filter Bag’s small
Label on the elastic edge should be on the outside of the bag and positioned at the center of either long side of the Bottom
Lid Assembly plastic. Stretch the elastic bottom over each Wire and slide the Filter Bag down until the Filter Bag reaches
the Bottom Lid plastic. At that point the Filter Bag’s elastic bottom should be stretched over the plastic lips located on
each short side of the Bottom Lid Assembly, and will hold the Filter Bag in place. Pull the Filter Bag top corners into each
of the top 4 corners of the Wire Frame. Insert the Bottom Lid into the bottom of the cleaner. Be sure that the Filter Bag’s
fabric is not interfering with the locking of the Lock Tabs (Page 8; Fig 8). Be sure that each of the Lock Tabs are “Locked”
closed.
Debris Intake Port Flaps (Page 4; Fig. 3, 12d)
Check that the Intake Valve Flaps on the underside of your cleaner (in the Bottom Lid Assembly / Page 4; Fig. 3) move freely
to open and close. Clean Flaps if necessary.
Lock Tabs (Page 8; Fig 8)
Check that the Lock Tabs are not warped. They should be straight and aligned with the cleaner’s body. If they are warped
then replacement Lock Tabs are available for purchase through your Authorized Dealer.
DOES NOT PUMP WATER OR MOVE, OR POWER SUPPLY DOES NOT TURN ON
It is unlikely that both Motors (Drive Motor and Pump Motor; Page 4; Figs.1, 7 and 8) are experiencing mechanical problems.
In most cases the issue lies with something that is hindering the flow of electricity from the electrical outlet to the Power
Supply (Page 4; Fig. 4) or through the Floating Cable (Page 3; Fig. 2) to the cleaner itself. To locate and resolve where
electrical flow is being hindered check the following:
Electrical Outlet & Connections
Make sure that the Power Supply is firmly plugged into a grounded electrical outlet which has power. To test the outlet,
plug in another electrical instrument that you know works to the outlet.
Check that the Floating Cable is securely plugged into the Power Supply.
Power Supply and Fuse (Page 4; Fig. 4)
1. Check that the Power Switch is pressed upwards to the “ON” position.
2. Switch the Power Supply “OFF” and “ON” several times, allowing approximately 30 seconds between each “ON” and
“OFF”.
3. Unplug the Power Supply from the electrical outlet. Check that the Fuse (Page 4; Fig. 4) in the Power Supply’s Fuse
Holder appears operational. If the Fuse appears burned out, then replacement Fuses are available for purchase
through most major electronic supply stores, including your Authorized Dealer.
4. After unplugging the Power Supply from the electrical outlet, use a cotton swab to dry all sides of the Fuse and Fuse
Holder (inside and out). Reinsert Fuse and plug in and start Power Supply.
Cable Assembly (Page 3; Fig. 2)
With the Power Supply unplugged, check the Power Supply Cable (Page 4; Fig. 4, 15f) and the Floating Cable (Page 3; Fig.
2) for cuts or damage. if you detect damage to either Cable, please visit your local Authorized Service Center.
Table of contents
Other Aquabot Swimming Pool Vacuum manuals

Aquabot
Aquabot Pura 4X User manual

Aquabot
Aquabot BREEZE XLS User manual

Aquabot
Aquabot turboT User manual

Aquabot
Aquabot Bottom Access User manual

Aquabot
Aquabot PURA SERIES User manual

Aquabot
Aquabot Pura Series User manual

Aquabot
Aquabot RKA80C User manual

Aquabot
Aquabot Robotic Pool Cleaner User manual

Aquabot
Aquabot RAPIDS XLS User manual

Aquabot
Aquabot RAPIDS 4WD User manual
Popular Swimming Pool Vacuum manuals by other brands

Zodiac
Zodiac CyclonX OC 3300 TILE Installation and user manual

MARIMEX
MARIMEX ProStar Vac Smart instructions

Zodiac
Zodiac Polaris 3900 Sport instructions

Maytronics
Maytronics Dolphin Classic 12 User instructions

Zodiac
Zodiac BARACUDA RANGER Quick start guides

BASETech
BASETech 1499558 operating instructions