AQUALEAK EMS-5X User manual

Read these instructions carefully before using this product.
Keep these instructions in a safe place for future reference.
EMS-5X / 10X / OS
Water Leak Detection System
Instruction Manual

Environmental Monitoring System (EMS-5X, 10X and OS) Instruction Manual
2
Document Information
Copyright
© Aqualeak Detection Ltd. All Rights Reserved.
This document is the sole property of Aqualeak Detection Ltd. and shall not be reproduced, transmitted,
transcribed, stored in a retrieval system, or translated in any form, by any means, without prior written
permission from Aqualeak Detection Ltd.
Publication
Publisher: Aqualeak Ltd. Publication date: 22 December 2021. Version number: 1.0.
All possible care has been taken in the preparation of this manual, but Aqualeak, its agents and distributors
accept no liability for any inaccuracies that may be found. This manual reflects the state of the product at
the publication date below, but further enhancements while in service may mean that the manual does not
precisely reflect your system. Aqualeak reserves the right to make changes without notice both to this
manual and the products which it describes.
Purpose
This document provides installation and operating instructions for the Environmental Monitoring System
(EMS-5X, EMS-10X, and EMS-OS) Water Leak Detection System.
Symbols and Notices Used
Important information has been highlighted throughout this document using the following symbols:
Warning
See relevant section
Take note of this information
Important Safety Information has been highlighted throughout the Safety Information section using the
following warning notices:
Death / serious injury
(irreversible)
Death / serious injury
(irreversible)
Minor injury
(reversible)
Damage to
property
Immediate risk
Potential risk
Potential risk
Potential risk
Contact Details
Address
Telephone
Email
Website
Aqualeak Detection Ltd.
+44 (0)1249 715698
sales@aqualeak.com
www.aqualeak.com
11 Forest Gate
Pewsham
Chippenham
Wiltshire, SN15 3RS
United Kingdom

Environmental Monitoring System (EMS-5X, 10X and OS) Instruction Manual
3
Contents
1Safety Information .............................. 5
1.1 Intended Use ............................... 5
1.2 Statutory Obligations...................... 5
1.3 Electrical Safety ........................... 5
1.4 Installation Safety ......................... 6
1.5 Post-Installation Safety ................... 6
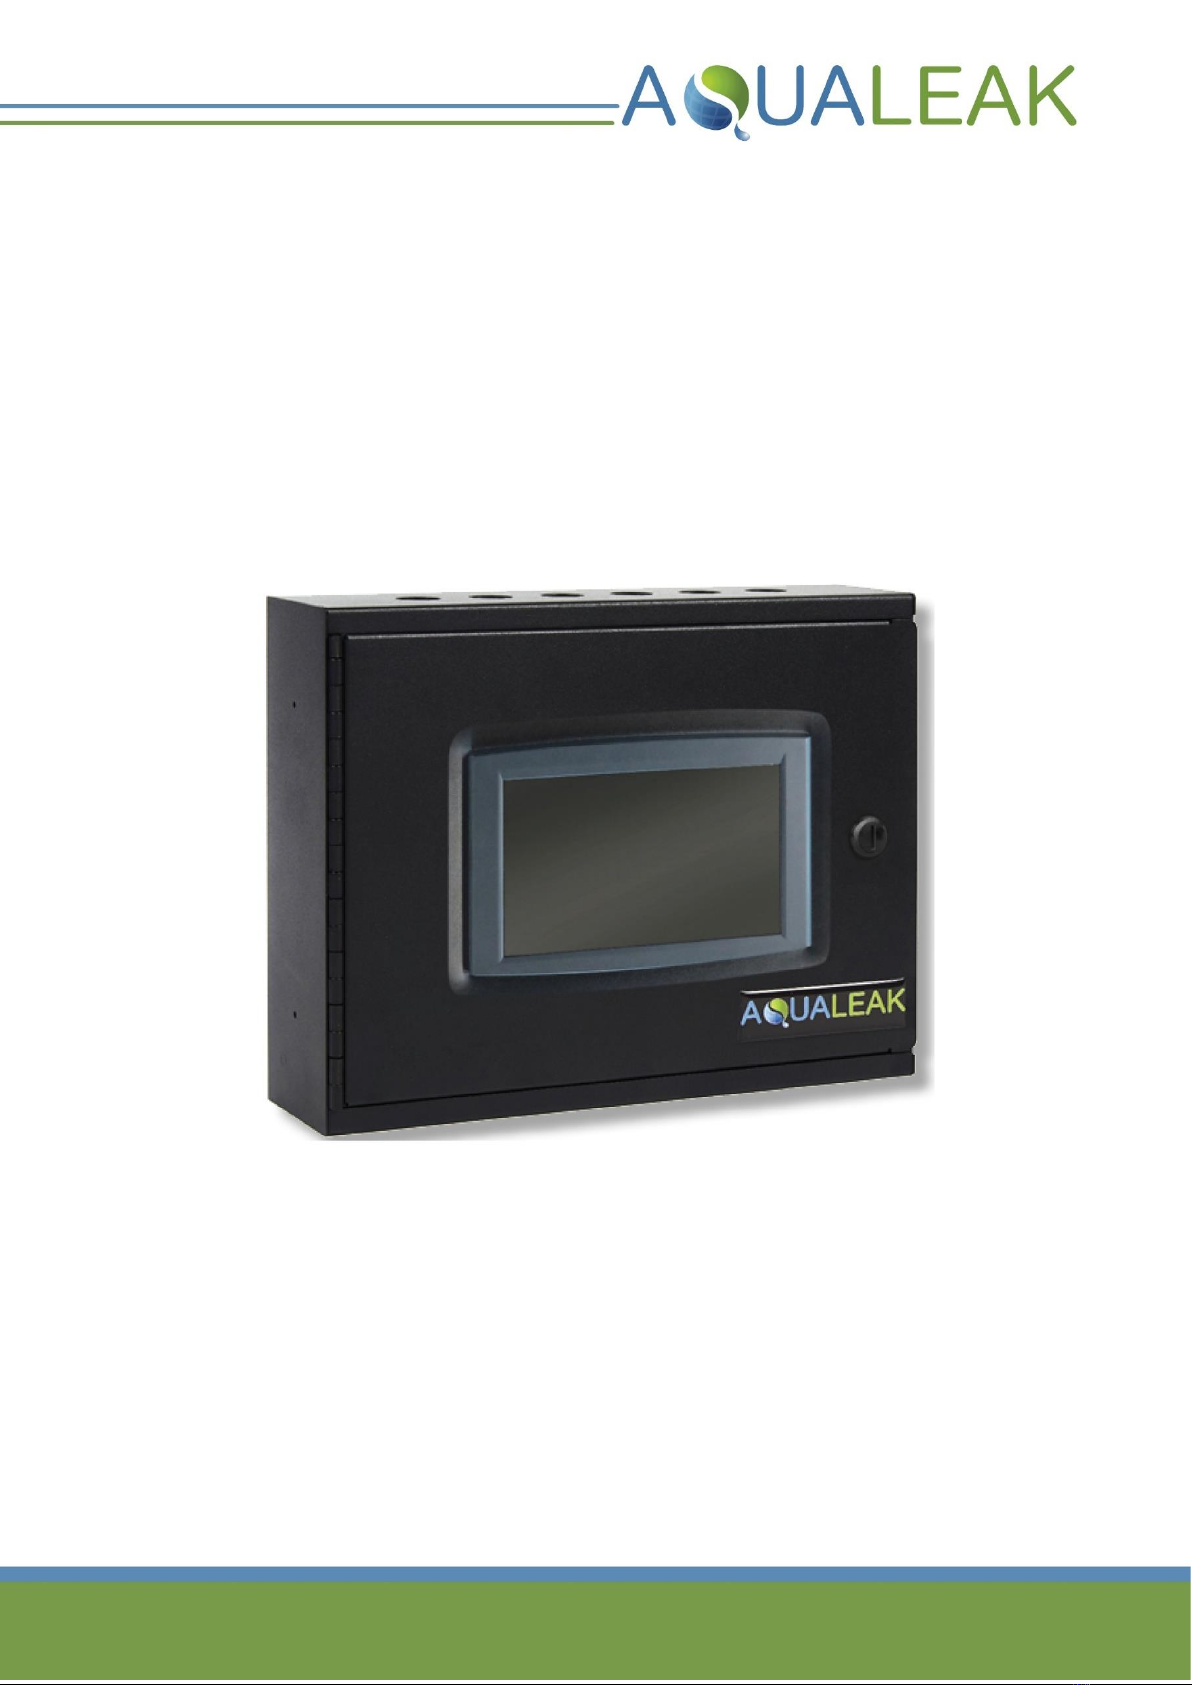
2Product Overview ............................... 7
2.1 Technical Specifications .................. 8
2.2 Input-Output Connections ................ 9
2.3 Multiple Zone Application Examples ...11
3Installation ......................................13
3.1 Master Panel Installation ................ 13
3.1.1 Mounting ................................ 13
3.1.2 Power Connection ..................... 13
3.2 Relays and Sensors .......................14
3.2.1 Relay Functions and Triggers ........ 14
3.2.2 Reboot Relay ........................... 14
3.2.3 Sensor Connections .................... 15
3.3 Ancillary Devices.......................... 19
3.3.1 Signalling to Ancillary Device ........ 19
3.3.2 12/24V Output to Ancillary Device .. 19
3.3.3 230V Output to Ancillary Device..... 20
3.4 Outstations ................................ 21
4Configuration ...................................22
4.1 USB Port....................................22
4.2 XML Configuration File ................... 23
4.2.1 Export to USB........................... 23
4.2.2 EMS Settings ............................ 24
4.2.3 User PIN Types and Numbers......... 25
4.2.4 Network Settings....................... 26
4.2.5 Modbus Settings........................ 27
4.2.6 Email Settings .......................... 30
4.2.7 Relay Settings .......................... 33
4.2.8 Interface Board and Outstation
Settings.................................. 36
4.2.9 Configuration File Installation ....... 37
4.3 Operating System Updates .............. 38
5Operation ........................................40
5.1 Master Panel LCD Touch Screen ........ 40
5.1.1 Summary Screen ....................... 40
5.2 User Menu ................................. 41
5.2.1 Date / Time ............................ 41
5.2.2 LCD Backlight .......................... 42
5.2.3 Live Zone Readings .................... 42
5.2.4 Alarm Log ............................... 43
5.3 Engineers Menu ........................... 44
5.3.1 Live Communications ................. 45
5.3.2 Relay Maintenance .................... 46
5.4 Alarms...................................... 47
5.4.1 Active Alarms .......................... 47
5.4.2 Mute Alarms ............................ 49
6Maintenance ....................................50
6.1 Cleaning.................................... 50
6.2 Relays ...................................... 50
6.3 Troubleshooting........................... 50
7Warranty.........................................51
8Outstation Dip Switch Address Sheet.......52
Tables
Table 1: EMS-5X, 10X and OS Technical
Specifications ........................... 8
Table 2: EMS-X / OS Input-Output Connections
........................................... 10
Table 3: Relay Functions and Notes / Triggers
........................................... 14
Table 4: EMS Configuration File Settings ..... 24
Table 5: User PIN Settings ...................... 25
Table 6: EMS Network Settings................. 26
Table 7: Register 0 Corresponding Replays and
Register 1 Corresponding Functions 27
Table 8: Modbus Ethernet/TCP Settings ...... 28
Table 9: Modbus Serial Link/RTU Settings.... 29
Table 10: Email Alert Settings ................... 30
Table 11: Email Summary Request Settings ... 32
Table 12: Relay 14 Settings ...................... 33
Table 13: Relay 1–10 Settings.................... 34
Table 14: Interface Board and Outstation
Settings ................................. 36
Table 15: Troubleshooting ....................... 50

Environmental Monitoring System (EMS-5X, 10X and OS) Instruction Manual
4
Figures
Figure 1: Aqualeak EMS-5X / 10X / OS Water Leak Detection System ......................................... 7
Figure 2: EMS-5X (Top) and 10X / OS (Bottom) Input-Output Connections .................................... 9
Figure 3: EMS-5X Three-Zone Communications Room Example ................................................ 11
Figure 4: EMS-OS Multiple Zone / Floor Example Using Outstations........................................... 12
Figure 5: Master Panel Electrical Power Connections ........................................................... 13
Figure 6: Sensor Cable Connection to Interface Board .......................................................... 15
Figure 7: Sensor Cable Connection using Leader Cable (LC10C) ............................................... 15
Figure 8: Sensor Cable using LC10/LCB100 and Start of Line................................................... 16
Figure 9: Sensor Cable using Single ESD Sensor Probe........................................................... 17
Figure 10: Multiple ESD Sensor Probes to a Single Zone .......................................................... 18
Figure 11: Connection of Master Panel for Signalling to an Ancillary Device .................................. 19
Figure 12: Using the 12/14 Output to Power an Ancillary Device ............................................... 19
Figure 13: Using the EMS to Power a 230V Ancillary Device (Normally Closed) ............................... 20
Figure 14: Using the EMS to Power a 230V Ancillary Device (Normally Open) ................................. 20
Figure 15: Outstation Panel .......................................................................................... 21
Figure 16: Rear of EMS-5X / 10X / OS Main Panel Showing USB Port ........................................... 22
Figure 17: EMS Engineers Menu ...................................................................................... 23
Figure 18: Expanded EMSSettings Folder ........................................................................... 24
Figure 19: Expanded UserPins and EngineerPins Folders ......................................................... 25
Figure 20: Expanded NetworkSettings Folder ...................................................................... 26
Figure 21: Expanded TCPModbusSettings Folder................................................................... 28
Figure 22: Expanded SerialModbusSettings Folder ................................................................ 29
Figure 23: Expanded EmailSettings Folder (SMTP and Email Alerts) ............................................ 30
Figure 24: Expanded EmailSettings Folder (Email Summary Requests and IMAP) ............................. 32
Figure 25: Expanded RelaySettings,Relay, Triggers and Trigger Folders ...................................... 33
Figure 26: Expanded Outstation profile Folder (First Profile for Interface Board) ........................... 36
Figure 27: EMS Software Update Process ........................................................................... 38
Figure 28: EMS-5X Boot Screen (Loading .xml Configuration).................................................... 40
Figure 29: Healthy EMS-OS Summary Screen ....................................................................... 40
Figure 30: Active Alarm EMS-OS Summary Screen ................................................................. 40
Figure 31: EMS User Menu............................................................................................. 41
Figure 32: EMS Live zone readings ................................................................................... 42
Figure 33: EMS Engineers Screen with Additional Options........................................................ 44
Figure 34: Live Comms Screen ....................................................................................... 45
Figure 35: EMS Relay Maintenance Screen.......................................................................... 46
Figure 36: EMS Summary Screen with Alarm Activated ........................................................... 47
Figure 37: EMS Alarms Screen with Active Alarms Listed......................................................... 47
Figure 38: EMS Alarms Screen with Selected Alarm and Acknowledge Button ................................ 48
Figure 39: EMS Alarms Screen with Selected Relay and Reset Relay Button................................... 49

Environmental Monitoring System (EMS-5X, 10X and OS) Instruction Manual
5
1Safety Information
To ensure your safety and the safety of others, please ensure that you read the Safety
Information below before you install or operate this product.
1.1 Intended Use
Only use this product for the intended purpose described in this manual.
1.2 Statutory Obligations
✓Installation and maintenance must comply
with all relevant local laws and regulations
(‘statutory obligations’), particularly
concerning electrics, water supplies, and
building regulations.
✓Statutory obligations always override
manufacturer documentation.
✓It is the responsibility of the customer to
conduct a Health & Safety risk assessment
prior to installing and operating this
product.
This product should not be operated by
children or persons with reduced physical,
sensory or mental capabilities. Where
necessary, such Persons should be given
supervision by a qualified person
responsible for their safety.
DO NOT position the unit (including its
power cable) where it may violate Fire or
Health and Safety regulations (e.g. block
fire exits or stairwells, etc.).
1.3 Electrical Safety
RISK OF 230 VOLT ELECTRIC SHOCK
RISK OF DEATH OR SERIOUS INJURY
✓ONLY qualified, competent and approved
persons (e.g. ‘electrical engineers’) may
undertake installations, repairs, or
relocations of this product.
✓The product must be earthed correctly.
✓For indoor use only.
✓Ensure that the building electrical system is
compliant with Safety Regulations.
DO NOT allow children or any other
unqualified or unapproved persons to
install, repair, clean, relocate, or
otherwise interfere or tamper with the
product.
DO NOT immerse the unit or its
peripherals in liquid.
DO NOT install outdoors, near hot works,
or where there is a danger of freezing.

Environmental Monitoring System (EMS-5X, 10X and OS) Instruction Manual
6
1.4 Installation Safety
RISK OF DAMAGE
RISK OF INJURY
✓Install the product on a hard, solid, and
level surface.
✓Follow the instructions provided in this
manual. Where necessary, refer to the
Aqualeak website (www.aqualeak.com) for
contact and support information.
✓Be aware of any existing electrical (e.g.
wiring), water (e.g. pipes), or other
installations in the vicinity (including
within or behind the surface used for
mounting.
✓Where applicable, this manual should be
read in conjunction with manufacturer
documentation for any components
specified in the installation requirements
of this manual.
1.5 Post-Installation Safety
Once installed:
1. Perform a test run to ensure normal
operation.
2. Explain all safety precautions to the end
user.
3. Provide a copy of this manual to the end
user.
✓It is the responsibility of the end user to
supply this manual to any other subsequent
users.
✓All goods are sold subject to our
‘Conditions of Sale’.
✓As Aqualeak Detection Ltd. continuously
improves products, they may be modified
without notice. In such circumstances,
this manual and other relevant
documentation should be disregarded.
Updated documentation will be produced,
supplied with new product ranges, and
made available on request.
SAVE THESE INSTRUCTIONS

Environmental Monitoring System (EMS-5X, 10X and OS) Instruction Manual
7
2Product Overview
The EMS-05 supports both RS232/RS485 protocols. RS485 is the default protocol and an Aqualeak
Engineer will be required if RS232 is required.
The Aqualeak Environmental Monitoring System (EMS)
Water Leak Detection System series are standalone leak
detection systems designed to be integrated with larger
Building Management Systems (BMS) and networks.
Designed for continuous operation with minimal human
intervention, the EMS series is also compatible with a wide
variety of sensing technologies (sold separately) to detect
the presence of water and other liquids.
With 5 (EMS-5X) or 10 (EMS-10X) input channels as standard,
these models are ideal for applications ranging from small
multi-room offices to medium-sized industrial and
commercial complexes. Alternatively, the scalable and
modular EMS-OS is ideal for large scale industrial and
commercial applications.
Features
Highly versatile with bespoke configuration
Programmable relay outputs
Remote Status Monitoring (via email)
Email, Modbus and multiple digital outputs
Supports Modbus TCP/IP and Modbus RTU
RS232/RS485
Touch screen display
Designed and built in the United Kingdom
CE Compliant
Monitors for leaks, sensor cable breaks and
internal system faults
Operation
In operation, the EMS-05 continuously monitors all independent sensing circuits connected to it to reduce risks
from flooding. If a leak or cable break is detected, the EMS-05 will and/or can be configured to:
Activate a visual alarm
Activate an audible alarm
Shut off local water supplies
Activate default and user-defined outputs
Report to any network via Modbus, digital
output, and/or email
EMS Series Models
Model
Channels
Configuration
Notes
EMS-01
1
DIP switches
Single zone applications
EMS-5X
5
Touch screen
Small scale applications
EMS-10X
10
Touch screen
Medium scale applications
EMS-OS
Variable
Touch screen
Large scale applications
EMS-5
5
None
Operates ‘out of the box’ with no configuration required
EMS-10
10
None
Figure 1: Aqualeak EMS-5X / 10X / OS
Water Leak Detection System

Environmental Monitoring System (EMS-5X, 10X and OS) Instruction Manual
8
2.1 Technical Specifications
EMS & Outstation
Operating Temperature
0 to +50°C
Degrees Centigrade. Ambient temperature
Operating Humidity
10 to 95%
Relative humidity (non-condensing) at 45°C
Operating Altitude
0 to 3,000 m
Metres
Storage Temperature
-20 to +70°C
Sensor Cable Length (per
input channel)
100m (or maximum
20 probes)
Use recommended yellow Sensor Cable.
Also requires End of Line (EOL) terminator
Electrical Interface Adapter
(EIA) Communication Port
User defined
Table 1: EMS-5X, 10X and OS Technical Specifications
Name
Specification
Notes
Master Panel / EMS Unit
Dimensions
335 x 270 x 110 mm
Millimetres. Width x Height x Depth
Weight
4.5 KG
Kilograms
Supply Voltage
80 –264 VAC
Volts / Alternating Current. 50/60 Hz
frequency
Motherboard Output Relay
Voltage Rating
250 VAC
Motherboard Output Relay
Current Rating
8 A
Amps. Maximum into resistive load
Relay Minimum Load
10 mA
Milliamps. At 5 VDC (Volts / Direct Current)
Detection Response Time
1 second
Ingress Protection (IP) Code
IP51 (dust protected
and dripping water)
Ingress Protection to IEC 60529. Holes drilled
during installation may affect unit IP
USB Port
2.0
For software and configuration file updates
Operating System
Android
Android Application Package (.apk)
Configuration File
XML
Extensible Markup Language (.xml)
Alarm (Audible)
85 dB
Decibels. Within 0.6 m range
Alarm (Visible)
Via LCD Touch Screen
Input channels
5 / 10 / Multiple
OS model expandable to over 620 zones
Leader Cable
Belden 9534
Variable length
Outstation
Dimensions
180 x 130 x 77 mm
Millimetres. Width x Height x Depth
Weight
1.0 KG
Kilograms
Supply Voltage
24 VDC
Volts / Direct Current.
50/60 Hz frequency (+/- 10% variance)
Ingress Protection (IP) Code
IP64 (dust-tight and
splashing water)
Ingress Protection to IEC 60529. Holes drilled
during installation may affect unit IP
Input channels
5

Environmental Monitoring System (EMS-5X, 10X and OS) Instruction Manual
9
2.2 Input-Output Connections
Figure 2: EMS-5X (Top) and 10X / OS (Bottom) Input-Output Connections
11
12
13
14
15
11
2
3
4
5
6
7
8
9
10
12
13
1
14
1 2 3 4 5 6 7 8 9 10 16
11
12
13
14
15
11
2
3
4
5
6
7
8
9
10
12
13
1
14
1 2 3 4 5

Environmental Monitoring System (EMS-5X, 10X and OS) Instruction Manual
10
Item
Name
Notes
Relay Abbreviations
1
Configurable Relays
5 or 10 Configurable Relays
Relay terminals
are marked
NC | COM | NO
NO = Normally Open
NC = Normally Closed
COM = Common
2
Interface Board
5 or 10 Zone Inputs
3
Watchdog Relay
Relay 15
4
Configurable Alarm / Fault Relay
Relay 14
5
Alarm Relay
Relay 13
6
Cable Break Relay
Relay 12
7
Common Alarm / Fault Relay
Relay 11
8
Interface Board Power
PL7
Mains Abbreviations
Communications Terminals
PL8
Mains terminals
are marked
L | E | N
L = Live
E = Earth
N = Neutral
9
12/24 VDC Output Terminals
PL6
10
12/24 VDC Selector Switch
SW2
11
Reboot Relay Switch
SW1
12
230 VAC to 24 VDC Power Supply Unit
13
230 VAC Mains Cable Input Terminals
14
Spare / Unused Relay
Relay 16
Table 2: EMS-X / OS Input-Output Connections

Environmental Monitoring System (EMS-5X, 10X and OS) Instruction Manual
11
2.3 Multiple Zone Application Examples
Aqualeak EMS water leak detection and prevention systems are based on a modular design. Parts
supplied depend upon intended application and particular requirements. Once the individual
components have been selected, the bespoke system can be built and installed.
Figure 3: EMS-5X Three-Zone Communications Room Example
EMS-5X
LCB10C
Leader Cable
SCY Sensor Cable

Environmental Monitoring System (EMS-5X, 10X and OS) Instruction Manual
12
Figure 4: EMS-OS Multiple Zone / Floor Example Using Outstations
Outstation
EMS-OS
SCY Sensor Cable
LCB10C
Leader
Cable

Environmental Monitoring System (EMS-5X, 10X and OS) Instruction Manual
13
3Installation
Risk of electric shock and equipment damage! Ensure you have read section 1 Safety Information
before attempting installation.
3.1 Master Panel Installation
3.1.1 Mounting
The Master Panel has knock-outs for electrical cables on the top, bottom and lower rear of its
enclosure.
Mount the Master Panel as follows:
1. Ensure the Master Panel has been properly
removed from its packaging.
2. Securely mount the Master Panel in a
suitable location, making cable entries as
required.
3. Bring the cables through into the Master
Panel before starting to make final
connections
3.1.2 Power Connection
A competent person must install a 230 VAC unswitched fused spur near to the EMS. The switched
fused spur must be clearly marked as the disconnecting device for the EMS. Where available, the
EMS unit should be connected to a UPS-backed power supply.
Figure 5: Master Panel Electrical Power Connections
Connect power to the EMS as follows:
1. Route the power cable from the
unswitched fused spur into the Master
Panel through a suitable containment or
cable protection method.
2. Connect the power cable (i.e. Live, Neutral
and Earth) to the Master Panel mains cable
input terminal (Figure 5).
Interface Board
(5 or 10 zone)
Motherboard
Power Supply unit
230 VAC Mains
Cable Input
Terminal
DC OUT
0V|12/24V
12/24 VDC
Selector Switch

Environmental Monitoring System (EMS-5X, 10X and OS) Instruction Manual
14
3.2 Relays and Sensors
Although multiple sensors and sensor types may be connected to the unit, there must always be
an end of line (EOL) terminating resistor at the end of the sensing circuit to allow for cable break
monitoring and alarm reference set point. The unit relies upon a terminating resistor of value
47k ohms.
The unit should be powered OFF when making connections. Sensors should be installed so that they remain
accessible for maintenance.
3.2.1 Relay Functions and Triggers
Relay
Function
Description and Triggers
1-10
Individual zone
Software configurable. Used to operate auxiliary devices.
11
Common Alarm /
Fault
Relay latched upon alarm until acknowledged by User or Engineer.
✓Zone cable break
✓Zone Alarm
✓interface board / Outstation
communication failure
✓Ethernet connection failure
✓Modbus TCP/IP connection failure
✓Motherboard communication
failure
12
Cable break
Relay latched upon alarm until acknowledged by User or Engineer.
✓Zone cable break
13
Alarm
Relay latched upon alarm until acknowledged by User or Engineer.
✓Zone alarm
14
Configurable
User configurable to latch on Alarm (13) and/or Cable Break (12). Relay
latched only when alarm or cable break present in real time.
✓See Alarm (13) and/or Cable Break (12)
15
Watchdog
Relay normally energised. De-energised upon any system fault.
✓Motherboard loss of power
✓Interface Board / Outstation loss
of power
✓Complete power failure to EMS
✓Motherboard communication
failure
✓Interface Board / Outstation
communication failure
16
Spare
Unused
Not applicable
Table 3: Relay Functions and Notes / Triggers
3.2.2 Reboot Relay
The reboot relay switch SW1 must be returned to the OFF position when testing of or updates
to the EMS have been completed.
Power to the TFT LCD Touch Screen Computer is supplied via a re-boot relay. If communications between
the Motherboard and the touch screen are lost for more than 60 seconds, this relay will operate to re-boot
the computer.
This function can be bypassed by switch SW1 for testing purposes or when updating the EMS software. When
the switch is in the OFF position the relay is bypassed and power is permanently supplied to the touch
screen.

Environmental Monitoring System (EMS-5X, 10X and OS) Instruction Manual
15
3.2.3 Sensor Connections
Figure 6: Sensor Cable Connection to Interface Board
A. Sensor Cable (SCY) using LC10C and End of Line
Figure 7: Sensor Cable Connection using Leader Cable (LC10C)
Connect the Sensor Cable using LC10C and End of Line as follows:
1. Ensure that the unit is powered OFF.
Connect the leader cable into the sensor
input terminals on the interface board. Do
not connect the green or white cores
(Figure 6).
2. When connecting the leader cable to its
respective sensor input terminals, ensure
that the factory-issued terminating resistor
is removed. Retain all resistors for future
fault finding/testing.
3. Plug the opposite end of the leader cable
into the sensor cable (Figure 7).
4. Once all sensor cables are connected, plug
the End of Line (EOL) terminator into the
end of the last run of the sensor cable.
Motherboard
Interface Board
(5 or 10 zone)
For unpopulated zones,
leave resistor terminated
in zone plug. Remove
resistor on populated
zones.
Belden 9534 EIA RS-232 Multicore
Cable (4 Core, 24 AWG, 0.2 mm²)
Green and white
cores not used
Cable Connection
Leader Cable
Sensor Cable
EOL Terminator

Environmental Monitoring System (EMS-5X, 10X and OS) Instruction Manual
16
B. Sensor Cable (SCY) using LC10/LCB100 and Start of Line
Figure 8: Sensor Cable using LC10/LCB100 and Start of Line
Connect the Sensor Cable using LC10/LCB100 and Start of Line as follows:
1. Ensure that the unit is powered OFF.
Connect the leader cable into the sensor
input terminals on the interface board. Do
not connect the green or white cores
(Figure 6).
2. When connecting the leader cable to its
respective sensor input terminals, ensure
that the factory-issued terminating resistor
is removed. Retain all resistors for future
fault finding/testing.
3. Cable the opposite end of the leader cable
in to the Start of Line (SOL; Figure 8).
4. Plug the sensor cable into the connection
on the SOL.
5. Once all sensor cables are connected, plug
the End of Line (EOL) terminator into the
end of the last run of the sensor cable.
LOOP TERMINAL
block not used
Green and white
cores not used
Belden 9534 Cable to
EMS Zone Input
Secure cable under clamp
strap
SENSE TERMINAL
Red Core: +/1
Black Core: -/2

Environmental Monitoring System (EMS-5X, 10X and OS) Instruction Manual
17
C. Single Environmental Sensing Device (ESD) Sensor Probe
Figure 9: Sensor Cable using Single ESD Sensor Probe
Connect the single ESD Sensor Probe as follows:
1. Ensure that the unit is powered OFF.
Connect the leader cable into the sensor
input terminals on the interface board. Do
not connect the green or white cores
(Figure 6).
2. When connecting the leader cable to its
respective sensor input terminals, ensure
that the factory-issued terminating resistor
is removed. Retain all resistors for future
fault finding/testing.
3. Connect the opposite end of the leader
cable to the ESD probe (Figure 9).
LOOP TERMINAL
block not used
Green and white
cores not used
Belden 9534
Cable to
EMS Zone Input
Secure cable under clamp
strap
SENSE TERMINAL
Red Core: +/1
Black Core: -/2
RED EOL SWITCH
‘IN’ position

Environmental Monitoring System (EMS-5X, 10X and OS) Instruction Manual
18
D. Multiple Environmental Sensing Device (ESD) Sensor probes to a Single Zone
Figure 10:Multiple ESD Sensor Probes to a Single Zone
Connect multiple ESD sensor probes to a single zone as follows:
1. Ensure that the unit is powered OFF.
Connect the leader cable into the sensor
input terminals on the interface board. Do
not connect the green or white cores
(Figure 6).
2. When connecting the leader cable to its
respective sensor input terminals, ensure
that the factory-issued terminating resistor
is removed. Retain all resistors for future
fault finding/testing.
3. Connect the series of ESD probes. Ensure
that:
a. All EOL switches except the last
are set to the ‘OUT’ position.
b. The last EOL switch should be set to
the ‘IN’ position (e.g. Figure 10).
ESD #3: RED EOL SWITCH
‘IN’position
ESD #1: RED EOL SWITCH
‘OUT’ position
ESD #2: RED EOL SWITCH
‘OUT’position

Environmental Monitoring System (EMS-5X, 10X and OS) Instruction Manual
19
3.3 Ancillary Devices
3.3.1 Signalling to Ancillary Device
The EMS can be connected to provide a signal to a range of ancillary devices such as a Building
Management System (BMS) or Short Message Service (SMS) alarm unit.
Figure 11:Connection of Master Panel for Signalling to an Ancillary Device
Connect the EMS Master Panel to an ancillary device as follows:
1. Ensure that the unit is powered OFF. Refer
to Table 3 (3.2.1 Relay Functions and
Triggers)to select the correct relay for the
application.
2. Connect to the relevant relay (Figure 11;
core colours are for illustrative purposes
only and may differ during application).
3.3.2 12/24V Output to Ancillary Device
Figure 12:Using the 12/14 Output to Power an Ancillary Device
Use the 12/24V auxiliary output to power an ancillary device as follows:
1. Ensure that the unit is powered OFF. Use
the voltage selector switch SW2
(Figure 12)to set the output to the correct
voltage for your device.
2. Connect your device to the 12/24V output
(Figure 12).
This device requires a ‘normally open’
condition for healthy status
This device requires a ‘normally closed’
condition for healthy status
TERMINALS
NC not used
TERMINALS
NO not used
Cables to Device
Cables to device

Environmental Monitoring System (EMS-5X, 10X and OS) Instruction Manual
20
3.3.3 230V Output to Ancillary Device
The EMS can be used to control a powered ancillary device such as beacons or solenoid valves.
Maximum demand of all connected ancillary devices will be governed by the supply fuse in the
unswitched spur and cable of a suitable cross-sectional area should be used.
Figure 13:Using the EMS to Power a 230V Ancillary Device (Normally Closed)
Figure 14:Using the EMS to Power a 230V Ancillary Device (Normally Open)
Use the EMS to power a 230V ancillary device as follows:
1. Refer to Table 3 (3.2.1 Relay Functions
and Triggers) to select the correct relay.
2. Wire the device (Figure 13 and Figure 14).
If the device is not within the immediate
vicinity of the EMS panel, a local isolator
must be installed next to the device for
safe isolation and maintenance. The fuse
rating of the local isolator should be less
than that in the supply spur for circuit
discrimination.
Device
Relay
Mains Input
L E N
L E N
Power cable
from EMS to
device
Power cable from
unswitched
fused spur to EMS
Device
Relay
Mains Input
L E N
L E N
Power cable
from EMS to
device
Power cable from
unswitched
fused spur to EMS
This manual suits for next models
2
Table of contents
Other AQUALEAK Measuring Instrument manuals
Popular Measuring Instrument manuals by other brands

Omega
Omega DPG108 instruction sheet

Fluke
Fluke SMFT1000/PRO user manual

Agilent Technologies
Agilent Technologies OmniBER 720 user guide

Endress+Hauser
Endress+Hauser Micropilot FMR67B technical information

Lovibond
Lovibond Tintometer SensoDirect Salt110 instruction manual

Satechi
Satechi pm130p reference guide