AQUARAY MiniLED 400 User manual

AQUARAY
SOLID STATE LIGHTING
DESIGNED BY TMC
®
Habitats
AQUARIUM ESSENTIALS
BY TMC
MiniLED 400
MiniLED 400 instructions v1-2011_Layout 1 08/06/2011 12

ENGLISH............................................................. 1
FRANÇAIS......................................................... 8
DEUTSCH.......................................................... 15
NEDERLANDS................................................. 23
ESPAÑOL............................................................ 31
PORTUGUÊS.................................................... 39
ITALIANO........................................................... 47
Русский........................................................... 54
MiniLED 400 instructions v1-2011_Layout 1 08/06/2011 12

1
INSTRUCTIONS FOR
INSTALLATION AND USE
Important Safety Information
- Please Read Carefully
- This MiniLED 400 comprises a lamp unit with a
separate mains power supply unit (PSU) which
supplies a constant DC (low voltage) power
supply to the lamp unit.
Power supply for MiniLED 400 lamp unit:
INPUT-100-240 VAC 50-60Hz 0.15A
OUTPUT-19.5 VDC 0.7A
Caution: Do not use any other power supply unit
with this lamp unit as the lamp unit may not work
and this may cause irreparable damage to the lamp
unit. If the PSU supplied with the unit needs to be
replaced then please obtain an authentic AquaRay
PSU supplied by one of Tropical Marine Centre’s
local stockists.
- Always isolate the PSU from the mains
electricity before installing or carrying out
any maintenance to the lamp unit.
Caution: The power supply unit (PSU) is
not waterproof and therefore must not be
mounted above the aquarium or in any position
where it may accidentally fall into water or be
splashed by water.
Caution: Do not position the PSU in an enclosed
space. Ventilation must be provided to ensure it
does not overheat.
Caution: Do not operate this appliance if any part
of it has a damaged cord or plug, is malfunctioning,
or has been dropped, immersed in water or
damaged in any way. If the external cord of this
unit is damaged, it should be replaced by a cord
exclusively available from the manufacturer
or his service agent.
- This unit is designed to be used indoors
and is not suitable for any outdoor
applications.
Caution: Ensure the lamp unit is securely installed
above the tank before operating.
Caution: The lamp must be installed no less than
25mm from the water surface.
Caution: DO NOT SUBMERGE THE LAMP UNIT.
If the unit is submerged the lamp unit guarantee
will be invalidated.
s
MiniLED 400 instructions v1-2011_Layout 1 08/06/2011 12

Caution: Always leave a drip-loop in the DC
supply cable to the lamp unit to prevent water
running down the cable and reaching the PSU (see
picture below).
- When in operation, the grooved aluminium heat
sink on the back of the lamp unit will get hot
(± 60°C) to the touch. This is normal and is an
essential feature of protecting the lamp unit from
over-heating.
Caution: Do not cover, or obstruct in any way,
the rear aluminium surface of the lamp unit which
should always have a minimum of 10mm clearance
from the nearest surface to allow free circulation
of air around it.
Caution: Operation of the lamp unit in a confined
or unventilated space, or where there is an
additional heat source, could cause the ambient
operating temperature to rise above
35°C, reducing the useable life of the unit.
- Dispose of this unit responsibly. Check with
your local authority for disposal information.
The MiniLED 400 lamp unit is
mercury free.
PRODUCT INFORMATION
- This unit is manufactured and conforms to:-
Safety: BS EN 60598-1: 2000. BS EN 60598-2-11: 2005
EMC: BS EN 55015: 2006+A2:2009.
BS EN 61000-3-2: 2006+A2:2009.
- This unit is CE approved.
Drip-loop
Aquarium
Typical Installation
2
MiniLED 400 instructions v1-2011_Layout 1 08/06/2011 12

3
PARTS LIST/DIMENSIONS
1. Power supply unit (PSU).
2. Mains power supply cord with UK, European or
USA plug configuration.
3. MiniLED 400 lamp unit with 3m (10ft) cable
complete with matching plug connector to the DC
outlet from the PSU.
4. Fixing brackets - two supplied.
5. Fixing kit.
ASSEMBLY
The MiniLED 400 is fully assembled and ready to use.
INSTALLATION
Please note: This lamp unit is NOT designed to
be operated partially or fully submerged. It must
be SECURELY mounted not less than 25mm
from the maximum water level of the aquarium.
Its versatile, compact and light-weight design allows
the MiniLED 400 lamp unit to be installed above your
aquarium in a variety of ways to suit any application.
The design of the lamp unit means it can be fitted in
close proximity to the surface of the aquarium.
However, mounting further from the surface of the
aquarium will maximise the spread of light from the
MiniLED 400’s unique wide-angled beam.
140 mm
Depth = 140 mm
33 mm
MiniLED 400 instructions v1-2011_Layout 1 08/06/2011 12

4
A. Using AquaRay fixing brackets for more
permanent attachment with six screws
(stainless steel self tap, or nylon nut and
bolt – all supplied) to the INSIDE or
UNDERSIDE of a wooden or metal hood
or other enclosure.
Caution: Before the brackets have been attached
to the wooden or metal hood or other enclosure
using all six screws, make sure that they are fully
pushed onto the metal rail of the heat sink.
Caution:To securely attach the bracket to the
wooden or metal hood or other enclosure, all six
screws must be used.
B. Without any fixtures, by resting the
MiniLED 400 lamp unit on the specially
designed front lens face for installation ON
TOP of a transparent cover glass or plastic
condensation tray.
Further mounting options are available. Please
refer to the AquaRay Modular Mounting System
leaflet included with this unit.
For other tips and answers to some
frequently asked questions visit:-
www.tropicalmarinecentre.co.uk
MiniLED 400 instructions v1-2011_Layout 1 08/06/2011 12

5
OPERATION
Once mounted above the aquarium according to
one of the recommended installation methods
detailed above, the lamp unit may be connected to
the power supply unit (PSU) and then the PSU
connected to the mains using the power cord
supplied, and switched on. The lamp unit must not
be connected to, or used with, any PSU other than
that supplied by Tropical Marine Centre.
The PSU may be connected to the mains via a
suitable 24 hour timer device (not supplied) to
regulate when the lamp unit is switched on or off.
The PSU may also be connected to an AquaRay
Control unit (available separately) to simulate
sunrise, sunset and moonlight.
Caution: Do not attempt to control or regulate in
any way the DC supply from the PSU to the
MiniLED 400 lamp unit. Any attempt to do so may
invalidate the 5 year guarantee on your MiniLED 400
lamp unit.
MAINTENANCE
Caution: To avoid possible electric shock, special
care should be taken when using this electrical
appliance near water.
Caution: Always isolate the PSU from mains
electricity before installing or carrying out
any maintenance to the lamp unit.
Caution: Do not attempt to open the
plastic case of the PSU. This will invalidate the 1 year
guarantee on the PSU.
Caution: Do not attempt to open the plastic casing
of your MiniLED 400 lamp unit. This will damage the
waterproof sealing and invalidate the 5 year
guarantee on the lamp unit.
The MiniLED 400 lamp unit and associated power
supply unit (PSU) is a sealed unit and is not a
customer serviceable part. The lamp array inside the
lamp unit is also not a customer serviceable part and
the whole lamp unit is to be disposed of at the end
of its life (>50,000 hours).
MiniLED 400 instructions v1-2011_Layout 1 08/06/2011 12

6
A MiniLED 400 lamp unit should need little or no
maintenance once set up. However due to salt
deposits and the high calcium level in marine
aquariums it is common for deposits to build up on
the body of the unit.
Therefore it is recommended that:-
a. The lens face of the lamp unit is cleaned
periodically with a warm, damp cloth.
b. The heat sink on the rear of the unit is kept free
of large particles of salt and other films or
deposits which might obstruct the free movement
of air around the vanes of the heat sink.
Occasional cleaning with a small brush and/or dry,
lint-free cloth is recommended.
TROUBLE SHOOTING
Problem: The lamp unit does not switch on.
Solution: Check cable connection between lamp unit
and PSU.
Solution: Check power cord is firmly connected to PSU.
Solution: Check (and replace if necessary) the fuse in the
power cord plug (UK only).
If the lamp unit is still not switching on, return the
PSU and lamp unit to your local stockist for further
testing and replacement if necessary.
Problem: The lamp unit starts flashing.
Solution: Return the PSU to your local stockist for
replacement with an authentic Tropical Marine
Centre part.
Problem: One or more lamps in the lamp unit
do not come on or cease to work.
Solution: Return lamp unit to your local stockist for
replacement with an authentic Tropical Marine
Centre part.
MiniLED 400 instructions v1-2011_Layout 1 08/06/2011 12

7
Problem: The lamp unit has been accidentally
immersed.
Solution: Immediately switch off the mains supply to
the PSU and remove the lamp unit from the water
while holding the unit vertically with the cable entry
end uppermost.
Disconnect the lamp unit from the PSU via the
connector located 150mm/6” from the PSU. If
immersed it is normal for some water to be held
around the outside edge of the lamp unit and this can
be removed by gently shaking the unit vertically and
then drying carefully with a lint-free cloth.
When fully dry, check to see if any water or drips
are visible inside the main body of the unit when
observed through the front lens cover. If you are in
any doubt as to whether water has penetrated the
unit then do not reconnect to the PSU and
immediately return the unit to your local stockist for
further inspection by Tropical Marine Centre.
Please Note: Accidental immersion or
partial/fully submerged installation of the
lamp unit will invalidate the guarantee on the
lamp unit.
For further information, please see our
website: www.tropicalmarinecentre.co.uk
MiniLED 400 instructions v1-2011_Layout 1 08/06/2011 12

8
NOTICE D’INSTALLATION ET MODE D’EMPLOI
Notice de sécurité importante – A lire
attentivement
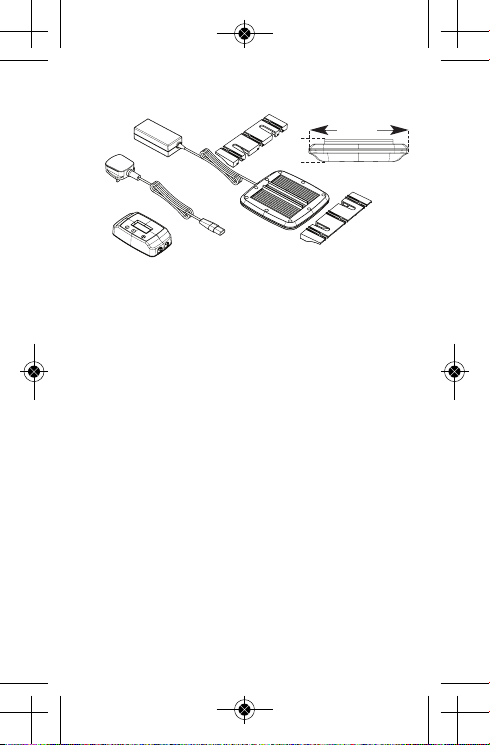
- L’unité MiniLED 400 contient une lampe et un bloc
d’alimentation indépendant qui alimente la lampe en
courant continu (basse tension).
Alimentation d’une lampe MiniLED 400 :
ENTREE-100-240 VCA 50-60 Hz 0,15A
SORTIE-19,5 VCC 0,7A
Attention : Ne pas utiliser la lampe avec d’autres
blocs d’alimentation car il se peut qu’elle ne
fonctionne pas et qu’elle soit endommagée de manière
irréparable. Si le bloc d’alimentation fourni avec l’unité
doit être remplacé, veuillez obtenir un bloc
d’alimentation AquaRay authentique auprès d’un
distributeur de produits Tropical Marine Centre.
- Débranchez toujours le bloc d’alimentation du
courant de secteur avant d’installer la lampe
ou de procéder à un entretien.
Attention : Le bloc d’alimentation n’est pas
étanche et ne doit donc pas être installé au-
dessus de l’aquarium ou à tout autre endroit où il
pourrait accidentellement tomber dans l’eau ou être
éclaboussé.
Attention : Ne pas installer le bloc d’alimentation
dans un endroit enclos. L’espace doit être bien aéré
pour veiller à ce que le bloc d’alimentation
ne surchauffe pas.
Attention : N’utilisez pas cet appareil si l’une de ses
pièces a un cordon
ou une fiche endommagée, s’il ne fonctionne pas
correctement, s’il a subi une chute, s’il a été immergé
dans de l’eau ou endommagé d’une manière
quelconque. Si le cordon externe de cette unité est
endommagé, il doit être remplacé par un cordon
exclusivement disponible auprès du fabricant ou de
son agent de service.
- Cette unité est prévue pour usage dans un
endroit couvert et ne convient pas aux
applications en plein air.
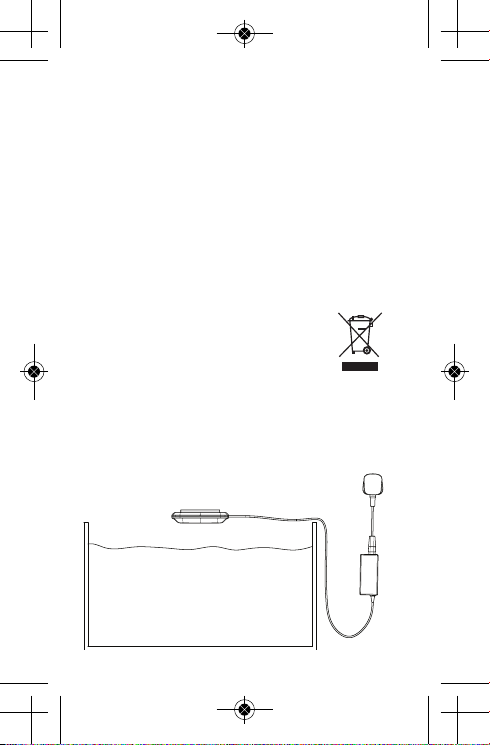
Attention : Veillez à ce que la lampe soit
installée en toute sécurité au-dessus de l’aquarium
avant de l’utiliser.
Attention : la lampe ne doit pas être installée à
moins de 25 mm de la surface de l’eau.
Attention : N’IMMERGEZ PAS LA LAMPE.
L’immersion de la lampe annulera la garantie.
-
-
I
-
-
s
MiniLED 400 instructions v1-2011_Layout 1 08/06/2011 12

I
e
é
Attention : Veillez à toujours inclure une boucle
d’égouttement dans le câble d’alimentation cc de la
lampe pour empêcher que l’eau ne coule le long du
câble et n’atteigne le bloc d’alimentation (voir
l’illustration ci-dessous).
- Lorsque l’unité est en marche, le dissipateur
thermique en aluminium rainuré situé à l’arrière de la
lampe devient chaud (± 60°C) au toucher.
Ceci est normal et indispensable pour que la lampe ne
surchauffe pas.
Attention : Veillez à ne pas couvrir ou bloquer la
surface arrière en aluminium de la lampe. Il doit
toujours y avoir un espace minimum de 10 mm entre
la lampe et la surface la plus proche, pour permettre
la libre circulation d’air autour de la lampe.
Attention : Le fonctionnement de l’unité MiniLED
400 dans un espace restreint ou non aéré, où dans un
endroit où il y a une source de chaleur supplémentaire,
peut entraîner une augmentation de la température
ambiante au-delà de 35°C, ce qui risque de réduire la
durée de vie utile de l’unité.
- Veuillez éliminer cette unité correctement.
Vérifiez le mode d’élimination recommandé
auprès de vos autorités locales.
La lampe MiniLED 400 ne contient pas
de mercure.
INFORMATIONS SUR LE PRODUIT
- Ce produit a été fabriqué conformément aux normes
suivantes :-
Sécurité : BS EN 60598-1 : 2000. BS EN 60598-2-11 : 2005
EMC : BS EN 55015 : 2006+A2:2009.
BS EN 61000-3-2 : 2006+A2:2009.
- Cette unité est certifiée CE.
Boucle
d’égouttement
Aquarium
Installation type
9
MiniLED 400 instructions v1-2011_Layout 1 08/06/2011 12

10
NOMENCLATURE / DIMENSIONS
1. Bloc d’alimentation.
2. Cordon d’alimentation avec configuration de
fiche britannique, européenne ou américaine.
3. Lampe MiniLED 400 – avec câble de 3 m et
connecteur correspondant à la fiche CC du bloc
d’alimentation.
4. Pattes de fixation – deux fournies.
5. Kit de fixation.
MONTAGE
La lampe MiniLED 400 est pré-assemblée et prête à
l’usage.
INSTALLATION
NB : Cette lampe N’est PAS prévue pour être
partiellement ou entièrement submergée. Elle
doit être fixée EN TOUTE SECURITE à pas
moins de 25 mm du niveau d’eau maximum de
l’aquarium.
La conception flexible, compacte et légère de la
lampe MiniLED 400 est telle qu’elle peut être
installée au-dessus de votre aquarium de multiples
façons, selon les besoins de votre application. Elle
peut être installée à proximité de la surface de l’eau.
Toutefois, si elle est installée plus loin de la surface de
l’aquarium, la diffusion lumineuse du faisceau à angle
large unique de MiniLED 400 sera maximisée.
140 mm
Profondeur = 140 mm
33 mm
MiniLED 400 instructions v1-2011_Layout 1 08/06/2011 12

11
A. En utilisant les pattes de fixation AquaRay
pour une fixation plus permanente avec six
vis (inox, autotaraudeuses ou écrou et
boulon Nylon – tous fournis) à l’INTÉRIEUR
ou SOUS un capot en bois ou métallique
ou un autre type de capotage.
Attention : avant de fixer les pattes de fixation au
capot en bois ou métallique ou à un autre type de
capotage à l’aide des six vis, veillez à bien les pousser
à fond sur le rail métallique du dissipateur thermique.
Attention : les six vis doivent être utilisées, pour
bien fixer la patte de fixation sur le capot en bois
ou métallique ou un autre type de capotage.
B. Sans aucune fixation, en posant l’unité
d’éclairage MiniLED 400 sur la partie
frontale de la lentille spéciale, à des fins
d’installation AU-DESSUS d’un couvercle
en verre transparent ou d’un plateau de
condensation en plastique.
D’autres options de fixation sont disponibles. Veuillez vous
reporter au dépliant sur le Système de fixation modulaire
AquaRay qui accompagne cette unité.
Pour d’autres conseils et réponses à certaines
questions fréquentes, veuillez consulter le site :-
www.tropicalmarinecentre.co.uk
MiniLED 400 instructions v1-2011_Layout 1 08/06/2011 12

12
FONCTIONNEMENT
Lorsque la lampe a été installée au-dessus de
l’aquarium en suivant l’une des méthodes d’installation
recommandées ci-dessus, elle peut être raccordée au
bloc d’alimentation. Ce dernier peut être relié au
courant de secteur à l’aide du cordon fourni, et il peut
alors être mis en marche. La lampe ne doit pas être
connectée à ou utilisée avec un bloc d’alimentation
autre que celui qui a été fourni par Tropical Marine
Centre.
Le bloc d’alimentation peut être branché sur le
courant de secteur par le biais d’un temporisateur
adéquat de 24 heures (qui n’est pas fourni) pour
contrôler quand la lampe s’allume et s’éteint. Le bloc
d’alimentation peut également être connecté à une
unité de contrôle AquaRay (disponible séparément)
pour simuler le lever du soleil, le coucher du soleil et
la lumière de la lune.
Attention : N’essayez pas de contrôler ou de régler
l’alimentation en courant continu de manière
quelconque entre le bloc d’alimentation et la lampe
MiniLED 400. Toute tentative de ce genre pourrait
annuler la garantie de 5 ans de votre unité MiniLED 400.
ENTRETIEN
Attention : Pour éviter les chocs électriques
éventuels, faites attention lors de l’utilisation de cet
appareil électrique à proximité d’eau.
Attention : Veillez à toujours débrancher le
bloc d’alimentation du courant avant d’installer
une lampe MiniLED 400 ou de procéder à un
entretien.
Attention : N’essayez pas d’ouvrir le boîtier en
plastique du bloc d’alimentation. Ceci risque d’annuler la
garantie d’un an du bloc d’alimentation.
Attention : N’essayez pas d’ouvrir le boîtier en
plastique de votre lampe MiniLED 400. Ceci
endommagerait son étanchéité et annulerait la
garantie de 5 ans de la lampe.
MiniLED 400 instructions v1-2011_Layout 1 08/06/2011 12

13
La lampe MiniLED 400 et le bloc d’alimentation
associé sont des unités étanches qui ne peuvent pas
être réparées par le client. L’unité d’éclairage à
l’intérieur de la lampe ne peut pas non plus être
réparée par le client et l’intégralité de la lampe doit
être éliminée à la fin de sa vie utile (plus de 50 000
heures).
La lampe MiniLED 400 ne nécessite que peu ou pas
d’entretien une fois qu’elle est installée. Toutefois, en
raison des dépôts de sel et du niveau de calcium élevé
dans les aquariums marins, il est courant que les dépôts
s’accumulent sur le corps de l’unité.
Nous faisons par conséquent les recommandations
suivantes :-
a. La surface de la lentille de la lampe MiniLED 400
doit être nettoyée périodiquement avec un chiffon
humecté d’eau chaude.
b. Le dissipateur thermique à l’arrière de l’unité doit
être libre de grosses particules de sel et autres
pellicules ou dépôts qui pourraient affecter
la libre circulation d’air autour des ailettes du
dissipateur thermique.
Un nettoyage occasionnel avec une petite brosse
et/ou un chiffon sec et non pelucheux est
recommandé.
DEPISTAGE DE PANNES
Problèmes : La lampe ne se met pas en
marche.
Solution : Vérifiez la connexion du câble entre la
lampe et le bloc d’alimentation.
Solution : Vérifiez que le cordon d’alimentation est
bien branché sur le bloc d’alimentation.
Solution : Vérifiez (et remplacez si nécessaire) le
fusible de la fiche du cordon d’alimentation
(Royaume-Uni uniquement).
Si la lampe ne se met toujours pas en marche,
retournez le bloc d’alimentation et la lampe à votre
distributeur pour qu’il effectue d’autres essais et
qu’il les remplace le cas échéant.
MiniLED 400 instructions v1-2011_Layout 1 08/06/2011 12

14
Problème : La lampe commence à clignoter.
Solution : Renvoyez le bloc d’alimentation à votre
distributeur pour qu’il le remplace par une pièce
authentique de Tropical Marine Centre.
Problème : Au moins une lampe de l’unité
MiniLED 400 ne s’allume pas ou s’éteint.
Solution : Renvoyez le bloc d’alimentation à votre
distributeur local pour qu’il le remplace par une
pièce authentique de Tropical Marine Centre.
Problème : La lampe a été immergée
accidentellement.
Solution : Coupez immédiatement le courant de
secteur du bloc d’alimentation et sortez la lampe de
l’eau tout en la maintenant à la verticale, de manière
à ce que le point d’entrée du câble soit tout en haut.
Débranchez la lampe du bloc d’alimentation par le
biais du connecteur situé à 150 mm du bloc
d’alimentation. S’il est immergé, il est normal qu’il y ait
de l’eau autour du bord extérieur de la lampe. Vous
pouvez l’éliminer en secouant doucement l’unité, à la
verticale, et en la séchant ensuite soigneusement
à l’aide d’un chiffon non pelucheux.
Quand elle est totalement sèche, vérifiez s’il y a de
l’eau ou des gouttes à l’intérieur du corps de l’unité
lorsque vous regardez à travers le couvercle avant. Si
vous n’êtes pas certain qu’il y a de l’eau à l’intérieur
de l’unité, ne rebranchez pas le bloc d’alimentation
et renvoyez immédiatement l’unité à votre
distributeur pour inspection ultérieure par Tropical
Marine Centre.
NB : Toute immersion accidentelle ou
installation partiellement/entièrement
submergée de l’unité en annulera la garantie.
Pour tous renseignements complémentaires,
veuillez consulter notre site Internet :
www.tropicalmarinecentre.co.uk
MiniLED 400 instructions v1-2011_Layout 1 08/06/2011 12

15
INSTALLATIONS- UND
GEBRAUCHSANLEITUNG
Wichtige Sicherheitshinweise – Bitte
sorgfältig durchlesen!
- Dieses Licht MiniLED 400 besteht aus einer
Lampeneinheit mit einem separaten Netzteil
(Power Supply Unit, PSU) zur Niederspannungs-
Gleich-stromversorgung der Lampeneinheit.
Netzteil für MiniLED 400 Leuchtstreifen:
EINGANG 100-240 V WS, 50-60 Hz, 0,15 A
AUSGANG 19,5 V GS, 0,7 A.
Achtung: Es darf kein sonstiges Netzteil mit dieser
Lampeneinheit verwendet werden, da die
Lampeneinheit in diesem Fall nicht nur funktionsunfähig
sein, sondern auch irreparable Schäden erleiden
könnte. Falls das mit der Einheit gelieferte Netzteil
ausgetauscht werden muss, beschaffen Sie bitte ein
originales AquaRay-Netzteil von einem lokalen Händler
für Produkte von Tropical Marine Centre.
- Vor Installation oder Wartung Ihrer MiniLED
400-Lampeneinheit immer zuerst die
Stromversorgung zum Netzteil trennen.
Achtung: Das Netzteil ist nicht wasserdicht und darf
daher nicht über dem Aquarium oder in einer anderen
Position montiert werden, in der es unbeabsichtigt ins
Wasser fallen oder mit Spritzwasser bespritzt werden
könnte.
Achtung: Das Netzteil nicht in einem geschlossenen
Raum aufstellen! Es muss immer eine ausreichende
Belüftung vorhanden sein, um die Überhitzung des
Netzteils zu verhindern.
Achtung: Dieses Gerät nicht verwenden, wenn es ein
beschädigtes Netzkabel oder einen beschädigten
Netzstecker hat, einen Fehler aufweist oder fallen
gelassen, in Wasser eingetaucht oder anderweitig
beschädigt worden ist. Wenn das externe
Anschlusskabel dieses Gerätes beschädigt ist, sollte
dieses ausschließlich durch ein Kabel vom Hersteller
oder dessen Kundendienst ersetzt werden.
- Das Gerät ist ausschließlich zur Verwendung
im Innern von Gebäuden entworfen und
eignet sich nicht zum Einsatz im Freien.
s
MiniLED 400 instructions v1-2011_Layout 1 08/06/2011 12

Tropfschleife
Aquarium
Typische Installation
Achtung: Stellen Sie vor der Inbetriebnahme der
MiniLED 400-Lampeneinheit sicher, dass das Gerät
sicher über dem Tank installiert ist.
Achtung: Die MiniLED 400-Lampeneinheit muss
mindestens 25 mm von der Wasseroberfläche
entfernt angebracht werden.
Achtung: DIE MINILED 400-LAMPENEINHEIT
NICHT IN WASSER EINTAUCHEN! Falls das
Gerät in Wasser eingetaucht worden ist, wird
seine Garantie erlöschen.
Achtung: Verlegen Sie das GS-Kabel zur MiniLED
400-Lampeneinheit immer mit einer Tropfschleife,
um zu verhindern, dass Wasser am Kabel hinunter
laufen und in das Netzteil eindringen kann (siehe
folgende Abbildung).
- Der Lamellenwärmetauscher auf der Rückseite der
MiniLED 400-Lampeneinheit wird beim Betrieb heiß
werden (ca. 60°C). Das ist vollkommen normal und
zeigt die wesentliche Schutzfunktion des Wärme-
tauschers gegen Überhitzung der Lampeneinheit an.
Achtung: Die rückseitige Aluminiumoberfläche der
MiniLED 400-Lampeneinheit unter keinen Umständen
abdecken oder anderweitig blockieren. Der Abstand
zwischen ihr und der nächstgelegenen Oberfläche
sollte immer mindestens 10 mm betragen, um den
ungehinderten Kühlluftstrom um die Rückseite
zu gewährleisten.
Achtung: Beim Betrieb der MiniLED 400-Lampeneinheit
in einem beengten oder nicht belüfteten Raum oder in
der Nähe einer zusätzlichen Wärmequelle könnte die
Umgebungstemperatur am Gerät auf über 35°C steigen,
wodurch die Lebensdauer des Geräts verkürzt wird.
16
MiniLED 400 instructions v1-2011_Layout 1 08/06/2011 12

- Dieses Gerät ordnungsgemäß entsorgen.
Weitere Informationen über geltende
Entsorgungsvorschriften erhalten Sie von
Ihrer lokalen Umweltschutzbehörde.
Die MiniLED 400-Lampeneinheit
enthält kein Quecksilber.
PRODUKTINFORMATIONEN
- Dieses Gerät wurde zur Übereinstimmung mit
folgenden Normen gefertigt: Sicherheit -
BS EN 60598-1: 2000. BS EN 60598-2-11: 2005
EMC: BS EN 55015: 2006+A2:2009.
BS EN 61000-3-2: 2006+A2:2009.
- Dieses Gerät trägt die CE-Zulassung.
TEILLISTE/ABMESSUNGEN
1. Netzteil
2. Netzkabel mit britischer, europäischer oder US-
Steckerkonfiguration.
3. MiniLED 400-Lampeneinheit mit 3 m langem
Kabel und passendem Stecker für den GS-
Ausgang aus dem Netzteil.
4. Zwei mitgelieferte Befestigungshalter
5. Montagesatz.
MONTAGE
Die MiniLED 400-Lampeneinheit wird fertig montiert
und gebrauchsfertig geliefert.
17
140 mm
Tiefe = 140 mm
33 mm
MiniLED 400 instructions v1-2011_Layout 1 08/06/2011 12

18
INSTALLATION
Bitte beachten: Dieser Lampeneinheit ist
NICHT zum Betrieb im teilweise oder
vollständig in Wasser eingetauchten ustand
ausgelegt. Es muss mit einem Mindestabstand
von 25 mm zum maximalen Wasserstand des
Aquariums SICHER befestigt werden.
Das vielseitige und kompakte Design mit geringem
Gewicht gestattet die Installation der MiniLED 400-
Lampeneinheit über Ihrem Aquarium auf eine
beliebige Weise, die Ihrer Anwendung entspricht. Das
Design der Lampeneinheit gestattet die Montage in
direkter Nähe zur Oberfläche des Aquariums. Wenn Sie
die Einheit jedoch in einem etwas größeren Abstand zur
Wasseroberfläche des Aquariums montieren, werden
Sie die Lichtausbreitung des einzigartigen
Weitwinkelstrahls der MiniLED 400-Lampe maximieren.
A. Nutzung von AquaRay Befestigungshaltern
für dauerhafte Befestigung mit sechs
Schrauben (selbstschneidender Edelstahl
oder Nylonmutter und -bolzen – alles
mitgeliefert) für das INNERE oder UNTERE
einer Holz- oder Metallhaube oder anderer
Gehäuse.
Achtung:Vor Anbringung der Halter an Holz- oder
Metallhauben oder andere Gehäuse mit allen sechs
Schrauben sicherstellen, dass diese vollständig auf die
Metallschiene der Kühlkörpereinrichtung stoßen.
Achtung: Um den Halter sicher an Holz- oder
Metallhauben oder andere Gehäuse anzubringen,
müssen alle sechs Schrauben verwendet werden.
MiniLED 400 instructions v1-2011_Layout 1 08/06/2011 12
Table of contents
Languages:
Other AQUARAY Lighting Equipment manuals
Popular Lighting Equipment manuals by other brands

Marq
Marq Gesture Beam 400 quick start guide

Hornbach
Hornbach 10599894 Assembly instructions

Robern
Robern VESPER EDGELINE LIGHTS installation instructions

LEUCHTWURM
LEUCHTWURM 43LED/581 quick start guide

Blizzard Lighting
Blizzard Lighting HotBox RGBW/RGBA manual

ADJ
ADJ Mega QPlus GO User instructions

Easy Camp
Easy Camp 680229 instruction manual

WISKA
WISKA COMBI 304 LED Mounting instructions

Jefferson
Jefferson JEFTRCH16-R user manual

As Pool
As Pool Sterilor XP Series Installation and user manual

Arize
Arize Element L2000 installation guide

Eaton
Eaton CGLine+ LED CEAG 71811 Mounting and operating instructions