Aquasana EQ-AST-WH User manual

Whole House
Salt-Free Water
Conditioner
Owner’s Manual
EQ-AST-WH and EQ-AST-WH-C

Meet clean, healthy water. Your new Aquasana®whole house Salt-Free Water
Conditioner system was expertly engineered to protect internal pipes and
plumbing from scale buildup without the use of harsh chemicals or salt.
Enjoy the peace of mind that comes from knowing you're protecting your
home's plumbing and extending the life of your washing machine, water
heater, dishwasher, and other appliances.
EQ-AST-WH and EQ-AST-WH-C
Whole House
Salt-Free Water
Conditioner
TABLE OF CONTENTS
Box Contents ................................................................................................................ 1
System Conguration.................................................................................................. 2
Use & Care .................................................................................................................... 3
Installation Steps......................................................................................................4–7
Warranty ....................................................................................................................... 8
Water for Life®Program.............................................................................................. 9

BOX CONTENTS 1
10" Pre-Filter
Shut-O Valve
(Not included
with Pro-Kit)
Salt-Free Water
Conditioner
3" Nipples (4)
Slip Unions (2)
Garden Hose
Adapter
Pre-Filter
Support Bracket
• Drill
• Wrench
• Channel locks
• PVC pipe cutter
Tools recommended for installation:
Parts and pieces included with your system will vary depending on your specic order.
Please call Customer Service with any questions or concerns 866-662-6885.
• NSF approved PVC primer and glue
• NSF certied plumber's tape
• Copper wire & grounding clamps
(if copper pipes are present)
Wrench
OPTIONAL UPGRADE - Professional Grade Install Kit
20"
Pre-Filter
10"
Post-Filter
Not NSF Certied
Pex Support
Brackets (2)
Brass
Valves (3)
Post-Filter
Support Bracket
Brass "T"
Fittings (2) Brass
Adapters (2)

2SYSTEM CONFIGURATION
2
If you have added components to your Salt-Free Water Conditioner,
note the correct sequencing below.
(Installation shown below includes Professional Grade Install Kit)
Before installing
• Lay out system in appropriate conguration. Improper sequence
of equipment will aect performance, and could possibly damage
your system.
• For all installations: Anticipate the need for additional parts and pieces
including but not limited to pex tubing, clamps and mounting screws to
install unit properly (available at a local home improvement stores or
through your plumbing contractor). Due to the varieties of home design,
not all congurations can be addressed in this guide.
• DO NOT install this water conditioner where the line pressure may
exceed 100 psi. The operating pressure range for this lter is between
20psi – 100psi.
• Install on cold water lines only (40° – 90°F).
• Installation of the water conditioner must comply with existing state and
local plumbing codes. Aquasana and its manufacturer are not liable for
consequential or incidental damages due to improper installation.
• DO NOT install the unit on its side. It must be installed upright
to maximize contact with media bed.
Salt-Free Water
Conditioner
10" Post-Filter
(Optional)
10" Pre-Filter
20" Pre-Filter
(Optional)
UV Filter
(Optional)
Rhino®Water
Filter System
(Optional)

USE & CARE 3
Read all precautions and installation instructions carefully and completely
before installing.
Precautions
• Properly tighten all ttings to
ensure a leak-free assembly.
• NSF certied plumber's tape (thread
sealing tape) is the only sealer that
can be used on threaded ttings.
DO NOT use pipe dope or PVC
primer/glue on threaded ttings.
Exposure to these compounds will
damage nipples causing leaks.
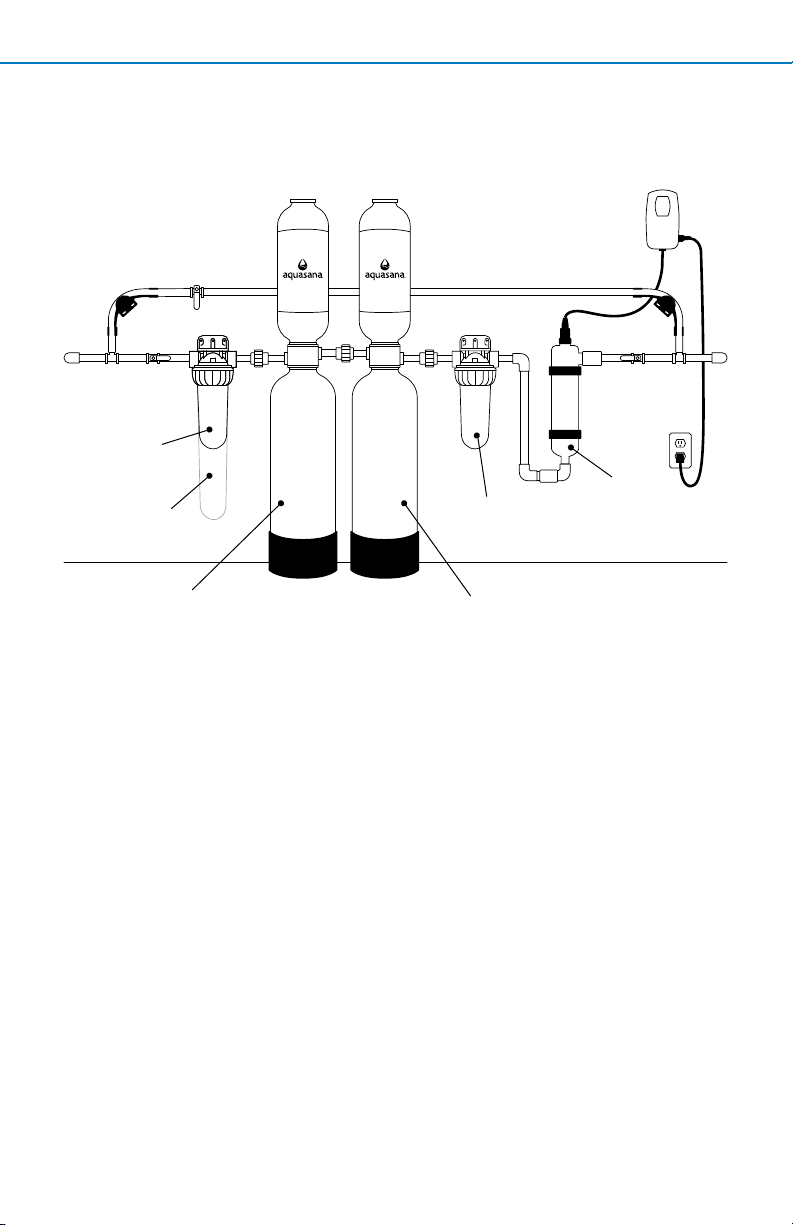
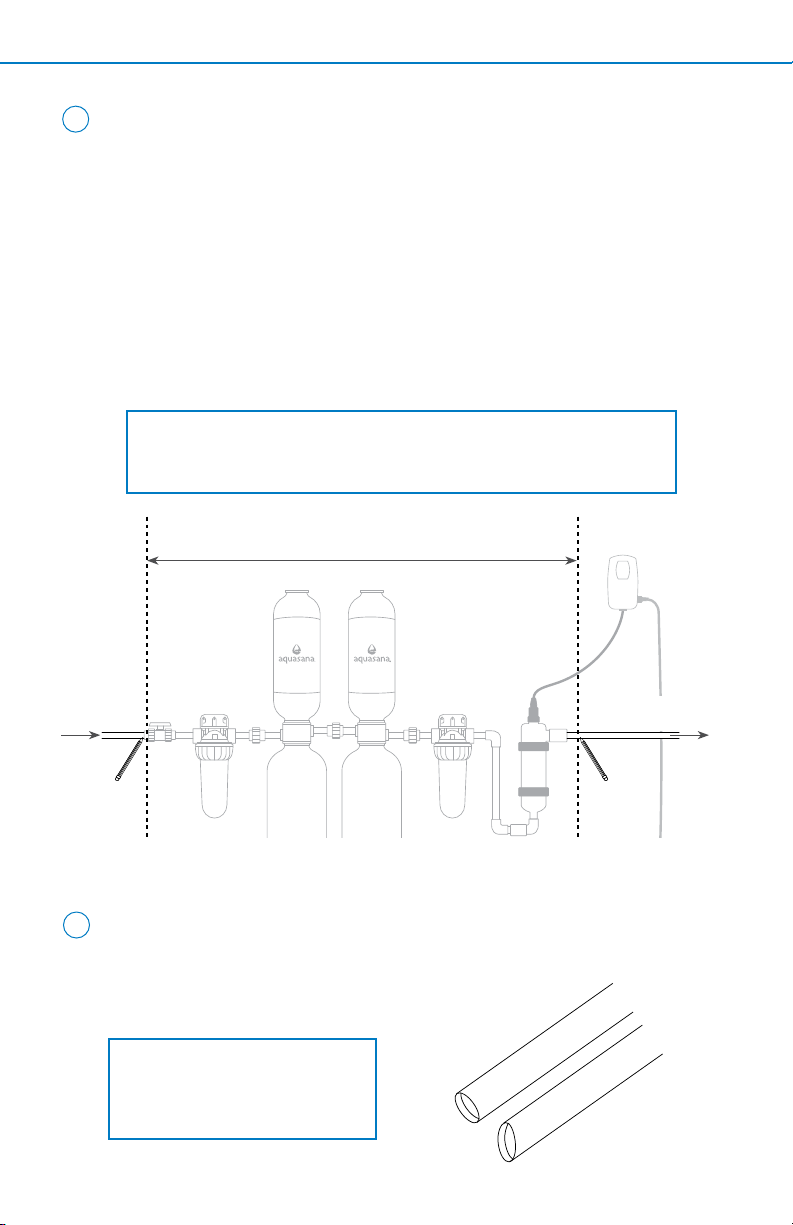
• Pick an appropriate installation
location. Dimensions of systems
vary—always allow an estimated
minimum of 60” clearance for
height of tank, and a minimum
of 45” for oor space.
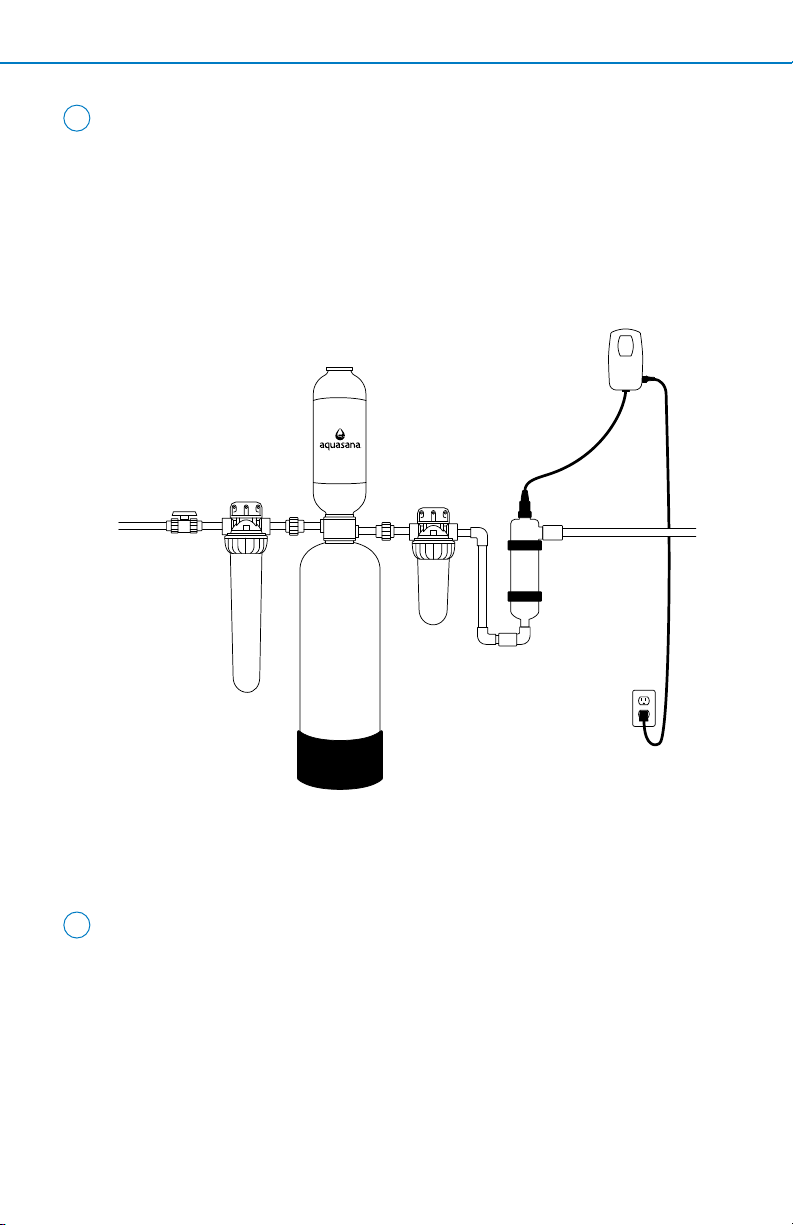
• Unit must be installed in an area
where the main water line enters
your home, before connecting to
the water heater. DO NOT install
after a water heater or on the
hot water line.
• It is recommended your system
be installed indoors and out of
direct sunlight. Prolonged
exposure to light can weaken
plastic components, resulting in
lter housing failure. If this is not
possible and the system is outdoors
or in a sunny area, the unit must be
protected from both direct sunlight
and freezing temperatures.
• If installing on metallic plumbing,
two grounding clamps and #4
copper wire are essential for safety.
• Some local codes may require
the use of a licensed plumber or
certied installer when disrupting
a potable water line.
• In areas with high pressure, a
pressure relief valve and a water
hammer arrestor may be necessary.
Cleaning
The exterior of your water conditioner
can be cleaned with warm, soapy
water. Rinse well with fresh, clean
water.
A Pre-Filter is included with your
system. Sediment levels vary from one
location to another. It is recommended
to replace your Pre-Filter every 2
months. If the ow rate has noticeably
decreased, replace your lter cartridge
sooner.
Specications
This water conditioner is designed and
tested for use with genuine Aquasana
parts including replacement lters and
all hardware. Use of parts from other
manufacturers may result in loss of
contaminant reduction performance,
system damage or failure. Use of parts
from other manufacturers will also
void your warranty. Please visit
aquasana.com for replacement parts.
Model: EQ-AST-WH / EQ-AST-WH-C
Replacement tank:
EQ-AST-WH-R / EQ-AST-WH-C-R
Additional Replacements:
20" Pre-Filter: EQ-304-20
10" Pre Filter: EQ-304
10" Post-Filter: EQ-PFC.35
UV Lamp: AQ-UV-L330C
NOTE: Never use chemical
cleaning products on the system’s
exterior surface as they may
damage the housing.

1. Once out of the box, keep the tank upright
at all times as to not apply pressure to
divider. Remove shipping caps from inlet
and outlet ports. Using supplied adapter,
connect a garden hose to the inlet port
so the water will ow into the system
and out of the outlet port.
2. Slowly turn faucet on and allow
discolored water to ow from
outlet into a suitable
drainage area.
TIP: You may need to slightly shake
the tank to help ush the system.
3. Flush the tank for 5-10 minutes.
4. Disconnect the system from the garden
hose, be sure the white washers are
properly set inside the inlet and outlet
ports, and position the system
for installation.
4
Pre-Condition Salt-Free Water Conditioner
Select Location
1. Pick an appropriate installation location. Unit must be installed in an
area where the main water line enters your home, before connecting
to the water heater.
2. Turn o the main water source prior to installation. Drain water from
lines to relieve pressure by turning on a faucet inside your home.
NOTE: DO NOT install after the water heater or on the
hot water line. Components and installation will vary.
NOTE: It’s imperative that this system is ushed properly prior to nal installation.
1
2
INSTALLATION STEPS

5
Prepare Salt-Free Water Conditioner
Wrap your pipe nipples with NSF
certied plumber's tape. Connect the
nipples to the system's inlet and outlet.
NOTE: DO NOT use pipe solvent
(dope), as solvents in some types
of pipe dope may cause damage to
plastic ttings. Do not over-tighten
to prevent damage to lter head.
3
When installing on metallic plumbing,
ensure you take the following precautions.
Securely install two (2) grounding clamps
and a #4 copper wire (not included) across
the location where the system will be
installed. Tightly clamp at both ends,
as shown in the illustration.
Ground
Clamp
Ground
Clamp
Ground Wire
WARNING
ELECTRICAL SHOCK HAZARD
Prior to installation on metallic
plumbing, securely install two
grounding clamps and a #4 copper
wire per installation instructions.
Failure to follow these instructions
can result in death or electric shock.
4COPPER PIPES ONLY (proceed to Step 5 for PVC Pipes)
INSTALLATION STEPS

6
Cut Pipes
Cut pipe along the marked sections from step
5 and clean ends of pipe. Ensure there are no
burrs, sharp edges or deep scratches.
6
NOTE: Cut tubing as straight as
possible with a utility knife, or
an appropriate pipe cutter for
copper tubing or PVC.
INSTALLATION STEPS
NOTE: DO NOT cut more pipe than necessary. You can cut more pipe
later if needed. If you're also installing a Pro-Install Kit or bypass loop,
do so at this time.
Incoming
water supply
Outgoing
water supply
Install Shut-o Valve and Ensure Spacing
1. Using a pipe cutter, cut into the main water supply line to install
the shut-o valve.
2. Loosely t shut-o valve to calculate proper spacing of components.
3. Measure distance for Pre-Filter, Salt-Free Water Conditioner tank,
and optional add-ons (Rhino Tank, Post-Filter, and UV) and mark
pipe accordingly.
If you're installing additional add-ons make sure to read through
those separate installation manuals prior to fully installing your
complete system.
5
Ensure proper spacing to t Pre-Filter, Salt-Free Water Conditioner,
and any optional add-ons
CORRECT
INCORRECT

Congure System
Fit Salt-Free Water Conditioner tank and additional optional add-ons
into the system at this time. Screw Pre-Filter support bracket onto
the wall and attach Pre-Filter.
Properly connect system together accordingly (slip ttings, barbed
ttings, NSF certied PVC glue, etc.). Ensure all parts are owing
through the "IN" port in the correct direction of water ow.
Final System Check
Once installation is complete, allow proper time for glue to dry
according to manufacturer instructions. Then, slowly turn water
on and inspect for leaks.
After inspecting for leaks, turn on the faucet closest to the
installed unit and allow water to run for 5-10 minutes for the
nal ushing period.
7
8
7
INSTALLATION STEPS

What is covered
This Warranty covers defects in materials or workmanship in manufacturing of your
Aquasana Whole House Salt-Free Water Conditioner, except as provided below.
For how long
This warranty runs for 72 months from the date of purchase by a consumer
(“Warranty Period”).
What is not covered
This warranty does not cover lter cartridges and any systems that were not installed in
compliance with the instructions or that have been abused or operated incorrectly. It also
does not cover the following:
• Incidental or consequential damages caused by a failure of the product.
• Clogging, as replacement of the Pre-Filter cartridge is the purchaser’s responsibility.
• Damage from use of non-potable water supplies.
• Labor costs to install or replace the system or lters.
• Damage caused by re, ood or acts of God.
This warranty is voided if the product is used with parts that are not genuine Aquasana parts.
This includes, but is not limited to: replacement lters, faucets, and diverter valves.
What Aquasana will do
We will replace the defective part of the covered product, or if necessary, the product and
send it to you with installation instructions for a licensed plumber.
How to get service
To receive service under this Warranty, you must contact Aquasana, Inc. at 1-866-662-6885 or
service representative who will verify that the product is under warranty and determine
whether a part or the system will be replaced and whether you must send back the defective
part at our cost. If so, we will send you a return shipping label. You will be required to provide
a proof of purchase (unless you purchased direct from us). We will send you the replacement
part or system at no cost to you.
How state law applies
This warranty gives you specic rights and you may have other rights which vary from
state to state.
Some states do not allow the exclusion or limitation of incidental or consequential damages,
so the above limitation or exclusion may not apply to you.
Warranty Registration
Warranty registration is not required for coverage under the factory direct purchases
made from www.aquasana.com. If you purchased from a retailer or dealer, please
complete the online warranty registration form at www.aquasana.com/warranty. Once
registered online, we will have a record of your purchase and you will not be required to
produce a proof of purchase for a warranty claim.
EQ-AST-WH AND EQ-AST-WH-C
SALT-FREE WATER CONDITIONER
6-YEAR LIMITED WARRANTY
6
YEAR
LIMITED
WARRANTY

Replace your lters on time, without worry — auto-delivered
to you, for less.
It’s important to change your lters using genuine Aquasana replacements for
continued water ltration and optimum system performance. This is why we oer
our no contract, auto-ship lter replacement program called Water for Life®.
Free Shipping
Replacements shipped directly to you, right
when you need them, at no extra cost.
Discount Replacements
Lock in a 15% discount on lters to
ensure you always get the best price.
Extended Warranty
Our performance promise to you –
free replacement parts, just in case.
No Contract
Replacing your lters is serious –
but your commitment doesn’t have to be.
CONTACT US TO LEARN MORE
866-662-6885
Other manuals for EQ-AST-WH
2
This manual suits for next models
1
Table of contents
Other Aquasana Water Dispenser manuals