Thank you for purchasing a quality AQUAPRO product, the
answers for your watergarden made easy!
PRESSURE FILTER/UV COMBO
INSTRUCTION MANUAL
REPLACING THE GLOBE
1. Turn off power supply and remove plug from
power outlet. Turn off your pump.
2. Undo the 4 screws on the top of the filter
holding the UV-C Assembly in place.
3. Carefully lift up the UV-C Assembly out of the
filter lid. Take care not to impact the quartz
sleeve on anything – it will break.
4. Undo the quartz sleeve locking collar at the
top of the quartz sleeve. Take cars not to lose
the quartz sleeve o ring and collar.
5. Carefully remove the quartz sleeve from the
UV-C Assembly and place in a secure position.
6. You can now access the globe to replace it.
Pull out the old globe and discard responsibly.
Insert a new globe ensuring it is connected
securely.
7. Replace the quartz sleeve onto the UV-C
Assembly ensuring the o ring and collar is
located properly. Replace and tighten the
quartz sleeve locking collar.
8. Replace the UV-C Assembly into the top of
the filter ensuring it fits securely. Tighten the
4 screws fixing the Assembly into the filter
lid.
9. Turn your pump back on and then reconnect
power supply and turn on your filter. You have
successfully replaced your UV-C globe.
IMPORTANT SAFEGUARDS
To guard against injury, basic safety precautions
should be observed including, but not limited to
the following;
• Do not look at an unshielded UV-C globe.
Ultra Violet light is harmful to your eyes and
may cause blindness.
• Always use a properly grounded power supply
that is connected to an RCd with a rated
residual operating current not exceeding
30mA. As per AS/NZS 3350.2.41:1997.
• Always unplug the filter from the power
supply when not in use or before performing
any maintenance on the pump.
• Never pull the cord to disconnect the plug
from the power supply. Grasp the plug and
pull to disconnect.
• Do not install or store the filter where it
will be exposed to extreme hot or cold
temperatures.
• Keep out of reach of children or pets. This
appliance should not be used by children or
infirm persons without supervision.
• Do not cut the cord as this will result in
voiding your warranty.
• Care should be taken to arrange the power
cord so that it cannot be accidently tripped
over or pulled.
• Do not attempt to repair the filter yourself.
Return to an authorized service centre or
place of purchase if a fault occurs (regular
maintenance is not considered repair and is
required by user).
5. If the flow from your pump is greater than
the recommended max flow, you must
reduce the flow, or bypass some of the flow
with a Y piece. The pressure must not exceed
the 4 metre head.
6. Turn your pump on and then plug in the UV-C
unit on the filter. The UV-C unit should not be
turned on if there is no water flowing past the
UV-C globe. The ballast (black box on cable)
should be kept in a sheltered location.
7. You can help boost the biological function
of your filter with AQUAPRO Bacteria. Now
sit back, relax and enjoy a clean and healthy
pond.
MAINTENANCE
Disconnect power cord from the power supply
before performing maintenance. Never lift the
filter by the power cord.
Check the UV-C globe regularly and replace
every 5 months. Failure to replace the globe
before it’s life span may cause electrical
damage.
To visually check the globe, look through the
clear UV-C indicator on the top of the filter and if
the light is working you will see a purple glow.
The power cord cannot be replaced. If the cord is
damaged, the filter must be discarded.
The filter must be operational 24 hours every day
for it to function effectively.
Regular backwash cleaning every two weeks is
recommended.
USING THE BACKWASH
1. Whilst the filter is still functioning, connect
tubing to the backwash outlet of the filter.
You can divert the dirty water into a garden
bed or into your drain. Turn the valve on the
backwash outlet to open.
2. Now turn the backwash arrow shaped dial on
the top of the filter to “clean” mode (the ar-
row will face towards the ball value backwash
outlet). The water from the normal outlet will
now come out the backwash outlet.
3. Turn the cleaning handle clockwise on the
filter several times or until the water exiting
the backwash outlet becomes clean. This
squeezes the filter sponges and cleans them
mechanically.
4. Now turn the backwash function dial on the
top of the filter back to “filter” mode and
close the valve on the backwash outlet.
5. Your filter has now been rinsed, now sit back
and enjoy your watergarden.
FULL DISASSEBLE AND RINSE
1. Turn off your pump and disconnect the power
cord from any electrical source. Undo the
threaded inlet and outlets from the filter,
unclip the lid clamp and carefully remove the
lid.
2. Take care not to lose or damage the O ring
seal. Unscrew the clear locking screw at the
bottom of the filter sponge layers (or the black
base plate on AP10000UV model). Undo the
screw that holds the rod in place and remove
the base plate.
3. Now remove the foam sponge rings from off
the centre core and rinse them in dechlorinat-
ed water or pond water. Using dechlorinated
water ensures the chlorine in normal tap
water does not kill the beneficial bacteria liv-
ing in your filter media. Be sure to thoroughly
squeeze the sponges to remove sludge.
4. Remove the high efficiency bio media ring (in
AP10000UV Model only) from the bottom of
the filter canister and only remove any excess
brown sludge from the biospheres. You
should not remove all of this brown matter as
this is the beneficial bacteria which is essen-
tial in the breakdown of toxic waste from your
pond.
5. Now clean out the canister of your filter
and any debris from the lid of the filter and
reassemble. First reassemble the partially
cleaned bio media ring into the canister and
then insert lid with the foam rings installed
onto the center core. The Foam rings should
alternate from Blue to Yellow.
6. Now put the lid back in place, taking care to
locate the O ring on the lid of the filter, firmly
push the lid back onto the canister. Fasten the
lid clamp in place and reconnect the inlet and
outlet.
7. Now plug the pump and filter in, turn on, and
sit back and enjoy your watergarden.
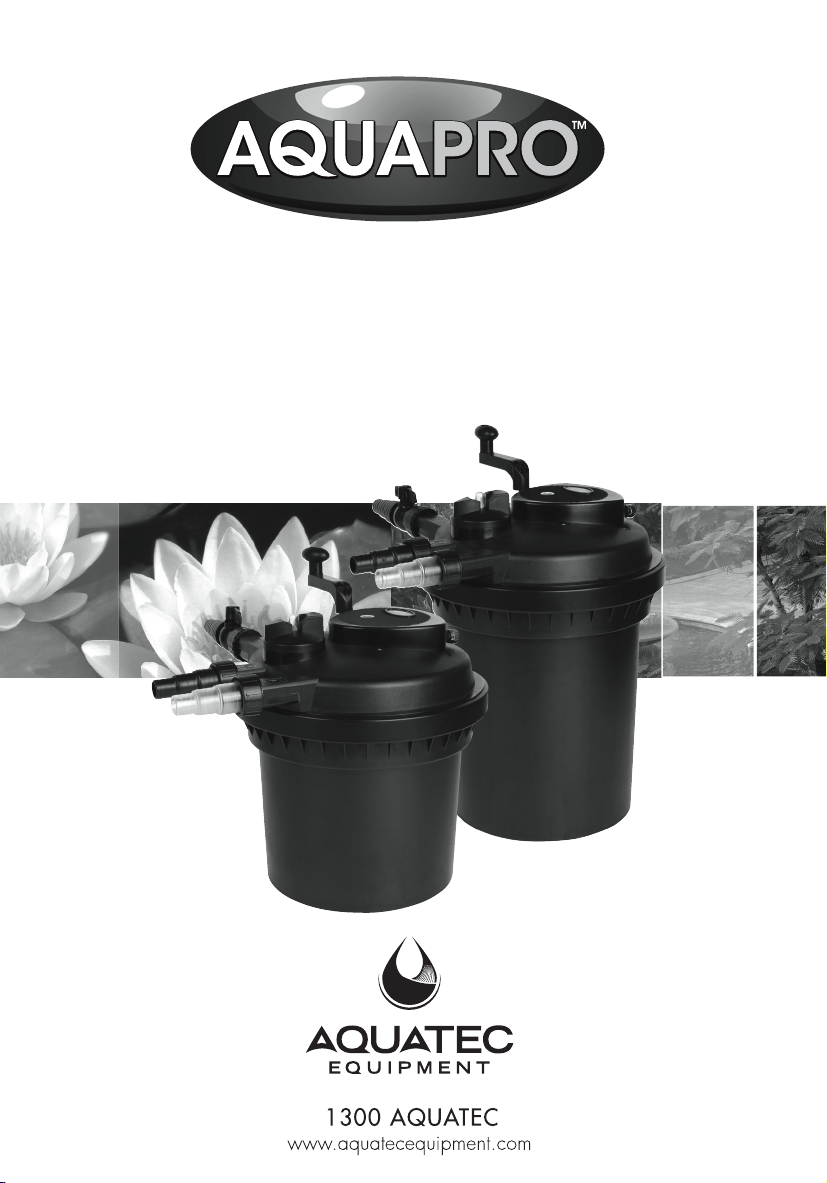
DESCRIPTION AND FEATURES
Your AQUAPRO pond filter has been manufac-
tured with advanced technology to provide you
with the best quality filter for your pond or water
feature.
• Your AQUAPRO pressure filter has an ad-
vanced backwash cleaning function to make
cleaning and maintenance easy.
• An ultraviolet clarifier incorporated into the
filter sterilizes the water as it passes through,
giving you crystal clear water.
• A pressure indicator lets you know when the
pressure in the filter increases, indicating
that the filter foams are getting blocked and
requires cleaning.
• A large canister and high surface area bio
media ensures maximum biological filtration.
INSTALLATION
1. If required, have a qualified electrician install
weatherproof power point near to the pond or
water feature, (within the cable length of the
filter).
2. Identify a suitable location for your new
pressure filter. NB: Do not submerge this
product in water. The pressure filter can be
used in between a pump and a water feature
or waterfall. The filter can also be partially
buried to help disguise it in your garden. It is
important to return the clean filtered water
from your filter to the opposite end of your
pond to where the pump suction is located.
3. Connect antikink or poly tubing from your
pump to the inlet of your filter. Your filter has a
3 Step hosetail inlet and outlet, please ensure
you use the largest size tubing possible and
cut off the hosetails smaller than the tubing
you are using. The outlet hose size should be
the same or larger than the inlet hose size.
Eg: If using 40mm hose, cut off the 25 and
32mm hosetail sections.
4. Connect tubing from the outlet of the filter
back into your pond at the opposite end to
where you are pumping from. You can have
the outlet of the filter running into a waterfall.
AP5000UV AP10000UV
MAXIMUM POND SIZE - WITHOUT FISH - SHADED (L) 5000 10000
MAXIMUM POND SIZE - WITH FISH - FULL SUN (L) 1500 3000
MAXIMUM FLOW (L/H) 3000 6000
VOLTS (V) 240 240
ULTRAVIOLET CLARIFIER (W) 11 11
FILTER CANISTER CAPACITY (L) 20 25
INLET/OUTLET Ø (mm) 25|32|40 25|32|40
CABLE LENGTH (m) 5 5
AQUAPRO_AP5000UV_10000UV_Instructions.indd 4-6 17/10/2014 2:25 pm
Thank you for purchasing a quality AQUAPRO product, the
answers for your watergarden made easy!
PRESSURE FILTER/UV COMBO
INSTRUCTION MANUAL
REPLACING THE GLOBE
1. Turn off power supply and remove plug from
power outlet. Turn off your pump.
2. Undo the 4 screws on the top of the filter
holding the UV-C Assembly in place.
3. Carefully lift up the UV-C Assembly out of the
filter lid. Take care not to impact the quartz
sleeve on anything – it will break.
4. Undo the quartz sleeve locking collar at the
top of the quartz sleeve. Take cars not to lose
the quartz sleeve o ring and collar.
5. Carefully remove the quartz sleeve from the
UV-C Assembly and place in a secure position.
6. You can now access the globe to replace it.
Pull out the old globe and discard responsibly.
Insert a new globe ensuring it is connected
securely.
7. Replace the quartz sleeve onto the UV-C
Assembly ensuring the o ring and collar is
located properly. Replace and tighten the
quartz sleeve locking collar.
8. Replace the UV-C Assembly into the top of
the filter ensuring it fits securely. Tighten the
4 screws fixing the Assembly into the filter
lid.
9. Turn your pump back on and then reconnect
power supply and turn on your filter. You have
successfully replaced your UV-C globe.
IMPORTANT SAFEGUARDS
To guard against injury, basic safety precautions
should be observed including, but not limited to
the following;
• Do not look at an unshielded UV-C globe.
Ultra Violet light is harmful to your eyes and
may cause blindness.
• Always use a properly grounded power supply
that is connected to an RCd with a rated
residual operating current not exceeding
30mA. As per AS/NZS 3350.2.41:1997.
• Always unplug the filter from the power
supply when not in use or before performing
any maintenance on the pump.
• Never pull the cord to disconnect the plug
from the power supply. Grasp the plug and
pull to disconnect.
• Do not install or store the filter where it
will be exposed to extreme hot or cold
temperatures.
• Keep out of reach of children or pets. This
appliance should not be used by children or
infirm persons without supervision.
• Do not cut the cord as this will result in
voiding your warranty.
• Care should be taken to arrange the power
cord so that it cannot be accidently tripped
over or pulled.
• Do not attempt to repair the filter yourself.
Return to an authorized service centre or
place of purchase if a fault occurs (regular
maintenance is not considered repair and is
required by user).
5. If the flow from your pump is greater than
the recommended max flow, you must
reduce the flow, or bypass some of the flow
with a Y piece. The pressure must not exceed
the 4 metre head.
6. Turn your pump on and then plug in the UV-C
unit on the filter. The UV-C unit should not be
turned on if there is no water flowing past the
UV-C globe. The ballast (black box on cable)
should be kept in a sheltered location.
7. You can help boost the biological function
of your filter with AQUAPRO Bacteria. Now
sit back, relax and enjoy a clean and healthy
pond.
MAINTENANCE
Disconnect power cord from the power supply
before performing maintenance. Never lift the
filter by the power cord.
Check the UV-C globe regularly and replace
every 5 months. Failure to replace the globe
before it’s life span may cause electrical
damage.
To visually check the globe, look through the
clear UV-C indicator on the top of the filter and if
the light is working you will see a purple glow.
The power cord cannot be replaced. If the cord is
damaged, the filter must be discarded.
The filter must be operational 24 hours every day
for it to function effectively.
Regular backwash cleaning every two weeks is
recommended.
USING THE BACKWASH
1. Whilst the filter is still functioning, connect
tubing to the backwash outlet of the filter.
You can divert the dirty water into a garden
bed or into your drain. Turn the valve on the
backwash outlet to open.
2. Now turn the backwash arrow shaped dial on
the top of the filter to “clean” mode (the ar-
row will face towards the ball value backwash
outlet). The water from the normal outlet will
now come out the backwash outlet.
3. Turn the cleaning handle clockwise on the
filter several times or until the water exiting
the backwash outlet becomes clean. This
squeezes the filter sponges and cleans them
mechanically.
4. Now turn the backwash function dial on the
top of the filter back to “filter” mode and
close the valve on the backwash outlet.
5. Your filter has now been rinsed, now sit back
and enjoy your watergarden.
FULL DISASSEBLE AND RINSE
1. Turn off your pump and disconnect the power
cord from any electrical source. Undo the
threaded inlet and outlets from the filter,
unclip the lid clamp and carefully remove the
lid.
2. Take care not to lose or damage the O ring
seal. Unscrew the clear locking screw at the
bottom of the filter sponge layers (or the black
base plate on AP10000UV model). Undo the
screw that holds the rod in place and remove
the base plate.
3. Now remove the foam sponge rings from off
the centre core and rinse them in dechlorinat-
ed water or pond water. Using dechlorinated
water ensures the chlorine in normal tap
water does not kill the beneficial bacteria liv-
ing in your filter media. Be sure to thoroughly
squeeze the sponges to remove sludge.
4. Remove the high efficiency bio media ring (in
AP10000UV Model only) from the bottom of
the filter canister and only remove any excess
brown sludge from the biospheres. You
should not remove all of this brown matter as
this is the beneficial bacteria which is essen-
tial in the breakdown of toxic waste from your
pond.
5. Now clean out the canister of your filter
and any debris from the lid of the filter and
reassemble. First reassemble the partially
cleaned bio media ring into the canister and
then insert lid with the foam rings installed
onto the center core. The Foam rings should
alternate from Blue to Yellow.
6. Now put the lid back in place, taking care to
locate the O ring on the lid of the filter, firmly
push the lid back onto the canister. Fasten the
lid clamp in place and reconnect the inlet and
outlet.
7. Now plug the pump and filter in, turn on, and
sit back and enjoy your watergarden.
DESCRIPTION AND FEATURES
Your AQUAPRO pond filter has been manufac-
tured with advanced technology to provide you
with the best quality filter for your pond or water
feature.
• Your AQUAPRO pressure filter has an ad-
vanced backwash cleaning function to make
cleaning and maintenance easy.
• An ultraviolet clarifier incorporated into the
filter sterilizes the water as it passes through,
giving you crystal clear water.
• A pressure indicator lets you know when the
pressure in the filter increases, indicating
that the filter foams are getting blocked and
requires cleaning.
• A large canister and high surface area bio
media ensures maximum biological filtration.
INSTALLATION
1. If required, have a qualified electrician install
weatherproof power point near to the pond or
water feature, (within the cable length of the
filter).
2. Identify a suitable location for your new
pressure filter. NB: Do not submerge this
product in water. The pressure filter can be
used in between a pump and a water feature
or waterfall. The filter can also be partially
buried to help disguise it in your garden. It is
important to return the clean filtered water
from your filter to the opposite end of your
pond to where the pump suction is located.
3. Connect antikink or poly tubing from your
pump to the inlet of your filter. Your filter has a
3 Step hosetail inlet and outlet, please ensure
you use the largest size tubing possible and
cut off the hosetails smaller than the tubing
you are using. The outlet hose size should be
the same or larger than the inlet hose size.
Eg: If using 40mm hose, cut off the 25 and
32mm hosetail sections.
4. Connect tubing from the outlet of the filter
back into your pond at the opposite end to
where you are pumping from. You can have
the outlet of the filter running into a waterfall.
AP5000UV AP10000UV
MAXIMUM POND SIZE - WITHOUT FISH - SHADED (L) 5000 10000
MAXIMUM POND SIZE - WITH FISH - FULL SUN (L) 1500 3000
MAXIMUM FLOW (L/H) 3000 6000
VOLTS (V) 240 240
ULTRAVIOLET CLARIFIER (W) 11 11
FILTER CANISTER CAPACITY (L) 20 25
INLET/OUTLET Ø (mm) 25|32|40 25|32|40
CABLE LENGTH (m) 5 5
AQUAPRO_AP5000UV_10000UV_Instructions.indd 4-6 17/10/2014 2:25 pm