Aquatic Nature CO2 Junior Kit User manual

www.aquatic-nature.com
Dear customer,
We congratulate you for the purchase of your CO2Junior Kit. Aquatic Nature developed this new
type of CO2 system for several reasons. First of all, for the wellbeing and the ourish growth of
aquarium plants, thus preventing the accumulation of phosphates (PO4) and of nitrates (NO3) in the
aquarium. Secondly, to increase the ease of use and to bring a very high degree of accuracy. The
disposable cartridges were selected because they are completely recyclable, easy to handle and
without any danger. While designing the Junior Kit, we have taken additional measures to ensure
your safety. We have added a security outlet in the regulator (beneath the V-shape). This permits
an escape of the CO2gas, should you, by accident or negligence, unscrew the cartridge/bottle
(while under pressure) from the regulator (g 17). The aesthetic aspect was studied to obtain a
system with a functional design. The perfect adjustment gives you the possibility of distributing CO2
for each aquarium going from 10 L up to 250 L, and this at high precision. To guarantee a good
service, each apparatus was controlled before being packed. Aquatic Nature developed an adap-
tor, permitting the use of bigger bottles. This adapter can be ordered under Art. N° 02 728. For your
safety, no disassembling of the xed parts may be carried out. This leads to void of warranty.
ADVICE ABOUT THE PLANTS : The quality of water and lighting is very important for a perfect
assimilation of CO2by the plants. The use of Professional Glass Diffusor is recommended for the
aquariums having a dense or very dense plantation. A greater quantity of CO2is then diffused in
an optimal way. CO2is not recommended to decrease the pH over a short period. This occurs
automatically in the long run.
NOTE OF SAFETY
- Keep out of reach of children.
- The kit must not be placed in direct sunlight or close to a heat source, It is absolutely necessary
to avoid temperatures above 40°C.
- Once connected and in function the kit stays on his place and should not be moved.
- Important : the cartridge/bottle must not be unscrewed during function or when still containing
gas in the bottle, this could cause severe damage if the outlet is blocked (g. 17).
Once the cartridge/bottle is empty, no more CO2is added. The green needle on the manometer
is now in the yellow eld. The pressure gauge shows the current pressure of CO2in the cartridge/
bottle. Use only Aquatic Nature 80 g (Article N° 02 720) or 95 g cartridge/bottles (Art. N° 02 722 ).
When using other bottles, you are likely to damage the threading of the pressure regulator.
Junior
Kit
10 / 250
CO2
User Instructions

www.aquatic-nature.com
INSTRUCTIONS
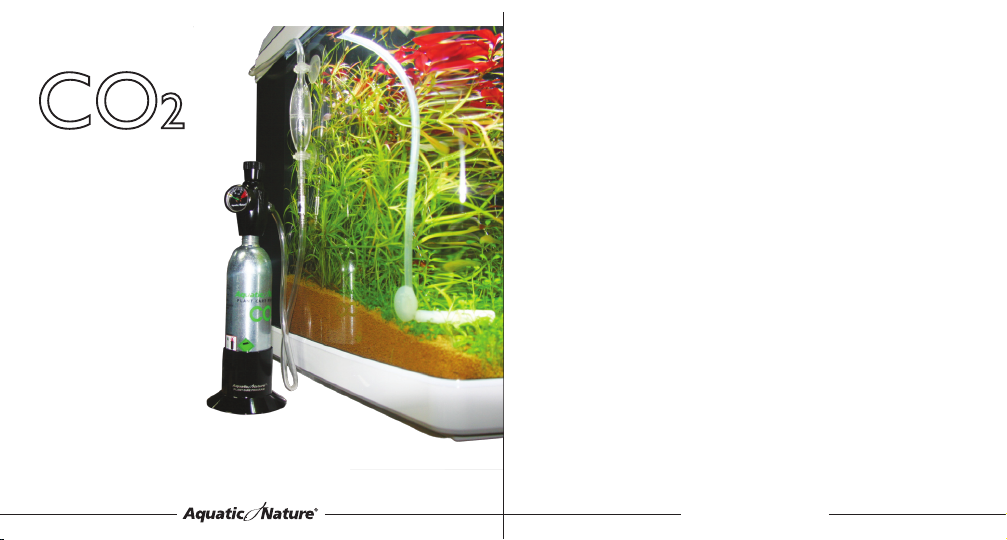
Choose the place where you will install your Junior CO2Kit (preferably beside the aquarium) or if
necessary below the aquarium.
a. A two-sided sticker is at the bottom of the bottle holder. This sticker is used to ensure the position
and stability of the system CO2. Remove the paper of the sticker (g. 1) and place the bottle holder
in a place of your choice. Caution: once the sticker placed, you will not be able to move the bottle
holder any more. For reasons of safety and to ensure an optimal adjustment, the CO2 cartridge/
bottle must always be placed in the bottle holder on a at and horizontal surface.
b. Take the pressure regulator and close it by hand, turning it in the clockwise direction (g. 2).
c. Take the CO2cartridge/bottle. Check if there is no dust or dirt in the threading of the pressure
regulator or on the thread of the cartridge/bottle. Clean if needed, by blowing strongly. Now connect
it to the pressure regulator while turning the bottle clockwise until you feel a light resistance. At this
time, the bottle is against the bottle pressure part. Keep on turning until the cartridge/bottle is tightly
xed (g. 3).
ASSEMBLY
Take the pressure regulator, remove the bolt from the pressure regulator (g. 4) and slide the bolt
over the special CO2tubing (g. 5). Now place the special CO2tubing with the bolt back over the
pressure regulator (g. 6), and tighten it rmly by hand (g. 7). The assembly of the pressure
regulator is now complete.
Check-Valve : The check-valve is placed on the side of the aquarium, with the arrow pointed
upward. To easily slide the special CO2tubing over the check-valve and afterwards on the bubble
counter, we recommend making the tubing wet with lukewarm water. Now connect the check-valve
at the bottom with the special CO2tubing (g. 8). Connect a piece of CO2tubing (2 - 3 cm length )
over the top of the check-valve. Now attach the lled bubble counter.
Bubble Counter : Inside the bubble counter, you’ll see an upright tube (g. 9a). The upright tube
position goes into a glass lled with water. Let it ll for ¾ with water (g 9b). Take the bubble
counter out of the glass, and keep your nger on the opening at the top, so the water doesn’t run
out (g. 10).
Now connect the bubble counter on the check-valve (g. 11). Attach the now connected bubble
counter/check-valve with suction cups to the aquarium on a visible place (g. 12). Caution: the
Check-Valve and the Bubble-Counter must thus be handled with the greatest prudence. While
assembling, never use excessive force, this could cause damage.
Ceramic diffusor : Determine and cut the length of the special CO2tubing you need to install
the ceramic diffuser at the bottom and in the front of your aquarium. Now connect it to the bubble
counter (g. 13). The ceramic diffuser is assembled with a small elbow, supplied with the Junior
Kit. This permits a horizontal placement, thus optimizing the distribution of CO2(g 14 & 15). A
suction cup is also supplied, to easily attach the diffuser to the aquarium. The placement in the
aquarium in the front and just above the layer of gravel enables you to check on the distribution of
CO2(g. 16). Caution : make sure the special CO2tube is never folded.
INSTALLATION : As seen earlier, you will nd the button of adjustment on the top of the regulator.
While slightly turning the button anti-clockwise, you open the regulator and CO2will be released.
Wait a few minutes until small CO2bubbles gently leave the ceramic diffuser and go up slowly
towards the surface. It is important that CO2is released in tiny bubbles. Remaining as long as
possible in contact with water, thus helping an optimal dissolving process, in which plants can
assimilate a maximum of dissolved CO2 . The ner the bubbles, the easier they will be dissolved.
The quantity of CO2used will be optimised and the best assimilation will be achieved for all water
plants. It is important to follow the above instructions. When, after 5 minutes, no CO2comes out
the ceramic diffuser, turn the button some more anti-clockwise. Do not forget to stop the CO2
diffusion when lighting is out. Indeed, light is the source of the aquarium plants and they start their
photosynthesis process. Now a distribution of CO2is required. Thus, plants do not assimilate CO2
when light is off. Keep this in mind every time you turn the lighting on or off.
Important : After closing the pressure regulator, the ceramic diffusor still emits CO2for a short
while. This is absolutely normal, the remaining CO2in the tubing is still under pressure. In the
morning the reverse happens : after opening the pressure regulator, it can take a while before CO2
is released. This procedure is ideal for the photosynthesis process, because the plants are not
capable of assimilating CO2immediately after the light is switched on. If the ceramic diffusor stops
emitting small bubbles, then this indicates the cartridge/bottle is empty. You can control this by
checking the pressure gauge.

www.aquatic-nature.com
Good to know : Because we don’t know the volume of the aquarium that the Juinor Kit will be
connected too, all the kits are equipped with the same ceramic diffusor.
The small ceramic diffusor is appropriate in most cases. But for the large aquariums, it is advisable
to use a diffusor adapted to the volume of the aquarium. 3 different sizes of diffusors are avail-
able from Aquatic Nature. Their capacity varies and can be used for aquariums up to 300 L. For
example, for an aquarium with 60 L, the glass diffusor 40/60 (Art. N° 02710) is recommended, for
an aquarium with 100 L, the glass diffusor 80/120 (Art. N° 02712), and for an aquarium with 140 L,
the glass diffusor 120/200 (Art. N° 02714). The small ceramic diffusor (art. N° 02 708) is also very
useful ,for ex. when the glass diffusor has to be rinsed. For any information concerning the cleaning
of the glass diffusor or ceramic diffusor, contact your retailer.
MAINTENANCE
Bubble Counter : From time to time, check the water level in the Bubble-Counter , and rell it when
needed.
Ceramic diffuser : All diffusors have to be cleaned from time to time, depending on the parameters
of the water. For example with hard water there is a greater limestone presence, and the diffusor
can get blocked. For more information, contact your specialist dealer. There is a cleaning method.
Special CO2tubing: Only use the special CO2tubing from Aquatic Nature. Use of another type of
tubing will inevitably lead to a disruption of the check-valve’s function, with a greater release of CO2.
We are not responsible for damages occurred in this way.
WARRANTY
WE GIVE 24 MONTHS WARRANTY FROM THE PURCHASE DATE ON THIS AQUATIC NATURE
CO2SYSTEM. The warranty covers all material and production faults. The warranty covers only the
value of the product.
Not included in this warranty :
- Incorrect treatment or dismantling, or insufcient warning of the CO2System.
- Damages caused through dirt or misconduct.
In case of a defect CO2System, send it ,carefully packed, back to your retailer.
THIS WARRANTY IS ONLY VALID WITH PURCHASE TICKET AND SIGNATURE OF YOUR
RETAILER.
security outlet
for your protection!
In case of accidental
opening under
pressure - never block
the security outlet !!
World novelty !
17

www.aquatic-nature.com
6 - 7 cm
2,36 - 2,75 inch
1 2 3
4 6
7 8 9a
10 11 12
13 14 15
16
5
9b
Junior
Kit
10 / 250
CO2
This manual suits for next models
1
Other Aquatic Nature Aquarium manuals