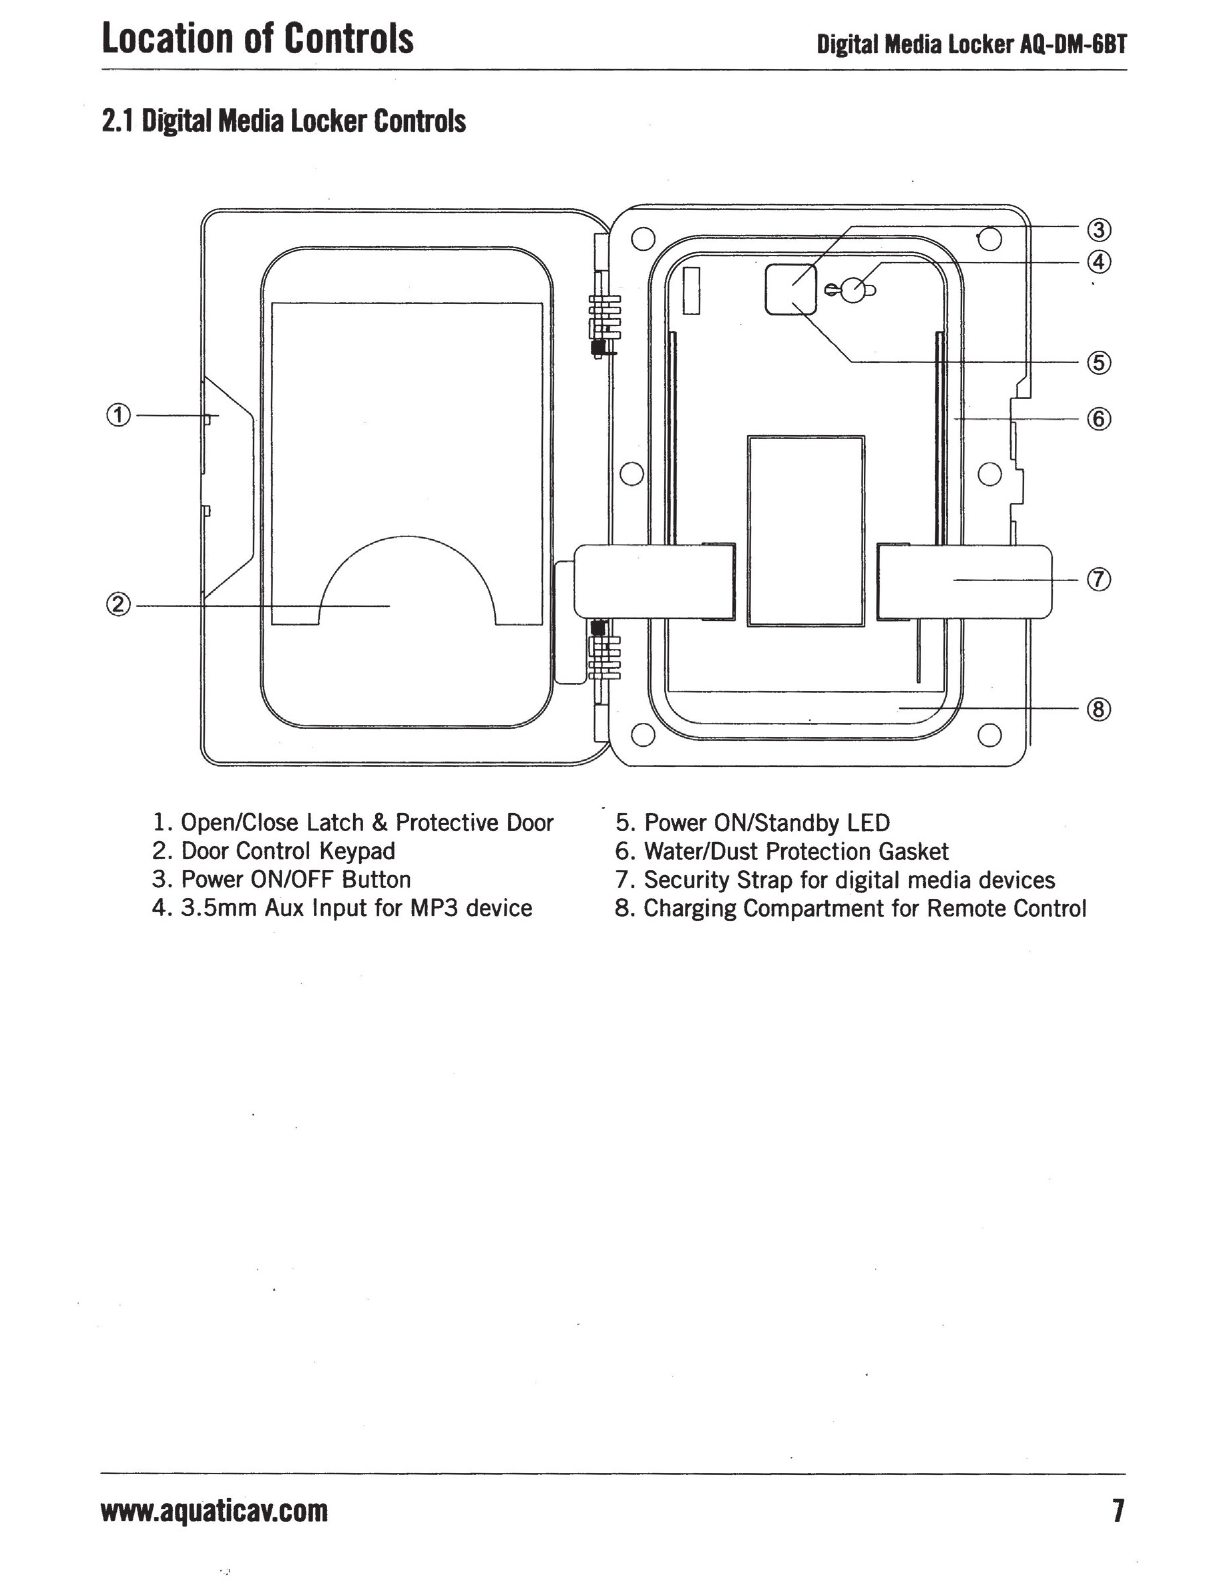
Aquatic Digital Media Locker AQ-DM-6BT Guide

products
with
a
watertight
reputation
AQ-OM-6BT
DIGITAL
MEDIA
LOCKER™
for
Bluetooth
&
MP3
devices
USER
/INSTALLATION
MANUAL
.?J
HALo
AERIAL
~
Bluetooth•
~-.a
(J
TECHNOLOGY
~
~,_,

Table
of
Contents
Digital
Media
Locker
AQ-DM-&BT
1
Getting
Started
..................................................................................
...
...............................
3
1.1
Contents
..
......
...
....
.
......
...
..............
...
.........
..
..
..
..........
.
......
...
....
.
......
.
....
.
.......
.
....
.
...
..
........3
1.2
Connections
...
.
...
.
...........
...
..
...
..
..
...
.......
...
..
..
...
...
..
....
.
....
....
......
...
.....
.
..
...
.....
..
....
..
........
.....
3
1.3
12-pin
Harness
Connection
..
...
...
.....
......
.
..
.
.....
..
...
...
.......
..
....
......
...
.....
......
..
;.
..
.....
..
..
..
...
..4
1.4
Mounting
the
Digital
Media
locker
.
....
..
....
....
...
...
..
....
..
.
....
.
..
.
..
.
........
..........
..
....
..
.............
5
1.5
Bluetooth
Antenna
lnstallation
.
..
.
....
.......
..
......
..
.
..
..
........
...
..........
......
..
.......
.
....
..
....
..
..
..
...
5
1.6
Power
On
.
.......
......
....
~
.
.............
..
.......
.
......
..
~
.....
..
,
...
..
..
.
....
..
.......
..
....
..
......
..
...
.
..................
6
1.7
Handheld
Remote
Control
Charging
....
.....
...
....
....
...............
..
.
..
............
.
..
......
................
.6
1.8
Handheld
Remote
Control
Synchroniz
i
ng
...
.......
.
....
..
.......
.....
..
.......
....
......
...
..
...
..
...
....
...
..
.6
2
Location
of
Con
_
trols
................
.
...............................................................
.
...........................
7
2.1
Digital
Media
Locker
Controls
....
...
..
...
...
....
....
.....
..
.....
...
....
..
....
...
..
......
..
..........
..
...
...
......
.
..
7
2.2
Door
Keypad
Controls
.
...
..
...
....
.
.....
.
..
......
.....
..
..
..
....
.
..
......
.
..
..
.
..
.....
...
................
......
......
...
..
8
2.3
Wireless
Handheld
Remote
Control
(sold
separately)
..............................................
~
......
9
3
Listening
to
Devices
...................................................
.
.......................
.
..............................
..
.10
3.1
Listening
via
Bluetooth
.......
.
.............
...
.......
.
..
..
..
.
...
..
.
...
..............
..
.
..
...
.
..
...
....
........
...
......
.
10
3.
1.1
Pair
with
Bluetooth
Device
...
..
...
..
........
..
....
.................
.
..
......
..........
..
........
...
..
....
.......
10
3.1.2
listening
via
Bluetooth
Device
..
....
..
..
......
.....
..
..
.......
...
.................
..
..
.
......................
10
3.1.3
Bluetooth
Multi-link
..............
.
.....
..
...
...
......
...
.
..
......
.
....
...
.
.........
.
.....
..
...
..
.
..
.
..
...
..
.......
.
10
3.2
Listening
via
Auxiliary
lnput..
.........................................
..
...........
~
...
..
..................
.
....
..
....
10
3.3
Adjust
Volume
level
....................
..
..
........
..
..........
.
......................
.
..
...
.........
..
...
..
....
......
..
..
10
4
Additional
Features
.•.•
l!
...
.
...................
. .
..
..................
.
...........................
.
......
.
.....
. . .
......
.
..
.
......
11
4.1
Audio
Menu
.
..
.
............
..
..
....
..
...
..
.
...
..
....
..
...
......
................
.
...............
.
....
..
...
...
.........
.
.........
11
4.2
Virtual
Bass
(VBass)
..
............
...
.......
.
....
.
....
..
...
..
............
.
............
......
.....
..
........
..
...
.
.....
....
11
4.3
Externall2V
Triggers
...
.
...........................
.
..
.
.........................
.
........
.
....
...
......
...
.
..
...
..
..
....
.l1
4.4
Bluetooth
Halo
Aerial
Technology.
.......
.
.......
.
...
..
....
..
..
....
.........
.
.....
..
..
..
..
.........
..
...
....
.........
...
........
ll
5
Specifications
&
Dimensions
............................................................................................
..
12
5.1
Specifications
..........
..
...
..
.....
.
....
..
......
..
.
.....
.....................
..
..................
..
.........
...
..
..
...
..
.....
l2
5.2
Dimensions
..
..
......
.
........
.
....
..
...
.....
.............
.
......
..
..
.
.................
.....
.
.............
..
..
.
..
...
........
.
..
12
6
Warranty
lnformation
..
.
..
.
...
.
..
.
....................
~
·-··················
·
···················································13
2
www.aquaticav.com

Getting
Started
Digital
Me~Jja
Locker
AQ-DM-88T
1.1
Contents
l .
• AQ-DM-6BT Digital Media Locker
• Jack Cable (3.5mm·Female to
3.5mm
Male)
• Wiring Harness (AQ-UNH-2)
• Six (6) Stainless Steel Mounting Screws
• Mounting Template
• User/Installation Manual
1.2
Connections
(see
Diagram
1.2.1}
1. 12-pin
Watertight
Harness
The 12-pin harness suppl4es power and ground connections to the Digital Media Locker
and four
(4)
speaker channel output connections from the Digital Media Locker (see Wiring
Diagram
1.3.1
on page 4).
A
Do
not
cut
or
modifythe 12-pin harness on the BlueCube side
or
warranty will
be
void.
2.
Auxiliary
Outputs
Allows external amplifiers
to
be
connected
to
power additional speakers.
3.
Remote
8-pin DIN
Cable
(x2)
Allows connection
of
the optional wired and wireless Remote Controls (sold separately).
4. 12V
DC
External
Trigger
(x2)
Allows for external lighting or relays
to
be triggered (2A max load). This feature is only
available when using the optional Remote Control (sold separately).
5.
Bluetooth
Halo
Aerial
Connector
Connect the Bluetooth
Halo
Aerial
Technology
Antenna (AQ-BTANT-1) to the male SMA
connector.
Do
not apply excessive torque on the SMA connector (no more than 0.5N-m). _Use
hands
to
tighten the connection (do not use a wrench). · ·
0 Aquatic
AV
does
not recommend the wired
Remote
Control
(AQ-WR
-6F) for
use
in
spa
applications.
www.aquaticav.com
3

Getting
Started
1.2.1
Connections
Diagram
1.3
12-pin
Harness
Connection
Digital
Media
Locker
AQ-DM-&BT
CD
12-pin
Watertight Harness
®
RCA
AuxiliaryOutputs
_....._. @ Wireless Remote
8-pin
DIN
Connectors (Black)
'----{::::::J
@
12V
DC
Trigger
(x2)
(Brown)
® Bluetooth Halo Aerial Connector
(on rearside
of
DigitalMedia
Locker)
The AQ-DM-6BT includes
the
universal harness AQ-UNH-2
in
order
to
connect the stereo
to
power and speakers.
All open wire connections should be soldered and protected against water and dust for best long-
term performance.
1.3.112-pin
Harness
Wiring
Diagram
4
ACC
(Red
color)
Please
pula
fuse
Into
lhe
box
(Yellow
color)
(Blue
color)
A
No
lowerthan a2 Ohm
load
should
be
used
or
damage
may
occur
tothe Media Player.
Make sure thepolarity
of
speakersare
connectedcorrectly.
www.aquaticav.com

Getting
Started
1.4.
Mounting
the
Digital
Media
Locker
1. A mounting template is included.
Aquatic
AV
recommends using the 'measure
twice,
cut
.once' method.
2. Once the mounting hole is complete,
make sure the outside surface is clean and
clear
of
debris. The Digital Media Locker
has
an
external water/dust proof gasket, but
this
requires a clean and flat surface for
best performance.
3. The Digital Media Locker has six (6)
front screws. Drive the screws using a screw
driver. During final mounting, apply equal
pressure to all points for the best water/
dust outer seal performance. make sure
screws
arB
snug and do not over tighten.
4.
Review all outside surfaces
of
the Digi-
tal Media Locker
to
ensure proper water/
dust seal. This is important for long term
environmental protection performance for
your digital media device.
1.5
Bluetooth
Antenna
Installation
1. Screw
on
the provided Bluetooth Antenna,
avoiding bending the cable
at
a goo angle.
2. Install the Bluetooth antenna
as
high
as
possible, above
the
waterline of the
spa
if
possible,
and making sure the arrow is pointing directly
upwards towards the sky to ensure the Bluetooth
range is maximized.
If
there is no suitable surface
to screw
it
in,
we
recommend using a
good
quality
double sided tape.
www.aquaticav.com
Digital
Media
Locker
AQ-OM-&BT
26mm
65mm
j
i..-
......
..
.....................
..
..
..
...
..;
I
'I
120mm
0
)-
- - - - -
-1'
I '
I t '
' '
'
'I
....
:i
(n
3
3
5

Getting
Started
Digital
Media
Locker
AQ-DM-&BT
1.6
Power
On
Press
the
ON/OFF
button.
Red
Light: Power
to
the docking station is ON, but the
unit
is in standby mode.
Blue Light: The unit is powered
ON
and looking for
an
1udio source.
For
applications that require low current draw and where battery drain may occur, the power but-
ton must
be
turned
OFF
inside the unit.
When
the power button is in the
OFF
position the
red
LED
will not
be
lit.
For
applications where a 12V battery is not used, such
as
in a Spa, the power button can
be
left
ON
and the remote control or door controls can then
be
used
to
power on/off accordingly.
For
detailed instructions you can check out our online video:
'How to wire your Aquatic
AV
stereo system'
http://www.aguaticav.com/support/videos
1.
7
Hand~eld
Remote
Control
Charging
The optional remote AQ-RF-6UBT-T {sold separately) has a built-in Polymer Lithium re-
chargeable battery and comes with a charging cable. Connect one end
of
the charging cable
to the charging connection on remote control and connect the USB end of thje charging
cable
to
any USB charger {5V
DC)
for charging.
Make sure the remote
has
been
charged before
used
.
1.8
Handheld
Remote
Control
Synchronizing
The
AQ
-
RF
-6UBT-T remote {sold separately) has a receiver module (AQ-RF-6UBT-R) with a
built-in male DIN connector. Connect the receiver module's DIN connection
to
the female
Dl
N connector
of
the Digital Media Locker.
The remote should already
be
paired from the factory,
but
if
you need
to
synchronize the
remote, follow the steps below.
1. Make sure Digital Media Locker is powered
ON
{red LED) 2. Put the remote within
0.5
meter
of
the Digital Media Locker.
2.
Press
and hold
MODE
on
remote control until the
LCD
shows "Pairing in Progress"..
Re-
lease
the button.
3.
Within 2 seconds, the
LCD
will
show "Paired".
If
it
fails
to
pair, the
LCD
will show "Retry
again".
If
this
happens, wait 5 seconds and repeat steps above.
For
any additional remote controls,
you
will
also need
to
synchronize those remote controls
to
the Digital Media Locker.
II
If
the pairingprocess is.
not
su
cc
essful,
try
again
to
put
your
remote close to the remote receiver.
II
Dependingon the frequency
of
usage, the remote
may
drain
its
battery. Please charge the remote before use.
If
the LCD
shows nothing, the battery has been drained
and
will
need charging.
II
If
you have lost
or
damaged
your
remote control
and
buy
a newremote c
ontrol
, follow the above steps to
pair
the
new remote control.
6
www.aquaticav.com

Location
of
Controls
2.1
Digital
Media
Locker
Controls
/
~
.
p
v (
\_
L_j
'
1. Open/Close Latch & Protective Door
2. Door Control Keypad
3.
Power ON/OFF Button
4.
3.
5mm
Aux
Input
for MP3 device
www.aqu
·
aticav.com
Digital
Media
Locker
AQ-DM-&BT
~/0
~u
/
rD
~
~
(
i
0 0
,--
~
i
/_/
0
~\.0
./
5. Power ON/Standby LED
6. Water/Dust Protection Gasket
7. Security Strap for digital media devices
8. Charging Compartment for Remote Control
@
®
®
®
®
7

Location
of
Controls
2.2
Door
Keypad
Controls
8
Buttons
Mode
Power
Mode
Volume
Up
Volume
Down
Fast
Forward
Fast
Rewind
Play/
Pause
Pop
Classic
Rock
•
+
......
AUXIN
Mode
Press
once:
Change
the
source
Press
and
hold:
no
function
Digital
Media
Locker
AQ-DM-&BT
Bluetooth
Mode
Press
once:
Toggle
Operational
mode
to
Standby
mode
or
vice
versa
Press
once:
External
Trigger
1
Press
and
hold
:
External
Trigger
2
Press
once:
Volume
up
Press
and
hold
:
Fast
volume
up
Press
once:
Volume
down
Press
and
hold
:
Fast
volume
down
Press
once:
no
function
Press
and
hold:
no
function
Press
once:
no
function
Press
and
hold
:
no
function
Press
once:
Toggle
mute
Press
and
hold:
no
function
Press
once:
Next
track
Press
and
hold:
Fast
Forward
Press
once:
Previous
track
Press
and
hold:
Fast
backward
Press
once:
Play/Pause
Press
and
hold:
no
function
Press
once:
Preset
Equailizer
Setting
Pop
Press
and
hold:
no
function
Press
once:
Preset
Equailizer
Setting
Classic
Press
and
hold:
Toggle
VBass
Press
once
:
Preset
Equailizer
Setting
Rock
Press
and
hold:
no
function
www.aquaticav.com

Location
of
Controls
Digital
Media
Locker
AQ-DM-&BT
2.3
Wireless
Handheld
Remote
Control
AQ-RF-6UBT-
T
(sold
separately)
Buttons
AUXIN
Mode
Bluetooth
Mode
Power
©
Press
once
:
Toggle
Operational
mode
to
Standby
mode
or
vice
versa
MODE
Press
once
:
Change
the
source
Mode!Pair
1111
Press
and
hold:
Pair
Volume
+
Press
once
:
Vo
l
ume
up
Up
Press
and
hold
:
Fast
volume
up
Volume
Press
once
:
Volume
down
Down
-
Press
and
hold
:
Fast
volume
down
Fast
~I
Press
once
:
no
function
Press
once
:
Next
track
Forward
Press
and
hold
:
no
function
Press
and
hold
:
Fast
Forward
Fast
I~
Press
once
:
no
function
Press
once
:
Previous
track
Rewind
Press
and
'
hold
:
no
function
Press
and
hold
:
Fast
backward
Play/
~~~
-
Press
once
:
Toggle
mute
Press
once
:
Play/Pause
Pause
Press
and
hold
:
no
function
Press
and
hold
:
no
function
1
CD
Press
once
:
no
function
Press
and
hold
:
no
function
2
0
Press
once:
no
function
Press
and
hold
:
no
function
3
®
Press
once
:
no
function
Press
and
hold
:
no
function
EXT
I
Press
once
:
Toggle
EXT
trigger
1
{12V
de)
Trigger
-
Press
and
hold
:
Toggle
EXT
trigger
2
(12V
de)
Audio
AUDIO
Press
once
:
no
function
Press
aod
hold
:
no
function
VB
a
ss
"-
Press
once:
Toggle
VBass
ON
or
OFF
Press
and
hold:
no
function
www.aquaticav.com
9

Listening
to
Devices
Digital
Media
Locker
AQ-DM-&BT
3.1
Listening
via
Bluetooth
3.1.1
Pair
with
Bluetooth
Device
l.
Switch
on
your Bluetooth device.
2. Select 'AQUATIC
AV'
from the list of available devices to pair (no password is needed).
3.1.2
Listening
via
Bluetooth
Device
1.
Bluetooth mode will
be
activated once a Bluetooth device is paired.
2. Play the song from device and the sound will play through the Digital Media Locker.
3.
Press
PLAY/PAUSE to play/pause the song.
4.
Press
FAST
REWIND/FORWARD buttons to play previous/next song file.
4.
Press
and hold
FAST
REWIND/FORWARD buttons to fast forward
I
fast rewind the song
file.
5. Previous/next track and volume up/down can
be
controlled directly from your Bluetooth
device or directly from the Digital Media Locker remote control (sold separately).
3.1.3
Bluetooth
Multi-link
A second Bluetooth device can pair to the Digital Media
Lo<;:ker
even when
it
has
been paired
to another Bluetooth device. The second Bluetooth device will
be
able to play once the first
device
has
stopped playing.
3.2
Listening
via
Auxiliary
Input
1. Connect your MP3 device ot the
3.5mm
inputs
2. Secure the device with the anchor straps in the locker.
3. Secure the Digital Media Locker's protective door.
4.
Press
Mode
on
the remote control
to
select
'AUXIN'
mode.
0
Only
one
Auxiliary input
(RCA)
can
be
used
at
any
one
time.
3.3
Adjust
Volume
Level
10
l.
Press
VOLUME UP once
to
increase the volume.
2.
Press
VOLUME
DOWN
once to reduce the volume.
3.
Press
and hold either VOLUME
UP
or VOLUME
DOWN
to increase or decrease audio
volume continuously.
www.aquaticav.com

Additional
Features
with
Remote
Control
Digital
Media
Locker
AQ-DM-SBT
4.1
Audio
Menu
with
Handheld
Remote
Control
(sold
separately)
When the optional remote control
AQ
-RF-6UBT-T & AQ-RF-6UBT-R is used with the Digital Media
Locker several functions are unlocked. The audio
DSP
(Digital Signal Processor) provides preset
listening experiences for different music types.
1.
To
enter audio menu, press once AUDIO
button.
2. Each press of AUDIO button will advance
to
the next audio setting
as
described
on
the right.
3.
In the audio menu, press and hold
AUDIO
to
save
and exit the audio menu
back to the original mode.
If
you
have
chosen preset equalizer (Rock, Classic,
or Pop), the previous
Bass
& Treble settings will
be
overridden.
Lon ross
AU
D
IO
to sava
and
axit
Lon rossAUD
IO
to sava and axil
Lon ro
AU
DIO
to sava
and
axit
Lon rossAUDIO
to sava
an
d axit
Lon rossAUDIO
to sava
and
axil
4.2
Virtual
Bass
(VBass)
with
Handheld
Remote
Control
(sold
separately)
Virtual
Bass
(VBass) boosts the bass of the audio signal using the latest
DSP
technology and is
particularly useful when used with very small speakers
to
create perceived bass frequencies of a
much larger speaker.
Press
VBASS
once
to
toggle
it
ON
or
OFF.
4.3
Externai12V
Triggers
with
Handheld
Remote
Control
(sold
separately)
Aquatic
AV
understands the
need
for more flexible remote applications. With the Digital Media
Locker Aquatic
AV
has provided two independent 12V 'accessory' triggers, activated from the
remote control. These could activate any 12V based device like 12V lights or 12V motors.
In any operational mode, press the 12V TRIGGER button
to
activate.
Press
again
to
deactivate.
If
using two external trigger wires
you
can also activate the second external trigger
by
pressing
and holding the 12V TRIGGER button
to
activate. Press and hold again
to
deactivate.
0
Aquatic AVstronglyrecomme
nd
you speak to
our
techni
c
al
service s
taff
or yo
ur
local Aquatic AV dealer
if
you are
considering usingthis feature.
A
Load on External Trigger should
not
exceed 2A.
4.4
Bluetooth
Halo
Aerial
Technology
The Bluetooth
Halo
Aerial
Technology
antenna AQ-BTANT-1 (included) improves the standard
Bluetooth wireless signal and range, for a stronger signal and increased range in all directions.
www.aquaticav.com
11

Specifications
&
Dimensions
Digital
Media
Locker
AQ-DM-&BT
5.1
Specifications
Media
Supported media....................................Biuetooth
I
MP31
AUX
Supported media max dimensions............
l07x184mm
(WxH)
Device Control....................................... via Door Keypad
or
optional Handheld
RF
Remote Control
or
Wired Remote Control (both sold separately)
Inputs
Auxiliary................................................
lx
3.5mm
Jack Socket
Outputs
Pre-Out..................................................
lx
stereo pair
RCA
(4V)
Power
Output voltage@ 2 Ohm.........................4x 72W
Output voltage@ 4 Ohm.........................4x 45W
Operation voltage....................................
9.6V-
14.4V
DC
Max
current draw....................................7A
Standby current draw..............................6mA
Multi-Environment Certifications
Waterproof
I
Dustproof............................Yes- IP65
Conformal
PCB
coating...........................
Yes
UV
protection.........................................
500
hours stable, ASTM
D4329
compliant
Salt/Fog protection.................................
500
hours stable, ASTM B
117
com
pi
iant
Stainless Steel mountings.......................
Yes
.5.2
Dimensions
178.5mm 26mm 65mm
··r ·-
-----
!
228mm
J
;s,
vvvvvvvvv
=:J
120mm
.....
~
(n
3
3
12
www.aquaticav.com

Warranty
Information
Digital
Media
Locker
AQ-OM-6BT
Aquatic
AV
offers a
limited
warranty of our products on
the
following terms:
Length
of
warranty
2 years on audio systems, electronics, speakers, and accessories (receipt required).
Coverage
This warranty covers only
the
original purchaser
of
an Aquatic
AV
product purchased from an
authorized Aquatic
AV
dealer. In order
to
receive service,
the
purchaser
must
provide Aquatic
AV
with
a copy
of
the
receipt stating
the
customer name, dealer name, product purchased and date
of purchase.
Defective products
Products found
to
be defective during
the
warranty period
will
be repaired or replaced (with a
product deemed
to
be equivalent) at Aquatic
AV's
discretion.
What
is
not
covered
Damage caused by accident, abuse, improper operations
or
theft
. Any cost
or
expense related
to
the removal
or
reinstallation
of
product. Service performed by anyone other than
an
authorized
Aquatic
AV
service center. Any product
with
the
serial number or tamper labels defaced, altered,
or removed. Subsequent damage
to
other components. Any product not purchased from
an
authorized Aquatic
AV
dealer.
Limit
on
implied
warranties
Any implied warranties including warranties
of
fitness
for
use and merchantability are limited
in duration
to
the period
of
the
express warranty set forth above. Some states
do
not allow
limitations on
the
length of an implied warranty, so
this
limitation may
not
apply. No person is
authorized to assume
for
Aquatic AVany other liab_
ility
in connection with
the
sale
of
the
product.
How
to
obtain service
You
must
obtain a return material authorization number (RMA)
to
return any product
to
Aquatic
.
AV
.
You
are responsible for shipping charges
of
returned products to Aquatic
AV.
Please record
the
model and serial number[s]
of
your
equipment
in
the
space provided below as
your permanent record and
will
assist us
with
your factory warranty coverage. These numbers can
be found on
the
rear
of
the
Digital Media Locker.
n.w.~.com
13

FCC
Statement
Digital
Media
Locker
AQ-DM-&BT
FCC
ID:
MADE
IN
CHINA
This device complies with Part
15
of the
FCC
Rules. Operation is subject to the following
two conditions:
(1)
this device may not cause harmful interference, and (2) this device
must accept any interference received, including
int
::
:ference
that
may cause undesired
operation.
NOTE:
The equipment has
been
tested and found to comply with the
limits
for a Class 8 digital
device, pursuant to Part
15
of the
FCC
Rules. These limits are designed to provide .
reasonable protection against harmful interference in a residential installation. This
equipment generates,
uses
and can radiate radio frequency energy and,
if
not installed
and used in accordance with the instructions, may cause harmful interference to radio
communications. However,-there is
no
guarantee that interference will not occur
in
a
particular installation.
If
this equipment does cause harmful
interfer~nce
to
radio or television reception, which
can·be determined
by
turning the equipment off and on, the user is encouraged to try to
correct the interference
by
one or more
of
the following measures:
• Reorient or relocate the receiving antenna.
• Increase the separation between the equipment and receiver.
• Consult the dealer or
an
experienced radio/TV technician for help.
The manufacturer is not responsible for any radio or
TV
interference caused by unauthorized
modifications to this equipment. Such modifications could void the user authority to operate
the equipment.
Product
design
and
specification
subject
to
change
without
notice
.
E&OE.
Doc
Vl.2
CE
14
www.aquaticav.com

,•
.
;,_~~7:
:
:
~
..
:-:.:
.
·::-~'
...
:
~com
. - 6 .-
_,_
Digital
Media
Locker
AQ-DM-&BT
This
page
is
intentionally
blank
15

Aquatic
AV
282
Kinney
Drive
San
Jose,
CA
95112,
USA
E-mail:
US
&
Canada:
1
877
579
2782
International:
+1408
559
1668
Fax:
+1408
559
0125
www.aquaticav.com
111roducts
with
a
watertight
reputation
Other manuals for Digital Media Locker AQ-DM-6BT
1
Table of contents
Other Aquatic Indoor Furnishing manuals
Popular Indoor Furnishing manuals by other brands

LINEA ITALIA
LINEA ITALIA LIT-TR757 manual

CareCo
CareCo LUXBURY FN01020028 user manual

Otto
Otto STOCKHOLM OTSTCKHMOB Assembly instructions

kingsley-bate
kingsley-bate Mandalay MD80 Assembly instructions

Magniflex
Magniflex MagniSmartech Operating and maintenance manual

Amisco
Amisco Kyle Dining Chair with Distressed Wood Seat/Back... manual