Aquavitro division 125 User manual

division™125/250/500
User Manual

EN-For the most current and/or multilingual
version of this User Manual, please visit:
www.aquavitro.com/downloads/manuals/
division-skimmers.pdf
ES-Para obtener la versión más reciente y/o
multilingüe de este Manual del usuario, visite:
www.aquavitro.com/downloads/manuals/
division-skimmers.pdf
FR-Pour la version la plus récente et/ou
multilingue de ce manuel d’utilisation, veuillez
visiter: www.aquavitro.com/downloads/
manuals/division-skimmers.pdf
IT-Per la versione più aggiornata e/o
multilingue di questo Manuale dell’utente,
visitare: www.aquavitro.com/downloads/
manuals/division-skimmers.pdf
PT-Para a versão mais atual e/ou multilíngue
deste manual do usuário, visite: www.
aquavitro.com/downloads/manuals/division-
skimmers.pdf
NL-Ga voor de meest recente en/of meertalige
versie van deze gebruikershandleiding naar:
www.aquavitro.com/downloads/manuals/
division-skimmers.pdf
DE-Die aktuellste und/oder mehrsprachigste
Version dieses Benutzerhandbuchs nden Sie
unter: www.aquavitro.com/downloads/manuals/
division-skimmers.pdf
RU-Самую актуальную и/или многоязычную
версию этого Руководства пользователя
можно найти по адресу: www.aquavitro.com/
downloads/manuals/division-skimmers.pdf
PL-Najbardziej aktualną i/lub wielojęzyczną
wersję tej instrukcji obsługi można znaleźć
na stronie: www.aquavitro.com/downloads/
manuals/division-skimmers.pdf
TR-Bu Kullanım Kılavuzunun en güncel ve/veya
çok dilli sürümü için lütfen şu adresi ziyaret
edin: www.aquavitro.com/downloads/manuals/
division-skimmers.pdf
VN-Để biết phiên bản mới nhất và/hoặc đa ngôn
ngữ của Hướng dẫn sử dụng này, vui lòng truy
cập: www.aquavitro.com/downloads/manuals/
division-skimmers.pdf
HI- /
, : www.aquavitro.com/
downloads/manuals/division-skimmers.pdf
ATTENTION / ATENCIÓN / ATTENZIONE / ATENÇÃO /
OPMÆRKSOMHED / BEACHTUNG / ВНИМАНИЕ / UWAGA /
DİKKAT / CHÚ Ý /

3
IMPORTANT SAFETY INSTRUCTIONS
WARNING - To guard against injury, basic safety precautions should be observed, including the following:
A) READ AND FOLLOW ALL SAFETY INSTRUCTIONS
B) DANGER: To avoid possible electric shock, special care should be taken since water is employed in the
use of aquarium equipment. For each of the following situations, do not attempt repairs by yourself; return the
appliance to an authorized service facility for service or discard the appliance:
1) CAUTION: If the appliance falls into the water, DON’T reach for it! First unplug it and the retrieve it. If electrical
components of the appliance get wet, unplug the appliance immediately. (Non-immersible equipment only)
2) If the appliance shows any sign of abnormal water leakage, immediately unplug it from the power source. (Non-
immersible equipment only)
3) Carefully examine the appliance after installation. It should not be plugged in if there is water on parts not intended
to be wet.
4) Do not operate any appliance if it has a damaged cord or plug, or if it is malfunctioning or has been dropped or
damaged in any manner.
5) To avoid the possibility of the appliance plug or receptacle getting wet, position
aquarium stand and tank or the fountain to one side of a wall-mounted receptacle
to prevent water from dripping onto the receptacle or plug. A “drip-loop” shown in
the Figure A should be arranged by the user for each cord connecting an aquarium
appliance to a receptacle. The “drip-loop” is the part of the cord below the level of the
receptacle or the connector if an extension cord is used, to prevent water traveling
along the cord and coming in contact with the receptacle. If the plug or receptacle does
get wet, DON’T unplug the cord. Disconnect the fuse or circuit breaker that supplies
power to appliance. Then unplug and examine for presence of water in the receptacle.
C) Close supervision is necessary when any appliance is used by or near children.
D) To avoid injury, do not contact moving parts or hot parts such as heaters,
reectors, lamp bulbs and the like.
E) Always unplug an appliance from an outlet when not in use, before putting on or taking off parts and before
cleaning. Never yank cord to pull plug from outlet. Grasp the plug and pull to disconnect.
F) Do not use an appliance for other than intended use. The use of attachments not recommended or sold by the
appliance manufacturer may cause an unsafe condition.
G) Do not install or store the appliance where it will be exposed to the weather or to temperatures below freezing.
H) Make sure an appliance mounted on a tank is securely installed before operating it.
I) Read and observe all the important notices of the appliance.
J) If an extension cord is necessary, a cord with a proper rating should be used. A cord rated for less amperes or
watts than the appliance rating may overheat. Care should be taken to arrange the cord so that it will not be tripped
over or pulled.
K) This appliance has a polarized plug (one blade is wider than other). As a safety feature, this plug will t in a
polarized outlet only one way. If the plug does not t fully in the outlet, reverse the plug. If it still does not t, contact
a qualied electrician. Never use with an extension cord unless plug can be fully inserted. Do no attempt to defeat
this safety feature.
EXCEPTION: This instruction may be omitted for an appliance that is not provided with a polarized attachment plug.

4
SAVE THESE INSTRUCTIONS
division™ skimmers are made in conformity with the national and international security laws.
READ AND FOLLOW ALL SAFETY INSTRUCTIONS
1) Check that the current on the pump’s label matches the outlet current. The pump has a differential
switch (protector) through which the nominal current must be lower or equal to 30 mA.
2) Never operate the pump without water to avoid damage to the pump motor.
3) Before plugging in the pump, check that the cord and pump are not damaged.
4) The pump has a type Z cable link. The cable and plug cannot be substituted or repaired. In case
of damage, replace the entire pump
5) CAUTION: disconnect all submerged electrical products before doing maintenance in the
water; in case the plug or electrical outlet is damaged, switch off the circuit breaker before
disconnecting the plug from the outlet.
6) This appliance can be run in liquids or in any environment with a maximum temperature of
35°C/95° F.
7) Do not use for purposes (i.e. in bathroom or similar applications) other than for which it was
designed.
8) Avoid use with corrosive or abrasive liquids.
9) This appliance has not been designed for use by children or mentally challenged individuals.
Appropriate adult supervision or persons responsible for personal safety is required.
10) Do not disconnect from an electrical outlet by pulling the cord.
11) The lter can only be used in the above-mentioned applications and is only for indoor use.
12) This appliance has no user serviceable parts.
INSTRUCTIONS FOR THE CORRECT DISPOSAL OF THE PRODUCT ACCORDING TO EU DIRECTIVE
2002/96/EC
When used or broken, this product does not have to be disposed with other waste. It can be
delivered to specic electrical waste collection centers or to dealers who provide this service.
Disposal of electrical products separately avoids negative consequences for the environment
and for overall public health and allows the reuse of materials providing savings of energy and
resources.
LIMITED WARRANTY
Seachem guarantees this product (see Exclusions below) to the original purchaser against defects of
materials and workmanship for a period of ve (5) years from the date of original purchase, except for
the pump’s impeller, which is guaranteed for a period of six (6) months. This warranty is limited to repair
or replacement (at Seachem’s option) of defective product only and does not cover loss of aquarium life,
personal injury, property loss, or damage arising from the use of the product. You must retain original

5
proof of purchase to validate the warranty. Any warranty herein shall run concurrently with, and not in
addition to, any minimum warranty periods established by applicable law.
Claims made under warranty shall be led online at www.seachem.com by the original purchaser
and who must provide proof of purchase at the time of ling. The claimant must obtain a “Return
Merchandise Authorization” at the time of ling before sending any product for warranty or technical
service. The purchaser bears the cost of shipping to and from the service center or repair station.
EXCLUSIONS. This warranty does not cover the following: *Damage resulting from accident, misuse,
abuse, lack of reasonable care, use of the product that is other than normal or ordinary, using the
project in abnormal working conditions or any other failures not resulting from defects in materials or
workmanship. *Damage resulting from modication, tampering with or attempted repair by anyone other
than Seachem or its designee. * Transfer of the product to someone other than the original purchaser.
* Subjecting the product to electrical service not specied in the packaging; the original purchaser is
responsible for providing adequate electrical facilities.
EXCLUSION DAMAGES AND LIMITATION OF IMPLIED WARRANTIES
Your sole and exclusive remedy is product repair or replacement as provided in this Limited Warranty.
The company disclaims any liability for incidental and consequential damages for breach of any express
or implied warranty or conditions, including the implied warranties or conditions of merchantability,
merchantable quality, tness for a particular purpose, or of satisfactory quality with respect to this
product. This writing constitutes the entire warranty agreement of the parties with respect to the subject
matter hereof, no waiver or amendment shall be valid unless in writing signed by Seachem. Any implied
warranties herein are limited to one year or the shortest period allowed by the law of your jurisdiction.
6
This protein skimmer is used to remove pollutants from the marine aquarium water, such as
proteins, dyes, phenols, albumin, etc. With a mixture of water and air produced in the reaction
column and the properties of salt water, dense foam is generated and collected in the collection
cup. Because various pollutants accumulate within the foam that is then extracted from the
aquarium water, the overall organic load of the aquarium is decreased. Additionally, the division™
series protein skimmer will increase oxygen content in the system, increase oxidation/reduction
potential (redox level), and aid balance of pH and the overall cleanliness of the system.
Introduction
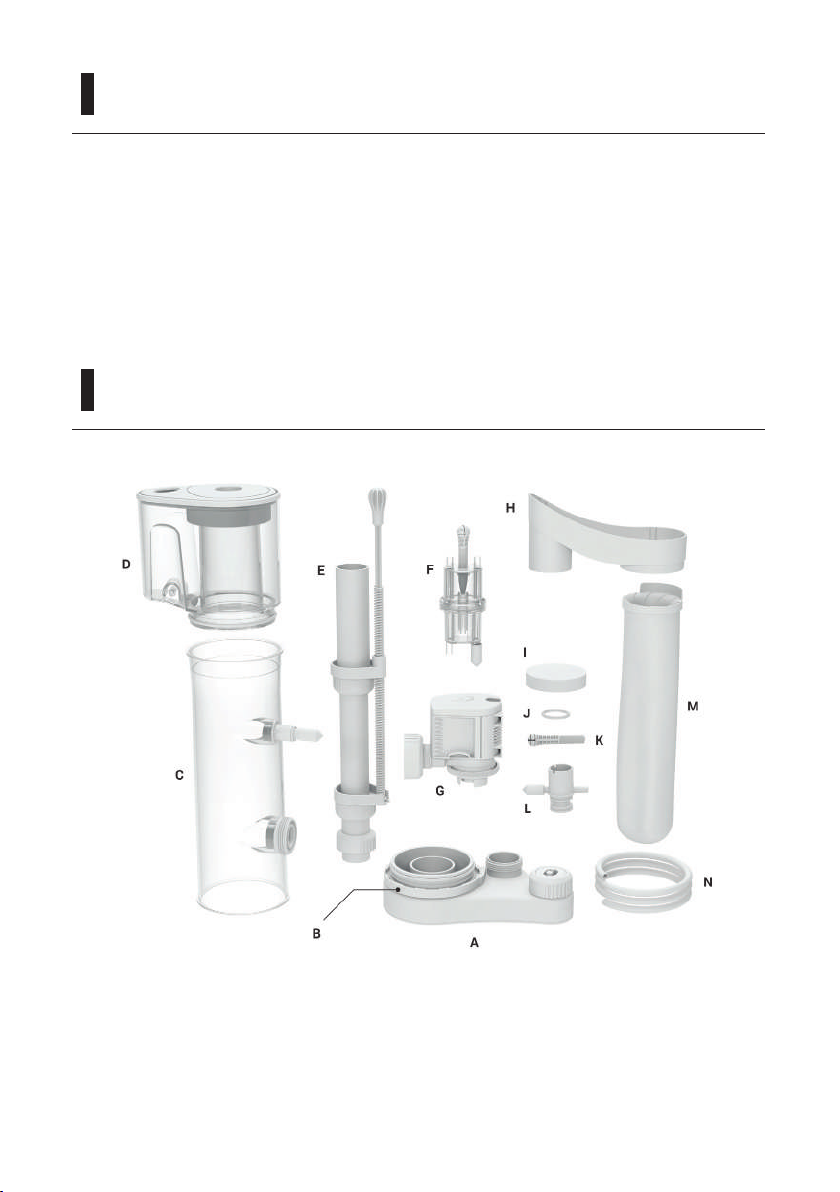
Parts Checklist
A. Support Base
B. Locking Ring
C. Reaction Column
D. Collection Cup
E. Drain Tube
F. Air Silencer
G. Pump
H. Drain Spillway
I. Sponge
J. Pump O-ring
K. Water Control Screw
L. Venturi Injector
M. Filter Sock
N. Tubing
Figure 1
7
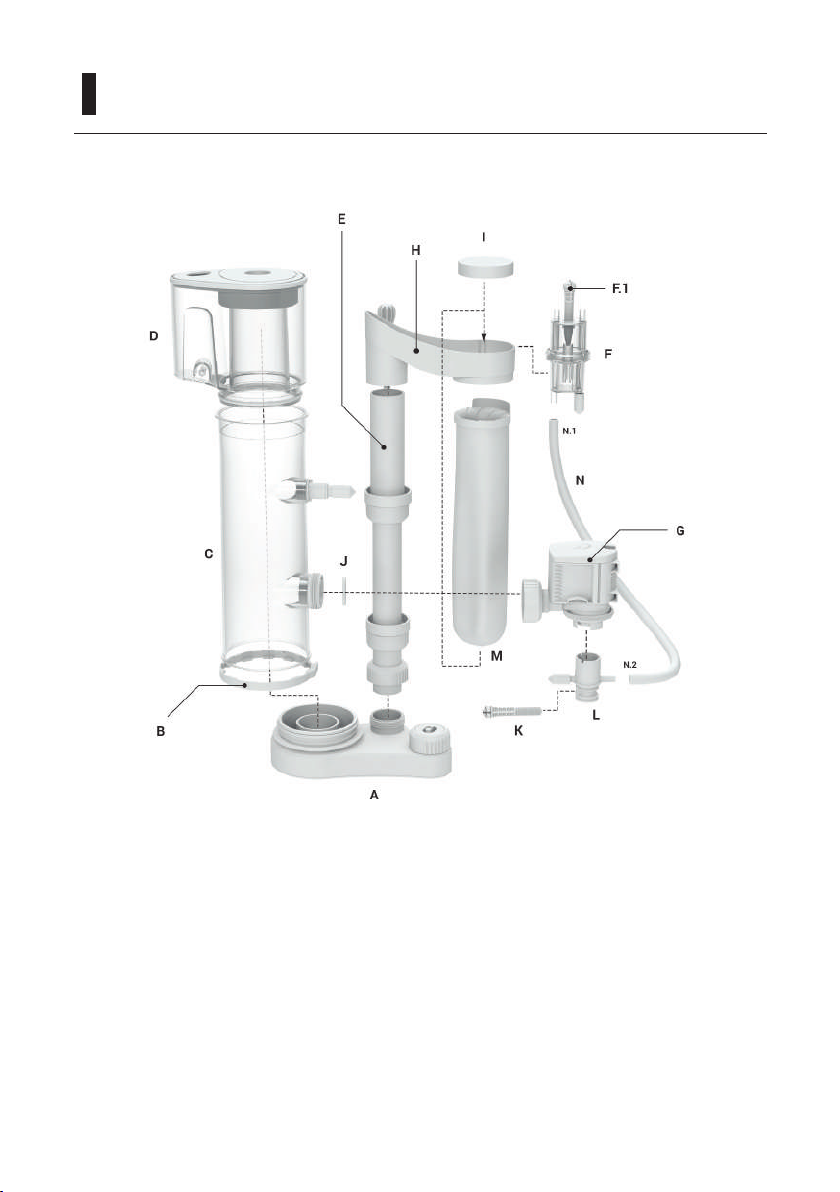
After checking the integrity of each component, assemble the unit using the diagram. (Figure 2)
1. Start by placing the main Reaction Column (C) onto the Support Base (A).
2. Apply the Locking Ring (B) around the connection point of the Reaction Column (C) to the
Support Base (A).
3. Press the Venturi Injector (L) into the intake of the Pump (G).
4. Insert the Pump O-ring (J) into the Reactor Column (C) in appropriate groove (note location
in Figure 2).
Assembly
Figure 2

8
Installation
5. Connect the Pump (G) onto the Reactor Column (C) using the compression ring by turning the
ring clockwise onto the threads.
6. Once the Pump (G) in mounted to the Reaction Column (C), the Venturi Injector (L) should be
in a vertical position as shown in Figure 2.
7. Attach the Drain Tube (E) to the Support Base (A) and tighten the compression ring as shown
in Figure 2.
8. Attach the Drain Spillway (H) on the top of the Drain Tube (E).
9. Slip the Filter Sock (M) through the Drain Spillway (H) and place the Sponge (I) on top of the
drain hole.
10. Attach the Tubing (N) at the attachment point N.2 to the Venturi Injector (L).
11. Attach the other end of Tubing (N) to the bottom of the Air Silencer (F) as shown in Figure 2.
12. The Air Silencer (F) can then be hung in a variety of positions on the Drain Spillway (H)
utilizing the mounting post of the Air Silencer (F)
13. Insert the Water Control Screw (K) into the Venturi Injector (L) lightly so as to leave the ow
open.
14. Place the Collection Cup (D) securely on top of the Reaction Column (C) as shown in Figure 2
Place the skimmer inside of the aquarium system’s sump in an accessible and convenient
position for regular maintenance and cleaning and also preferably near where water comes into
the sump from the aquarium.
The design of the division™ skimmer offers various positioning options to optimize space by
rotating the Drain Tube (E), Drain Spillway (H) or the Collection Cup (D).
For initial setup please follow these steps making sure that the aquarium’s sump is at its
appropriate water level rst:
After placing the skimmer in the aquarium’s sump as above, orient the Drain Spillway (H) such
that it ows water away from the Pump (G).
1. Remove the Collection Cup (D).
2. Check and adjust as necessary the Water Control Screw (K) of the Venturi Injector (L) on the
Pump (G) and the Air Intake Screw (F.1) of the Air Silencer (F) so that they are fully open.

9
3. ATTENTION: While the division™ skimmer is not affected by changes in water level, the
Pump (G) must never be allowed to run without being submerged. Do not run the pump
if water drops below the ~MIN~ waterline mark on the Pump (G) Figure 3. Plug in the
Pump (G) and ensure it is operating to ll the Reaction Column (C) with both water and air
bubbles.
4. Adjust the height of the Drain Tube (E) and Drain Spillway (H), see Figure 3, by turning the
threaded rod clockwise to raise the level and counterclockwise to lower the level of the
water and foam in the Reaction Column (C). The level should be adjusted so that the top of
the foam is at the highest level without overowing. While this level will be very stable, it is
important to wait a few moments to allow for stabilization of the system as a whole.
5. Replace the Collection Cup (D).
6. Upon initial setup, it is important to check the level of the foam every couple of hours as the
new plastic components can inhibit foam production briey.
7. Once the level in the Reactor Column (C) is fully stable, foam will begin to build and climb
up into the Collection Cup (D). Make any adjustments to the level of foam by raising or
lowering the Drain Tube (E) and Drain Spillway (H). Raise the level by turning the Threaded
Rod (E) clockwise (up), and lower the level by turning it counterclockwise (down).
Figure 3

10
In this manner, ow of water from the Pump (G) and the ow of air from the Air Silencer
(F) are always maximized. Initially the foam may be fairly wet in nature. To make the foam
more concentrated in waste, lower the level. If very little foam is climbing over the edge
of the cup after a few days then raise the level. It is normal that in the rst few days of
operation, the skimmer may ll with a clear liquid. In time, the collected liquid (skimate)
will become darker in color and more concentrated with waste from the aquarium. Fine
adjustments can be made by turning the Air Intake Screw (F.1) on the Air Silencer (F)
however this would should only be done when there is simply too much foam created and
the foam cannot be controlled by lowering the water level by adjusting the Drain Tube (E)
and Drain Spillway (H).from the aquarium.
NOTE: While most marine or saltwater can be skimmed easily, a specic gravity of 1.026 or a
salinity of 35 ppt is recommended for best results.
When used in completely new aquariums, the foam can be suppressed for several days. This
is temporary and is due to various rubber and plastic parts used to setup the aquarium having
compounds that inhibit foam.
In some special cases, the air intake can be regulated, but it is an operation to be carried out
after having acquired some experience with the skimmer. An excessive closure of the air supply
could damage the needle impeller of the pump.
Maintenance
1. Before proceeding with maintenance, disconnect power to the Pump (F).
2. Check the skimmer daily for the level of collected liquid (skimate). If the skimate continues
to be clear after a few days of operation, the level of foam can be lowered slightly to
concentrate the skimate more. If the foam does not continue to produce a skimate, then
the level of foam can be raised slightly. It is important to make adjustments in very small
increments and then allow time for the adjustment to take effect. The ne-tuning of the
skimmer level will come with experience.
3. When the level of skimate in the Collection Cup (D) reaches 3-4 cm (1-2”), it is recommended
that the Collection Cup (D) be removed and cleaned. A cleaner inner column of the
Collection Cup (D) results in better skimate production. As an option the Collection Cup (D)
has a drain where a small hose can be connected to drain into a larger reservoir such as a
small bucket or jug for longer periods between cleaning.
4. It is recommended to check the Air Silencer (F) and the Tubing (N) weekly to make sure they
are clear of any salt, dust or dirt build up. An increase in noise or vibration can indicate an
obstruction of air ow.
11
5. Check the Pump (G) monthly. The skimmer is designed with an external pump connected by
a compression ring. This allows for quick and easy cleaning of the Pump (G).
6. If salt or limescale deposits are present, it is recommended to clean the affected parts with
water and vinegar away from the aquarium sump.
7. Do not use detergents or solvents that could damage the product or be harmful to aquatic
organisms.
8. If the pump runs with the intake or impeller blocked for extended periods of time due to
debris or encrustations, it could cause irreversible damage.
9. The Filter Sock (M) and Sponge (I) should be cleaned by gently rubbing and rinsing every
1-2 weeks. Though replacement needs will vary, the Filter Sock (M) and Sponge (I) should
be replaced every couple of months.
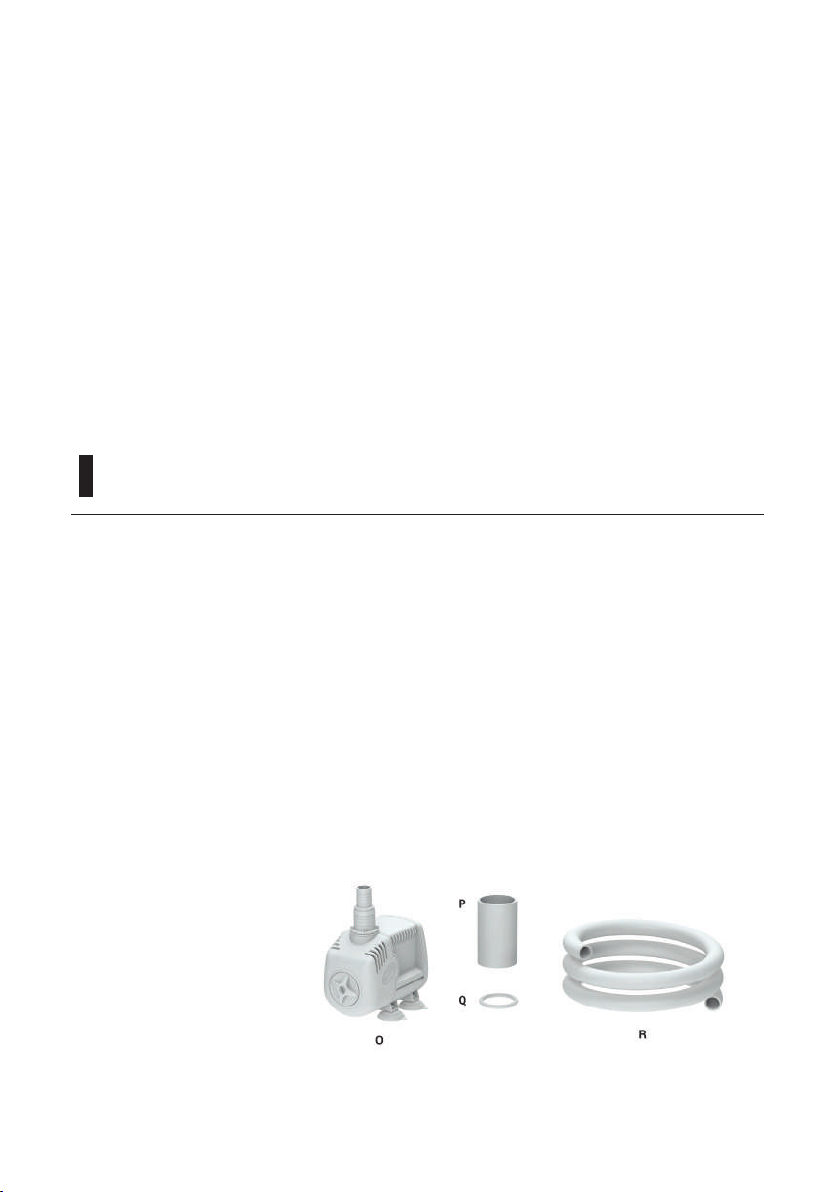
Secondary Pump Conguration (optional)
O. Secondary Pump
P. Venturi Extension
Q. O-ring
R. Connecting Hose
The Secondary Pump Kit (sold separately) allows you to nely adjust the amount of water you
want to treat. The Pump (G) recirculates water and air on itself, reducing consumption because it
does not have to fulll the task of loading the water, but is optimized completely for skimming.
The Secondary Pump Conguration (Recirculating) allows the adjustment of three parameters
independently:
1. Water ow rate to the skimmer is controlled by the Secondary Pump (O)
2. Foam level is controlled by the threaded rod on the Drain Tube (E)
3. Air ow to the skimmer is controlled by the air intake screw of the Air Silencer (F)
The Secondary Pump Kit consists of:
Figure 4
12
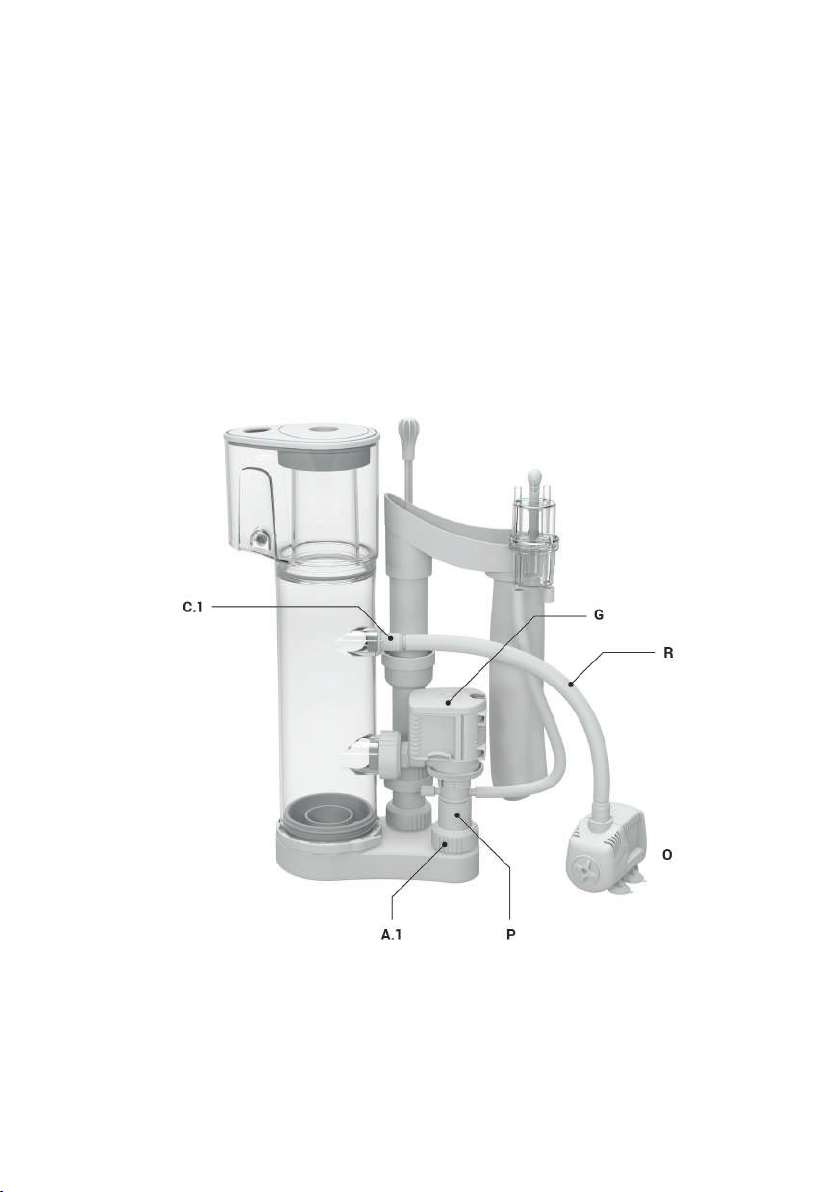
Figure 5
Secondary Pump Assembly
1. Remove the Pump (G).
2. Remove the Water Control Screw (K).
3. Insert the Venturi Extension (P) onto the Venturi Injector (L)
4. Remove the cap from the Support Base (A) just under the Pump (G) by unscrewing the
compression ring (A.1).
5. Insert the Venturi Extension (P) into the O-ring (Q) and secure everything with the
Compression Ring (A.1) as in Figure 5.
6. Connect the Secondary Pump (O) with the Connecting Hose (R) to the inlet connector (C.1)
as in Figure 5.

13
Troubleshooting
Symptom Possible Causes Solution
The skimmer produces
foam, but the foam
does not rise into the
Collection Cup.
Newly set-up aquarium or new
skimmer.
Wait for the living organisms to
produce a greater organic load and
for the skimmer to exceed an initial
running time of 2-3 days.
The water level of the sump is too
low for the skimmer and the pump
does not suck in enough water to
work properly.
Restore the minimum recommended
water level in sump.
The water level inside the skimmer
is too low.
Use the adjustment rod on the Drain
Tube (E) to raise the water level.
The foam is drastically
reduced in the skimmer
Food was administered. Some foods
contain fatty acids and oils that can
inhibit skimming.
Wait a few hours for the normal
biological process to improve the
conditions.
The aquarium may have reached a
biological maturation level such that
it produces little organic residue.
This balance is rare and is usually
not constant.
It will normally correct itself over time.
Pump or air intake system are dirty. Disassemble and clean thoroughly
The pump is noisy The water level of the sump is too
low for the skimmer and the pump
does not suck in enough water to
work properly.
Restore the minimum recommended
water level in sump.
The pump intake is blocked. Dismantle the pump and check
that all its parts are in order. Check
the cleanliness and positioning of
the impeller and any presence of
limescale.
Lime and salt deposits and/or
natural wear
Replace the impeller
14
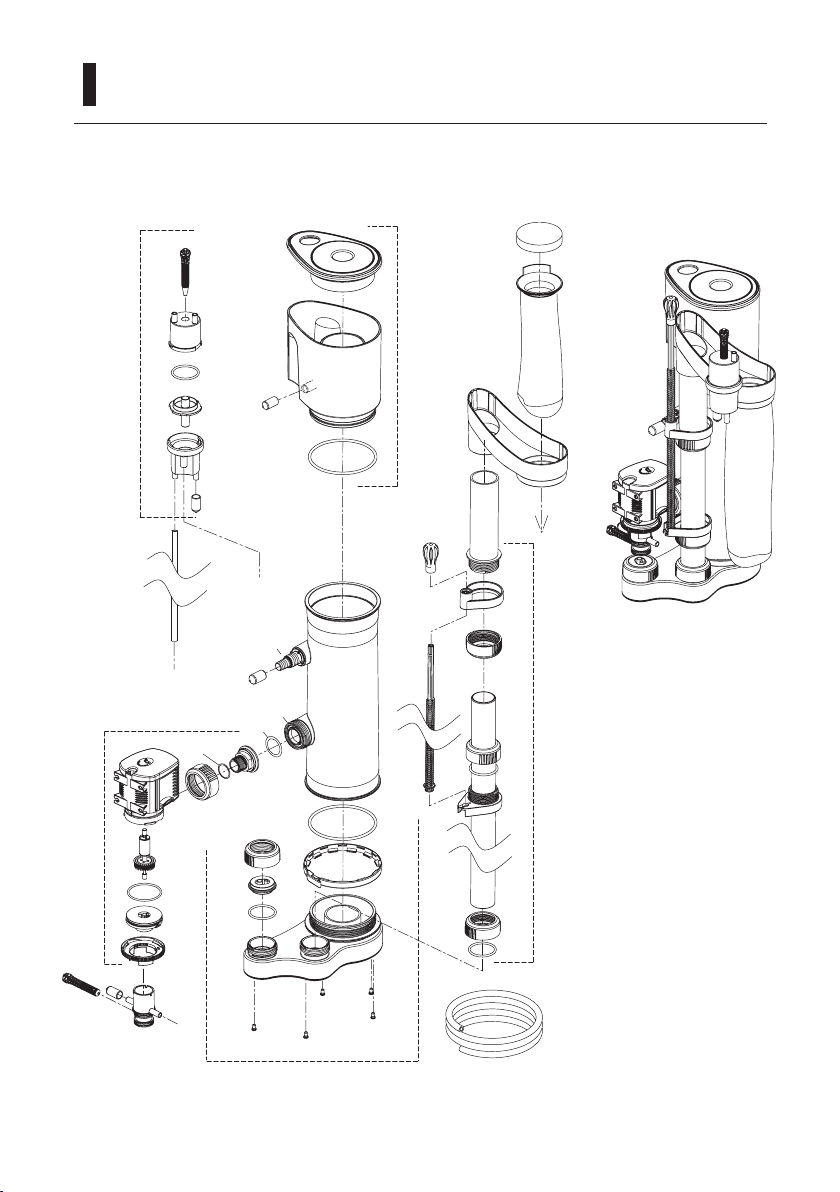
Appendix Exploded View
A
B
A
B
B
A complete listing and diagram of replacements parts and codes is available at www.aquavitro.com

15
Appendix Technical Specications
Single Pump
Double Pump
125 250 500
Liters US Gallons Liters US Gallons Liters US Gallons
Maximum Load (extremely
high SPS density) 175 50 350 120 720 180
Average Load 300 75 650 160 1400 320
Min Load 500 125 1000 250 2000 500
Consumption (Watts)* 12-18 12-18 14-22 14-22 16-30 16-30
Air Flow MAX 200 50 500 150 900 250
Water Flow MAX 300 75 500 150 900 250
Height 45 cm 17.7” 53 cm 20.9" 64 cm 25,2"
Recommended Water
Height 14/20 cm 5.5/8” 16/25 cm 6/10" 16/25 cm 6/10"
125 250 500
Liters US Gallons Liters US Gallons Liters US Gallons
Maximum Load (extremely
high SPS density) 250 75 600 180 1200 250
Average Load 450 120 975 240 2100 450
Min Load 750 190 1500 375 3000 750
Consumption (Watts)* 12-18 + 2 12-18 + 2 14-22 + 6 14-22 + 6 16 - 30 + 14 16 - 30 + 14
Air Flow MAX 200 50 500 150 900 250
Water Flow MAX 400 / 700 100 / 175 700 / 1000 175 / 250 1000 /
1500 250 / 350
Height 45 cm 17.7" 53 cm 20.9" 64 cm 25.2"
Recommended Water
Height 14/20cm 5.5/8" 16/25 cm 6/10" 16/25 cm 6/10"
* Consumption rates are considered in this specic application and WITH AIR

aquavitro® is a premium product line from
Seachem Laboratories, Inc
Seachem Laboratories, Inc.
1000 Seachem Drive, Madison, GA 30650
www.aquavitro.com • 888-SEACHEM
This manual suits for next models
2
Table of contents


