ARAG Bravo 400 S LT Series User guide

INSTALLATION, USE AND MAINTENANCE
4674L15XX
4674L17XX
BRAVO 400S LT SERIES COMPUTER
MULTI-ROW SPRAYER
Software rel. 1.0.X

2
• LEGEND OF SYMBOLS
=Generic danger
=Warning
This manual is an integral part of the equipment to which it refers and must accompany the equipment in case of sale or change of ownership. Keep it for any
future reference; ARAG reserves the right to modify product specications and instructions at any moment and without notice.
LEGEND OF SYMBOLS

3
CONTENTS
CONTINUES > > >
1 Risks and protections before assembly.................................5
2 Intended use .............................................................................5
3 Precautions ...............................................................................5
4 Package content .......................................................................6
5 Position on farming machine ..................................................7
5.1 System recommended composition.................................7
5.2 Computer positioning.......................................................8
5.3 Bracket fixing ...................................................................9
5.4 Control unit position .........................................................9
5.5 Hydraulic unit positioning.................................................9
6 Wiring connections ................................................................10
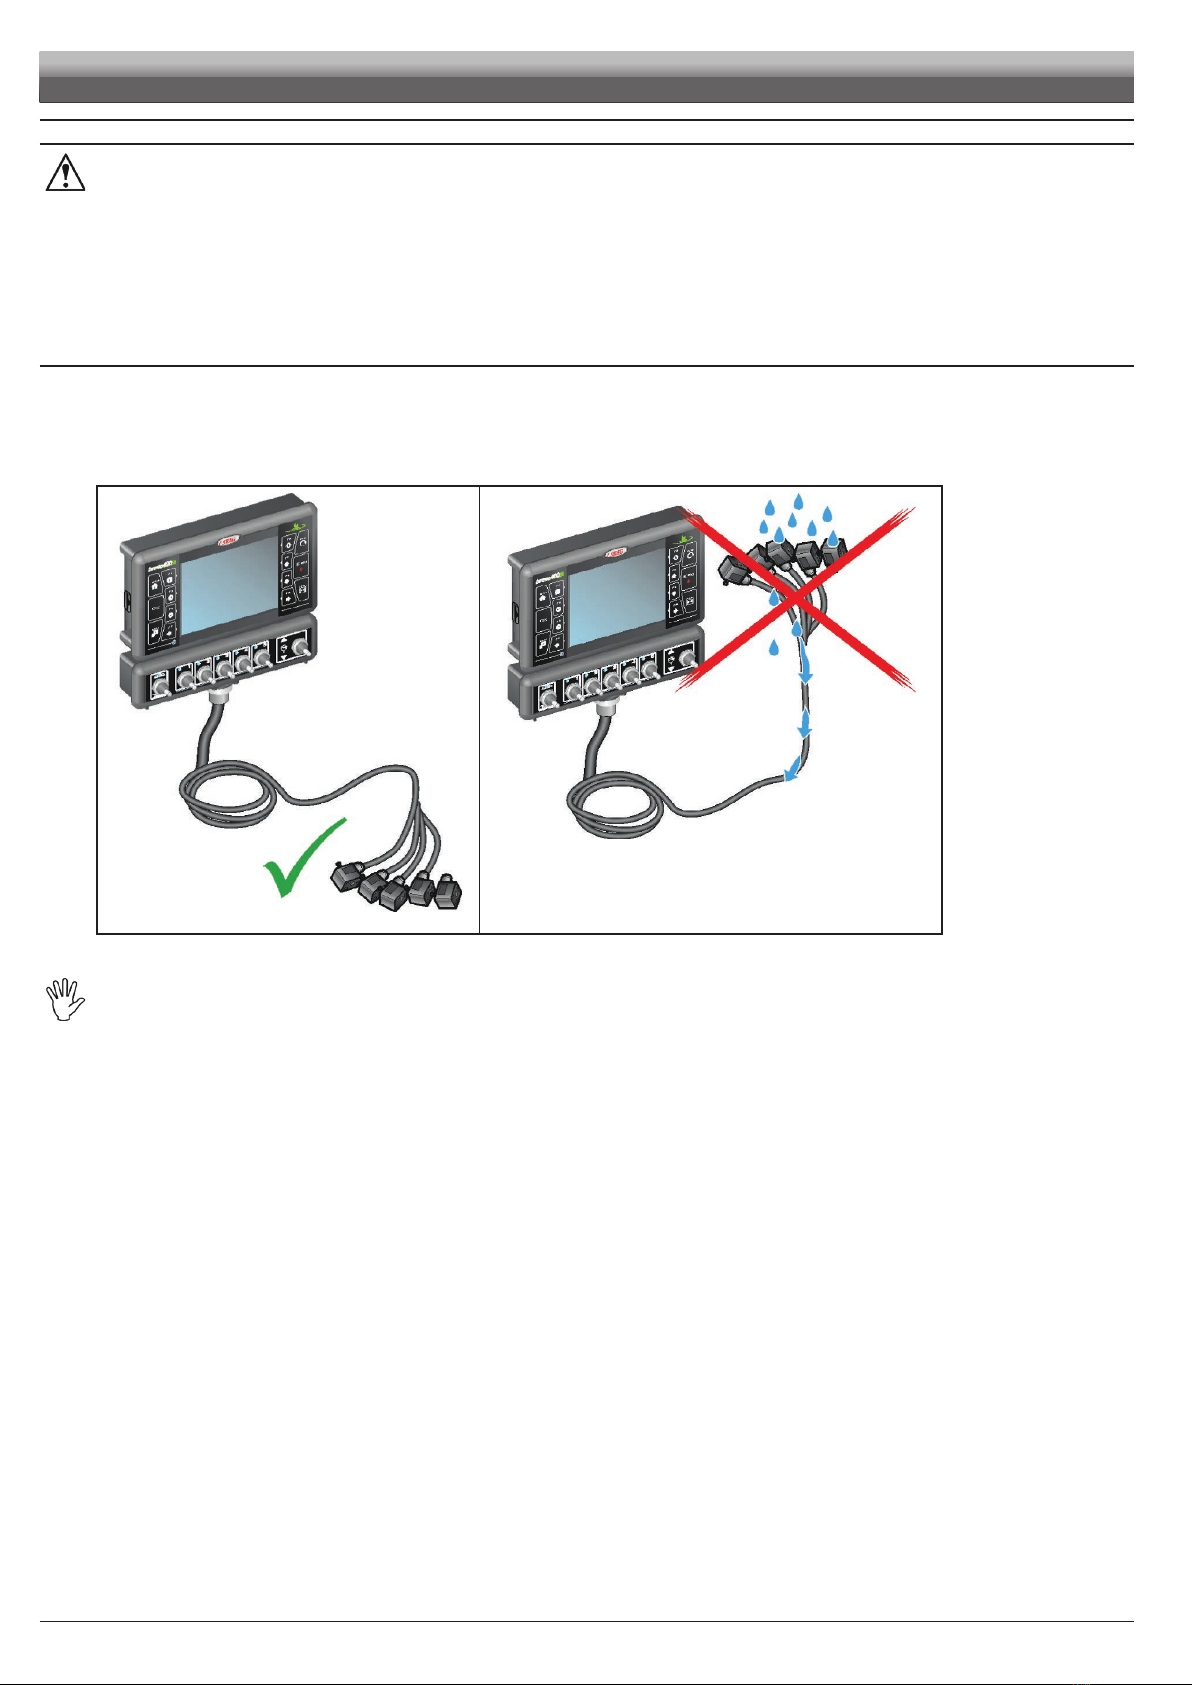
6.1 General precautions for a correct harness position .......10
6.2 Control unit valve connection.........................................11
6.3 Hydraulic valve connection ............................................11
6.4 Sensor connection.........................................................12
6.5 Auxiliary functions..........................................................12
6.6 Power supply connection ...............................................13
7 Accessories ............................................................................14
7.1 SD memory card............................................................14
7.2 Pendrive.........................................................................14
8 Setup........................................................................................15
8.1 Setup preparation ..........................................................15
8.2 Switching on ..................................................................15
8.3 Switching off...................................................................16
8.4 Use of keys for setup .....................................................17
9 Menu structure........................................................................18
10 Basic settings .........................................................................19
11 Advanced setup ......................................................................20
11.1 Configuration management............................................20
11.2 Device reduced configuration ........................................21
11.3 Settings..........................................................................22
11.4 IMPLEMENT SETTINGS...............................................23
11.4.1 Boom settings..................................................................... 23
• Number of covered rows ................................................ 23
• Number of nozzles per half-row ..................................... 23
• Total number of nozzles .................................................. 23
• Half-rows coverage ......................................................... 23
• Half-rows enablement ..................................................... 25
11.4.2 Flowmeter........................................................................... 25
• Type ................................................................................. 25
• Constant: ......................................................................... 25
• Minimum flowrate ............................................................ 25
• Maximum flowrate ........................................................... 25
11.4.3 Filling flowmeter.................................................................. 26
• Type ................................................................................. 26
• Constant: ......................................................................... 26
• Minimum flowrate ............................................................ 26
• Maximum flowrate ........................................................... 26
11.4.4 Pressure sensor.................................................................. 27
• Activation status .............................................................. 27
• Type ................................................................................. 27
• Maximum pressure ......................................................... 27
11.4.5 Valves ................................................................................. 27
MAIN VALVE........................................................................ 27
• Type (REMINDER) .......................................................... 27
• Automatic closing of section valves ................................ 27
• Automatic closing of main valve ..................................... 27
• Switching time ................................................................ 27
PRESSURE REGULATING VALVE...................................... 28
• Regulation direction ........................................................ 28
• Type ................................................................................. 28
• Aggressiveness .............................................................. 28
SECTION VALVES............................................................... 28
• Type ................................................................................. 28
• Shut-off time .................................................................... 28
• Switch-on time ................................................................ 28
11.4.6 Nozzles data....................................................................... 29
• Flowrate .......................................................................... 29
• Pressure .......................................................................... 29
• Minimum pressure .......................................................... 29
• Maximum pressure ......................................................... 29
11.4.7 Wheel sensor ...................................................................... 29
• Constant: ......................................................................... 29
11.4.8 Rev counter ........................................................................ 30
• Status .............................................................................. 30
• Constant: ......................................................................... 30
• Minimum rotation speed ................................................. 30
• Maximum rotation speed ................................................ 30
11.4.9 Tank .................................................................................... 30
• Reserve level .................................................................. 30
• Capacity ......................................................................... 30
• Reserve level .................................................................. 30
• Tank profile ...................................................................... 30
11.4.10 Alarms................................................................................. 31
NOZZLE ALARMS.............................................................. 31
• Nozzle wear check ......................................................... 31
• Nozzle wear limit percentage ......................................... 31
• Minimum pressure alarm ................................................ 31
• Maximum pressure alarm ............................................... 31
FLOWMETER ALARMS...................................................... 31
• Minimum flowrate alarm .................................................. 31
• Maximum flowrate alarm ................................................. 31
REV COUNTER ALARMS .................................................. 31
• Minimum rotation speed alarm ....................................... 31
• Maximum rotation speed alarm ...................................... 31
11.4.11 Working parameters............................................................ 32
SPRAYING LIMITS ............................................................. 32
• Spraying speed limit ....................................................... 32
• Minimum spraying speed ............................................... 32
• Regulation pressure limit ................................................ 32
• Minimum regulation pressure ......................................... 32
• Flowrate correction factor ............................................... 32
• Tank level correction factor .............................................. 32
AUTOMATIC SECTION CONTROL..................................... 33
• Sections overlapping limit .............................................. 33
• Perimeter overlapping limit ............................................. 33
• Spray closing delay ........................................................ 34
• Spray opening advance ................................................. 34
GUIDANCE ......................................................................... 35
• Steering radius ............................................................... 35
• Reference line distance compensation .......................... 35
11.4.12 Device calibration............................................................... 36
SENSORS .......................................................................... 36
• Pressure sensor zero value ............................................. 36
• Tank level zero value ....................................................... 36
• Tank profile calibration .................................................... 36
11.5 IMPLEMENT GEOMETRY
(MACHINE WITH TOWED / CARRIED IMPLEMENT) ...38
11.5.1 Geometry settings (TOWED IMPLEMENT)......................... 38
11.5.2 Geometry settings (CARRIED IMPLEMENT) ..................... 39
11.6 GPS RECEIVER SETTINGS.........................................40
11.6.1 Tilt compensation ............................................................... 40
11.6.2 Correction type ................................................................... 40
11.6.3 HDOP alarm ....................................................................... 41
11.6.4 Receiver advanced data .................................................... 41
11.6.5 Receiver update - for Smart range receivers ONLY ........... 41
11.6.6 Minimum quality - for NMEA / A100 receivers ONLY .......... 41
11.6.7 Baud rate - for NMEA receiver ONLY ................................. 41

4
CONTENTS
11.7 TRACTOR ADVANCED SETTINGS ..............................42
11.7.1 Camera ............................................................................... 42
11.7.2 Geometry settings
(SELF-PROPELLED) .......................................................... 42
11.7.3 Geometry settings
(TRACTOR WITH REAR 3-POINT HITCH IMPLEMENT).... 43
11.8 USER.............................................................................44
ACOUSTIC ALARMS.......................................................... 44
11.8.1 Acoustic critical alarms ...................................................... 44
11.8.2 Acoustic low priority alarms ............................................... 44
11.8.3 Acoustic info ....................................................................... 44
11.8.4 Steering warning ................................................................ 44
GUIDANCE ......................................................................... 44
11.8.5 Offset tolerance .................................................................. 44
11.8.6 Displayed data configuration.............................................. 45
BACKLIGHT MANAGEMENT ............................................. 45
11.8.7 Backlight............................................................................. 45
11.8.8 Attenuation.......................................................................... 45
PREFERENCES.................................................................. 46
11.8.9 Selective job loading .......................................................... 46
11.9 GENERAL OPTIONS ....................................................46
11.9.1 Language ........................................................................... 46
11.9.2 Units of measurement......................................................... 46
11.9.3 Mode l/100 m ...................................................................... 46
11.9.4 Date and time GPS updating ............................................. 46
11.9.5 Date and Time..................................................................... 46
11.9.6 Sampling period ................................................................. 47
12 Use...........................................................................................48
12.1 Controls .........................................................................48
12.2 Operating switches for control unit valves......................48
12.3 Operating switches for hydraulic valves .........................48
12.4 Guidance screen............................................................49
12.5 Spraying a field ..............................................................50
13 Automatic functions...............................................................52
13.1 F2 Automatic adjustment ON/OFF ...............................53
13.2 Output adjustment .........................................................53
13.3 Importing and using a prescription map ........................53
13.4 F6 Automatic section management ON/OFF................53
13.5 Boom section management ...........................................54
14 "Home" menu..........................................................................55
14.1 F1 Continue last job......................................................56
14.2 F2 Save job ..................................................................56
14.3 F3 New job ...................................................................57
14.4 F4Memories management ...........................................58
14.4.1 Jobs export......................................................................... 59
• KML to USB / SD card .................................................... 59
• Shape to USB / SD card ................................................. 59
• Screenshots to USB / SD card ....................................... 59
14.4.2 Backup ............................................................................... 60
• Create backup file on USB / SD card ............................. 60
• Load backup file from USB / SD card ............................ 61
• Delete all backup files on USB / SD card ....................... 61
14.4.3 Internal memory deletions .................................................. 62
14.4.4 Files copy to internal memory............................................. 62
14.4.5 Remote devices upgrade................................................... 63
• Upgrade monitor firmware ......................................................... 63
14.5 F5 Resume job .............................................................65
14.6 F6 Info / Alarms ............................................................65
15 Job menu.................................................................................66
15.1 Tank ...............................................................................66
15.2 Prescription map ............................................................68
15.3 Job data .........................................................................68
15.4 Camera ..........................................................................69
15.5 GPS data .......................................................................69
15.6 Zoom all .........................................................................70
15.7 Menu..............................................................................71
15.7.1 Speed source ..................................................................... 71
• GPS ................................................................................ 71
• Wheel sensor .................................................................. 71
• GPS and Wheel sensor .................................................. 71
• Simulation ....................................................................... 71
15.8 Device status .................................................................72
DEVICE TOTALIZERS.......................................................... 72
EXTERNAL SIGNALS ......................................................... 72
FIRMWARE VERSIONS...................................................... 72
POWER SUPPLY DATA....................................................... 72
MEMORY STATUS.............................................................. 72
16 Job functions ..........................................................................73
16.1 F1 Target rate ...............................................................74
16.2 F2 Guidance mode.......................................................74
16.3 F3 Point marking ..........................................................75
16.3.1 F1 Pause........................................................................... 75
16.3.2 F3/F5/F7 General point marking ................................... 75
16.4 F4 Surface....................................................................76
16.5 F5 Resume from pause................................................77
16.6 F6 Align ........................................................................77
16.7 F7 New AB....................................................................78
16.8 F8 Display ....................................................................79
16.8.1 F2 Tractor themes.............................................................. 79
16.8.2 F4 Spraying themes.......................................................... 80
16.8.3 F6 Daytime/night time display mode ............................... 80
16.8.4 F8 2D/3D display mode .................................................... 80
17 Maintenance / diagnostics / repairs ......................................81
17.1 Cleaning rules................................................................81
17.2 Troubleshooting..............................................................81
17.3 Error messages .............................................................82
18 Technical data.........................................................................83
19 End-of-life disposal ................................................................83
20 Guarantee terms .....................................................................83
21 EU declaration of conformity.................................................83

5
INTRODUCTION
• MANUAL USE MODES
The section of this manual dedicated to the installation contains information for installers. For this reason we have used technical terms without
providing any explanations.
THE INSTALLATION MUST BE CARRIED OUT BY AUTHORISED AND SKILLED PERSONNEL ONLY. THE MANUFACTURER IS
NOT RESPONSIBLE FOR ANY OPERATION SPECIFIED IN THIS MANUAL CARRIED OUT BY UNAUTHORISED OR UNSKILLED
PERSONNEL.
• RESPONSIBILITY
The installer must carry out workmanlike installations and ensure to the end user the perfect operation of the whole system both with ARAG
components only and other brands' components.
ARAG always recommends using its components to install control systems.
The installer will be held responsible for any malfunction if he decides to use other brands' components even without actually changing the system
parts or harness.
The compatibility check with components and accessories of other manufacturers shall be carried out by the installer.
If the ARAG components installed together with other brands' components get damaged because of what stated above, no direct or indirect
warranty will be provided.
1 RISKS AND PROTECTIONS BEFORE ASSEMBLY
All installation works must be done with battery disconnected, using suitable tools and any individual protection equipment
deemed necessary.
Use ONLY clean water for treatment tests and simulations: using chemicals during simulated treatment runs can seriously injure
persons in the vicinity.
2 INTENDED USE
The device you have purchased is a computer which, when connected to a valve or suitable control unit, makes it possible to control all phases of
treatment in agricultural applications directly from the cabin of the farming machine it is installed in.
The computer is directly connected to the system by means of two cables connected to the hydraulic and control unit valves and the sensors. In the
cabin you nd all controls necessary to manage the system ensuring great safety during the job.
Bravo 400S LT features a satellite navigator that – through the external GPS receiver – can be used for agricultural applications and navigation.
Bravo 400S LT is not designed for use on public roads and should only be used on farmland.
This device is designed to work on agricultural machinery for spraying and crop spraying applications.
The equipment is designed and built in compliance with UNI EN ISO 14982 standard (Agricultural and forestry machinery -
Electromagnetic compatibility - Test methods and acceptance criteria), harmonized with EMC Directive - 2014/30/EU.
3 PRECAUTIONS
• Do not aim water jets at the equipment.
• Do not use solvents or fuel to clean the case outer surface.
• Do not clean equipment with direct water jets.
• Comply with the specied power voltage (12 VDC).
• In case of voltaic arc welding, remove connectors from Bravo 400S LT and disconnect the power cables.
• Only use ARAG genuine spare parts and accessories.
• Bravo 400S LT can control hydraulic valves to open/close the multi-row sprayer booms.
The computer does not feature emergency stop devices: the manufacturer must provide all necessary safety devices for the
hydraulic valve control.
Any time one hydraulic section is opened or closed the computer emits an acoustic signal and the display shows the relevant
indication. The manufacturer should also provide acoustic and optical warnings in the vicinity of it.

6
INTRODUCTION
4 PACKAGE CONTENT
The table below indicates the components that you will nd in the Bravo 400S LT computer package:
BRAVO 400S LT BRAVO 400S LT WITH HYDRAULIC CONTROLS
Fi g . 1 Fi g . 2
Legend:
1 Bravo 400S LT
2 Power supply cable
3 Power supply connector
4 Fixing kit
5 Safety covers for control unit valve connectors (no. 2)
6 Valve and sensor harness
7 Seals for control unit valve connectors
Legend:
1 Bravo 400S LT
2 Power supply cable
3 Power supply connector
4 Fixing kit
5 Safety covers for control unit valve connectors (no. 2)
6a Valve and sensor harness
6b Hydraulic unit harness
7a Seals for control unit valve connectors
7b Seals for hydraulic valve connectors

7
INSTALLATION
5 POSITION ON FARMING MACHINE
5.1 System recommended composition
ASSEMBLY DIAGRAM FOR MULTI-ROW SPRAYER WITH DIAPHRAGM PUMP - SYSTEM WITH MAIN VALVE
Fi g . 3
Legend:
AMonitor
BBattery
CGPS receiver
DFilling pump
EOil-hydraulic unit
FFlowmeter
GMain valve
HExternal main control
MPressure sensor
PRegulating valve
SSpeed sensor
TFilling owmeter /
Level sensor
V1 Camera 1
V2 Camera 2
XRPM sensor
1-7 Section valves
ASSEMBLY DIAGRAM FOR MULTI-ROW SPRAYER WITH CENTRIFUGAL PUMP - SYSTEM WITH MAIN VALVE
Fi g . 4
Legend:
AMonitor
BBattery
CGPS receiver
DFilling pump
EOil-hydraulic unit
FFlowmeter
GMain valve
HExternal main control
MPressure sensor
PRegulating valve
SSpeed sensor
TFilling owmeter /
Level sensor
V1 Camera 1
V2 Camera 2
XRPM sensor
1-7 Section valves

8
INSTALLATION
5.2 Computer positioning
• The Bravo 400S LT series computer must be placed in the control cabin of the farming machine. Observe the following precautions:
- Do NOT install the computer in areas where it would be subjected to excessive vibrations or shocks, to prevent any damage or
accidental use of the control keys;
- Install the device in a visible position within easy reach by hand; bear in mind that the computer should not obstruct the
operator’s freedom of movement or block his/her view.
Consider all necessary connections of the computer (Fig. 5), the cable length, and make sure there is enough space for
connectors and cables. An identication symbol is located next to each connector to indicate its function.
NUM CONNECTION POINTS
For any reference to the system conguration read
par. 5.1 System recommended composition.
1SD memory card
2USB (2)
3GPS receiver
4Auxiliary functions
5Power supply
6Control unit and sensors
7Hydraulic unit
Fi g . 5

9
INSTALLATION
5.3 Bracket xing
The computer must be mounted after having xed the bracket at the desired location (the previous paragraph shows the bracket drilling template).
The bracket must be slid out of the computer seat (A, Fig. 6) and xed using the supplied screws (B).
Make sure the bracket is securely mounted, t the computer on it, and push it until it locks in place (C).
Fi g . 6
WARNING: the Bravo 400S LT computer must be fastened by means of the supplied bracket only, using suitable screws.
OTHER FASTENING METHODS ARE NOT ALLOWED.
ARAG is not liable for any damage to the equipment, persons or animals caused by failure to observe the above instructions.
5.4 Control unit position
The control unit must be xed with the special brackets supplied and tted to the unit, positioning it as shown in the manual provided with the
assembly.
MAKE SURE TO FOLLOW ALL THE SAFETY INSTRUCTIONS GIVEN IN THE CONTROL UNIT’S MANUAL.
5.5 Hydraulic unit positioning
The hydraulic unit shall be secured to the machine, making sure it is well protected against the elements and the uid sprayed by the machine.
ARAG IS NOT LIABLE FOR ANY DAMAGE RESULTING FROM INSTALLATION BY UNSKILLED PERSONNEL. ANY SYSTEM
DAMAGE CAUSED BY A WRONG INSTALLATION AND/OR CONNECTION AUTOMATICALLY VOIDS THE WARRANTY.
WARNING! DO NOT CONNECT HYDRAULIC UNITS OTHER THAN THE SPECIFIED ONES (SEE ARAG GENERAL CATALOGUE).
ARAG IS NOT LIABLE FOR ANY DAMAGE TO THE PRODUCT, MALFUNCTION ERRORS AND ANY KIND OF RISK IF THE MODULE
IS CONNECTED TO NON ORIGINAL UNITS OR UNITS NOT SUPPLIED BY ARAG.

10
INSTALLATION
6 WIRING CONNECTIONS
WARNING:
To avoid short circuits, do not connect the power cables to battery before the installation is completed.
Before powering up the computer, make sure the tractor battery voltage is as specied (12 VDC).
• Only use ARAG harnesses suitable for Bravo 400S LT computer.
• Take care not to break, pull, tear or cut the cables.
• Use of unsuitable cables not provided by ARAG automatically voids the warranty.
• ARAG is not liable for any damage to the equipment, persons or animals caused by failure to observe the above instructions.
6.1 General precautions for a correct harness position
• Securing the cables:
- secure the harness so that it does not interfere with moving parts;
- route the harnesses so that they cannot be damaged or broken by machine movements or twisting.
• Routing the cables to protect against water inltrations:
- the cable branches must ALWAYS be facing down (Fig. 7).
Fi g . 7
Fi g . 8
• Fitting the cables to the connection points:
- do not force the connectors by pushing too hard or bending them: the contacts may be damaged and computer operation may be compromised.
Use ONLY the cables and accessories indicated in the catalog, having technical features suitable for the use to be made of them.

11
6.2 Control unit valve connection
• The system only works if assembled with 3-wire type valves.
• Use ARAG valves: use of unsuitable valves not provided by ARAG automatically voids the warranty.
ARAG is not liable for damage to the equipment, persons or animals caused by failure to observe the above instructions.
• All valve connectors must be provided with seals before being connected (Fig. 10).
• Make sure the seals are correctly tted to avoid water inltration when using the control unit.
Section
2
Section
3
Section
4
Section
1
Valve 1 Valve 3Valve 2 Valve 4
Section
5
Valve 5
Fi g . 9
Connector 1 shall control the valve, which in turn is connected to the boom section 1, and so on with the other valves.
Connect "connector 1" to "valve 1", and then the other connectors with increasing numbers from left to right: the boom section 1 is the furthest
from the machine on the left, looking at the machine from the rear side (Fig. 9).
Fi g . 10
Fix the connectors to the relevant valves according to the initials indicated in
your assembly general diagram (par. 5.1 System recommended composition)
• Remove the protection cap (1, Fig. 10) from the electric valve.
• Position the seal (2) onto connector (3), and connect the latter pressing it fully
home (4): be careful not to bend the contacts upon insertion on the valve.
• Tighten the screw (5) fully home.
Close the connectors of the valves not used with the kit
supplied in the package (safety covers).
6.3 Hydraulic valve connection
Fi g . 11
Bravo 400S LT can control up to 7 hydraulic functions through double-acting valves.
Fix the connectors to the relevant valves according to the initials indicated in your assembly general diagram (par. 5.1).
• Position seal (1) onto connector (2), then connect the latter pressing it fully home (3):
during this operation, take special care not to bend valve electric contacts.
• Insert screw inside connector, and screw it (4) until it is tightened.
The function of each switch on the hydraulic function control panel is described below.
• Connect the connector marked with "DD" to the pilot valve, and then the other connectors, as specied on the table:
COMMAND MOVEMENT CONNECTOR
Section movement
1 - 2 - 3 - 4
Opening 1 ÷ 4 A
Closing 1 ÷ 4 C
Boom height
Opening AA
Closing AC
Boom lock
Opening BA
Closing BC
Boom leveling
Opening CA
Closing CC
INSTALLATION

12
INSTALLATION
6.4 Sensor connection
Fix the connectors to the relevant functions according to the initials indicated in your assembly general diagram (par. 5.1).
Harness cables are marked with a symbol denoting their functions: please see the table for correct harness connection.
Use ARAG sensors: use of unsuitable sensors not provided by ARAG automatically voids the warranty.
ARAG is not liable for damage to the equipment, persons or animals caused by failure to observe the above instructions.
ITEM MAIN CONNECTION ALTERNATIVE CONNECTION
FFlowmeter -
MPressure sensor -
SSpeed sensor -
TFilling owmeter Level sensor
XRPM sensor -
- The products are supplied with the sensor installation instructions.
The following speed sensors can also be used as RPM sensors:
• inductive speed sensor (code 467100.086);
• magnetic speed sensor (code 467100.100).
- Connection of:
• owmeter;
• pressure sensor;
• level sensor;
• lling owmeter;
• RPM sensor.
All ARAG sensors use the same type of connector. Connect the sensor connector to the relevant harness; make sure it is correctly tted and push it
until locking it.
Fi g . 1 2 Fi g . 1 3
6.5 Auxiliary functions
Depending on the auxiliary functions requested, various harnesses are available for connecting cameras, spraying activation
signal and treatment status signal (ARAG general catalog).
• Camera connection
Bravo 400S LT can be connected to one or two cameras code 46700100 (purchased separately) using the suitable cables listed in the ARAG
general catalog.
Connect the connector to the computer (see connection points at par. 5.2) and the other cable end to the camera: ensure it is correctly in place and
press until blocking it.
• Treatment activation
Further harnesses that connect Bravo 400S LT to a treatment activation control are available on the ARAG general catalog.
CABLE COLOR FUNCTION LABEL STATUS
1RED Treatment activation SERVICE IN Active low
2GREEN General status SERVICE OUT +12Vdc output
3BLACK Ground GND --
Fi g . 14

13
6.6 Power supply connection
The package includes the power connector (component 5, Fig. 1 / Fig. 2) to be connected to the farming machine battery;
Fig. 17 shows the drilling template of the power connector.
Connect the power connector to the battery wires using two 6-mm faston connectors, as indicated in Fig. 15 and Fig. 16.
Use the cable provided with the package (component 3, Fig. 1 / Fig. 2) to connect the computer to the power supply.
Fig. 15 Fig. 16 Fi g . 1 7
WARNING:
To avoid short circuits, do not connect the power cables to battery before the installation is completed.
Before powering up the computer and control unit, make sure the battery voltage is as specied (12 Vdc).
Bravo 400S LT is supplied directly by the farming machine battery (12 VDC): ALWAYS switch on the system through the computer, and then
remember to switch it off using the specic key on the control panel.
If BRAVO 400S LT remains on for a long time with the machine off, the tractor battery could run at: in case of prolonged breaks
of the machine with engine off, make sure the computer is off, too.
The power source must be connected as indicated in Fig. 18: the computer must be directly connected to the farming machine battery. DO
NOT connect the computer to key-operated switch (15/54).
Fig. 18
WARNING:
• The power circuit shall ALWAYS be protected by a 10 A fuse
like the ones for automotive applications.
• All cables connected to the battery shall have a minimum
cross-section of 2.5 sq. mm.
To avoid short-circuits, connect the power cable connector only
after completing installation.
• Use cables with suitable terminals ensuring correct connection
of all wires.
INSTALLATION

14
7 ACCESSORIES
7.1 SD memory card
The SD memory card may be used to exchange data with the Bravo 400S LT computer.
Before use, format the SD card in FAT 32 mode; make sure that the card is not protected and can be read by the system (Fig. 19).
The system is ONLY compatible with SD or SDHC memory cards with up to 8 Gb memory.
Fig. 19 Fig. 20
Fig. 21
• Insertion
Insert the memory card making sure to orient it correctly:
the card cut edge Amust be face down; push the card until it engages into place
and close the slot with the cover.
• Removal
Press and immediately release the card into the slot and slide it out.
7.2 Pendrive
The pendrive may be used to exchange data with the Bravo 400S LT computer.
Before use, format the SD board in FAT 32 mode; make sure that the board is not protected and can be read by the system.
Most pendrives with up to 8 Gb memory are compatible.
ACCESSORIES

15
8 SETUP
8.1 Setup preparation
Before computer setup, check:
• that all components are correctly installed (control unit and sensors);
• the correct connection to the power source;
• the correct connection of components (control unit and sensors).
Failure to correctly connect system components or to use specied components might damage the device or its components.
8.2 Switching on
Probing devices...
TURNING ON
BRAVO 400S LT
Fig. 22
SOFTWARE VERSION
Fig. 23
Keep the switching on button pressed for 3 seconds: after a few seconds the monitor will show the screen Fig. 22.
Immediately after, system is checked to detect the compatibility of the internal device and its software version.
Before the Fig. 23 (“Home”) page, the monitor software version is displayed. It can be consulted also from menu Device status.
AUTOMATIC DETECTION UPON SYSTEM SWITCHING ON
Probing devices...
Fig. 24
System update:
1. IBX100 Bravo400S LT Multirow V1.X.X
Press OK to proceed or ESC to skip
Fig. 25
INTERNAL CONTROL UNIT UPDATE
The Fig. 25 screen indicates that the system has
detected a device that is not updated.
Press Ok to update the internal control unit and make
it compatible with the Bravo 400S LT software.
Once the procedure is completed, press Ok to restart
the system.
WARNING: IF Esc KEY IS PRESSED, THE INTERNAL CONTROL UNIT IS NOT UPDATED AND IT IS
BLOCKED.
PROGRAMMING

16
PROGRAMMING
FIRST DEVICE SWITCHING ON
Fig. 26 Fig. 27 Fig. 28
Upon rst switching on, after system checks, the monitor directly accesses screen "Home" (Fig. 26).
Set the monitor language.
LANGUAGE SETTING
- In the "Home" (Fig. 26) screen press F8 to enter the Settings menu(Fig. 27).
- Select General options > Language and set the monitor language.
- Press ESC and return to the "Home” menu.
Shift to device basic settings (chap. 10).
ORDINARY SWITCHING ON
Fig. 29
After system checks, the monitor directly accesses "Home” screen (Fig. 29).
Shift to device basic settings (chap. 10).
8.3 Switching off
Keep switching off key (Fig. 30)pressed until the switching off message (Fig. 31), is displayed, then release key.
Now press key OK to conrm switching off, or key ESC to cancel it.
DO NOT KEEP SWITCHING OFF KEY PRESSED FOR TOO LONG:
if it is pressed for a long time, an alarm triggers and the Fig. 32 screen is displayed.
TURNING OFF
BRAVO 400S LT
Fig. 30
PRESS OK TO POWER OFF
Fig. 31
RELEASE POWER BUTTON
Fig. 32
During switching off, monitor automatically saves the current job: Do NOT press any other key and do NOT disconnect the power
supply until monitor turns off.
WARNING: ALWAYS use the special key to switch off the device; otherwise ALL data concerning the spraying and the setup will
be lost.

17
8.4 Use of keys for setup
SELECTION AND ACCESS TO MENU ITEMS
A
B
1B
1A
1A
1B
2 3
Fig. 33
1A Press in succession to move across the menu items (UP /
DOWN).
The selected item is highlighted with a gray bar (A).
1B Press in succession to move across the available options
(RIGHT / LEFT).
Display options (B):
The selected option is highlighted with a blue bar.
Active option
Inactive option
2Press to access the selected item or to conrm modication.
3Press to exit screen without conrming modication.
ENTERING A NUMERICAL VALUE
1
2
2
1
3 4
C
Fig. 34
1Press to move the cursor (C) across the digits
2Press to edit the highlighted digit
(increase, decrease)
3Press to conrm
4Press to exit screen without conrming modication
ENTERING TEXT
B
A
|
2 3
1B
1A
1A
1B
4 5
Fig. 35
1A Press in succession to select the character you wish to type
(UP / DOWN).
1B Press in succession to select the character you wish to type
(RIGHT / LEFT).
Press to:
2conrm the selected character.
2delete the character before the cursor
(when symbol “ ” is selected)
2save the entered text
(when symbol “ ” is selected)
3delete the character before the cursor
4save the entered text
(when symbol “ ” is selected)
5exit screen without conrming modication
Legend:
usr01
Typed Name
|
Cursor Selected character Shift cursor across name
characters
Caps lock Deletes the character
before the cursor
Saves the entered text
The box at the bottom of the page is a summary of key functions during setup.
PROGRAMMING
Exit the function
or data change
Conrm access
or data change
Scroll
(LEFT /
RIGHT)
Delete
selected
character
Data
decrease
of data
Scroll
(UP /
DOWN)
Enter
selected
character Par.
8.4

18
PROGRAMMING
9 MENU STRUCTURE
Upon rst switching on, enter the device basic settings (chap. 10).
Afterwards, it will be possible to select the preset settings by pressing F7.
chap. 16
Job functions
chap. 13
Automatic functions
Edit the created congurations*(chap. 10).
System setup.
chap. 14
“Home” menu
chap. 11
Advanced setup
chap. 10
Basic settings
Create / Load settings*:
User ("usrxx")
Configuration
("macxx", "impxx", "traxx")
*The type of displayed conguration varies based on the type
of system set (chap. 10):
- the "macxx" conguration refers to self-propelling machines,
- the "impxx" and "traxx" congurations refer to the machines
with towed or carried implement ("impxx" for the implement,
"traxx" for the tractor)
chap. 15
Job menu

19
Exit the function
or data change
Conrm access
or data change
Scroll
(LEFT /
RIGHT)
Delete
selected
character
Data
decrease
of data
Scroll
(UP /
DOWN)
Enter
selected
character Par.
8.4
SETUP "BASIC SETTINGS"
10 BASIC SETTINGS
FIRST SWITCHING ON - SETTINGS
If you have a conguration le (Backup), correctly saved on a pen-drive / SD card, press F4 (A in Fig. 36) and follow the steps specied in par. 14.4.2.
IN ALL OTHER CASES, PRESS F7 (B): SAVE USER AND MACHINE CONFIGURATION;
THEN START GUIDED SETUP BY PRESSING KEY F8 (Fig. 38 or Fig. 39).
B
PAR.
14.4.2
A
Fig. 36
ACTIVE SETTINGS AT THE END
OF GUIDED SETUP
self-propelled
machine
machine
with towed / carried
implement
Fig. 37
GUIDED SETUP
You can do the following:
SELF-PROPELLING MACHINE
Fig. 38
MACHINE WITH CARRIED / TOWED
IMPLEMENT
Fig. 39
GUIDED SETUP - MENU
IMPLEMENT / SELF-PROPELLING MACHINE BASIC
SETTINGS
• SWITCH BOX
Number of switches present on control panel:
4 switches
5 switches
7 switches
• MAIN VALVE
Main control valve installed on the control unit:
None
2 ways (drain valve)
3 ways (main valve)
• FLOWRATE REFERENCE SENSOR
Device used to calculate owrate:
Flowmeter
Pressure sensor: measured pressure is used to calculate target rate.
Both: within the working limits the computer uses the owmeter, otherwise it uses
the pressure sensor, ONLY if properly congured.
• TANK LEVEL SOURCE
Device used to read tank level:
Manual: no external device connected
Filling flowmeter
Tank level sensor
GUIDANCE SETTINGS /
BASIC TRACTOR SETTINGS
• AUTONOMOUS GUIDANCE: automatic control unit disabled:
None
• GPS RECEIVER
: ARAG receivers code 467016xx.
Smart-Ag
Smart 6 AgStar Atlas
A100: ARAG receiver code 520100.693.
NMEA: all GPS receivers with NMEA183 protocol and with the following features:
- 10 Hz GGA message; latitude and longitude coordinates with at least 6 decimal
digits.
- 10 Hz VTG message.
- 0.1 Hz ZDA message.
- Serial port 57600 bps, n, 8, 1.
Demo: monitor simulates the driving.
None
BASIC SETUP PROCEDURE IS NOW COMPLETE. NOW IT IS POSSIBLE TO START THE ADVANCED SETUP PROCEDURE,
DESCRIBED IN CHAP. 11.The system assigns to the monitor ONLY the suitable setup menus.

20
Exit the function
or data change
Conrm access
or data change
Scroll
(LEFT /
RIGHT)
Delete
selected
character
Data
decrease
of data
Scroll
(UP /
DOWN)
Enter
selected
character Par.
8.4
11 ADVANCED SETUP
ACTIVE SETTINGS
self-propelled
machine
machine with
carried /towed implement
Before starting advanced setup, select the type of system
conguration: all the modications to advanced setup will be applied to
ACTIVE SETTINGS (mac, imp, tra, usr).
11.1 Conguration management
Press F7 in the “Home” screen (Fig. 40).
Now it is possible to create a new setup (A), or select an existing one (B):
in all cases the setup will be enabled and the name will be displayed in the "Home" screen”.
Fig. 40
A
B
Fig. 41
CREATE A NEW SETTING (Create new > User / Create new > Setup)
1Select Create new> User (ain Fig. 42) to create a new setup and press OK.
2User denition: select Yes for extended conguration, No for device reduced conguration (par. 11. 2 ) - FOR “NEW USER” ONLY.
Follow the steps and select the desired options. OK: next step ESC: previous step.
3Type the name (in the example of Fig. 43: usr01) and press OK.
The new setup is now active on the computer (Fig. 44). Before moving on to the advanced setup procedure carry out the basic setup (chap. 10).
You can follow the same procedure for setting Create new > Setup (b)
a
b
Fig. 42 Fig. 43 Fig. 44
COPYING A SETTING (Create new > Copy: COPYING DATA FROM AN EXISTING SETUP)
* copy valid only for "Setup" les
1Select Copy (cin Fig. 45) to copy the active setup and save the data on a new one; press OK.
Follow the steps and select the desired options. OK: next step ESC: previous step.
2Type the name (in the example of Fig. 46: imp01) and press OK.
The saved setup is now active on the computer (Fig. 47). Proceed to advanced setup.
c
Fig. 45 Fig. 46 Fig. 47
ADVANCED SETUP
CONTINUES
1
2
2
1
3
Table of contents
Other ARAG Paint Sprayer manuals
Popular Paint Sprayer manuals by other brands

SATA
SATA SATAjet 1000 K HVLP operating instructions

WAGNER
WAGNER PC 15 operating manual

DeVilbiss
DeVilbiss COMPACT P2-11 Operation manual

Kremlin-Rexson
Kremlin-Rexson 106 036 00 instruction manual

Graco
Graco 231-576 Instructions-parts list

PermaGreen Supreme
PermaGreen Supreme 711Triumph A1A Operator's manual