Arbonia 6908042 User manual

DE – Montageanleitung Bankkonsole für stehenden Röhrenradiator
EN – Installation manual Bench bracket for vertical column radiator
FR – Instructions de montage des consoles pour banc pour radiateur tubulaire vertical
IT – Istruzioni di montaggio delle mensole per radiator tubolari in versione verticale
2022/08
•
6908042
180–350
45
Ø 2
5

2
DE – Montageanleitung
Zulässiger Gebrauch
Die Konsolen dürfen nur zur Montage von Heiz-
körpern verwendet werden.
Jeder andere Gebrauch ist nicht bestimmungsge-
mäß und daher unzulässig.
Sicherheitshinweise
ŶVor der Montage diese Anleitung gründlich lesen.
Gefahr
Lebensgefahr!
Ŷ
Lage der Versorgungsleitungen (Strom, Gas, Was-
ser) prüfen.
Ŷ
Keine Leitungen anbohren.
Warnung
Verletzungsgefahr!
ŶGewicht des Heizkörpers beachten.
ŶAb 25 kg mit Hebeeinrichtung oder mehreren
Personen arbeiten
.
Warnung
Personen- und Sachschäden!
ŶUntergrund auf Tragfähigkeit prüfen. Gewicht
des befüllten Heizkörpers und mögliche Zu-
satzlasten beachten.
Ŷ
Befestigungsmaterial auf Eignung prüfen und auf
die bauliche Situation abstimmen.
Ŷ
Gesonderte Anforderungen, z. B. für öffentliche
Gebäude (Schulen o. Ä.), berücksichtigen.
Entsorgung
ŶVerpackung und nicht benötigte Teile dem Recy-
cling oder der ordnungsgemäßen Entsorgung zu-
führen. Die örtlichen Vorschriften beachten.
Hinweise zur Montage
Vorbereitende Tätigkeiten
ŶKonsolen auf Schäden prüfen.
ŶGeeignetes Befestigungsmaterial (Schrauben und
Dübel) auswählen. Dabei die Beschaffenheit des
Bodens berücksichtigen.
ŶMindestanzahl der Befestigungspunkte beachten
(siehe Tab. A). Dabei Folgendes beachten:
–Gewicht der Bankauflage wurde nicht be-
rücksichtigt
–max. Belastung der Konsole 500 kg
–Empfehlung: Bei Heizkörpern mit Mitten-
anschluss eine gerade Anzahl von Konso-
len verwenden.
ŶEmpfohlene Positionen der Befestigungspunkte
beachten (siehe Abb. B):
–Äußere Konsolen jeweils zwischen dem 3.
und 4. Element montieren.
–Konsolen über die Baulänge hinweg
gleichmäßig verteilen.
Werksseitig sind die Konsolen für Heizkörper mit
Bauhöhen = 350 mm ausgelegt.
ŶBei kleineren Bauhöhen die Mittelteile entspre-
chend kürzen (siehe Abb. D).
Konsolen montieren
ŶKunststoffteile montieren (siehe Abb. 2–3).
ŶUnterteile und Mittelteile der Konsolen am Heiz-
körper montieren (siehe Abb. 4–5).
ŶOberteile fest mit den Mittelteilen verschrauben,
um den Heizkörper gegen Ausheben zu sichern
(siehe Abb. 4–5).
ŶHeizkörper mit Konsolen positionieren und aus-
richten (siehe Abb. 6).
ŶBohrlöcher anzeichnen und bohren (siehe
Abb. 7–8).
ŶKonsolen mit dem entsprechend ausgewählten
Befestigungsmaterial montieren (siehe Abb. 9).
Warnung
Personen- und Sachschäden!
ŶPrüfen, ob alle Montageschritte vollständig
ausgeführt sind.
ŶPrüfen, ob die Aushänge- und Verschiebesi-
cherungen und die Schrauben ordnungsgemäß
montiert sind.

3
EN – Installation manual
Permissible use
The brackets must only be used for installing ra-
diators.
Any other use is contrary to its intended purpose
and therefore not permissible.
Safety instructions
ŶRead these instructions thoroughly prior to
installation.
Danger
Life-threatening situation!
Ŷ
Check the condition of the supply lines (electricity,
gas, water).
Ŷ
Do not drill into any of the lines.
Warning
Risk of injury!
Ŷ
Keep the weight of the radiator in mind.
Ŷ
At 25kg and above, the work should be carried
out with a lifting device or by several persons.
Warning
Personal injury and material damage!
Ŷ
Check the base for adequate carrying capacity.
Take the weight of the filled radiator and possible
additional loads into account.
Ŷ
Check fixing material is suitable and match it to
the structural situation.
Ŷ
Special requirements, e.g. for public buildings
(schools or similar), must be taken into account.
Disposal
ŶPackaging and any parts that are not needed
should be recycled or disposed of properly. Ob-
serve local regulations.
Directions for installation
Preparatory activities
ŶCheck brackets for damage.
ŶSelect appropriate fasteners (screws and dowels).
In doing so take the condition of the floor into
account.
ŶNote the minimum number of fastening points
(see Table A). In doing so take the following into
account:
–Weight of the bench support was not tak-
en into account
–Bracket's max. load 500 kg
–Recommendation: For radiators with a
centre connection use an even number of
brackets.
ŶNote the recommended positions of the faste-
ning points (see Fig. B):
–Always install outer brackets between the
3rd and 4th element.
–Distribute the brackets evenly across the
length.
The brackets are dimensioned ex factory for radi-
ators with heights = 350 mm.
ŶFor shorter heights reduce the middle sections
proportionately (see Fig. D).
Installing brackets
ŶInstall plastic parts (see Fig. 2–3).
ŶInstall brackets' lower sections and middle secti-
ons on the radiator (see Fig. 4–5).
ŶBolt upper sections tightly together with the
middle sections to prevent the radiator from lif-
ting up (see Fig. 4–5).
ŶPosition and align the radiator with brackets (see
Fig 6).
ŶMark drill holes and drill (see Fig. 7–8).
ŶInstall brackets using the fasteners selected ac-
cordingly (see Fig. 9).
Warning
Personal injury and material damage!
ŶCheck whether all installation steps have been
executed in full.
ŶCheck whether the stopping and sliding safety
devices and the screws are installed properly.

4
FR – Instructions de montage
Utilisation conforme
Les consoles doivent uniquement être utilisées
pour le montage de radiateurs.
Toute autre utilisation n'est pas conforme à
l'usage prévu et est donc interdite.
Consignes de sécurité
ŶLire attentivement ces instructions avant le
montage.
Danger
Danger de mort
!
Ŷ
Contrôler la position des lignes d'alimentation
(électricité, gaz, eau).
Ŷ
Ne pas percer de lignes.
Avertissement
Risque de blessure!
Ŷ
Tenir compte du poids du radiateur.
Ŷ
À partir de 25kg, utiliser un dispositif de levage
ou travailler à plusieurs.
Avertissement
Blessures corporelles et dégâts matériels!
Ŷ
Contrôler la force portante du support. Tenir
compte du poids du radiateur rempli et des char-
ges complémentaires possibles.
Ŷ
Contrôler l'adéquation du matériel de fixation et
la définir en fonction de la situation de montage.
Ŷ
Tenir compte des exigences spéciales, par ex. pour
les bâtiments publics (écoles, etc.).
Élimination
ŶAmener l'emballage et les pièces non nécessaires
dans un centre de recyclage ou un centre d'élimi-
nation des déchets réglementaire. Respecter les
prescriptions locales.
Remarques relatives au montage
Tâches préparatoires
ŶContrôler les consoles à la recherche de
détériorations.
ŶSélectionner un matériel de fixation approprié
(vis et chevilles) en tenant compte de la qualité
du sol.
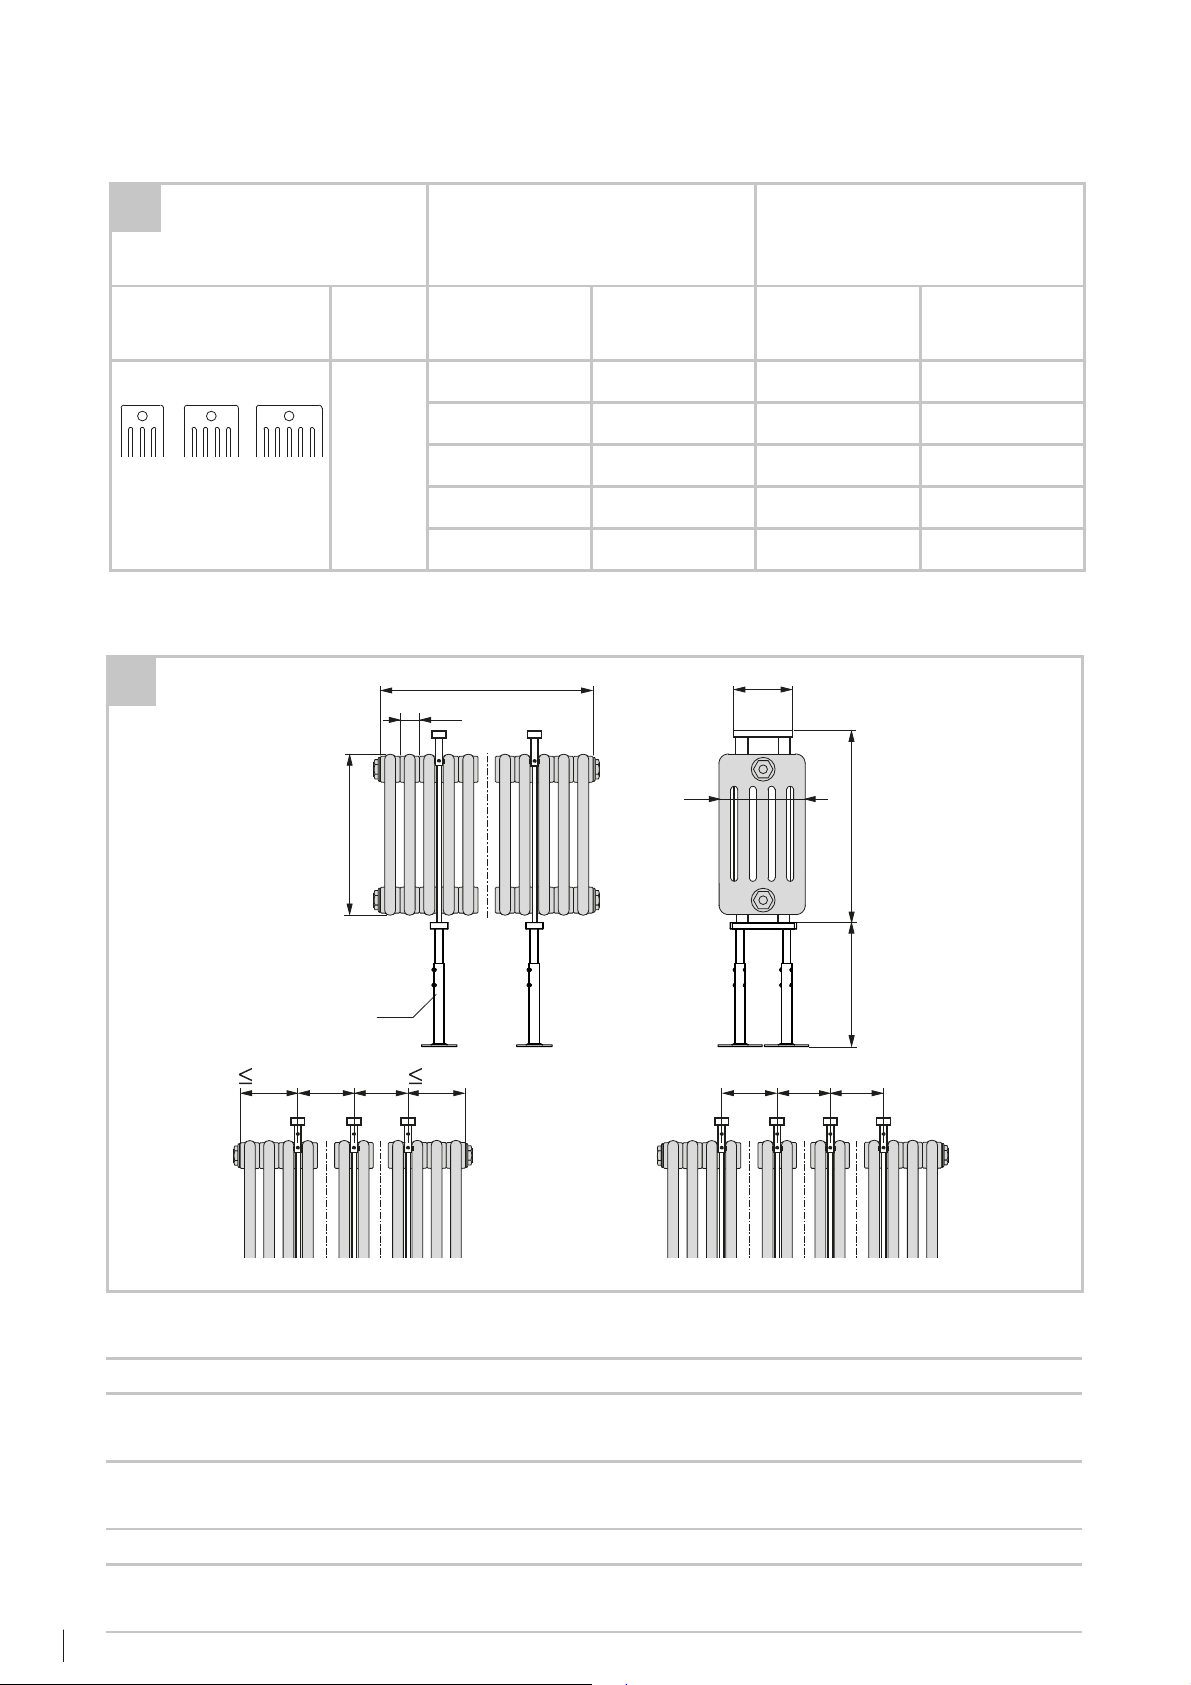
ŶRespecter le nombre minimal de points de fixa-
tion (voir tab. A) en tenant compte des points
suivants :
–Le poids du support de banc n'a pas été
pris en compte
–Charge maximale de la console : 500 kg
–Recommandation : Pour les radiateurs
équipés d'un raccordement central, utili-
ser un nombre de consoles pair.
ŶRespecter les positions recommandées pour les
points de fixation (voir fig. B) :
–Monter les consoles extérieures respecti-
vement entre les 3ème et 4ème éléments.
–Répartir uniformément les consoles sur
l'ensemble de la longueur.
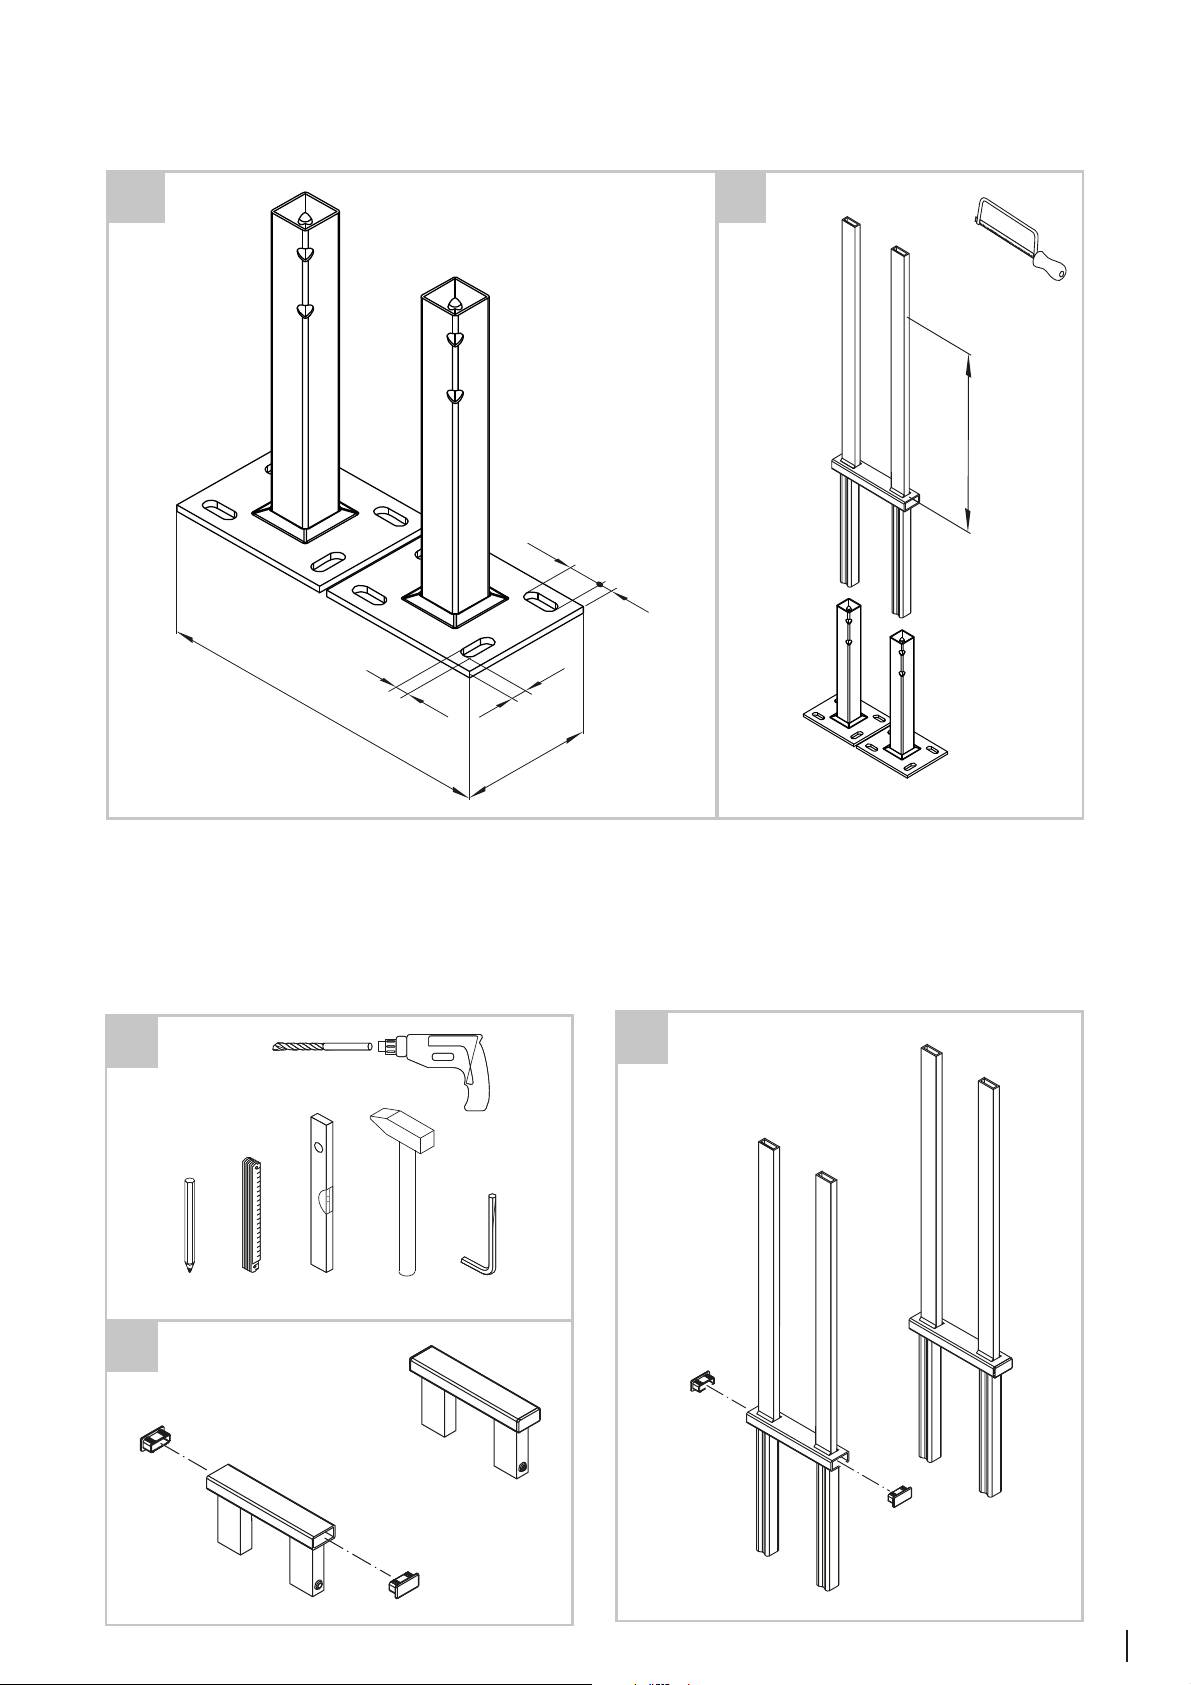
Les consoles sont conçues en usine pour des ra-
diateurs ayant une hauteur de 350 mm.
ŶEn cas de hauteurs inférieures, raccourcir les piè-
ces centrales de manière appropriée (voir fig. D).
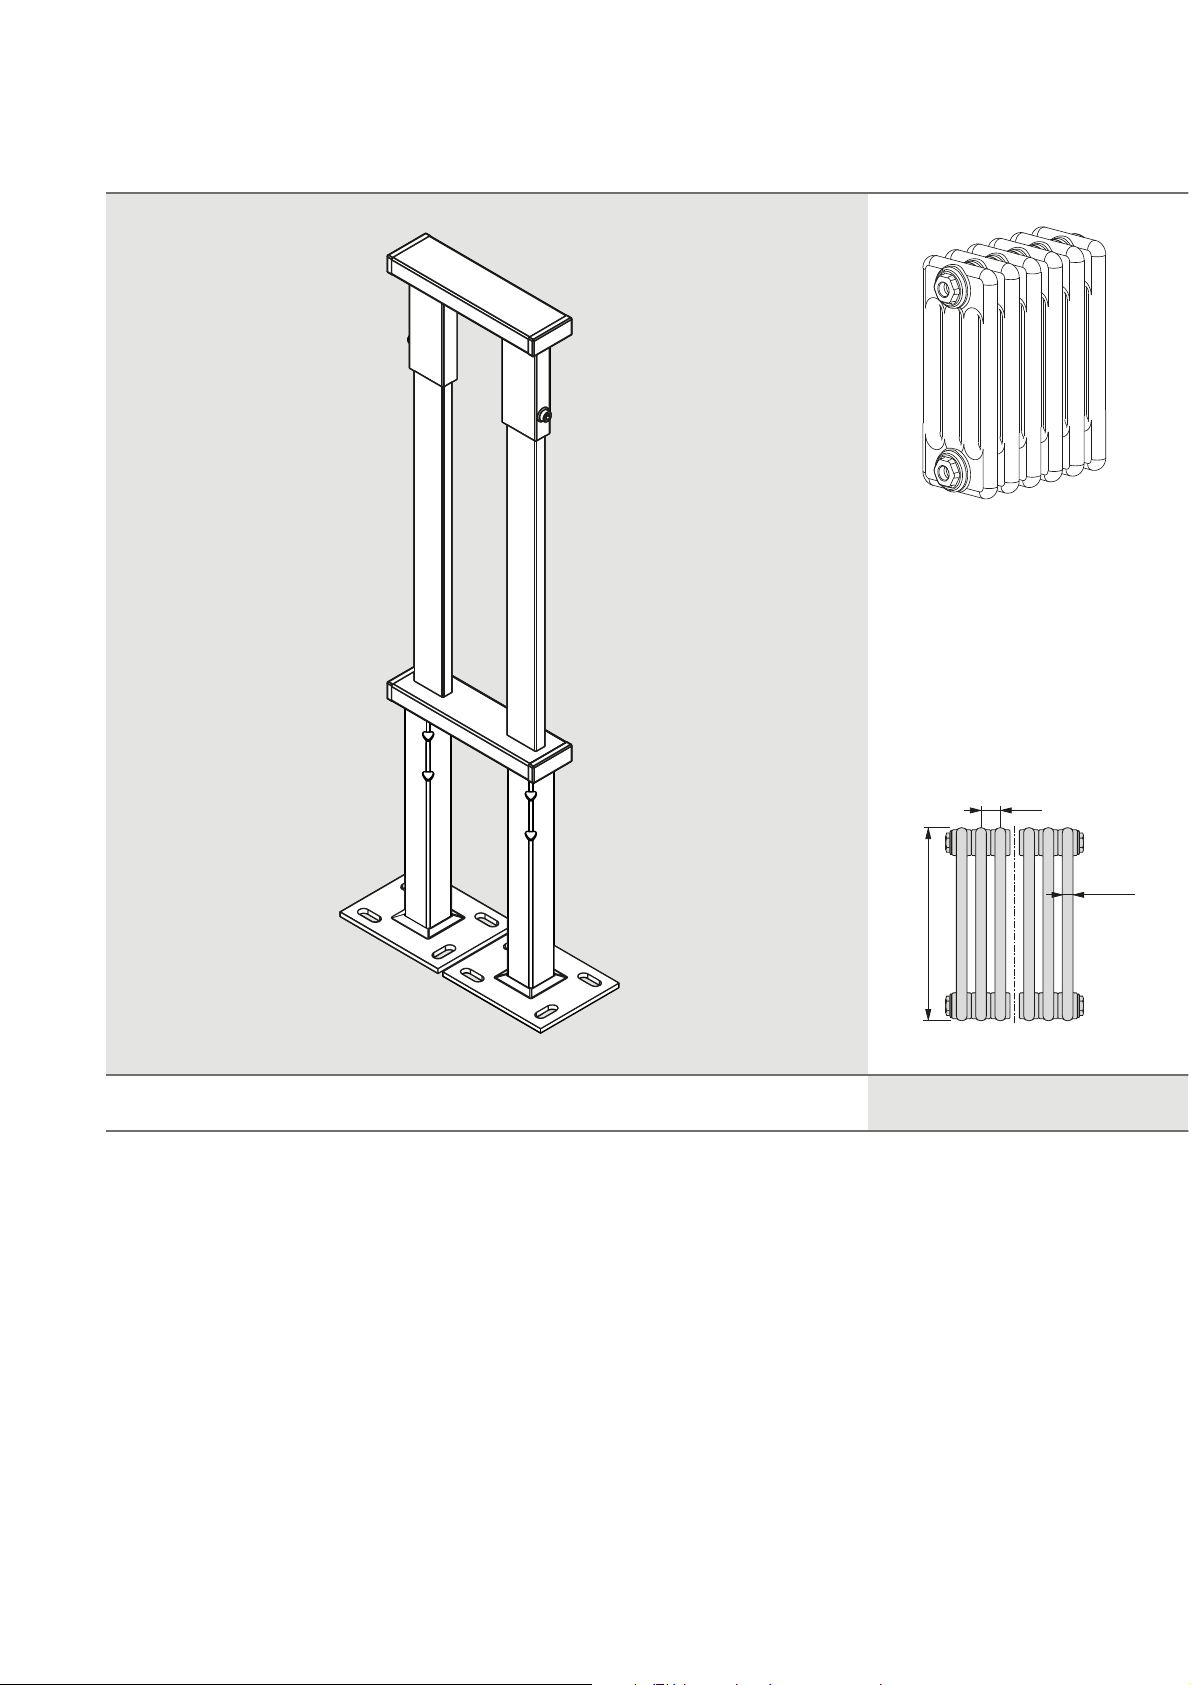
Monter les consoles
ŶMonter les pièces en matière plastique
(voir fig. 2–3).
ŶMonter les pièces inférieures et centrales des
consoles sur le radiateur (voir fig. 4–5).
ŶVisser fortement les pièces supérieures aux piè-
ces centrales, afin de sécuriser le radiateur contre
tout soulèvement (voir fig. 4–5).
ŶPositionner et aligner les radiateurs avec les con-
soles (voir fig. 6).
ŶTracer les trous de perçage et percer (voir
fig. 7–8).
ŶMonter les consoles avec le matériel de fixation
approprié sélectionné (voir fig. 9).
Avertissement
Blessures corporelles et dégâts matériels !
ŶVérifier que toutes les étapes de montage ont
été réalisées.
ŶVérifier que les sécurités contre le décrochage
et le glissement ainsi que les vis ont été correc-
tement montées.

5
IT – Istruzioni di montaggio
Uso consentito
Le mensole devono essere utilizzate solo per il
montaggio di radiatori.
Ogni altro uso non è considerato conforme alle
disposizioni ed è quindi non ammesso.
Indicazioni di sicurezza
ŶLeggere attentamente le istruzioni prima di pro-
cedere al montaggio.
Pericolo
Pericolo di morte
!
Ŷ
Verificare la posizione delle linee di alimentazione
(corrente, gas, acqua).
Ŷ
Non forare le tubazioni.
Attenzione
Pericolo di lesioni!
Ŷ
Osservare il peso del radiatore.
Ŷ
Se il peso supera i 25kg effettuare le operazio-
ni con l'attrezzo di sollevamento o con l'aiuto di
altre persone.
Attenzione
Danni a persone e danni materiali!
Ŷ
Controllare la portata della base di appoggio.
Osservare il peso del radiatore pieno ed eventuali
carichi aggiuntivi.
Ŷ
Verificare che il materiale di montaggio sia idoneo
e sceglierlo adatto alla situazione architettonica.
Ŷ
Rispettare i requisiti particolari, ad es. per edifici
pubblici (scuole o simili).
Smaltimento
ŶProcedere al riciclaggio o al corretto smaltimento
dell'imballaggio e delle parti non necessarie. Os-
servare le disposizioni locali.
Istruzioni di montaggio
Operazioni di preparazione
ŶVerificare che le mensole non siano danneggiate.
ŶSelezionare il materiale di fissaggio adatto (viti
e tasselli). Verificare le condizioni del pavimento.
ŶRispettare la quantità minima di punti di fissag-
gio (vedere tab. A). Osservare quanto segue:
–Il peso del supporto mensola non è stato
considerato
–La portata massima della mensola è di
500 kg
–Consiglio: per radiatori con collegamento
centrale utilizzare un numero pari di men-
sole.
ŶRispettare le posizioni consigliate dei punti di fis-
saggio (vedere fig. B):
–Montare le mensole esterne tra il 3° e il
4° elemento.
–Distribuire uniformemente le mensole per
la larghezza.
Le mensole standard sono adatte per radiatori
con altezza = 350 mm.
ŶIn caso di altezze inferiori accorciare adeguata-
mente le parti centrali (vedere fig. D).
Montare le mensole
ŶMontare le componenti in plastica (vedere
fig. 2–3).
ŶMontare sul radiatore le parti inferiori e le parti
centrali delle mensole (vedere fig. 4–5).
ŶFissare saldamente le parti superiori alle parti
centrali, per evitare che il radiatore si sganci (ve-
dere fig. 4–5).
ŶPosizionare e allineare i radiatori con le mensole
(vedere fig. 6).
ŶDisegnare ed eseguire i fori (vedere fig. 7–8).
ŶMontare le mensole utilizzando il materiale di
fissaggio selezionato (vedere fig. 9).
AVVERTENZA
Danni a cose e persone!
ŶControllare che tutte le fasi di montaggio siano
state eseguite completamente.
ŶVerificare che le sicure antisganciamento
e antisollevamento e le viti siano montate
correttamente.

6
DE – Befestigungspunkte
EN – Fastening points
FR – Points de fixation
IT – Punti di fissaggio
Legende Key Légende Leggenda
El. Element Element Elément Elemento
H Bauhöhe Heizkörper Radiator
height
Hauteur du
radiateur
Altezza
L Baulänge
Heizkörper
Radiator
length
Longueur du
radiateur
Larghezza
BK Bankkonsole Bench bracket Console pour banc Supporti
T Bautiefe Heizkörper Radiator
depth
Profondeur du
radiateur
Profondità
BK
El.
L
375-430210-270
105
H
T
B
== ===
4 El. 4 El.
Private Nutzung • Private use
• Utilisation privée • Utilizzo in
ambienti privati
Öffentliche Nutzung • Public
use • Utilisation publique •
Utilizzo in ambienti pubblici
T
[mm]
H
[mm]
LBKLBK
145
4
185
5
225
6
180–
350
12–25 El. 2x 12–25 El. 2x
26–45 El. 3x 26–45 El. 4x
46–65 El. 4x 46–65 El. 6x
66–100 El. 5x 66–85 El. 7x
– – 86–100 El. 8x
A

7
DE – Maße
EN – Dimensions
FR – Dimensions
IT – Quote
4
DE – Montage
EN – Installation
FR – Montage
IT – Montaggio
80
8
205
20 8
9
C
H + 40
D
1
2
3

8
4
1
2
4
5
5
3
3
210-270
Ø8
(4x)
Ø8
(4x)
4
5
6
7
8
9

9

Kermi GmbH
Pankofen-Bahnhof 1
D-94447 Plattling
Tel. +49 9931 501-0
www.kermi.com
Prolux Solutions AG
Amriswilerstrasse 50
CH-9320 Arbon
T +41 71 447 48 48
www.prolux-ag.ch
Kermi Sp. z o.o.
Ul. Graniczna 8b
PL-54-610 Wrocław
T +48 71 35 40 370
www.kermi.pl
ООО «АФГ РУС»
RU-127282 Москва,
Чермянский проезд д. 7, стр. 1
Тел.: +7495 646 2719
www.керми.рф
www.afg-rus.ru
Arbonia Riesa GmbH
Industriestrasse A 11
D-01612 Glaubitz
T +49 (0) 35265 6896-0
www.arbonia.de
Arbonia Solutions AG
Amriswilerstrasse 50
CH-9320 Arbon
T +41 (0) 71 447 47 47
www.arbonia.ch
Arbonia Kermi France SARL
17A rue d‘Altkirch
CS 70053
F-68210 Hagenbach
T +33 (0) 3 89 40 02 53
www.arbonia.fr
Kermi s.r.o.
Dukelská 1427
CZ-349 01 Stříbro
T +420 374 611 111
Vasco Group
Kruishoefstraat 50
BE-3650 Dilsen
Tel. +32 (0 )89 79 04 11
www.vasco.eu
6908042 / 08/2022
Table of contents
Languages: