Arbutus Medical DrillCover Hex System User manual

DrillCover Hex System
INSTRUCTIONS FOR USE

Arbutus Medical
560 - 828 West 10th Ave
Vancouver, BC Canada V5Z 1L8
Advancing Safe Surgery Together
Phone: +1-778-296-2577
Website: www.arbutusmedical.ca
Do not modify this equipment.
Do not service the device. Service
is not intended to be performed
by the operator.
If troubleshooting, contact
Arbutus Medical.
LBL-003(10)

DrillCover Hex System: Instructions For Use 3
CONTENTS
1. Warnings 4
2. Intended Use and Technical Description 5
3. Inventory of Materials 6
4. Sterile Unloading Procedure 7
5. Reprocessing 13
6. Disposal 17
7. Storage 17

Arbutus Medical4
1. WARNINGS
Solutions that contain or release chlorine (eg. chlorine bleach, Presept
by J&J) or hydrogen peroxide will damage the product. Refer to the
instructions in Section 7: Reprocessing.
Handle with care. Dropping the device on a hard surface can
permanently damage the sterile barrier. Follow guidelines for
preventing mechanical damage outlined in Section 5.1. Inspect device
after each use following procedure outlined in Section 5.3 and replace if
integrity has been compromised. Insert a strong, cool light inside of the
Drill Cover linen to inspect for damage.
Drilling of bone can produce heat at the cutting site and damage
surrounding bone. Control bone temperature. Drill only in short bursts
and use irrigation.
The device is not suitable for use in oxygen rich environments. Ensure
staffhave been trained on surgical fire prevention associated with
electrical equipment, and have a plan of action in the case of fire.
For electrical safety, consult the enclosed Dewalt tool manual. This
device generates electromagnetic interference within approved
limits for medical devices. If interference were to occur in a particular
application, stop operation of the device. Reorient or relocate the
affected equipment. There is no significant risk of reciprocal interference
posed by the device during specific investigations or treatments.
Do not oil or lubricate unless with biocompatible lubricant.
For more information regarding these warnings, contact Arbutus Medical.

DrillCover Hex System: Instructions For Use 5
2. INTENDED USE AND TECHNICAL DESCRIPTION
This instructions for use gives users essential information to prepare the device for use and
to reprocess for re-use. The DrillCover Hex System is a battery powered drilling system
equipped with a standard hex quick-change drive and reusable aseptic enclosure. The
device is meant for use by orthopaedic surgeons. Surgical staff require training in sterile
technique and surgical fire prevention. The intended patient population is patients
indicated for trauma or reconstructive procedures involving orthopaedic bone drilling.
Contraindications for use: oxygen rich environments or patients not indicated for
orthopaedic procedures.
Specications
In this instructions for use,
conveys a general warning message which describes a foreseen risk.
conveys mandatory action.
tells the user to refer to these instructions for use.
signifies a type B applied part.
This equipment has been evaluated for compliance with IEC60601-1. Any modification will
require evaluation to the requirements of this standard.
Classification of device when assembled for use: Internally powered ME equipment.
DrillCover Linen and Chuck adapter components are Type B applied parts. We do not claim
IPXX ingress protection (IPX0). Sterilization of patient contacting components by moist
heat. Not suitable for use in oxygen rich environment. Suitable for continuous operation.
Drill Specification DCF610
Charger Specification DCB113 or DCB115
Battery Specification DCB120 or DCB127
See charger and battery manual for associated charger and
battery specification.
Storage/Transport 10-40ºC and 700-1060 hPA, 30-70% humidity.
Use Environment 10-32ºC and 700-1060 hPA, 30-70% humidity.
Sterilization Specification Prevacuum or gravity displacement autoclave.

Arbutus Medical6
3. INVENTORY OF MATERIALS
DrillCover Linen
Nose piece
Chuck Adapter
Accepts drill bits Ø 0.5 - 7.4mm
Spare Battery
Battery Charger
Drill
Chuck Key

DrillCover Hex System: Instructions For Use 7
4. STERILE LOADING PROCEDURE
The following step-by-step procedure describes the sterile loading process for the DrillCover
Hex System. Two team members are required for loading. Observe when a sterile or
nonsterile team member should perform each step.
Arbutus Medical recommends practicing the sterile loading procedure before clinical
use.
Complete the loading procedure before the sterile team member is contaminated by
biohazard during the procedure.
1. Collect sterile parts, including: DrillCover
linen, chuck adapter, and chuck key.
2. Check parts for cleanliness.
3. If soiled, send soiled components for
reprocessing and use a cleaned and
sterilized DrillCover.
4.1. Obtain Sterile Equipment
Sterile Team Member

Arbutus Medical8
4.2. Prepare the Drill
4.3. Prepare Sterile Cover
1. Install a charged battery and confirm that
the drill is functioning by pressing the
trigger and observing if it turns ON. If the
drill is not functioning, do not proceed to
the next step. Try re-charging the battery
again or use a different charged battery.
If the drill still does not operate, contact
Arbutus Medical.
2. You may terminate operation of the drill by
releasing the trigger.
3. Ensure toggle switch is set to forward, not
reverse.
4. Set the torque to “MAX”
1. Hold Cover and keep it suspended in air.
2. Roll the Cover edge back. Only expose the
inside lining of the Cover to the non-sterile
team member.
3. Hold the Cover so that your sterile gloves
are tucked under the folded fabric cuffand
protected by the fold.
Nonsterile Team Member
Sterile Team Member
A torque setting less than ‘MAX’ may be
insucient for drilling.
DrillCover Hex System: Instructions For Use 9
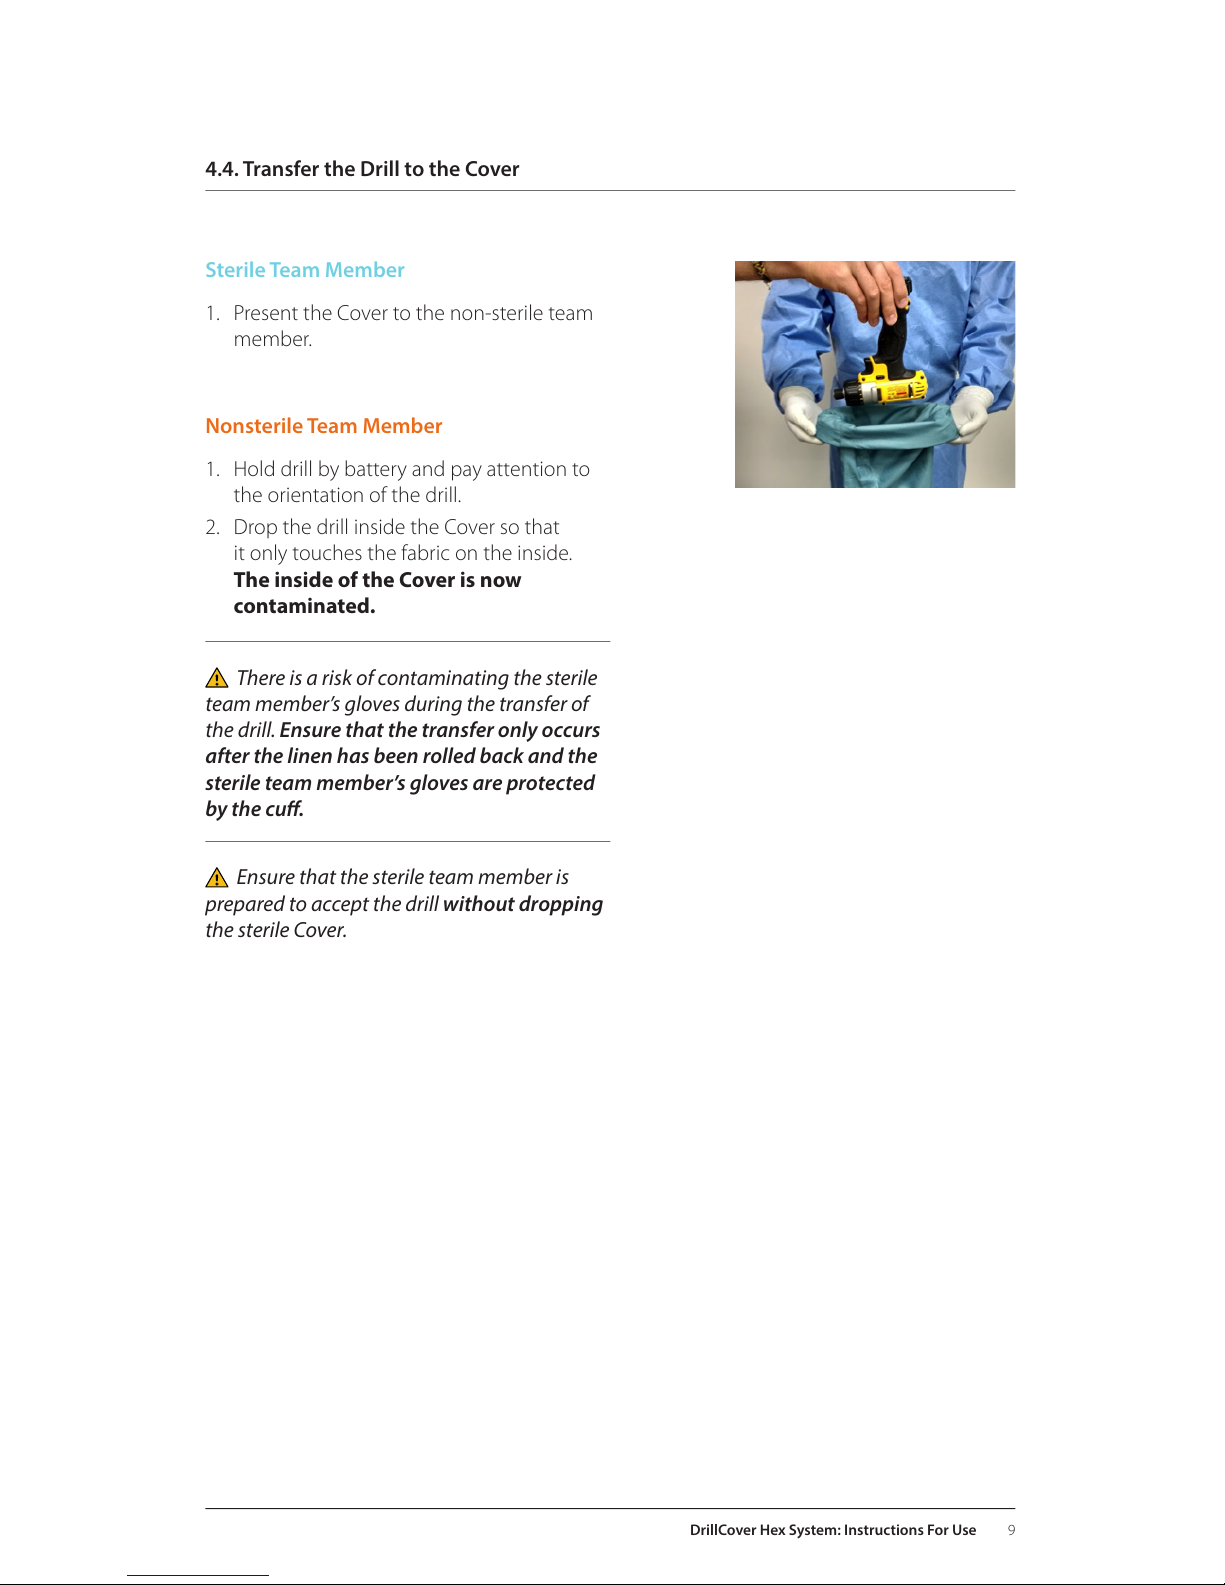
4.4. Transfer the Drill to the Cover
1. Present the Cover to the non-sterile team
member.
1. Hold drill by battery and pay attention to
the orientation of the drill.
2. Drop the drill inside the Cover so that
it only touches the fabric on the inside.
The inside of the Cover is now
contaminated.
Sterile Team Member
Nonsterile Team Member
There is a risk of contaminating the sterile
team member’s gloves during the transfer of
the drill. Ensure that the transfer only occurs
after the linen has been rolled back and the
sterile team member’s gloves are protected
by the cu.
Ensure that the sterile team member is
prepared to accept the drill without dropping
the sterile Cover.

Arbutus Medical10
4.5. Seal the Cover
1. Rotate hands palms-
down to unfold linen
in air.
2. Carefully lay linen on a
sterile surface.
3. Roll the webbing 3
times.
4. Buckle away from the
direction of roll.
Sterile Team Member
If the closure is not rolled
3 times and buckled away
from the roll direction, it
may not be secure.
Keep nose piece facing
up at all times. Do not let it
touch sterile eld.
Do not let quick-release chuck come out of
nose opening.
4.6. Connect the Chuck Adapter
1. Keep nose piece facing up.
2. Pull back excess fabric so the quick-release
chuck can be seen but it does not come
out of the opening.
Sterile Team Member

DrillCover Hex System: Instructions For Use 11
4.7. Install the Drill Bit
1. Insert drill bit into the chuck adapter.
2. Tighten with chuck key.
Sterile Team Member
4.8. Pre-cleaning After Use
1. Remove drill bit from soiled DrillCover linen.
Sterile Team Member
3. Insert chuck adapter into quick-release
chuck. You should hear a click sound.
4. Screw the chuck adapter and the nose
piece together until O-ring is no longer
visible.
5. Check the engagement between Chuck
Adapter and drill by pulling up on the
chuck.
Do not test the engagement of the hex-
shaft before sealing the closure, as the shaft
becomes contaminated once touching the
drill and can then be pulled out of the bag (if
it is improperly engaged), and contaminate
your gloves.
Do not loosen chuck more than required to remove bit; this draws the chuck jaws into the
chuck and makes it more dicult to remove soil.
2. Remove excess soil from device with a non-linting wipe.
3. Spray soiled device with a solution of neutral pH enzymatic detergent (between 7pH –
8pH) on the linen, buckles, chuck piece and into the chuck. Enzyme concentration should
follow manufacturer recommendations. Do not use a saline solution for pre-cleaning as it
will damage the device.
4. Disassemble the DrillCover linen.

Arbutus Medical12
Do not unscrew chuck adapter from the
nose piece.
5. Unclip the buckle and unroll linen
opening. Open the Cover and reveal drill
to non-sterile nurse.
6. Pull the drill out of the linen while the drill
and the chuck adapter are still connected.
7. Hold quick-release chuck collar and push
forward to disengage the Chuck Adapter
(see red arrow in picture). No turning is
required. Pull drill back.
8. Flip the linen inside out so that the nose
is visible. Unscrew the chuck adapter from
the nose piece.
9. Send soiled drill cover for reprocessing,
timely reprocessing is important as it will
not allow soil to dry and set.
Nonsterile Team Member
Nonsterile Team Member
Sterile Team Member
10. Remove drill battery and click into charger.
A light indicates charging. The battery
takes approximately 30 minutes to charge.
You many store battery in charger.

DrillCover Hex System: Instructions For Use 13
Ensure the linen is reprocessed separately
from the Chuck Adapter.
5. REPROCESSING
The following step-by-step instructions describe the reprocessing procedure for the
DrillCover. It is important to carefully follow these steps to ensure the device is not damaged
and remains safe to use.
Separate DrillCover Linen from hardware and other sharp and hard objects before
reprocessing.
Reprocessing linen together with sharps and hard objects may result in damage to the
linen and compromised sterility.
The lifetime of the DrillCover linen is 75 uses when following these guidelines.
1. Clean and disinfect drill and battery with germicidal cloth. Follow the manufacturers
instruction for contact time.
If the disassembly step 8 in Section 4.8. was
not followed by the sterile team member,
disassemble the chuck adapter from the
drill cover by turning in counter clockwise
direction.
1. Immerse chuck key, chuck adapter and
linen into a freshly prepared solution of
neutral enzymatic solution designed for
surgical instruments (ex. Medzyme) and
allow to soak for 5 minutes.
5.1. Wipe Drill
5.2. Clean DrillCover

Arbutus Medical14
Autoclaving the cover while wet will reduce
its expected lifetime.
2. Scrub chuck adapter, linen, buckles and chuck key in the enzymatic solution using a soft-
bristled, non-abrasive brush under the surface of the water to minimize splashing. Scrub
the inside of the chuck and shaft using a channel cleaning brush. Pay special attention to
crevasses on the buckles and outside of the metal chuck adapter. Remove all visible soil.
Any solution with a high or low pH may damage the instrument. Enzyme concentration
should follow manufacturer recommendations. Do not use dish soap, iodine, bleach, presept,
cold-soak solution, chlorhexidine-based solution, laundry soap or surgeons hand scrub.
Metal brushes or scouring pads will damage the linen.
3. Open and close the chuck while flushing
irrigation through the chuck in order to
remove any residual soil. When done,
leave the chuck in fully open position.
4. Carefully inspect for any signs of residual
soils. Repeat steps 2 and 3 until no
residuals remain.
5. Rinse in water and allow device to drain.
Remove excess moisture with lint-free,
soft absorbent towel. Allow device to dry
completely before sterilization. Remove
excess moisture with lint-free, soft
absorbent towel to speed up drying. Do
not wring or twist device. Hang cover in
drying cabinet, or on a drying rack in front
of a fan.

DrillCover Hex System: Instructions For Use 15
1. Inspect all components of the device
for visible soil under good lighting
conditions. Inspect the integrity of
O-rings.
2. Inspect linen for obvious tears and rips in
fabric or seams and check for integrity of
the buckles. Invert the linen and inspect
integrity of seam tape.
5.3. Inspection
TEAR IN FABRIC: If there is a tear, contact
Arbutus Medical for replacement information.
Inspection with a bright, cool light inside of
the Cover is necessary to detect small tears.
STAINS: Check for blood/other stains. If
found, send for re-cleaning. (Note: Dye residue
is acceptable).
TAPE or RESIDUE: Remove any tape and
residue. If you cannot remove, send for re-
cleaning.
3. Invert the linen back to the right side and
place it over a light fixture with bright
cold light source (eg. fluorescent light
bulb). Look for pin holes in fabric. Move
the linen around on the light fixture to
ensure all areas are inspected. Preferably,
do this step in a dark room to make it
easier to spot pin holes.
4. If linen passes inspection, record each use
on the tracking grid located on the inside
of the linen, by marking one square using
a laundry pen. If linen fails inspection,
remove it from clinical use.

Arbutus Medical16
Keep the metal portion pointing upwards.
Folding cover along the same lines after each use will create concentrated areas of wear
at crease lines, reducing the lifetime of the Cover.
Ensure chuck is in a fully-open position.
2. Wrap the chuck adapter and chuck key together in sterile linens for distribution using a
sequential envelope fold. Include a sterile indicator or sterile indicator tape. Two 10 in by
10 in sterile linens are sufficient for the chuck adapter and key.
3. Place packages in autoclave and run the autoclave using these sterilization settings:
TEMPERATURE 121ºC
EXPOSURE TIME 30 minutes
DRY TIME 60 minutes
5.4.1 Gravity Displacement Autoclave Sterilization
1. Wrap the Cover in sterile linens for distribution using a sequential envelope fold. Include
a sterile indicator or sterile indicator tape. Two 18 in by 18 in sterile linens is sufficient for
each Cover.
5.4. Sterilize
First fold lengthwise, dividing it in thirds, with the metal portion pointing upwards. Then
fold upwards from the bottom, again into thirds.

DrillCover Hex System: Instructions For Use 17
5.4.2. Prevac (Dynamic Air Removal) Sterilization
1. Fold DrillCover linen once lengthwise and insert into a sterilization case (3/4 Aesculap
case or equivalent).
2. Separate the metal components from the cover by using a separate sterilization
container or partitions within the same container.
3. Sterilize per parameter set 1 or 2.
Parameter Set 1:
TEMPERATURE 132ºC
EXPOSURE TIME 4 minutes
DRY TIME 30 minutes
Parameter Set 2:
TEMPERATURE 134ºC
EXPOSURE TIME 3 minutes
DRY TIME 30 minutes
6. DISPOSAL
7. STORAGE
DrillCover linen and hardware can be disposed with other biohazardous waste or it can be
sterilized and disposed as regular waste. Drill can be disposed of in common electronics
recycling.
Store device in a cool, dry place to maximize the lifetime of the product.

ARBUTUS
MEDICAL
560 - 828 West 10th Ave
Vancouver BC Canada
V5Z 1M9
Website: www.arbutusmedical.ca
Email: service@arbutusmedical.ca
Telephone: (+1) 778-296-2577
This manual suits for next models
5
Table of contents
Popular Medical Equipment manuals by other brands

bort medical
bort medical 122 600 SP quick guide

Johnson & Johnson
Johnson & Johnson DePuy Synthes GRYPHON manual

J. MITRA & CO. PVT. LTD.
J. MITRA & CO. PVT. LTD. DENGUE NS1 Ag QUANTI CARD

Sirona
Sirona Orthophos XG 3D/Ceph installation manual

Courtney Thorne
Courtney Thorne Altra Wear user guide

Ossur
Ossur COLD RUSH COMPACT Instructions for use

Synovis
Synovis Peri-Strips Dry Series Instructions for use

MGE UPS Systems
MGE UPS Systems SA 2 Operating and maintenance manual

Steris
Steris Hausted VIC329 Operator's and service manual

Body Clock
Body Clock SensaTONE Instructions for use

CME America
CME America BodyGuard 323 Clinician Quick Reference

Planmeca
Planmeca SingLED user manual


