arcelik 9484 STA User manual

Document Number :
Bulaşık Makinesi
Kullanma Kılavuzu
9484 STA
Dishwasher
User’s Manual
EN
1728766926_AA_Arcelik_9484 STA_E9_EN/ 27-08-19.(11:54)

Explanation of symbols
Throughout this User Manual the following symbols are used:
CImportant information or
useful hints about usage.
AWarning for hazardous
situations with regard to life
and property.
BWarning for electric shock.
Packaging materials of the
product are manufactured
from recyclable materials
in accordance with our
National Environment
Regulations.
Do not dispose of the packaging materials together with the domestic or other
wastes. Take them to the packaging material collection points designated by
the local authorities.
Please read this user manual first!
Dear Customer,
We hope that you get the best results from your product which has been
manufactured with high quality and state-of-the-art technology. Therefore,
please read this entire user manual and all other accompanying documents
carefully before using the product and keep it as a reference for future use.
If you handover the product to someone else, give the user manual as well.
Follow all warnings and information in the user manual.
Remember that this user manual is also applicable for several other models.
Differences between models will be identified in the manual.

Document Number :
1728766926_AA_Arcelik_9484 STA_E9_EN/ 27-08-19.(11:54)
Document Number :
9484 STA
Dishwasher
User’s Manual
EN

Explanation of symbols
Throughout this User Manual the following symbols are used:
CImportant information or
useful hints about usage.
AWarning for hazardous
situations with regard to life
and property.
BWarning for electric shock.
Packaging materials of the
product are manufactured
from recyclable materials
in accordance with our
National Environment
Regulations.
Do not dispose of the packaging materials together with the domestic or other
wastes. Take them to the packaging material collection points designated by
the local authorities.
Please read this user manual first!
Dear Customer,
We hope that you get the best results from your product which has been
manufactured with high quality and state-of-the-art technology. Therefore,
please read this entire user manual and all other accompanying documents
carefully before using the product and keep it as a reference for future use.
If you handover the product to someone else, give the user manual as well.
Follow all warnings and information in the user manual.
Remember that this user manual is also applicable for several other models.
Differences between models will be identified in the manual.

CONTENTS
1
General safety ....................................4
Intended use .......................................5
Children’s safety .................................5
Disposing of packaging material.........5
Transportation of the product .............6
Compliance with WEEE Directive and
Disposing of the Wae Product .........6
Compliance with RoHS Directive........6
Package information ...........................6
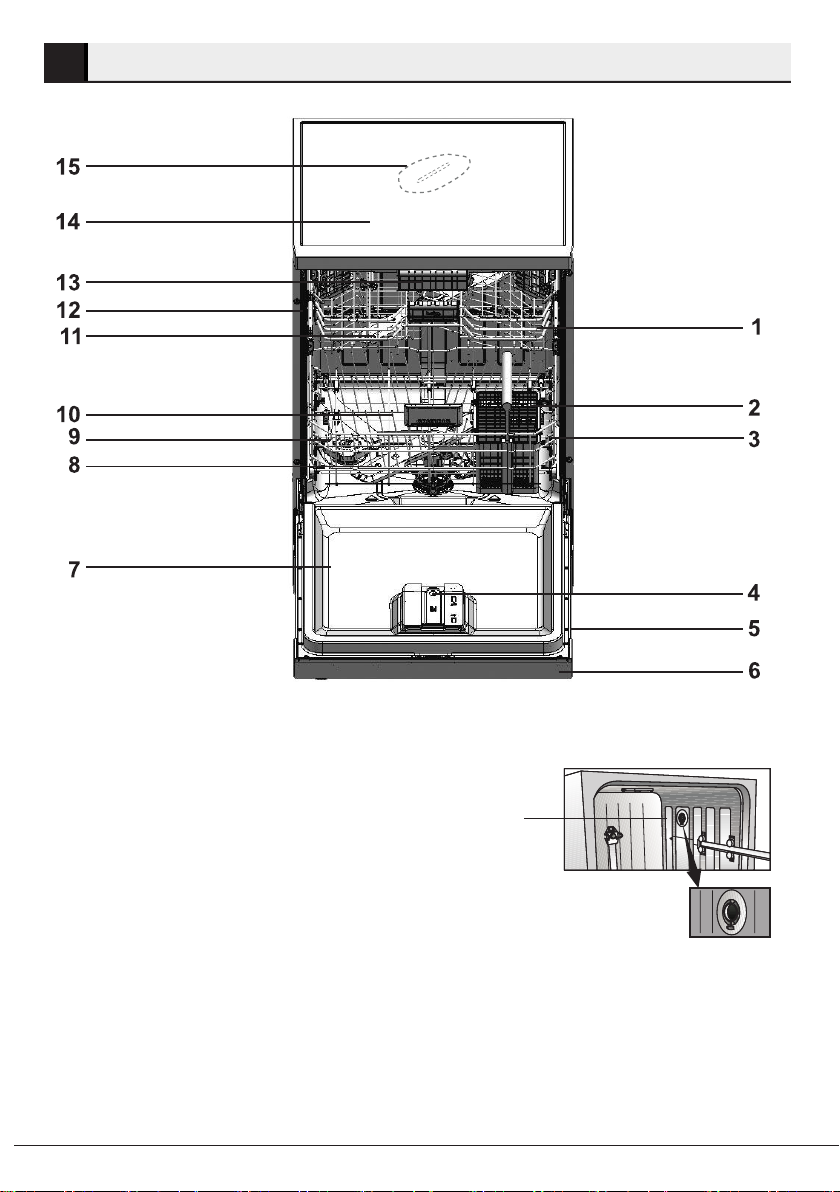
2
Overview.............................................7
Technical specifications ......................8
3
Appropriate inallation location ..........9
Connecting water supply ..................10
Aquasafe+ .......................................11
Adjuing the feet ..............................12
Electrical connection.........................12
Initial use ..........................................12
Tips for energy saving ......................13
Water softening syem ....................13
Adjuing the water softening syem13
Detergent ..........................................15
Adding Liquid/Gel Detergent and Rinse
Aid ...................................................16
Powder Detergents ...........................19
Tablet detergents ..............................20
Silverware basket piece....................23
Silverware basket .............................23
Cutlery basket ..................................24
Collapsible lower basket wires (6
pieces) ..............................................25
Collapsible lower basket wires (4
pieces) ..............................................26
Collapsible lower basket wires (2
pieces) ..............................................26
Collapsible lower basket tines ..........27
Collapsible lower basket tines ..........28
Lower basket bottle wire ...................28
SoftTouch Accessory ........................29
Lower Basket Glass Holder ..............29
Tray Wash Supports .........................29
Lower basket multipurpose / height
adjuable service rack .....................30
Upper basket height adjuable rack 31
Upper basket drawer ........................31
Upper basket glass support piece ....31
Upper basket glass support piece ....32
Collapsable upper basket wires........32
Collapsible upper basket tines..........33
Collapsible upper basket wires .........34
Adjuing the height of the upper
basket ...............................................35
Adjuing the height of loaded upper
basket ...............................................36
Height setting with empty basket ......37
Adjuing the height of the upper
basket ...............................................38
Ceiling cutlery basket .......................39
Upper cutlery basket.........................40

CONTENTS
5
Programme Selection / Programme
Cancel key ........................................42
Function Keys ...................................42
Preparing the machine .....................42
Programme selection........................42
Auxiliary functions.............................44
Scheduling the washing time ............47
Starting the programme ....................47
Adjuing the amount of rinse aid .....48
Cancelling the programme ...............48
Salt indicator ( ) .............................48
Rinse Aid indicator ( ) ....................48
End of programme ............................49
Water cut-o warning ........................49
Overowing warning .........................49
6
Cleaning the outer surface of the
product..............................................50
Cleaning the interior of the machine . 50
Cleaning the filters ............................50
Cleaning the hose filter .....................51
Upper impeller .................................52
Cleaning the impellers ......................52
Lower impeller assembly ..................52

4Dishwasher / User’s Manual/57 EN
1
This section contains safety
instructions that will help to
get protected from risk of
personal injury or property
damage. Failure to follow
these instructions shall void
all warranties.
•Never place the product
on a carpet-covered floor;
otherwise, lack of airflow
beneath the product will
cause electrical parts
to overheat. This will
cause problems with your
product.
•Do not operate the product
if the power cable / plug is
damaged! Call the
•Connect the product to a
grounded outlet protected
by a fuse complying
with the values in the
“Technical specifications”
table. Do not neglect
to have the grounding
installation made by a
qualified electrician. The
manufacturer shall not be
liable for any damages
that will arise when the
product is used without
grounding in accordance
with the local regulations.
•The water supply and
draining hoses must be
securely fastened and
remain undamaged.
•Unplug the product when
not in use.
•Never wash the product by
spreading or pouring water
onto it! There is the risk of
electric shock!
•Never touch the plug
with wet hands! Never
unplug by pulling on the
cable, always pull out by
grabbing the plug.
•The product must
be unplugged during
installation, maintenance,
cleaning and repairing
procedures.
•Always have the
installation and repairing
procedures carried out by
the Authorised Service
Agent. Manufacturer
shall not be held liable for
damages that may arise
from procedures carried
out by unauthorised
persons.
•Never use chemical
solvents in the product.
They bring forth the risk of
explosion.
•When you pull the upper
and lower baskets out
completely, the door of
the product will bear all
the weight of the baskets.
Do not put other loads on
the door; otherwise, the
product may tilt.
•Never leave the door
of the product open
apart from loading and
unloading procedures.
•Do not to open the door
of the product when it is
running unless necessary.
Be careful for the rush of
hot steam when you open
the door.

Dishwasher / User’s Manual 5 / 57 EN
instructions for safety and environment
•This product has been
designed for domestic
use.
•It must be used to do the
domestic type dishes only.
•This appliance is intended
to be used in household
and similar applications
such as:
- Staff kitchen areas in shops,
offices and other working
environments;
- Farm houses;
- By clients in hotels, motels
and other residential type
environments;
- Bed and breakfast type
environments
•Only dishwasher safe
detergents, rinse aids and
additives must be used.
•The manufacturer waives
any responsibility arisen
from incorrect usage or
transportation.
•This appliance can be
used by children aged
from 8 years and above
and persons with reduced
physical,sensory or
mental capabilities or
lack of experience and
knowledge if they have
been given supervision or
instruction concerning use
of the appliance in a safe
way and understand the
hazards involved. Children
shall not play with the
appliance. Cleaning and
user maintenance shall
not be made by children
without supervision.
•Electrical products are
dangerous for the children.
Keep children away from
the product when it is in
use. Do not let them to
tamper with the product.
•Do not forget to close the
door of the product when
leaving the room where it
is located.
•Store all detergents and
additives in a safe place
away from the reach of the
children.
Packaging materials are
dangerous to children. Keep
packaging materials in a safe
place away from reach of the
children.
Packaging materials of the
product are manufactured
from recyclable materials.
Dispose of them properly
and sort in accordance with
recycled waste instructions.
Do not dispose of them with
normal domestic waste.

6Dishwasher / User’s Manual/57 EN
instructions for safety and environment
AIf you need to move
the product, do it
in upright position
and hold from the
rear side. Slanting
the product onto its
front side may cause
the electronic parts
in it get wet and
damaged.
1. Unplug the product before
transporting it.
2. Remove water drainage
and water supply
connections.
3. Drain the remaining water
in the product completely.
This product complies
with EU WEEE Directive
(2012/19/EU). This
product bears a
classification symbol for
waste electrical and electronic
equipment (WEEE).This
product has been
manufactured with high
quality parts and materials
which can be reused and are
suitable for recycling. Do not
dispose of the waste product
with normal domestic and
other wastes at the end of its
service life. Take it to the
collection center for the
recycling of electrical and
electronic equipment. Please
consult your local authorities
to learn about these collection
centers.
The product you have
purchased complies with EU
RoHS Directive (2011/65/EU).
It does not contain harmful
and prohibited materials
specified in the Directive.
Packaging materials of the
product are manufactured
from recyclable materials in
accordance with our National
Environment Regulations. Do
not dispose of the packaging
materials together with the
domestic or other wastes.
Take them to the packaging
material collection points
designated by the local
authorities.

Dishwasher / User’s Manual 7 / 57 EN
2
1. Upper basket
2. Cutlery basket
3. Lower basket
4. Automatic Liquid/Gel Detergent and
Rinse Aid Dosing System
5. Type Label
6. Control panel
7. Door
8 Lower impeller
9. Salt reservoir lid
10. Filters
11. Upper impeller
12. Upper basket rail
13. Upper cutlery basket ( depends on
model )
14. Upper table ( depends on model )
15. Ceiling impeller ( depends on model )
16. Fan drying system ( depends on
model )
16

8Dishwasher / User’s Manual/57 EN
Dishwasher
This product complies with the following EU directives;
Development, production and sales stages of this product comply with the
safety rules included in all pertaining European Community regulations.
2014/35/EU, 2014/30/EU, 93/68/EC, IEC 60436/DIN 44990, EN 50242
Power input 220-240 V, 50 Hz (see rating label)
Total power consumption 1800-2100 W (see rating label)
Heater power consumption 1800 W (see rating label)
Total current (depends on the model) 10 A (see rating label)
Drain pump power consumption 30 W (see rating label)
Water pressure 0.3 –10 bar (= 3 – 100 N/cm² = 0.01-
1.0 Mpa)
CTechnical specifications may be changed without prior notice to
improve the quality of the product.
CFigures in this manual are schematic and may not match the product
exactly.
CValues stated on the markings of the product or in the printed
documents accompanying the product are obtained in the laboratory
on basis of the relevant standards. Depending on operational and
environmental conditions of the product, these values may vary.
Data required for performance tests shall be provided upon request. Requests
can be e-mailed to the following address:
Do not forget to provide the code, stock and serial numbers of the product to be
tested in your request e-mail along with your contact information. Code, stock and
serial numbers of the product may be found on the type label attached to the side
wall of the door.

Dishwasher / User’s Manual 9 / 57 EN
3
Refer to the nearest Authorised
Service Agent for installation of your
product. To make the product ready
for use, make sure that the electricity,
tap water supply and water drainage
systems are appropriate before calling
the Authorised Service Agent. If they
are not, call a qualified technician
and plumber to have any necessary
arrangements carried out.
CPreparation of the location
and electrical, tap water and
waste water installations at
the place of installation is
the customer's responsibility.
BInstallation and electrical
connections must be carried
out by the Authorised
Service Agent. Manufacturer
shall not be held responsible
for damages arising from
processes carried out by
unauthorised persons.
APrior to installation, visually
check if the product has any
defects on it. If so, do not
have it installed. Damaged
products cause risks for
your safety.
CMake sure that the water
inlet and discharge hoses
are not folded, pinched or
crushed while pushing the
product into its place after
installation or cleaning
procedures.
When placing the product, pay
attention not to damage the floor, walls,
piping, etc. Do not hold the product by
its door or panel to move it.
•Place the product on a solid and
flat floor that has sufficient load
carrying capacity! The product
must be installed on a flat surface
in order for the door to be closed
comfortably and securely.
•Do not install the product at places
where temperature may fall below
0ºC.
•Place the product at least 1 cm
away from the edges of other
furniture.
•Place the product on a rigid floor.
Do not place it on a long pile rug
or similar surfaces.
BDo not place the product on
the power cable.
•Make sure that you select a
location that will allow you to load
and unload the dishes in a fast
and comfortable manner.
•Install the product in a place close
to the tap and the drain hole.
Select the installation location
by considering that it will not be
changed after the connections are
made.

10 Dishwasher / User’s Manual/57 EN
Installation
CWe recommend attaching
a filter on the house/
apartment supply water
inlet to protect the machine
from damages that may
arise from impurities (sand,
dirt, rust, etc.) coming from
the urban water supply
system or from your own
water system as well as to
prevent complaints such
as yellowing or sludge
accumulation at the end of
washing.
•Do not use old or used water inlet
hose on the new product. Use the
new water inlet hose supplied with
the product.
•Connect the water inlet hose
directly to the water tap. Pressure
coming from the tap should be
minimum 0.3 and maximum
10 bars. If the water pressure
exceeds 10 bars, a pressure
relief valve should be installed in
between.
•Open the taps completely after
making the connections to check
for water leaks.
Tightly fix the water discharge hose to
the drainpipe in order to prevent any
dislocation of the water discharge hose
during operation of the product.
min
300
min
120
max 1000
min 500
CUse a screw-on hose
connector to connect the
water inlet hose to a water
tap with a ¾ inch external
thread. If required, use a
filter insert to filter deposits
from the pipes.
CDrainpipe must be
connected to the sewage
system and it should not be
connected to any surface
water.

Dishwasher / User’s Manual 11 / 57 EN
Installation
(depends on model)
The Aquasafe+ system protects
against water leaks that may occur
at the hose inlet.Water contact with
the valve box of the system must be
avoided to prevent damage to the
electrical system. If the Aquasafe+
system is damaged, unplug the product
and call the Authorised Service Agent.
AAs the hose set contains
electrical connections and
assemblies, never shorten
or lengthen the hose with
extension hoses.

12 Dishwasher / User’s Manual/57 EN
Installation
If the door of the product cannot be
closed properly or if the product swings
when you push it slightly, then you
need to adjust the feet of the product.
Adjust the feet of the product as
illustrated in the installation manual
supplied with the product.
ADishwashers door must be
aligned properly otherwise
hot steam can escape!
Danger of serious burns,
other injury or may damage
furniture.
Connect the product to a grounded
outlet protected by a fuse complying
with the values in the “Technical
specifications” table. The manufacturer
shall not be liable for any damages
that will arise when the product is used
without grounding in accordance with
the local regulations.
•Connection must comply with
national regulations.
•Power cable plug must be within
easy reach after installation.
BUnplug the product after the
washing programme is over.
•The voltage and allowed fuse or
breaker protection are specified
in the “Technical specifications”
section. If the current value of
the fuse or breaker in the house
is less than 16 Amps, have a
qualified electrician install a 16
Amp fuse.
•The specified voltage must be
equal to your mains voltage.
•Do not make connections via
extension cables or multi-plugs.
BDamaged power cables
must be replaced by the
Authorised Service Agent.
BIf your dishwasher is
equipped with internal
illumination, lamp should
only be replaced by the
Authorised Service Agent
in case of failures that may
occur on the lamp.
BIf the product has a failure,
it should not be operated
unless it is repaired by the
Authorised Service Agent!
There is the risk of electric
shock!
Before starting to use the product,
make sure that all preparations
are made in accordance with the
instructions in sections “Important
safety instructions” and “Installation”.
•To prepare the product to do the
dishes, perform first operation
in the shortest programme with
detergent while the machine is
empty.
AThere might be a small
amount of water left in the
product after factory quality
control tests. This has no
harm on the product.

Dishwasher / User’s Manual 13 / 57 EN
4
Following information will help you
use the product in an ecological and
energy-efficient manner.
Wipe away any coarse food remnants
on the dishes before putting them in
the product.
Operate the product after filling it
completely.
When selecting a programme, consider
the table of "Programme data and
average consumption values".
Do not put more detergent than
suggested on the detergent package.
The product is equipped with a water
softening system which reduces the
hardness of incoming water. This
system softens the supply water to a
level that will allow washing the dishes
with the required quality.
Dishwasher salt is used for this
purpose.
Washing performance will increase
when water softening system is
adjusted properly.
Cleaning, rinsing and drying
performance of your dishwasher will
increase when water softening system
is adjusted properly.
Adjust the new water hardness level
according to the Water hardness level
instruction in this booklet.
Use the test strip supplied with the
product according to the steps given
below to determine hardness level of
your supply water.

14 Dishwasher / User’s Manual/57 EN
PreparatIon
After determining hardness level of the supply water:
5. Press the Menu key to exit the settings menu. Your setting will be saved
automatically.
In order to protect your glassware against glass corrosion in an optimal way, you
have to perform the same hardness settings, which you have made in the control
panel, with the regeneration setting switch.
For example, if you have adjusted to “3rd level” in the control panel, also set the
regeneration adjustment switch to 3rd level.
Regeneration Adjustment Switch
0th Level 1st Level 2nd Level 3rd Level 4th Level 5th Level
1 1 2 3 4 5
If the hardness level of the supply water is above 90 °dF or if you are using well
water, then it is recommended to use water purification devices and special filters.
If the hardness level of the supply water is below 13°dF, there is no need to use
salt in your dishwasher. If this is the case, “No Salt Warning Indicator” (if any)
illuminates continuously on the panel of your machine.
If the water hardness level adjustment is set to level 1, the “No salt warning
indicator” will illuminate continuously although it is not necessary to use salt. If
you use salt under this condition, salt will not be consumed and the Salt indicator
will not illuminate.
CIf you move your house,
it is necessary to readjust
water hardness level of your
machine by considering the
information given above
according to the hardness
level of the supply water
in your new location. Your
machine will display the
most recently adjusted water
hardness level.

Dishwasher / User’s Manual 15 / 57 EN
PreparatIon
CSince different salt brands
in the market have different
particle sizes and since the
water hardness may vary,
dissolution of the salt in
water may take a couple
of hours. Therefore, Salt
Indicator remains on for a
while after adding salt into
the machine.
You can use powder, tablet and liquid/
gel detergent in the machine.
AOnly use the detergents
produced particularly for
use with dishwashers in the
machine. We recommend
you not to use detergents
that contain chlorine and
phosphate as they are
harmful for the environment.
Your dishwasher is equipped with an
Automatic Liquid/Gel Detergent Dosing
System.
Thanks to this system, the amount
of rinse aid and liquid/gel detergent
required for the selected washing
programme is adjusted automatically.
CPlease read the information
given in section “Operating
the Product” to activate or
deactivate the Automatic
Liquid/Gel Detergent Dosing
adjustment.
CUse only special softening
salts produced particularly
for the dishwashers in your
machine.
1. First take the lower basket out to
add softening salt.
2. Turn the salt reservoir lid counter-
clockwise to open it (A).
3. Add 1 litre of water to salt reservoir
of your machine only in initial use.
4. Add salt to the salt compartment.
To speed up dissolution rate of salt
in water, stir it with a spoon.
CYou can put about 2 kg of
softening salt into the salt
reservoir.
5. Replace the lid and tighten it when
the reservoir is full.
CYou need to add salt right
before starting the machine.
Thus, the overflowing
salty water will be flushed
immediately, preventing
the risk of corrosion in
machine. In cases where
you would not start washing
immediately, run your
machine empty in the
shortest program.

16 Dishwasher / User’s Manual/57 EN
PreparatIon
CWhen the Automatic Liquid/
Gel Detergent function is
enabled, the Automatic
Liquid/Gel Detergent
indicator on the panel will
light up if there is liquid/gel
detergent in the detergent
box. If there is little or no
detergent in the detergent
box, the indicator will flash.
CWhen the Automatic Liquid/
Gel Detergent indicator
starts to flash, there is
enough detergent for at
least 5 washing cycles.
•Factory settings of the Automatic
Liquid/Gel Detergent Dosing
System are based on the
detergent amount recommended
by detergent manufacturers.
•You can proceed to the Settings
menu to change the Automatic
Liquid/Gel Detergent Dosing
setting according to your habits, or
according to the recommendations
by the detergent manufacturer if
you are using a different liquid/gel
detergent.
CPlease follow the instructions
given in section “Operating
the Product” to change the
settings of the Automatic
Liquid/Gel Detergent Dosing
System and Rinse Aid.
CIn addition to liquid/gel
detergents that function
only as a detergent,
there are also liquid/gel
detergents that act as rinse
aid and/or soften water.
Follow the manufacturer’s
recommendations when
using these detergents.
Detergent manufacturer’s
recommendations about the amount of
liquid/gel detergent to be used are as
follows:
For lightly soiled dishes 20 ml
For moderately soiled dishes 25 ml
For heavily soiled dishes
30 ml
CSome gel-type detergents
may not be suitable for
automatic dosing as they
are highly viscous. Apply
this type of detergents
onto the inner surface of
the dishwasher’s door or
directly into the dishwasher,
paying attention to the
recommendations of the
detergent manufacturer.
The Automatic Liquid/Gel Detergent
Dosing system is found on the door of
your dishwasher.
1
2

Dishwasher / User’s Manual 17 / 57 EN
PreparatIon
After fully opening the door of the
dishwasher, open the decorative cover
as shown with arrows 1 and
A
B
C
D
2. Open the cover shown with (A) in
the picture and add rinse aid. Open the
cover shown with (B), add liquid/gel
detergent and close the covers.
CThe indicator marked with
(C) on your machine informs
you about the liquid/gel
detergent level in the box.
CThe indicator marked with
(D) on your machine informs
you about the rinse aid level
in the box.
CWipe clean any spilled rinse
aid outside the reservoir.
Otherwise, it will cause
foaming in the next washing
cycle, reducing the washing
performance of the product.
CThe rinse aid used in
dishwashers is a special
product that is recommended
to increase drying efficiency
and prevent water or lime
stains on the washed items.
For this reason, care must
be paid to have rinse aid in
the rinse aid reservoir and
to use rinse aids produced
specially for dishwashers
only.
In order to use the Automatic Liquid/
Gel Detergent Dosing function, select
Automatic Liquid/Gel Detergent Dosing
function on the control panel.
When the function is active, its
indicator comes lit and the system uses
appropriate amount of detergent and
rinse aid in each washing program.
CPress the key again to
cancel the function.
CWhen automatic liquid/gel
detergent dosing function is
selected, do not use other
types (powder, tablet, etc) of
detergents.
If you want to use another type of
detergent while the automatic liquid/gel
detergent dosing system is full, cancel
the automatic liquid/gel detergent
dosing function on the control panel.
Then you can use powder, tablet or
liquid/gel detergent.
CUse only liquid/gel detergent
suitable for the dishwasher.
ADo not mix different brands
of liquid/gel detergents.
CDo not fill the liquid/gel
detergent box with liquids or
chemical cleaners (vinegar,
bleacher etc.) other than
liquid/gel detergent.
Table of contents
Other arcelik Dishwasher manuals

arcelik
arcelik 6555 X User manual

arcelik
arcelik 6220 T User manual

arcelik
arcelik 9300 SS WF User manual

arcelik
arcelik 63103 I WF User manual

arcelik
arcelik 9263 SI User manual

arcelik
arcelik 6343 I User manual

arcelik
arcelik 9361 FI User manual

arcelik
arcelik 9464 STA User manual

arcelik
arcelik 9487 FI User manual

arcelik
arcelik 6383 User manual

arcelik
arcelik 6254 User manual

arcelik
arcelik 9380 SI User manual

arcelik
arcelik 9460 FCB User manual

arcelik
arcelik 9252 MI User manual

arcelik
arcelik 9241 MI User manual

arcelik
arcelik DIN28320 User manual

arcelik
arcelik 6364 I User manual

arcelik
arcelik 6388 I User manual

arcelik
arcelik 6386 SC User manual

arcelik
arcelik 9463 FCB User manual