manuals.online logo
Brands
  1. Home
  2. •
  3. Brands
  4. •
  5. Arduino
  6. •
  7. Control Unit
  8. •
  9. Arduino MKR1000 User manual

Arduino MKR1000 User manual

Getting started with the Arduino/Genuino
MKR1000
MKR1000 board has been designed to offer a practical and cost effective solution for makers seeking to add
Wi-Fi connectivity to their projects with minimal previous experience in networking. Learn how to set up the
programming environment and get the hardware up and running, ready for your projects, in minutes.
The MKR1000 is programmed using the Arduino Software (IDE) (//www.arduino.cc/en/Main/Software), our
Integrated Development Environment common to all our boards and running both online
(https://create.arduino.cc/editor) and offline. For more information on how to get started with the Arduino
Software visit the Getting Started page (//www.arduino.cc/en/Guide/HomePage).
Use your Arduino/Genuino MKR1000 on the Arduino Web IDE
Use your Arduino/Genuino MKR1000 on the Arduino Desktop IDE
Installing Drivers for the MKR1000
Open your first sketch
Select your board type and port
Upload the program
Learn more on the Desktop IDE
Tutorials
Please Read...
Features
Upgrading Firmware and uploading SSL certificates
Use your Arduino/Genuino MKR1000 on the Arduino Web
IDE
GETTING STARTED (/EN/GUIDE/HOMEPAGE) > MKR1000
-
-
-
-
-
-
-
-
-
-
-
(https://create.arduino.cc/editor)
All Arduino and Genuino boards, including this one, work out-of-the-box on the Arduino Web Editor
(https://create.arduino.cc/editor), no need to install anything.
Use your Arduino/Genuino MKR1000 on the Arduino
Desktop IDE
If you want to program your MKR1000 while offline you need to install the Arduino Desktop IDE
(//www.arduino.cc/en/Main/Software) and add the Atmel SAMD Core to it. This simple procedure is done
selecting Tools menu, then Boards and last Boards Manager, as documented in the Arduino Boards Manager
(https://www.arduino.cc/en/Guide/Cores) page.
(//www.arduino.cc/en/uploads/Guide/MKR_Zero_BrdMgrAdd.jpg)
Installing Drivers for the MKR1000
With the SAMD core installed, you now proceed with the driver installation.
OSX
No driver installation is necessary on OSX. Depending on the version of the OS you're running, you may get a
dialog box asking you if you wish to open the “Network Preferences”. Click the "Network Preferences..."
button, then click "Apply". The MKR1000 will show up as “Not Configured”, but it is still working. You can quit
the System Preferences.
Windows (tested on 7, 8 and 10)
Connect the MKR1000 to your computer with a USB cable. Windows should initiate its driver installation
process once the board is plugged in, but it won't be able to find the driver on its own. You'll have to tell it
The Arduino Web Editor is hosted online, therefore it will always be up-to-date with the latest features and
support for all boards. Follow this simple guide
(https://create.arduino.cc/projecthub/Arduino_Genuino/getting-started-with-arduino-web-editor-4b3e4a)
to start coding on the browser and upload your sketches onto your board.
where the driver is. Click on the Start Menu and open the Control Panel Navigate to “System and Security”.
Click on System, and open the Device Manager. Look for the listing named “Ports (COM & LPT)”. You should
see an open port named “MKR1000”. Right click on the “MKR1000” and choose “Update Driver Software”.
(//www.arduino.cc/en/uploads/Guide/Win10MKR1000Install_1.png)
Select the “Browse my computer for Driver software” option.
(//www.arduino.cc/en/uploads/Guide/Win10MKR1000Install_2.png)
Navigate to the folder with the Arduino Software (IDE) you downloaded and unzipped earlier. Locate and
select the “Drivers” folder in the main Arduino folder (not the “FTDI USB Drivers” sub-directory). Press “OK”
and “Next” to proceed.
If you are prompted with a warning dialog about not passing Windows Logo testing, click “Continue
Anyway”.
-
Windows now will take over the driver installation.
(//www.arduino.cc/en/uploads/Guide/Win10MKR1000Install_3.png)
You have installed the driver on your computer. In the Device Manager, you should now see a port listing
similar to “MKR1000 (COM24)” If you have multiple COM devices, the MKR1000 will probably be the COM
port with the highest number.
(//www.arduino.cc/en/uploads/Guide/Win10MKR1000Install_4.png)
Linux
No driver installation is necessary for Linux.
Open your first sketch
Open the LED blink example sketch: File > Examples >01.Basics > Blink.
Select your board type and port
You'll need to select the entry in the Tools > Board menu that corresponds to your Arduino or Genuino board.
Select the serial device of the board from the Tools | Serial Port menu. This is likely to be COM3 or higher
(COM1 and COM2 are usually reserved for hardware serial ports). To find out, you can disconnect your board
and re-open the menu; the entry that disappears should be the Arduino or Genuino board. Reconnect the
board and select that serial port.
Upload the program
Now, simply click the "Upload" button in the environment. Wait a few seconds - you should see the RX and
TX leds on the board flashing. If the upload is successful, the message "Done uploading." will appear in the
status bar.
A few seconds after the upload finishes, you should see the on-board LED start to blink (in orange). If it does,
congratulations! You've gotten your MKR1000 up-and-running. If you have problems, please see the
troubleshooting suggestions (//www.arduino.cc/en/Guide/Troubleshooting).
Learn more on the Desktop IDE
See this tutorial (https://create.arduino.cc/projecthub/Arduino_Genuino/getting-started-with-the-
arduino-software-ide-623be4) for a generic guide on the Arduino IDE with a few more infos on the
Preferences, the Board Manager, and the Library Manager.
Tutorials
Now that you have set up and programmed your MKR1000 board, you may find inspiration in our Project
Hub (https://create.arduino.cc/projecthub/products/arduino-mkr1000-genuino-mkr1000) tutorial platform
Arduino Musical WiFi Analyzer
(https://create.arduino.cc/projec
Project showcase by Team ReloadTM
3,270 VIEWS 3 COMMENTS 10 RESPECTS
(https://create.arduino.cc/projecthub/reloadt
musical-wifi-analyzer-cad59b)
GoPRO Shutter
(https://create.arduino.cc/projec
by Arduino_Genuino (/projecthub/Ardui...
10,492 VIEWS 0 COMMENTS 15 RESPECTS
(https://create.arduino.cc/projecthub/Arduin
shutter-1261d6)
or have a look to the tutorial pages that explain how to use the various features of your board.
Here a list of tutorials that will help you in making very cool things!
F I L E : P U B L I C & R E S P O N S E _ T Y P E = T O K E N & R E D I R E C T _ U R I = H T T P S % 3 A % 2 F % 2 F W W W . A R D U I N O . C C )
Scheduled WiFi SSL Web Client (//www.arduino.cc/en/Tutorial/ScheduledWiFiSSLWebClient)
Analog to Midi (//www.arduino.cc/en/Tutorial/AnalogToMidi)
WiFi RTC (//www.arduino.cc/en/Tutorial/WiFiRTC)
Battery Life tutorial (//www.arduino.cc/en/Tutorial/MKR1000BatteryLife)
Adding mores Serial interfaces to SAMD microcontrollers (//www.arduino.cc/en/Tutorial/SamdSercom)
Please Read...
The microcontroller on the MKR1000 runs at 3.3V, which means that you must never apply more than 3.3V to
its Digital and Analog pins. Care must be taken when connecting sensors and actuators to assure that this
limit of 3.3V is never exceeded. Connecting higher voltage signals, like the 5V commonly used with the
other Arduino boards, will damage the MKR1000.
Features
Serial ports on the MKR1000
The USB connector of the board is directly connected to the USB host pins of the SAMD21. This routing
enables you to use the MKR1000 as a client USB peripheral (acting as a mouse or a keyboard connected to
the computer) or as a USB host device so that devices like a mouse, keyboard, or an Android phone can be
connected to the MKR1000. This port can also be used as a virtual serial port using the "Serial" object in the
Arduino programming language.
ADC and PWM resolutions
The MKR1000 has the ability to change its analog read and write resolutions (defaults to 10-bits and 8-bits,
respectively). It can support up to 12-bit ADC/PWM and 10-bit DAC resolutions. See the analog write
resolution (//www.arduino.cc/en/Reference/AnalogWriteResolution) and analog read resolution
(//www.arduino.cc/en/Reference/AnalogReadResolution) pages for more information.
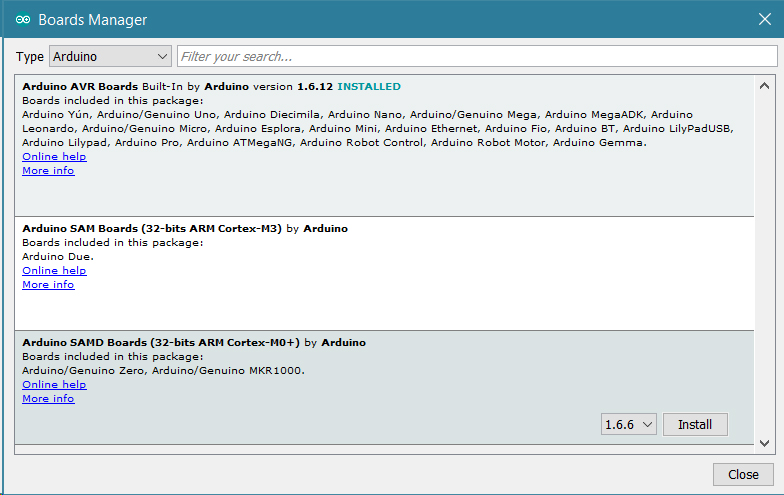
WiFi on the MKR1000 This board is fully compatible with the WiFi101 library
(//www.arduino.cc/en/Reference/WiFi101) and examples originally made for the Arduino WiFi101 Shield.
Upgrading Firmware and uploading SSL certificates
When it is needed, the WiFi101 library is updated to implement new features. This usually requires an update
of the WiFi firmware with a specific tool. The board comes with a number of root certificates that allow the
secure connection with a wide variety of websites. If you need to use different certificates, you need to use
the same tool. Please refer to the Firmware Updater sketch and plug-in documentation, available from the
WiFi101 library page (//www.arduino.cc/en/Reference/WiFi101).
For more details on the Arduino or Genuino MKR1000, see the product page
(//www.arduino.cc/en/Main/ArduinoMKR1000).
Last revision 2017/01/11 by SM
The text of the Arduino getting started guide is licensed under a Creative Commons Attribution-ShareAlike
3.0 License (http://creativecommons.org/licenses/by-sa/3.0/). Code samples in the guide are released into
the public domain.
Share
(//www.arduino.cc/en/Main/CopyrightNotice)
(//www.arduino.cc/en/Main/ContactUs)
(//www.arduino.cc/en/Main/AboutUs)
(//www.arduino.cc/Careers)
Copyright Notice
Contact Us
About Us
Careers
© 2017 Arduino
(https://www.facebook.com/official.arduino)(https://twitter.com/arduino)(https://plus.google.com/+Arduino)(https://www.instagram.com/arduino.cc/)(https://github.com/arduino/)(https://www.flickr.com/photos/arduino_cc)(https://www.youtube.com/user/arduinoteam)
NEWSLETTER
ENTER YOUR EMAIL TO SIGN UP
SUBSCRIBE

Other Arduino Control Unit manuals

Arduino HM-11 User manual

Arduino

Arduino HM-11 User manual

Arduino Nano 33 BLE Rev2 User manual

Arduino

Arduino Nano 33 BLE Rev2 User manual

Arduino Nano 33 BLE Sense Rev2 User manual

Arduino

Arduino Nano 33 BLE Sense Rev2 User manual

Arduino Ethernet Shield 2 User manual

Arduino

Arduino Ethernet Shield 2 User manual

Arduino MLT-BT05 Setup guide

Arduino

Arduino MLT-BT05 Setup guide

Arduino NRF24L01 Operation instructions

Arduino

Arduino NRF24L01 Operation instructions

Arduino Nano 33 BLE User manual

Arduino

Arduino Nano 33 BLE User manual

Popular Control Unit manuals by other brands

Wilo Wilo-CC-System Installation and operating instructions

Wilo

Wilo Wilo-CC-System Installation and operating instructions

SOMFY animeo KNX Master Control W8 installation guide

SOMFY

SOMFY animeo KNX Master Control W8 installation guide

VBK technology Uniquom manual

VBK technology

VBK technology Uniquom manual

ETC EM264 user manual

ETC

ETC EM264 user manual

Bender RCMA126P1-S operating manual

Bender

Bender RCMA126P1-S operating manual

Emerson CASH VALVE C776 Installation and operating instructions

Emerson

Emerson CASH VALVE C776 Installation and operating instructions

Siemens SIRIUS ACT 3SU14 Original operating instructions

Siemens

Siemens SIRIUS ACT 3SU14 Original operating instructions

Gemu 512 Assembly instructions

Gemu

Gemu 512 Assembly instructions

Sierra Wireless AirPrime WS Series AT Command manual

Sierra Wireless

Sierra Wireless AirPrime WS Series AT Command manual

Bticino LN4890 Installation

Bticino

Bticino LN4890 Installation

MTS Systems MK292 user manual

MTS Systems

MTS Systems MK292 user manual

Viega 8655.11 Instructions for use

Viega

Viega 8655.11 Instructions for use

PICOLAS LDP-VRM 045-12 CA user manual

PICOLAS

PICOLAS LDP-VRM 045-12 CA user manual

ASCO Valves EV8308G360 Installation & maintenance instructions

ASCO Valves

ASCO Valves EV8308G360 Installation & maintenance instructions

Kohler AQUA TURBO 360 installation instructions

Kohler

Kohler AQUA TURBO 360 installation instructions

Stollmann BlueMod+B20 user guide

Stollmann

Stollmann BlueMod+B20 user guide

Texas Instruments TPS62933 user guide

Texas Instruments

Texas Instruments TPS62933 user guide

LOVATO ELECTRIC EXP10 13 instruction manual

LOVATO ELECTRIC

LOVATO ELECTRIC EXP10 13 instruction manual

manuals.online logo
manuals.online logoBrands
  • About & Mission
  • Contact us
  • Privacy Policy
  • Terms and Conditions

Copyright 2025 Manuals.Online. All Rights Reserved.