Arec KL-3WT User manual
AREC Inc.© All Rights Reserved 2020. l www.arec.com
All information contained in this document is Proprietary
KL-3WT
Media Station
User Manual English
User Manual English

KL-3WT User Manual
Introduction
Specifications
Package Contents
Product Appearance
Connection
Front Panel Buttons and Indicators
External Control via USB Numeric Keypad
Getting start
Overview of the Web Interface
Chapter 1 Administrator
1.1 Media I/O
1.1.1 Video inputs
1.1.1.1 Content / Cam 1 / Cam 2
1.1.1.2 Advanced conguration
1.1.2 Network device manager
1.1.3 PTZ control port
1.1.4 Audio
1.1.5 Display
1.2 Video
1.2.1 Recording
1.2.2 Streaming
1.2.3 Content
1.2.4 Theme
1.3 Storage
1.4 Scheduler
1.5 Upload
1.5.1 Upload settings
1.5.2 Transfer settings
1.6 System
1.6.1 System settings
1.6.2 Network
1.6.3 WiFi module
1.6.3.1 System information
1.6.3.2 Management
1.6.4 Firmware
1.6.5 Conguration
1.7 Account
1.8 Mini Controller (mobile phone)
1.8.1 Page1
4
4
4
5
6
7
8
8
8
9
9
10
10
11
12
13
13
14
14
15
16
19
19
21
22
25
25
26
27
28
29
29
30
31
32
32
33
34
34
Table of Contents

KL-3WT User Manual
Table of Contents
1.8.2 Page2
Chapter 2 Director
2.1 Local Director
2.1.1 Preview
2.1.2 Toolbar
2.1.2.1 Theme and Display
2.1.2.2 Recording, Streaming control and Snapshot
2.1.2.3 Playback Video
2.1.2.4 Settings
2.1.2.5 Others
2.2 Online Director
2.2.1 Recording controls panel
2.2.1.1 Background
2.2.1.2 Layout
2.2.1.3 Overlay
2.2.1.4 Theme
2.2.1.5 Volume control
2.2.1.6 Recording/ Streaming control and Snapshot buttons
2.2.2 Visual Sources Monitoring
2.2.3 Recording/Streaming setup
Chapter 3 Video Manager
3.1 Video Management
3.1.1 Upload the recording
3.1.2 Download the recording
3.1.3 Delete the recording
3.1.4 Playback the recording
3.1.5 Edit the recording information
3.1.6 Edit the bookmark information
3.2 Snapshot Management
3.2.1 Upload the photo
3.2.2 Download the photo
3.2.3 Delete the photo
3.2.4 Preview the photo
Chapter 4 Video source of the Flexible Application
Table of On Screen Disaplay Icons
35
37
37
37
38
38
39
41
43
44
45
46
46
46
46
47
47
48
49
50
51
51
52
52
52
53
53
54
54
55
55
55
56
57
59
KL-3WT User Manual
4www.arec.com
Specifications
Featuring a compact and stand-alone design, AREC KL-3WT Media Station consists of diverse features and functionality,
including multi-signals capturing, recording synchronously, codec, streaming online, live broadcasting, and web-based
monitor page, providing complete presentation or lecture capture solution.
Product Name Media Station
Model Name KL-3WT
Dimension 354mm(L) x 188.2mm(W) x 91.35mm(H)
Weight 2840g
Power Requirement 12V/3A
Power Consumption (Max.) 36W (Max.)
Operating Temperature / Humidity 0ºC ~ 40ºC / 90%
Maximum normal load description
Insert 1 IP CAM to LAN port and insert 2 video signals (either HDMI or VGA input).
Using external USB flash to record the transcoded video/audio. And output the
transcoded video/audio to HDMI port.
Introduction
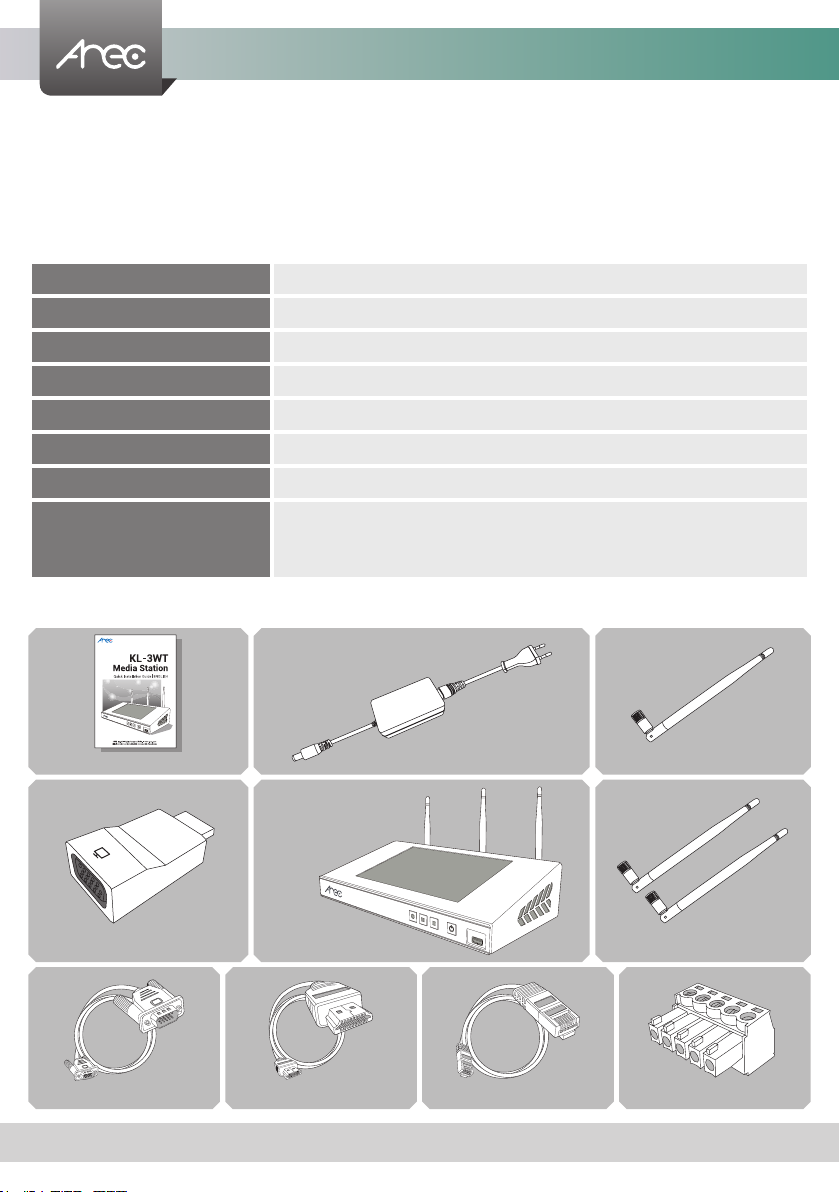
Package Contents
Terminal BlockVGA Line
HDMI-to-VGA converter
Quick Installation Guide Power Adapter
WiFi Module Antenna
Wireless Mic. Antenna
HDMI Line RJ-45 Line
KL-3WT

KL-3WT User Manual
5www.arec.com
No. Name Brief introduction
110.1” LCD Display Preview mixed recording
2Record function keys Control the Record, Pause, Stop function
3Power Power on/off the device
4Front USB port 1.For external USB storage device*
2.Firmware update through USB disk
5Power port 12V/ 3A
6Video input VGA/ HDMI input source for PC [ ]
7Video input VGA/ HDMI input source for camera [ ]
8Video output 1.HDMI loop thru from input [ ]
2.VGA output can use the HDMI-to-VGA converter
9Audio input Line audio input
10 Audio input Mic audio input
11 Audio output Line audio output
12 Network port RJ-45 Ethernet connector for network connection
13 Network camera input 1.RJ-45 Ethernet connector for network camera input source
2.Connected to setting PC for device conguration and control
14 RS-232 Captive screw connector for control over RS-232
15 Reset button Restoring devices to its factory default state
16 Antenna port for Camera Connected to antennas for wireless cameras receive
17 Antenna port for Microphone Connected to antenna for wireless microphone
Product Appearance
NOTE: The port can detect and record to USB storage devices using FAT32, NTFS le systems.
Front
Back
2 3 4
1
5 6 7
15
149 108 1211 13 17
16

KL-3WT User Manual
6www.arec.com
Connection
USB
projector USB drive
Power
AREC
Network Camera
Setting PC
Audio output
Video output VGA / HDMI
Speaker
TV
projector
AREC Wireless
Full HD Camera
AREC
Wireless
Microphone
AREC Wireless
Full HD Camera
RS-232
document cam
notebook
DV
amplier
Video input VGA / HDMI
Line audio input Mic audio input
microphone network
Ethernet
KL-3WT User Manual
7www.arec.com
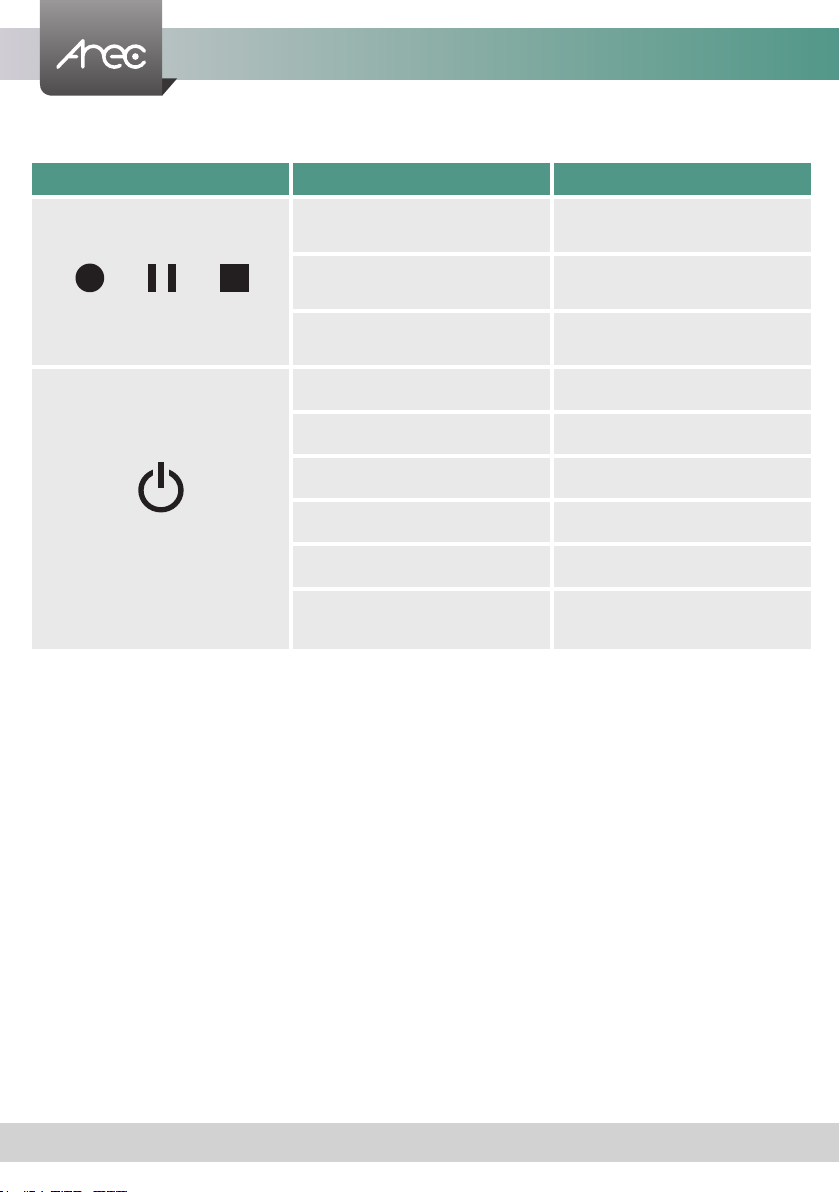
Front Panel Buttons and Indicators
Button Display method of indicator Product status
Record / Pause / Stop
Record button glows red
continuously. Recording in progress.
Record button flashes red rapidly. Recording is paused.
Record button flashes red slowly. Recording is being nalized.
Power
Solid red. Device is powered, yet not booted up.
Green and red light flash alternately. Device is booting up.
Solid green. Boot up completed.
Fast flashing red. Device is shutting down.
Fast flashing green. Firmware updating.
Slow flashing red. Fan is abnormal.
Storage is abnormal.

KL-3WT User Manual
8www.arec.com
Overview of the Web Interface
KL-3WT web interface has three user types, which are described in detail in the following chapters :
Online Director
For quick start recording, log in Online director from the initial login page with default
username director and password director. This user also has access to Video Manager
web pages.Log in with Administrator account, can switch to Administrator page.
Administrator
To setup the device, log in Administrator with default username admin and password
admin, then entering System Administrator webpages. The admin account provides the
user all three type of privileges.
Mini Controller For mobile device quick start recording, log in Mini Controller from the initial login page
with Administrator or Online Director account.
Video Manager
If you only need to access to the recordings, log in Video Manager with default username
video and password video.Log in with Administrator account, can switch to Administrator
page.
External Control via USB Keypad
Insert the keyboard into the Media Station's USB hole, let USB numeric keypad as function keys to control the Media Station.
Button Brief introduction Button Brief introduction
1Theme 1 Backspace All input volume mute/unmute
2Theme 2 -All input volume down
3Theme 3 +All input volume up
4Theme 4 Enter Record
5Theme 5 ESC Power off
6Theme 6 Z • z Change Background
7Theme 7 X • x Change Layout
8Theme 8 C • c Change Overlay
9Theme 9 V • v Live streaming on/off
/Pause B • b Playback last record video
*Stop A • a All output volume up
0Change Display S • s All output volume down
.Snapshot D • d All output volume mute/unmute
Caps Lock Recording Start / Stop G • g Local director control panel on/off
Getting start
Connect PC to the setting port of Media Station with standard network cable. Open up the browser, and input 192.168.11.254
in the browser page. Log in Administrator with default username admin and password admin, then entering the KL-3WT
system Administrator webpages.

KL-3WT User Manual
9www.arec.com
Chapter 1 Administrator
The Administrator web pages provide a system administration interface of the KL-3WT: it can perform Media I/O, Video,
Storage,Scheduler,Account, Upload, System settings and conrm operations. The Media I/O settings make sure each input
source are properly connected, and adjust the audio volume. The Video setting pages congure the recording, streaming, and
other functions which dene the content being recorded. System are pages contain basic settings and information of this
device.Click icon can switch to Video Manager page.
1.1 Media I/O
The pages within Media I/O include the following :
Video inputs Select the signal type, video source and PTZ control method for each input.
Network device manager List out all the connected network cameras and Auto-Tracking Mount.
PTZ control port Set KL-3WT back USB-to-RS-232 serial port to drive PTZ cameras.
Audio Adjust the volume and select the audio input source.
Display Set the KL-3WT on screen display language, video output settings and color adjustment.
KL-3WT
KL-3WT User Manual
10www.arec.com
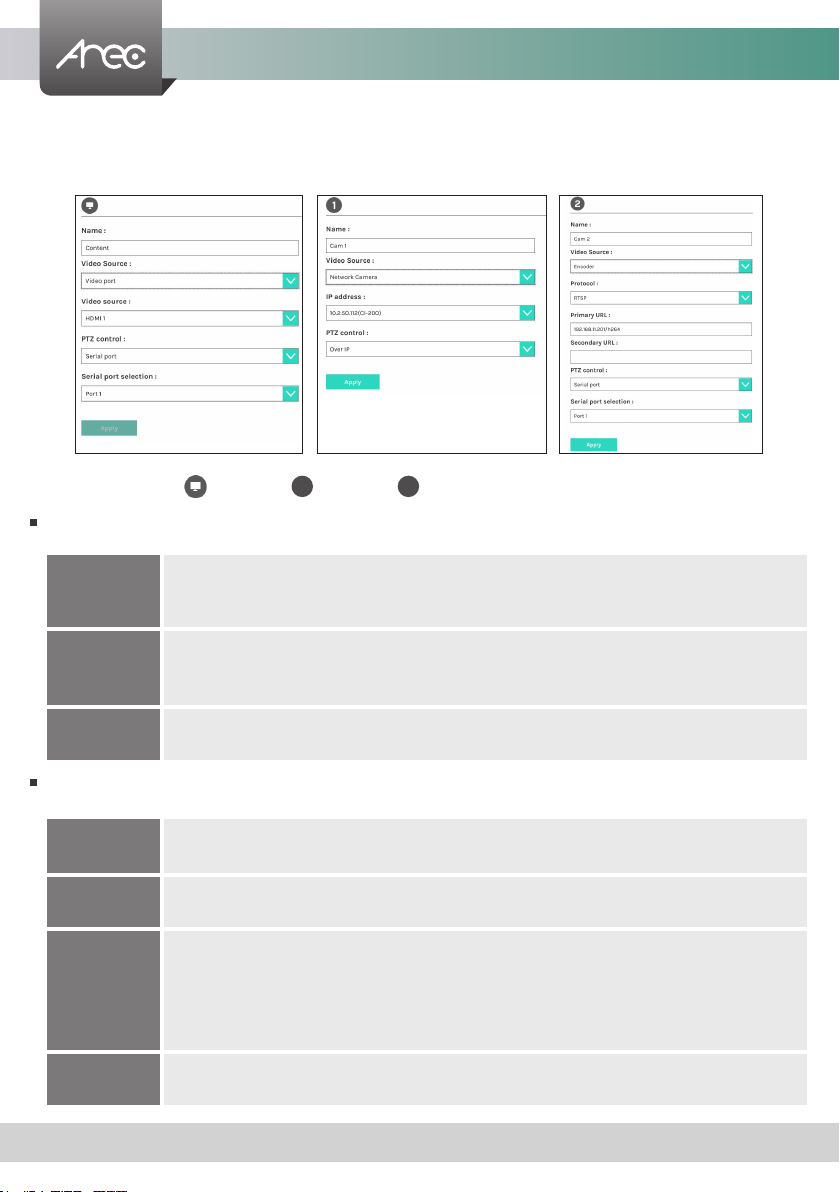
1.1.1 Video inputs
The KL-3WT is capable to process up to four video inputs. The name of these inputs are user congurable; by default are
Content, Cam 1 and Cam 2.
1.1.1.1 Content / Cam 1 / Cam 2
Video Source can be choose from Network Camera, Encoder or Video port. The last option is available only for the rst
two video inputs.
PTZ control : The KL-3WT is highly integrated with PTZ cameras and provides two control methods, Over IP or via Serial
port.
Video port
Select Video source: The KL-3WT provides VGA and HDMI input options for video port. If only one
of those is connected, the system would detect and automatically switch to source of signal. If both
options are connected, select one in between.
Network Camera
Select IP address: Select from the camera ip address drop list of those available.
Note: A login authentication with the camera might be required. See Media I/O\ Camera manager for
more details.
Encoder Select Protocol: The available options are RTP, RTSP, or RTMP. Enter the primary and secondary url/
port number.
Serial port Select this option when the appointed camera uses RS-232 PTZ control protocol. Then complete the
Serial port selection from drop list ttyUSB 0~3. See Media I/O\ PTZ control port for more details.
Over IP The option is available when the specied signal type is a network camera. Select this option if that
camera supports networking PTZ control.
Auto-Tracking
Mount
Select IP address: Select from the TP-100 ip address drop list of those available.
Select Tracking mode: off / Auto-Tracking / Auto-Tracking (pan only), the default is the Auto-
Tracking.
Note: A login authentication with the TP-100 might be required. See Media I/O\ Network device
manager for more details.
VISCA over IP With VISCA over IP function, you can control the camera using VISCA on a controller equipped with IP
communication capabilities via LAN.
1 2
Other manuals for KL-3WT
1
Table of contents
Other Arec DVD Player manuals


