Arenti Laxihub J1 User manual

加工要求
印刷尺寸(单页):76x110mm
折叠方式:骑马钉
材质:128G铜版纸

EN Wireless chime
FR Carillon sans fil
NL Draadloze gong
DE Drahtloses glockenspiel
IT Campanello senza fili
ES Campana inalámbrica
PT Carrilhão sem fio
RU Беспроводной звонок
TU Kablosuz zil sesi
QUICK GUIDE
powered by
J1

Functions
EN
Reset
Power Interface
Speaker
Description
Mini USB
DC5V±10%, USB power supply
Press the RESET for 5s to restore Factory Settings;
Short-press the RESET button to pair the doorbell
Blue light blinks: Awaiting for configuration;
Blue light solids on: Configuration completed
You can choose your own ringtone among the four ringtones
Customize Your Ringtone
The Chime
'
s volume could be adjusted by sliding the volume of your
smartphone
Adjust the Volume
Status Light
Status light
Reset
Chime Appearance
1

EN
Step 1: Supply power to your Chime and Doorbell.
Pair via pressing Doorbell button
(not included)
USB compatible
charger(DC5V)
Step 2: A short press on the RESET button on the Chime, and you will see
the indicator flashes blue, indicating the device is in pairing mode.
Step 3: Press the doorbell button. When successfully paired, a voice or tone
will be played and the Chime LED status indicator will be in solid blue.
Note: The Doorbell and Chime have been configured before leaving the
factory. If the Chime isn’t paired by default, please refer to the
following instructions to pair it with the doorbell camera.
Reset Button LED Indicator
Pairing the Chime
2

ENChime Pairing
Note:
If the configuration fails, please press the "RESET" button for 5 seconds
to reset your Chime and then short-press the "RESET" button to add it
again.
Step 1:Short-Press the"RESET" button of the Chime. When successfully enter
the configuration mode, the LED status indicator will flash blue.
Step 2:Access to “Settings” of your App, press “Basic Function”.
Step 3:Select “Wireless Chime“, and then press “Chime Pairing“, confirm the
blue light of chime blinks.
Step 4:Press "Pair" and your Chime will automatically pair your doorbell.
Step 5:After pairing successfully, the Chime status light will be in solid on
blue.
3

FR
Les fonctions
Réinitialiser
Interface d'alimentation
Orateur
La description
Mini USB
DC5V ± 10%, alimentation USB
Appuyez sur RESET pendant 5s pour restaurer les
paramètres d'usine
Appuyez brièvement sur le bouton RESET pour coupler
la sonnette
La lumière bleue clignote: en attente de configuration
Voyant bleu allumé: configuration terminée
You can choose your own ringtone among the four ringtones
Customize Your Ringtone
The Chime
'
s volume could be adjusted by sliding the volume of your
smartphone
Adjust the Volume
Voyant d'état
Voyant
d'état
Réinitialiser
Apparition du carillon
4

FR
Étape 1: Alimentez votre carillon et votre sonnette
Associer en appuyant sur le bouton de la sonnette
(non inclus)
Compatible USB
chargeur (DC5V)
Étape 2: Un appui court sur le bouton RESET du carillon, et vous verrez
l'indicateur clignoter en bleu, indiquant que l'appareil est en mode d'appairage.
Étape 3: Appuyez sur le bouton de la sonnette. Une fois l'appairage réussi,
une voix ou une tonalité sera jouée et l'indicateur d'état du carillon LED
sera en bleu fixe.
Remarque: La sonnette et le carillon ont été configurés avant de quitter l'usine.
Si le carillon n'est pas couplé par défaut, veuillez vous référer aux
instructions suivantes pour le coupler avec la caméra de la sonnette.
Bouton de réinitialisation Indicateur LED
Jumeler le carillon
5

FRCarillon Jumelage
emarque:
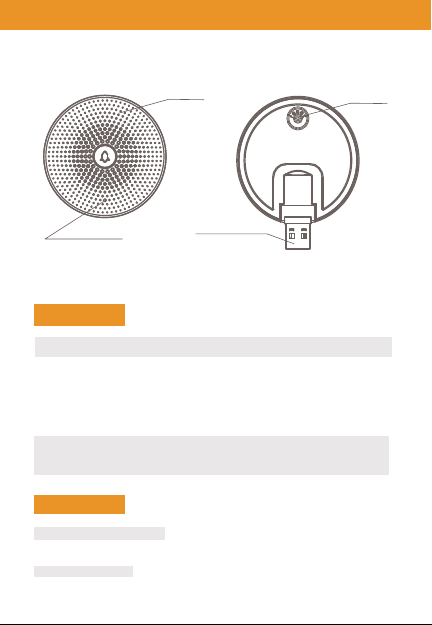
Si la configuration échoue, veuillez appuyer sur le bouton "RESET"
pendant 5 secondes pour réinitialiser votre carillon, puis appuyez
brièvement sur le bouton "RESET" pour l'ajouter encore.
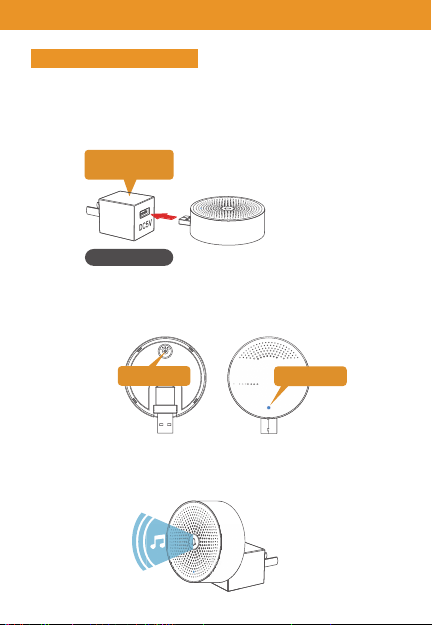
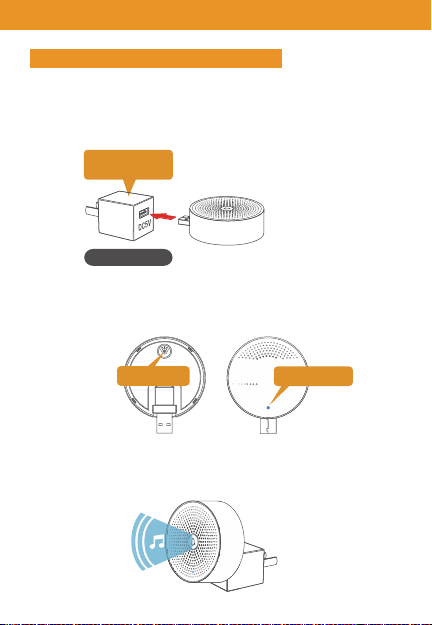
Étape 1: Appuyez brièvement sur le bouton "RESET" du carillon. Quand entrer
avec succès le mode de configuration, l'indicateur d'état LED clignote en bleu.
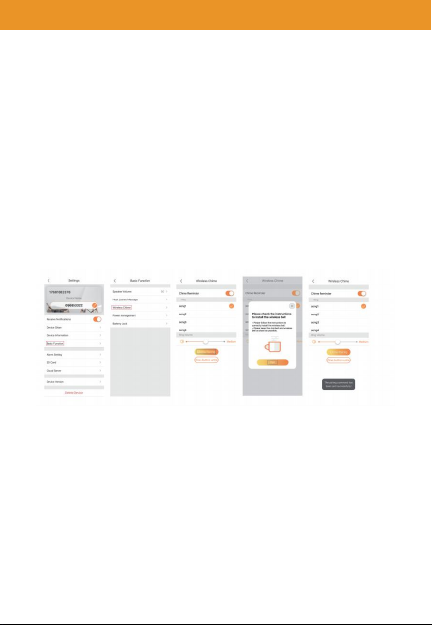
Étape 2: Accédez aux "Paramètres" de votre application, appuyez sur "Fonction
de base".
Étape 3: Sélectionnez "Carillon sans fil", puis appuyez sur "Couplage du carillon",
confirmez la lumière bleue du carillon clignote.
Étape 4: Appuyez sur "Pair" et votre carillon appairera automatiquement votre
sonnette.
Étape 5: Après le couplage réussi, le voyant d'état du carillon sera allumé en
continu bleu.
6

NL
Functies
Reset
Stroominterface
Spreker
Omschrijving
Mini USB
DC5V ± 10%, USB-voeding
Druk 5 seconden op de RESET om de fabrieksinstellingen te
herstellen
Druk kort op de RESET-knop om de deurbel te koppelen
Blauw lampje knippert: wacht op configuratie
Blauw lampje brandt continu: configuratie voltooid
U kunt uw eigen beltoon kiezen uit de vier beltonen
Pas uw beltoon aan
Het volume van de Chime kan worden aangepast door het volume van uw
te verschuiven smartphone
Pas het volume aan
Statuslampje
Status light
Reset
Koppelen Verschijning
7

NL
Stap 1: Voorzie uw deurbel en deurbel van stroom
Associer en appuyant sur le bouton de la sonnette
(niet inbegrepen)
USB-compatibel
oplader (DC5V)
Stap 2: Druk kort op de RESET-knop op de bel en je zult het zien de indicator
knippert blauw, wat aangeeft dat het apparaat zich in de
koppelingsmodus bevindt.
Stap 3: Druk op de deurbelknop. Bij een succesvolle koppeling, een stem of toon
wordt afgespeeld en de Chime LED-statusindicator brandt continu blauw.
Remarque: De deurbel en deurbel zijn geconfigureerd voordat ze de fabriek.
Als de Chime niet standaard is gekoppeld, raadpleeg dan de
volgende instructies om het te koppelen met de deurbelcamera.
Bouton de réinitialisation Indicateur LED
De gong koppelen
8

NLong koppelen
Notitie:
Als de configuratie mislukt, druk dan 5 seconden op de "RESET" -knop
om uw Chime opnieuw in te stellen en druk vervolgens kort op de knop
"RESET" om deze toe te voegen opnieuw.
Stap 1 :Druk kort op de "RESET" -knop van de bel. Wanneer succesvol ingevoerd
In de configuratiemodus knippert de LED-statusindicator blauw.
Stap 2 :Toegang tot "Instellingen" van uw app, druk op "Basisfunctie".
Stap 3 :Selecteer "Wireless Chime" en druk vervolgens op "Chime Pairing",
bevestig de het blauwe licht van de bel knippert.
Stap 4 :Druk op "Pair" en uw Chime zal automatisch uw deurbel koppelen.
Stap 5 :Nadat het koppelen is gelukt, blijft het deurbel-statuslampje continu
branden blauw.
9

DE
Funktionen
Zurücksetzen
Stromschnittstelle
Lautsprecher
Beschreibung
Mini USB
DC5V ± 10%, USB-Netzteil
Drücken Sie 5 Sekunden lang auf RESET, um die
Werkseinstellungen wiederherzustellen
Drücken Sie kurz die RESET-Taste, um die Türklingel zu
koppeln
Blaues Licht blinkt: Warten auf Konfiguration
Blaulicht-Festkörper an: Konfiguration abgeschlossen
Sie können Ihren eigenen Klingelton unter den vier Klingeltönen auswählen.
Passen Sie Ihren Klingelton an
Die Lautstärke des Glockenspiels kann durch Schieben der Lautstärke Ihres
Glockenspiels eingestellt werden Smartphone.
Stell die Lautstärke ein
Statusanzeige
Statusleuchte
Zurücksetzen
Glockenspiel Aussehen
10

DE
Schritt 1: Versorgen Sie Ihr Glockenspiel und Ihre Türklingel mit Strom.
Pairing durch Drücken der Türklingeltaste
(nicht enthalten)
USB-kompatibel
Ladegerät (DC5V)
Schritt 2: Durch kurzes Drücken der RESET-Taste am Glockenspiel blinkt die
Anzeige blau und zeigt an, dass sich das Gerät im Pairing-Modus
befindet.
Schritt 3: Drücken Sie die Türklingeltaste. Nach erfolgreicher Kopplung wird
eine Stimme oder ein Ton abgespielt und die Statusanzeige der
Glockenspiel-LED leuchtet durchgehend blau.
Hinweis: Die Türklingel und das Glockenspiel wurden vor dem Verlassen des
konfiguriert fabrik. Wenn das Glockenspiel nicht standardmäßig
gekoppelt ist, lesen Sie bitte die fefolgen Sie die Anweisungen, um es
mit der Türklingelkamera zu koppeln.
Reset-Knopf LED-Anzeige
Das Glockenspiel koppeln
11

DEGlockenspiel-Paarung
Hinweis:
Wenn die Konfiguration fehlschlägt, drücken Sie bitte 5 Sekunden lang die
Taste "RESET", um Ihr Glockenspiel zurückzusetzen, und drücken Sie dann
kurz die Taste "RESET", um es erneut hinzuzufügen.
Schritt 1: Drücken Sie kurz die Taste "RESET" des Glockenspiels. Wenn der
Konfigurationsmodus erfolgreich aufgerufen wurde, blinkt die
LED-Statusanzeige blau.
Schritt 2: Zugriff auf "Einstellungen" Ihrer App, drücken Sie "Grundfunktion".
Schritt 3: Wählen Sie „Wireless Chime“ und drücken Sie dann „Chime Pairing“.
Bestätigen Sie, dass das blaue Licht des Glockenspiels blinkt.
Schritt 4: Drücken Sie "Pair" und Ihr Glockenspiel koppelt automatisch Ihre
Türklingel.
Schritt 5: Nach erfolgreichem Pairing leuchtet die Glockenspiel-Statusanzeige
dauerhaft blau.
12

IT
Funzioni
Ripristina
Interfaccia di potenza
Altoparlante
Descrizione
Mini USB
DC5V ± 10%, alimentatore USB
Premere RESET per 5 secondi per ripristinare le impostazioni
di fabbrica
Premere brevemente il pulsante RESET per accoppiare il
campanello
La luce blu lampeggia: in attesa di configurazion
Solidi luce blu accesi: configurazione completata
Puoi scegliere la tua suoneria tra le quattro suonerie
Personalizza la tua suoneria
Il volume del Carillon può essere regolato facendo scorrere il volume del tuo
smartphone
Regola il volume
Spia di stato
Spia di stato
Ripristina
Chime Appearance
13

IT
Passaggio 1: Fornisci energia al tuo Campanello e Campanello.
Associare premendo il pulsante del campanello
(non incluso)
USB compatibile
caricatore (DC5V)
Passaggio 1: premere brevemente il pulsante RESET sul carillon e vedrai
l'indicatore lampeggia in blu, indicando che il dispositivo è in
modalità di associazione.
Passaggio 3: premere il pulsante del campanello. Se associato correttamente,
una voce o un tono verrà riprodotto e l'indicatore di stato a LED
Chime sarà di colore blu fisso.
Nota: il campanello e il carillon sono stati configurati prima di lasciare il fabbrica.
Se Chime non è associato per impostazione predefinita, fare riferimento a
seguendo le istruzioni per abbinarlo alla videocamera del campanello.
Tasto reset Indicatore LED
Abbinamento del carillon
14

IT
Chime Pairing
Nota:
Se la configurazione non riesce, premere il pulsante "RESET" per 5 secondi
per resettare il tuo Chime e poi premere brevemente il pulsante "RESET" per
aggiungerlo ancora.
Passaggio 1: premere brevemente il pulsante "RESET" del carillon. Quando entra
con successo modalità di configurazione, l'indicatore di stato a LED
lampeggerà in blu.
Passaggio 2: accedere a "Impostazioni" della tua app, premere "Funzione di base".
Passaggio 3: Selezionare "Wireless Chime", quindi premere "Chime Pairing",
confermare la luce blu del campanello lampeggia.
Passaggio 4: Premi "Abbina" e il tuo campanello abbinerà automaticamente il tuo
campanello.
Passaggio 5: Dopo aver eseguito correttamente l'associazione, la spia di stato di
Chime sarà accesa fissa blu.
15

Las funciones
Reiniciar
Interfaz de energía
Altavoz
Descripción
Mini USB
DC5V ± 10%, fuente de alimentación USB
Presione RESET durante 5 segundos para restaurar la
configuración de fábrica;
Presione brevemente el botón RESET para emparejar el timbre
La luz azul parpadea: en espera de configuración;
Sólidos de luz azul en: configuración completada
Puedes elegir tu propio tono de llamada entre los cuatro tonos de llamada
Personaliza tu tono de llamada
El volumen del Chime podría ajustarse deslizando el volumen de su teléfono
inteligente
Ajusta el volumen
Luz de estado
Luz de
estado
Reiniciar
Apariencia del timbre ES
16

Paso 1: suministre energía a su Chime y Doorbell.
Emparejar presionando el botón del timbre
(No incluido)
Compatible con USB
cargador (DC5V)
Paso 2: Presione brevemente el botón RESET en el Chime, y verá el indicador
parpadea en azul, indicando que el dispositivo está en modo de
emparejamiento.
Paso 3: presiona el botón del timbre. Cuando se empareja con éxito, una voz
o tono se reproducirá y el indicador de estado del LED Chime estará en azul
sólido.
Nota: El timbre y el timbre se han configurado antes de abandonar el fábrica.
Si el timbre no está emparejado de forma predeterminada, consulte la
siguiendo las instrucciones para emparejarlo con la cámara del timbre.
Botón de reinicio Indicador LED
Emparejando el timbre ES
17

Emparejamiento de campana
Nota:
Si la configuración falla, presione el botón "RESET" durante 5 segundos
para restablecer su Chime y luego presione brevemente el botón "RESET"
para agregarlo de nuevo.
Paso 1: Presiona brevemente el botón "RESET" del Chime. Cuando ingrese con
éxito En el modo de configuración, el indicador LED de estado parpadeará en
azul.
Paso 2: Acceda a la "Configuración" de su aplicación, presione "Función básica".
Paso 3: Seleccione "Timbre inalámbrico", y luego presione "Emparejamiento de
timbre", confirme la luz azul de la campanilla parpadea.
Paso 4: presione "Emparejar" y su Chime emparejará automáticamente su
timbre.
Paso 5: después de emparejar con éxito, la luz de estado de Chime estará
encendida azul.
ES
18
Table of contents
Languages:
Popular Radio manuals by other brands

Midland
Midland Syn-Tech II Service manual

Motorola
Motorola EMS APX 7500 Product spec sheet

Kompernass
Kompernass e-bench KH 2282 operating instructions

Radio Shack
Radio Shack STEREO MATE 12-791 owner's manual

Makita
Makita DMR108N instruction manual

Sirius Satellite Radio
Sirius Satellite Radio SV1 G3 manual